1
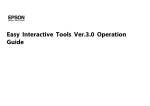
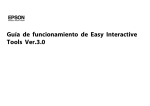
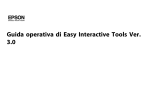
Installing and Using the Epson Easy Interactive Tools with a
BrightLink Projector
These instructions are for both Mac & Windows clients
Table of Contents
Installing Epson Tools on a Mac Computer ...................................................................................................... 2
Install Epson Tools: ....................................................................................................................................... 2
Install the Epson Tools Drivers: .................................................................................................................... 3
Installing Epson Tools on a Windows Computer .............................................................................................. 3
Install Epson Tools: ....................................................................................................................................... 3
Install the Epson Tools driver ....................................................................................................................... 5
Calibrating a BrightLink 455 Projector to work with Epson Tools (Mac): .................................................... 5
Calibrating a BrightLink 455 Projector to work with Epson Tools (Windows) ............................................. 6
Calibrating a BrightLink 475 Projector to work with Epson Tools:............................................................... 7
Correcting Pen Calibration for the BrightLink 475 WI Projector ...................................................................... 8
Solutions When the Interactive Pen Position Is Not Accurate ..................................................................... 8
Adjusting the Pen Operation Area ............................................................................................................... 8
Using the Remote ........................................................................................................................................... 10
Connecting Your Computer ............................................................................................................................ 11
Using the Pens ................................................................................................................................................ 12
Using the Interactive Tools ............................................................................................................................. 13
Saving a Document You have Annotated ....................................................................................................... 15
BrightLink Projector Models by Room ........................................................................................................... 16
1
Installing Epson Tools on a Mac Computer
There are 3 steps: installing the software, installing the driver and calibration.
Install Epson Tools:
Open the Finder
Select Go and then Connect to Server from the toolbar
Copy and paste the following path into Server Address window and click Connect:
smb://fileshare/hs$/BrightLink Projectors/Epson Tools
Select the Mac folder and select Edit and then Copy “Mac” from the toolbar
Click any blank area on your desktop and select Edit and then Paste Item from the toolbar
Open the folder once it has finished copying and double-click the epson tools.dmg file
Double-click the Epson icon to begin installation
Click Continue
Click Continue again
Click Continue again
Accept the license agreement and click Continue
Click the Install button
Enter your credentials if prompted and select Install Software
Click the Close button
When the installation has finished you will see it listed in your Applications under Easy Interactive
Tools Ver. 2
Eject the installer by clicking on the Epson Easy Interactive tools icon on your desktop and
selecting File and then Eject Epson Easy Interactive Tools from the toolbar
2
Install the Epson Tools Drivers:
The driver is located in the same folder as the Epson Tools software
Double-click the epson tools driver 1.1.dmg file and the installation will begin
Double-click the EIDriverV102_Setup icon
Click Continue
Click Continue again
Click Continue again
Click Agree to Accept the license agreement and click Continue
Click the Install button
Enter your credentials if prompted and select Install Software
Click the Close button
When the installation has finished you will see it listed in your Applications under Easy Interactive
Driver Ver.1.02
Double-click the Epson tools driver 2.0 file
Follow the same instructions as above
You will be prompted to restart when the installation has finished
When the installation has finished you will see it listed in your Applications under Easy Interactive
Driver Ver.2
You can now delete the Mac folder you downloaded to your desktop
Installing Epson Tools on a Windows Computer
There are 3 steps: installing the software, installing the driver and calibration.
Install Epson Tools:
Click the Start button
Copy and paste the following path into the search window and click enter:
3
\\fileshare\hs$\BrightLink Projectors\Epson Tools
Right-click the Windows folder and select copy
Right-click any blank area on your desktop and select paste
Open the folder once it has finished copying and double-click the EIN_TTWInst.exe file and the
installation will begin
Select English as the language and click next
Click next and then select the option to accept the license agreement and click next
Click the Install button
Click the Finish button
When the installation has finished you will see it listed in your program files under EPSON
Projector
4
Install the Epson Tools driver
The driver is located in the same folder as the Epson Tools software
Double-click the epson14218.exe file and the installation will begin
Select English as the language and click next
Click next and then select the option to accept the license agreement and click next
Click the Install button
Click the Finish button
When the installation has finished you will see it listed in your program files under EPSON
Projector
Calibrating a BrightLink 455 Projector to work with Epson Tools (Mac):
The BrightLink 475 Projector does not need to be calibrated
Connect your laptop to a BrightLink 455 projector using the VGA connector as well as the USB
connector
Start the Epson Easy Interactive Tools application
Start the Epson Interactive Driver application*
Select Calibration and then Calibrate (Normal) from the toolbar
5
Click OK to start calibration
Wait a few seconds for the first green flashing circle to appear
Touch the Epson pen into the center of the circle until it stops flashing
Repeat for all circles as they are added to the screen
When you’re done you can start using the tools
*In order to use the Interactive Tools you will need to start the driver each time you use a BrightLink
455 Projector as well as having the USB cable connected. You do not need to calibrate each time
however. Calibration only needs to be done the first time you connect to the projector.
Calibrating a BrightLink 455 Projector to work with Epson Tools (Windows)
The BrightLink 475 Projector does not need to be calibrated
Connect your laptop to a BrightLink 455 projector using the VGA connector as well as the USB
connector
Start the Epson Easy Interactive Tools application
Start the Epson Interactive Driver application*
Click the up arrow in the lower right hand side of your desktop (down by the clock) to show your
hidden icons
Right-click the icon for the Easy Interactive Driver (it looks like a sheet of paper with a pen)
Select the option to Calibrate Normal
6
Click OK to start calibration
Wait a few seconds for the first green flashing circle to appear
Touch the Epson pen into the center of the circle until it stops flashing
Repeat for all circles as they are added to the screen
When you’re done you can start using the tools
*In order to use the Interactive Tools you will need to start the driver each time you use a BrightLink
455 Projector as well as having the USB cable connected. You do not need to calibrate each time
however. Calibration only needs to be done the first time you connect to the projector.
Calibrating a BrightLink 475 Projector to work with Epson Tools:
You shouldn’t have to calibrate the BrightLink 475 projector as it calibrates automatically, but if you find
that it’s not calibrated correctly to work with your laptop, perform the following steps:
Connect your laptop to a BrightLink 475 projector using the VGA connector as well as the USB
connector
Press the Menu button on the remote control
Select the Extended menu, and press Enter.
Select the Easy Interactive Function setting and press Enter
You see this screen:
Select Manual Calibration and press Enter
You see this screen:
Press Enter to select Yes
7
Turn the BrightLink pen on
Touch the green circles as they appear and when you’ve finished all of them calibration is
complete.
Correcting Pen Calibration for the BrightLink 475 WI Projector
Adapted from http://files.support.epson.com/htmldocs/bl475wi/bl475wiug/index.html
Solutions When the Interactive Pen Position Is Not Accurate
If the pen position is not the same as the cursor, try the following solutions:
Try manual calibration of the display (see other handout)
Adjust the pen operation area (see below)
If you use the E-Zoom + button on the remote control to enlarge the image, the pen position is not
accurate. When you return to the original size, the position should be correct.
If you use a full-screen or presentation view in an application like PowerPoint, the pen position
may lose calibration.
Adjusting the Pen Operation Area
The pen operation area is normally adjusted automatically if you connect a different computer or adjust the
computer's resolution. If you notice that the pen position is incorrect, you can adjust the pen area
manually.
Project your computer's desktop.
Press the Menu button, select the Extended menu, and press Enter.
8
Select the Easy Interactive Function setting and press Enter.
Select Advanced and press Enter.
Select Manual Adj. Pen Area and press Enter.
Press Enter to select Yes. The mouse pointer moves toward the top left corner.
When the mouse pointer stops at the top left corner of the image, touch the tip of the pointer
with the pen. The mouse pointer moves toward the bottom right corner.
When the mouse pointer stops at the bottom right corner of the image, touch the tip of the
pointer with the pen.
9
Using the Remote
10
Connecting Your Computer
Attach both the VGA and the USB cables to your computer. If using a Mac you will need a
dongle to attach the VGA connector.
Power on the BrightLink Projector using the remote control.
Select the source you wish to project. These are the default sources:
o Computer 1 = computer
o Computer 2 = visualizer
o Video = DVD player, default is S-Video so click again to get regular Video for DVDs
Note: the quality of video from the laptop is much better than that through the DVD player
The source for this document will be Computer 1 (your laptop)
Start the Easy Interactive Tools once your screen is projected
o If you’re using a MacBook and having issues projecting your computer do the following:
Open System Preferences from your Applications folder
Go into Displays
Click the tab for Arrangement and make sure that Mirror Displays is checked.
o If you’re using a Mac Air you should reboot your computer with the VGA and USB
11
cables connected. If you’re still not projecting then please follow the steps above.
Start the Easy Interactive Driver
o If you’re connecting to a BrightLink 455 projector you will start the driver located in the
Easy Interactive Driver Ver.1.02 folder in your applications directory by double-clicking
the Easy Interactive Driver file.
o If you’re connecting to a BrightLink 475 projector you will start the driver located in the
Easy Interactive Driver Ver.2 folder in your applications directory by double-clicking the
Easy Interactive Driver Ver.2.00 file.
Note: see the end of this document for a listing of projector models by room.
Using the Pens
Your projector may have come with 2 pens (new style) that have different colored ends, orange and blue.
Make sure one AA battery is installed in each pen. Please note that only PC laptops have the ability to use
both pens at the same time. If you are using a Mac you can use either pen, but only one at a time.
New Style Pen 475
Old Style Pen 455
Turn on the pen by sliding the power switch (or pushing the button on the old style pen). The
green light comes on briefly. If the battery is low the light flashes.
Hold the pen perpendicular to the board.
To left-click tap once onto the board.
To double-click tap twice onto the board.
To right-click press the pen onto the board for about 3 seconds.
To click and drag tap the pen onto the board and then drag
To move the cursor hover over the board without touching it
When you are finished slide the power switch to turn off the pen (new style only)
Note: The pens turn off automatically after about 20 minutes of inactivity.
12
Using the Interactive Tools
Easy Interactive Tools provides the following two modes.
Annotation mode: You can draw lines and shapes on the computer screen.
Whiteboard mode: You can project solid color background such as a whiteboard and write or
draw text and pictures. In addition to the plain background, you can also choose other
background patterns such as grid lines or a music sheet.
1.
2.
3.
4.
5.
6.
7.
8.
9.
10.
11.
12.
13.
14.
15.
Annotation mode tab: Switches to
annotation mode.
Whiteboard mode tab: Switches to
whiteboard mode.
Save: Saves the screen displayed in the
current mode in JPEG: BMP: PNG or PDF
format.
Undo: Undo the previous operation
Redo: Cancels an undo operation and
restores the previous status
Magnifier: Opens the magnifier screen
and displays and enlarged view of the
image at the center of the screen.
Other tools: Displays the following
toolbar (see below)
Shapes: Select the shape you want from
the shapes provided.
Pen: Switches to a pen to draw freely.
Click the upside down triangle to the left
to change the color and/or width of the
pen line.
Highlighter Pen: Switches to a highlighter
pen. Click the upside down triangle to the
left to change the color and/or width of
the pen line.
Black Pen: Switches to a black pen to
draw freely. The larger circle draws a
thick line and the small circle draws a thin
line.
Red Pen: Switches to a red pen to draw
freely. The larger circle draws a thick line
and the small circle draws a thin line.
Blue Pen: Switches to a blue pen to draw
freely. The larger circle draws a thick line
and the small circle draws a thin line.
Eraser: Switches to an eraser. Click on
the right of the icon to erase wider areas,
and on the left to erase narrower areas.
Clear Screen: Clears everything drawn on
the displayed page.
13
Other Tools:
Spotlight: Emphasizes part of the projected image using a spotlight effect.
You can drag the spotlight frame to change the emphasized area.
Shade: Covers the projected image with a shade. You can drag the four
sides to change the shaded area.
Print: Prints the screen displayed in the current mode. If you are in
Whiteboard mode, select which page you want to print on the print settings
screen.
Settings: Opens the settings screen.
Right Click: (Only available when using computer interactive functions in
Annotation mode.) A pen click functions as a right-click only once, and
then returns to a normal click.
Help: (Annotation mode only.) Displays the Help.
Annotation Mode Specific Modes:
Mouse: Switches from Annotation mode to Mouse mode and the cursor on the
computer screen becomes a normal mouse cursor. You can click and drag on the
projected image using the Easy Interactive Pen.
Page Up: Go to the previous page in an opened document.
Page Down: Go to the next page in an opened document.
Camera: (available in Mouse mode). Displays the image from a
document camera* connected to the computer.
Keyboard: (available in Mouse mode). Displays a virtual keyboard on the
screen.
14
Whiteboard Mode Specific Functions:
Select Background: Allows you to select a pattern from the nine background patterns
provided for Whiteboard mode. You can also select to show your desktop, an image
file, or an image from the document camera as the background image.
Page List: Displays a list of the pages currently being edited. When the mouse cursor
leaves the page list, the list is automatically minimized to the right or left of the screen.
The list is displayed again if you move the cursor to, or click on the minimized area.
New Page: Opens a new page in Whiteboard mode.
Insert Image: Select the source image you want to insert into the current page.
The following two options are available: from file or from camera.
Delete Page: Deletes the current page.
Select: Changes to a cursor so that you can move or adjust the size of the image you
inserted using Insert image.
Saving a Document You have Annotated
Notes on a document or image can be saved as a .PDF, .JPEG, .BMP or .PNG file.
Click the Save icon:
Select the location you would like the document to be saved to (by default it will want to save to
the Epson Interactive Tools directory).
Name your file
Select the File Type you would like to save as (for this example I have selected .PDF)
Click Save
15
BrightLink Projector Models by Room
O-301
O-302
O-303
O-304
O-305
O-306
O-308
O-309
O-311
O-313
O-315
O-316
O-317
O-318
O-319
O-320
O-322
O-323
O-326
O-328
O-329 (Journalism)
O-348 (DISLP)
O-345
W-301
W-302
W-303
W-305
W-308
W-309
Y-201
Y-212
R-301
R-302
R-303
R-305
R-306
Epson 455Wi
BenQ
Epson 455Wi
Epson 475Wi
Epson 475 Wi
Epson 475 Wi
BenQ
Epson 455 Wi
Projector (non-Epson Brightlink)
Projector (non-Epson Brightlink) - TBC
Epson 475 Wi
Epson 475 Wi
Epson 455 Wi
Epson 455 Wi
Epson 455 Wi
Epson 455 Wi
Epson 475 Wi
Epson 475 Wi
Epson 475 Wi
Epson 475 Wi
Samsung Smart TV 60"
Samsung Smart TV 60"
Epson 455 Wi
Epson 455 Wi
BenQ
Epson 455 Wi
Epson 455 Wi
Epson 455 Wi
BenQ
Projector (non-Epson Brightlink)
Epson 455 Wi
Epson 455 Wi
Epson 455 Wi
Epson 455 Wi
Epson 455 Wi
Epson 455 Wi
16