1
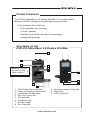
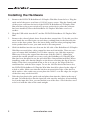
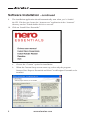
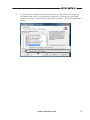
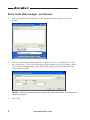
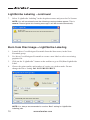
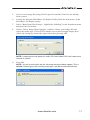
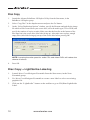
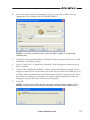
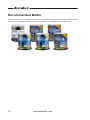
QUICK START GUIDE Aleratec DVD/CD RoboRacer LS Duplex™ Win/Mac Part No. 280113 Welcome! Congratulations on your purchase of an Aleratec DVD/CD RoboRacer LS Duplex Win/Mac, considered by industry experts to be one of the finest DVD/ CD Duplicators available. The entire Aleratec team is committed to providing you with courteous service. Our knowledgeable staff will strive to make owning and operating your new Aleratec DVD/CD RoboRacer LS Duplex Win/Mac a pleasant experience. For more detailed information on configuring the DVD/CD RoboRacer LS Duplex Win/Mac and applying it’s various capabilities, please refer to the User Guide on the CD included. This Quick Start Guide will lead you step-by step through the basic operation procedures of your DVD/CD RoboRacer LS Duplex Win/Mac. We at Aleratec appreciate your selection of our product, and wish you great success and enjoyment of your new DVD/CD RoboRacer LS Duplex Win/Mac. Check out Aleratec online! Blog.Aleratec.com Facebook.com/Aleratec Twitter.com/Aleratec YouTube.com/Aleratec Included Items •• •• •• •• •• •• •• •• •• •• •• 1 DVD/CD RoboRacer LS Duplex Win/Mac 2 Disc Output Bin Holders 1 100-disc Capacity Disc Output Bin 2 50-disc Capacity Disc Output Bins 4 100-Disc Capacity Guide Rods 4 50-Disc Capacity Guide Rods 1 USB 2.0 Cable 1 Power Cord 1 Power Adapter 1 Disc Publishing Software Suite CD 1 Nero Essentials CD NOTE: Please store and track the included software, registration codes and parts carefully. Requests for replacement software, registration codes, and/or parts may incur a fee. www.aleratec.com Product Features The DVD/CD RoboRacer LS Duplex Win/Mac is a versatile robotic desktop DVD/CD copying and LightScribe printing solution. •• Fully Automatic Disc Publisher –– Fully automatic disc handling –– 100-disc capacity –– Duplicate and LightScribe label simultaneously –– Unattended operation Key Items on the DVD/CD RoboRacer LS Duplex Win/Mac 1 5 6 2 3 4 NOTE: Do not pick up the unit using these surfaces. A B C 7 8 1. 2. 3. 4. 5. 6. 7. 8. Clear Plastic Disc Guide Rods Power and Function Indicator LED LightScribe DVD Recorders Disc Tray Control Arm Disc Input Bin Protective Cover Disc Bin Holder Disc Output Bin A. High Performance Cooling Fan B. Power Plug C. USB 2.0 to the PC www.aleratec.com 1 Installing the Hardware 1. Remove the DVD/CD RoboRacer LS Duplex Win/Mac from the box. Plug the male end of the power cord into a 110VAC power source. Plug the female end of the power cord into the back of the DVD/CD RoboRacer LS Duplex Win/ Mac and leave the power switch off, (power on the device after the software has been installed). Place the RoboRacer LS Duplex Win/Mac on a level surface. 2. Plug the USB cable into the PC and the DVD/CD RoboRacer LS Duplex Win/ Mac. 3. Remove the colored plastic bases from the three output bins. To do this you first must break the two black pins on each base, pushing them in the direction the arrow on the base points. Save the bases along with the other packaging foam in the product box in case your unit needs to be transported. 4. Slide bin holders into the two slots on the left side of the RoboRacer LS Duplex Win/Mac case and place a disc output bin into each bin holder. There are two types of output bins included (Two 50-disc capacity, one 100-disc capacity). Make sure to keep the output bins that come with the 280111. Although a normal disc media spindle cover may work, the RoboRacer LS Duplex Win/ Mac has been designed to use the provided Disc Output Bins included. When installing, make sure that the flanges on the bin are touching the lip of the bin holder. If the bin is not pushed down as far as it can go, the edge of the bin could interfere with the disc output. To use the 100 disc bin in the lower slot, the DVD/CD RoboRacer LS Duplex Win/Mac should be placed at the edge of a desk or table. Make sure that the bin does not touch the edge of the desk or table surface. Also, make sure to not place the 280113 over the edge, the weight of the discs may result in a fall. 5. Take the clear plastic disc guide rods and place them into the 4 holes in the top of the unit. To load the discs into the input bin, take one disc and place it horizontally level in the input bin. Now you can load the rest of the discs. All of the discs need to be level with the sides of the stack straight. 2 www.aleratec.com Software Installation For Windows users, use the Aleratec Disc Publishing Software Suite CD to install the necessary software as described below. For Mac Users Mac users please see the Discribe Robotic Software Quick Start Guide. For Windows Users 1. Insert the Aleratec DVD/CD Disc Publishing Software CD into your CD-ROM drive. 2. The installation application should automatically start when you’ve loaded the CD. If it does not, locate the “Autorun” application on the CD and double-click it to execute. 3. Install the USB Serial Driver. 4. Install the RoboRacer LS Duplex Utility. 5. Install Microsoft .NET Framework. 6. Install LightScribe System Software Update. 7. Exit the Aleratec DVD/CD Disc Publishing Software Suite Installation. 8. Insert the Nero Essentials CD. www.aleratec.com 3 Software Installation - continued 9. The installation application should automatically start when you’ve loaded the CD. If it does not, locate the “Autorun.exe” application in the “Autorun” directory on the CD and double-click it to execute. 10. Click on “Install Nero Essentials”. 4 a. Choose the “Custom” option for installation. b. When the Custom Setup screen comes up, select only the program features Nero Express Essentials and Nero CoverDesigner Essentials to be installed. www.aleratec.com c. To prevent the installation of program features other than Nero Express Essentials and Nero CoverDesigner, unselect by clicking on a program feature and select “This feature will not be available.” from the drop down menu. www.aleratec.com 5 Getting Started Creating Image Files Image files contain the data that you wish to copy onto your disc(s) and are necessary for the RoboRacer LS Duplex Win/Mac to create copies. Image files that are acceptable to the RoboRacer LS Duplex Utility application have file extensions of .ISO or .NRG. You can use Nero Express Essentials to create image files for the RoboRacer LS Duplex Win/Mac: If you are starting with a physical disc that contains your source files: 1. Launch Nero Express Essentials from the Start menu, in the “Nero Essentials” group. 2. Select “Image, Project, Copy” and then “Copy Entire CD” or “Copy Entire DVD” (depending on the type of disc). 3. If you are prompted to print a label, uncheck “Print label” and then click “Next.” 4. Select the DVD/CD drive in your computer containing the disc you wish to copy as “Source drive.” 5. Choose “Image Recorder” as the “Destination drive” and then click “Copy.” 6. Type in a file name and choose a location to save the disc “image” file and then choose “Save.” 7. When the disc is successfully copied, close Nero Express Essentials. NOTE: Using the Copy Disc or Copy Disc + LightScribe Labeling options on the RoboRacer LS Duplex Utility allows you to create copies from a source disc without first creating an image file. These options create the image file for you from a source disc. If the data you wish to burn is on your computer: 1. Launch Nero Express Essentials from the Start menu, in the “Nero Essentials” group. 2. Choose the option that corresponds to the type of project you wish to create. 3. Add the desired files/folders to the project and then click “Next.” 4. If you are prompted to print a label, uncheck “Print label” and then click “Next.” 5. Choose “Image Recorder” as the “Destination drive” and then click “Burn.” 6. Type in a file name and choose a location to save the disc “image” file and then choose “Save.” 7. When the disc “image” file is successfully created, close Nero Express Essentials. 6 www.aleratec.com Creating Disc Graphics Files for LightScribe The Nero CoverDesigner Essentials software gives you the ability to create graphics files that can be labeled onto LightScribe discs. These files have the extension .NCT or .NCD. Please consult the Nero CoverDesigner Essentials help for more information on creating graphics for your discs. Using the RoboRacer LS Duplex Utility The Aleratec RoboRacer LS Duplex Utility offers five options for copying data to discs and/or performing LightScribe labeling: 1. Burn From Disc Image – Creates discs from an existing image file. 2. LightScribe Labeling – Labels discs from a graphics file. 3. Burn From Disc Image + LightScribe Labeling – Uses an existing image file and a graphics file to both burn data and label discs. 4. Copy Disc – Automatically creates an image file from a source disc and then creates disc copies from that file. 5. Copy Disc + LightScribe Labeling - Automatically creates an image file from a source disc and then creates disc copies from that file. Also uses a graphics file to label the created discs. Burn from Disc Image 1. Create a new image file using Nero Express Essentials if one has not already been created. 2. Launch the Aleratec RoboRacer LS Duplex Utility from the Start menu, in the RoboRacer LS Duplex group. www.aleratec.com 7 Burn from Disc Image - continued 3. Select “Burn From Disc Image” in the dropdown menu and press the Go! button. 4. On the “Select Image Write Options” window, choose your image file, select the media type (CD or DVD) and specify the number of copies to make. Make sure to place enough empty discs (label side facing up) in the disc input bin before pressing OK. NOTE: Lowering the write speed for audio CD’s and video DVD’s will reduce the chance of failures. 5. 8 Press OK. www.aleratec.com LightScribe Labeling 1. Launch Nero CoverDesigner Essentials from the Start menu, in the Nero Essentials group. 2. Use Nero CoverDesigner Essentials to create a new label or select an existing graphics file. 3. Click on the “LightScribe” button on the toolbar or go to File|Print LightScribe Label. 4. Choose the print quality and number of copies you wish to make. Do not change the Drive setting. DO NOT PRESS PRINT. NOTE: It is always recommended to use the “Best” setting for LightScribe Labeling jobs. 5. Launch the Aleratec RoboRacer LS Duplex Utility from the Start menu, in the RoboRacer LS Duplex group. 6. Make sure to place enough empty discs (label side facing DOWN) in the disc input bin before pressing OK. www.aleratec.com 9 LightScribe Labeling - continued 7. Select “LightScribe Labeling” in the dropdown menu and press the Go! button. NOTE: You will occasionally see the following warning window appear. This is normal. Please ignore this warning message; it will be closed automatically. Burn from Disc Image + LightScribe Labeling 1. Launch Nero CoverDesigner Essentials from the Start menu, in the Nero Essentials group. 2. Use Nero CoverDesigner Essentials to create a new label or select an existing graphics file. 3. Click on the “LightScribe” button on the toolbar or go to File|Print LightScribe Label. 4. Choose the print quality and number of copies you wish to make. Do not change the Drive setting. DO NOT PRESS PRINT. NOTE: It is always recommended to use the “Best” setting for LightScribe Labeling jobs. 10 www.aleratec.com 5. Create a new image file using Nero Express Essentials if one has not already been created. 6. Launch the Aleratec RoboRacer LS Duplex Utility from the Start menu, in the RoboRacer LS Duplex group. 7. Select “Burn From Disc Image + LightScribe Labeling” in the dropdown menu and press the Go! button. 8. On the “Select Image Write Options” window, choose your image file and select the media type (CD or DVD). Make sure to place enough empty discs (label side facing up) in the disc input bin before pressing OK. NOTE: Lowering the write speed for audio CD’s and video DVD’s will reduce the chance of failures. 9. Press OK. NOTE: You will occasionally see the following warning window appear. This is normal. Please ignore this warning message; it will be closed automatically. www.aleratec.com 11 Disc Copy 1. Launch the Aleratec RoboRacer LS Duplex Utility from the Start menu, in the RoboRacer LS Duplex group. 2. Select “Copy Disc” in the dropdown menu and press the Go! button. 3. On the “Select Duplication Options” window, specify the filename and path for the image file which will be created from your source disc, select the media type (CD or DVD) and specify the number of copies to make. Make sure that the first disc at the bottom of the disc input bin is the source disc (label side facing up). Also make sure to place enough empty discs (label side facing up) on top of the source disc before pressing OK. NOTE: Lowering the write speed for audio CD’s and video DVD’s will reduce the chance of failures. 4. Press OK. Disc Copy + LightScribe Labeling 1. Launch Nero CoverDesigner Essentials from the Start menu, in the Nero Essentials group. 2. Use Nero CoverDesigner Essentials to create a new label or select an existing graphics file. 3. Click on the “LightScribe” button on the toolbar or go to File|Print LightScribe Label. 12 www.aleratec.com 4. Choose the print quality and number of copies you wish to make. Do not change the Drive setting. DO NOT PRESS PRINT. NOTE: It is always recommended to use the “Best” setting for LightScribe Labeling jobs. 5. Launch the Aleratec RoboRacer LS Duplex Utility from the Start menu, in the RoboRacer LS Duplex group. 6. Select “Copy Disc + LightScribe Labeling” in the dropdown menu and press the Go! button. 7. On the “Select Duplication Options” window, specify the filename and path for the image file which will be created from your source disc and select the media type (CD or DVD). Make sure that the first disc at the bottom of the disc input bin is the source disc (label side facing up). Also make sure to place enough empty discs (label side facing up) on top of the source disc before pressing OK. 8. Press OK. NOTE: You will occasionally see the following warning window appear. This is normal. Please ignore this warning message; it will be closed automatically. www.aleratec.com 13 Recommended Media For best results we recommend Aleratec LightScribe Duplicator Grade DVD and CD media. For complete details go to www.aleratec.com/lightscribe-media.html. 14 www.aleratec.com Technical Support Addresses and Phone Numbers ►► By e-mail: [email protected] ►► By Telephone: 1-818-678-0484 Technical Support Group can be reached 8:00 AM to 5:00 PM, Pacific Time, Monday through Friday, excluding U.S. holidays. Please try to call from a phone near your computer system. ►► Access is available 24 hours a day, 365 days a year, via: The World Wide Web at: www.aleratec.com FAX at: 1-818-678-0483 www.aleratec.com 15 Notes: www.aleratec.com Notes: www.aleratec.com Document Number: 9299067_ENG_Rev. C Specifications subject to change without notice. Copyright © 2011 Aleratec, Inc. 9851 Owensmouth Avenue Chatsworth, CA 91311 U.S.A. www.aleratec.com