1
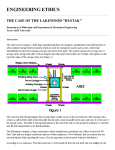
MC-4 Hack
Cover Page
MC-4 Hack
User Documentation
1
MC-4 Hack
Table of Contents
Cover Page .................................................................................................................................... 1
Table of Contents........................................................................................................................... 2
Overview........................................................................................................................................ 4
History............................................................................................................................................5
System Requirements.....................................................................................................................6
Installation......................................................................................................................................7
Uninstallation............................................................................................................................... 10
Authorization & Initial Startup.................................................................................................... 11
Preferences................................................................................................................................... 13
Audio Settings......................................................................................................................... 14
Sequence Settings....................................................................................................................14
Usage............................................................................................................................................16
MIDI file import......................................................................................................................17
MIDI Channel Mapping..................................................................................................... 18
Pad to Bar (Sequence Length)............................................................................................ 19
MPX....................................................................................................................................20
Timebase.............................................................................................................................21
Sequence Editing.....................................................................................................................22
Note Values......................................................................................................................... 23
Adding or Deleting Notes...................................................................................................24
Transposing Notes.............................................................................................................. 25
Copying Notes Between Channels..................................................................................... 26
Sequence Previewing.............................................................................................................. 27
2
MC-4 Hack
Making the MC-4 Sequence....................................................................................................28
Name...................................................................................................................................28
Tempo................................................................................................................................. 29
Leader................................................................................................................................. 29
Save / Send to MC-4...........................................................................................................30
Documentation & Help................................................................................................................ 32
About Menu................................................................................................................................. 33
Demo Limitations........................................................................................................................ 34
Acknowledgments and Thanks.................................................................................................... 35
Contact & Support....................................................................................................................... 36
Copyright..................................................................................................................................... 36
Version History............................................................................................................................ 36
3
MC-4 Hack
Overview
MC-4 Hack is a software application that allows you to program the Roland MC-4 sequencer in
an entirely new way, and keeps you from having to learn the complexities of the “calculator
style” keypad data entry that the MC-4 has required up until now. It takes a MIDI file and
converts it into a WAV audio file that is played into the cassette input port of the MC-4, to
program one or more of its four sequencer channels.
You can also edit the sequences (or enter them completely from scratch) within MC-4 Hack,
and preview them using the built in General MIDI instruments on your computer, before
converting them into MC-4 format.
MC-4 Hack is available for both Macintosh and Windows systems.
4
MC-4 Hack
History
In 1997, I released the first version of MC-202 Hack, a program which allowed users to convert
MIDI sequences into WAV audio files that could be used to program the Roland MC-202's
sequencer. Since that time, and through multiple improvements to MC-202 Hack, I've gotten
innumerable requests to do the same thing for the Roland MC-4 sequencer – to create an “MC-4
Hack.”
Those requests make perfectly logical sense, as the sequencers in the two devices are very
similar, and they are from roughly the same time period in Roland's history. That said, creating
MC-4 Hack proved difficult on multiple levels, despite the similarities. For one, I don't (and
never have) owned or even touched an MC-4. So reverse engineering the tape save format, and
testing of the software was only possible because of a group of extremely helpful and dedicated
beta testers, to whom I'm extremely grateful (see Acknowledgements section for their names).
Second, the tape save formats between the two machines were quite different, despite the
sequencer's similarities. So a lot of work went into “cracking the code” of the MC-4...
So all that said - I'm happy to finally deliver on all those requests – I hope you enjoy the result!
5
MC-4 Hack
System Requirements
Macintosh
• OS X
◦ 10.4.9 or greater (PowerPC and Intel)
◦ 10.5.x (PowerPC and Intel)
◦ 10.6.x (Intel)
◦ 10.7.x (Intel)
• Java Runtime Environment (JRE) 1.4 or greater (present by default on OS X 10.4 - 10.6,
must be installed on OS X 10.7.x, will be automatically prompted to install if not
present)
Windows
Windows
◦ XP Service Pack 2 or greater
◦ Vista
◦ 7
• Java Runtime Environment (JRE) 1.4 or greater (if not present will be notified by
installer, with option to download and install it)
•
6
MC-4 Hack
Installation
Macintosh
The Macintosh version is supplied as a Macintosh disk image file (.dmg). Just double click the
downloaded file, and you will see a new window appear on your desktop. Drag the MC-4 Hack
application icon to the Applications window icon that you see – this will install the MC-4 Hack
application on your computer:
After the file has copied, you can unmount the disk image, and delete the .dmg file (or keep it
somewhere safe if you'd like, for future installations).
7
MC-4 Hack
Note that if you are installing on Mac OS X 10.7.x (Lion), a Java Runtime is not present by
default as with previous versions of the Mac operating system. If you have not already installed
Java previously, upon first starting MC-4 Hack, you will be prompted with the following dialog:
Press Install, let the Java installation complete, and then try MC-4 Hack again.
Windows
The Windows version is supplied as a compressed .zip file. Unzip the file, and you will be left
with a file called MC-4 Hack Installer.exe (or MC-4 Hack Demo Installer.exe if installing the
demo version). Double click this file to run the installer, and follow its instructions:
8
MC-4 Hack
If you do not have a Java Runtime Environment greater than or equal to version 1.4 on your
computer, you will be notified, and prompted to install it (a browser window will open to allow
you to download it). The MC-4 Hack installer will abort the install in this case. After you have
successfully installed the Java Runtime Environment, please re-run the MC-4 Hack installer to
correctly install MC-4 Hack.
After installation, you will find a shortcut available to launch the MC-4 Hack application in the
Windows Start menu, in addition to uninstallation and documentation shortcuts. You can keep
the MC-4 Hack Installer.exe file somewhere safe if you'd like, for future installations.
9
MC-4 Hack
Uninstallation
Macintosh – Just drag the MC-4 Hack application out of the Applications folder to the
Trash.
Windows – Use either the Windows Add/Remove Programs control panel to remove the
application, or use the Uninstall shortcut in the Windows Start menu.
10
MC-4 Hack
Authorization & Initial Startup
If you’re trying the demo version of MC-4 Hack, you can start to use it immediately after
installing it.
If you are installing the full version of MC-4 Hack, you’ll need to authorize it before being able
to use it. Start the application, and you'll find yourself at the About & Authorization screen:
11
MC-4 Hack
Enter your Username and Password, and then click the Authorize button. Be careful,
cApiTaliZation MaTteRs! If successful, the Status field will change to “Registered”, and you
will see a “Start MC-4 Hack!” button, which when clicked will allow you to begin to use the
software. If not successful, you will be left at the Authorization screen to try again.
To verify your authorization status, or to remind yourself of your Username and Password, you
can select the About MC-4 Hack menu item to be brought back to the About and Authorization
screen at any time.
After authorization, on first run of the program, the Preferences window will automatically
display – see next section.
12
MC-4 Hack
Preferences
MC-4 Hack has user preferences that are selected in the Preferences window. This window will
show automatically on the first run of the program. Subsequently, you can modify the
preferences by selecting the Setup/Preferences... menu item. After selections are made, just
close the window and the preferences will be saved. There are two categories of preferences,
Audio Settings and Sequence Settings.
13
MC-4 Hack
Audio Settings
This section allows you to turn audio processing on and off, select the audio driver used,
configure the audio output device, and adjust settings that device. Some of the configuration
options will depend on which driver and devices are selected, as well as whether you are
working on a Macintosh or a Windows machine.
Audio processing must be On to be able to send audio directly to the MC-4,
Sequence Settings
This section specifies various default values used for sequence editing, importing and
previewing.
• Default New Note Number – when manually adding a new note to an MC-4 sequence,
this is the default note number. (Range 0 – 125)
• Default New Note Gate Length – when manually adding a new note to an MC-4
sequence, this is the default gate length. (Range 0 – Step Length)
• Default New Note Step Length – when manually adding a new note to an MC-4
sequence, this is the default step length. (Range 1 – 240)
• Default New Note Velocity – when manually adding a new note to an MC-4 sequence,
this is the default velocity. (Range 1 – 125)
• Default Timebase - default timebase when starting the application. (Range variable –
see Usage/Timebase section)
• Default Tempo - default tempo when starting the application. (Range variable – see
Usage/Tempo section)
14
MC-4 Hack
•
•
Default Leader - this is the length of the leader tone that will be used before the data
portion of the MC-4 Hack audio file begins. (Range 1- 20 seconds).
Program – this is the General MIDI instrument that will be used to audition your
sequence within MC-4 Hack.
15
MC-4 Hack
Usage
MC-4 Hack works by converting sequence information displayed in its 4 channel sections into
audio that can be played into the MC-4's cassette input port to program its sequencer. Note
information can either be manually added to each of these 4 channels, or can be imported into
them from an existing MIDI file. Each of these methods are outlined in the sections below. In
addition, they can be combined, meaning that one can import a MIDI file sequence, and then
edit it using the manual methods.
16
MC-4 Hack
MIDI file import
To import a MIDI file, use the MIDI file import panel in the upper left of the application
window:
MIDI file import works with either type 0 or type 1 MIDI files. To import a MIDI file, specify
your desired settings (described below), and then drag and drop the MIDI file onto the panel.
Once the file is successfully interpreted by MC-4 Hack, the sequences will automatically be
displayed within the desired MC-4 channel sections to the right.
17
MC-4 Hack
Because of note range constraints on the MC-4, note values lower than C2 (note number 36) in
the MIDI file will be mapped to C2 (note number 0) on the MC-4.
MIDI Channel Mapping
The MC-4 allows you to use up to four sequences, numbered 1 to 4. Using MC-4 Hack, you
can map notes from different MIDI channels within your MIDI file, to different MC-4 channels.
The following drop down menus allow you to select which MIDI channels from the input MIDI
file will be mapped to channels 1, 2, 3 or 4 within MC-4 Hack:
In this example, MIDI channel 1 is mapped to MC-4 channel 1, MIDI channel 2 to MC-4
channel 2, and MIDI channel 7 to MC-4 channel 3. MC-4 channel 4 has no data mapped to it
from the MIDI file.
The range of accepted MIDI channels is 1-16. You cannot map the same MIDI channel to more
than one MC-4 channel (though if you desire the same sequence data on multiple channels, you
can copy it from channel to channel later). If you do select the same MIDI channel for more
18
MC-4 Hack
than one MC-4 channel, it will be mapped to the lowest MC-4 channel selected. If there is no
data on the MIDI channel selected within the MIDI file, no data will be written to the MC-4
channel.
If you specify “None” for the MIDI channel desired for any of the MC-4 channels, MC-4 Hack
will not overwrite any information that may already be loaded into that channel within the
application.
Pad to Bar (Sequence Length)
MIDI files do not include information about the absolute length of the original sequence in
terms of bars; they only include the information on the length and position of notes in the
sequence. This means that a MIDI sequence will end at the exact time that the last note in the
sequence has completed playing. Let's take for example the following sequence, created in
Ableton Live:
The MIDI file exported from this sequence will only contain information about the notes
19
MC-4 Hack
included, and nothing about the overall length of the sequence that was originally intended (i.e.
that it was a full bar long). The silence after the last note to “complete” the bar is not included
in the MIDI file.
The Pad To Bar parameter will insert silence after the last note to “complete” the bar; in most
cases, this will give what was originally desired, and makes importing of MIDI loops into the
MC-4 much easier. Using the example above, compare the resulting sequences within MC-4
Hack when the Ableton Live MIDI file was imported; the sequence on the left was imported
with the Pad To Bar parameter off (unchecked), whereas the one on the right was imported with
the Pad To Bar parameter on (checked). Note the Step length of the 4 th note:
Pad To Bar parameter OFF
Pad To Bar parameter ON
MPX
MPX can be thought of as an extra gate for each note, which could be used as an on/off switch
for various synth functions. It has no independent gate time, and rather just follows the step
time for each note. The MPX option within the MIDI import panel specifies whether MPX
should default to Off (value of 0) or On (value of 1) for all notes upon importing of the MIDI
file. Subsequent individual note editing of the MPX values can be done manually in the MC-4
20
MC-4 Hack
channel sections if desired.
Timebase
This sets the timebase resolution of the MC-4 sequence that will be transmitted to the MC-4.
The timebase represents the number of ticks per beat on the MC-4. The MC-4 step and gate
durations for the notes from the MIDI file depend on the timebase chosen. You should choose
your desired timebase before importing your MIDI file; changing the timebase after the import
will result in an inaccurate conversion from MIDI sequence to MC-4 sequence.
Some important notes about choosing your timebase. A higher value for the timebase will result
in “tighter” timing on the MC-4, but at very high values, you may be limited in your tempo
range for the sequence; this is because the MC-4 has the following constraint: (Timebase x
Tempo) must be in the range of 92 – 20,000. This means that if using the maximum allowable
timebase value of 240, then the maximum allowable tempo for your song will be 83
(20,000/240 = 83.3).
Also note that MIDI files can have different resolutions as well (referred to in MIDI parlance as
the “ticks per quarter note” value). For most MIDI files, this value is 96 ticks per quarter note.
This means however that if you choose a lower MC-4 timebase of 48 for example, that MC-4
Hack will have to scale the MIDI notes to a lower timing resolution, and may result in
inaccurate note timing. Ideally, the MC-4 timebase and MIDI ticks per quarter value should be
the same, as there will then be no note duration scaling required.
21
MC-4 Hack
Sequence Editing
Once you have imported a MIDI file and if you wish to edit the sequence(s), or if you just want
to create sequences from scratch, you can use the manual sequence editing functionality. The
sequence editing section is composed of 4 identical tabular areas (only 1 if using the demo),
each representing one of the four MC-4 channels:
22
MC-4 Hack
Note Values
Each channel section represents notes in the sequence by a row in the table. Each row has
parameters for Row number, Note, Gate, Step, Velocity and MPX:
The Note entry in each row represents the MC-4 note number. If you click once on the Note
value in any row, the note will be highlighted in orange on the virtual keyboard below. In
addition, the note letter value (e.g. C4, as in the example above) will be displayed to the right
and just below the virtual keyboard. There are two ways to edit the note number for any row –
you can click once in the table on the Note you wish to change to highlight it, then you can
click on the note you would like to change it to on the virtual keyboard. Alternatively, you can
23
MC-4 Hack
double-click the Note entry in the table, and type in a new numeric note number value. The
allowable note numbers are between 0 and 125 (or C2 to F12), representing the note range of
the MC-4.
The Gate and Step entries in each row are equivalent to the values on the MC-4, and represent
ticks. A quarter note is the same number of ticks as the Timebase that is specified. The
minimum allowable value for the Gate parameter is 0; the minimum allowable value for the
Step parameter is 1. The Gate value should never exceed the Step value for any row;
currently, the editing grid does not prevent you from doing so, so be careful. The
maximum value for both Gate and Step is 240 (this is a constraint of the MC-4). To edit these
values, double-click the current value and type in a new one.
The Velocity entry in each row represent the note's velocity as encoded in the MIDI file, and it
will be mapped to “CV2” on the MC-4. The allowable range is 0-125. To edit this value,
double-click the current value and type in a new one.
The MPX entry in each row represent the MPX status for the note in that row. A value of 0
represents Off, whereas a value of 1 represents On. 0 and 1 are the only two allowable values.
To edit this value, double-click the current value and type in a new one.
Adding or Deleting Notes
You can add or delete notes (rows) in each sequence, by using the buttons to the right of each
table:
24
MC-4 Hack
Clear All will remove all notes from the sequence. Delete will remove the currently selected
row (note). Insert Above will add an empty row above the currently selected row. Likewise,
Insert Below will add an empty row below the currently selected row. When you have an
empty sequence (as when you first start MC-4 Hack, or after Clearing the sequence, you
should add a new note by Insert Below, and not Insert Above. Using Insert Above in this
case will confuse the sequence grid.
When Inserting new notes into the grid, the default Note, Gate, Step and Velocity values
specified in the Preferences will be used. See the Preferences section above for more details.
Transposing Notes
You can transpose all notes in each sequence using the Transpose function:
The number to the left of the Transpose button allows you to specify how many semitone steps
(positive or negative) you would like to transpose the sequence. You can adjust this value by
25
MC-4 Hack
clicking on it and dragging up or down, or alternatively, you can click on it once to “activate” it
(indicated by an orange triangle), and then type in a new value from your keyboard. You can
transpose up to four octaves (48 semitones) up or down.
Copying Notes Between Channels
You can copy all of the notes from one channel to another by using the Copy section just below
the Channel grids:
Select both the source and destination channels, and then press Copy. This process overwrites
any notes that may already be in the destination sequence, so be careful!
26
MC-4 Hack
Sequence Previewing
MC-4 Hack allows for your sequence(s) to be previewed on your computer, using its built in
General MIDI instruments. The specific instrument it will use to preview is selected in the
Preferences; see the Preferences section above for more detail.
You can preview a single channel by using the transport buttons within the channel section, just
below the virtual keyboard. These allow you to rewind, stop, play and loop the sequence on
that channel. You can also preview all channels in sync, using the All Channels transport
buttons just below the Channel grids:
The tempo for previewing is controlled in the MC-4 audio creation section, on the lower left of
the main screen – see next section.
27
MC-4 Hack
Making the MC-4 Sequence
Once you have created your desire sequence(s), you are ready to make the MC-4 audio that will
program the MC-4. This is done in the MC-4 audio creation section, in the lower left of the
main screen:
Any time the Make MC-4 button is enabled, it means that a change has been made to the
sequence or to one of the other parameters that affect the MC-4 output. These include the
Timebase, Name, Tempo and Leader parameters. The Timebase parameter has been described
above; the other parameters are described below.
Name
This is where you can specify a numeric identifier for your sequence. This identifier can be 0 to
28
MC-4 Hack
10 digits long, 0 meaning that you do not need to add one if you don't wish to. You can use any
digit from 0-9, though currently, you cannot start the identifier with a 0.
Tempo
This sets the tempo of the sequence in beats per minute (BPM). The allowable range is
variable; as described above in the Timebase description, this is because the MC-4 has the
following constraint: (Timebase x Tempo) must be in the range of 92 – 20,000. This means that
if using the maximum allowable timebase value of 240, then the maximum allowable tempo for
your song will be 83 (20,000/240 = 83.3).
Leader
This sets the length of the leader tone that is present before the data portion of the MC-4 Hack
audio file begins. (Range 1- 20 seconds).
Once you have set all the parameters to your liking you are ready to make the MC-4 audio.
Click the Make MC-4 button, and you will shortly see a light blue indicator within the button to
indicate progress:
When done, you will briefly see a “Done!” message flash to the right of the button:
29
MC-4 Hack
Save / Send to MC-4
Once you have completed creating the MC-4 audio, you can save the audio file or send it
directly to the MC-4.
To save the audio file, press the Save button, and you will be prompted with a file dialog where
you can name the file. If you do not specify a .wav suffix for the file, one will automatically be
appended to the name you specify.
If you prefer to just send the audio directly to the MC-4, press the Play button. Adjust audio
levels using the Volume button. Audio will be transmitted per the Audio preferences specified
in the Preferences (see above). Note that Audio must be turned On in the Preferences!
As mentioned above, any modification of the sequence(s) and/or change of the parameters listed
above will re-enable the Make MC-4 button, and correspondingly disable the MC-4 playback
and save options. They will be re-enabled once new MC-4 audio is created.
30
MC-4 Hack
The sequence of steps necessary to load the sequence onto the MC-4 is as follows:
1)
2)
3)
4)
5)
Power On
Press Mode two times
Press 9
Press Measure End
Start sending the MC-4 audio to the MC-4.
The MC-4 will beep to indicate that it has recognized the data, and will display “FN 1” plus the
file name (if you have used one). Once the load is complete, it will display “END1” if
successful, otherwise it will display “ERR1”. If this occurs, try adjusting the volume of the
audio being sent to the MC-4, and try again.
31
MC-4 Hack
Documentation & Help
MC-4 Hack can launch its full documentation (this document) from within the application
itself; just go to the Documentation menu, and choose “MC-4 Hack Documentation”. This will
launch a PDF viewing application in which to view the documentation:
On Windows, you can also find a shortcut to the documentation in the MC-4 Hack Start menu
shortcuts.
32
MC-4 Hack
About Menu
The About MC-4 Hack menu item (in the MC-4 Hack menu on Macintosh, and in the Help
menu on Windows) will replace the MC-4 Hack main screen with the About and Authorization
screen. In addition to the Authorization information described above, it shows version
information about the application, copyright information and acknowledgments, and has a
direct link to the MC-4 Hack home page:
33
MC-4 Hack
Demo Limitations
The demo version of MC-4 Hack is feature complete compared with the full version, with the
following exceptions:
•
•
It only support 1 out of the 4 MC-4 channels.
It will only allow up to 8 notes on channel 1.
34
MC-4 Hack
Acknowledgments and Thanks
I would like to acknowledge the following four beta testers for their incredible assistance in
helping me create and test this software: David Bulog, Stephen Hennelly, Lars Johansson
and David Lackey. Quite literally, I could not have created this software without their
assistance; this is because I don't own an MC-4 myself, and so all initial MC-4 sequence dumps
and subsequent testing of MC-4 audio files created by the application was done by them.
Thanks again guys!
MC-4 Hack was created using Cycling ‘74’s Max/MSP ( http://www.cycling74.com) software. In
addition, it uses, with permission, some 3 rd party external objects – I'm indebted to their creators
for them:
•
•
Thanks
getpaths, creatfolder (Mac); getenv (Windows), by Jasch (http://www.jasch.ch/dl)
mkdir (Windows), by Bill Orcutt (http://publicbeta.cx/max)
to
everyone
at
Cycling ’74 and on the Cycling
(http://www.cycling74.com/forums) for their invaluable help with Max/MSP issues.
’74
forums
Finally I'd like to thank my wife and kids for putting up with my absences while I was busy
writing the software!
35
MC-4 Hack
Contact & Support
Support Forum
http://defectiverecords.com/forum/index.php?p=/categories/mc-4-hack
Dan Nigrin
[email protected]
Copyright
MC-4 Hack is Copyright © 2011 by Daniel Nigrin and Defective Records Software. All rights
are reserved.
Version History
Version 1.0 (October 4, 2011)
• First version released, including demo version.
• Built with Max/MSP version 5.1.9.
Version 1.0 Betas 1 through 5 (August 30 – September 23, 2011)
• Bug fixes and firming up of feature set.
Version 1.0 Alphas (July 15 – August 30, 2011)
• First versions for internal testing.
36