1
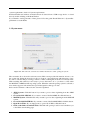
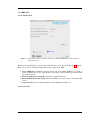
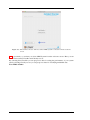
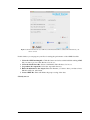
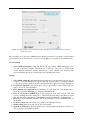
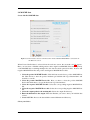
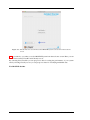
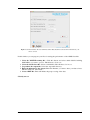
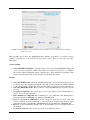
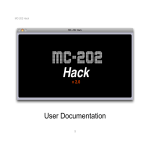
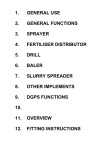
Appendix C
User’s Manual Incident Tracker
Table of Contents
• 1.0.....................GENERAL INFORMATION.....................
1.1 Project Overview
1.2 System summary
1.3 System requirements
1.4 Definitions and Acronyms
• 2.0.....................GETTING STARTED.....................
2.1 Starting the system for the first time
2.2 System Menu
2.3 Processing AIMS data
2.4 Processing MAUDE data
• 3.0.....................USING THE SYSTEM.....................
3.1 Selecting Data
3.2 Cleaning data
3.3 Running data in Weka
For any questions or remarks feel free to write to [email protected].
57
1.0 GENERAL INFORMATION
1.1 Project Overview
Welcome to the Incident Tracker User Manual. With Incident Tracker you can prepare data for
use in the machine learning software Weka. Incident Tracker is capable of cleaning and removing
unwanted data from files originating from AIMS and MAUDE incident reporting systems and
thereby enable a quick and error-free processing and manipulation in Weka.
This guide allows you to learn to control Incident Tracker. Just follow through the guide below,
and you will have your results in Weka in no time!
Authors
The first version of Incident Tracker was written by Anders Schierup, Christian Bruun Jensen and
Jakob Skriver Routhe. Mei Sing Ong has contributed significantly to the system with pieces of
code included into the system.
Acknowledgments
We want to thank our supervisor Farah Magrabi and our co supervisor Mei-Sing Ong for supervising on this project and a special thanks goes to Jakob Bredal Jensen and Dennis Jasch who have
helped with several programming difficulties and by giving interesting feature suggestions.
1.2 System summary
Incident Tracker is developed to help researchers extract information from the growing amount
of patient safety incidents reported by health professionals. The application helps improving the
effectiveness and efficiency of learning and monitoring from incident reports on a local, national
and international level. This will help easing the problem that thousands of incident reports remains unanalysed.
The overall purpose of the application is to automate the categorising process of identifying patient
safety incidents related to HIT by applying machine learning methods. Incident Tracker prepares
the input data and manipulates it so it can be accessed and analysed by the external machine learning software Weka. By preparing the input data for Weka it is possible to train and model different
classifiers based on training sets of incident reports created in Incident Tracker. It also makes it
possible to classify unseen incident reports based on the stated rules and thereby makes it adaptable to the future changes related to HIT incident reports. Incident Tracker can process data from
two different incident reporting systems: The Australian AIMS and American MAUDE.
1.3 System requirements
In order for Incident Tracker to run on your computer, you must have all minimum system requirements. Incident Tracker is very resource demanding, so if you intend to run the system with the
minimum requirements, the system will only be capable of running small amounts of data.
Minimum
Operating System: Windows XP or newer, mac OSX or newer
CPU: 2,26 GHz intel core 2 duo or faster
System Memory (RAM): 2 GB
Hard Disk: 2 GB free space
Screen resolution: 1024x768
Recommended settings
58
C. User’s Manual Incident Tracker
When working with files containing 1 mil. or more incident reports, the recommended settings is
as much RAM and CPU as possible.
In order to make Weka process big amounts of data, Weka needs to be tweaked. Below are two
user guides on how to tweak Weka for Windows and Mac.
Tweak Weka in Windows
Close any running versions of Weka and locate the RunWeka.bat in the Weka file folder and open
the file in a text editing tool, e.g. notepad. Search for the word "maxheap=256" and enter a higher
value for the heap size, corresponding to the majority of your RAM, e.g. "maxheap=1024". Save
the changes into the .bat file and relaunch Weka.
WARNING: By allocating too much RAM to Weka, your system may become unresponsive.
Tweak Weka in Mac
Close any running versions of Weka and locate the version number of your Weka software (e.g.
weka-3-5-7.app, hereafter mentioned as weka-x-x-x.app).
Open up a terminal window and type:
cd /Applications/weka-x-x-x.app/Contents
Now type: open Info.plist
This will open some code in a text editor. Locate an entry called "VMOptions" with the value
"-Xmx256M". Edit the value and enter a higher value for the heap size, corresponding with your
RAM. Save the changes and relaunch Weka.
WARNING: By allocating too much RAM to Weka, your system may become unresponsive.
1.4 Definitions and Acronyms
• MAUDE - Manufacturer and User Facility Device Experience (MAUDE) data represents
reports of adverse events involving medical devices reported to the US Food and Drug Administration.
• AIMS - AIMS Incident Management System is an incident reporting system for reports,
analyses and manages adverse healthcare events and near miss information.
• .csv - A comma-separated values (CSV) file stores tabular data numbers and text in plaintext form.
• Weka - Weka is a data Mining Software in Java containing a collection of machine learning
algorithms for data mining tasks.
• .arff - Attribute Relationship File Format (ARFF) is the text format file used by Weka to
store data in a database.
• MDR Report Key - All incident records types in the MAUDE database are linked via the
MDR REPORT KEY.
• Incident Reporting System - An incident reporting system is a computerized system used
to collect reports on safety incidents.
2.0 GETTING STARTED
2.1 Starting the system for the first time
Please install Weka before running Incident Tracker and make sure all .arff files are set to open in
Weka.
For the newest version of Weka, go to <http://www.cs.waikato.ac.nz/ml/weka/> to acquire it. Incident Tracker will run on both windows and mac OSX systems and requires java installed. For
C. User’s Manual Incident Tracker
59
system requirements, check 1.3 System requirements.
Incident Tracker runs without an install and can be started from a USB storage device or a hard
drive by double clicking on Incident Tracker.
If you intend to run big amounts of data, please follow the guide Tweak Weka in 1.3 System Requirements to tweak Weka.
2.2 System menu
Figure C.1: The welcome screen the user will be introduced to when opening the system.
The screenshot above shows the welcome screen. This screen provides information on how to use
the system. By letting the mouse hover above a button, a text will appear with directions of use.
In order to start the data processing you have to make a training file, if such is not already made.
With a training file at hand you are ready to process data and to do so you have to select either
the MAUDE or AIMS incident reporting system. When the wanted reporting system is selected, a
new window appears with an interface special designed for that type of data.
Below are the elements of the welcome screen be explained.
1. AIMS System: Click this button if you want to process data originating from the AIMS
system.
2. Create labelled AIMS file: If you want to create a labelled AIMS file click this button.
3. MAUDE System: Click this button if you want to process data originating from the MAUDE
system.
4. Create labelled MAUDE file: If you want to create a labelled MAUDE file click this button.
5. Open file in Weka: If you simply want to open a file in Weka, click this button.
6. Click on the link to download Weka: This link will open up a web browser and direct you
to the Weka downloading page.
60
C. User’s Manual Incident Tracker
2.3 AIMS data
Create labelled data
Figure C.2: The interface the user will meet when Create labelled AIMS file is selected from the
Welcome screen.
When Create labelled data is selected from the welcome screen, the screenshot in C.2 appears.
Here you can create a labelled training and test data origin from AIMS.
1. Select AIMS file to convert: Click this button and select which AIMS file you want to
create a labelled data set for. This file has to have the positive incidents pre labelled with
"isposiitiveincident".
2. Select the path for the output file: Select the output file directory.
3. Enter the filename for the output: Enter the filename you want to have your labelled data
to have.
4. Create CSV file: Process the data with the wanted filename and directory.
Select your choice
C. User’s Manual Incident Tracker
61
Figure C.3: The interface the user will meet when AIMS System is selected from the welcome
screen.
C.3 is presented to you when you select AIMS System from the welcome screen. Here you can
choose between Test Classifier and Classify test set.
By selecting Test Classifier you can preprocess data for testing the performance of your system
and by selecting Classify test set you can preprocess data for classifying unlabelled data.
Test AIMS classifier
62
C. User’s Manual Incident Tracker
Figure C.4: The interface the user will meet when Test Classifier is selected from the Select your
choice screen.
In this window you can prepare your files for testing the performance of the AIMS classifier.
1. Select the AIMS training file: Click this button and select which labelled training AIMS
file you want to process. This file has to be in .csv.
2. Select the labelled test file: Select a labelled file. This file has to be in .csv.
3. Set path for the output file: Select the output file directory.
4. Enter the filename for the output: Enter the filename you want to have your data to have.
This file will be in .arff format.
5. Create ARFF file: This will initiate the preprocessing of the data.
Classify test set
C. User’s Manual Incident Tracker
63
Figure C.5: The interface the user will meet when Classify test set is selected from the Select
your choice screen.
The screenshot above shows the AIMS interface which is presented to you when you have clicked
on Classify test set from the Select your choice screen. Here you can preprocess unlabelled data
Create training
1. Select AIMS training file: Click this button and select which AIMS training file (.csv)
you want to prepare for Weka. The filechooser is limited to only show .csv which is the
systems default training file format. This file has to have labelled some instances with
ispositiveincident and can be created in the Create labelled data screen.
Testing
1. Select AIMS testing file: When the labelled training file is selected in the previous step, its
possible to select the unlabelled testing file. This will open up a filechooser which is limited
to only show .xls files, which is the file format that the data is given in from the distributors.
2. Set path for output file: The system gives you the opportunity to select which folder you
want to save your .arff output file to.
3. Enter filename for output file Enter a filename for your output file. This filename has a
hardcoded extension TESTING, e.g. filename_TESTING.arff.
4. Press to convert file to ARFF When all the settings are done, press convert. This will
convert a training file and a testing file to .arff and locate both files at the directed output
path with the names givenfilename_TRAINING.arff and givenfilename_TESTING.arff.
5. Reset If you have mistakenly entered some wrong information, press reset which will reset
all the fields.
6. Go back to menu This button lets you go back to the Welcome Screen.
7. Click for help This button will open up the users manual.
8. Open file in Weka When all the steps have been completed this button appears and lets you
open your newly created files in Weka.
64
C. User’s Manual Incident Tracker
2.4 MAUDE data
Create labelled MAUDE data
Figure C.6: The interface the user will meet when Create labelled MAUDE file is selected from
the Welcome screen.
When Create labelled data is selected from the welcome screen, the screenshot in C.6 appears.
Here you can create a labelled training and test data origin from MAUDE. Since the complexity
of the MAUDE data containing multiple files, the data should be parted four files: Positive and
negative MAUDE Text files and positive and negative MAUDE Device files.
1. Select the positive MAUDE Text file: Click this button and select a positive MAUDE Text
file. This file has to have the positive incidents pre labelled with "isposiitiveincident" and
should be a .txt file.
2. Select the positive MAUDE Device file: Here you have to select the positive MAUDE
Device file which have to be pre labelled with "ispositiveincident".
3. Select the negative MAUDE Text file: Select the corresponding negative MAUDE Text
file.
4. Select the negative MAUDE Device file: Select the corresponding negative MAUDE Text
file.
5. Select the output path for the training file: Select the output file directory.
6. Enter the filename for the output: Enter the filename you want to have your labelled data
to have.
7. Create CSV file: Process the data with the wanted filename and directory.
Select your choice
C. User’s Manual Incident Tracker
65
Figure C.7: The interface the user will meet when MAUDE System is selected from the welcome
screen.
C.7 is presented to you when you select MAUDE System from the welcome screen. Here you can
choose between Test Classifier and Classify test set.
By selecting Test Classifier you can preprocess data for testing the performance of your system
and by selecting Classify test set you can preprocess data for classifying unlabelled data.
Test MAUDE classifier
66
C. User’s Manual Incident Tracker
Figure C.8: The interface the user will meet when Test classifier is selected from the Select your
choice screen.
In this window you can prepare your files for testing the performance of the AIMS classifier.
1. Select the MAUDE training file: Click this button and select which labelled training
MAUDE file you want to process. This file has to be in .csv.
2. Select the labelled test file: Select a labelled file. This file has to be in .csv.
3. Set path for the output file: Select the output file directory.
4. Enter the filename for the output: Enter the filename you want to have your data to have.
This file will be in .arff format.
5. Create ARFF file: This will initiate the preprocessing of the data.
Classify test set
C. User’s Manual Incident Tracker
67
Figure C.9: The interface the user will meet when Classify test set is selected from the Select
your choice screen.
The screenshot above shows the MAUDE interface which is presented to you when you have
clicked on Classify test set from the Select your choice screen. Here you can preprocess unlabelled data
Create training
1. Select MAUDE training file: Click this button and select which MAUDE training file
(.csv) you want to prepare for Weka. The filechooser is limited to only show .csv which is
the systems default training file format. This file has to have labelled some instances with
ispositiveincident and can be created in the Create labelled data screen.
Testing
1. Select the TEXT test file: When the labelled training file is selected in the previous step, its
possible to select the unlabelled testing file. This will open up a filechooser which is limited
to only show .txt files, which is the file format that the data is given in from the distributors.
2. Select the DEVICE test file: Here you have to select the DEVICE test file. This can only
be a .txt.
3. Set path for output file: The system gives you the opportunity to select which folder you
want to save your .arff output file to.
4. Enter filename for output file Enter a filename for your output file. This filename has a
hardcoded extension TESTING, e.g. filename_TESTING.arff.
5. Press to convert file to ARFF When all the settings are done, press convert. This will
convert a training file and a testing file to .arff and locate both files at the directed output
path with the names givenfilename_TRAINING.arff and givenfilename_TESTING.arff.
6. Reset If you have mistakenly entered some wrong information, press reset which will reset
all the fields.
7. Go back to menu This button lets you go back to the Welcome Screen.
68
C. User’s Manual Incident Tracker
8. Click for help This button will open up the users manual.
9. Open file in Weka When all the steps have been completed this button appears and lets you
open your newly created files in Weka.
3.0 USING THE SYSTEM
3.1 Selecting data
Training and testing data
To use Incident Tracker you have to make a training and testing file and convert these in either
Create labelled AIMS file or Create labelled MAUDE file. Before converting the training and
testing file you have to have labelled data or make yourself.
For AIMS data it is crucial that you label the positive incidents with the label "ispositiveincident"
and this label occurs in the end of the text string for which it belongs. AIMS files are only accepted
in .xls format.
For MAUDE data a positive and a negative file, containing positive and negative incident types
have to be created for each file type.
E.g. the MAUDE Text file has to be divided into a positive Text file and a negative Text file and
the MAUDE Device file has to be divided into a positive Device file and a negative Device file.
The MAUDE files are only accepted as .txt format
It is very important that the two original files foitext and foidev are from the same period of time.
There is a inconsistency in the MAUDE data, so incident reports in one file sometime does not
occur in the other. This is dealt with an algorithm which cross checks if the incident key are
present in both files, if and only if will the incident report be analysed, otherwise it is discarded.
3.2 Cleaning data
Weka has a list of characters which will develop errors if encountered. These characters are dealt
with, removed and in special cases replaced before the .arff file are created. These characters are:
;
:
"
’
+
,
|
The system removes all unnecessary columns. The unnecessary columns are chosen as such do
to the relevance of data it contained, when exposed to a text classification, which meant columns
containing unwanted numeric data or single letter code were removed.
3.3 Running data in Weka
When a training file and a testing file has been created, press Open file in Weka. This will load the
training file so a learning algorithm can be trained straight away.
C. User’s Manual Incident Tracker
69