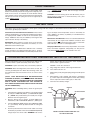
1
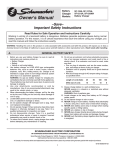
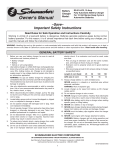
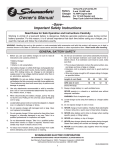
Read Rules for
Safe Operation
and Instructions
Carefully
MODEL MKC-10P
10 AMP 12 VOLTS
BATTERY CHARGER
WARNING: Working in the vicinity of a lead-acid battery is dangerous. Batteries generate explosive
gases during normal battery operation. For this reason, it is of utmost importance that each time
before using your charger, you read this manual and follow the instructions exactly.
GENERAL BATTERY SAFETY
1.
10. Do not use an extension cord unless absolutely necessary.
Use of an improper extension cord could result in fire or
electric shock. If an extension cord must be used, make
sure that:
Before you use your battery charger, be sure to read all
instructions and cautions printed on:
• Battery Charger
• Battery
2.
• Pins on plug of extension cord are the same number, size,
and shape as those of plug on charger.
Use battery charger on LEAD ACID type rechargeable batteries only, such as used in autos, trucks, tractors, airplanes,
vans, RV's, trolling motors, etc. Charger is not intended to
supply power to low-voltage electrical system other than in
an automotive or boat/marine application.
• Extension cord is properly wired and in good electrical
condition.
• Wire size is large enough for AC ampere rating of charger,
as specified below:
WARNING: Do not use battery charger for charging drycell batteries that are commonly used with home appliances.
These batteries may burst and cause injury to persons and
damage to property.
3.
4.
Use only attachments recommended or sold by manufacturer. Use of non-recommended attachments may result in
fire, electric shock, or injury.
Locate battery power cord so it cannot be stepped on, tripped
over, or subjected to damage or stress.
6.
Do not operate charger with damaged cord or plug. Have
cord replaced immediately.
7.
Do not operate charger if it has received a sharp blow, been
dropped, or otherwise damaged in any way. Take it to a
qualified professional for inspection and repair.
8.
Do not disassemble charger. Take it to a qualified professional when service or repair is required. Incorrect reassembly may result in electric shock or fire.
9.
25
50
100
150
AWG size of cord:
18
18
16
14
11. Always charge battery in a well ventilated area.
NEVER operate in a closed-in or restricted area without
adequate ventilation.
When disconnecting the battery charger, pull by the plug
not by the cord. Pulling on the cord may cause damage to
cord or plug.
5.
Length of cord (feet):
WARNING: Risk of explosive gas.
12. Locate charger as far away from battery as DC charger
cables permit.
13. Do not expose charger to rain or snow.
14. NEVER charge a frozen battery. If battery fluid (electrolyte)
is frozen, bring into a warm area to thaw before charging.
15. NEVER allow battery acid to drip on charger when reading
specific gravity or filling battery.
16. NEVER set a battery on top of charger.
17. NEVER place charger directly above battery being charged.
Gases from battery will corrode and damage charger.
18. NEVER touch the battery clips together when the charger
is energized.
To reduce risk of electric shock, unplug charger from outlet
before attempting any maintenance or cleaning.
19. NEVER crank engine with charger attached to battery.
• IMPORTANT SAFETY INSTRUCTIONS •
• SAVE THESE INSTRUCTIONS •
00-99-000344/0503
1
PERSONAL PRECAUTIONS AND SAFETY
1.
WARNING: Wear complete eye protection and clothing protection, when working with lead-acid batteries.
2.
Make sure someone is within range of your voice or close
enough to come to your aid when you work with or near a
lead-acid battery.
3.
Have plenty of fresh water and soap nearby for use if battery acid contacts skin, clothing, or eyes. If battery acid
contacts skin or clothing, wash immediately with soap and
water.
4.
5.
6.
Take care not to drop a metal tool or other metal onto the
battery. Metal may cause sparking or short circuit the battery or another electrical device. Sparking may cause an
explosion.
7.
Always operate battery charger in an open well ventilated
area.
8.
Battery chargers get hot during operation and must have
proper ventilation. Air needs to flow around entire charger.
9.
Do not set battery charger on flammable items like carpeting, upholstery, paper, cardboard etc. Charger may damage leather and melt plastic and rubber.
Avoid touching your eyes while working with a battery. Acid
particles (corrosion) may get into your eyes! If acid enters
your eye, immediately flood eye with running cold water for
at least 10 minutes. Get medical attention immediately.
10. NEVER smoke or allow a spark or flame in the vicinity of
the battery or engine. Batteries generate explosive gases!
Remove all personal metal items such as rings, bracelets,
necklaces, and watches when working with a lead-acid battery. A lead-acid battery can produce a short-circuit current
high enough to weld a ring (or the like) to metal, causing a
severe burn.
11. WARNING: Handling the cord on this product or cords associated with accessories sold with this product, will expose you to lead, a chemical known to the State of California to cause cancer and birth defects or other reproductive
harm. Wash hands after handling.
PREPARING TO CHARGE
1.
Make sure you have a 12 volt lead-acid battery. Check
owner manual to make sure.
2.
Clean battery terminals. Take care to keep corrosion from
coming in contact with your eyes.
3.
If required, add distilled water in each cell until battery acid
reaches levels specified by battery manufacturer. This helps
purge excessive gas from cells. Do not overfill. For a battery without cell caps, carefully follow manufacturer's recharging instructions.
4.
Study all battery manufacturer's specific precautions, such
as removing or not removing cell caps while charging, and
recommended rates of charge.
5.
Be sure area around battery is well ventilated while battery
is being charged. Gas can be forcefully blown away by using a piece of cardboard or other non-metallic material as a
fan.
6.
A marine (boat) battery must be removed and charged on
shore. To charge it on board requires equipment specially
designed for marine use.
BATTERY SIZE/RATING
MARINE / OR
DEEP CYCLE
MCA
AMP HR
220-350
350-600
600-935
24-40
40-70
70-104
CCA: COLD CRANKING AMPS
MCA: MARINE CRANKING AMPS
2
3-5
5-9
9-13
RES. CAP.: RESERVE CAPACITY
AMP HR: AMPERE HOUR
BATTERY CHARGER CONTROLS
FIGURE 3 - CHARGER CONTROLS
MANUAL-AUTOMATIC SWITCH
Charging may be either Manual or Automatic.
NOTE: Some batteries, especially those with a built in state of
charge indicator and have been deeply discharged, may require
the use of the MANUAL position in order to obtain full charge.
The AUTOMATIC position may be used to maintain the full
charge state.
MANUAL
When the Manual position is selected the charger will continue
to charge and will not shut off. You must keep a visual check on
the ammeter or the green LED to determine when the battery is
charged. When the ammeter reads around 5 Amps and the green
LED is on the battery is charged.
METER/LED INDICATOR
The meter gives a reading of the AMP draw on the charger.
When a fully discharged battery is connected to the charger, the
meter will read the maximum output rating of the charger. The
charge current will gradually taper down as the battery approaches full charge. As the charge current tapers, the meter
needle will also move down.
WARNING: In the Manual position, the charger will continue to
charge even after the battery is fully charged.
WARNING: Overcharging will damage the battery.
AUTOMATIC CHARGING
When the battery reaches the full charge state, charge current
is turned off and the charger switches to the maintainer mode of
operation. This action occurs when the ammeter tapers down to
approximately 5 Amps. In this state the battery voltage is constantly being monitored. When the battery voltage drops to a
predetermined value charge will turn on for a few seconds replacing the small amount of energy that was lost while the charge
current was at 0 Amps.
When full charged, the meter needle will suddenly drop to 0 and
a green LED will turn on. The 0 is not printed on the meter
scale, the LED is located in its place. As a visual aid, the meter
scale has been divided into 2 zones, CHARGED and CHARGING.
NOTE: As the battery approaches the full charge state the meter
needle and LED will fluctuate back and forth between CHARGING and CHARGED. For the average size automotive battery,
allow 5 to 10 minutes for the battery to stabilize.
MANUAL VS AUTOMATIC CHARGING
For your safety, in the AUTOMATIC position this charger will
only turn on when properly connected to a 12 volt battery with a
voltage over .7 volts. In the MANUAL position the charger will
turn on for any condition. If a battery is so depleted of charge
that it's voltage is less than .7 volts, switch to MANUAL until the
ammeter begins to move up scale, than switch back to the desired AUTOMATIC position.
NOTE: A buzz or hum is normal when the output cables have
been disconnected and the AC power cord is still connected to
an electrical source (i.e. wall outlet).
These types of noises will also occur when the green light comes
on indicating the battery is "Completely Charged". At this point,
the charger has stopped charging the battery, but still hums or
buzzes until the electrical power is shut off.
READING METERS
D C AMPS
CHARGED
2
4
D C AMPS
CHARGING
6
8
10
12
CHARGE COMPLETE
FULLY DISCHARGED BATTERY
Initial charge current to the battery
is typically 10 Amps.
CHARGED
2
4
D C AMPS
CHARGING
6
8
10
12
CHARGED
2
4
CHARGING
6
8
10
12
CHARGE COMPLETE
CHARGE COMPLETE
APPROACHING FULL CHARGE
Charge current to the battery is typically 6 Amps.
FULLY CHARGED BATTERY
Charge current to the battery is 0
Amps and the green LED is on.
3
CIRCUIT BREAKER
NOTE: Clicking sound is normal. Wait until charger automatically resets itself.
This battery charger is equipped with a self-resetting circuit
breaker. This device protects the charger from temporary overloads. In the event of an overload, the circuit breaker will trip
open and after a short cooling off period will reset automatically.
This process is known as cycling and can be recognized by an
audible clicking sound.
CAUTION: Persistent clicking (more than 30 minutes) may indicate reverse connection or shorted battery cells. (See
TROUBLESHOOTING)
BATTERY TYPES
Three basic types of lead-acid batteries can be given a charge with this charger: (1) Conventional and Low Maintenance, (2) Maintenance Free, (3) Deep Cycle / Marine.
Conventional and Low Maintenance Batteries. These are the
antimony/lead batteries. Conventional/Low Maintenance batteries require periodic addition of water to the acid solution (electrolyte). Additional water may be added by removing the filler
caps located on the top of the battery.
ing of electrolyte level and provides access to the battery for
water additions, the battery is probably a Low Maintenance/
Conventional type.
Maintenance Free Batteries. These are calcium/lead batteries
and normally do not require water additions. Therefore, filler
caps have been removed from the battery surface. These batteries will have a smooth or sealed appearance.
IMPORTANT: When antimony is known to be one of the materials used in the battery's construction, that battery is a Low
Maintenance/Conventional type.
Deep Cycle Batteries. These heavy duty batteries are used in
boats, construction equipment, sump pumps, etc. They are normally marked DEEP CYCLE on the outside of the case.
CAUTION: Some Low Maintenance batteries have a relatively
smooth top without any apparent battery filler caps. If, however,
the battery manufacturer/distributor recommends periodic check-
OPERATING INSTRUCTIONS: CHARGING BATTERY OUT OF THE VEHICLE
battery when making final connection. Rock clip back and
forth to make a good connection.
When charging battery, take care to determine the battery type.
To reduce risk of a spark near battery, follow these steps.
FIGURE 7 shows the connection.
WARNING: A spark near battery may cause battery explosion.
WARNING: When removing battery from vehicle or boat, disconnect grounded pole first. When disconnecting, make sure
the engine/motor and all accessories are off, so as not to cause
an arc.
(NOTE: BOAT BATTERIES MUST BE REMOVED AND
CHARGED ON SHORE. (TO SAFELY CHARGE ON BOARD
REQUIRES SPECIAL EQUIPMENT ESPECIALLY DESIGNED
AND UL LISTED FOR MARINE USE. THIS CHARGER IS
NOT WATER RESISTANT AND SHOULD NOT BE EXPOSED
TO WET CONDITIONS.)
Attach a 24-inch long (or longer) 6-gauge (AWG) insulated battery cable to NEGATIVE (NEG, N, -) battery post.
3.
Connect POSITIVE (RED) charger clip to POSITIVE (POS,
P, +) post battery. Rock clip back and forth to make good
connection.
4.
6.
Turn switch from off to on.
7.
When battery is fully charged, unplug charger from AC power
source.
8.
When battery is fully charged and charger is unplugged,
(1) remove clip from end of Negative end of cable, and (2)
remove clip from Positive battery post, in that order.
9.
Clean and store battery charger.
NEGATIVE
BATTERY CHARGER
Check polarity of battery posts. Battery case will be marked
by each post: POSITIVE (POS, P, +) and NEGATIVE (NEG,
N, -). NOTE: The positive battery post usually has a larger
diameter than the negative post.
2.
Plug charger AC cord into 120 volt grounded outlet.
POSITIVE
WARNING: When reinstalling battery, attach the ground post
first.
1.
5.
BATTERY
+ POWER
CORD
24", 6 GAUGE
CABLE
TO GROUNDED
POWER OUTLET
Position yourself and free end of 24 inch cable as far away
from battery as possible. Then connect NEGATIVE (BLACK)
charger clip to free end of cable. WARNING: Do not face
FIGURE 7 CONNECT NEGATIVE BATTERY CLIP
TO 24 INCH CABLE END
4
TROUBLESHOOTING
The battery charger is designed to work automatically. However, If a problem does occur, check the following:
PROBLEM
POSSIBLE
SOLUTION
No meter reading.
Charger is not plugged in.
Plug in
Connections are reversed.
With charger unplugged, reverse clamps and
reconnect (rock back and forth to bite in).
Poor electrical connection.
Clean clamps and battery poles and
reconnect (rock back and forth to bite in).
AC outlet is dead.
Plug in a lamp or other appliance to check for
voltage.
Battery is defective (will not accept
charge).
Have battery checked.
Battery recently used in vehicle and is
fully charged.
Battery does not need changing.
(If battery is in vehicle, turning on headlights
will lower battery voltage in a few seconds and
charger should then turn on.)
Charger will not turn on when
properly connected to power.
Battery has less than .7 volts, set to Manual
and retry.
Charger will not turn OFF.
Battery has a problem and will not
take a full charge.
Have battery checked.
(If in MANUAL, switch to AUTOMATIC).
Meter needle pulses (fluctuates)
every few seconds AFTER THREE
HOURS without slowing down.
Two or more batteries connected in
parallel.
Requires more time to charge: continue
charging.
Battery of 200 ampere hours or larger.
Requires more time to charge: continue
charging.
Battery is connected to application that
draws a small current (such as a
vehicle's dome light).
Requires more time to charge: continue
charging.
Battery is partially charged.
Continue charging.
Battery is defective (battery plates are
crusted) and will not accept a full
Have checked and replace battery.
charge.
AC power supply is low.
Plug charger into another grounded AC outlet.
Severely discharged battery (but
otherwise good battery).
Allow charging to continue until battery has
recovered sufficiently to take a charge (Circuit
breaker will continue to cycle and needle will
swing side to side until battery has recovered).
In MANUAL with battery connections
reversed.
Unplug charger and change to correct
connections.
Battery is defective (will not accept
charge)
Have battery checked.
Charger is cycling after circuit breaking
overload.
Wait until charger automatically resets itself
(DO NOT RETURN FOR SERVICE).
Charging current is less than full
output rating of charger.
Meter needle moves to extreme
right, remains a short time, then
returns to zero, accompanied by a
clicking sound.
NOTE:
This product is manufactured for Minn Kota by Schumacher Electric Corporation. If you have any questions regarding the operation of
this charger please contact Schumacher Electric technical service at 1-800-621-5485, Ext. 322.
5
MAINTENANCE/CLEANING INSTRUCTIONS
Very little maintenance is required for the battery charger. Follow common sense in wiping the charger clean and store in a clean,
dry area.
1.
2.
3.
After use, wipe all battery corrosion and other dirt or oil
from clip, cord, and the charger case. Use a dry cloth.
Coil charger cords to prevent damage.
4.
Have any cracked or frayed cords replaced by a qualified
professional.
Store battery charger in a clean, dry area.
LIMITED WARRANTY
SCHUMACHER ELECTRIC CORPORATION, 801 BUSINESS CENTER
DRIVE, MOUNT PROSPECT, ILLINOIS 60056-2179 MAKES THIS LIMITED WARRANTY TO THE ORIGINAL PURCHASER AT RETAIL OF THIS
PRODUCT. THIS LIMITED WARRANTY IS NOT TRANSFERABLE.
THIS IS THE ONLY EXPRESS LIMITED WARRANTY AND THE MANUFACTURER NEITHER ASSUMES NOR AUTHORIZES ANYONE TO
ASSUME OR MAKE ANY OTHER OBLIGATION TOWARDS THE PRODUCT OTHER THAN THIS EXPRESS LIMITED WARRANTY. THE MANUFACTURER MAKES NO WARRANTY OF MERCHANTABILITY OR FITNESS FOR PURPOSE OF THIS PRODUCT AND EXPRESSLY EXCLUDES SUCH FROM THIS LIMITED WARRANTY.
Schumacher Electric Corporation warrants this battery charger for one year
from date of purchase at retail against defective material or workmanship. If
such should occur, the unit will be repaired or replaced at the option of the
manufacturer. It is the obligation of the purchaser to forward the unit together with proof of purchase, transportation and/or mailing charges prepaid to the manufacturer or its authorized representative.
SOME STATES DO NOT ALLOW THE EXCLUSION OR LIMITATION OF INCIDENTAL OR CONSEQUENTIAL DAMAGES OR LENGTH
OF IMPLIED WARRANTY SO THE ABOVE LIMITATIONS OR EXCLUSIONS MAY NOT APPLY TO YOU.
This limited warranty is void if the product is misused, subjected to careless
handling, or repaired by anyone other than the manufacturer or its authorized representative.
THIS WARRANTY GIVES YOU SPECIFIC LEGAL RIGHTS AND
YOU MAY ALSO HAVE OTHER RIGHTS WHICH VARY FROM STATE
TO STATE.
The manufacturer makes no warranty other than this limited warranty and
expressly excludes any implied warranty including any warranty for consequential damages.
6
NOTES
7
• IMPORTANT SAFETY INSTRUCTIONS •
• SAVE THESE INSTRUCTIONS •
Minn Kota Battery Charger
Manufactured by
Schumacher Electric Corporation
1-800-621-5485
8