1
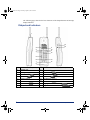
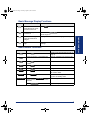
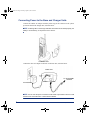
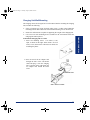
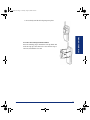
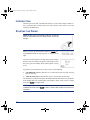
INT1400.book Page 1 Monday, August 4, 2008 2:46 PM
MITEL
INT1400
Cordless Telephone User Guide
INT1400.book Page 2 Monday, August 4, 2008 2:46 PM
INT1400.book Page 3 Monday, August 4, 2008 2:46 PM
Notice
This Mitel® INT1400 User Guide is released by Mitel as a guide for end-users. It provides information necessary to use the INT1400 endpoint. The contents of this user
guide, which reflect current Mitel standards, are subject to revision or change without
notice. Some features or applications mentioned may require a future release and are not
available in the initial release. Future product features and applications are subject to
availability and cost. Some features or applications may require additional hardware and/
or specific software.
For sales, service, or technical support,
contact your local authorized Mitel provider.
Comments about this user guide or other
technical documentation should be directed to
Mitel’s Technical Publications Department (USA) at:
[email protected]
All products and services mentioned in this publication are the trademarks, service marks,
registered marks, or registered service marks of their respective owners.
Mitel® 3000 is a registered trademarks of Mitel Networks Corporation.
.
© 2005-2008 Mitel Networks Incorporated
INT1400.book Page iii Monday, August 4, 2008 2:46 PM
Table of Contents
CONTENTS
PAGE
IMPORTANT SAFETY INSTRUCTIONS . . . . . . . . . . . . . . . . . . . . . . . . V
WARNINGS . . . . . . . . . . . . . . . . . . . . . . . . . . . . . . . . . . . . . . . . . . . . . VII
SAVE THESE INSTRUCTIONS . . . . . . . . . . . . . . . . . . . . . . . . . . . . . . IX
1
2
3
3
Dialpad and Indicators . . . . . . . . . . . . . . . . . . . . . . . . . . . . . . . . . . . .
Basic Message Display Functions . . . . . . . . . . . . . . . . . . . . . . . . . . .
Basic Button Functions. . . . . . . . . . . . . . . . . . . . . . . . . . . . . . . . . . . .
Display . . . . . . . . . . . . . . . . . . . . . . . . . . . . . . . . . . . . . . . . . . . . . . . .
4
5
5
6
INT1400 Installation . . . . . . . . . . . . . . . . . . . . . . . . . . . . . . . . . . . . 7
Setting Endpoint Preferences. . . . . . . . . . . . . . . . . . . . . . . . . . . 16
Changing Volume Levels . . . . . . . . . . . . . . . . . . . . . . . . . . . . . . . . .
Selecting a Ring Tone . . . . . . . . . . . . . . . . . . . . . . . . . . . . . . . . . . .
Turning the Handset Ringer On/Off . . . . . . . . . . . . . . . . . . . . . . . . .
Returning to Default Operation. . . . . . . . . . . . . . . . . . . . . . . . . . . . .
16
17
17
17
About the Telephone System . . . . . . . . . . . . . . . . . . . . . . . . . . . 17
About Voice Mail . . . . . . . . . . . . . . . . . . . . . . . . . . . . . . . . . . . . . 18
iii
INT1400 Cordless Telephone User Guide
USING YOUR PHONE
Selecting the Location . . . . . . . . . . . . . . . . . . . . . . . . . . . . . . . . . . . . 7
Connecting the Telephone Cord . . . . . . . . . . . . . . . . . . . . . . . . . . . . 7
Connecting Power to the Base and Charger Units. . . . . . . . . . . . . . . 8
Wall Mounting. . . . . . . . . . . . . . . . . . . . . . . . . . . . . . . . . . . . . . . . . . . 9
Attaching the Belt Clip to the Handset . . . . . . . . . . . . . . . . . . . . . . . 12
Installing the Handset Battery Pack . . . . . . . . . . . . . . . . . . . . . . . . . 14
Charging the Handset Battery Pack . . . . . . . . . . . . . . . . . . . . . . . . . 15
Checking the Low Battery Indicator . . . . . . . . . . . . . . . . . . . . . . . . . 15
Cleaning Charging Unit Contacts . . . . . . . . . . . . . . . . . . . . . . . . . . . 16
Base Units and Handsets. . . . . . . . . . . . . . . . . . . . . . . . . . . . . . . . . 16
Range Limits . . . . . . . . . . . . . . . . . . . . . . . . . . . . . . . . . . . . . . . . . . 16
FINDING YOUR WAY
FINDING YOUR WAY . . . . . . . . . . . . . . . . . . . . . . . . . . . . . . . . . . . . . . .
Welcome . . . . . . . . . . . . . . . . . . . . . . . . . . . . . . . . . . . . . . . . . . . . .
About This Guide . . . . . . . . . . . . . . . . . . . . . . . . . . . . . . . . . . . . . .
About Your Phone . . . . . . . . . . . . . . . . . . . . . . . . . . . . . . . . . . . . .
INT1400.book Page iv Monday, August 4, 2008 2:46 PM
CONTENTS
PAGE
USING YOUR PHONE . . . . . . . . . . . . . . . . . . . . . . . . . . . . . . . . . . . . .
Introduction . . . . . . . . . . . . . . . . . . . . . . . . . . . . . . . . . . . . . . . . .
Starting the Phone . . . . . . . . . . . . . . . . . . . . . . . . . . . . . . . . . . . .
How to use your INT1400 Cordless Phone . . . . . . . . . . . . . . . .
19
20
20
21
Receiving and Making Calls . . . . . . . . . . . . . . . . . . . . . . . . . . . . . . .
Placing Calls on Hold or Park. . . . . . . . . . . . . . . . . . . . . . . . . . . . . .
Transferring Calls . . . . . . . . . . . . . . . . . . . . . . . . . . . . . . . . . . . . . . .
Muting the Microphone. . . . . . . . . . . . . . . . . . . . . . . . . . . . . . . . . . .
Placing Conference Calls . . . . . . . . . . . . . . . . . . . . . . . . . . . . . . . . .
Forwarding Calls . . . . . . . . . . . . . . . . . . . . . . . . . . . . . . . . . . . . . . .
Forwarding Group Calls . . . . . . . . . . . . . . . . . . . . . . . . . . . . . . . . . .
Setting Up Voice Mail . . . . . . . . . . . . . . . . . . . . . . . . . . . . . . . . . . . .
Personal Speed-Dialing . . . . . . . . . . . . . . . . . . . . . . . . . . . . . . . . . .
System Speed-Dialing . . . . . . . . . . . . . . . . . . . . . . . . . . . . . . . . . . .
Redialling a Number. . . . . . . . . . . . . . . . . . . . . . . . . . . . . . . . . . . . .
Setting Up Follow Me . . . . . . . . . . . . . . . . . . . . . . . . . . . . . . . . . . . .
Using Call Waiting . . . . . . . . . . . . . . . . . . . . . . . . . . . . . . . . . . . . . .
Performing a “Hookflash” During a Call . . . . . . . . . . . . . . . . . . . . . .
Using Door Open . . . . . . . . . . . . . . . . . . . . . . . . . . . . . . . . . . . . . . .
Logging In/Out of Individual Hunt Groups . . . . . . . . . . . . . . . . . . . .
21
21
22
22
23
23
25
26
28
28
28
29
29
29
30
30
INT1400 Cordless Telephone User Guide
iv
INT1400.book Page v Monday, August 4, 2008 2:46 PM
Important Safety Instructions
NOTE: For use with CSA Certified (NRTL/C) Mitel® 3000 system only.
When using your telephone equipment, basic safety precautions should always be followed to reduce the risk of fire, electrical shock, and injury to persons, including the
following:
v
•
Read and understand all instructions.
•
Follow all warnings and instructions marked on the product.
•
Unplug this product from the wall outlet before cleaning. Do not use liquid or
aerosol cleaners. Use a dry cloth for cleaning.
•
Do not use this product near water (for example, near a sink or in a wet area).
•
Do not place this product on an unstable cart, stand, or table. The telephone may
fall, causing serious damage to the unit.
•
Do not block or cover any slots or openings in the base unit to protect the product
from overheating. This product should never be placed near or over a radiator or
heat register, or in a built-in installation unless proper ventilation is provided.
•
This product should be operated only from the type of power source indicated on
the marking label.
•
Do not allow anything to rest on the power cord. Do not locate this product where
the power cord might be trampled or damaged.
•
Do not overload wall outlets and extension cords, as this can result in the risk of
fire or electrical shock.
•
Never push objects of any kind into this product through the base unit slots, as
they may touch dangerous voltage points or short out parts that could result in a
risk of fire or electric shock. Never spill liquid of any kind on the product.
•
Do not disassemble this product to reduce the risk of electric shock. Contact qualified service personnel when some service or repair work is required. Opening or
removing covers may expose you to dangerous voltages or other risks. Incorrect
reassembly can cause electric shock when the appliance is subsequently used.
INT1400 Cordless Telephone User Guide
INT1400.book Page vi Monday, August 4, 2008 2:46 PM
•
•
Unplug this product from the wall outlet and refer servicing to qualified service
personnel under the following conditions:
—
When the power supply cord is damaged or frayed.
—
If liquid has been spilled into the product.
—
If the product has been exposed to rain or water.
—
If the product does not operate normally when following the operating
instructions. Adjust only those controls that are covered by the operating instructions. Improper adjustment of other controls may result in
damage and will often require extensive work by a qualified technician
to restore the product to normal operation.
—
If the product has been dropped or the cabinet has been damaged.
—
If the product exhibits a distinct change in performance.
Do not use the telephone to report a gas leak in the vicinity of the leak.
INT1400 Cordless Telephone User Guide
vi
INT1400.book Page vii Monday, August 4, 2008 2:46 PM
Warnings
CAUTION
Changes or modifications to this product not expressly approved by Mitel, or
operation of this product in any way other than as detailed by this user guide,
could void your authority to operate this product.
Unplug all electrical appliances when you know an electrical storm is approaching.
Lightning can pass through your household wiring and damage any device connected
to it. This phone is no exception.
NOTE: Do not attempt to unplug any appliance during an electrical storm.
NOTICE
The INT1400 is not waterproof. To reduce the risk of fire, electrical shock, or
damage to the unit, DO NOT expose this unit to rain or moisture.
Range
The INT1400 cordless phone is designed to achieve the maximum possible range by
transmitting and receiving according to the highest specifications set forth by the FCC
and IC. The INT1400 is rated to operate at a maximum distance with the qualification
that the range depends upon the environment in which the telephone is used. Many
factors limit the range, and it would be impossible to include all the variables in the
rating. The maximum range rating of this phone is meant to be used as a means of
comparison against other range claims.
vii
INT1400 Cordless Telephone User Guide
INT1400.book Page viii Monday, August 4, 2008 2:46 PM
Radio Interference
Radio interference may occasionally cause buzzing and humming in your cordless
handset or clicking noises in the base unit. This interference is caused by external
sources, such as a TV, refrigerator, vacuum cleaner, fluorescent lighting, computer
equipment, or electrical storm. Your unit is NOT DEFECTIVE. If these noises continue and are too distracting, please check your office to see what appliances may be
causing the problem. In addition, we recommend that the base unit not be plugged
into a circuit that also powers a major appliance because of the potential for interference.
In the unlikely event that you consistently hear other voices or distracting transmissions on your phone, you may be receiving radio signals from another cordless telephone or some other source of interference. If you cannot eliminate this type of
interference, change to a different channel.
INT1400 Cordless Telephone User Guide
viii
INT1400.book Page ix Monday, August 4, 2008 2:46 PM
Save These Instructions
Finally, it should be noted that some cordless telephones operate at frequencies that
may cause interference to nearby TVs and VCRs. To minimize or prevent such interference, the base of the cordless telephone should not be placed near or on top of a
TV or VCR. If interference is experienced, moving the cordless telephone farther
away from the TV or VCR will often reduce or eliminate the interference.
More Than One Cordless Telephone
If you want to use more than one cordless telephone in your office, they must operate
on different channels. Press the channel button ( CH ) to select a channel that provides the clearest communication.
Privacy
Cordless phones are radio devices. Communications between the handset and base
unit of your cordless telephone are accomplished by means of radio waves which are
broadcast over the open airways. Because of the inherent physical properties of radio
waves, your communications can be received by radio-receiving devices other than
your own cordless telephone unit. Consequently, any communications using your
cordless telephone may not be private.
Base Units and Handsets
The handsets are programmed to work with a specific base unit. You cannot switch to
a new handset or a new base unit without having it reprogrammed by Mitel.
Battery Packs
The battery packs contain rechargeable, sealed, Nickel-Metal Hydride batteries. To
reduce the risk of fire or injury to persons by the battery:
•
•
•
•
•
•
•
ix
Use only the appropriate type and size battery pack specified in this user guide.
Do not dispose of the battery pack in a fire. The cell may explode. Check with
local codes for possible special disposal instructions.
Do not open or mutilate the battery pack. The released electrolyte is corrosive
and may cause damage to the eyes or skin. It may be toxic if swallowed.
Exercise care in handling the battery pack to avoid shorting the battery with conducting materials such as rings, bracelets, and keys. The battery or conductor
may overheat and cause burns.
Do not charge the battery pack used in this telephone in any charger other than
the one provided. Using another charger may damage the battery or cause the battery to explode.
Observe proper polarity orientation between the battery pack and charger unit.
Do not short circuit the battery pack.
INT1400 Cordless Telephone User Guide
INT1400.book Page x Monday, August 4, 2008 2:46 PM
INT1400.book Page 1 Monday, August 4, 2008 2:46 PM
Finding Your Way
SECTION CONTENTS
PAGE
INT1400 Cordless Telephone User Guide
FINDING YOUR WAY
Welcome . . . . . . . . . . . . . . . . . . . . . . . . . . . . . . . . . . . . . . . . . . . . . . . . . . . 2
About This Guide . . . . . . . . . . . . . . . . . . . . . . . . . . . . . . . . . . . . . . . . . . . . 3
About Your Phone . . . . . . . . . . . . . . . . . . . . . . . . . . . . . . . . . . . . . . . . . . . 3
Dialpad and Indicators . . . . . . . . . . . . . . . . . . . . . . . . . . . . . . . . . . . . 4
Basic Message Display Functions . . . . . . . . . . . . . . . . . . . . . . . . . . . 5
Basic Button Functions. . . . . . . . . . . . . . . . . . . . . . . . . . . . . . . . . . . . 5
Display . . . . . . . . . . . . . . . . . . . . . . . . . . . . . . . . . . . . . . . . . . . . . . . . 6
INT1400 Installation . . . . . . . . . . . . . . . . . . . . . . . . . . . . . . . . . . . . . . . . . . 7
Selecting the Location . . . . . . . . . . . . . . . . . . . . . . . . . . . . . . . . . . . . 7
Connecting the Telephone Cord . . . . . . . . . . . . . . . . . . . . . . . . . . . . 7
Connecting Power to the Base and Charger Units. . . . . . . . . . . . . . . 8
Wall Mounting. . . . . . . . . . . . . . . . . . . . . . . . . . . . . . . . . . . . . . . . . . . 9
Attaching the Belt Clip to the Handset . . . . . . . . . . . . . . . . . . . . . . . 12
Installing the Handset Battery Pack . . . . . . . . . . . . . . . . . . . . . . . . . 14
Charging the Handset Battery Pack . . . . . . . . . . . . . . . . . . . . . . . . . 15
Checking the Low Battery Indicator . . . . . . . . . . . . . . . . . . . . . . . . . 15
Cleaning Charging Unit Contacts . . . . . . . . . . . . . . . . . . . . . . . . . . . 16
Base Units and Handsets. . . . . . . . . . . . . . . . . . . . . . . . . . . . . . . . . 16
Range Limits . . . . . . . . . . . . . . . . . . . . . . . . . . . . . . . . . . . . . . . . . . 16
Setting Endpoint Preferences . . . . . . . . . . . . . . . . . . . . . . . . . . . . . . . . . 16
Changing Volume Levels . . . . . . . . . . . . . . . . . . . . . . . . . . . . . . . . . 16
Selecting a Ring Tone . . . . . . . . . . . . . . . . . . . . . . . . . . . . . . . . . . . 17
Turning the Handset Ringer On/Off . . . . . . . . . . . . . . . . . . . . . . . . . 17
Returning to Default Operation. . . . . . . . . . . . . . . . . . . . . . . . . . . . . 17
About the Telephone System . . . . . . . . . . . . . . . . . . . . . . . . . . . . . . . . . 17
About Voice Mail . . . . . . . . . . . . . . . . . . . . . . . . . . . . . . . . . . . . . . . . . . . 18
1
INT1400.book Page 2 Monday, August 4, 2008 2:46 PM
WELCOME
Congratulations on your purchase of the Mitel® INT1400 cordless telephone. The
INT1400 is designed to work on an Mitel 3000 system to provide you with access to
multiple lines, Caller ID, and other phone system features.
To help familiarize you with the features of the INT1400, read this user guide thoroughly.
Your INT1400 includes the following items:
•
Base Unit
•
Handset
•
Telephone Cord
•
Two AC Adapters
•
Rechargeable Battery (750 mAh Ni-MH)
•
Belt Clip
•
Charger Unit
•
Charger Unit Wall Mount
•
Wall Plate Adapter
•
This User Guide
NOTE: If any of these items are missing or damaged, contact your System Administrator. If your INT1400 is not performing to your expectations, try the steps listed in the
Troubleshooting section of this user guide. If you are still unable to resolve the problem,
contact your System Administrator.
2
INT1400 Cordless Telephone User Guide
INT1400.book Page 3 Monday, August 4, 2008 2:46 PM
ABOUT THIS GUIDE
This guide contains instructions for using the INT1400 cordless telephone on the
Mitel telephone system. To help you find information more quickly, this guide is
divided into two separate sections, as indicated by the tabs.
These sections include the following:
Finding Your Way: This section provides installation instructions and illustrations for your phone. It includes figures and general information designed to help
you find what you need.
•
Using Your Phone: If you need to make a call, this is the section for you. It not
only includes basic phone and voice mail information, but it provides instructions
on how to perform everyday tasks, such as answering calls, making calls, accessing voice mail, etc.
ABOUT YOUR PHONE
The INT1400 cordless phone has the following features:
•
•
•
•
•
•
•
•
•
Interference avoidance with other 900MHz systems
900 MHz narrow band FM
Autoscan channel selection (up to 30 channels)
16-digit, 2-line liquid crystal display (LCD)
Approximately 6-hour talk time
Approximately 5-day standby time
3 ring tones and vibrate ringer
Headset jack with belt clip for handsfree operation
Wall mountable base unit
INT1400 Cordless Telephone User Guide
3
FINDING YOUR WAY
•
INT1400.book Page 4 Monday, August 4, 2008 2:46 PM
The following pages describe the basic functions of the dialpad buttons and message
display indicators.
Dialpad and Indicators
1
15
2
16
9
10
11
12
3
4
5
13
14
6
7
8
DEFAULT BUTTON (LABEL)
Headset Jack
9
Hold Button (
2
Message Display
10
Redial Button ( REDIAL )
3
Transfer Button (
4
Talk Button ( TALK )
Numeric Dialpad
6
Line Button 2 (
8
Line Button 1 (
Microphone
HOLD
)
11
Channel Button (
12
Mail Button (
13
Line Button 3 (
)
)
14
Line Button 4 (
)
)
15
Ring Type and Volume Button (
16
Ringer On/Off and Mute Button ( ON/OFF MUTE )
XFER
5
7
4
DEFAULT BUTTON (LABEL)
1
)
MAIL
)
CH
)
RING/VOL
)
INT1400 Cordless Telephone User Guide
INT1400.book Page 5 Monday, August 4, 2008 2:46 PM
Basic Message Display Functions
ICON
FUNCTION
ACTION
The connection has been
made between the handset and the base unit.
Press
The handset ringer switch
is turned off.
Press and hold ON/OFF MUTE on the side of handset to
turn the ringer on.
The handset battery pack
is low and needs to be
charged.
See page 15 for information on charging the battery.
TALK
to answer or make a call.
Basic Button Functions
BUTTON
TALK
IF YOU..
Press
YOU CAN..
Answer a call, place an intercom call, or
hang up.
TALK
Press an unlit key or the flashing key
Select an outside line or answer a call.
XFER
Press XFER and dial the destination
number
Transfer a call.
HOLD
Press
HOLD
Put a call on hold.
CH
Press
CH
Change a channel.
REDIAL
Press
REDIAL
Redial a telephone number or save the
last number dialed.
RING/VOL
Press
RING/VOL
Adjust volume during a call or select a
ring tone on standby mode.
LINE
ON/OFF MUTE
Press and hold
seconds
Press
ON/OFF MUTE
ON/OFF MUTE
INT1400 Cordless Telephone User Guide
for two
Turn the ringer on/off.
Mute the microphone.
5
FINDING YOUR WAY
You have received a mes- See page 26 for instructions on how to listen to the
sage.
message.
INT1400.book Page 6 Monday, August 4, 2008 2:46 PM
NOTE: Because the telephone system allows customized feature keys, your phone
may have been reprogrammed so that the feature buttons do not match those
described in this guide.
Display
Your INT1400 has two lines of display with 16 characters per line. When your phone
is idle, this display shows your extension number, your username, the time of day, and
the date. At other times, it may display reminder messages, Do-Not-Disturb. (DND)
messages, numbers dialed, call sources, elapsed time of calls, current call costs, error
messages, etc.
Because the display can only support 16 characters, you may see a few abbreviations.
The most commonly used abbreviations are provided in the table below.
ACCT CODE
6
Account Code
CNF
Conference
DEST
Destination
DIR
Directory
DND
Do-Not-Disturb
EXT
Extension
MSG
Message
RCL
Recall
SPKR
Speaker
SPKRPHN
Speakerphone
STN SPD
Station Speed Dial
SYS SPD
System Speed Dial
TFR
Transfer
TG
Trunk Group (a group of outside lines)
TRNK
Trunk (an outside line)
INT1400 Cordless Telephone User Guide
INT1400.book Page 7 Monday, August 4, 2008 2:46 PM
INT1400 INSTALLATION
This section describes how to install the INT1400. Follow the instructions below.
Selecting the Location
Connecting the Telephone Cord
Plug the telephone line cord from the base unit into a telephone system port.
TO TELEPHONE SYSTEM
BASE UNIT
INT1400 Cordless Telephone User Guide
7
FINDING YOUR WAY
Select a location for the INT1400 that is away from excessive heat or humidity. The
base unit of your INT1400 can be placed on a desk or tabletop near a standard 120V
AC outlet and telephone line jack. The base unit can also be mounted on a standard
wall plate using the included wall plate adapter. Keep the base unit and handset away
from sources of electrical noise (motors, fluorescent lighting, computers).
INT1400.book Page 8 Monday, August 4, 2008 2:46 PM
Connecting Power to the Base and Charger Units
Connect the smaller AC adapter with the yellow ring on the connector to the yellow
jack on the back of the charger unit, as shown below.
NOTE: A blinking LED on the charger indicates the handset is not seated properly, the
battery is not hooked up, or the phone is not in service.
CHARGER UNIT
Connect the other AC adapter to the back of the base unit, as shown below.
BASE UNIT
TO TELEPHONE
SYSTEM
AC ADAPTER
NOTE: Do not route the power cord where it will create a trip hazard or where it could
become worn and create a fire or other electrical hazard.
8
INT1400 Cordless Telephone User Guide
INT1400.book Page 9 Monday, August 4, 2008 2:46 PM
Wall Mounting
You can mount your INT1400 either on a standard wall plate or directly on a wall.
Follow the instructions below.
Standard Wall Plate Mounting
Your INT1400 is designed to be mounted on a standard wall plate.
FINDING YOUR WAY
To attach the wall mount stand to the base unit:
1. Slide the wall mount stand into the notches at
the top of the base unit, rotate the wall mount
stand down and snap it into place, as shown on
the right.
2. If you haven’t done so, plug the AC adapter
into the base unit as previously described.
WALL MOUNT STAND
3. Place the AC adapter cord inside the molded
channel of the wall mount stand, as shown on
the right.
4. Plug one end of the telephone cord into the
LINE jack on the base unit. Then place the telephone cord inside the molded channel(s) on the
bottom of the wall mount stand.
5. Plug the other end of the telephone cord into
the modular wall jack.
6. Place the base unit on the posts of the wall
plate and push down until it's firmly seated, as
shown on the right.
7. Plug the AC adapter into a standard 120V AC
wall outlet.
NOTE: Do not use an outlet controlled by a wall
switch. Turning the wall switch off will also turn
the base unit off.
INT1400 Cordless Telephone User Guide
9
INT1400.book Page 10 Monday, August 4, 2008 2:46 PM
Direct Wall Mounting
If you do not have a standard wall plate, you can mount your phone directly on a wall.
Before mounting your phone, consider the following:
•
Select a location away from electrical cables, pipes, or other items behind the
mounting location that could cause a hazard when inserting screws into the wall.
•
Ensure the wall material is capable of supporting the weight of the base unit.
•
Use #10 screws with anchoring devices suitable for the wall material where the
base unit will be placed.
To mount the base unit on a wall:
1. Insert two mounting screws 3 15/16 inches (10 cm) apart. Allow
about 3/16 of an inch (0.5 cm) between the wall and screw heads
for mounting the phone, as shown on the right.
2. Follow steps 2 and 3 on the previous page to plug and secure the
AC adapter cord.
3. Plug one end of the telephone line cord into the LINE
jack on the base unit. Then place the telephone cord
inside the molded channel(s) on the bottom of the wall
mount stand.
4. Place the base unit on the posts of the wall
screws and push down until it’s firmly
seated, as shown on the right.
5. Plug the other end of the short telephone
cord into a telephone wall jack.
6. Follow step 7 on the previous page to plug
the AC adapter into a standard 120V AC
wall outlet.
10
INT1400 Cordless Telephone User Guide
INT1400.book Page 11 Monday, August 4, 2008 2:46 PM
Charging Unit Wall Mounting
The charging unit is also designed to be wall mounted. Before mounting the charging
unit, consider the following:
Select a location away from electrical cables, pipes, or other items behind the
mounting location that could cause a hazard when inserting screws into the wall.
•
Ensure the wall material is capable of supporting the weight of the charging unit.
•
Use #10 screws with anchoring devices suitable for the wall material where the
charging unit will be placed.
To mount the charging unit on a wall:
1. Insert two mounting screws 1 1/5 inches (3 cm)
apart, as shown on the right. Allow about 3/16 of an
inch (0.5 cm) between the wall and screw heads for
mounting the phone.
2. Pass one end of the AC adapter cord
through the hole of the wall mount
stand and plug it into the charging
unit, as shown on the right. Wrap the
AC adapter cord around the strain
relief.
CHARGING UNIT
WALL MOUNT STAND
INT1400 Cordless Telephone User Guide
11
FINDING YOUR WAY
•
INT1400.book Page 12 Monday, August 4, 2008 2:46 PM
3. Slide the wall mount stand into the
notches on the bottom of the charging
unit, as shown on the right.
NOTCHES
4. Place the charging unit on the
posts of the wall screws and
push down until it is firmly
seated, as shown on the right.
5. Plug the AC adapter into a
standard 120V AC wall outlet.
Attaching the Belt Clip to the Handset
You can use the belt clip to attach the handset to your belt or pocket for convenient
portability.
To attach the belt clip to the handset:
1. Snap the cover tab out of the belt clip notch on the top of the handset.
2. Slide the clip into the tab slot, as shown on the
right. The belt clip is designed to fit snugly into the COVER TAB
handset.
BELT CLIP
12
INT1400 Cordless Telephone User Guide
INT1400.book Page 13 Monday, August 4, 2008 2:46 PM
3. Press firmly until the belt clip snaps into place.
FINDING YOUR WAY
To remove the belt clip from the handset:
Press the retaining clip in toward the belt clip blade and
slide the clip up at the same time. Once the belt clip is
removed, reinstall the cover tab.
INT1400 Cordless Telephone User Guide
13
INT1400.book Page 14 Monday, August 4, 2008 2:46 PM
Installing the Handset Battery Pack
To install the battery pack:
1. Remove the battery cover by pressing the latch and sliding the cover
down and off of the handset.
BATTERY COVER
2. Connect the battery pack connec-
tor, observing correct polarity to
the jack inside the battery compartment, as shown on the right.
NOTE: Do not exert any force on
this connection. It could cause damage to the battery or handset. Once
you are certain that you have made
a good connection, then insert the
battery pack into the battery compartment. Do not pinch the wires.
3. Replace the cover and slide it up
until it latches into the handset.
14
INT1400 Cordless Telephone User Guide
INT1400.book Page 15 Monday, August 4, 2008 2:46 PM
Charging the Handset Battery Pack
To charge the battery pack:
1. Place the handset into the charger unit.
2. Verify the CHARGE indicator lights. If the CHARGE
indicator does not light, check to see that the AC
adapter is plugged in and that the handset is making
good contact with the charger unit contacts.
charge the rechargeable Ni-MH battery pack for five hours
without interruption.
CHARGE INDICATOR
Checking the Low Battery Indicator
When the battery pack in the handset is low and needs to
be charged, the LOW message appears on the display.
The following table shows what to do when the LOW
message is displayed.
WHAT HAPPENS
ACTION
On a call, handset beeps once every
three seconds. All buttons and
functions are available.
Complete your call as quickly as possible, or
replace battery pack within 20 seconds to
continue call.
In standby mode, handset beeps
every 15 seconds for 3 minutes. None
of the buttons operate, and you
cannot either make or receive a call.
Replace battery pack before making a call.
INT1400 Cordless Telephone User Guide
15
FINDING YOUR WAY
NOTE: If you are using the INT1400 for the first time, fully
INT1400.book Page 16 Monday, August 4, 2008 2:46 PM
Cleaning Charging Unit Contacts
To maintain a good charge, it is important to clean all CHARGING CONTACTS
charging contacts on the handset and charging unit about
once a month. Use a pencil eraser or other contact cleaner
to clean the battery charging contacts. Do not use any liquids or solvents.
Base Units and Handsets
The handsets are programmed to work with a specific base unit. You cannot use a new
handset or base unit without having it reprogrammed by Mitel.
Range Limits
The INT1400 is designed for commercial use. The range has been approved for 150 to
300 feet (45 to 90 meters) per base unit. The actual range may be more or less
depending on the environment. Building wiring, walls, elevators, and other electronic
interference frequencies may limit the range of this telephone. Please see your telecommunications consultant for information about testing your facility.
To maximize the range capability:
• Locate the base unit at the highest point possible in the center of your coverage
zone. If you are planning to cover an outdoor area, such as a car lot, building
grounds, or campus, place the base unit near a window at the highest point within
the building.
•
Place the base unit away from any other electronic device. This includes, but is
not limited to, computer screens, radios, electronic signs, coffee pots, microwaves, and other electronic devices.
SETTING ENDPOINT PREFERENCES
Your endpoint is automatically set to specific defaults. You can, however, configure
many of these settings at any time.
Changing Volume Levels
You can select a low, medium, high, or maximum volume level.
To change a volume level:
During a call, press
volume level.
16
RING/VOL
on the side of the handset until you hear the desired
INT1400 Cordless Telephone User Guide
INT1400.book Page 17 Monday, August 4, 2008 2:46 PM
Selecting a Ring Tone
The ability to change your ring tone is helpful in close-quartered environments. If
your ring tone is unique, you can quickly identify when a call is ringing on your endpoint.
To select the type of ring tone for your endpoint:
On standby mode, press RING/VOL on the side of the handset until you hear the
desired ring type. There are three ring tones and vibrate ringer available.
the endpoint rings when a call comes in and the call is answered when you lift the handset off of the base.
Turning the Handset Ringer On/Off
You can temporarily turn the handset ringer off.
To turn the ringer off:
In standby mode, press and hold RING/VOL on the side of handset for two seconds.
The Ring Off (
) icon appears in the display.
Returning to Default Operation
You can return your endpoint to default levels at any time. This feature returns volumes to default levels; cancels Do-Not-Disturb, and manual call forwarding.
To return your endpoint to default:
Dial
3
9
4
.
ABOUT THE TELEPHONE SYSTEM
As you can see, your INT1400 and Mitel telephone system come equipped with a lot
of “bells and whistles.” To help you understand what everything means, it is recommended that you read the following information before you use your phone:
•
Your telephone system may be programmed for one or two dial tones. Systems
with two dial tones have one for intercom calls and one for outside calls.
•
Many features “time out” if you wait too long before performing the next step. If
this happens, you must hang up and start again.
INT1400 Cordless Telephone User Guide
17
FINDING YOUR WAY
NOTE: When your endpoint is set to vibrate and the handset is charging in the base,
INT1400.book Page 18 Monday, August 4, 2008 2:46 PM
ABOUT VOICE MAIL
Voice mail services are available only on those systems equipped with the optional
voice mail module. With the voice mail application, you and other callers can send
and receive recorded messages from any station or touchtone telephone. To use this
and other features, each user (you included) is assigned a “voice mailbox,” which usually corresponds to a valid extension number. You can, however, have an “unassociated” mailbox that does not correspond to an extension. Unassociated mailboxes are
typically used for agents or other personnel who don’t have a permanent office.
With your voice mailbox, you can use personal or system greetings to let callers know
if you are out of town, on a call, etc. (see page 26). If a caller reaches your voice mailbox, they can leave a message, hang up, or access an attendant.
In addition, the Voice Mail Administrator can program the name for “group lists” of
mailboxes. With these lists, you can send a message to a group of people by entering
one number instead of everyone’s individual mailbox number.
18
INT1400 Cordless Telephone User Guide
INT1400.book Page 19 Monday, August 4, 2008 2:46 PM
Using Your Phone
SECTION CONTENTS
PAGE
Introduction . . . . . . . . . . . . . . . . . . . . . . . . . . . . . . . . . . . . . . . . . 20
Starting the Phone . . . . . . . . . . . . . . . . . . . . . . . . . . . . . . . . . . . . 20
How to use your INT1400 Cordless Phone . . . . . . . . . . . . . . . . 21
Receiving and Making Calls . . . . . . . . . . . . . . . . . . . . . . . . . . . . . . .
Placing Calls on Hold or Park. . . . . . . . . . . . . . . . . . . . . . . . . . . . . .
Transferring Calls . . . . . . . . . . . . . . . . . . . . . . . . . . . . . . . . . . . . . . .
Muting the Microphone. . . . . . . . . . . . . . . . . . . . . . . . . . . . . . . . . . .
Placing Conference Calls . . . . . . . . . . . . . . . . . . . . . . . . . . . . . . . . .
Forwarding Calls . . . . . . . . . . . . . . . . . . . . . . . . . . . . . . . . . . . . . . .
Forwarding Group Calls . . . . . . . . . . . . . . . . . . . . . . . . . . . . . . . . . .
Setting Up Voice Mail . . . . . . . . . . . . . . . . . . . . . . . . . . . . . . . . . . . .
Personal Speed-Dialing . . . . . . . . . . . . . . . . . . . . . . . . . . . . . . . . . .
System Speed-Dialing . . . . . . . . . . . . . . . . . . . . . . . . . . . . . . . . . . .
Redialling a Number. . . . . . . . . . . . . . . . . . . . . . . . . . . . . . . . . . . . .
Setting Up Follow Me . . . . . . . . . . . . . . . . . . . . . . . . . . . . . . . . . . . .
Using Call Waiting . . . . . . . . . . . . . . . . . . . . . . . . . . . . . . . . . . . . . .
Performing a “Hookflash” During a Call . . . . . . . . . . . . . . . . . . . . . .
Using Door Open . . . . . . . . . . . . . . . . . . . . . . . . . . . . . . . . . . . . . . .
Logging In/Out of Individual Hunt Groups . . . . . . . . . . . . . . . . . . . .
21
21
22
22
23
23
25
26
28
28
28
29
29
29
30
30
USING YOUR PHONE
INT1400 Cordless Telephone User Guide
19
INT1400.book Page 20 Monday, August 4, 2008 2:46 PM
INTRODUCTION
Now that you know what your INT1400 can do, it’s time to start using it. In this section, you’ll learn how to make and receive calls, transfer calls, retrieve voice mail
messages, and much more.
STARTING THE PHONE
NOTE: Before using your INT1400, make sure to raise the
antenna of the base unit to the vertical position, as show on
the right.
When you pick up the handset and press TALK , the
ACQUIRING LINK message appears, as shown on the
right.
After the connection has been made between the handset
and base unit, the TALK icon appears on the display. Then
the screen goes into standby mode, and the phone is ready
to use.
If you don’t see the TALK icon, you may see one of the following:
•
NO SERVICE: Indicates that there is no connection to the base unit, and you
hear an error tone.
•
LINE IN USE: Indicates that the line is in use, and you hear an error tone.
You must have a connection between the handset and the base unit to use the phone.
If the handset does not respond when you attempt to place a call or enter a feature
code, press TALK to acquire a link.
NOTE: If you have more than one cordless telephone in your office, they must operate
on different channels. Press
munication.
20
CH
to select a channel that provides the clearest com-
INT1400 Cordless Telephone User Guide
INT1400.book Page 21 Monday, August 4, 2008 2:46 PM
HOW TO USE YOUR INT1400 CORDLESS PHONE
Receiving and Making Calls
To receive an internal call that is ringing:
Display shows EXTENSION XX MM:SS; Press TALK or the Line button.
NOTE: If the phone system has been programmed to show names for extensions, the
display will show the name instead of EXTENSION XX.
To receive an external call that is ringing:
Display shows LINE X MM:SS; Press TALK or the Line button
NOTE: If Caller ID is available, the display will show the phone number instead of
LINE X.
ALSO: You cannot see caller ID history with the INT1400.
To make an internal call by pressing “TALK” initially:
1. Press TALK. (Display shows DIAL, OR SELECT OPTION.)
2. Dial the extension number. (Display shows the extension number).
To make an external call by pressing “TALK” initially:
1. Press TALK. (Display shows DIAL, OR SELECT OPTION.)
2. Dial 9 or press the Line button to reach an outside line. (Displays shows LINE
X.)
To make an external call by dialing digits initially:
1. Dial the number. (Display shows the phone number.)
2. Press TALK to dial the digits.
Placing Calls on Hold or Park
To place and retrieve an external call on hold:
1. From an existing external call, press HOLD. (Display returns to an idle state and
the Line button flashes.)
2. Press TALK or the Line button to retrieve the call
NOTE: After the call is on hold for 90 seconds, the phone rings, the Line button flutters,
and the display shows RECALL FROM HOLD. Press TALK to return the call.
To park a call and retrieve a parked call:
1. From an existing external call, press XFER. (Display shows DIAL, OR SELECT
EXTN.)
INT1400 Cordless Telephone User Guide
21
USING YOUR PHONE
3. Dial the number.
INT1400.book Page 22 Monday, August 4, 2008 2:46 PM
2. Dial feature code 712. (Display shows ENTER PARK ZONE.)
3. Dial a park zone 1-5. Three beep tones are heard and now the call can be
retrieved from any extension on the system by dialing feature code 712.
NOTE: When a call is parked in any zone, there is no indication in the display.
4. To retrieve the parked call, press TALK.
5. Dial feature code 712. (Display shows the phone number or extension number
and duration of the call in minutes and seconds.)
Transferring Calls
Note: The following instructions assume you are on a call.
To transfer an existing internal call to an internal number:
1. Press XFER. (Display shows DIAL, OR SELECT EXTN.)
2. Dial the internal extension. A ring tone is heard when the call is answered and
the call counter starts. (Display shows extension number and the duration of the
call in minutes and seconds.)
3. Press TALK to transfer the call or press XFER to return the call.
To transfer a call to an external number:
1. Press XFER. (Display shows DIAL, OR SELECT EXTN.)
2. Dial the external number. When the call is answered, the call counter starts.
(Display shows phone number and the duration of the call in minutes and seconds.)
3. Press TALK to transfer the call or press XFER to return the call.
Muting the Microphone
To mute the microphone so that you can hear the other party, but they cannot
hear you (this does not put them on hold):
Press MUTE (the TALK icon in the display flashes).
To return to the call:
Press MUTE.
22
INT1400 Cordless Telephone User Guide
INT1400.book Page 23 Monday, August 4, 2008 2:46 PM
Placing Conference Calls
To place an internal call in a conference:
1. Press XFER. (Display shows DIAL, OR SELECT EXTN.)
2. Dial the internal extension. A ring tone is heard when the call is answered and
the call counter starts. (Display shows extension number and the duration of the
call in minutes and seconds.)
3. Press TALK and “3” within two seconds to establish a conference. Now you are
connected with both parties.
To place a call with an external number in a conference:
1. Press XFER. (Display shows DIAL, OR SELECT EXTN.)
2. Dial the external number. When the call is answered, the call counter starts.
(Display shows phone number and the duration of the call in minutes and seconds.)
3. Press TALK and “3” within two seconds to establish a conference. Now you are
connected with both parties.
Forwarding Calls
To forward all calls:
1. Press TALK. (Display shows DIAL, OR SELECT OPTION.)
2. Dial feature code 732. (Display shows ENTER DESTINATION NUMBER.)
3. If forwarding to an internal extension number, enter the destination extension
To cancel forward all calls:
1. Press TALK. (Display shows DIAL, OR SELECT OPTION.)
2. Dial feature code 732. (Display shows FORWARDING CANCEL.) You will
hear three beeps before the phone returns to an idle state.
INT1400 Cordless Telephone User Guide
23
USING YOUR PHONE
number.
If forwarding to an external number, select “9,” then enter the destination external number.
If forwarding to voice mail, dial feature code 710.
Display shows FORWARDING SET. You will hear three beeps before the phone
returns to an idle state.
INT1400.book Page 24 Monday, August 4, 2008 2:46 PM
To forward calls when your extension is busy:
1. Press TALK. (Display shows DIAL, OR SELECT OPTION.)
2. Dial feature code 733. (Display shows ENTER DESTINATION NUMBER.)
3. If forwarding to an internal extension number, enter the destination internal
extension number.
If forwarding to an external number, press “9,” then enter the destination external
number.
If forwarding to voice mail, dial feature code 710.
Display shows FORWARDING SET. You will hear three beeps before the phone
returns to an idle state.
To cancel forward a call on busy:
1. Press TALK. (Display shows DIAL, OR SELECT OPTION.)
2. Dial feature code 733. (Display shows FORWARDING CANCEL.) You will
hear three beeps before the phone returns to an idle state.
To forward calls when your extension does not answer (after four rings):
1. Press TALK. (Display shows DIAL, OR SELECT OPTION.)
2. Dial feature code 734. (Display shows DIAL, OR SELECT OPTION.)
3. If forwarding to an internal extension number, enter the destination internal
extension number.
If forwarding to an external number, press “9,” then enter the external destination
number.
If forwarding to voice mail, dial feature code 710.
Display shows FORWARDING SET. You will hear three beeps before the phone
returns to an idle state.
To cancel forward a call when your extension does not answer (after four rings):
1. Press TALK. (Display shows DIAL, OR SELECT OPTION.)
2. Dial feature code 734. (Display shows FORWARDING CANCEL.) You will
hear three beeps before the phone returns to an idle state.
24
INT1400 Cordless Telephone User Guide
INT1400.book Page 25 Monday, August 4, 2008 2:46 PM
Forwarding Group Calls
To forward all calls from a group:
1. Press TALK. (Display shows DIAL, OR SELECT OPTION.)
2. Dial feature code 792. (Display shows SELECT GROUP.)
3. Dial group number (180-199). Display shows ENTER DESTINATION NUM-
BER.
4. If transferring to an internal extension number, enter the internal extension des-
tination number.
If transferring to an external number, press “9,” then enter the external destination number.
Display shows GROUP FORWARD SET. You will hear three beeps before the
phone returns to an idle state.
To cancel group forward all calls:
1. Press TALK. (Display shows DIAL, OR SELECT OPTION.)
2. Dial feature code 792. (Display shows SELECT GROUP.)
3. Dial group number 180-199. (Display shows GROUP FORWARD CAN-
CELLED.) You will hear three beeps before the phone returns to an idle state.
To forward calls when the group is busy:
1. Press TALK. (Display shows DIAL, OR SELECT OPTION.)
2. Dial feature code 793. (Display shows SELECT GROUP.)
3. Dial group number 180-199. (Display shows ENTER DESTINATION NUM-
To cancel group forward all calls:
1. Press TALK. (Display shows DIAL, OR SELECT OPTION.)
2. Dial feature code 793. (Display shows SELECT GROUP.)
3. Dial group number 180-199. (Display shows GROUP FORWARD CAN-
CELLED.) You will hear three beeps before the phone returns to an idle state.
INT1400 Cordless Telephone User Guide
25
USING YOUR PHONE
BER.)
4. If transferring to an internal extension number, enter the internal extension destination number.
If transferring to an external number, press “9,” then enter the external destination number.
Display shows GROUP FORWARD SET. You will hear three beeps before the
phone returns to an idle state.
INT1400.book Page 26 Monday, August 4, 2008 2:46 PM
To forward calls when a group does not answer (after four rings):
1. Press TALK. (Display shows DIAL, OR SELECT OPTION.)
2. Dial feature code 794. (Display shows SELECT GROUP.)
3. Dial group number 180-199. (Display shows ENTER DESTINATION NUM-
BER.)
4. If transferring to an internal extension number, enter the internal extension des-
tination number.
If transferring to an external number, press “9,” then enter the external destination number.
Display shows GROUP FORWARD SET. You will hear three beeps before the
phone returns to an idle state.
To cancel group forward all calls:
1. Press TALK. (Display shows DIAL, OR SELECT OPTION.)
2. Dial feature code 794. (Display shows SELECT GROUP.)
3. Dial group number 180-199. (Display shows GROUP FORWARD CAN-
CELLED.) You will hear three beeps before the phone returns to an idle state.
Setting Up Voice Mail
Note: Voice Mail services require the Voice Mail module to be installed.
To enter a personal greeting:
1. Press TALK. (Display shows DIAL, OR SELECT OPTION.)
2. Press MAIL.
3. Enter your mailbox number.
4. Enter your password, followed by #.
5. Select option “3” to record your greeting.
6. Follow the voice prompts to record your greeting.
7. Press TALK to disconnect the call.
To turn on your Voice Mail
"Forward On No Answer" to the Voice Mail is automatically set when a voice
mailbox is allocated to your extension.
You may also select the other Forwarding options as required (see Forwarding Calls
above).
To retrieve messages from your Voice Mail box:
The “Message” LCD icon is lit to indicate a waiting message.
1.
2.
3.
4.
26
Press TALK. (Display shows DIAL, OR SELECT OPTION.)
Press MAIL. (Display shows ENTER VOICE MAIL BOX.)
Enter your mailbox number. (Display shows ENTER PASSWORD.)
Enter your password, followed by #. (Display shows your password in the form
of asterisks.)
INT1400 Cordless Telephone User Guide
INT1400.book Page 27 Monday, August 4, 2008 2:46 PM
5. Select option “1” to play your messages.
6. Follow the voice prompts to play your messages.
7. Press TALK to disconnect the call.
To set internal message for incoming internal extensions:
1. Press TALK. (Display shows DIAL, OR SELECT OPTION.)
2. Dial feature code 729. (Display shows SELECT OPTION.)
3. Dial 1-8:
– Return At
– Call Back At
– Call Me At
– In A Meeting
– At Lunch
– Gone Home
– On Vacation
– Call
The text from the selected option is displayed.
4. Enter numerical data, if desired (for example, enter 1230 to indicate 12:30).
LCD displays the selected option and any numerical data entered.
To cancel internal message for incoming internal extensions:
1. Press TALK. (Display shows DIAL, OR SELECT OPTION.)
2. Dial feature code 729. (Display shows MESSAGE CANCELLED.) The phone
To change your Voice Mail box Password:
Press TALK. (Display shows DIAL, OR SELECT OPTION.)
Press MAIL. (Display shows ENTER VOICE MAIL BOX.)
Enter your mailbox number. (Display shows ENTER PASSWORD.)
Enter your password, followed by #. (Display shows your password in the form
of asterisks.)
5. Select option “4” to change your password.
6. Follow the prompts to change your password.
7. Press TALK to disconnect the call.
1.
2.
3.
4.
INT1400 Cordless Telephone User Guide
27
USING YOUR PHONE
returns to an idle state.
INT1400.book Page 28 Monday, August 4, 2008 2:46 PM
Personal Speed-Dialing
To program your personal Speed-Dial list:
1. Press TALK. (Display shows DIAL, OR SELECT OPTION.)
2. Dial feature code 75. (Displays shows ENTER SPD INDEX 01-30.)
3. Dial an index number between 1 and 30 to designate as your speed dial number.
(Display shows ENTER NUMBER.)
4. Enter the phone number. (Display shows the phone number entered.)
5. Press TALK to save your entry. The phone returns to an idle display.
To dial a number from your personal Speed-Dial list:
1. Press TALK. (Display shows DIAL, OR SELECT OPTION.)
2. Dial feature code 74. (Display shows SELECT OR SCROLL
NOTE: The scroll feature does not work on an INT1400.
3. Dial your speed dial index number between 1 and 30. The number is dialed.
(Display shows the number that was dialled.)
System Speed-Dialing
There can be 500 (001-500) system speed dial numbers programmed on a system.
You cannot program system speed dial numbers from an INT1400. See your System
Administrator.
To dial a number in the system Speed-Dial list:
1. Press TALK. (Display shows DIAL, OR SELECT OPTION.)
2. Dial the system speed dial number. Once you finish entering the system speed
dial number the number is dialled. (Display shows the number that was dialed.)
Redialling a Number
To redial a number by pressing “TALK” initially:
1. Press TALK. (Display shows DIAL, OR SELECT OPTION.)
2. Press REDIAL to redial the last external number dialed. (Display shows the last
number that was dialed.)
3. Press TALK to clear the call.
To redial a number by pressing “REDIAL” initially:
1. Press REDIAL to redial the last external number dialed. (Display shows the last
number that was dialed).
2. Press TALK to clear the call.
28
INT1400 Cordless Telephone User Guide
INT1400.book Page 29 Monday, August 4, 2008 2:46 PM
Setting Up Follow Me
To set “follow me” from the INT1400 on another extension in the phone system:
1. Press TALK. (Display shows DIAL, OR SELECT OPTION.)
2. Dial feature code 735. (Display shows ENTER SOURCE EXTENSION.)
3. Dial the extension of the phone you want to receive calls for. (Display shows the
number you dialed.)
4. Dial the three digit password. (Display shows FORWARD SET.) You will hear
three beeps before the phone returns to an idle state.
To cancel “follow me” from the INT1400 on another extension in the phone
system:
1. Press TALK. (Display shows DIAL, OR SELECT OPTION.)
2. Dial feature code 735. (Display shows ENTER SOURCE EXTENSION.)
3. Dial the extension of the phone you want to receive calls for. (Display shows the
number you dialed.)
4. Dial the three digit password. (Display shows FORWARD CANCELLED.) You
will hear three beeps before the phone returns to an idle state.
NOTE: When Follow Me has been set on the Uniden extension, from another extension, the Uniden phone alerts the user to this by presenting stuttered dial tone, when
TALK is pressed. No visual display is given.
To cancel “follow me” from the another extension in the phone system to an
INT1400:
WARDING CANCEL)
Using Call Waiting
To set call waiting tone protection before a new call:
1. Press TALK. (Display shows DIAL, OR SELECT OPTION.)
2. Dial feature code 725. (Display shows TONE PROTECT ENABLED.)
3. Dial your number.
Performing a “Hookflash” During a Call
To send a hookflash to the external line:
1. On an active call, press XFER. (Display shows DIAL, OR SELECT EXTN.)
2. Dial feature code 731. (Display shows FLASH SENT.) The hookflash was sent
to the external line and the call continues.
INT1400 Cordless Telephone User Guide
29
USING YOUR PHONE
1. Press TALK. (Display shows DIAL, OR SELECT OPTION.)
2. Dial feature code 732 to cancel forwarding all calls. (Display shows FOR-
INT1400.book Page 30 Monday, August 4, 2008 2:46 PM
Using Door Open
To press the code to open the door lock:
1. From an existing internal extension. (Door phone), press TALK. (Display shows
DIAL, OR SELECT EXTN.)
2. Dial feature code 731 to unlock the door. (Display shows EXTENSION XX
MM:SS.)
Logging In/Out of Individual Hunt Groups
To log in to an individual hunt group:
1. Press TALK. (Display shows DIAL, OR SELECT OPTION.)
2. Dial feature code 723. (Display shows XX.)
3. Dial the hunt group number of which you are a member (180-199).
To log out of an individual hunt group:
1. Press TALK. (Display shows DIAL, OR SELECT OPTION.)
2. Dial feature code 723. (Display shows XX.)
3. Dial the hunt group number of which you are a member (180-199).
NOTE: The INT1400 does not recognize the feature code 723*1 to log you in to all
hunt groups or 723*0 to log you out of all hunt groups. You need to log in to hunt groups
individually.
30
INT1400 Cordless Telephone User Guide
INT1400.book Page 31 Monday, August 4, 2008 2:46 PM
INT1400.book Page 32 Monday, August 4, 2008 2:46 PM
Part No. 935.0307 (OMINT1400)
Issue 2, August 2008
A:46/1418A