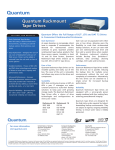
1
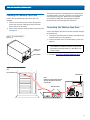
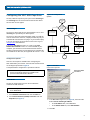
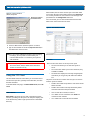
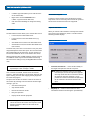
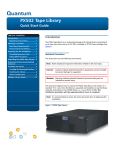
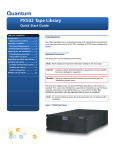
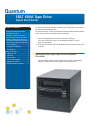
SDLT 600A Tape Drive
Quick Start Guide
TABLE OF CONTENTS
Identifying the Proper Tape Drive
Installation Procedure ........................... 1
This quick start guide provides basic installation and configuration instructions for
the Quantum SDLT 600A Tape Drive.
For more information, see the Quantum SDLT 600A Product Manual (PN 81-81487)
on the documentation CD provided with your tape drive.
Checking the Tabletop Tape Drive ........ 2
Connecting the Tabletop Tape Drive .... 2
Checking the Rackmount Tape Drive.... 3
Connecting the Rackmount Tape Drive 3
Configuring the SDLT 600A Tape Drive . 4
The Java Plug-in ..............................4
Configuration Options....................4
1 Inspect the shipping box and contents of the box for damage.
If you find any damage, report it to the shipping company or contact
Quantum immediately.
2 Verify that the Ethernet cables are compatible with the connectors on the host
computer.
For Windows....................................4
Using the FTP Client .............................. 5
SDLT 600A Tab .................................5
File Panes .........................................5
File Transfers ...................................6
File Transfer Stopped......................6
Duplicate File Name ........................6
Formatting Media Cartridges............7
Identifying the Proper Tape Drive Installation
Procedure
The SDLT 600A is available in two configurations, tabletop and rackmount.
Follow the installation procedures appropriate to your tape drive.
0
SDLT 600A Tape Drive Quick Start Guide
Checking the Tabletop Tape Drive
0
To check that the tabletop tape drive works and is not
damaged:
1 Connect one end of the power cord to the tape drive
power cord connector and plug the other end of the
power cord into an AC outlet.
2 Power on the tape drive using the switch on the rear panel
(see figure 1).
The tape drive performs a self-diagnostic test, called a Poweron Self-Test (POST), each time you power it on. During POST,
each LED lights in sequence. When POST has completed
successfully, the middle LED stops flashing and remains
illuminated and the left and right LEDs remain off.
Connecting the Tabletop Tape Drive
0
Connect the tabletop tape drive to the host computer through
the network port:
1 Connect one end of the Ethernet cable to the network port
located on the rear of the tape drive.
Figure 1 Check the Tabletop
Tape Drive
2 Connect the other end to a network switch or router (see
figure 2).
Power cord
connector
NOTE: The GigE network port is backward compatible
with 100BaseT and 10BaseT networks. To get the full
performance of the SDLT 600A, it is advisable to use
a GigE network.
On/off switch
3 Proceed to Configuring the SDLT 600A Tape Drive.
Figure 2 Connect to the Network
Port
Host network port
Network port
Note:
Optionally, the tape drive may be
directly connected to the host
network port.
Ethernet cables
Router
2
SDLT 600A Tape Drive Quick Start Guide
Checking the Rackmount Tape Drive
0
Figure 4 Install the
Rackmount Tape Drive
To check that the rackmount tape drive works and is not
damaged:
Thumbscrews
1 Connect one end of the power cord to the tape drive
power cord connector and plug the other end of the
power cord into an AC outlet.
2 Power on the tape drive using the switch on the front
panel (see figure 3).
Figure 3 Check the
Rackmount Tape Drive
On/off switch
Power button
2 Secure the unit to the rack with the thumbscrews.
Power cord
connector
3 Connect the power cable to the rear of the rackmount
SDLT 600A tape drive (see figure 5).
Figure 5 Connect the Power
and Network Cables
The tape drive performs a self-diagnostic test, called a PowerOn Self-Test (POST), each time you power it on. During POST,
each LED lights in sequence. When POST has completed
successfully, the middle LED stops flashing and remains
illuminated and the left and right LEDs remain off.
Disconnect the power cord from the power cord connector.
Connecting the Rackmount Tape Drive
Power cord
connector
0
Install the rackmount tape drive in a rack and then connect the
drive to a network though the network (GigE) port located on
the rear of the drive:
1 Slide the rackmount tape drive into the equipment rack
(see figure 4).
Network port
To power
To router or switch
4 Connect one end of the Ethernet cable to the network port
located on the rear of the SDLT 600A tape drive and
connect the other end to a network switch or router.
5 Power on the tape drive using the switch on the front
panel of the rackmount unit.
6 Proceed to Configuring the SDLT 600A Tape Drive.
3
SDLT 600A Tape Drive Quick Start Guide
Configuring the SDLT 600A Tape Drive
0
Figure 6 IP Configuration
Options
The only software required on your system is the Java Plug-in.
The Java Plug-in is the virtual machine software that allows
the execution of Java applets.
To
configure
IP
yes
The Java Plug-in
0
The Java FTP client needs the Java Virtual Machine to run. This
Java Plug-in is provided by Sun Microsystems.
Is
SDLT 600A
on it's own
network?
no
Leave SDLT 600A
on 10.10.10.10
yes
The Java FTP client will install immediately. When you load the
Java FTP client for the first time, a display window may ask you
to download and install the Java plug-in. If you need that plugin you can just follow the instructions on the screen or go to
www.java.com to download it.
If you have Java Plug-in version 1.5 or later or the Java
Runtime Environment version 1.5 or later installed on your
computer, you should not need to download new software.
The plug-in should activate on your Web browser automatically
once installed. For Mac OSX, the supported JRE version is 1.4.2.
Open PC's
network
properties
Is PC
configured
for DHCP?
no
Obtain valid IP and
netmask for
SDLT 600A
from network admin
Configure PC to IP
10.10.10.1
Configure
SDLT 600A for
DHCP
Configure
SDLT 600A as
advised
done
Configuration Options
0
There are several options available when configuring the
SDLT 600A within your network. Select the best solution based
on the diagram presented in figure 6.
A sample Windows configuration is provided as follows.
Figure 7 Local Area
Connection Properties
NOTE: Detailed configuration instructions for Macintosh
and Linux operating systems are available in the
Quantum SDLT 600A Product Manual.
For Windows
Select the TCP/IP
connection
0
The host IP configuration may have to be modified to
communicate with the drive.
NOTE: The factory default IP address for the SDLT 600A is
set to 10.10.10.10.
1 Go to Network Connections and click the LAN icon.
2 Go to Internet Protocol (TCP/IP) connection and click
Properties (see figure 7).
3 In the General dialogue box (see figure 8), select the radio
button Use the following IP address.
•
In the IP address box, enter 10.10.10.1
•
In the Subnet mask box, enter 255.255.255.0
4 Click OK.
4
SDLT 600A Tape Drive Quick Start Guide
When loaded, the FTP client connects you to the SDLT 600A
server when the login name (root) and password (password)
are correctly entered. You can rename or reset the login and
password from the Configuration tab menu.
Figure 8 Internet Protocol
(TCP/IP) Properties
Enter the IP address
and Subnet mask
Once connected, you can choose Local instead of the SDLT
600A server to disconnect the FTP client.
Figure 9 SDLT 600A/FTP Client
5 Launch a Web browser (Internet Explorer or Firefox).
6 Type in the IP address of the drive (http://10.10.10.10) in
the address line of the browser.
NOTE: If you require additional assistance when changing
IP settings, you may need to consult either your
network administrator or an authority on IP policies
and standards.
File Panes
There are three text zones on the top of each pane:
CAUTION: Any change of the IP address could result in the
loss of the device; always double-check that the IP
number is entered correctly
Using the FTP Client
0
The SDLT 600A Client/FTP client allows you to transfer files to
and from the tape drive, partially restore MXF files, and view
the MXF metadata.
In the SDLT 600A main page, click SDLT 600A Client, then FTP
client.
SDLT 600A Tab
0
0
SDLT 600A is the main tab view with a standard FTP client
interface, providing two file panes. The left pane displays your
local disk directory and the right pane shows the SDLT 600A
directory.
•
The first zone allows you to select the system or
server.
•
The second zone allows you to select the drive (only
available on Local).
•
The third zone displays the currently navigated path
and allows you to type the path within the address
bar.
The panes can be local or remote views and you can interact
with the system as follows:
•
Double-click a folder to expand it to view the enclosed
folders and files
•
Double-click a folder at the top followed by leader
dots that lead toward the parent folder
•
Click an item (file or folder) to select it
•
Use <Ctrl> for non-continuous and <Shift> for
continuous item selection
•
Use < Ctrl + A> to select all files and folders
5
SDLT 600A Tape Drive Quick Start Guide
•
Use F2 is supported (allows you to edit the name
of the selected file)
•
Right-click to see the Contextual menu
(<Ctrl>+right-click under Mac OSX)
•
Click the column headings to change the sorting
order
File Transfer Stopped
A sequence of file transfers using the built-in FTP client
stops when a file is reserved by the FTP client file system or
the file name contains characters not supported.
Duplicate File Name
File Transfers
0
The SDLT 600A FTP client allows you to transfer files from a:
•
Local PC to/from a SDLT 600A server
•
Local PC to/from a non-SDLT 600A server (e.g.
Filezilla)
•
SDLT 600A server to/from a non-SDLT 600A server
•
SDLT 600A server to/from another SDLT 600A server
(FXP transfer)
0
0
When you transfer a file and there is already a file with the
same name in the destination, there is a conflict and the
following window displays:
Figure 10 File Exist
To transfer files, select one or more items in one pane, then
drag and drop them to the other pane. You can also transfer
files within folders of the same pane, local or remote (e.g.
into the SDLT 600A FTP server or into another FTP server).
When transferring files of 4 MB and larger, transfer rates up
to 36 MB/sec native may be achieved. When transferring
files of less than 4 MB, you may see degraded drive transfer
rates.
NOTE: The maximum storage capacity of the
SuperDLTtape II data cartridge is 300GB.
•
NOTE: When you overwrite a file, it is not erased
from the tape, because the tape drive appends
data only (unless the file to overwrite is the last
file stored on the tape). However it is not
possible to access the overwritten file (unless the
file to overwrite is the last file stored on the
tape).
Once a transfer is initiated, the bars show the transfer
progress—when the indicator is moving back and forth, the
tape is seeking, and once data copying actually begins the
bar shows the progress.
The queue lists the files to transfer as well as the status of
the transfer. By selecting a file from the list and then rightclicking it, you can:
•
Start the transfer queue
•
Stop the file transfer
•
Remove the file from the list
•
Retry the operation
•
Display the file transfer properties
Overwrite/Overwrite all — Erases the file already on
the target and copies the new file in its place.
NOTE: The SDLT 600A does not support Resume.
•
Skip/Skip all— Continues the transfer for other
selected files without overwriting the specified file(s).
NOTE: Canceling a transfer aborts it. Skipping a transfer
cancels the current file transfer. The sequence of file
transfers continues if there are other files in the
transfer queue.
6
SDLT 600A Tape Drive Quick Start Guide
Formatting Media Cartridges
0
1 Insert the media cartridge into the tape drive.
When the tape drive recognizes an unformatted or new
media cartridge, a prompt appears (see figure 11)
when connected to the FTP client.
CAUTION: When formatting with the SDLT 600A
tape drive, all existing data on the media
cartridge will be overwritten.
2 Click Yes.
NOTE: The initial formatting of a media cartridge
takes approximately 30 – 40 seconds.
Figure 11 Media Formatting
7
SDLT 600A Tape Drive Quick Start Guide
United States of America
Quantum Corporation
141 Innovation Drive
Irvine, CA 92612
U.S.A.
phone 949.856.7800
fax 949.856.7799
European Headquarters
Quantum Corporaton
3 Bracknell Beeches
Old Bracknell Lane West
Bracknell
Berkshire RG12 7BW
United Kingdom
phone +44 1344 353500
fax +44 1344 353510
Asia Pacific
Quantum Corporaton
9 Temasek Boulevard, #08-03
Suntec Tower Two
Singapore 038989
phone +65 6334 0660
fax +65 6432 2830
©2006 Quantum Corporation. Quantum, the Quantum logo, and the DLTtape logo are all registered trademarks of Quantum Corporation. SDLT and Super DLTtape are trademarks ofQuantum Corporation. Other trademarks may be mentioned herein which belong to other companies. )
81-81488-02 A01 December 2006
*81-81488-02 A01*
81-81488-02 A01