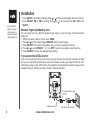
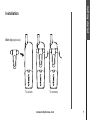
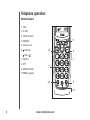
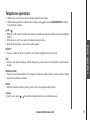
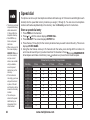
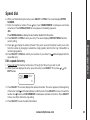
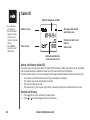
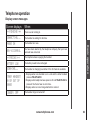
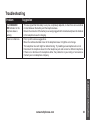
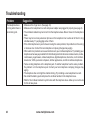
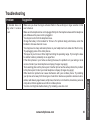
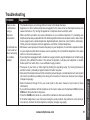
1
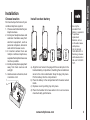
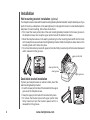
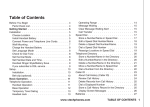
Table of contents Parts checklist....................................................................1 Installation..........................................................................2 Connect power and telephone line cords..........................2 Choose location.................................................................3 Install handset battery.......................................................3 Wall mounting bracket installation.....................................4 Desk/table bracket installation..........................................4 Check for dial tone.............................................................5 Charge the handset battery...............................................5 Language...........................................................................5 Set the dial mode...............................................................5 Set handset date and time.................................................5 Handset ringer style/battery save......................................6 If you subscribe to DSL service:........................................6 Belt clip...............................................................................7 Telephone operation..........................................................8 Handset layout...................................................................8 Telephone base layout.......................................................9 Handset operation............................................................10 Telephone base operation...............................................12 Set language....................................................................13 Set dial mode...................................................................13 Set handset date and time...............................................13 Check for dial tone...........................................................14 Charge the handset battery.............................................14 Handset ringer style/battery save....................................14 Set ringer volume.............................................................14 Temporary tone dialing....................................................15 Headset jack....................................................................15 Operating range...............................................................16 New voice mail.................................................................16 Clear voice mail alert.......................................................17 Call transfer......................................................................17 Directory...........................................................................18 Store a directory entry.....................................................18 Edit a directory entry........................................................19 Erase a directory entry....................................................20 Move a directory entry to the speed dial.........................20 Dial a directory number....................................................21 Speed dial .......................................................................22 Store a speed dial entry...................................................22 Edit a speed dial entry.....................................................23 Delete a speed dial entry.................................................24 Dial a speed dial number.................................................24 Reassign locations in speed dial.....................................24 Caller ID...........................................................................25 About call history (caller ID).............................................26 Review call history...........................................................26 Delete records from call history.......................................27 Delete a specific call...................................................27 Delete all calls.............................................................27 Dial a displayed number..................................................27 Store a call history record in the directory.......................27 Display screen messages................................................28 Battery information .........................................................30 Battery care and maintenance.........................................30 www.vtechphones.com Table of contents Replacing the handset battery.........................................30 Troubleshooting...............................................................31 Maintenance.....................................................................40 Limited Warranty..............................................................40 Important safety instructions...........................................42 FCC, ACTA and IC regulations........................................43 The RBRC ® seal...............................................................44 Technical specifications...................................................45 Index.................................................................................46 ii www.vtechphones.com Important! Before using this telephone, you must read the Important safety instructions on page 42 of this manual. NEED HELP? This manual has all the feature operations and troubleshooting you need to install and operate your new VTech telephone. Please take the time to review thoroughly to ensure proper installation of this VTech innovative and feature rich product. You can also visit our website at www.vtechphones.com for support, shopping, and everything new at VTech. In Canada, please visit www.vtechcanada.com. Handsets (2) Telephone base Base power adapter Charger power adapter Charger Desk/wall mount bracket Batteries (2) Battery covers (2) Belt clips (2) Telephone line cord User’s manual To p u r c h a s e r e p l a c e m e n t batteries, visit us on the web at www.vtechphones.com or call us at 1-800-595-9511. In Canada, go to www.vtechcanada.com or call us at 1-800-267-7377. Charger power adapter Handsets (2) Telephone base with desk /wall mount bracker Battery covers (2) Batteries (2) Base power adapter Charger Telephone line cord • Important! Before using this telephone, please read Important safety instructions on page 42. Belt clips (2) User’s manual www.vtechphones.com Getting started Parts checklist • • • • • • • • • • • Installation Connect power and telephone line cords • Install the telephone base away from electronic equipment such as personal computers, television sets or microwave ovens. Avoid excessive heat, cold, dust or moisture. • Connect the power and telephone line cords to the underside of the base as illustrated. • Plug the AC adapter into an electrical outlet. Connect the telephone line cord to the wall jack. • This power unit is intended to be correctly orientated in a vertical or floor mount position. The prongs are not designed to hold the plug in place if it is plugged into a ceiling or an under the table/cabinet outlet. Install the telephone base and the charger as shown below. Choose a central location within the home, away from any electronic equipment and appliances such as personal computers, computer routers, television sets, microwave ovens, and refrigerators. Avoid excessive heat, cold, dust or moisture. Plug the telephone line cord into a telephone jack. Modular telephone jack Standard electrical outlet www.vtechphones.com Choose location For maximum performance of your cordless telephone system: 1.Choose a central location for your telephone base. 2. Install your telephone base and extension handsets away from electronic equipment, such as personal computers, television sets and microwave ovens. 3. In locations where there are multiple cordless telephones, separate the telephone bases as much as possible. 4. Install your telephone equipment away from heat sources and sunlight. 5.Avoid excessive moisture, dust or extreme cold. 1 2 Install handset battery •Use only the provided VTech battery, or equivalent. • To purchase replacement batteries, visit us on the web at www. vtechphones. com or call us at 1-800-595-9511. In Canada, go to www. vtechcanada.com or call us at 1-800-2677377. a) Align the two holes in the plug with the socket pins in the handset battery compartment, matching the red and black wires to the color-coded label. Snap the plug into place. Put the battery into the compartment. b) Place the battery in the compartment with the wires tucked inside. c) Replace cover by sliding it up into place. d) Place the handset in its base when not in use to ensure maximum daily performance. www.vtechphones.com Getting started Installation Installation Wall mounting bracket installation (optional) Your telephone base comes with the wall mounting/desktop bracket installed, ready for desktop use. If you prefer to mount your telephone on the wall (optional), it is designed to mount on a standard telephone wall plate. For wall mounting, follow these instructions: • First, insert the lower portion tabs of the wall mounting/desktop bracket into the lower grooves in the telephone base, then snap the upper portion tabs of the bracket into place. • Mount the telephone base on the wall by positioning it so the mounting studs will fit into the holes on the telephone base and wall mounting/desktop bracket. Slide the telephone base down on the mounting studs until it locks into place. • To remove the bracket, press both upper portion tabs firmly inward and pull the bracket downward until it release from the grooves. upper portion tab lower portion tab lower groove upper grooves Desk/table bracket installation To place your telephone base on a desk or table, insert the wall mounting/desktop bracket. • Insert the lower portion tabs of the bracket into the upper grooves of the telephone base. • Snap the upper portion tabs of the bracket into place. • To remove the bracket, press both upper portion tabs firmly inward and pull the bracket upward until it is released from the grooves. www.vtechphones.com Check for dial tone fter the batteries are charged, pick up the handset and press TALK/FLASH; you should hear a dial A tone. If you do not, refer to the Troubleshooting section in the back of this user’s manual. Charge the handset battery If battery power is low, NEEDS RECHARGING will appear on the handset. Charge the battery for at least 16 hours the first time. Language • Press PROG, then press or until LANGUAGE is displayed. Press SELECT. •The current setting blinks. Press or until the screen displays the correct language (English, Espanol, Francais). • Press SELECT to save your selection. Set the dial mode If you have touch tone service, the phone is ready to use as soon as the battery is charged. If you have pulse (rotary) service, you’ll need to change the dial mode. • Press PROG. • Press or until �������������������������� the screen displays DIAL MODE: and the current setting. • Press SELECT. The current setting blinks. • Press or to ���������� select TONE or PULSE. • Press SELECT to save. • If the phone will not be used for a long period of time, remove the battery to prevent battery damage. •If you have any trouble installing your phone, please visit our website at www.vtechphones. com. In Canada go to www.vtechcanada. com. Set handset date and time If you subscribe to caller ID service, the date and time will be set automatically with the first incoming call. If you do not have caller ID service, you can set the date and time manually: • Press PROG, then press or until DATE/TIME is displayed. • Press SELECT. The month is flashing. Press or until the screen displays the correct month. • Press SELECT. The day is flashing. Press or until the screen displays the correct day. • Press SELECT. The hour is flashing. Press or until the screen displays the correct hour. www.vtechphones.com Getting started Installation Installation •In the event the battery loses all of its power or is removed, the time setting will be lost. • Press SELECT. The minute is flashing. Press or until the screen displays the correct minute. • Press SELECT. AM or PM is flashing. Press or to choose between AM or PM. Press SELECT. Handset ringer style/battery save ou can select from four different handset ringer styles, or turn the ringer off and extend the Y battery life. 1. With the handset in idle (off) mode, press PROG. 2. Press or until the screen displays RINGER: and the current setting. 3. Press SELECT. The current setting blinks, and you will hear a sample of the ring. 4.Press or to select RINGER: 1, 2, 3, 4 or OFF. You will hear a sample of each ring tone. 5. Press SELECT to choose the displayed ringer setting. If you subscribe to DSL service: If you receive high speed internet service through your phone line (commonly referred to as DSL) and you are experiencing interference during conversations and/or your caller ID features aren’t functioning properly, install a DSL filter to the telephone line between the telephone base and the telephone line jack. Contact your DSL provider to obtain a DSL filter. To single telephone jack (RJ11C) Telephone line cord www.vtechphones.com DSL filter (For DSL users) Getting started Installation Belt clip (optional) To attach To remove www.vtechphones.com Telephone operation Handset layout 1. TALK 2. FLASH 3. CHAN (channel) 6 4. REMOVE 5. Answer a call 6. /CID VOL- /VOL+ 1,2 7 7. SELECT 8. OFF 9. REDIAL/PAUSE 8 5 10.PROG (program) 3,4 9 10 www.vtechphones.com Telephone operation Telephone base layout 11. CHARGE/IN USE 12. Message waiting indicator 13. FIND HANDSET Basic operation 11 12 13 www.vtechphones.com Telephone operation Handset operation • Whenever the phone is in use, call timer will be shown at the top right corner. Making Calls • Press TALK/FLASH, then dial the number. — OR — Dial the number (press then press CHAN/REMOVE to backspace), then press TALK/FLASH . • To answer a call, press TALK/FLASH. • To end a call, press OFF. Ending calls • Press OFF to end your call. — OR — Put the handset on the telephone base or charger to end your call. Answering calls • Press any key to answer a call (except OFF, or ). FLASH • During a call, press TALK/FLASH to receive an incoming call, if call waiting is activated. CHAN • Press CHAN to switch to a clear channel while on a call. REMOVE • When viewing the call log, press to delete the current record displayed. While handset is in idle mode, press and hold to delete all records in the call log. /CID VOL- and /VOL+ /CID VOL• While on a call, press to decrease the volume. A double beep will sound when you reach the lowest setting. 10 www.vtechphones.com Telephone operation • While phone is not in use, press to display caller ID information. • While entering names or numbers into memory, press then press CHAN/REMOVE to delete last character entered. Basic operation /VOL+ • While on a call, press to increase the volume. A double beep will sound when you reach the highest setting. • While phone is not in use, press to display directory entries. • While entering names, press twice to add a space. SELECT • Press to confirm an entry of operation, or to select highlighted item from menu. OFF • During a call, press to hang up. While using menu, press to cancel an operation or exit the menu display EDIAL/PAUSE R • Press to view redial number. Press it again to delete the redial number. Press to insert a dialing pause while entering a number. PROG • With the handset in idle (on-hook), press to enter the program setting mode. Volume • During a call, press or to adjust the listening volume to a comfortable level. www.vtechphones.com 11 Telephone operation Telephone base operation • During a page, if you press OFF on a handset, it will cancel the page on that handset only, the other handset will continue to page for 60 seconds. CHARGE/IN USE • Flashes slowly when the handset is in use. • Glows steadily when the handset is charging in its base. • Flashes in unison with an incoming call. Voice mail indicator • If you subscribe to telephone company voice mail with a visual message waiting signal, this light flashes, NEW VOICEMAIL and an icon will also display on the handset screen when you have voice mail waiting. FIND HANDSET • Press to page the handset. Press again, press OFF on handset, or place handset in the telephone base to cancel the page. 12 www.vtechphones.com Telephone operation Language • Press PROG, then press or until LANGUAGE is displayed. Press SELECT. • The current setting blinks. Press or until the screen displays the correct language (English, Espanol, Francais). • Press SELECT to save your selection. Set dial mode Basic operation If you have touch tone service, the phone is ready to use as soon as the battery is charged. If you have pulse (rotary) service, you’ll need to change the dial mode. • Press PROG. • Press or until the screen displays DIAL MODE: and the current setting. • Press SELECT. The current setting blinks. • Press or to select TONE or PULSE. • Press SELECT to save. Set handset date and time If you subscribe to caller ID service, the date and time will be set automatically with the first incoming call. If you do not have caller ID service, you can set the date and time manually: • Press PROG, then press or until DATE/TIME is displayed. Press SELECT. • The month is flashing. Press or until the screen displays the correct month. Press SELECT. • The day is flashing. Press or until the screen displays the correct day. Press SELECT. • The hour is flashing. Press or until the screen displays the correct hour. Press SELECT. • The minute is flashing. Press or until the screen displays the correct minute. Press SELECT. • AM or PM is flashing. Press or to choose between AM or PM. Press SELECT. www.vtechphones.com 13 Telephone operation Check for dial tone fter the batteries are charged, pick up the handset and press TALK/FLASH; you should hear a dial A tone. If you do not, refer to the Troubleshooting section in the back of this user’s manual. Charge the handset battery The battery may have enough power to allow for short calls. If the battery power is low, NEEDS RECHARGING will appear on the handset screen. For best performance charge the battery for at least 16 hours the first time. Handset ringer style/battery save ou can select from four different handset ringer styles, or turn the ringer off and extend the Y battery life. 1. With the handset in idle (off) mode, press PROG. 2. Press or until the screen displays RINGER: and the current setting. 3. Press SELECT. The current setting blinks, and you will hear a sample of the ring. 4. Press or to select RINGER: 1, 2, 3, 4 or OFF. You will hear a sample of each ring tone. 5. Press SELECT to choose the displayed ringer setting. Set ringer volume You can select from two different handset ringer volume, or turn the ringer off. 1. Begin with the handset in idle (off) mode. 2. Press and hold or until the screen displays OFF LOW HIGH. 3. The current setting blinks, and you will hear a sample of the ring volume. 4. Press or to select ringer volume: OFF/LOW/HIGH. You will hear a sample of each ring tone. 5. Press SELECT to choose the displayed ringer setting. 14 www.vtechphones.com Telephone operation Temporary tone dialing If you have pulse (rotary) dialing, you can change from dial pulse to touch tone dialing by pressing TONE*. This is useful if you need to send touch tone signals for access to telephone banking or long distance services. •The temporary tone feature is useful if you need to send touch tone signals for access to telephone banking or long distance services. Basic operation 1. Press TALK/FLASH. 2.Press TONE*. 3. Dial the number. 4. When you end the call by pressing OFF, the phone automatically returns to pulse dialing. Headset jack You can use this telephone handsfree when you install any VTech 2.5 mm headset, purchased separately. Plug the headset into the jack located on the right side of the handset (under the small rubber flap). Do not force the connection, but make sure the plug fits securely. SELECT To purchase a headset, visit us on the web at www. vtechphones.com or call us at 1-800-595-9511. In Canada, go to www.vtechcanada.com or call us at 1800-267-7377. www.vtechphones.com 15 Telephone operation Operating range •For clearer reception while on a call, press the CHAN button until any interference is eliminated. • Turning off the voice mail indicator only turns off the NEW VOICEMAIL message on all handsets; it does not delete your voice mail message(s). Use this feature when the phone indicates there is voice mail when you have none, or you have accessed your voice mail from a different phone line (while away from home). If there actually is a new voice mail message, your local telephone company will continue to send the signal to turn on the NEW VOICEMAIL message. 16 This cordless telephone operates within the maximum power allowed by the Federal Communications Commission (FCC). Even so, this handset and telephone base can communicate over only a certain distance — which can vary with the locations of the telephone base and handset, the weather, and the construction of your home or office. If you receive a call while you are out of range, the handset might not ring or if it does ring, the call might not connect when you press TALK/FLASH. Move closer to the telephone base, then press TALK/FLASH to answer the call. If you move out of range during a phone conversation, you might hear noise or interference. To improve reception, move closer to the telephone base. If you move out of range without pressing OFF, your phone will be left off the hook. To hang up properly, walk back into range, periodically pressing OFF. New voice mail Your phone is designed to work with most local and regional telephone service provider’s voice messaging systems, providing alerts on both the handset and telephone base when new messages come in. Voice messaging is subscription service, available through most service providers, for a monthly fee. Contact your local telephone company for more information. When a caller leaves a message in your voice mailbox, the VOICEMAIL light on the telephone base will flash. In addition, the handset will display: NEW VOICEMAIL 5:40 PM 5/01 www.vtechphones.com Telephone operation Clear voice mail alert If after you review your message(s) your message waiting alert does not go off, you may manually turn it off by: 1. Press PROG. 2. Press or until screen displays CLR VOICEMAIL. 3. Press SELECT, the screen displays: 4. Press or to select YES or NO. 5. Press SELECT to choose the desired setting. You’ll hear a confirmation tone. Call transfer An external call can be forwarded from one handset (HS1) to the other handset (HS2) by following these steps: 1. While on a call, press SELECT on HS1 to forward the call to HS2. HS1 will show: HS2 will ring and show: CALL TRANSFERRED TRANSFERRED CALL 2. Press TALK/FLASH on HS2 to answer the forwarded call. HS1 will return to the idle mode. www.vtechphones.com 17 Basic operation CLEAR? YES • Only one handset can be on a call at a time. For example, if HS1 is on a call and HS2 presses the TALK/FLASH button, OTHER HANDSET ON OR OUT OF RANGE will display. • If the HS2 cannot be found, HS1 will emit an error tone and continue the call automatically. Before HS2 answers, HS1 can press TALK/ FLASH to cancel the forward function and continue the external call. • If HS2 doesn’t respond within 30 seconds, HS1 will start ringing until TALK/FLASH is pressed to pick up the returned call. If it is not answered within another 30 seconds, the external call will end automatically. Directory Your phone can store 20 (including the nine speed dial entries) telephone numbers with names (up to 15 characters for the name and 24 digits for the number in each location) in the handset. • Press OFF at any time to exit the directory. •When the memory is full the screen will display MEMORY FULL, an error tone sounds and you will not be able to store a new number until you delete a stored number to make room for another entry. • �������������������� If the directory is empty and you try to access it, DIRECTORY EMPTY will show on the screen. • ��������������� When you reach the end of the list in the directory, END OF LIST will be shown on the screen. 18 Store a directory entry 1. Press prog. The screen displays DIRECTORY. 2. Press SELECT. The screen displays ENTER NAME. 3. Using the chart below, enter up to 15 characters for the name you’re storing with the number. Press then press CHAN/REMOVE to backspace and make corrections; press to advance or press it twice to add a space. Dial Key 1 2 3 4 5 6 7 8 9 0 * # Once Characters by number of key presses Twice 3 Times 4 Times 5 Times 6 Times 1 A B C 2 D E F 3 G H I 4 J K L 5 M N O 6 P Q R S T U V 8 W X Y Z 9 ‘ , - . 7 0 * & # 4. W hen you finish entering the name, press SELECT or prog. The screen displays ENTER NUMBER. www.vtechphones.com Directory Edit a directory entry 1. 2. 3. Press . The screen displays DIRECTORY. Press or to scroll alphabetically through entries stored in directory. — OR — Press the dial pad key for the first letter of the entry you want to edit. When the screen displays the entry you want to edit, press SELECT. Then press EDIT flashes. or until SPEED EDIT ERASE 8005959511 • When using the dial pad key(s) to search for a directory entry and there is not an entry for that letter, NO DATA will display on the handset. • Each handset directory is independent of the other handsets. If you make entries or changes to the directory of one handset they will not be reflected in the other handsets. 4. Press SELECT. The screen displays the name and number. The cursor appears at the beginning of the name. Use , and the dial pad keys to edit the name. Press SELECT to confirm and move on to edit the number. Press then press CHAN/REMOVE to backspace and make corrections. Press SELECT to confirm and move to edit the distinctive ring setting. 5. Press SELECT to save the edited information. www.vtechphones.com 19 Basic operation 5. Enter the telephone number. Press then press CHAN/REMOVE to backspace and make corrections. Press redial/pause to store a pause (a P will be shown) if necessary. — OR — Press redial/pause to display the last number dialed from this handset. 6. Press SELECT or prog. The screen displays DISTINCT RING? and the current setting. 7. Press or to choose Y (yes) if you wish the phone to alert you to calls from this number by changing to a distinctive ringer after the first ring. Choose N for a normal ringer. 8. Press SELECT or prog to confirm. If you chose Y in Step 7, a will be displayed with the directory entry. Directory Erase a directory entry 1. 2. 3. Press . The screen displays DIRECTORY. Press or to scroll alphabetically through entries stored in directory. — OR — Press the dial pad key for the first letter of the entry you want to delete. When the screen displays the entry you want to delete, press SELECT. Then press ERASE flashes. or until SPEED EDIT ERASE 8005959511 4. Press SELECT. The screen displays ERASE NO YES and the number. The current choice flashes. 5. Press until YES flashes. 6. Press SELECT. You’ll hear a confirmation beep. Move a directory entry to the speed dial 1. 2. 3. Press . The screen displays DIRECTORY. Press or to scroll alphabetically through entries stored in directory. — OR — Press the dial pad key for the first letter of the entry you want to move. When the screen displays the entry you want to move, press SELECT. Then press SPEED flashes. SPEED EDIT ERASE 8005959511 20 www.vtechphones.com or until Directory 4. Press SELECT. The screen displays ENTER 1-9. 5. Press the key (1-9) to move this entry from the normal directory to the speed dial memory and assign the memory location. You’ll hear a confirmation beep. A memory location number (1 through 9) will be displayed with this entry. Dial a directory number www.vtechphones.com Basic operation 1. Press . The screen displays DIRECTORY. 2. Press or to scroll alphabetically through entries stored in directory. — OR — Press the dial pad key for the first letter of the entry you want to dial. 3. When the screen displays the entry you want to dial, press TALK/FLASH. 21 Speed dial •The entries you stored in speed dial memory will be marked with 01 through 09 in the telephone directory. •Press OFF at any time to exit speed dial mode. • When memory is full the screen displays MEMORY FULL, an error tone sounds, and you cannot store a new number until you delete a record in speed dial memory or the directory. • If the locations is not empty, your new entry will be stored in place of the old and the entry will be moved to a directory location. • The entries you stored in the speed dial/directory are independent from other handset. 22 Your phone can store up to nine telephone numbers with names (up to 15 characters and 24 digits in each location) into the speed dial memory locations you assign (1 through 9). You can also store telephone numbers with names alphabetically in the directory. See the Directory section for instructions. Store a speed dial entry 1. Press PROG on the handset. 2. Press or until the screen displays SPEED DIAL. 3. Press SELECT. The screen displays ENTER 1-9. 4.Press the key (1 through 9) for the memory location where you want to store this entry. The screen displays ENTER NAME. 5.Using the chart below, enter up to 15 characters for the name you’re storing with the number. An error tone will sound if you try to enter more than 15 characters. Press then press CHAN/REMOVE to backspace and make corrections; press to advance or press it twice to add a space. Characters by number of key presses Dial Key 1 2 3 4 5 6 7 8 9 0 * # Once Twice 3 Times 4 Times 5 Times 6 Times 1 A B C 2 D E F 3 G H I 4 J K L 5 M N O 6 P Q R S T U V 8 W X Y Z 9 ‘ , - . 7 0 * & www.vtechphones.com # Speed dial Basic operation 6.When you finish entering the name, press SELECT or PROG. The screen displays ENTER NUMBER. 7.Enter the telephone number. Press then press CHAN/REMOVE to backspace and make corrections. Press REDIAL/PAUSE to store pauses in the dialing sequence. -OR Press redial/pause to display the last number dialed from this phone. 8.Press SELECT or PROG to store your entry. The screen displays DISTINCT RING? and the current setting. 9.Press or to change the setting. Choose Y (for yes) if you wish the phone to alert you to calls from this number by changing to a distinctive ringing pattern after the first ring. Choose N for a normal ringing pattern. 10.Press SELECT or PROG to confirm your selection. If you chose Y, a will be displayed with the speed dial entry. Edit a speed dial entry 1. Press and hold the memory location key (1 through 9) of the entry you wish to edit. 2.When the screen displays the entry you want to edit, press SELECT. Then press or EDIT flashes. until SPEED EDIT ERASE 8005959511 01 3. Press SELECT. The screen displays the name and number. The cursor appears at the beginning of the name. Use , and the dial pad keys to edit the name. Press SELECT to move on to edit the number. Use then press CHAN/REMOVE to backspace and make corrections. Press SELECT to move to edit the distinctive ring setting. 4. Press SELECT to save the edited information. www.vtechphones.com 23 Speed dial Delete a speed dial entry 1. Press and hold the speed dial location key (1 through 9) of the entry you wish to delete. 2.When the screen displays the entry you want to delete, press SELECT. Then press or ERASE flashes. until SPEED EDIT ERASE 8005959511 01 3. Press SELECT. The screen displays ERASE NO YES and the number. 4. Press until YES flashes. 5. Press SELECT. You’ll hear a confirmation beep. Dial a speed dial number 1. Press and hold the speed dial location key (1 through 9) of the entry you wish to dial. 2. Press TALK/FLASH to dial the displayed memory number. Reassign locations in speed dial 1. Press and hold the speed dial location key (1 through 9) of the entry you want to reassign. 2.When the screen displays the entry you want to reassign, press SELECT. Then press or until SPEED flashes. SPEED EDIT ERASE 8005959511 01 3. Press SELECT. The screen displays ENTER 1-9. 4.Press the keys (1 through 9) to reassign this entry into another memory location. You’ll hear a confirmation beep. 24 www.vtechphones.com Caller ID www.vtechphones.com Basic operation Your phone has a caller ID (CID) with call waiting feature that works with service from your local phone service provider. Caller ID with call waiting lets you see who’s calling before you answer the phone, even when you’re on another call. You may need to change your phone service to use this feature. Contact your phone service provider if: • You have both caller ID and call waiting, but as separate services (you may need combined service) • You have only caller ID service, or only call waiting service. • You don’t subscribe to any caller ID or call waiting services. You can use this product with regular caller ID service, and you can use this product’s other features without subscribing to either caller ID or combined caller ID with call waiting service. There are fees for caller ID services, and they may not be available in all areas. This product can provide information only if both you and the caller are in areas offering caller ID service, and if both telephone companies use compatible equipment. 25 Caller ID Caller’s telephone number • If you answer a call before the information appears on the screen, it will not be in the call history. • Press OFF at any time to exit call history. Caller’s name This party has called more than once Position of call in call history Date of call Time of call Indicate whether the record is new or not About call history (caller ID) Your phone can store up to 45 calls in its caller ID (CID) memory. When the memory is full, the oldest call will automatically be deleted to make room for new incoming call information. For each call that comes in, the screen displays the following information between the first and second rings: • Your caller’s name (15 letters are sent by your telephone company). • The caller’s area code and telephone number. • The time and date of the call. • The repeat tag (*) in the upper right corner, indicating the party has called more than once. Review call history 1. 2. 26 Press Press (CID) to enter call history viewing mode. or to scroll through records in call history. www.vtechphones.com Caller ID Delete records from call history Dial a displayed number 1. Locate the record in call history that you want to dial. 2. Although the call log entries you receive are 10 digits, (the area plus the 7-digit number,) in some areas, you may need to dial only the seven digits, or a 1 plus the seven digits, or a 1 plus the area code plus the seven digits. You can change the number of digits that you dial or store from the call log. While reviewing the call log, press # repeatedly to display these dialing options for local and long distance numbers before dialing or saving the telephone number. See an example below. 3. 4. 595-9511 1-595-9511 800-595-9511 1-800-595-9511 • Caller ID numbers may appear with an area code that may not be required for local calls, or without a 1 that may be needed for long distance calls. If the number displayed is not in the correct format, press # repeatedly to see the different dialing options. You can choose to dial with or without the area code and with or without the 1. Press SELECT. Press or until DIAL flashes. Press SELECT. The number is automatically dialed. — OR — When the number is correctly displayed for dialing, press TALK/FLASH. Store a call history record in the directory 1. Locate the record in the call history you want to store in the directory. www.vtechphones.com 27 Basic operation Delete a specific call 1. Locate the record you want to delete from call history. 2. Press the REMOVE key. You’ll hear a confirmation beep. Delete all calls 1. With the handset in idle (off) mode, press and hold the REMOVE key. The screen displays ERASE ALL NO YES. The current choice flashes. 2. Press until YES flashes. 3. Press SELECT. You’ll hear a confirmation beep. Caller ID • Caller ID numbers may appear with an area code that may not be required for local calls, or without a 1 that may be needed for long distance calls. If the number displayed is not in the correct format, press # repeatedly to see the different dialing options. You can choose to dial with or without the area code and with or without the 1. 2. You can change the number of digits that you dial or store from the call log. While reviewing the call log, press # repeatedly to display these dialing options for local and long distance numbers before dialing or saving the telephone number. See the side column (and illustration on the previous page) for more information on changing the dialing format. 3. Press SELECT, then press press SELECT again. or until PROGRAM flashes, then 4. You will be given the option to edit the name and press SELECT. Then you can edit the number and press SELECT. 5. Press or to select Y or N for distinctive ringer. 800-595-9511 NEW28 5:40PM 12/30 DIAL PROGRAM 800-595-9511 NEW28 5:40PM 12/30 DISTINCT RING? N 800-595-9511 6. Press SELECT. You’ll hear a confirmation beep. If you choose Y in step 5 a will be displayed with the directory entry. Display screen messages 28 Screen displays: When: PRIVATE CALLER The other party is blocking name and/or number information. UNKNOWN CALLER Your phone company is unable to receive information about this caller’s name and/or number. * This caller has called you more than once. (after name) www.vtechphones.com Telephone operation Display screen messages When: ** RINGING ** There is a call coming in. CONNECTING... The handset is waiting for dial tone. PHONE ON The handset is in use. NEW VOICEMAIL You have been alerted by the telephone company that you have received new voice mail. ** PAGING ** The telephone base is paging the handset. BATTERY LOW The battery needs to be recharged. SCANNING... The handset is changing to another of the 30 channels available. OTHER HANDSET ON OR OUT OF RANGE 1. Displays when one handset is on a call and the other handset presses TALK/FLASH. 2. Displays when telephone base power is off and TALK/FLASH is pressed. You’ll also hear an error tone. 3. Displays when an out-of-range dial fails to connect. RINGER: OFF The handset ringer is turned off. www.vtechphones.com Basic operation Screen displays: 29 Battery information Battery care and maintenance After your battery is fully charged, you can expect the following performance: •If you repeatedly get a low battery indicator, even after charging overnight, the battery should be replaced. • To reduce the risk of fire or injury to persons or damage to the telephone, read and follow these instructions carefully: Charge the battery provided with or identified for use with this product only in accordance with the instructions and limitations specified in the user’s manual. 30 Operation Operating time While in use (talking) up to 5 hours While not in use (standby*) up to 7 days * Handset is off the telephone base or charger but not in use. • The battery needs charging when: — A new battery is installed in the handset. — The phone beeps twice every five seconds. — The screen displays BATTERY LOW and the low battery icon. •Place the handset in the telephone base or charger so the charge light turns on. The battery is typically fully charged in 16 hours. •You can keep the battery fully charged by returning the handset to the telephone base or charger after each use. Replacing the handset battery 1.Remove the battery compartment cover on the handset by pressing on the indentation and sliding the cover downward. 2. Lift out the old battery and disconnect. 3.Align the two holes in the new battery’s plug with the socket pins, and snap the plug into place. Snap the battery in the compartment, as described in Installation, on page 3. 4. Replace the cover by sliding it up into place. 5.The new battery must be charged before using the phone. Place the handset in the telephone base or charger and allow it to charge for at least 16 hours the first charge. The telephone might operate before that, but for best performance, let the battery charge fully. www.vtechphones.com Troubleshooting If you have difficulty operating your phone, the suggestions below should solve the problem. If you still have difficulty after trying these suggestions, call VTech Communications at 1-800-595-9511. In Canada, call VTech Telecommunications Canada Ltd. at 1-800-267-7377. Suggestion My telephone does not work at all. • Make sure the battery is installed and charged correctly (see page 3 and 30). For optimum daily performance, return the cordless handset to the telephone base after use. • Make sure the power adapter is securely plugged into an outlet not controlled by a wall switch. • Make sure the telephone line cord is plugged firmly into the telephone base and the modular wall jack. • Unplug the unit’s electrical power and remove the battery from the handset. Wait for 15 seconds then plug in the battery and plug in the power. Allow up to one minute for the cordless handset and base to synchronize. • Charge the battery in the cordless handset for at least 16 hours. • Remove and re-insert the battery. If that still does not work, it may be necessary to purchase a new battery pack. • Disconnect the telephone base from the modular jack and plug in a working telephone. If this telephone does not work, the problem is probably in the wiring or the local service. Call the local telephone company. BATTERY LOW is displayed on screen • Place the handset in the telephone base or charger for recharging. • Remove and re-install the battery and use it normally until fully discharged, then recharge the handset on the telephone base or charger for 16 hours. • If the above measures do not correct the problem, the battery may need to be replaced. www.vtechphones.com 31 Additional information Problem Troubleshooting Problem Suggestion The battery does not charge in the handset or the handset battery does not accept charge • Make sure the handset is placed in the charger correctly. The CHARGE light on the telephone base or charger should be on. • Remove the battery from the handset and install it in the spare battery compartment on the side of the telephone base and let it charge for 16 hours. Then re-install the charged battery into the handset. • If the cordless handset is in the charger or in the telephone base but the CHARGE light is not on, refer to The charge light is off in this section. • It may be necessary to purchase a new battery. Please refer to the Battery information section on page 30 of this user’s manual. • The telephone might be malfunctioning. Please refer to the Warranty section on page 40 of this user’s manual for further instruction. The CHARGE light is off • Clean the charging contacts on the cordless handset(s) and telephone base each month using a pencil eraser or a dry non-abrasive fabric. • Make sure the power adapter and telephone line cords are plugged in correctly and securely. • Unplug the power adapter. Wait for 15 seconds before plugging it back in. Allow up to one minute for the cordless handset and telephone base to reset. • The telephone might be malfunctioning. Please refer to the Warranty section on page 40 of this user’s manual for further instruction. 32 www.vtechphones.com Troubleshooting Problem Suggestion The CHARGE/IN USE Indicator on the telephone base is flashing • This is a signal that the battery is very low, completely depleted, or when there is no electrical contact between the battery and the telephone base. • Ensure the connector of the battery is securely plugged into the handset and place the handset in the telephone base for charging. There is no dial tone. • First, try all the above suggestions. • Move the cordless handset closer to the telephone base. It might be out of range. • The telephone line cord might be malfunctioning. Try installing a new telephone line cord. •Disconnect the telephone base from the telephone jack and connect a different telephone. If there is no dial tone on the telephone either, the problem is in your wiring or local service. Contact your local telephone company. 33 Additional information www.vtechphones.com Troubleshooting Problem Suggestion The telephone does not ring when there is an incoming call. • Make sure the ringer is on. (See page 14). • Make sure the telephone line cord and power adapter are plugged in properly (see page 2). • The cordless handset may be too far from the telephone base. Move it closer to the telephone base. • There may be too many extension phones on the telephone line to allow all of them to ring simultaneously. Try unplugging some of them. • If the other telephones in your home are having the same problem, the problem is in the wiring or local service. Contact the local telephone company (charges may apply). • Other electronic products can cause interference to your cordless telephone. Try installing your telephone as far away as possible from the following electronic devices: wireless routers, radios, radio towers, pager towers, cellular telephones, digital telephones, intercoms, room monitors, televisions, VCRs, personal computers, kitchen appliances, and other cordless telephones. • Test a working telephone at the telephone jack. If another telephone has the same problem, the problem is in the telephone jack. Contact your local telephone company (charges may apply). • The telephone line cord might be malfunctioning. Try installing a new telephone line cord. • Re-install the battery pack and place the cordless handset in the telephone base. • Wait for the cordless handset to synchronize with the telephone base. Allow up to one minute for this to take place. 34 www.vtechphones.com Troubleshooting Problem Suggestion www.vtechphones.com 35 Additional information My handset does not • Make sure you have the ringer activated. Refer to the section(s) on ringer selection in this ring when I receive user’s manual. a call. • Make sure the telephone line cord is plugged firmly into the telephone base and the telephone jack. Make sure the power cord is plugged in. • You may be too far from the telephone base. • Charge the battery in the handset for 16 hours. For optimum daily performance, return the handset to its base when not in use. • You may have too many extension phones on your telephone line to allow all of them to ring. Try unplugging some of the other phones. • The layout of your home or office might be limiting the operating range. Try moving the base to another location, preferably on an upper floor. • If the other phones in your home are having the issue, the problem is in your wiring or local service. Contact your local telephone company (charges may apply.) • Test a working phone at the phone jack. If another phone has the same problem, the problem is the phone jack. Contact your local telephone company (charges may apply.) • Other electronic products can cause interference with your cordless phone. Try installing your phone as far away from these types of electronic devices as possible: wireless routers, radios, radio towers, pager towers, cell phones, intercoms, room monitors, televisions, personal computers, kitchen appliances and other cordless phones • Your line cord might be malfunctioning. Try installing a new line cord. Troubleshooting Problem Suggestion I cannot dial out. • First, try all the above suggestions. • Make sure there is a dial tone before dialing. It is normal if the cordless handset takes a second or two to synchronize with the telephone before producing a dial tone. Wait an extra second before dialing. • Make sure the telephone is set to the correct dial mode (pulse dial or tone dial) for the service in your area. Refer to the Set dal mode section of this user’s manual (page 13) to set the dial mode. • If the other telephones in your home are having the same problem, the problem is in the wiring or local service. Contact your local telephone company (charges may apply). • Eliminate any background noise. Noise from a television, radio, or other appliances may cause the telephone to not dial out properly. If you cannot eliminate the background noise, first try muting the cordless handset before dialing, or dialing from another room in your home with less background noise. I hear other calls when using the telephone. • Disconnect the telephone base from the telephone jack. Plug in a different telephone. If you still hear other calls, the problem is probably in the wiring or local service. Call your local telephone company. • Press the CHAN key to switch to a clear channel when on a call. I hear noise in the cordless handset, and none of the keys or buttons work. • Make sure the telephone line cord is plugged in securely. 36 www.vtechphones.com Troubleshooting Suggestion There is noise or interference during a telephone conversation. • The handset may be out of range. Move it closer to the telephone base. • Appliances or other cordless telephones plugged into the same circuit as the telephone base can cause interference. Try moving the appliance or telephone base to another outlet. • Other electronic products can cause interference to your cordless telephone. Try installing your telephone as far away as possible from the following electronic devices: wireless routers, radios, radio towers, pager towers, cellular telephones, digital telephones, intercoms, room monitors, televisions, VCRs, personal computers, kitchen appliances, and other cordless telephones. • Microwave ovens operate on the same frequency as your telephone. It is normal to experience static on your telephone while the microwave oven is operating. Do not install this telephone in the same outlet or near a microwave oven. • If your telephone is plugged in with a modem or a surge protector, plug the telephone (or modem/surge protector) into a different location. If this solves the problem, re-locate your telephone or modem farther apart from each other, or use a different surge protector. • The layout of your home or office might be limiting the operating range. Try moving the base to another location, preferably a higher location for better reception. • Disconnect the telephone base from the modular jack and plug in a corded telephone. If calls are still not clear, the problem is probably in the wiring or local service. Contact your local service company (charges may apply). • Select channels 4 through 10 for your router (refer to the user’s manual of your router for more information). • If you still have problems with the telephone or the router, make sure the handset is ON and press CHAN until the performance improves. • Press the CHAN button while on a call until the interference has been eliminated. • If the other telephones in your home are having the same problem, the problem is in the wiring or local service. Contact the local telephone company (charges may apply). My calls fade out or cut in and out when I am using the cordless handset. www.vtechphones.com 37 Additional information Problem Troubleshooting Problem Suggestion • Do you have DSL service? If yes, you need to have a DSL filter installed at every telephone jack that has a telephone connected to it. Contact your DSL service provider for filter information. My caller ID features are not working properly. • Caller ID is a subscription service. You must subscribe to this service from your local telephone company for this feature to work on your telephone. • The caller may not be calling from an area which supports caller ID. • Both you and the caller’s telephone companies must use equipment which are compatible with caller ID service. • If you subscribe to DSL service, install a DSL filter to the telephone line between the telephone base and the telephone line jack. Contact your DSL service provider for filter information. The system does not receive caller ID or the system does not display caller ID during call waiting. • Make sure you subscribe to caller ID with call waiting features services provided by the local telephone company. • The caller may not be calling from an area which supports caller ID. • Both you and the caller’s telephone companies must use equipment which are compatible with caller ID service. • If you subscribe to DSL service, install a DSL filter to the telephone line between the telephone base and the telephone line jack. Contact your DSL service provider for filter information. Caller ID entries do not match the numbers I need to dial. • Although the call log entries you receive are 10 digits, (the area plus the 7-digit number,) in some areas, you may need to dial only the seven digits, or a 1 plus the seven digits, or a 1 plus the area code plus the seven digits. You can change the number of digits that you dial or store from the call log. • While reviewing the call log, press # repeatedly to display these dialing options for local and long distance numbers before dialing or saving the telephone number. 38 www.vtechphones.com Troubleshooting Suggestion My cordless handset beeps five times and is not performing normally • Make sure the power cord is securely plugged into the telephone base. Plug the unit into a different working electrical outlet not controlled by a wall switch. • Move the cordless handset closer to the telephone base. It may be out of range. • Reset the telephone base by unplugging and removing the battery from the handset. Wait for 15 seconds then plug in the battery and plug in the power. Allow up to one minute for the cordless handset and the telephone base to synchronize. • Other electronic products can cause interference to your cordless telephone. Try installing your telephone as far away from these electronic devices as possible: wireless routers, radios, radio towers, pager towers, cellular telephones, intercoms, room monitors, televisions, personal computers, kitchen appliances and other cordless telephones Common cure for electronic equipment • If the unit is not responding normally, try putting the cordless handset in the telephone base or the charger. If it does not seem to respond, try the following (in the order listed): • Disconnect the power to the telephone base. • Disconnect the battery on the cordless handset and the spare battery in the telephone base. • Wait a few minutes before connecting power to the telephone base. • Re-install the battery and place the cordless handset into the telephone base or charger. • Wait for the cordless handset to synchronize its connection with the telephone base. Allow up to one minute for this to take place. www.vtechphones.com 39 Additional information Problem Maintenance Taking care of your telephone Your cordless telephone contains sophisticated electronic parts, so it must be treated with care. Avoid rough treatment Place the handset down gently. Save the original packing materials to protect your telephone if you ever need to ship it. Avoid water Your telephone can be damaged if it gets wet. Do not use the handset outdoors in the rain, or handle it with wet hands. Do not install your telephone base near a sink, bathtub or shower. Electrical storms Electrical storms can sometimes cause power surges harmful to electronic equipment. For your own safety, use caution when using electric appliances during storms. Cleaning your telephone Your telephone has a durable plastic casing that should retain its luster for many years. Clean it only with a soft cloth slightly dampened with water or a mild soap. Do not use excess water or cleaning solvents of any kind. Limited Warranty What does this limited warranty cover? The manufacturer of this VTech Product warrants to the holder of a valid proof of purchase (“Consumer” or “you”) that the Product and all accessories provided in the sales package (“Product”) are free from defects in material and workmanship, pursuant to the following terms and conditions, when installed and used normally and in accordance with the Product operating instructions. This limited warranty extends only to the Consumer for Products purchased and used in the United States of America and Canada. What will VTech do if the Product is not free from defects in materials and workmanship during the limited warranty period (“Materially Defective Product”)? During the limited warranty period, VTech’s authorized service representative will repair or replace at VTech’s option, without charge, a Materially Defective Product. If we repair the Product, we may use new or refurbished replacement parts. If we choose to replace the Product, we may replace it with a new or refurbished Product of the same or similar design. We will retain defective parts, modules, or equipment. Repair or replacement of the Product, at VTech’s option, is your exclusive remedy. VTech will return repaired or replacement Products to you in working condition. You should expect the repair or replacement to take approximately 30 days. How long is the limited warranty period? The limited warranty period for the Product extends for ONE (1) YEAR from the date of purchase. If VTech repairs or replaces a Materially Defective Product under the terms of this limited warranty, this limited warranty also applies to repaired or replacement Product for a period of either (a) 90 days from the date the repaired or replacement Product is shipped to you or (b) the time remaining on the original one-year warranty; whichever is longer. What is not covered by this limited warranty? This limited warranty does not cover: 1. Product that has been subjected to misuse, accident, shipping or other physical damage, improper installation, abnormal operation or handling, neglect, inundation, fire, water or other liquid intrusion; or 2. Product that has been damaged due to repair, alteration or modification by anyone other than an authorized service representative of VTech; or 3. Product to the extent that the problem experienced is caused by signal conditions, network reliability, or cable or antenna systems; or 4. Product to the extent that the problem is caused by use with non-VTech accessories; or 5. Product whose warranty/quality stickers, Product serial numbers plates or electronic serial numbers have been removed, altered or rendered illegible; or 6. Product purchased, used, serviced, or shipped for repair from outside the United States of America or Canada, or used for commercial or institutional purposes (including but not limited to Products used for rental purposes); or 7. Product returned without valid proof of purchase (see item 2 below); or 40 www.vtechphones.com Limited Warranty 8. Charges for installation or set up, adjustment of customer controls, and installation or repair of systems outside the unit. How do you get warranty service? To obtain warranty service in the United States of America, please call 1-800-595-9511; In Canada, please dial 1 (800) 267-7377. NOTE: Before calling for service, please review the user’s manual - a check of the Product controls and features may save you a service call. Except as provided by applicable law, you assume the risk of loss or damage during transit and transportation and are responsible for delivery or handling charges incurred in the transport of the Product(s) to the service location. VTech will return repaired or replaced Product under this limited warranty to you, transportation, delivery or handling charges prepaid. VTech assumes no risk for damage or loss of the Product in transit. If the Product failure is not covered by this limited warranty, or proof of purchase does not meet the terms of this limited warranty, VTech will notify you and will request that you authorize the cost of repair prior to any further repair activity. You must pay for the cost of repair and return shipping costs for the repair of Products that are not covered by this limited warranty. What must you return with the Product to get warranty service? 1. Return the entire original package and contents including the Product to the VTech service location along with a description of the malfunction or difficulty; and 2. Include “valid proof of purchase” (sales receipt) identifying the Product purchased (Product model) and the date of purchase or receipt; and 3. Provide your name, complete and correct mailing address, and telephone number. Other Limitations This warranty is the complete and exclusive agreement between you and VTech. It supersedes all other written or oral communications related to this Product. VTech provides no other warranties for this Product. The warranty exclusively describes all of VTech’s responsibilities regarding the Product. There are no other express warranties. No one is authorized to make modifications to this limited warranty and you should not rely on any such modification. State/Provincial Law Rights: This warranty gives you specific legal rights, and you may also have other rights, which vary from state to state or province to province. Limitations: Implied warranties, including those of fitness for a particular purpose and merchantability (an unwritten warranty that the Product is fit for ordinary use) are limited to one year from date of purchase. Some states/provinces do not allow limitations on how long an implied warranty lasts, so the above limitation may not apply to you. In no event shall VTech be liable for any indirect, special, incidental, consequential, or similar damages (including, but not limited to lost profits or revenue, inability to use the Product or other associated equipment, the cost of substitute equipment, and claims by third parties) resulting from the use of this Product. Some states/provinces do not allow the exclusion or limitation of incidental or consequential damages, so the above limitation or exclusion may not apply to you. Please retain your original sales receipt as proof of purchase. 41 Additional information www.vtechphones.com Important safety instructions When using your telephone equipment, basic safety precautions should always be followed to reduce the risk of fire, electric shock and injury, including the following: 1. Read and understand all instructions. 2. Follow all warnings and instructions marked on the product. 3.Unplug this product from the wall outlet before cleaning. Do not use liquid or aerosol cleaners. Use a damp cloth for cleaning. 4. Do not use this product near water (for example, near a bath tub, kitchen sink or swimming pool). 5.Do not place this product on an unstable surface, such as a table, shelf or stand. The product may fall, causing serious damage. 6.Slots and openings in the back or bottom of the telephone base and handset are provided for ventilation. To protect them from overheating, these openings must not be blocked by placing the product on a soft surface such as a bed, sofa or rug. This product should never be placed near or over a radiator or heat register. This product should not be placed in any area where proper ventilation is not provided. 7.This product should be operated only from the type of power source indicated on the marking label. If you are not sure of the type of power supply in your home, consult your dealer or local power company. 8.Do not allow anything to rest on the power cord. Do not install this product where the cord may have anyone walking on it. 9.Never push objects of any kind into this product through slots in the base or handset as they may touch dangerous voltage points or short out parts that could result in a risk of fire or electric shock. Never spill liquid of any kind on the product. 10. To reduce the risk of electric shock, do not disassemble this product, but take it to an authorized service facility. Opening or removing parts of the base or handset other than specified access doors may expose you to dangerous voltages or other risks. Incorrect reassembling can cause electric shock when the product is subsequently used. 11. Do not overload wall outlets and extension cords as this can result in the risk of fire or electric shock. 12.Unplug this product from the wall outlet and refer servicing to an authorized service facility under the following conditions: A. When the power supply cord or plug is damaged or frayed. B. If liquid has been spilled onto the product. C. If the product has been exposed to rain or water. D.If the product does not operate normally by following the operating instructions. Adjust only those controls that are covered by the operating instructions, as improper adjustment of other controls may result in damage and often requires extensive work by an authorized technician to restore the product to normal operation. E. If the product has been dropped and the base and/or handset has been damaged. F. If the product exhibits a distinct change in performance. 13.Avoid using a telephone (other than cordless) during an electrical storm. There is a remote risk of electric shock from lightning. 14. Do not use the telephone to report a gas leak in the vicinity of the leak. 15. Only put the handset of your telephone next to your ear when it is in normal talk. 16. This power unit is intended to be correctly orientated in a vertical or floor mount position. The prongs are not designed to hold the plug in place if it is plugged into a ceiling or an under the table/cabinet outlet. SAVE THESE INSTRUCTIONS 42 www.vtechphones.com FCC, ACTA and IC regulations FCC Part 15 This equipment has been tested and found to comply with the requirements for a Class B digital device under Part 15 of the Federal Communications Commission (FCC) rules. These requirements are intended to provide reasonable protection against harmful interference in a residential installation. This equipment generates, uses and can radiate radio frequency energy and, if not installed and used in accordance with the instructions, may cause harmful interference to radio communications. However, there is no guarantee that interference will not occur in a particular installation. If this equipment does cause harmful interference to radio or television reception, which can be determined by turning the equipment off and on, the user is encouraged to try to correct the interference by one or more of the following measures: * Reorient or relocate the receiving antenna. * Increase the separation between the equipment and receiver. * Connect the equipment into an outlet on a circuit different from that to which the receiver is connected. * Consult the dealer or an experienced radio/TV technician for help. Changes or modifications to this equipment not expressly approved by the party responsible for compliance could void the user’s authority to operate the equipment. To ensure safety of users, the FCC has established criteria for the amount of radio frequency energy that can be safely absorbed by a user or bystander according to the intended usage of the product. This product has been tested and found to comply with the FCC criteria. The handset may be safely held against the ear of the user. The telephone base shall be installed and used such that parts of the user’s body other than the hands are maintained at a distance of approximately 20 cm (8 inches) or more. If you choose to use a clipping device, please make sure to only use the supplied VTech belt clip. FCC Part 68 and ACTA This equipment complies with Part 68 of the FCC rules and with technical requirements adopted by the Administrative Council for Terminal Attachments (ACTA). The label on the back or bottom of this equipment contains, among other things, a product identifier in the format US:AAAEQ##TXXXX. This identifier must be provided to your local telephone company upon request. The plug and jack used to connect this equipment to premises wiring and the telephone network must comply with applicable Part 68 rules and technical requirements adopted by ACTA. A compliant telephone cord and modular plug is provided with this product. It is designed to be connected to a compatible modular jack that is also compliant. An RJ11 jack should normally be used for connecting to a single line and an RJ14 jack for two lines. See Installation Instructions in the user’s manual. The Ringer Equivalence Number (REN) is used to determine how many devices you may connect to your telephone line and still have them ring when you are called. The REN for this product is encoded as the 6th and 7th characters following the US: in the product identifier (e.g., if ## is 03, the REN is 0.3). In most, but not all areas, the sum of all RENs should be five (5.0) or less. For more information, please contact your local telephone company. If this equipment is malfunctioning, it must be unplugged from the modular jack until the problem has been corrected. Repairs to this telephone equipment can only be made by the manufacturer or its authorized agents. For repair procedures, follow the instructions outlined under the Limited Warranty. If this equipment is causing harm to the telephone network, the telephone company may temporarily discontinue your telephone service. The telephone company is required to notify you before interrupting service. If advance notice is not practical, you will be notified as soon as possible. You will be given the opportunity to correct the problem and the telephone company is required to inform you of your right to file a complaint with the FCC. Your telephone company may make changes in its facilities, equipment, operation, or procedures that could affect the proper functioning of this product. The telephone company is required to notify you if such changes are planned. If this product is equipped with a corded or cordless handset, it is hearing aid compatible. If this product has memory dialing locations, you may choose to store emergency telephone numbers (e.g., police, fire, medical) in these locations. If you do store or test emergency numbers, please: www.vtechphones.com 43 Additional information This equipment may not be used with Party Lines. If you have specially wired alarm dialing equipment connected to your telephone line, ensure the connection of this equipment does not disable your alarm equipment. If you have questions about what will disable alarm equipment, consult your telephone company or a qualified installer. FCC, ACTA and IC regulations * Remain on the line and briefly explain the reason for the call before hanging up. * Perform such activities in off-peak hours, such as early morning or late evening. Industry Canada This equipment complies with regulations RSS210 and CS-03 of Industry Canada. Operation is subject to the following two conditions: (1) this device may not cause interference, and (2) this device must accept any interference, including interference that may cause undesired operation of the device. The term ‘’IC: ‘’ before the certification/registration number only signifies that the Industry Canada technical specifications were met. The Ringer Equivalence Number (REN) for this terminal equipment is 0.1. The REN is an indication of the maximum number of devices allowed to be connected to a telephone interface. The termination on an interface may consist of any combination of devices subject only to the requirement that the sum of the RENs of all the devices does not exceed five. The RBRC® seal The RBRC ® Seal on the nickel-cadmium battery indicates that VTech Communications, Inc. is voluntarily participating in an industry program to collect and recycle these batteries at the end of their useful lives, when taken out of service within the United States and Canada. The RBRC ® program provides a convenient alternative to placing used nickel-cadmium batteries into the trash or municipal waste, which may be illegal in your area. VTech’s participation in RBRC ® makes it easy for you to drop off the spent battery at local retailers participating in the RBRC ® program or at authorized VTech product service centers. Please call 1-800-8-BATTERY™ for information on Ni-Cd battery recycling and disposal bans/restrictions in your area. VTech’s involvement in this program is part of its commitment to protecting our environment and conserving natural resources. RBRC® is a registered trademark of Rechargeable Battery Recycling Corporation. 44 www.vtechphones.com Technical specifications Enhanced 5.8GHz technology–your phone operates on a dual band transmission that combines the best of 5.8GHz and 900MHz technologies, providing enhanced performance over standard cordless telephones. Frequency control Crystal controlled PLL synthesizer Transmit frequency Telephone base: 912.75 - 917.10 MHz Handset: 5863.80 - 5872.5 MHz Receive frequency Telephone base: 5863.80 - 5872.5 MHz Handset: 912.75 - 917.10 MHz Channels 30 Nominal effective range Maximum power allowed by FCC and IC. Actual operating range may vary according to environmental conditions at the time of use. Size Handset: 184mm X 52mm X 41mm Telephone base: 143.61mm X 108mm X 103.26mm (with wall mount) Charger: 85mm X 78mm X 50mm Weight Handset: 130 grams Charger: 61grams Power requirements Handset: 400mAH Ni-Cd battery Charger: 9V DC @ 150mA Memory Nine speed dial locations; up to 24 digits, 15 characters per location Directory: 20 memory locations (including the nine speed dial entries); up to 24 digits, 15 characters per location Caller ID: 45 memory locations Telephone base: 219.8 grams (with wall mount) www.vtechphones.com 45 Additional information Telephone base: 9V AC @ 250mA Index A About call history (caller ID) 25-28 Answering calls 10 B Battery information 30 Belt clip 7 C Caller ID 25-28 Call transfer 17 Charge the handset battery 5, 14 Check for dial tone 5, 14 Choose location 3 Clear voicemail alert 17 Connect power and telephone line cords 2 D Delete all calls 27 Delete a specific call 27 Delete a speed dial entry 24 Delete records from call history 27 Desk/table bracket installation 4 Dial a directory number 21 Dial a displayed number 27 Dial a speed dial number 24 Directory 18-21 46 Display screen messages 28, 29 E Edit a directory entry 19 Edit a speed dial entry 23 Ending calls 10 Erase a directory entry 20 Maintenance 40 Making calls 10 Move a directory entry to the speed dial 20 N New voice mail 16 F O FCC, ACTA and IC regulations 43, 44 Operating range 16 H P Handset layout 8 Handset operation 10 Handset ringer style/battery save 6, 14 Headset jack 15 Parts check list 1 I If you subscribe to DSL service 6 Important safety instructions 42 Installation 2, 3, 4, 5, 6, 7 Install handset battery 3 Internet 6 L Language 13 Limited Warranty 40,41 M www.vtechphones.com R Reassign locations in speed dial 24 Replacing the handset battery 30 Review call history 26 S Set dial mode 13 Set handset date and time 5, 13 Set language 13 Set ringer volume 14 Set the dial mode 5 Speed dial 22-24 Store a call history record in the directory 27 Store a directory entry 18 Store a speed dial entry 22 Index T Table of contents i, ii Technical specifications 45 Telephone base layout 9 Telephone base operation 12 Telephone operation 8-17, 29 Temporary tone dialing 15 The RBRC® seal 44 Troubleshooting 31-39 V Voice mail indicator 12 W Wall mounting 4 www.vtechphones.com 47 VTECH TELECOMMUNICATIONS LTD. A member of THE VTECH GROUP OF COMPANIES. Distributed in the U.S.A. by VTech Communications, Inc. Beaverton, Oregon Distributed in Canada by VTech Telecommunications Canada, Ltd., Richmond, B.C. Copyright ©2007 for VTECH TELECOMMUNICATIONS LTD. Printed in China. v0.5 91-000908-040-100 User’s manual www.vtechphones.com Model: ia5847