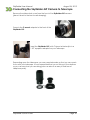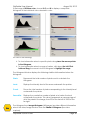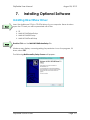
1
SKYRAIDER Revision Sheet [Version 2.0] Michael Burns Rock Mallin [SkyRaider User Manual] This document will quickly introduce you to the wonders of the MallinCam SkyRaider Camera. It will include instructions on how to install the Software and Drivers and how connect the SkyRaider to your computer along with explanations of the camera’s major settings. The purpose of this guide is to quickly get you up and running with the SkyRaider Camera so that you can image. For a more detailed explanation of the various camera parameter settings, look for the SkyRaider User Manual. SkyRaider Quick Guide Page i Revision Sheet Revision History Version Date Revision Description 1.0 07/17/2015 Template Creation 2.0 08/26/2015 Version 3.7.5985 SkyRaider Quick Guide Page ii SkyRaider User Manual August 26, 2015 Table of Contents Contents Revision History ................................................................................................................................... ii Table of Contents .......................................................................................................................... 1 1. Introduction ............................................................................................................................ 5 The Contents of the SkyRaider-DS Package ....................................................................... 6 Specifications: ........................................................................................................................................ 6 System Requirements: ........................................................................................................................... 7 In the Box............................................................................................................................................... 7 The Contents of the SkyRaider-SLP Package ..................................................................... 8 Specifications: ........................................................................................................................................ 8 System Requirements: ........................................................................................................................... 9 In the Box............................................................................................................................................... 9 The Contents of the SkyRaider-AG Package ..................................................................... 10 System Requirements: ......................................................................................................................... 10 In the Box............................................................................................................................................. 11 2. Installing Driver and Software ............................................................................. 12 System Requirements .............................................................................................................. 12 Installing the Software ............................................................................................................. 12 3. Connecting the SkyRaider .................................................................................. 15 Connecting the SkyRaider-DS Camera to Computer ........................................................... 15 Connecting the SkyRaider-DS Camera to Telescope............................................................ 16 Connecting the SkyRaider-G Camera to Computer............................................................. 17 Connecting the SkyRaider-G Camera to Telescope.............................................................. 18 Connecting the SkyRaider-SLP Camera to Computer ........................................................ 19 Connecting the SkyRaider-SLP Camera to Telescope ......................................................... 20 4. Using MallincamSky Software ............................................................................ 21 The MallincamSky Window .................................................................................................... 21 SkyRaider Quick Setup and WorkFlow ................................................................................ 22 Detailed Workflow for MallincamSky................................................................................................. 23 Select SkyRaider Camera..................................................................................................................... 23 Select an Exposure Time for Dark Field Correction ............................................................................ 23 Take Dark Field Correction ................................................................................................................. 24 Reduce Exposure Time to Align Telescope ......................................................................................... 25 SkyRaider Quick Guide Page 1 SkyRaider User Manual August 26, 2015 Increase Exposure Time to Image ........................................................................................................ 25 Adjust the Parameters .......................................................................................................................... 25 5. The SkyRaider Software Controls ....................................................................... 26 Top Menu Line ......................................................................................................................... 26 File ....................................................................................................................................................... 26 Open Image ...................................................................................................................................... 27 Open Video ...................................................................................................................................... 28 Open Broadcast ................................................................................................................................ 29 Save .................................................................................................................................................. 29 Save As …........................................................................................................................................ 29 Batch Save… .................................................................................................................................... 32 Quick Save… ................................................................................................................................... 34 Paste as New File ............................................................................................................................. 34 Recent Files ...................................................................................................................................... 35 Exit ................................................................................................................................................... 35 Edit ...................................................................................................................................................... 35 Cut .................................................................................................................................................... 35 Copy ................................................................................................................................................. 36 Paste ................................................................................................................................................. 36 Image Select ..................................................................................................................................... 36 Select All .......................................................................................................................................... 36 Select None ...................................................................................................................................... 36 View ..................................................................................................................................................... 37 Browse.............................................................................................................................................. 37 Sidebar.............................................................................................................................................. 38 Grids ................................................................................................................................................. 39 Best Fit ............................................................................................................................................. 41 Actual Size ....................................................................................................................................... 41 Full Screen ....................................................................................................................................... 42 Track ................................................................................................................................................ 42 Reticule ............................................................................................................................................ 42 Browse ................................................................................................................................................. 43 Sort ................................................................................................................................................... 43 Icons ................................................................................................................................................. 43 Paste Shortcut ................................................................................................................................... 43 Delete ............................................................................................................................................... 43 Refresh ............................................................................................................................................. 44 Properties.......................................................................................................................................... 44 Setup.................................................................................................................................................... 44 Start/Pause ........................................................................................................................................ 44 View Properties… ............................................................................................................................ 44 ST4 Test… ....................................................................................................................................... 45 Capture ............................................................................................................................................... 46 Capture Image .................................................................................................................................. 46 Start Time-Lapse (Auto Capture)… ................................................................................................. 46 Start Record… .................................................................................................................................. 48 Start Broadcast… ............................................................................................................................. 49 Image ................................................................................................................................................... 50 Mode ................................................................................................................................................ 50 Adjust ............................................................................................................................................... 51 Rotate ............................................................................................................................................... 56 Crop .................................................................................................................................................. 57 Scale… ............................................................................................................................................. 58 Histogram ......................................................................................................................................... 59 SkyRaider Quick Guide Page 2 SkyRaider User Manual August 26, 2015 Process................................................................................................................................................. 61 Image Stacking ................................................................................................................................. 64 Options ................................................................................................................................................ 66 Window ............................................................................................................................................... 70 Close All........................................................................................................................................... 70 Reset Window Layout ...................................................................................................................... 71 Windows… ...................................................................................................................................... 71 About ................................................................................................................................................... 72 MallincamSky Toolbar ............................................................................................................ 73 Open ..................................................................................................................................................... 73 Save...................................................................................................................................................... 74 Quick Save ........................................................................................................................................... 74 Browse ................................................................................................................................................. 75 Zoom .................................................................................................................................................... 76 Image Select ......................................................................................................................................... 76 Track .................................................................................................................................................... 76 Stitch ............................................................................................................................................... 77 EDF ...................................................................................................................................................... 80 Reticule ................................................................................................................................................ 82 ST4 Test .......................................................................................................................................... 82 6. Controlling the SkyRaider ................................................................................... 84 Camera List .............................................................................................................................. 84 Capture and Resolution ........................................................................................................... 84 Exposure & Gain...................................................................................................................... 87 Exposure Target ................................................................................................................................... 87 Exposure Time ..................................................................................................................................... 88 Gain...................................................................................................................................................... 89 Defaults ................................................................................................................................................ 89 Color Balance ........................................................................................................................... 89 Color Adjustment ..................................................................................................................... 90 Hue ....................................................................................................................................................... 90 Saturation ............................................................................................................................................. 91 Brightness ............................................................................................................................................ 91 Contrast ................................................................................................................................................ 91 Gamma ................................................................................................................................................. 92 Frame Rate ............................................................................................................................... 92 Color/Gray ................................................................................................................................ 93 Flip ............................................................................................................................................. 93 Sampling ................................................................................................................................... 93 Bit Depth ................................................................................................................................... 94 ROI ............................................................................................................................................ 94 Histogram ................................................................................................................................. 95 Dark Field Correction ............................................................................................................. 96 Select SkyRaider Camera..................................................................................................................... 96 Select an Exposure Time for Dark Field Correction ............................................................................ 96 Take Dark Field Correction ................................................................................................................. 97 Enable Check-box ................................................................................................................................ 97 Parameters ................................................................................................................................ 98 SkyRaider Quick Guide Page 3 SkyRaider User Manual August 26, 2015 7. Installing Optional Software .............................................................................. 101 Installing DirectShow Driver ................................................................................................ 101 Installing WDM Driver ......................................................................................................... 103 Installing Mallincam ASCOM Driver .................................................................................. 105 8. AutoGuiding with SkyRaider G ......................................................................... 106 AutoGuiding with MaximDL and DirectShow.................................................................... 106 Video Capture Pin ... .......................................................................................................................... 111 Video Capture Filter … ..................................................................................................................... 111 Running PHD2 with WDM Driver + ToupST4 Driver ...................................................... 112 Running PHD2 with ASCOM Driver ................................................................................... 117 9. Appendix ......................................................................................................... 121 How Do I … ............................................................................................................................ 121 How do I get rid of the Green Exposure Rectangle? .......................................................................... 121 How do I Select a part of the Image and Zoom in? ............................................................................ 121 How do I automatically save 1 image every 30 seconds? .................................................................. 122 How do I adjust the brightness in my monochrome SkyRaider? ....................................................... 122 How do I Broadcast my image onto Night Skies Network (NSN)? ................................................... 122 Can I Use MallincamSky with One SkyRaider and Auto-Guide with another? ................................ 122 How Do I Pause the Video? ............................................................................................................... 123 How do I Undo an Operation? ........................................................................................................... 123 How do I make my ROI the whole Image Again? ............................................................................. 123 How do I Turn Off Dark Field correction? ........................................................................................ 123 How Do I take Another Dark Field? .................................................................................................. 123 Dark Field Explanation ......................................................................................................... 124 Dark Frame vs Dark Field .............................................................................................................. 124 Dark Frame Subtraction ................................................................................................................. 124 Dark Field Correction ..................................................................................................................... 124 Setting up to Broadcast on Night Skies Network ................................................................ 126 Focal Reducers ....................................................................................................................... 133 MFR-8 ................................................................................................................................................ 133 User Notes ............................................................................................................................... 134 SkyRaider Quick Guide Page 4 SkyRaider User Manual 1. August 26, 2015 Introduction After years of designing and testing under all operative conditions, MallinCam has created the next generation of Live Astronomical Video CCD Cameras. Not only live observation is possible, the series of SkyRaider Cameras can take images and video recording too! No one in the industry has developed and pushed the envelope in an astronomical camera with such a state of the art product. We are the leader in the Live Video CCD camera industry and plan to stay that way for the benefit of astronomical advancement for the amateur community and professionals alike. The software package features the most advanced live video imaging system ever created. MallinCam has created the world's first software with the MC DarkField Subtraction System, on-the-fly eliminating the need of a Peltier cooler under live application and yet retaining the best low noise live image ever encountered on the market today. A MallinCam Advanced exclusive, the MallinCam Dark Field live subtraction feature is unique to the MallinCam SkyRaider Series of cameras. Images can be saved in the same manner or video files can be created with the same On-The-Fly DarkField correction. Among other advanced features, a live on-the-fly histogram make final image adjustment possible to produce the finest live image, with the option to save your view as an image or video file. The MallinCam SkyRaider-DS features the world renowned Hyper-circuit with a buffered variable gain. The Hyper circuit is used in our other camera designs and allows a user to increase sensitivity with low noise without increasing exposure time. A MallinCam Exclusive. Installation of the Hyper circuit in the SkyRaider-DS differs from other MallinCam cameras in that it uses a triple buffered electronic section to keep noise to a low level and still can be used with the Live MC Dark Field Subtraction for even lower noise. The MallinCam SkyRaider-DS features dual independent on board memory, ensuring separate video / imaging signal / data from the camera control through USB2 demand. No other video CCD camera system has these exciting unique features on the market today. The MallinCam SkyRaider-DS uses a two stage step up voltage driver to operate the CCD sensor to its maximum sensitivity at 15.3 volts from a 5 volts source. A MallinCam unique feature not found on any other video CCD cameras using USB2 system. The SkyRaider Cameras are USB cameras and due to the physical limitations of USB, the length of the cable is restricted to about 5 metres; even though some users may try to extend that distance using other hardware, there is no guarantee that the video signal (timing issue) will be recognized when going beyond the recommended maximum. Special thanks to Chris Appleton and Rock Mallin who expertise and experience are way beyond my capabilities. So thank you for your purchase, and let the adventure begin. SkyRaider Quick Guide Page 5 SkyRaider User Manual August 26, 2015 The Contents of the SkyRaider-DS Package The MallinCam SkyRaider-DS features the world renowned Hyper circuit with a buffered variable gain. The Hyper circuit is used in our other camera designs and allows a user to increase sensitivity with low noise without increasing exposure time. A MallinCam Exclusive. Installation of the Hyper circuit in the SkyRaider-DS differs from other MallinCam cameras in that it uses a triple buffered electronic section to keep noise to a low level and still can be used with the Live MC Dark Field Subtraction for even lower noise. The MallinCam SkyRaider-DS features dual independent on board memory, ensuring separate video / imaging signal / data from the camera control through USB2 demand. No other video CCD camera system has these exciting unique features on the market today. The MallinCam SkyRaider-DS uses a two stage step up voltage driver to operate the CCD sensor to its maximum sensitivity at 15.3 volts from a 5 volts source. A MallinCam unique feature not found on any other video CCD cameras using USB2 system. Specifications: PC Win XP, Win7, Win 8, Win 10. Will include a separate Mac software. Hypered Buffered Gain circuit for greater low noise sensitivity Two stage voltage step up to ensure full ccd sensor sensitivity Dual independent memories for image / camera control 5 meter (15 feet) USB2 cable included 1.25" C mount eyepiece adapter included Zinc Aluminum Alloy construction for unmatched durability Sealed multi coated optical window with 350 to 950nm range Grade 1 Industrial electronic components throughout 5 volts USB operation at low 250 ma current draw 13.30 oz / 377 grams Uses ceramic Sony ICX829 EXview HAD II Chip Available with color ccd sensor SkyRaider-DSc Available with monochrome ccd sensor SkyRaider-DSm 17.5 mm spacing between chip and front of SkyRaider-Ds SkyRaider Quick Guide Page 6 SkyRaider User Manual August 26, 2015 System Requirements: Equal to Intel Core2 2.8GHz or Higher Memory: 2GB or More USB port: USB2.0 High-speed Port Display: 17" or Larger Recommended In the Box Depending upon the SkyRaider Model purchased, the contents may vary, but all SkyRaider cameras include the following standard equipment: MALLINCAM SkyRaider-DS Camera High Precision 1.25" C mount Eyepiece Adapter 5 metre USB 2.0 cable. CDROM that contains the driver and software for the SkyRaider. SkyRaider Quick Guide Page 7 SkyRaider User Manual August 26, 2015 The Contents of the SkyRaider-SLP Package The New SkyRaider-SLP has been designed for Solar, Lunar and Planetary live viewing and imaging. Part of the SkyRaider series of USB type cameras, the New SkyRaider SLP has a 3MP sCMOS with pixel size of 2.5 x 2.5um capable of binning mode of 2048 X 1536, 1024 X 768, 684 X 512 in full color. A monochrome mode is also included in the software. The new MallinCam SkyRaider-SLP uses the same software of all other SkyRaider Series cameras. A 5 meter (15 feet) USB cable is included, sealed sensor chamber, passive cooling, and attractive stainless steel front mount to keep the sensor alignment with the optical train and make this camera built to last. There is no other camera designed and built for Solar, Lunar and Planetary like the new MallinCam SkyRaider-SLP. Specifications: PC Win XP, Win7, Win 8, Win 10. Up to 8 Seconds exposure @ 2048 X 1536 Binning mode 2048 X 1536, 1024 X 768, 684 X 512 Ceramic sCMOS sensor (super CMOS or scientific CMOS) Passive cooling for greater temperature stability Super low noise Superb Dynamic Range Up to 8 seconds exposure at full resolution Hypered Buffered Gain circuit for greater low noise Dual independent memories for image / camera control 5 meter (15 feet) USB2 cable included 1.25" C mount eyepiece adapter included Aluminum / Stainless Steel construction for unmatched durability Sealed multi coated optical window with 350 to 970nm range Grade 1 Industrial electronic components throughout 5 volts USB operation at low 200 ma current draw 9.30 oz / 263 grams Exclusive On-The-Fly Dark Frame subtraction Full live video mode, full screen selectable Full imaging capabilities Seamless fast download live video observation SkyRaider Quick Guide Page 8 SkyRaider User Manual August 26, 2015 System Requirements: Equal to Intel Core2 2.8GHz or Higher Memory: 2GB or More USB port: USB2.0 High-speed Port Display: 17" or Larger Recommended In the Box MALLINCAM SkyRaider-SLP Camera High Precision 1.25" C mount Eyepiece Adapter 5 metre USB 2.0 cable. CDROM that contains the driver and software for the SkyRaider. SkyRaider Quick Guide Page 9 SkyRaider User Manual August 26, 2015 The Contents of the SkyRaider-AG Package The New SkyRaider-G Guider-Imager is the most affordable camera in its class. Packed with stunning features, it can perform very well as an imager. The camera can be used as a guider or an imager for Lunar, Planets, Solar and Deep sky objects. Using an Aptina ARO130 CMOS sensor, the camera deliver sharp images and provide superb accuracy when used as a guider. The New SkyRaider-G is the most affordable astronomical camera ever offered and it’s a MALLINCAM. Available with an Aptina color sensor or a monochrome sensor, there is a SkyRaider-G just for your specific requirement. Fully ST-4 compatible, Native WDM drivers for easy connection with 3rd party software astrophotography software. Specifications * Passive Sensor Cooling * Carefully Selected Aptina ARO 130 color or mono sensor available * 3.75X3.75 pixels size * 1280 X 960 resolution and 640X480 binning mode * 1.2 Mp sensor, 1/3" size (6 mm) * Protective sealed Window with Double-sided AR coatings * Exposure up to 16 minutes 40 seconds * 1.25" threaded adapter included * ST4 guiding cable included * 15 feet USB cable (5 meters) * Aluminum CNC housing with built-in passive sensor cold finger offering thermal heat transfer from the sensor to camera body * Dedicated astrophotography software to support live video, image acquisition, video saving and Auto guiding * MallinCam unique Dark Field Correction * Built-in ST4 auto-guider port * 2.15 oz (61grams) * 2.5 Inches long System Requirements: Equal to Intel Core2 2.8GHz or Higher Memory: 2GB or More USB port: USB2.0 High-speed Port Display: 17" or Larger Recommended SkyRaider Quick Guide Page 10 SkyRaider User Manual August 26, 2015 In the Box MALLINCAM SkyRaider Camera High Precision 1.25" C mount Eyepiece Adapter 5 metre USB 2.0 cable. CDROM that contains the driver and software for the SkyRaider. SkyRaider-AG also includes 2 metre ST4 Guider cable SkyRaider Quick Guide Page 11 SkyRaider User Manual 2. August 26, 2015 Installing Driver and Software System Requirements PC running either Windows ® (32-bit & 64-bit) XP, Vista, 7, 8, 8.1, Mac OSX. Performance is not guaranteed if the following specification cannot be reached. DirectX 9.0 or later installed 2.0GHz processor(Recommend dual core 2.8GHz or more) USB 2.0 Port or USB 3.0 Port CD-ROM drive 2GB RAM(Recommend 2GB or more) 200MB Free HDD Installing the Software Step 1 Insert the Mallincam CD into CD-ROM drive of your computer. Have windows open the CD and you will be presented with 4 files: Step 2 95 MALLINCAMDshowSetup MALLINCAMSKYSetup MALLINCAMTwainSetup Double-Click on the MALLINCAMSKYSetup File Windows may display a warning asking for permission to run the program, if it does, select YES The following MallincamSky Setup Screen will appear: Step 3 Click on Next to start the installation process. SkyRaider Quick Guide Page 12 SkyRaider User Manual August 26, 2015 The installation program now want to know where you would like to install the software. Either choose your own location, or select the default. Step 4 Click on Install to proceed. Windows will again ask for permission to install the device software. Step 5 Click on Install to accept. The MallincamSky Software will take about a minute to be installed. When completed, the following screen will appear: SkyRaider Quick Guide Page 13 SkyRaider User Manual Step 6 August 26, 2015 Click on Finish, and the MallincamSky will start and will appear on your screen. SkyRaider Quick Guide Page 14 SkyRaider User Manual 3. August 26, 2015 Connecting the SkyRaider Connecting the SkyRaider-DS Camera to Computer Attach the 5 metre USB 2.0 Cable from the back of the SkyRaider-DS to a free USB 2.0 port on your computer. Windows will then load the specific SkyRaider Camera Driver onto your computer. Once the driver has been successfully loaded, you will see the name of the SkyRaider Camera in the MallincamSky Camera List on the upper left of the Window. You can install more than one SkyRaider Camera to your computer, but the software can only control one SkyRaider Camera at a time. SkyRaider Quick Guide Page 15 SkyRaider User Manual August 26, 2015 Connecting the SkyRaider-DS Camera to Telescope Remove the rubber dust cover from the front of the SkyRaider-DS camera (place it back in the box for safe keeping). Screw in the C-mount adapter to the front of the SkyRaider-DS Insert the SkyRaider-DS (with C-Mount attached) into a 1.25” eyepiece adapter on your Telescope. Depending upon the telescope, you may need extenders so that you can reach focus with your telescope. It is recommended that you set this up in the daytime so you can see what you are doing (plus can aim at an easy to find tree or telephone pole). SkyRaider Quick Guide Page 16 SkyRaider User Manual August 26, 2015 Connecting the SkyRaider-G Camera to Computer Attach the 5 metre USB 2.0 Cable from the back of the SkyRaider-G to a free USB 2.0 port on your computer. Windows will then load the specific SkyRaider Camera Driver onto your computer. Once the driver has been successfully loaded, you will see the name of the SkyRaider Camera in the MallincamSky Camera List on the upper left of the Window. You can install more than one SkyRaider Camera to your computer, but the software can only control one SkyRaider Camera at a time. SkyRaider Quick Guide Page 17 SkyRaider User Manual August 26, 2015 Connecting the SkyRaider-G Camera to Telescope Remove the rubber dust cover from the front of the SkyRaider-G camera (place it back in the box for safe keeping). Screw in the C-mount adapter to the front of the SkyRaider-G. Insert the SkyRaider-G (with C-Mount attached) into a 1.25” eyepiece adapter on your Telescope. Attach one end of the ST4 cable into the ST4 slot on the back of the SkyRaiderG, and the other end into the ST4 port on your Telescope Mount Depending upon the telescope, you may need extenders so that you can reach focus with your telescope. It is recommended that you set this up in the daytime so you can see what you are doing (plus can aim at an easy to find tree or telephone pole). SkyRaider Quick Guide Page 18 SkyRaider User Manual August 26, 2015 Connecting the SkyRaider-SLP Camera to Computer Attach the 5 metre USB 2.0 Cable from the back of the SkyRaider-SLP to a free USB 2.0 port on your computer. Windows will then load the specific SkyRaider Camera Driver onto your computer. Once the driver has been successfully loaded, you will see the name of the SkyRaider Camera in the MallincamSky Camera List on the upper left of the Window. You can install more than one SkyRaider Camera to your computer, but the software can only control one SkyRaider Camera at a time. SkyRaider Quick Guide Page 19 SkyRaider User Manual August 26, 2015 Connecting the SkyRaider-SLP Camera to Telescope Remove the rubber dust cover from the front of the SkyRaider-SLP camera (place it back in the box for safe keeping). Screw in the C-mount adapter to the front of the SkyRaider-SLP. Insert the SkyRaider-SLP (with C-Mount attached) into a 1.25” eyepiece adapter on your Telescope. Depending upon the telescope, you may need extenders so that you can reach focus with your telescope. It is recommended that you set this up in the daytime so you can see what you are doing (plus can aim at an easy to find tree or telephone pole). SkyRaider Quick Guide Page 20 SkyRaider User Manual 4. August 26, 2015 Using MallincamSky Software The MallincamSky Window ① ② ④ ③ ⑤ The MallincamSky Software Window is segmented into a few regions to make viewing and adjusting the SkyRaider camera easy and intuitive. ① The Top Menu Line provides dropdown menus to allow you to make major settings of the software ② The MallincamSky Toolbar provides the simple click activation and selection capabilities. ③ The Left SideBar provides selection options for Camera, Folders, or Undo. Left Clicking on the selection choice will fill the SideBar with its options. ④ The Video Window will contain the display from the SkyRaider Camera. It is here that you will see the live video, or images. ⑤ The Information Line will indicate the current camera, current frame rate, number of frames displayed, resolution, information about captures, etc. SkyRaider Quick Guide Page 21 SkyRaider User Manual August 26, 2015 SkyRaider Quick Setup and WorkFlow The following is a typical workflow when using the SkyRaider with MallincamSky. Start Computer, Attached SkyRaider, Power on Telescope Mount Start MallincamSky Take Dark Fields Configure Telescope Mount Adjust MallincamSky Settings Use MallincamSky to assist in Alignment of Telescope (Short Exposure) Image with MallincamSky Exit MallincamSky, and Power down the equipment. SkyRaider Quick Guide Page 22 SkyRaider User Manual August 26, 2015 Detailed Workflow for MallincamSky The Mallincam SkyRaider Cameras provide a processing technique called Dark Field Correction (see the Appendix for a complete description of Dark Field Correction). The Dark Field Correction is prepared by the user at the beginning of an observing session by covering the camera or scope, pre-determining the exposure time (the times you select will become more intuitive with practice), and setting the software to automatically take up to 10 images. As your telescope equipment will be different, along with the possible use of various types of filters, and the skies you observe under, experiment with the length and number of the Dark Field Corrections. Take this into account when selecting you exposure time for your dark images. Step 1 Select SkyRaider Camera With the Camera Tab selected on the Left SideBar, LeftClick on the Camera you are currently using (between lines in Camera Heading). Once a camera is selected, a black rectangle (with SkyRaider Camera name) will appear in the Video Window of the MallincamSky Software along with the Horizontal and Vertical Rulers. Step 2 Select an Exposure Time for Dark Field Correction With the Camera Tab selected on the Left SideBar, Left-Click on the Exposure & Gain Line (a Green Rectangle with the word Exposure will appear in your Video Window, to inform you that you are setting an exposure time. Closing the Exposure Window will remove the Green Rectangle). The Exposure & Gain Window will open up and you can either slide the Exposure Time bar (Left-Click Hold and Drag) or LeftClick on the current Exposure Time value, and a another Window will open to allow you to manually enter a time (don’t forget to click OK). Exposure Target is only active when Auto Exposure is selected. The Green Rectangle is used to see if reference region it encloses matches Exposure Target that you set (We recommend that Auto Exposure is not selected). You can Left-Click Hold and Drag corners of the Green Exposure Rectangle to resize it to either cover the whole image window, or even to be a zero size box at one of the corners of your image window. This way you can always have the Exposure & Gain tab open without the green rectangle in the middle. SkyRaider Quick Guide Page 23 SkyRaider User Manual Step 3 August 26, 2015 Take Dark Field Correction Ensure that the cover is either on the SkyRaider Camera or the Telescope is covered. With the Camera Tab selected on the Left SideBar, Left-Click on the Dark Field Correction Line. The Dark Field Correction Line will open up allowing you to select the Quantity of Dark Fields and the option to start the Dark Field Capture process. Select up to 10 for the Quantity (Start with 5 with 30 second exposures to get a feel of the process). Then Left-Click on the Capture Button. The Software will display its progress above the selected Quantity. It is beneficial to set the Dark Field exposure time greater than the longest time you will be imaging at. Due to the unique way the Mallincam SkyRaider camera’s utilize odd and even image acquisition, a Dark Field is obtained for each of the odd and even frames. That is, five 30 seconds Dark Fields will take two times (5 x 30 seconds) or 300 seconds to complete. You can use this time to finish setting up your equipment. Once the Dark Fields have been taken, you have the option of saving them with the Export button in the Dark Field Correction Tab. Click in the Enable check box to have Dark Fields applied in real time to your video. M57, 20 Seconds exposure, VRC 6", F/4.5 with MallinCam 0.5X focal reducer, NO Dark Field Correction. No processing, as seen live on monitor. Single frame. SkyRaider Quick Guide M57, 20 Seconds exposure, VRC 6", F/4.5 with MallinCam 0.5X focal reducer, One Single DARK FIELD CORRECTION APPLIED LIVE, No processing, as seen live on monitor, Single frame. Page 24 SkyRaider User Manual Step 4 August 26, 2015 Reduce Exposure Time to Align Telescope As you will most likely use the camera to align your Telescope, now is the time to reduce the Exposure Time to 1 or 2 seconds, and if not already attached to the Telescope, remove the lens cap from the SkyRaider Camera and insert the cmount on front end of the camera and slide camera into eyepiece holder of telescope. Step 5 Increase Exposure Time to Image Now is the time to display some images. Adjust the Exposure Time to match the target and the equipment you are using. Remember, due to the dual image capture process, a 30 second exposure will actually take 60 seconds to display (you will actually see the half interlaced image at 30 seconds, then the final image at 60 seconds). Since you have already created the Dark Field Corrections for this session (Dark Fields are stored directly in the SkyRaider Camera and will be deleted when the camera is turned off, sorry no way to save the Dark Fields). The SkyRaider will automatically apply the best Dark Field Correction to your image when Dark Field Correction is enabled. Step 6 Adjust the Parameters Depending upon what SkyRaider Camera you are using, determines what sort or image corrections you can apply (a Monochrome camera will not be able to adjust the colours). Choose a parameter from the Camera Tab on the Left SideBar and see what you can adjust, and how it affects your image. You will have to wait until the next image is exposed to see how your adjustments look. Step 7 Have Fun and Experiment You can now spend some time to become more comfortable with the MallincamSky Software. The SkyRaider User Manual will go into more detail about all of the options and adjustment you can perform with the SkyRaider series of camera. But, don’t be afraid to experiment. Hint Go into Options from the Top Menu Line, and choose Preferences. It is here that you can set options for the MallincamSky. If you go into Misc., you can change the Color Style of the MallincamSky software. If you select another Color Style, Apply, then Left-Click on OK. Choose the Color Style which works for you. (Use a bright Color Style if using computer in Daylight). SkyRaider Quick Guide Page 25 SkyRaider User Manual 5. August 26, 2015 The SkyRaider Software Controls Top Menu Line File This Drop-Down Menu will allow you to load and save images, load a previously saved image, plus the future ability to View or Broadcast video stream on Night Skies Network. SkyRaider Quick Guide Page 26 SkyRaider User Manual August 26, 2015 Open Image The Open Image command is used to open an existing image file. This command can also be used to preview an image in small size, or to view its statistics and information without actually opening the image itself. You can use this command to quickly locate a particular image. MallincamSky supports and can open a variety of image formats. These are identified in the Files of type list box. MallincamSky can open more than one image simultaneously by: Ctrl + Left Mouse Click on each required File then Left-Click on Open Shift + Left Mouse Click method to highlight the files to be opened, then Left-Click on Open When an image is opened, MallincamSky places it into a new image window. It then becomes the active image. MallincamSky maintains, at the File>Recent Files submenu, a list of the last opened files. SkyRaider Quick Guide Page 27 SkyRaider User Manual August 26, 2015 Open Video Use the Open Video Command to open an existing video on your computer. The Open Video command is only enabled when no SkyRaider Camera is present when MallincamSky is started. Only a single video can be opened at a time. If a SkyRaider is started, this menu will be disabled and the Open Video command will be disabled. Hint Right-Click on Video Window’s Title, then choose Close. This will shut-down the video stream and allow you use the File>Open Video command. Select the name of the file you want to open. If the file does not appear, select the option for showing all files from the Video Files Drop-Down Button. The video file type can be wmv, asf, or avi format. You can preview the Video by Left-Clicking on the Play Button on the Preview Window on the right side of the Open Window. Click Open to open a video file, this will create a video window and begin to start the video stream. The video window will be associated a name called “Video [XXX.XXX]” (i.e., its title bar will display “Video [XXX.XXX]”, here, XXX.XXX is the video file name). No sound will be heard when playing the video stream. SkyRaider Quick Guide Page 28 SkyRaider User Manual August 26, 2015 Open Broadcast The Open Broadcast command is not active as the programmers may use this control for interfacing with Night Skies Network (NSN) at some time in the future. Save The Save command allows you to save the updated image onto your computer. The command immediately stores the current window image to its file (the filename is listed on the window's title bar) while leaving the image still active in its window. If the image is untitled or titled with a digit, MallincamSky will issue the File>Save As dialog automatically. The default “Save as type” will be “Window Bitmap (*.bmp,*.dib,*.rle)”. The File>Save command can be used to save the most recent changes to disk. It is often performed as a precautionary measure during lengthy or involved processes to reduce the amount of reprocessing that might be required in the event of a system failure or operational error. When an image is being closed (Left-Click on Image title) and not to save its changes is chosen from the Popup Window, MallincamSky discards all changes made since the last File>Save operation. The File>Save command always saves the contents of the entire window, even if there is an AOI (Area of Interest)defined on it. The File>Save command will be disabled if the file is not changed or the changes have been saved. Save As … The Save As command allows you to save an image onto your computer with a specified file format. At the end of a File>Save As ••• operation, the image window will be associated with the new file and the new format (i.e., its title bar will display the new file name). MallincamSky supports the following file formats: Window Bitmap (*.bmp,*.dib,*.rle) JPEG (*.jpg,*.jpeg,*.jpe,*.jif,*.jfif) Portable Network Graphics (*.png) Tag Image File Format (*.tif, *.tiff) PCX(*.pcx) Targa (*.tga) JPEG 2000 Standard (*.jp2) JPEG 2000 Codestream (*.j2k) MallincamSky File Type (*.tft) SkyRaider Quick Guide Page 29 SkyRaider User Manual August 26, 2015 The Save As command has several important uses beyond simply storing an image to a new file name. Left-Click on the Option button to select the different parameters to encode the file (based on selected Save as Type). JPEG Image quality Progressive Optimize Huffman codes Smoothing Save these setting as defaults If you save an image in JPEG format (*.jpg), you may adjust image quality in the edit box. The values range from 0 to 100. Default value is 75. The default is unchecked. The default is unchecked. The values range between 0 and 100. The default value is 0. When saving a file, the current settings will be saved as defaults for the next file save operation. PNG Interlaced Save these setting as defaults SkyRaider Quick Guide The default is unchecked. When saving a file, the current settings will be saved as defaults for the next file save operation. Page 30 SkyRaider User Manual August 26, 2015 TIFF Appended Pages Compression Image Quality Save these setting as defaults Determine whether the current image will be saved in multiple pages style or not. Specifies a method for compressing the composite image data. For saving a 32-bit TIFF file, one can specify that the file be saved with predictor compression, but have no option to use JPEG compression. If choosing Compressions as "JPEG", the Image quality can be adjusted by the slider bar. The values range between 0 and 100. The Default value is 75. When saving a file, the current settings will be saved as defaults for the next file save operation. JPEG 2000 Compress Ratio Save these setting as defaults SkyRaider Quick Guide If choosing Compressions as "JPEG 2000", the Image quality can be adjusted by the slider bar. The values range between 0 and 100. The Default value is 0. When saving a file, the current settings will be saved as defaults for the next file save operation. Page 31 SkyRaider User Manual August 26, 2015 TFT Compression Image Quality Save these setting as defaults Choose Lossless or JPG (Lossy) If choosing Compressions as "JPEG", the Image quality can be adjusted by the slider bar. The values range between 0 and 100. The Default value is 75. When saving a file, the current settings will be saved as defaults for the next file save operation. For Bitmap (*.bmp), PCX (*.pcx), Targa (*.tga); There is no Option. Batch Save… The File>Batch Save••• command will be enabled when: a) An image is opened. b) An image is captured from the camera. c) An image window is created by choosing the File>Paste as New File command. d) An image window is created copied from the Undo/Redo Sidebar. Batch Save for the a) style image window 1. If the image is modified, choosing the File>Batch Save••• command will save the file with its opened file name and file extension. 2. If the image is modified because of the Measurement Objects, choosing the File>Batch Save ••• command will save the file with its opened file name but with “MallincamSky File Type (*.tft)”file extension format; SkyRaider Quick Guide Page 32 SkyRaider User Manual August 26, 2015 Batch Save for the b), c) or d) style image window If the image window has been created with b), c) or d) style choosing the File>Save As •••command to realize the file saving task will be time-consuming. The Batch Save •••command will runs File>Save As •••command with the name automatically specified according to the paradigm specified in the Batch Save dialog. To start the File>Batch Save•••command, you have to: 1. Start the camera; 2. Snap at least an image first; 3. Choosing the File>Batch Save ••• command will bring up a Batch Save dialog: Directory: Enter the name of the drive and directory where your captured images will be saved. You may either type the path information, or use the Browse button to locate it from a standard Browse Folder dialog. Name Format: The year, month, date, hour, minute and second or nnnn (sequence) are used as part of the filename. If more files are saved with in a second, a (xx) suffix is attached to the end of Name Format to avoid the possible name conflict. For the nnnn (sequence) “Name Format”, no suffix is needed. File Prefix: Enter a file name prefix for Batch Save when generating files names for a series of images. This prefix will be combined with Name Format to form a final file name naming paradigm. File Type: In this combo box, select the format in which you want the image to be saved (can be BMP, JPG, PNG, TIF).Click the Option Button to set the different parameters for encoding the file (For BMP format, the Option will be disabled. See File>Save As ••• command about the details of the format encoding methods); If there are Measurement Objects over the image, the File Type will be chose as “MallincamSky File Type (*.tft)”. Sample: The final file name is shown at the right of the Sample label for quick reference. SkyRaider Quick Guide Page 33 SkyRaider User Manual 4. August 26, 2015 Once the settings are made, Left-Click the OK button to begin the file batch save process or Cancel to cancel the File>Batch Save ••• command and return to the application. when the File>Batch Save••• command has finished, the Title on the Image Tab or Image Window will be modified with the file name formed in the Batch Save dialog. The File>Batch Save••• will perform no saving operation if the file is not modified. Quick Save… The File>Quick Save command will be enabled when: a) A new image is captured from the camera; b) An Image Window is created by choosing the File>Paste as New File command. File>Quick Save can save the file a quick way with no need to specify the file directory, file name and file format. All those are specified in Options> Preferences •••, Quick Save Property Page. The file name can be renamed according to the setup in the Options>Preferences•••, Quick Save Property Page’s Show the rename dialog item Paste as New File The File>Paste as New File command will be enabled when there is valid image data on the clipboard first (see the Edit>Copy command). If there is no image data on the clipboard, the File>Paste as New File command will be disabled. Choose the File>Paste as New File command to place the contents of the clipboard image into a new image window, which becomes the active image. The new image type will be the same as that of the original image. MallincamSky will accept image data from other applications via the clipboard as long as it is in Windows Bitmap (DIB) format. MallincamSky will assign a digit to the Paste as New File command in the created image window Title Bar. SkyRaider Quick Guide Page 34 SkyRaider User Manual August 26, 2015 Recent Files MallincamSky maintains 4 (default) of the most recently opened document files under the Recent Files command. Choosing one of these submenus will reopen that file immediately. The maximum number of Recent Files can be modified by choosing the Options>Preferences••• command and clicking the Misc selection. Here, clicking the 4 (default) edit box will allow you to enter the number of the Recent Files submenu that you want. The value ranges from 0 to 8, the default is 4; One can also check the Clear the Recent Files when exit the application to clear the Recent Files after exiting the MallincamSky application. Exit Choosing the File>Exit command will close video, all of the image windows and Browse window and remove their windows from the screen. After all of the windows are closed, MallincamSky will end itself. If an image has been modified before attempting to Exit, MallincamSky will issue a warning to ask if user wants to save the image or not. Edit This Drop-Down Menu will allow you to Cut, Copy and Paste Layers over your images. From the Edit Menu you can also select a Region of Interest (ROI) from your image and copy it to the Windows Clipboard, or even de-select the ROI if you have changed your mind. Cut This command is or future implementation. SkyRaider Quick Guide Page 35 SkyRaider User Manual August 26, 2015 Copy This Edit>Copy command can be used to copy a selected part of your image to the Windows Clipboard. Then you can use another software’s Paste Command to place this selected image inside that software. Hint You can select a region of your currently live image (using the Left-click Hold and Drag technique) then choose Edit>Copy (or Ctrl+C). Now you can Paste that selected image into another document (such as Microsoft Word, or Microsoft Paint) for later use. Paste This command is for future implementation. Image Select You can select a Region of Interest on your Image Tab (live or static) by using the Left-Click Hold and Drag technique. Once selected then you can Copy (Ctrl+C) the selected region and then Paste it into another software program. Select All This command is not fully implemented, but you can use it to select the Whole Video Image Window. Once selected then you can Copy (Ctrl+C) the selected region and then Paste it into another software program. Select None This command can be used to De-Select the image that was selected using either the Image Select or the Select All commands. SkyRaider Quick Guide Page 36 SkyRaider User Manual August 26, 2015 View This Drop-Down Menu will allow you to Browse folders, Display or Remove Tabs from the Sidebar, Activate Grids or Reticules on the Video Window, Change the Video Window Size to match your computer real-estate, and Allow you to move the image around in your Video Window. Browse The View>Browse command from the View Menu (or the Browse Icon on the Icon Tool Bar) is used to browse images under the specified directory in the Folders Sidebar. The Browse Window resembles the Windows Explorer. LeftClicking on the + will expand a folder so that you can examine its contents. You can Right-Click on a Folder (or file) and the actual Windows controls will pop as in Windows Explorer. As you get deeper into the Browse Window, you can Back-Out or Move Deeper via the Green Left or Right Arrow in the Browse Window. The Blue Right Arrow will take you to your computer’s Root Directory. Left-Double Clicking on a Folder will open up a Window Tab in the Video Window (this Window will be labeled Browse). This Tab will display all of the graphic files inside that Folder. If you Left-Double Click on a Graphics File inside the Video Window, it will open up that Graphics File in a new Tab in the Video Window. SkyRaider Quick Guide Page 37 SkyRaider User Manual Hint August 26, 2015 You can close the Tab in the Video Window by Right-Clicking on the Tab’s Title (Browse), then choosing Close. Sidebar The SideBar can contain 3 different Tabs: Camera, Folders, and Undo/Redo. Left-Click on the SideBar control to expand it. You will see the 3 choices (each with a check-mark beside it), Left-Click on the check-mark to Select or DeSelect which ones of the 3 you would like to see displayed in the SideBar. The Tabs on the SideBar can remain docked to the SideBar or can be free floating. Just use the Left-Click Hold and Drag technique to move the Tab to another location on your Desktop Window. To Dock the Floating Tab back to the SideBar, just Left-Double Click on its Name. SkyRaider Quick Guide Page 38 SkyRaider User Manual August 26, 2015 Grids The View>Grids control has the ability to display a grid overlay on top of your Video Window. You can use the Auto Grid style of create your own grid format. Left-Click on the choice you require (No Grids, Auto Grids, or Manual Grids) to activate. Auto Grids Auto Grids can be set in the View>Grids>Settings control. This command will pop-up the Preferences Window. Left-Click on the Grids option on the left of the Preferences Window and adjust the Style (No Grid, Auto Grid, and Manual Grid), Line Style (Solid, Dash, Dot, or DashDot), and Color that you are interested in. SkyRaider Quick Guide Page 39 SkyRaider User Manual August 26, 2015 Left-Click on the Apply button to display the Grid, then Left-Click on OK to accept. Manual Grids Choosing this control will display two small Blue Right Arrow and Down Arrows overlaid on the top of the Vertical Ruler and on the left of the Horizontal Ruler as shown below: Use the Left-Click Hold and Drag technique to move the Blue Down Arrow along the Horizontal Ruler to where ever you want. When it is dragging over the video/image, there will be a Vertical Line (in the Color and Style chosen by you) appeared to let you judge where to release this line on the video/image. You can drag as many lines as you require to overlay them on the video/image. SkyRaider Quick Guide Page 40 SkyRaider User Manual August 26, 2015 Similarly, you can drag down as many Vertical Lines as you like to create Vertical Grids. Hint You can at any time, grab and move the Blue Arrows to adjust the locations of the Horizontal and Vertical Grid Lines. No Grids The No Grids control can be used to temporarily remove the grid overlay from the video/Image. If you re-select Manual Grids, your previous designed Grid Lines will re-appear. Remove All Grids This will remove the Grid Overlay from your video/image. It will also delete your Manual Grid Lines settings (thus allowing you to create a new set of Manual Grid Lines). Best Fit Select the control View>Best Fit to automatically resize the image/video to fit inside the Video Window Tab. Actual Size Select the control View>Actual Size to reset the Zoom to 100% (Actual Size will be disabled if the View is already set to 100%) and place the image/video inside the Video Window Tab. SkyRaider Quick Guide Page 41 SkyRaider User Manual August 26, 2015 Full Screen Selecting the View>Full Screen control will display the video window in full screen style. You will not see any commands or controls while in this mode. Pressing the Esc key on your keyboard will return MallincamSky to the Default Video Window. Track If the video/image's actual size is larger than the video/image Window, then this control will allow you to position the actual video/image within in the video/image Window. This control is activated automatically when necessary. Its function is similar to the scroll bars. It is an alternative to using the arrows on the scroll bars for positioning the video/image within the window. Position the mouse (make sure to choose a location outside a Region of Interest rectangle. You may need to close the ROI rectangle if necessary) on the actual video/image. Left-Click and Hold (the Open Hand will change to a Closed Hand). Now drag the image around inside the video/image Window If the video/image size is smaller than the video/image Window size, then the track operation will be disabled. Reticule MallincamSky provides a Reticule (or cross-hairs) to aid in aligning your telescope to a star (or other stellar object). You can change the color of the reticule via the Option>Preferences control in the Top Menu Line. Left-Click to Activate and Left-Click again to De-Activate. SkyRaider Quick Guide Page 42 SkyRaider User Manual August 26, 2015 Browse This command is used to determine how MallincamSky should display the graphic files when you are viewing the Folders. This command will allow you to change the size of the image icons, determine how to sort the files, add shortcuts to the folders, delete files, refresh the folders, and even determine the properties of the image file all without having to perform these tasks thru the Windows Environment. Sort This control allows you the option of rearranging the image files via a variety of choices (Name, Type, size, Width, and Height. All in either Ascending or Descending order.). Just Left-Click on the choice that best suits you needs and MallincamSky will automatically rearrange the files. Icons This control allows you to display the Graphic Files as either Large or Small Icons. Simply Left-Click to make your Selection. Paste Shortcut This control allows you to place a copied File Shortcut (you have previously selected the File and then have used Edit>Copy) into you currently selected folder. Delete This control allows you to delete a selected file from your currently selected folder. SkyRaider Quick Guide Page 43 SkyRaider User Manual August 26, 2015 Refresh This control allows you to refresh the contents of the currently selected folder. Properties This control will display the current File properties for the Graphics File that you have selected (This is identical to Right Clicking on a File while using Windows Explorer). Setup This Top Menu Line Command is used to provide you information about the current SkyRaider Camera activated thru MallincamSky. Start/Pause Left-Clicking on this control will Pause the SkyRaider Camera’s live display. LeftClicking on this control again will activate the live display. View Properties… Left-Clicking on this control will pop-up the View Properties Window that contains information about the currently activated SkyRaider Camera. SkyRaider Quick Guide Page 44 SkyRaider User Manual August 26, 2015 ST4 Test… If your SkyRaider camera (such as the SkyRaiderG Autoguider series) has a ST4 port then it can be used to AutoGuide your telescope mount. This control is used to check if the camera can correctly communicate with the Telescope Mount. Connect the ST4 cable provided with the SkyRaider Camera to the ST4 Port on your Telescope Mount. Turn on the Telescope Mount to ensure that it is ready to be tested. Left-Click on this control and the ST4 Popup Window will appear. The ST4 Window will contain 4 Green Arrow keys that when pressed will send a specific direction command thru the ST4 cable. Press each Green Arrow and note if the Telescope Mount moves in a specific direction. Due to the various orientations of the SkyRaider Camera once inserted inside the telescope, the Green Directions Arrows will not necessarily match the direction of Mount movement. Don’t worry; all guiding software will automatically orient itself with the movements. You can abort the movement by Left-Clicking on the Red Stop button in the ST4 Popup Window. The number box located in the middle of the 4 Green direction Buttons can be increase or decrease to affect the distance the Telescope Mount moves when a Green Direction Button is pressed. You can directly enter a number into the number box, or Left-Click on the up and down arrows to scroll up or down the value in the number box. Hint Attempt to orientate the SkyRaider Camera in the eye piece holder of the telescope in such a manner as to match the Green Directions Buttons movement of the stars in the video display. SkyRaider Quick Guide Page 45 SkyRaider User Manual August 26, 2015 Capture This Top Menu Line command allows you a more in depth capture routine of either a still image or a video stream. This command will offer connection to Night Skies Network (NSN) future releases. Capture Image During the video preview, you can always choose the Capture>Image Capture command to capture the video image. After the image is captured, the captured image (still image) will be placed the current active window with an automated title (0001*). The Capture>Capture Image menu now be disabled (as you are now viewing a still image). If you wish to capture another image again, Left-Click the active video window (Video [SkyRaider]) title to activate the Video Window and the Capture>Capture Image menu will be enabled again. The Snap Button on the Camera SideBar can continuously shoot the image even if the video window is not activated. Left-Click this Snap button on the Camera Sidebar to a capture image quickly Only when the video window is active, the Capture>Capture Image menu will be enabled. If the Live and Snap resolutions are different, then MallincamSky needs to switch the resolution from Live to Snap in the background to capture an image with Snap resolution. After the Snap is finished, then MallincamSky will switch back to the Live resolution to continue the video stream process. Therefore it will take more time to capture a still image. Start Time-Lapse (Auto Capture)… This function can capture a sequence of pictures with the same time interval; you can precisely set the time interval (2 to 3600 seconds) and the total number of images you require taken. The images will be saved to the computer (not displayed in the video/image window) Left-Clicking the Capture>Time-Lapse (Auto Capture)••• command will bring up Time-lapse(Auto Capture) Dialog Window as shown below: SkyRaider Quick Guide Page 46 SkyRaider User Manual August 26, 2015 Directory: The file Directory can be select by LeftClicking the Browse button (…). File: The File Name; This can be a combination of Name of Format, File Prefix, and File Type as shown in the Sample. Time Slot: This Time slot (in Seconds from 2s to 3600s) is the time that MallincamSky waits before capturing another image (5s would indicate waiting another 5 seconds before capturing another image). Total Images: Checking Total Images will enable its edit box. You can enter the Total Images (from 1 to 9999) to be captured. MallincamSky will stop the Time-lapse capture process automatically when the Total Images are reached. If Total Images is unchecked, MallincamSky will capture the images continuously until you choose the Capture>Stop Time-lapse (Auto capture) command again to stop the Time-Lapse capture. Left-Click OK to begin the Time-lapse capture, or Cancel to cancel the Start Time-Lapse (Auto Capture)••• command. After the Time-lapse capture is started, the Capture>Start Time-Lapse (Auto Capture)••• menu will be changed to the Capture>Stop Time-lapse (Auto capture) menu. Choosing this command will stop the Time-lapse capture. There are a variety of image format available (they are bmp, jpg, png, and tif) to save the captured image. For example, when choosing the jpg format, you can set the parameters of Option to adjust its compression quality or encoding method. Please check the File>Save As••• menu for more details. SkyRaider Quick Guide Page 47 SkyRaider User Manual August 26, 2015 Start Record… Left-Click this control to start the process of recording videos of what your SkyRaider is currently imaging. The video format can be in either avi or ser format. A Video File window will pop-up so that you can give the captured video a file name and location. Enter a name and choose a location for your video files. Left-Click on Browse to help choose a directory location Then Left-Click on Next to choose the File format that you would like MallincamSky to save the video in (choose avi). If you Left-Click on the Finish button, MallincamSky will start recording until you Left-Click on the Stop Recording Button that appears on the SideBar. SkyRaider Quick Guide Page 48 SkyRaider User Manual August 26, 2015 You can now enter the length of the Video you want MallincamSky to record by Left-Clicking the Time Limit (Minutes) Checkbox and choosing a time (from 1m to 1440m); leaving the check box unchecked will record until you click on the Stop Record Button in the SideBar. You can also insert a Time-Lapse value from 1 to 100 This Time-Lapse seems to record every Time-Lapsed frame from the Frame Rate of the Sky Raider Camera. The following are the observed recording times when choosing a 1 minute recording. Take extra note of the length of the video when you set the Time-Lapse to 2. At 60 seconds a Time-Lapse of 1 will produce a video of about 60s At 60 seconds a Time-Lapse of 3 will produce a video of about 41s At 60 seconds a Time-Lapse of 10 will produce a video of about 26s At 60 seconds a Time-Lapse of 30 will produce a video of about 6s At 60 seconds a Time-Lapse of 50 will produce a video of about 3.5s At 60 seconds a Time-Lapse of 100 will produce a video of about 1s At 60 seconds a Time-Lapse of 2 will produce a video of about 90s The only way to view Videos using MallincamSky is to restart MallincamSky without a SkyRaider plugged into the computer. Hint Use Windows Explorer to View your saved videos. Hint I would leave to Time-Lapse at 1, as this best matches the capabilities of your SkyRaider Camera’s output. Start Broadcast… This menu will be used for future plans. The intention is to give this command the ability to broadcast on Night Skies Network (NSN) SkyRaider Quick Guide Page 49 SkyRaider User Manual August 26, 2015 Image The Image menu will allow you to adjust the properties or any captured image in an active Image Tab in MallincamSky video/image window. Hint You can use the SideBar’s Undo/Redo Tab to revert any correction back to a previous state. Mode The Mode Control will give you the ability Color Quantize, Gray Scale, and Decolorize the selected still image. The Color Quantize••• command is widely used to change the image bit. MallincamSky supports the mutual changes among 24 bit, 8 bit, 4 bit or 1 bit images. When the Colour Bits dialog is opened, the default checked color bit is the current image's color bit. Check the desired bit and click OK to end the command. The image will converted to the selected color bits in the image window. The Gray Scale command to convert a color image (true color image or index color image) to a gray scale image. If the original image is 24 bit, the new image is 8 bit. Otherwise the bit of the image will not be modified. The Contrast Preserving Decolorization command to convert a color image (true color image or index color image) to a gray scale image with a unique algorithm to preserved as much of the color contrast for each channel into Monochrome image. If the original image is 24 bit, the new image is 8 bit. Otherwise the bit of the image will not be modified. SkyRaider Quick Guide Page 50 SkyRaider User Manual August 26, 2015 Adjust The Adjust menu will allow you to adjust the Brightness and Contrast of the image. You will be able to modify the RGB Color balance, as well as the High Lights, MidTones and Shadows values. Color Curves and Filtering algorithms are also in the menu control. You will have the ability to Invert the image as well as perform some Detail Enhancement procedures on the image. Adjust Brightness/Contrast The Image>Adjust>Brightness/Contrast••• command offers simple adjustments to the tonal range of an image. This command makes the same adjustment to every pixel in the image. The Brightness/Contrast command does not work with individual channels and is not recommended for high-end output because it can result in the loss of details about the image. Brightness: Dragging the slider bar to the left decreases the level and dragging it to the right increases the level. The numbers on the right of the slider bar displays the Brightness value. Values can range from -150 to +150. The Default value is 0. Contrast: Dragging the slider bar to the left decreases the level and dragging it to the right increases the level. The numbers on the right of the slider bar displays the Contrast value. Values can range from -150 to +150. The Default value is 0. Make your adjustments to the Brightness and Contrast values and Left-Click on OK to accept. SkyRaider Quick Guide Page 51 SkyRaider User Manual August 26, 2015 Color Choose the Image>Adjust>Color••• command to modify the overall mixture of the colors in an image. There are four color modules that are supported by MallincamSky: RGB MallincamSky uses the RGB model. It assigns an intensity value to each pixel ranging from 0 (black) to 255 (white) for each of the RGB components in a color image. For example, a bright red color might have an R value of 246, a G value of 20, and a B value of 50. When the values of all three components are equal, the result is a shade of neutral gray. When the value of all components is 255, the result is pure white; when the value is 0, pure black. RGB images use three channels to reproduce up to 16.7 million colors on-screen. In addition to being the default mode for new Mallincam images, the RGB mode is used by computer monitors to display colors. This means that when working in color modes other than RGB, such as CMYK, MallincamSky uses RGB mode for display on-screen. Although RGB is a standard color mode, the exact range of colors represented can vary, depending on the application or display device. SkyRaider Quick Guide Page 52 SkyRaider User Manual CMYK August 26, 2015 The CMYK mode is based on the light-absorbing quality of ink printed on papers. As white light strikes translucent inks, certain visible wavelengths are absorbed while others are reflected back to the eyes. In theory, pure cyan (C), magenta (M), and yellow (Y) pigments should combine to absorb all light and produce black. For this reason these colors are called subtractive colors. Because all printing inks contain some impurities, these three inks actually produce a muddy brown and must be combined with black (K) ink to produce a true black. (K is used instead of B to avoid confusion with blue.) Combining these inks to reproduce color is called four-color process printing. The subtractive (CMY) and additive (RGB) colors are complementary colors. Each pair of subtractive colors creates an additive color, and vice versa. HSI Based on the human perception of color, the HIS model describes three fundamental characteristics of colors: Hue is the color reflected from or transmitted through an object. It is measured as a location on the standard color wheel, expressed as a degree between 0° and 360°. In common use, Hue is identified by the name of the color such as red, orange, or green. Saturation, sometimes called Chroma, is the strength or purity of the color. Saturation represents the amount of gray in proportion to the hue, measured as a percentage from 0% (gray) to 100% (fully saturated). On the standard color wheel, Saturation increases from the center to the edge. Intensity is the relative lightness or darkness of the color, usually measured as a percentage from 0% (black) to 100% (white). HLS The HLS model is very similar to the HSI color model. The main difference between them is the calculation used to produce the brightness value. In the HLS model, a pixel's brightness (L) is derived from its three (R, G and B) color values. That is, a pixel's brightness (L) is determined by the minimum and maximum values of its three color values. SkyRaider Quick Guide Page 53 SkyRaider User Manual August 26, 2015 The values beside the slider bar show the color changes in various color channels. The RGB channel values can range from -100 to +100. The Default values are 0. The CMYK channel values, they can range from -100 to +100. The Default values are 0. In the HSI channel, the H value can range from -180 to 180, the S value can range from -275 to 275, and the I value can range from -442 to 442. The Default value are 0. In the HLS channel values, the H value can range from -180 to 180, the L value can range from -100 to 100, and the S value can range from -100 to 100. The Default values are 0. HMS Select the Image>Adjust>HMS••• command to adjust the HL (Highlight), M (Midtone), and S (Shadow) parts of the image. Each part's value ranges from -100 to 100. This command is only available for 24 bits true color image. Curve Sometimes you may desire more precise control, or more unusual, nonlinear effects. The Curves tool in MallincamSky provides more arbitrary remapping of the color channels; it is the colorcorrection tool of choice among many print and photographic professionals. Using Curves, the input-output mapping of color channels can be defined by an arbitrary cubic spline or can be drawn freehand. This flexibility provides extreme generality. It is worth the effort to review how color curves work in such graphics programs such as Photoshop (tons of information about curves on the internet). SkyRaider Quick Guide Page 54 SkyRaider User Manual August 26, 2015 Filter Color… Select the Image>Adjust>Filter Color command to filter out a special color channel from a color image. Check either Red, Green, or Blue color to filter. For Example, if Red color is checked, then only information about the Red channel will be discarded. The Green and Blue information will remain there. Extract Color… Select the Image>Adjust>Filter Color command to retain a special color channel from a color image. Check either Red, Green, or Blue color to filter. For Example, if Red color is checked, then only information about the Red channel will be retained. The Green and Blue information will discarded. Invert Select the Image>Adjust>Invert command to reverse the pixel values of the active image. Edge Preserving Smooth This control looks for the most homogeneous neighborhood area around each point in a picture, and then gives each point the average gray level of the selected neighborhood area. It removes noise in a flat region without blurring sharp edges, nor SkyRaider Quick Guide Page 55 SkyRaider User Manual August 26, 2015 destroying the details of the boundary of a region. This smoothing also has the ability to sharpen blurred edges. Choose either a Recursive or the Normalized Convolution. By adjusting the Spatial Sigma (like the domain) and the Range Sigma, you can affect how many pixels the algorithm uses when applying the smoothing. Detail Enhance This filter works by identifying sharp edge boundaries in the image, such as the edge between a subject and a background of a contrasting color, and increasing the image contrast in the area immediately around the edge. This has the effect of creating subtle bright and dark highlights on either side of any edges in the image, called overshoot and undershoot, leading the edge to look more defined when viewed from a typical viewing distance. Choose either a Recursive or the Normalized Convolution. By adjusting the Spatial Sigma (like the domain) and the Range Sigma, you can affect how many pixels the algorithm uses when applying the smoothing. Rotate This control allows you to rotate and or flip your image across an axis. Your options include: Rotate the image90 degrees Clockwise (CW) Rotate the image 180 degrees Clockwise (CW) Rotate the image 270 degrees Clockwise (CW) Rotate the image an Arbitrary amount SkyRaider Quick Guide Page 56 SkyRaider User Manual August 26, 2015 To Rotate the image a specified amount (in degrees) in a chosen direction (clockwise or counter clockwise), LeftClick on the Arbitrary control. When this option is selected, the Image Rotate Window will popup, where you can enter in the required values. You also have two redrawing algorithm choice for it to use when rotating the image (Bilinear or Bicubic). Bicubic seems to be better for images, but it is your choice that counts. This control also allows you to flip your image Horizontally or Vertically. Flip Horizontal reverses the image in the application area so that the top right corner of the original image is now the top left, and the top left corner of the original image is now the top right corner. Flip Vertical reverses the image in the application area so that the top right corner of the original image is now the bottom right corner, and the top left corner of the original image is now the bottom left corner. Crop Choose the Image>Crop command to remove the portions of an image that does not want so that the focus is on the part of the image that is left. First select Edit>Image Select (the mouse cursor will change into cross hairs) from the Top Menu Line. Next use the Left-Click Hold and Drag technique to draw a rectangle around the portion of the image you would like to keep. Finally select Image>Crop and your image window will now only contain the portion of the original image that was inside the Image Select’s Rectangle. When you create an Image Select Rectangle, you can Left-Click Hold and Drag the rectangle around your full image to move it to a different location. You can also resize the Image Select Rectangle by grabbing one of the little boxes around the rectangle and dragging the mouse to increase, decrease, or change dimensions of the rectangle. SkyRaider Quick Guide Page 57 SkyRaider User Manual August 26, 2015 Scale… Select the Image>Scale••• command to change the image to a specified size. This process actually changes spatial resolution by adding (replicating) or removing (decimating) pixels to achieve the specified dimensions. Width and Height: When choosing the Image Scale command; the dialog box displays the dimensions of the original image in pixels. The Width and the Height can be set on the new image by adding or removing pixels. If Constrain Proportions is checked, the Width and Height will stay proportionate to each other. If the Constrain Proportions is unchecked, the Width and the Height can be set independently, but this will distort the image. Reset: Resets the image’s Width and Height to the original settings. Constrain Proportions: To maintain the current proportions of pixel Width and Height, check Constrain Proportions. This option automatically updates the Width as the Height is modified, and vice versa. Otherwise, uncheck the Constrain Proportions button. Scale method: There are 2 options for the algorithm that the Scale method uses to resize the image. They are: Bilinear, and Bicubic. The default scaling method is Bilinear. Once you have selected your parameters, Left-Click on OK to make the new Image Scale final. SkyRaider Quick Guide Page 58 SkyRaider User Manual August 26, 2015 Histogram A Histogram illustrates how pixels in an image are distributed by graphing the number of pixels at each color intensity level. The Histogram shows detail in the shadows (shown in the left part of the histogram), mid-tones (shown in the middle), and highlights (shown in the right part). A Histogram can help you determine whether an image has enough detail to make a good correction. A histogram is a mathematical graph that shows you the current tonal range of an image. This way you can evaluate it and, if necessary, correct it. Tonal range refers to the range of brightness levels in the image. A histogram shows us how much of the image is currently pure black, how much is currently pure white, and how much of it falls somewhere in between. It is very important to note that even though we're talking about brightness levels, we're not just talking about black and white (grayscale) images, but Histograms work equally well, and are just as important, with full color images. This is because, even though we don't always think of color as being anything but color; yet every color in your image has its own brightness level. Orange, for example, are typically very light; while blues and reds are much darker. These differences in brightness values mean that color can have a huge impact on the tonal range of your image. Do a Google Search on How to Read and Understand Image Histograms in Photoshop to find out more information on how to use Histograms to improve your images. Choose the Image>Histogram••• command to open the Histogram Window. Depending on the image’s color mode, choose R, G and B, or Luminosity to view a composite Histogram of all the channels. If the image is RGB true color, choose Luminosity to display a Histogram representing the luminance or intensity values of the composite channel. SkyRaider Quick Guide Page 59 SkyRaider User Manual August 26, 2015 If the image is RGB true color, choose R, G and B to display a composite Histogram of the individual color channels in color. Do one of the following: To view information about a specific pixel value, place the mouse pointer in the Histogram. To view information about a range of values, click down the Left-Click hold and Drag the mouse into the Histogram to highlight the range. The Histogram Window displays the following statistical information below the Histogram: Pixels: Represents the total number of pixels used to calculate the Histogram. Level: Displays the intensity level of the area underneath the pointer. Count: Shows the total number of pixels corresponding to the intensity level underneath the pointer. Percentile: Displays the cumulative number of pixels at or below the level underneath the pointer. This value is expressed as a percentage of all of the pixels in the image, from 0% at the far left to 100% at the far right. The Histogram from Image>Histogram (still images) provides different information about the video/image window than the SideBar’s Histogram (live video capture). SkyRaider Quick Guide Page 60 SkyRaider User Manual August 26, 2015 Process MallincamSky provides some very advance image processing tools. You can apply these tools to your image to tweak the final output. It would take a novel to explain each of these standard graphical enhancement tools. So I will leave it up to you to Google Search the enhancement type to see if it is something you could use. Hint You can use the SideBar’s Undo/Redo Tab to revert any correction back to a previous state. You can find Enhancement Filters inside the Process command to sharpen your image. SkyRaider Quick Guide Page 61 SkyRaider User Manual August 26, 2015 You can modify the color effectiveness range with the Range control to color sharpen your image. You can modify the image the pixel/no pixel count with the Binary control SkyRaider Quick Guide Page 62 SkyRaider User Manual August 26, 2015 You can examine the image as a 3-D color contour map with the 3-D setup control You can apply the Pseudo Color application tools to turn a Black and White image into color tones. SkyRaider Quick Guide Page 63 SkyRaider User Manual Image Stacking August 26, 2015 Image Stacking control will allow you to select a saved video file, then it will do a elementary stacking process on the file. In the Image Stacking process, MallincamSky takes the first frame as the reference image, this means the first frame is very important and should be assure the first frame to be the right image scene and the subsequent frames have a greater overlap region with the first frame. The stacked image signal to noise ratio is greatly improved. The stacked image may have has some black edges, this is because the images in the video has moved and in the stacking process, MallincamSky will added black to the image area that has no corresponding pixel in the reference image. This Image Stacking process will not align the video images, so may be better suited for Deep Sky than for planets. Left-Click on the control and MallincamSky will open up a Dialog Window. Using the Open Dialog Window move to the directory and Left-Click on the File you would like to apply the Stacking process to, then Left-Click on Open. MallincamSky supports the following video formats for the Image Stacking process: wmv,asf,avi,mp4,m4v,3gp,3g2,3gp2,3gpp,mov,mkv, flv,rm,and rmvb . SkyRaider Quick Guide Page 64 SkyRaider User Manual August 26, 2015 MallincamSky will Open an Image Stacking Progress Bar to inform you of the process. Once completed, the stacked image will appear in the Video/Image window. You can now apply other processing techniques to this image which has a large signal to noise ratio. SkyRaider Quick Guide Page 65 SkyRaider User Manual August 26, 2015 Options The Options Menu provides 6 Tabs in the Preference Window. They are: Quick Save, File, Grids, Cursor, Video, and Misc. File>Quick Save menu or the Quick Save Icon can save the file with no need to specify the file directory, file name and file format. All those are specified in Options>Preferences•••, Quick Save property page. Directory: Enter the name of the drive and directory where the new image will be saved. You may either type the path information, or use the Browse button to locate it from a standard Browse Folder dialog box. SkyRaider Quick Guide Page 66 SkyRaider User Manual August 26, 2015 Name Format: The year, month, date, hour, minute and second or nnnn (sequence) are used as part of the filename. If more files are saved with in a second, a (xx) suffix is attached to the end of Name Format to avoid the possible name confliction. For the nnnn (sequence) Name Format, no suffix is needed. File Prefix: Enter a file name prefix for Quick Save when generating files names for a series of images. This prefix will be combined with Name Format to form a final file-name naming paradigm. File Type: In this combo box, select the format in which you want the image to be saved (can be BMP, JPG, PNG, TIF). Left-Click the Option button to set the different parameters for encoding the file (For BMP format, the Option will be disabled). See File>Save As•••menu about the details of the format encoding methods. Sample: The final file name is shown at the right of the Sample label for reference. Show the rename file dialog: The file name can be renamed according to this item. When this item is checked, a Rename Dialog window will pop up after choosing File>Quick Save command or click the Quick Save Icon on the toolbar. The new name can be specified again according to the requirement. One can check a File Extension for the specified file Format and its Abbr. (abbreviation), to determine whether or not it will be displayed in the Browse window or not (The checked Format can be displayed in the Browse window). SkyRaider Quick Guide Page 67 SkyRaider User Manual August 26, 2015 The Grids Tab allows you to determine if you would like a Grid displayed, and if so how should it be draw. Grids can also be used to define the color of the Reticule that can be drawn over the image. Grid Style: The Grid Style can be No Grid, Auto Grid or Manual Grid. Default is No Grid. Grid Line Style: The Line Style for the grid can be Solid, Dash, Dot or DashDot. The Default is Solid. Grid Line Color: The color of the grid line. The Default color is Red (255,0, 0). Reticule Color: The color of the Reticule. The Default color is Red (255,0, 0) This Cursor command will set the mouse cursor for the video and image window operations. Select the Horizontal Cross as: None (window default), Single (single line), Double(1 Pixel), Double(3 Pixels), Double(5 Pixels), Double(7 Pixels), and Double(9 Pixels)formats. Select the Vertical Cross as: None (window default), Single(single line), Double(1 Pixel), Double(3 Pixels), Double(5 Pixels), Double(7 Pixels),and Double(9 Pixels) formats. SkyRaider Quick Guide Page 68 SkyRaider User Manual August 26, 2015 Single means single line. Double means two parallel lines. 1 Pixel means the line space between the two lines is 1 pixel in distance. The other sizes also have this meaning. Select the cursor shape from: Cross, Point, and Null. In the figure below, a cursor with Double horizontal and vertical lines with 9 Pixels cross (for the alignment application, the longer one) and the Cursor as a Cross was defined. You can overlay the Date and Time on the Video Window (With a location and color of your choice). You can also have MallincamSky display the Clarity Factor (can assist in focusing) on the image. These overlays are updated in Real-time. For Example: The settings on the Right will overlay the video stream with Will produce the ovelay: In the top left corner. SkyRaider Quick Guide Page 69 SkyRaider User Manual August 26, 2015 The Misc page is mainly used for the control of the MallincamSky’s User Interface. It mainly includes: 1. MallincamSky’s special file format warning information. 2. Sidebars. 3. User Interface Style; 4. Language. 5. Graphics accelerator 6. Privacy. Just Left-Click in a checkbox to choose your required Option. Window The menu control will close all open windows (Tabs), and can reset the lays back to its default settings. Close All Selecting the Closes All command will close all of the pictures opened or captured inside MallincamSky’s frame. If you have made any modifications to the pictures or if you have captured some pictures from the camera, choosing the Close All will let you finish the saving operations quickly. SkyRaider Quick Guide Page 70 SkyRaider User Manual Hint August 26, 2015 The Close All will actually close down the live Video Stream window. You can now use the File>Open Video to view a saved video. Left-Click on camera will again open the Video Stream window. Reset Window Layout Choosing this command will reset the MallincamSky window layout to the original one. The reset will be effective after restart. Windows… Choosing the Windows>Windows••• control will open a dialog box that lets you manage the currently opened windows. The dialog allows you to manage large lists of open windows by assigning them into groups. Let us say you have eight windows open, but want to close four of them scattered through the list. 1. Choose the Windows>Windows••• control. 2. Select the windows you want to close. Hold Ctrl or Shift key to select more than one at a time. Here, 4 windows are selected. SkyRaider Quick Guide Page 71 SkyRaider User Manual August 26, 2015 3. Click Close Window(s) button, those four selected windows will be closed, leaving the other files or captures available for editing. You can use this command to switch to a required window on a list by hitting Activate. About This control will popup a window that informs you of the version number, and built date of this version of MallincamSky. Left-Click on OK to Close. SkyRaider Quick Guide Page 72 SkyRaider User Manual August 26, 2015 MallincamSky Toolbar Open The Open Image command is used to open an existing image file. This command can also be used to preview an image in small size, or to view its statistics and information without actually opening the image itself. You can use this command to quickly locate a particular image. MallincamSky supports and can open a variety of image formats. These are identified in the Files of type list box. MallincamSky can open more than one image simultaneously by: Ctrl + Left Mouse Click on each required File then Left-Click on Open Shift + Left Mouse Click method to highlight the files to be opened, then Left-Click on Open When an image is opened, MallincamSky places it into a new image window. It then becomes the active image. MallincamSky maintains, at the File>Recent Files submenu, a list of the last opened files. SkyRaider Quick Guide Page 73 SkyRaider User Manual August 26, 2015 Save The Save Icon allows you to save an image onto your computer. The command immediately stores the current window image to its file (the filename is listed on the window's title bar) while leaving the image still active in its window. If the image is untitled or titled with a digit, MallincamSky will issue the File>Save As dialog automatically. The default “Save as type” will be “Window Bitmap (*.bmp,*.dib,*.rle)”. The Save Icon can be used to save the most recent changes to disk. It is often performed as a precautionary measure during lengthy or involved processes to reduce the amount of reprocessing that might be required in the event of a system failure or operational error. When an image is closed and not to save its changes is chosen, MallincamSky discards all changes made since the last Save operation. The Save Icon always saves the contents of the entire window, even if there is an AOI (Area of Interest) defined on it; Hint The Save Icon can be used to save a Snap Shot to the default File folder of an active Video Stream (it will ask you for a File Name). Quick Save The Quick Save Icon will be enabled when: a) A new image is captured from the camera; b) An image window is created by choosing the File>Paste as New File command. The Quick Save Icon can save the file a quick way with no need to specify the file directory, file name and file format. All those are specified in Options>Preferences •••, Quick Save Property Page. The file name can be renamed according to the setup in the Options>Preferences•••, Quick Save Property Page’s Show the rename dialog item SkyRaider Quick Guide Page 74 SkyRaider User Manual August 26, 2015 Browse The Browse Icon from the MallincamSky Tool Bar is used to browse images under the specified directory in the Folders Sidebar. The Browse Window resembles the Windows Explorer. Left-Clicking on the + will expand a folder so that you can examine its contents. You can Right-Click on a Folder (or file) and the actual Windows controls will pop as in Windows Explorer. As you get deeper into the Browse Window, you can Back-Out or Move Deeper via the Green Left or Right Arrow in the Browse Window. The Blue Right Arrow will take you to your computer’s Root Directory. Left-Double Clicking on a Folder will open up a Window Tab in the Video Window (this Window will be labeled Browse). This Tab will display all of the graphic files inside that Folder. If you Left-Double Click on a Graphics File inside the Video Window, it will open up that Graphics File in a new Tab in the Video Window. Hint You can close the Tab in the Video Window by Right-Clicking on the Tab’s Title (Browse), then choosing Close. SkyRaider Quick Guide Page 75 SkyRaider User Manual August 26, 2015 Zoom The Zoom Icon allows you to Zoom-In or Zoom-Out while viewing a Video/image window. The Drop-Down list will off you the zoom options. Just highlight the zoom option with your mouse and release the mouse button. Image Select You can select a Region of Interest on your Image Tab (live or static) by using the Left-Click Hold and Drag technique. Once selected then you can Copy (Ctrl+C) the selected region and then Paste it into another software program. Once a Region of Interest Rectangle is on the screen, you can drag it around, or grab one of its handles and resize it. Left-Clicking on the Image Select Icon again will remove the Region of Interest Rectangle from the screen. Track If the video/image's actual size is larger than the video/image Window, then this control will allow you to position the actual video/image within in the video/image Window. This control is activated automatically when necessary. Its function is similar to the scroll bars. It is an alternative to using the arrows on the scroll bars for positioning the video/image within the window. Position the mouse (make sure to choose a location outside a Region of Interest rectangle. You may need to close the ROI rectangle if necessary) on the actual video/image. Left-Click and Hold (the Open Hand will change to a Closed Hand). Now drag the image around inside the video/image Window If the video/image size is smaller than the video/image Window size, then the track operation will be disabled. SkyRaider Quick Guide Page 76 SkyRaider User Manual August 26, 2015 Stitch When the video window is active, choosing the Stitch Icon will invoke the video Stitch dialog window as below: The purpose on this control is to stich (glue) together images to create a panoramic view (image) so plan ahead with this control; are you going to create a horizontal panoramic image, or a vertical panoramic image. Have the camera viewing a specific location (or object), Now Left-Click on the Snap button. This will place a snapshot in the viewing box. Move the telescope so that you have some overlap, and Left-Click on the Snap button again. Repeat as needed. When you are completed taking the snaps, Left-Click on Next to bring up the next Stich Window. SkyRaider Quick Guide Page 77 SkyRaider User Manual August 26, 2015 Examine the options in this window and make the appropriate decisions on how you would like MallincamSky to Stich the snapped images together (this is where the pre-planning comes in handy). You will still be experimenting with your decisions. Once completed, Left-Click on Next to bring up the final Stich Window. SkyRaider Quick Guide Page 78 SkyRaider User Manual August 26, 2015 Again make some logical guesses with the numbers, and Left-Click on the Finish button when decisions have been made. MallincamSky will work thru the Snaps (and apply the choices you have made) and will place the final result in an image window for your viewing pleasure. You can try other Stitching decision by having the Stitched imaged active in your Video Window and Left Clicking on the Stitch Icon again. You will notice that your original snapped image are available for you to play with and combine in other ways. SkyRaider Quick Guide Page 79 SkyRaider User Manual August 26, 2015 EDF EDF or Extended Depth of Focus is used to image the appearance of the object you are imaging by slightly moving the object off its current position. The EDF will ask you to capture images after each movement. It will then realign the images in such a manner to provide better focus on the primary object. This technique belongs to the microscope world, but what the heck give it a try, as when you are imaging planets they bounce around due to atmospheric difficulties. See if this control can put together a satisfactory image. When you Left-Click on the EDF Icon, the Capture Image Window will popup. Position your image then hit the Capture Button. Either move the mount a little bit (of if the image itself is moving about), Left-Click on Capture to take another image. Repeat as necessary (note how the Window keeps track on the numbers of captures you have taken. Left-Click on Next when you are ready for the next step. The Select Method Window will now pop-up. In this Window you will select a merging method on how MallincamSky will align the captured images. Read the Descriptions and choose a method that you would like to try. Then Cleft-Click on Next to continue. SkyRaider Quick Guide Page 80 SkyRaider User Manual August 26, 2015 The Options Window will now pop-up. Now you will choose the Detail Clarity, Total Brightness, and Background Brightness values for your combined image. Read the Description about these controls and make your best guess (I always start with the Defaults and move from there). Once the values are selected, Left-Click on Next for the Auto Align Window. The Auto Align Window allows you to choose the alignment method MallincamSky should use to align the images on top of each other. I would recommend using the Shift+Scale+Rotate method. Once the alignment method is chosen, Left-Click on Finish and MallincamSky will attempt to overlay all of the captured images. Once it is completed, MallincamSky will place the final image in an image Window for you to examine. You can try other alignment methods or stacking algorithms by clicking on the EDF Icon again. If you Left-Click on the EDF Icon again when the combined image is active, the first popup window will already have a list of the captured images for you to choose from. SkyRaider Quick Guide Page 81 SkyRaider User Manual August 26, 2015 Reticule MallincamSky provides a Reticule (or crosshairs) to aid in aligning your telescope to a star (or other stellar object). Left-Click on the Reticule Icon to activate it and Left-Click again to De-Activate. You can change the color of the reticule via the Option>Preferences control in the Top Menu Line. ST4 Test If your SkyRaider camera (such as the SkyRaiderGm) has a ST4 port then it can be used to AutoGuide your telescope mount. This control is used to check if the camera can correctly communicate with the Telescope Mount. Connect the ST4 cable provided with the SkyRaider Camera to the ST4 Port on your Telescope Mount. Turn on the Telescope Mount to ensure that it is ready to be tested. SkyRaider Quick Guide Page 82 SkyRaider User Manual August 26, 2015 Left-Click on this control and the ST4 Popup Window will appear. The ST4 Window will contain 4 Green Arrow keys that when pressed will send a specific direction command thru the ST4 cable. Press each Green Arrow and note if the Telescope Mount moves in a specific direction. Due to the various orientations of the SkyRaider Camera once inserted inside the telescope, the Green Directions Arrows will not necessarily match the direction of Mount movement. Don’t worry; all guiding software will automatically orient itself with the movements. You can abort the movement by Left-Clicking on the Red Stop button in the ST4 Popup Window. The number box located in the middle of the 4 Green direction Buttons can be increase or decrease to affect the distance the Telescope Mount moves when a Green Direction Button is pressed. You can directly enter a number into the number box, or Left-Click on the up and down arrows to scroll up or down the value in the number box. Hint Attempt to orientate the SkyRaider Camera in the eye piece holder of the telescope in such a manner as to match the Green Directions Buttons movement of the stars in the video display. SkyRaider Quick Guide Page 83 SkyRaider User Manual 6. August 26, 2015 Controlling the SkyRaider Once you have a connection to the SkyRaider Camera, your next task will be to adjust the controls that make it possible to improve the image the SkyRaider is capturing. These controls are located on the Left SideBar Menu on MallincamSky. The Controls all have drop-down arrows; Left-Clicking on the Down-Arrow in the control heading will expand that control. Some controls will also display a coloured rectangular box on the Video Window to remind you that that control is in effect. You will be able to collapse the control window by Left-Clicking on the Up-Arrow on the control heading. Camera List The Camera List control lists the current SkyRaider cameras connected to the computer. Left-Clicking on the camera name will start the camera video window. You will see a tabbed frame (with SkyRaider Camera Name) appear in the window after selecting the Camera from the list. You can only access one SkyRaider Camera at a time. Capture and Resolution This control allows you to adjust both the display and capture resolution of the SkyRaider Camera (each model of the SkyRaider Camera will have its own resolution settings that will appear in the list. Once the resolution is set, this control will also allow you to either take a snap shot of the image, or save a video recording of what is currently being displayed. SkyRaider Quick Guide Page 84 SkyRaider User Manual August 26, 2015 Left-Click on the Drop-Down list on the Live Control to see all the allowable resolutions available for your SkyRaider. Simply Left-Click on the resolution you require, and the MallincamSky will now display the image in the Video Window with the selected resolution. The Snap Shot resolution is usually adjusted to match the Live Resolution. But if your SkyRaider allows independent settings, its Drop-Down List will be enabled and you can select a resolution of the saved image. Left-Clicking on Snap will tell MallincamSky to display in a New Tabbed window a snap shot of the image that is currently being exposed by SkyRaider Camera. The image will appear in the Video Display Window, with a name which follows the naming convention nnnn* (for example 0001*). Every time you Left-Click on Snap, another tabbed window with the name number increased will appear in the Window. The image is only displayed in the Video Window; it is not saved on your computer. You can save the image (and thus rename it), by using the Save icon, or File>Save As… command from the Top Menu Line. Left-clicking on Record, will tell MallincamSky to start recording a video of what is currently being captured by the SkyRaider. MallincamSky will open up a Video File window where you can indicate where you would like the video file to be saved (via the Browse Button), and what name you would like give the file. You can then either Leftclick on Finish to Start the video recording process, or Left-Click on Next> to choose which one of two formats that MallincamSky can save the video in. Left-Click on Next> SkyRaider Quick Guide Page 85 SkyRaider User Manual August 26, 2015 The Video Format and Encoder window will open up. It is here where you choose the Video format to save your video in. You can now choose either ser or avi, we recommend selecting avi. Left-Click on Next> to display the Start to Record Window. Here you can set the time length of the Video (you can only select minutes). If the Time Limit Check Box is unchecked, then you manually stop the recording by Left-Clicking on the Stop Icon that will replace the Record Icon on the SideBar. Time-Lapse will allow you to the rate at which the frames are captured. See Start Record … in the Capture section of the User Manual for more detailed information on using Time-Lapse. Left-Click on Finish to Start to recording process, the process will then continue recording until you Left-Click on the Stop Record Icon, or when it reaches the Time Limit (if you selected a Time Limit). If you need to record video in units other than Minutes, use the Capture>Start Time Lapse (Auto Capture)… from the Top Menu Line. This command will allow you to select a time in units of seconds rather than minutes. You must have the Video Window active to use this command. SkyRaider Quick Guide Page 86 SkyRaider User Manual August 26, 2015 Exposure & Gain The Exposure & Gain control will allow you to set the Exposure and Gain for the SkyRaider Camera. This control also allows for Auto Exposure, but for AstroPhotography we recommend that you set your own Exposure and Gain values. This control allows you to adjust the values via a slider, arrow keys, or by entering a specific time value. When Exposure & Gain is expanded, you will see a Green Rectangle (labelled Exposure) will appear over your Video Window. This Green Rectangle is a marked region that is a reference region for judging if the image brightness has reached the Exposure Target Value (When Auto Exposure is selected). Dragging or Resizing the Green Exposure Rectangle to a dark area will increase the video brightness and Dragging it or Resizing it to a bright area will decrease the video brightness. Hint The Green Exposure Rectangle will be removed when you minimize the Exposure & Gain control, but since most of us will leave that control open so that we can make changes to the values as we image; I recommend that you enlarge the Green Exposure Rectangle to the full size of the Video Window (Left-Click Hold and Drag) or drag and reduce the green rectangle to a corner of the image window. Exposure Target To use Exposure Target, Auto Exposure must be checked. You can Change the Exposure Target by Left-Click-hold and drag the marker bar to the required value. If you Left-Click on the Slider Bar (which selects it), you can use the left and right arrow keys of your keyboard to move the slider (this gives you more control). See above on how to use the Green Exposure Rectangle. SkyRaider Quick Guide Page 87 SkyRaider User Manual August 26, 2015 Exposure Time The current Exposure time is displayed above the slider. MallincamSky will display the exposure time in ms, until 60000 ms is reached, then it will switch to minutes, seconds, and ms. To use Exposure Time, Auto Exposure must be unchecked. You can modify the Exposure Time in three different ways: By Left-Click-Hold and Drag the marker bar to the required value. If you Left-Click on the Slider Bar (which selects it), you can use the Left and Right Arrow Keys of your keyboard to move the slider (this gives you more control). If you Left-Click on the Current Exposure Time Value, a window will open up where you can enter in the exact exposure time you require. This window will also provide you the exposure limits your specific SkyRaider Camera can handle. Don’t forget to Left-Click on OK to have MallincamSky accept the entered exposure time. If you set the Exposure Time to 10 seconds or higher, you will see a timer in the lower right corner of the screen indicating the current half cycle time out of the exposure time for the current image. SkyRaider Quick Guide Page 88 SkyRaider User Manual August 26, 2015 Gain This control allows you to adjust the gain. Gain will brighten up the image (but it can also brighten up the artifacts). The higher the Gain value; the shorter the exposure that you will require. All you need to do is find the highest Gain value that provides you with the image you are satisfied with. The Gain Control Bar will indicate the maximum Gain value that is available for your specific SkyRaider Camera. You can modify the Gain in two different ways: By Left-Click-Hold and Drag the marker bar to the required value. If you Left-Click on the Slider Bar (which selects it), you can use the Left and Right Arrow Keys of your keyboard to move the slider (this gives you more control). Defaults If you (or the SkyRaider Camera) ever get confused with what settings you have entered into the Exposure & Gain control, you can reset these values back to their defaults by Left-Clicking on the Default Button. Color Balance This control is only enabled on those SkyRaider Cameras that can produce color. The Color Balance control allows you to manually adjust the individual Red, Green, and Blue components of your image to better match your requirements. Once this control is expanded, MallincamSky will draw A Red Region of Interest Rectangle on your Video Window. You can adjust the size and location of this rectangle by using Left-Click Hold and Drag mouse techniques. SkyRaider Quick Guide Page 89 SkyRaider User Manual August 26, 2015 Drag or Resize the Red Rectangle to a pure white area and Left-Click on the White Balance Button to establish the video White Balance for future video streaming process. To adjust the Red, Green, or Blue components of Color Balance use the Left-Click Hold and Drag technique to mode the sliders., or Left-Click on a slider (to activate it), then use your Left and Right Keys on your Keyboard to move the sliders. If you (or the SkyRaider Camera) ever get confused with what settings you have entered into the Color Balance control, you can reset these values back to their defaults by Left-Clicking on the Default Button. Color Adjustment This control contains commands that are only enabled on those SkyRaider Cameras that can produce color. The Color Adjustment control will allow you to adjust: the Hue, the Saturation, the Brightness, the Contrast, and the Gamma of the object that the SkyRaider is exposing. Any changes to these commands will only be display after the next camera refresh. Hue This command controls the Hue of the Video image. Hue is one of the main properties of color. By adjusting Hue, you are changing the balance of Red, Green, and Blue in the image. You can either use the Left-Click Hold and Drag technique to move the slider to the left or right, or just Left-Click on the Hue’s slider (this selects it), then use your SkyRaider Quick Guide Page 90 SkyRaider User Manual August 26, 2015 Left and Right arrow keys on your Keyboard to adjust the value. The value of the Hue setting will be displayed above the slider. Only works with a color SkyRaider. Saturation This command controls the Saturation of the Video image. Saturation increases the separation of colors on a video image. It has the ability to enhance or inhibit the colors on the video image. You can either use the Left-Click Hold and Drag technique to move the slider to the left or right, or just Left-Click on the Saturation’s slider (this selects it), then use your Left and Right arrow keys on your Keyboard to adjust the value. The value of the Saturation setting will be displayed above the slider. Only works with a color SkyRaider. Brightness This command controls the Brightness of the Video image. Brightness makes the video image brighter or dimmer. This is a linear adjustment. You can either use the Left-Click Hold and Drag technique to move the slider to the left or right, or just Left-Click on the Brightness’s slider (this selects it), then use your Left and Right arrow keys on your Keyboard to adjust the value. The value of the Brightness setting will be displayed above the slider. Only works with a color SkyRaider. Contrast This command controls the Contrast of the Video image. Contrast is defined as the separation between the brightest and darkest areas on the video image. When you adjust the Contrast, you increase the separation between bright and dark. You can either use the Left-Click Hold and Drag technique to move the slider to the left or right, or just Left-Click on the Contrast’s slider (this selects it), then use your Left and Right arrow keys on your Keyboard to adjust the value. The value of the Contrast setting will be displayed above the slider. SkyRaider Quick Guide Page 91 SkyRaider User Manual August 26, 2015 Gamma This command controls the Gamma of the Video image. Gamma adjusts the mid-tones in a non-linear manner. That is, rather than make the image look brighter; it can increase the brightness of the shadows and mid-tones, without affecting the highlights in the image (This control is like adjusting the mid-tone slider on a histogram. You can either use the Left-Click Hold and Drag technique to move the slider to the left or right, or just Left-Click on the Gamma’s slider (this selects it), then use your Left and Right arrow keys on your Keyboard to adjust the value. The value of the Gamma setting will be displayed above the slider. If you (or the SkyRaider Camera) ever get confused with what settings you have entered into the Color Adjustment control, you can reset these values back to their defaults by Left-Clicking on the Default Button. Frame Rate The speed of the through-put on the USB port on your computer can depend on many parameters that are specific to the processes running on your computer. This through-put can be affected by the current Windows environment, CPU, graphics cards. Using the Left-Click Hold and Drag technique, move the slider to the highest frame rate that your computer can support. Start with the Frame Rate slider at the highest value, and only adjust lower if video image fails to appear. Most will find setting frame Rate towards the Low end of the scale better. SkyRaider Quick Guide Page 92 SkyRaider User Manual August 26, 2015 Color/Gray This control contains commands that are only enabled on those SkyRaider Cameras that can produce color. If you require the color video to be displayed in Color, then Left-Click on the Color choice. If you require the color video to be displayed in shades of Gray, the Left-Click on the Gray choice. Flip This control allows you to Flip the video image, Horizontally, Vertically, or Both. Left-Click to place a check mark in the Horizontal, Vertical boxes to have the image immediately reflect your choices. Sampling This control contains commands that are only enabled on those SkyRaider Cameras that support binning. If you require to Bin or Skip your video sampling rate from the SkyRaider Camera, then this control allows you to select and/or change the current setting. Bin refers to the method of combining (averaging) pixels of block of neighbouring same color pixels to resize the video to a lower resolution (can increase video frames/second). Skip (also known as decimation) means that a certain amount of pixels are not read out but skipped (horizontally, vertically or in both axes). This reduces resolution of the resulting video but introduces subsampling artifacts. SkyRaider Quick Guide Page 93 SkyRaider User Manual August 26, 2015 Left-Click on the required button to select the Sampling technique you need. Bit Depth This control contains commands that are only enabled on those SkyRaider Cameras that support various Bit Depth capabilities. Pixel Bit Depth relates the number of bits assigned to produce a color (or shade of Gray). The larger the number of bits, the larger the number of assigned colors (or shades of Gray) that the camera can produce. In an 8 bit image; for each color channel (Red, Green, Blue), there are 8 bits assigned. That is, there are 256 (28) shades of Red, Green, and Blue available. In a 12 bit image; for each color channel (Red, Green, Blue), there are 12 bits assigned. That is, there are 4096 (212) shades of Red, Green, and Blue available. The larger the Bit Depth, the larger the data, and the harder the CPU must work to produce image adjustments. ROI ROI or Region Of Interest relates to the rectangular portion of the video image that you may be interested in. You will lose you Dark Field using this control. A Blue Rectangle will appear over your Video Window. You can adjust it using the Left-Click Hold and Drag technique, or Left-Click and Hold to drag it over a specific portion of your Video Window. Once you have resized and placed the Blue ROI Rectangle on your Video Window, Left-Click on the Apply Button to selection this as the New Video Window. You can then resize the New Video Window by either the Drop-Down Size command in the MallincamSky Tool Bar or by scrolling the wheel on your mouse (if your mouse has a scroll wheel). This command allows you to Zoom in on a specific area of your original Video image. SkyRaider Quick Guide Page 94 SkyRaider User Manual August 26, 2015 If you (or the SkyRaider Camera) ever get confused with what settings you have entered into the ROI control, you can reset the ROI to its full screen by Left-Clicking on the Default Button. You may need to set Fit to Window in the Drop-Down Size command in the MallincamSky Tool Bar. Histogram A Histogram illustrates how pixels in an image are distributed by graphing the number of pixels at each color intensity level. The Histogram shows detail in the shadows (shown in the left part of the histogram), mid-tones (shown in the middle), and highlights (shown in the right part). A Histogram can help you determine whether an image has enough detail to make a good correction. The Top Window in the expanded Histogram Control shows the Histogram of current active video. Two vertical line markers (white) show the upper and lower limits of the intensity levels. These markers can be dragged with mouse (Left-Click Hold and Drag). If you are looking at a color image, the Histogram will reflect the RGB (Red, Green and Blue channels histogram at the same time) values with shading of the same color. You can also use the Pull-Down to select the Histogram for just the Red, or just the Green, or just the Blue channel. You can also enter directly the desired values in the Left or Right boxes below the Histogram chart for both Left and Right Histogram boundaries. Left Click on the Defaults Button to return the Left and Right Histogram boundaries to their original settings. Left-Click on the Auto Button to automatically locate the Left and Right boundaries thus letting MallincamSky determine the best video quality. SkyRaider Quick Guide Page 95 SkyRaider User Manual August 26, 2015 Dark Field Correction What makes the Mallincam SkyRaider series of cameras unique is the built in ability to take Dark Fields. The best explanation of what a Dark Field is come from Simon Hanmer. See Appendix for his explanation. To have the SkyRaider camera to automatically apply Dark Fields, you need to follow the following procedures before imaging. Select SkyRaider Camera Step 1 Select Exposure Time Take Dark Fields Check Enable Box Select SkyRaider Camera With the Camera Tab selected on the Left SideBar, LeftClick on the Camera you are currently using (between lines in Camera Heading). Once a camera is selected, a black rectangle (with SkyRaider Camera name) will appear in the Video Window of the MallincamSky Software along with the Horizontal and Vertical Rulers. Step 2 Select an Exposure Time for Dark Field Correction With the Camera Tab selected on the Left SideBar, Left-Click on the Exposure & Gain Line (a Green Rectangle with the word Exposure will appear in your Video Window, to inform you that you are setting an exposure time. Closing the Exposure Window will remove the Green Rectangle). The Exposure & Gain Window will open up and you can either slide the Exposure Time bar (Left-Click Hold and Drag) or LeftClick on the current Exposure Time value, and a another Window will open to allow you to manually enter a time (don’t forget to click OK). SkyRaider Quick Guide Page 96 SkyRaider User Manual August 26, 2015 Exposure Target is only active when Auto Exposure is selected. The Green Rectangle is used to see if reference region it encloses matches Exposure Target that you set (We recommend that Auto Exposure is not selected). Step 3 Take Dark Field Correction Ensure that the cover is either on the SkyRaider Camera or the Telescope is covered. With the Camera Tab selected on the Left SideBar, Left-Click on the Dark Field Correction Line. The Dark Field Correction Line will open up allowing you to select the Quantity of Dark Fields and the option to start the Dark Field Capture process. Select up to 10 for the Quantity (Start with 5 with 30 second exposures to get a feel of the process). Then Left-Click on the Capture Button. The Software will display its progress above the selected Quantity. Due to the unique way the Mallincam SkyRaider camera’s utilize odd and even image acquisition, a Dark Field is obtained for each of the odd and even frames. That is, five 30 seconds Dark Fields will take two times (5 x 30 seconds) or 300 seconds to complete. You can use this time to finish setting up your equipment. Hint Step 4 Once you have finished taking your Dark Field, don’t forget to remove the lens cap on your camera, so that you can actually image (I won’t mention any names…). Enable Check-box Click in the Enable check box to have Dark Fields applied in real time to your video. Once you have collected your Dark Fields, you can then save them with the Export Button (choose a location and File name that allows you to locate the correct Dark Fields if you would like to reuse them. You can load previously saved Dark Fields via the Import Button. Just browse to the folder where you saved them when you used the Export Button. It has been found that setting the Histogram to 0 and 255 is best for Dark Fields. SkyRaider Quick Guide Page 97 SkyRaider User Manual August 26, 2015 Parameters The Parameters control allows you to: Load a previous set of camera control parameters, or Save the current camera control parameters for another session. The parameters includes most of the settings in the SideBar including the Rectangle Regions of Interest. The Drop-Down control provides a list of previous (if any) saved parameter settings. Just sellect the parameter session that you require from the list. Left-Click on the Load command and it will load the control parameters from the above file in the Drop-Down List. Left-Click on the Save command and MallioncamSky will open a window that will allow you to give a name to the current sessions, and then will save the current camera parameters under that name (see Management command below). Hint Give a Name that is easy to determine what the parameters in the file contain. That is, choosing a name like Eagle Nebula Dark Skies, would indicate that the parameters in the File are designed for the Eagle Nebula when you have great dark skies. Left-Click on the Overwrite command and it will overwrite any setting changes you made to the current parameter file. Left-Click on the Management command and a Management Dialoge Window will open up. SkyRaider Quick Guide Page 98 SkyRaider User Manual August 26, 2015 This Dialog Window will allow you to: Rename the Parameter File name Remove the Parameter File from the computer Re-order how the Parameter names appear in the list. The Management Dialog will also allow you to export all of the Parmeter Files to a *.pgt file, so that you can send this *.pgt file (which contains all of your parameter files) to a collegue. The Management Dialog will also allow you to import a collegues set of parameter files ( single *.pgt file whci contains all of their parameter files) into your MallincamSky folders. When you import a set of parameter files into your system, it will overwrite all of your parameter files. So use caution. See Hint below. Hint After you have created a list of parameter files that you are using. Save them in a Parameters File Folder (pick a location and name for This Folder such as Parameter Files) on your computer under a name that indicates that these files are yours (such as Michael’s SkyRaider-DSc Parameters Files for New Hamburg). This way you can save a another set of parameter files for another SkyRaider Camera In the same folder (Parameters File Folder) this way you can load parameter files for a specific camera. Also you can also include other collegues parameters files in the same Folder (Chris’s skyRaider-DSc Parameter Files for SkyRaider Quick Guide Page 99 SkyRaider User Manual August 26, 2015 Toronto). This allows you a method to reload your parameter files after trying colleagues (and not have them overwtitten). Parameter File Folder Michael’s SkyRaider-Dsc Parameters File for New Hamburg Michael’s SkyRaider-Gm Parameters File for New Hamburg Michael’s SkyRaider-Dsc Parameters File for Mount Forest Michael’s SkyRaider-Gm Parameters File for Mount Forest Chris’s SkyRaider-Dsc Parameters File for Toronto Chris’s SkyRaider-Gm Parameters File for Toronto Michael’s SkyRaider-Dsc Parameters File for New Hamburg Eagle Nebula Dark Skies Eagle nebula Light Skies Focus and Goto Parameter Mic SkyRaider Quick Guide Page 100 SkyRaider User Manual 7. August 26, 2015 Installing Optional Software Installing DirectShow Driver Step 1 Insert the Mallincam CD into CD-ROM drive of your computer. Have windows open the CD and you will be presented with 4 files: Step 2 95 MALLINCAMDshowSetup MALLINCAMSKYSetup MALLINCAMTwainSetup Double-Click on the MALLINCAMDshowSetup File Windows may display a warning asking for permission to run the program, if it does, select YES The following MallincamSky Setup Screen will appear: SkyRaider Quick Guide Page 101 SkyRaider User Manual Step 3 Step 4 Step 5 August 26, 2015 Click on Next to start the installation process. Click on Install to start the installation process. Click on Finish to close the process. The DirectShow driver will give you the ability to display the SkyRaider video using other video display software. The software that uses the DirectShow video protocol, will always have a button that pops up the DirectShow Control Window where you can control the exposure, and other settings on the SkyRaider camera. SkyRaider Quick Guide Page 102 SkyRaider User Manual August 26, 2015 Installing WDM Driver Step 1 Insert the Mallincam CD into CD-ROM drive of your computer. Have windows open the CD and you will be presented with 4 files: Step 2 95 MALLINCAMDshowSetup MALLINCAMSKYSetup MALLINCAMTwainSetup Double-Click on the MALLINCAMTwainSetup File Windows may display a warning asking for permission to run the program, if it does, select YES The following MallincamSky Setup Screen will appear: Step 3 Click on Next to start the installation process. SkyRaider Quick Guide Page 103 SkyRaider User Manual Step 4 Click on Install to start the installation process. Step 5 Click on Finish to close the process. August 26, 2015 The WDM driver will give you the ability to display the SkyRaider video using other video display software. The software that uses the WDM video protocol, will always have a button that pops up the WDM Control Window where you can control the exposure, and other settings on the SkyRaider camera. SkyRaider Quick Guide Page 104 SkyRaider User Manual August 26, 2015 Installing Mallincam ASCOM Driver Step 1 Visit www.Mallincam.net Select the Support Tab Go into Software Downloads Near the bottom of the page under Miscellaneous Downloads is the ASCOM ST4 DRIVER SKYRAIDER G Guider link Step 2 Download the ST4 ASCOM driver Plus download the ASCOM Video driver when made available Step 3 Double Click on the Drivers to install them onto your computer system (Windows); just follow the on screen instructions. This assumes that you have already installed the latest ASCOM Platform on your computer. SkyRaider Quick Guide Page 105 SkyRaider User Manual 8. August 26, 2015 AutoGuiding with SkyRaider G AutoGuiding with MaximDL and DirectShow The following is a pictorial procedure on how to select the SkyRaider DirectShow driver (assumes you have already installed the driver, and the ST4 ASCOM Driver on your computer) into MaximDL Step 1 Start MaximDL Step 2 Left-Click the Toggle Camera Control Icon (Camera Control Window will open up). SkyRaider Quick Guide Page 106 SkyRaider User Manual August 26, 2015 Step 3 Left-Click the Setup Camera button on Camera 2. Step 4 Choose Video DS (from Camera Model in Setup Video DS popup Window) SkyRaider Quick Guide Page 107 SkyRaider User Manual Step 5 Click OK in the Setup Video DS popup Window. Step 6 Click Connect in the Camera Control Window. SkyRaider Quick Guide August 26, 2015 Page 108 SkyRaider User Manual August 26, 2015 Step 7 Left-Click on the Guide Tab in Camera Control. Step 8 Left-Click on the Settings Button in the Guide Tab, and select ASCOM Direct in the Autoguider Output Control when the Guider Settings Tab opens up. SkyRaider Quick Guide Page 109 SkyRaider User Manual Step 9 August 26, 2015 Now Left-Click on the Setup Button in the Autoguider Output Control and the ASCOM chooser winder will popup. Select ToupST4 (ASCOM) as the driver You should now be able to Left-Click on the Start button in the Guide Tab to start the guiding process. As MalimDL is using Direct-DS to obtain the video image from the SkyRaider, it CANNOT directly control the exposure. But, MaximDL does provide a link to the exposure control written into Direct-DS. Left-Click on the Arrow beside the Options heading on the Guide Tab on the Camera Control. In the Drop-Down list that appears, choose Camera Settings. Another small Drop-Down list will appear with two choices (Video Capture Filter…, and Video Capture Pin…) SkyRaider Quick Guide Page 110 SkyRaider User Manual August 26, 2015 Video Capture Pin ... Choosing this choice will Pop-up a Properties Window that will allow you to choose the pixel size of the camera (selections depend upon which SkyRaider you are using). Make your Selection and Left-Click on OK to accept. Video Capture Filter … Choosing this selection will Pop-up a Properties Window that will allow you to adjust the Exposure of the camera (along with ROI, Histogram. Misc, and Parameters. See Above in the User Manual for how to use these control). This window can stay active when using MaximDL. I recommend, turning Off the Auto-Exposure, and control the exposure manually The Flashing Rectangle in the Middle of the Live Video Screen will disappear when you close the Properties Window. Now use MAXIMDL as you normally would. SkyRaider Quick Guide Page 111 SkyRaider User Manual August 26, 2015 Running PHD2 with WDM Driver + ToupST4 Driver Step 1 Start PHD2 software Step 2 Click on the Camera Icon to open up Connect Equipment Window. SkyRaider Quick Guide Page 112 SkyRaider User Manual August 26, 2015 Step 3 Choose WDM-style webcam camera from Camera Dropdown List. Step 4 Left-Click on the Connect button on Camera List. Step 5 The Camera choice window will pop-up. Select MALLINCAM and Click on OK. SkyRaider Quick Guide Page 113 SkyRaider User Manual Step 6 Select Resolution (recommend 640x480) and Click on OK Step 7 Choose ToupST4 (ASCOM) from the Mount Dropdown List SkyRaider Quick Guide August 26, 2015 Page 114 SkyRaider User Manual August 26, 2015 You can check to see if the SkyRaider can control your Mount by Left Clicking on the Mount Setup Icon moves. and use the Arrow Buttons to see if your mount Step 8 Left-Click on the Mount Connect Button activate the connection. Step 9 Click on Red X to close the Connect Equipment Window. SkyRaider Quick Guide Page 115 SkyRaider User Manual August 26, 2015 Step 10 Left-Click on the Looping Icon to start the SkyRaider imaging. Step 11 Since WDM is only a Video image from the SkyRaider, You will need to set the PHD2 Exposure Duration to a value other than AUTO (say 1 second). This will NOT control the actual exposure rate of the SkyRaider, but rather show what the SkyRaider has on its video image every 1 second. Left-Clicking on the Cam Dialog Box (see image above) in PHD2 will open a window where you can adjust the parameters of the SkyRaider Camera (such as the actual Exposure, as the Exposure control in PHD2 does not control WDM driver’s actual exposure, but rather just the refresh rate). It you can, set both the Actual Exposure and the PHD exposure duration to the same value (experiment). If you see a rectangular Box in your Window, go to the ROI Tab in the Cam Dialog Box, and move and shrink the box to one side of your window so it doesn’t affect the image. SkyRaider Quick Guide Page 116 SkyRaider User Manual August 26, 2015 Running PHD2 with ASCOM Driver Step 1 Start the PHD2 software. Step 2 Click on the Camera Icon to open up Connect Equipment Window. Step 3 SkyRaider Quick Guide Page 117 SkyRaider User Manual August 26, 2015 Choose ASCOM Toupcam Driver from Camera Drop Down List. Step 4 Step 5 Left-Click on the Camera Setup Button to open Setup Window. Setup Recommendations for SkyRaider is to use 640 * 480 Resolution with the 8 Bit Depth and Low Frame Rate. Left-Click on OK to go back to Connect Equipment Window. SkyRaider Quick Guide Page 118 SkyRaider User Manual Step 6 Step 7 Step 8 August 26, 2015 Left-Click on the Connect button on Camera List to connect camera. Select ToupST4 (ASCOM) from the Mount Dropdown list Left-Click on the Connect on Mount List to tell PHD2 that the mount that the SkyRaider controls the ST4 port itself. SkyRaider Quick Guide Page 119 SkyRaider User Manual Step 9 Step 10 August 26, 2015 Left-Click on the Red X to close the Connect Equipment Window. Left-Click on the Looping Icon to start the SkyRaider imaging and then start using PHD2 as you normally would. SkyRaider Quick Guide Page 120 SkyRaider User Manual 9. Appendix August 26, 2015 How Do I … How do I get rid of the Green Exposure Rectangle? First remember the Green Exposure Rectangle is used for the auto-exposure process, but it can be annoying when you are imaging. The way to remove it from the Video Window is to minimize the Exposure & Gain control. Hint If you require the Exposure & Gain Control to be expanded (so you can adjust the exposure), but still do not want the Green Rectangle in the middle of your screen, try this. Chose Fit to Window from the Zoom Drop down Box (on the Icon Tool Bar). Now just drag the Green Rectangle (Left-Click and Hold technique) to the lower left of the window. Next grab the Upper Left corner of the Green Rectangle and drag it to the Lower Right corner to make a zero size rectangle (all you should see is the Green word Exposure). Finally, grab the Left of the MallincamSky window and move it to the right until the edge is next to the actual video window (Watch how the word Exposure just gets covered (This is part of my Startup routine). How do I Select a part of the Image and Zoom in? Expand the ROI control (a Blue Rectangle should appear around you image). Using the Left-Click Hold and Drag technique, maneuver and size the Blue Rectangle so that it encloses the area you are interested in. LeftClick on Apply and watch the part of the image in Blue Rectangle, be the whole image in the Video Window. Now, Left-Click in the Blue Rectangle, and use the scroll wheel on your mouse to enlarge or reduce the image (you can also use the Fit to Window control on the Icon Tool Bar). Left-Click on Defaults to get back to Full screen. SkyRaider Quick Guide Page 121 SkyRaider User Manual August 26, 2015 How do I automatically save 1 image every 30 seconds? Choose the Time-Lapse (Auto Capture) from the Capture Menu on the Top Menu Line. Now determine your naming convention and location. Enter 30 in the Time slot Enter the total number of images you would like (or leave unchecked, and you will manually stop the process when you are ready). Left-Click on OK At the bottom of the MallincamSky Window; a running count will be displayed. Left-Click on Stop Time-lapse (Auto Capture) to stop the process. How do I adjust the brightness in my monochrome SkyRaider? You will have noticed that the Brightness command in the Color Adjustment control is deactivated. You can use the Gamma command (moving it to the left will brighten the whole image, but the better control is the Histogram command in the SideBar. By move the Left Marker Line or the Right Marker Line (or a combination of both) to the left will brighten up you image in a more controlled manner. How do I Broadcast my image onto Night Skies Network (NSN)? As a direct way is not yet available, you will need to use a third party software to assist you. Obtain one of the following: ManyCam, WebCam Max, SplitCam (different opinions on which is the best, it becomes a personal preference). Each of these software programs will allow you to capture what is happening on your computer screen. The software packages also act as a webcam to NSN. Therefore whatever screen image these software packages are capturing, will display on NSN as a webcam image. See Setting up to Broadcast on Night Skies Network in the Appendix for more detailed instructions. Can I Use MallincamSky with One SkyRaider and Auto-Guide with another? Yes, as long as you use DirectShow, WDM or ASCOM with the second SkyRaider. Remember if you are using DirectShow or WDM, the guiding software CANNOT control the exposure setting on the camera; look for a Settings or Property Tab button that pops up the SkyRaider exposure control window. SkyRaider Quick Guide Page 122 SkyRaider User Manual August 26, 2015 How Do I Pause the Video? You can Pause or Resume the live video by either choose Setup>Pause from the Top Menu Line, or even easier, just press on the pause key on your keyboard. How do I Undo an Operation? On the SideBar, there is an Undo/Redo Tab; Just Left-Click on the Tab and the Tab will open with a list of all the operations you have performed on your Image (not Video, you cannot undo video operations such as contrast). Just Left-Click on the location before the operation you would like to undo and MallincamSky will revert the image back to that step. How do I make my ROI the whole Image Again? Just Left-Click on the Defaults Button in the SideBar’s ROI control. Note, by changing the ROI, the Dark Fields will be removed from the SkyRaider. How do I Turn Off Dark Field correction? Just Left-Click in the Enable box to remove the check mark in the Dark Field correction control on the SideBar. Place a check mark back in the Enable box to reactivate Dark Field correction. How Do I take Another Dark Field? You have to either disconnect the SkyRaider, or even easier just Left-Click on the Video Window Title and Choose Close to disconnect. Now Left-Click on the SkyRaider camera in the Camera control on the SideBar to reactivate it. Now you just retake your Dark Fields. Note: If you change the ROI, then the Dark Fields will be removed from the SkyRaider. SkyRaider Quick Guide Page 123 SkyRaider User Manual August 26, 2015 Dark Field Explanation The following is the best explanation of what Dark Field is, and it comes from the work of Simon Hanmer. Dark Frame vs Dark Field Dark Frame Subtraction First, take an image with the camera shutter closed or the camera/scope covered under the same conditions of exposure time and temperature as the light frames you are going to capture of your astronomical target. Many astronomers will take ten or more such dark frames and then combine them into a master dark frame, principally for statistical reasons: the more sub-frames, the better quality of master frame. This will give you a single (master) frame of hot and warm pixels generated in the imaging chip, electronically and thermally, including amplifier glow. Second, subtract the dark frame from each of the light frames in order to remove hot and warm pixels and amplifier glow. However, other noise will remain and needs to be removed with other manipulations and software. Dark Field Correction Dark Field correction is another matter entirely. It does not refer to a single image and the recommended/default 10 frames captured to perform the Dark Field correction are not used to generate a master frame – nor are they simply subtracted from the light frames. Instead, the 10 frames are first used to perform a running stacking, analogous to the stacking procedure applied in both the SSI software and the new Universe/SSI software. Running Stacking: the first frame in the series of 10 is recorded in the camera as is. Then the first and second frames in the series of 10 are combined to form a new frame that is also recorded. Then the third frame is combined with the preceding 2 frames to form yet another combined frame that is also recorded … and so on until you end up with 10 frames in a series that represent 1, 2, 3, 4, 5, 6, 7, 8, 9 and 10 combined frames, respectively. Note that stacked and combined frame #10 represents information derived from all 10 frames. But hold on … we are not talking CCD imaging here – this is video. When a CCD chip is activated it cranks at full blast and requires effective cooling to prevent it from rapidly heating up beyond a user-determined temperature. But video chips work differently: they heat up slowly and progressively. This means that the first frame of the series of 10 was taken at a lower chip temperature than the final SkyRaider Quick Guide Page 124 SkyRaider User Manual August 26, 2015 one. Therefore, each of the 10 frames records different levels of thermal noise. In other words, when stored in the camera, these 10 combined frames represent a library of information that the camera and software can now choose from and use to CORRECT (note : not « subtract from ») the light image that we want to display on our computer screen. Now, how does this work in practice – and why is it called a Dark Field correction? The Dark Field correction is prepared by the user at the beginning of an observing session by covering the camera or scope, pre-determining the exposure time and setting the software to automatically taking up to 10 images. We all know our equipment and the skies we observe under (or we certainly will with a bit of practice). We also have an idea of what range of filters we might use that night and the effect they have with respect to exposure times. Take this into account when selecting you exposure time for your 10 dark images. But remember: this is NOT a Dark Frame subtraction – the exposures required for dark frame subtraction must be close to those used for the light frames of our astro-targets. Not so for Dark Field correction. The camera and software in the latter case are not looking for a single FRAME to subtract based on exposure time. They are looking at the 10 combined frames to see which one has the noise level that most closely matches the noise level in the light frame itself. In other words, they are looking for a noise FIELD. The point here is that camera and software will select the appropriate Dark Field for the correction, for both shorter and longer light frame exposure times from the same « library ». In addition, unlike the single frame of a CCD dark frame, the images used for Dark Field correction are interlaced combinations of odd and even scan lines. Apparently this too factors into the fact that this correction removes ALL NOISE, not just hot and warm pixels. The important point to retain here is that, because of the stacking and combining to form the library of images for the correction procedure, long light exposures do NOT require similarly long exposures for the Dark Field correction images. For example, a 2 minute light exposure using a narrow-band h-alpha filter may still only require the user to prepare ten 30 second dark images for the dark field correction. The precise numbers will vary with your equipment and conditions. SkyRaider Quick Guide Page 125 SkyRaider User Manual August 26, 2015 Setting up to Broadcast on Night Skies Network Introduction I found that when I first started connecting tonight Skies Network (NSN), things started happening too fast for me to keep track of everything at once. So, pre-planning was the most the most crucial step for me. I found that by doing test runs in the comfort of my house allowed me to develop my techniques that work for the equipment and software that I use. Below are the results and steps that I use to broadcast on NSN, feel free to follow them and/or made modification as you deem as necessary. Note Computer real-estate will be your nemesis. So, depending upon the size of the monitor (laptop), then number of screens that you are using, then number of software programs that using are simultaneously are using, will dictate how you will manage your windows. I will describe how I have organized my windows under a variety of situations (1 computer, 1 computer with 2 monitors, which software packages am I using, and what am I trying to do this session). Remember, it’s all about having fun, and time and patience are your best friends (not to mention all the guys and gals, and the Yahoo – MallinCam site : http://tech.groups.yahoo.com/group/mallincam/messages One of the most important decisions you will need to make with broadcasting the image of the SKYRAIDER is what Video capture software are you going to use. Some simple suggestions: Currently MallincamSky is not capable of modifying the Video Image and having that Video Image be directly captured by NSN Flash. So if you want to use all the features of the MallincamSky software and broadcast those results, as well as save screen shots and videos of your images, then we need another program to capture MallincamSky’s output and have the output from that program linked to NSN’s Flash grabber. You currently have three choices for that other program: Splitcam, Manycam, WebcamMax. All three have about the same features, some of these have versions that will cost you, but all have a version that is free (reduced functions, advertisements, etc…). My current program of choice is Splitcam (I can live with the Advertisements). You will then use Manycam/Splitcam/Webcam Max along with MallincamSky Software to broadcast the images on NSN. Step 1 Plug in the SKYRAIDER camera into an usb port on your computer. Always use the same port for your connected devices. I even mark on my laptop which usb port is for which device. SkyRaider Quick Guide Page 126 SkyRaider User Manual Step 2 August 26, 2015 Start MallincamSky Get the image of your object on the Image Window of MallincamSky, adjust the settings on the software for your planned object and size the window so you have room for other software on your monitor real-estate. If you have a dual Monitor system, move MallincamSky to the second monitor. During your initial NSN experience, you will find it easier to even get the object of interest onto the MallincamSky Software window. This allows you to spend some time playing and adjusting the settings prior to connecting to NSN. As you become more comfortable, you will not worry about that and will adjust while connected to NSN (with the whole universe watching you live). Step 3 Start Manycam/Splitcam/WebcamMax Size the Manycam/Splitcam/WebcamMax window so that is beside the MallincamSky Window and you can see both with little overlap. If you have a dual monitor system you can slide both the MallincamSky Software Window and the Manycam/Splitcam/WebcamMax window to the second monitor. Step 4 Have Manycam/ Splitcam/Webcam Max grab the window image All of these packages have the ability to get a desktop image. Choose this option and overlay the sizing window on top of your MallincamSky Software Image Window. You may need to play with the sizes until you obtain the ideal combination of both the fit in your screen. You want to ensure that you get a good image of whatever the MallincamSky Software is looking at inside the Manycam/ Splitcam/ Webcam Max window. This allows you to select the size and location of the desktop that you want on the SplitCam. Just slide and adjust the overlay on top of your MallincamSky’s Software image. SkyRaider Quick Guide Page 127 SkyRaider User Manual Step 5 August 26, 2015 Adjust the Resolution and frames/second (fps) value on Manycam/Splitcam/WebcamMax This will be trial and error; it all depends upon resolution, bandwidth, and what over members on NSN experience from your broadcasted image. You will end up adjusting both on the Manycam/Splitcam/Webcam Max side as well and on the NSN side to get the best image. A helpful hint: I slide over the Manycam/ Splitcam/Webcam Max window so that some of the text appears in the Manycam/Splitcam/Webcam Max window. Can the members on NSN read the words? If not, adjust. Remember, this may take a couple of sessions until you obtain the ideal resolutions for your particular setup. For me I have set both Manycam /Splitcam at 640 x 480 at 15 fps. Step 6 Minimize the Manycam/Splitcam/WebcamMax software window Click on the little underscore on the top right side of the Manycam/Splitcam/Webcam Max window. This will eliminate the Manycam/Splitcam/Webcam Max window from your desktop (it should now appear on the bottom of your desktop monitor), but note that the software is still running and still has hold of your desktop (MallincamSky) Image location. Do not move the MallincamSky Window around your desktop when broadcasting, since Manycam /Splitcam/WebcamMax is just grabbing the real-estate location that currently your MallincamSky Software image is situated at. If you move the MallincamSky Software Window, then Manycam /Splitcam/ Webcam Max will still grab the desktop location, but may not grab the whole MallincamSky Video Image. Don’t be afraid to practice moving the MallincamSky Software window when not broadcasting to learn how it affects the displayed Manycam/ Splitcam/ WebcamMax Window. If you need to, you can again use the Manycam/ Splitcam/ WebcamMax desktop select icon and select or change the location or size of the window for it to grab. If you have a dual monitor, you can leave the Manycam/Splitcam/WebcamMax window open on the second monitor since real-estate will not be an issue in the situation. In fact with Splitcam, you have an option to view the displayed image in full screen mode by clicking on the”[ ]” symbol in the upper right side of the screen (the escape key returns you back to normal size). Step 7 Start your Web Browser of Choice You may have to play with a number of Browsers to see which one works well with your particular computer setup. I have had success with many browsers: Chrome, Internet Explorer, Firefox, and Maxthon. SkyRaider Quick Guide Page 128 SkyRaider User Manual Step 8 August 26, 2015 Log into Night Skies Network (NSN) Have your Web Brower go to the location: http://www.nightskiesnetwork.com/ . Locate and click on the BROADCASTERS AND MEMBERS SIGN IN button. The next Login screen will ask you to enter your username and password. You will next be presented with the Channel Line Up screen for Night Skies network. Click on the Login selection on the upper right hand side of the screen. You will be presented with the Channel Launch Sign In screen for NSN. Again enter your Username and Password and click on Publish Channel button. Step 9 Allow Adobe Flash to use your Manycam/Splitcam/WebcamMax The Adobe Flash Player Settings window will pop up on your screen asking you for permission to use your camera and your microphone. Select Allow. SkyRaider Quick Guide Page 129 SkyRaider User Manual Step 10 August 26, 2015 Turn off your Microphone Until you have your microphone figured out, it is best to initially turn it off. If you do not, the viewers on NSN may hear an extreme loud buzzing (feedback noise). Later on we will look at using the microphone, but until then I recommend CLICKING on the little microphone symbol on the upper right corner of the NSN video display window to disable the microphone. Step 11 Set a message for the NSN observers It is a good idea to display a message above the NSN display window, so that the other NSN views understand what you are doing. When initially setting up (which usually takes longer when you are learning), I usually type the message “Setting Up the Camera” then CLICK on the SEND button to have it displayed. When you are us and running and everything is working as it should, you will change the message to indicate, what telescope, mount, and camera you are using. For that is the most frequently asked question from the NSN viewers. Step 12 Select the Camera Now is the time to activate the camera, or in our case have NSN driver point to our Manycam/Splitcam/Webcam Max output. RIGHT CLICK inside the NSN Video window to bring up a Settings Window SkyRaider Quick Guide Page 130 SkyRaider User Manual August 26, 2015 CLICK on the Settings choice and you will be presented with the Adobe Flash Player Settings Window. CLICK on the Camera Icon and you will be presented with a pull down menu to select your camera. CLICK on the Pull Down list to select your camera of choice. CLICK on CLOSE to Continue. NSN will remember what camera you chose from the last visit. So usually you only have to go through this process whenever you want to change what camera device you would like the NSN flash driver to use. Step 13 Choose your Camera Settings We will now select the settings for our camera. We have the option of changing: The Bandwidth, Picture, Resolution, Framerate, and even the microphone rate (when you are ready). The changes will not be activated until you CLICK on the Green OK symbol in the window. LEFT CLICK inside the NSN video Window to bring up the Camera Settings Window. SkyRaider Quick Guide Page 131 SkyRaider User Manual August 26, 2015 Use the sliders for Band Width and Picture values. I usually have both of my sliders way on the right. Over time you will find the sweet spot for your system. Select your Resolution from the Pull Down Menu. Select a starting value of (640 x 480) for the system. Again, play with these to see what settings the NSN viewers say is the best. Select your Frame Rate. From its Pull Down Menu. I usually leave it at 15 fps, but I have used 30 fps at times. Again trial and error for your system. CLICK on the green OK symbol to accept these settings. That’s it, you are done. If everything is working well and the Window’s gods are in a good mood, you should be broadcasting whatever object the SkyRaider is capturing. You should now enter another Message and SEND it out to indicate what system you are using and what object you are viewing. There is a time delay on what you say (if you have you microphone activated) and do on your computer as compared to what others see (and hear) on the NSN broadcast. You will freeze (and I don’t mean like what Chris does when he broadcasts in winter till 3am), I mean from time to time your NSN connection will freeze for no apparent reason. It happens to us all. When this happens, you can simply terminate the Web browser program (Ctrl –Alt-Del). Then restart your browser and Log back into NSN. This usual is a very quick process. But, sometime we all have to restart our computer (this takes longer for we need to power down hardware and software) and reactivate everything before login back in. Don’t worry, the NSN viewers sense what is happening and will keep the conversations going while waiting for you to come back on. Don’t be afraid to ask for advice by typing in on the Video chat window, as we are all learning and are willing to assist whenever we can. When ready, try activating the microphone (click on the microphone symbol). Other will let you know if they can hear you, or if there is noise. Remember there are settings for the microphone in the camera settings window. When you are finished with your session, you simply say your good nights to the crowd of NSN viewers to let them know that your session is ending. CLICK on the red STOP button on your NSN Window and NSN will shut down your channel and you can power down your system and call it an evening (It won’t force the NSN viewers off the channel and some viewers will continue chatting long after you have gone to bed). SkyRaider Quick Guide Page 132 SkyRaider User Manual August 26, 2015 Focal Reducers MFR-8 MFR 8 Mk II Kit. This focal reducer is made for the SkyRaider Series of cameras. Typically it is a MFR-5 II without the rear (MFR-6) small part. The front lens has a high precision achromatic 25 mm double sided coated lens, and includes two 10 mm spacers and a 5 mm spacer offering a variety of variable focal reduction for just about all telescope type. This is an ideal combination for the SkyRaider Series of cameras. If a user already own a MFR-5 type focal reducer no need to purchase the MFR-8 II Kit. The MFR-8 Mk II Kit will vary focal reduction from 0.55X down to about 0.4X. Test result did confirm reduction as low as 0.38X reduction when using the SkyRaiderDS using all supplied spacers. SkyRaider Quick Guide Page 133 SkyRaider User Manual August 26, 2015 User Notes SkyRaider Quick Guide Page 134