1
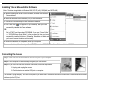
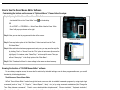
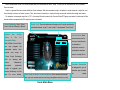
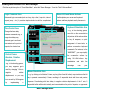
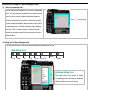
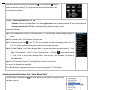
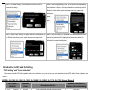
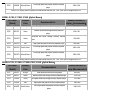
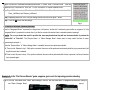
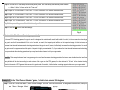
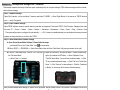
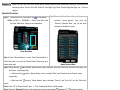
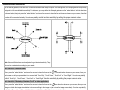
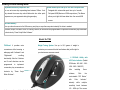
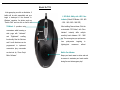
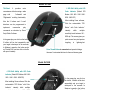
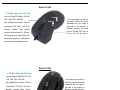
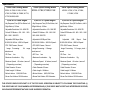
Oscar Mouse Editor Software
(Tailor-made to Dominate the Play)
User’s Guide
Model: XL-771K, XL-755K, XL-740K, XL-730K, XL-750MK, XL-750BK,
X-748K, X-738K, X-718K, X-710MK, X-710BK, X-705K, X-755K
www.a4tech.com
Installing "Oscar Mouse Editor Software
(Note: The driver is applicable to Windows 2000, XP, XP (x64), 2003(x64) and VISTA x86)
A. Before installing the mouse‘s Oscar software, uninstall other mouse’s
Oscar software.
B. Insert the enclosed Oscar software (CD) to start installation.
C. Follow the on-screen steps to finish software installation.
D. The Oscar icon “ ” will appear on your desktop, then you have
successfully installed the Oscar software.
OR
Go to START, and then select PROGRAM. If you see “Oscar Editor”
>>“OSCAR Mouse Script Editor” in the program list, then you have
successfully installed the driver. (Otherwise, installation is failed and
you have to remove the driver and re-install)
E. When the installation is completed, restart your computer.
To remove the driver, follow the steps: Go to START, then select PROGRAMS>>Oscar Editor>>Uninstall OSCAR.
Connecting the mouse
Step 1: Insert the USB mouse connector into the USB port of your computer.
Step 2: Your computer will automatically recognize your USB mouse.
Step 3: If you can’t find the USB mouse on the screen, follow the steps below:
1. Unplug and re-plug the mouse.
2. Test the device on another USB port or computer.
The mouse is “plug and play”. No Driver is required. If you would like to customize the button on the mouse. Please install the enclosed
software (on the CD) first.
How to Use the Oscar Mouse Editor Software
Customizing the buttons on the mouse in “Optional Macro”, Please follow the steps:
Step 1: Opening the Main Menu of Oscar Mouse Editor Software
Just double-Click on the “Oscar Editor” icon“
”on the desktop.
OR
Go to START >> PROGRAM >> Select Oscar Editor. Now the Oscar “Main
Menu” will pop up as shown on the right.
Step 2: Now, you can start to program each button of the mouse.
Oscar Main Menu
Step 3: From any button option of the “Main Menu”, Select one task from the “Task
Pull-down Menu”.
Step 4: After each button has been programmed one by one, you may save the script file
by clicking “Save” or “Save as” from the “File” option of main menu (shown as the
right figure). For instance, enter “Game Play 1” as the script file name. Then you
will see “Game play 1” in the Script option of the “Main Menu”.
Step 5: Click “Download to Mouse” to store settings in the mouse on-board memory.
Knowing the function of “OSCAR Mouse Editor” software
For an ordinary computer mouse, the moue itself is restricted by its default settings, even for those programmable ones, you are still
bounded by its limited applications.
The difference of Oscar Mouse Editor
A4Tech “Oscar Mouse Editor” breaks through this barrier, users are able to establish homemade programs by using simple logic
commands (such as “Loop”, “If”, “Equal to”, “Interval Repeat”, “Jump”…etc.) or by using command combinations (like “Change the
Time Delay between commands”, “Control cursor absolute/relative displacements”, “Mouse simulation”, “Keyboard simulation”,
“Record the keyboard & mouse continuous actions”…etc.). Moreover, instead of complex and repetitive mouse operations, you may
tailor-made your mouse and perform any one-click game stunts without any mouse driver being installed. Simplicity, high effectiveness,
and the overwhelming power of Oscar will bring you the unprecedented experience and dominate the play!
Oscar Script Exchange Site
Meanwhile, with A4Tech Oscar Mouse Editor, you may program the preferable scripts, then upload your script to “Oscar Script
Exchange Site” for sharing with others, or download preferable scripts to upgrade your mouse effortlessly via this site. For more details,
please visit www.x7.cn/Oscaren
What is the script? And what the script can do for you?
Before we proceed further, it is recommended that you understand the term “Script” so that you can maximize the use of powerful
Oscar software.
Script is a special file format used within the Oscar software. After the command script is compiled, it can be saved in a script file, and
store directly in mouse on-board memory. Thus, the mouse is transform to a special script mouse with each button being tailor-made.
For instance, the example script file of “CS” is the script file tailor-made to the Counter Strike FPS game, and when it is activated, all the
mouse buttons are preset with CS special control commands.
Script Operation:New、Open、
Save、Save As、Rename、Upload、
Upload
Your
Today
&
Profile 1 & 2: The on-board memory keeps up to 2 scripts and can be
switched between “script 1” and “script 2” via keyboard “Scroll Lock”
Scripts
Win
Key Definition: Each
the
mouse button can be
Honorable Prize!
set up to simulate any
With A4Tech Oscar Editor,
you
may
preferable
upload
program
scripts,
your
script
commands of
the
keyboard, mouse or
then
multimedia, and then
to
save to a script file for
“Oscar Script Exchange
Site”
for
others.
download
sharing
with
Meanwhile,
Function Description
preferable
is designed for you to
scripts to upgrade your
describe your function
mouse effortlessly via this
site.
For
more
details,
Store Script to Mouse On-Board Memory: Store and save the script
files onto your mouse and you can bring it anywhere and use it on any
Oscar Main Menu
for
easier
Illustrating the Available Settings for Each Button
Click any button option on the “Oscar Main
Menu”, you’ll see the below available tasks
of “Task Menu” for each button.
Task
Functions
Optional
Macro
Pull-down
Available tasks
No setting
System default or no function is selected
Keyboard
Any key or any collective key on the keyboard
Mouse
Left Button, Right Button, Middle Button, 4th Button, 5th Button, Up, Down, Leftwards,
Rightwards.
Office Sets
Zoom In & Zoom Out, Paste Text, Directly open executable file. Such as “EXE & COM &BAT”
Note: If the” Paste Text” of the “Office Sets” is selected, the “Figure. A” will pop up as shown;
you may input texts to paste.
Click right button of the mouse
in “Text Area” will bring you text
editing tool (shown as the left)
figure).
Fig. A
Key
Combination
1. Text Commands: such as “Cut (Ctrl+X), Copy (Ctrl+C), Paste (Ctrl+V), Delete, Search
(Ctrl+F), Select All (Ctrl+A), Redo (Ctrl+Y), Undo (Ctrl+Z).
2. Files Command: Such as “New File (Ctrl+N), Open File (Ctrl+O), Save as, (Ctrl+S), Print
(Ctrl+P)
Multimedia
Media Player, Previous Track, Next track, Stop, Play/Pause, Mute, Volume Down, Volume up.
Internet
Back, Forward, Stop, Search, Refresh, My Favorite, IE, E-mail
System
Calculator, My Computer, Sleep, Power Off
16-in-1
Mouse gestures are simple symbols that you "draw" on your screen using your
Mouse Gestures
mouse. When you perform a mouse gesture, it will perform one of the 16 ”actions”
that is associated with that gesture. In short, it's a nifty little program that lets you
easily control programs by drawing symbols with the mouse.
Select
Macro
File
There are some default example scripts in the “Select Macro file” to demonstrate how
powerful the software is by downloading the corresponding script file into the mouse on-board
memory.
Moreover, download preferable scripts to upgrade your mouse effortlessly via
“Scrip Exchange Site”. For more details, please visit www.x7.cn/oscaren
Programming
Macro
Macro
Manager...
You may record all actions of your mouse and keyboard and create or tailor-made your mouse
to perform complex and repetitive commands in the seconds!
Tailor-made the Mouse in “Macro Manager” for Each Button According to Your Requirements.
Step 1: From any button option of “Oscar Main Menu”, select the” Macro Manager” from the “Task
Pull-down Menu”. Then the “Macro Manager Menu” will pop up as shown on the right; you
may edit your script macros and then store to the buttons accordingly (see below details
on “how to edit the script macro”).
Macro
Step 2: Upon finishing, press the icon
Manager
and follow the on-screen steps to finish saving the script macro. And Macro file name appears
in the key column on the “Main Menu”.
Step 3: Click “Download to Mouse” to store Script in the mouse on-board memory.
Special Note: At any time, only the script file stored in the mouse will be activated. In order to activate any new script file, you have to
always download the script file to the mouse following the steps: From the main menu, click “Download to Mouse”, the selected script file
will be downloaded to the mouse on-board memory and it is activated immediately after download is successfully completed.
Knowing Main Function of the “Macro Manager”
Click the any button option of “Oscar Main Menu”, select the” Macro Manager…”from the “Task Pull-down Menu”.
Logic Command Area
Record K/B and Mouse Actions
Advanced logic commands (such as: loop, skip a line, if, equal to, interval
It will duplicate your mouse and keyboard
repeat, jump… etc.), it provides simple solution to edit the complicated
actions and then playback exactly the same in
A
Keyboard Simulation Area
D
Time Control Area
Change the time delay
C
B
between commands, e.g., a
one click on the mouse button
will perform all the actions either
longer time delay may
eliminate gun’s recoil and
F
concentrate on the point of
to buy all weapons, or quick
Macro
impacts, the shorter time
Programming
E
G
Control Cursor
Absolute / Relative
Displacement
commands. For instance, in the
using
recoil by changing Y Axis to
relative
displacement; or you may
turn around by 180 degrees
implementing
perform consecutive keyboard
the
a
consecutive
actions
Ctrl+Shift+others
combination
advantage
you may suppress gun’s
by
assignment of team tasks, or
“WARCRAFT”, you may simplify
- e.g., in the shooting games,
negative
- e.g., in the shooting games,
and
over
take
by
key
the
your
Mouse Simulation Area
- e.g., by clicking on left button 5 times, any key (other than left button) may simulate as the left
key is pressed consecutively 5 times, resulting in 5 sequential shots with fierce and precise
firepower. Coordinating with time delay to negative relative displacement of the Y axis, 5
sequential bullets will be shot instantly and concentrated on the point of impacts; no opponents
Macro Manager Menu
Illustration and Usage of “Macro Manager Menu”
A. Macro Programming Area
You can edit the macro details on the “Macro Programming
Area”. You may input the commands by moving the mouse
and click on the mouse/ keyboard illustration boards as
Macro
shown to the left and to the bottom. Each action you take
Programming
will be recorded immediately and be printed on the “Macro
Programming Area”. Continue the actions until completion,
then click “Save” to store the macro, which will be later
referred as the macro name for the mouse button that you
selected earlier.
B. Editing Tool of “Macro Manager Menu”
You may use the tools to edit the mouse and keyboard commands line by line.
Main Editing Tools
U do
Redo
C t
Cop
Pa te
Mo e Do
Move
Delete
Additional Editing Tools
Click right button on the mouse in “Macro
Programming Area” will bring you additional
editing tool (shown as the left figure).
C. Non Recycle Macro
When “Recycle macro” is enabled, there are two options are available:
A: “Press to start, Release to stop”: If this option is selected, the macro will be
performed continuously while the key is pressed and it will stop till the same key is
released.
B: ”Press to start, Re-press to stop”: If this option is selected, the macro will be
performed while the key is pressed, it will stop till another key is pressed again.
D. Record K/B and Mouse Actions
There is another handy and useful way to edit the macro commands. By simply enabling the “Record Mouse and Keyboard action”
from the “Macro Manager Menu”, you will be able to “duplicate” each actual action you apply to the mouse or to the keyboard and
the corresponding commands delimited with proper time interval is being recorded and be printed out synchronously. Follow the
steps below to see how it works:
Step 1: On the “Oscar Main Menu”, select the button that you intend to edit and select the
“Macro Manager” property as shown. It will bring you the “Macro Manager Menu”.
Step 2: On the “Macro Manager Menu”, click the “Record” icon
” >> Press “F11”
on your keyboard, the tracing functionality is starting to record.
Step 3: Now you may start to input mouse and keyboard actions. With each action you
apply to the mouse or to the keyboard, the corresponding commands are being
printed synchronously on the “Macro Programming Area”.
Step 4: Press “F12” on your keyboard to stop editing and click the icon”
” to save it.
E. Macro Programming Area
You can edit the macro details on the “Macro Programming Area”. You may input the commands by
moving the mouse and click on the mouse/ keyboard illustration boards as shown to the left and to
the bottom. Each action you take will be recorded immediately and be printed on the “Macro
Programming Area”. Continue the actions until completion, then click “Save” to store the macro,
which will be later referred as the macro name for the mouse button that you selected earlier.
F. Time Control Area
The “Time Control” is the time unit in Minute, Sec or mSec that you can select to edit in
the command line. You may tick the box to decide whether to set the delay time of press
or release as you need. To insert the time control unit to the command line, simply click
“Plug in” and you will see a new time control command is added to the command line.
Time control panel usually is used in conjunction with mouse area or keyboard area, so
that it may delay the time between each command from the other.
G. Control Cursor Absolute / Relative Displacement
Macro Manager Menu
In the Mouse area, there is absolute coordinate icon , click and drag the
icon will
capture the absolute position (X, Y) of target and then the value will be shown in the
mouse absolute coordinate.
Example:
View the properties of the “T6” file
Definition: To set up the “Middle Button " as clicking right button on the mouse and pressing “R” key on the keyboard to
view the properties of the“T6” file from desktop directly (without moving the cursor)
Please follow the steps:
Step 1: Click “Middle Button” button in “Oscar Main Menu” >> click and select “Macro Manager” property as
shown.
Step 2: For instance, input “View Properties” as topic name.
Step 3: Click and drag the icon
to be “T6” File on the desktop, and then the absolute position (X=115,
Y=617) of mouse movement will be shown on the mouse absolute coordinate.
Step 4: Click the “Plug in” in the “Macro Manager Menu” to record and perform mouse movement >> Click
“Right” on “Mouse Area”>>Click “R” key on “Keyboard Area” >>Click the “
” icon to save the setting
>> Click “Close” to close “Macro Manager Menu”, then the topic “View Properties” will appear in
“Oscar Main Menu”.
Step 5: Click “Download to mouse” in “Oscar Main Menu” to store it in the mouse.
Let’s check it in the application practically.
When “Middle Button” is pressed on the mouse, you can view properties of “T6” file directly.
Knowing Accessorial Function of the “Oscar Mouse Editor”
Click right button of the mouse on
icon in the task bar of your desktop, Then you’ll see the
right figure. A pop up.
(Fig.
Select “Tilt wheel setting” to set numbers of line at a time of
Select “Switch Responding Time” to set mouse key responding
horizontal scrolling.
time between 3-30ms. It not only extends the mouse key switch
lifetime but also offers quick response over your opponents
during the
game
play
Select “Report Rate Setting” to speed mouse’s acceleration up
Select “Key Hint Setting” to annotate the function name for each
to 1000Hz, and allows you to adjust the mouse’s report rate.
mouse key, which will be displayed on the screen when it is
activated for easier identification.
Introduction to DPI and Its Setting
“DPI Setting” and “Color Indication”
The mouse provides DPI shift capability with color indication, you can set-up your own sensitivity levels (DPI) within Oscar software, see
below:
MODEL: XL-755K, XL-740K, XL-730K, XL-750MK, XL-750BK, XL-771K, XL-770K(Laser Mouse)
DPI Levels
(Default)
Indicator
Color
DPI 1:
600DPI
No light
DPI 2:
800DPI
Green
DPI 3:
1200DPI
Yellow
DPI 4:
1600DPI
Red
DPI 5:
2000DPI
Red & Yellow
Recommended for:
Slow-Speed and normal accuracy player
Medium-Speed and average accuracy required
player
Fast-Speed and above average accuracy required
player
High-Speed and pinpoint accuracy required player
Extra High-Speed and pinpoint accuracy required
player
Suitable Resolution of
display(Recommended)
800×600
1024×768
1152×864
1280×960
1280×1024
DPI 6:
3600DPI
Yellow & Green
Extra High-Speed and pinpoint accuracy required
player
1280×1024
Click the “DPI Setting” Button to quickly shift and indicate from 600, 800, 1200, 1600, 2000 to as high as 3600 DPI.
MODEL: X-738K, X-718BK, X-748K(Optical Mouse)
DPI Levels
(Default)
Indicator
Color
DPI 1:
600 DPI
No light
DPI 2:
800 DPI
Green
DPI 3:
1200 DPI
Yellow
DPI 4:
1600 DPI
Red
DPI 5:
2400 DPI
Red & Yellow
DPI 6:
3200 DPI
Yellow & Green
Recommended for:
Slow-Speed and normal accuracy player
Medium-Speed and average accuracy required
player
Fast-Speed and above average accuracy required
player
High-Speed and pinpoint accuracy required player
Extra High-Speed and pinpoint accuracy required
player
Extra High-Speed and pinpoint accuracy required
player
Suitable Resolution of
display(Recommended)
800×600
1024×768
1152×864
1280×960
1280×1024
1280×1024
Click the “DPI Setting” Button to quickly shift and indicate from 600, 800, 1200, 1600, 2400 to as high as 3200 DPI.
MODEL:X-710K, X-710MK, X-710BK,X-705K, X-755K(Optical Mouse)
DPI Levels
(Default)
Indicator
Color
Recommended for:
Suitable Resolution of
display(Recommended)
DPI 1:
400DPI
No light
Slow-Speed and normal accuracy player
800×600
DPI 2:
800DPI
Green
Medium-Speed and average accuracy required player
1024×768
DPI 3:
1200DPI
Yellow
Fast-Speed and above average accuracy required player
1152×864
DPI 4:
1600DPI
Red
DPI 5:
2000DPI
Red & Yellow
High-Speed and pinpoint accuracy required player
Extra High-Speed and pinpoint accuracy required
player
1280×960
1280×1024
Click the “DPI Setting” Button to quickly shift and indicate from 400, 800, 1200, 1600 to as high as 2000 DPI.
How to Program the DPI
Two ways to change mouse DPI mode to obtain suitable mouse moving speed:
1. By default setting, just click the “DPI Setting Button” on the mouse to
change the DPI for range of 600-800-1200-1600-2000-3600 DPI, and
the “DPI Setting Button”indicator color will be changed in the sequence
as shown on the above “Indicator Color”.
2. You may customize your own DPI range and sensibility with Oscar
software.
Double click on the Oscar icon
from the task bar, the main menu will
be shown as right. >>Select the “Script Name” you want to change
the DPI, and then:
A. Locating the “DPI Setting Button” option from “Oscar Main Menu”.
Click it to open the “DPI Setting Menu” as shown right.
B. Select or input your favorite DPI numerical value into each column.
Click “OK” to bring back the main menu.
C. Click “File” >> “Download to Mouse” to save changes, or,
press”F9” key on your keyboard to store the settings.
Examples of Application in Game Play
Example 1: In Windows’ operation, 1click to perform “Double Click” or “One Click”
Step 1: From the “Oscar Main Menu”, select “Macro Manager” Step 2:
Click “Non Recycle Macro” in the “Macro Manager Menu”.
from the “Task Pull-down Menu” of designated mouse
>>Select “Recycle macro” >> Select “Press to start,
button, then you'll see "Macro Manager Menu" pop up.
Release to stop” as shown below.
Macro
Oscar Main Menu
Manager
Step 3: Tick the box of “Add delay automatically while press" >>Select ”mSec” of time unit in the
“Time unit”
Step 4: Input”64” of time value in “Time” box. >>Click “Left Button” on “Mouse Simulation Area”.
Step 5: Input”200” of time value in “Time” box. >>Click “Left Button” on “Mouse Simulation Area”. >>Delete
"Press _Left Button" and "Release _Left Button".
Step 6: Repeating steps from 4 to 5, now your editing area will look like this as figure 1 shows.
Step 7: Click the
icon to save the settings
Fig. 1
Let’s check it in Windows’ operation practically:
When the “Designated Button” is pressed for a longer time, it will perform “double-click” and directly open the files or programs. Or, if the
“Designated Button” is pressed for a shorter time, it just like the normal click and the folder is selected instead of opening it.
Benefits: The example shows how useful in practice that users may decide how they will use the mouse button to perform the
“Double-click” or “One-click”. The "Recycle Macro” of “Macro Manager Menu” allows users to freely control the time of macro
programming by example 1.
When the “Recycle Macro” of “Macro Manager Menu” is enabled, there are two options are available:
A: “Press to start, Release to stop”: If this option is selected, the macro will be performed continuously while the key is pressed and it will
stop till the same key is released.
B:”Press to start, Re-press to stop”: If this option is selected, the macro will be performed while the key is pressed, it will stop till another
key is pressed again.
Example 2: In the “First Person Shooter" game, suppress gun's recoil for improving precision shooting
Step 1: From the “Oscar Main Menu”, select “Macro Manager” from the “Task Pull-down Menu” of designated mouse button, then you'll
see "Macro Manager Menu"
pop up.
Macro Manager Menu
Oscar Main Menu
Step 2: Tick the box of “Add delay automatically while press “and “Add delay automatically while release”.
>>Select ”mSec” of time unit in the “Time unit”.
Step 3: Input”64” of time value in “Time” box. >>Click “Left Button” on “Mouse Simulation Area”.
Step 4: Input”70” of time value in “Time” box. >>Click “Left Button” on "Mouse Simulation Area"
Step 5: Input”85” of time value in “Time” box. >>Click “Left Button” on "Mouse Simulation Area"
Step 6: Input ”95” of time value in “Time” box. >>Click “Left Button” on "Mouse Simulation Area".
Step 7: Now your editing area will look like this as figure 2 shows.
Step 8: Click the
icon to save the settings
Fig. 2
Let’s check it in "First Person Shooter" game practically:
In the real FPS shooting games, the gun’s recoil is designed in coincide with each bullet while it is shot, for the consecutive shootings,
the gun’s recoil will accumulated till it is out of control, as result, the impact point will be out of expected range. In this instance, we
increase time interval between each shooting and reduce the gun’s recoil, hence, it effectively increase the shooting precision. As result,
the gun's recoil is suppressed and the point of impact is highly concentrated. Or, if you reduce the time interval between each shooting,
it may accelerate the shooting speed and you may have better chance to hit your opponents.
Benefits: This example shows how to suppress gun’s recoil and increase shooting precision that users can decide how fast and how
many bullets will be shot according to each various rifle or gun on the FPS games, the time interval of “64 ms” is the shortest testing
value for the most of FPS games that can work in good order. As results, it offers better surviving opportunities over your opponents!
Example 3: In the "First Person Shooter" game, 1 click to turn around 180 degrees
Step 1: From the “Oscar Main Menu”, select “Macro Manager” from the “Task Pull-down Menu” of designated mouse button, then you'll
see "Macro Manager Menu"
pop up.
Oscar Main Menu
Macro Manager Menu
Step 2: Input ”799” of coordinate value in “Mouse Relative Coordinate X Axis Box”. >>Click “Plug In”.
Step 3: Select ”mSec” of time unit in the “Time unit” >> Input”23” of time value in “Time” box.
>>Click “Plug In”.
Step 4: Repeating three times from step 2 to step 3.
Step 5:Input ”500” of coordinate value in “Mouse Relative Coordinate X Axis Box”. >>Click “Plug In”.
Step 6:Click “Plug in” in “Time Control Area” of “Macro Manager Menu”
Step 7:Input ”50” of coordinate value in “Mouse Relative Coordinate X Axis Box”. >>Click “Plug In”
Step 8:Click “Plug in” in “Time Control Area” of “Macro Manager Menu”
Fig.3
Step 9: Now your editing area will look like this as figure 3 shows.
Step 10: Click the
icon to save the setting.
Let’s check it in "First Person Shooter" game practically:
In the real FPS shooting games, in the circumstances that your opponents unexpected turn to, or show up on your back, it will be almost
impossible to instantly turn around and give them a shot. Or it requires a very high performance mouse to perform “turn around” actions,
but usually it is not fast enough to accomplish the “turn around” action before your opponent starts to fire. This example demonstrates
how powerful it is that it performs automatically the continuous “turn around” actions in the sudden, while your opponents are not ready
to give you the fatal hits!
Benefits: This example shows how to perform the “turn around” action by just one click to the designated button, and sustain your
aiming point at the same level. The given “799” relative displacement value is due to, after in practical testing, the games only response
to the value less than the maximum horizontal display resolution. For instance, this example is only applicable to the display resolution of
800x600 mode of your LCD display or monitor, “Overflow” error may occur in case the value is out of your display boundary. Meanwhile,
the time interval is inserted between each action and the same action is repeated by 6 times, this is due to after practical testing, we
found the FPS games will not properly response for the time interval shorter than 20 ms.
Example 4: In "First Person Shooter" game, 1 click to suppress gun’s recoil by changing cursor relative
displacement.
Step 1: From the “Oscar Main Menu”, select “Macro Manager” from the Task Pull-down Menu” of designated mouse button, then you'll
see "Macro Manager Menu" pop up.
Macro Manager Menu
Oscar Main Menu
Step 2: Click the “Non Recycle Macro” of the “Macro Manager Menu”.
>>Select “Recycle macro”>>Select “Press to start, Release to stop”.
Step 3: Tick the box of “Add delay automatically while release" >>Select ”mSec” of
time unit in the “Time unit”. >> Input ”110” of time value in “Time” box.
Step 4: Click “Left Button” on "Mouse Simulation Area".
Step 5: Input ”3” of coordinate value in “Mouse Relative Coordinate Y Axis” box.
>>Click “Plug In”
Step 6: Repeating Step 4
Step 7: Input ”8” of coordinate value in “Mouse Relative Coordinate Y Axis” box.
>>Click “Plug In”.
Step 8: Repeating 7 times from step 6 to step 7.
Fig.4
Step 9: Now your editing area will look like this as figure 4 shows.
Step 10: Click the
icon to save the setting
Let’s check it in "First Person Shooter" game practically:
This instance is similar to the example 2, but it offers faster shooting speed while perform the same effect of suppressing the gun’s
recoil. For those FPS professional gamers, they are capable to perform precise and difficult “manual” actions of suppressing gun’s
recoil during the consecutive shooting by moving the moue back and forth so as to keep the impact at the same point. Now, by using
this instance, you can do the same expertise with one click to the designated mouse button. In the CS practical testing, we found this
instance is very useful for the rifle types like” AK47 and M4A1”, but for those less recoil rifles such as MP5, you may reduce the relative
displacement value.
Benefits: This example shows how to integrate the “Mouse Relative Displacement” and “Recycle Macro” to perform the professional
actions during the game play. This example demonstrates how to suppress the gun’s recoil by compensating the “Y relative
displacement” value to reduce each shooting deviation, and hence increase the shooting precision. The Y relative displacement values
are in the reducing order as in the practical game testing, we found the gun’s recoil is increased gradually with each bullet is short. And
you may decide how many bullets will be shot by performing the “Recycle Macro” option; the consecutive shooting will be ceased
while the designated mouse button is released.
Example 5:In “CS” game, 1 Click to Buy All Weapons and Accessories
Step 1: From the “Oscar Main Menu”, select “Macro Manager” from the Task Pull-down Menu” of designated mouse button, then
you'll see " Macro Manager Menu" pop up.
Macro Manager Menu
Oscar Main Menu
Step 2: Tick the box of “Add delay automatically while
press “and “Add delay automatically while
release”. >>Select ”mSec” of time unit in the
“Time unit”. >> Input ”20” of time value in
“Time” box.
Step 3: Click "B 4 6 B 1 4 B 8 2 B 6 B 7 O 4 O 3 O 3 O
5 B 8 6" on "Keyboard Simulation Area”.
Step 4: Now your editing area will look like this as
figure 5 shows.
Step 5: Click the
icon to save the setting
Fig. 5
Let’s check it in "First Person Shooter" game practically:
By pressing on the designated mouse button, it will automatically perform all the consecutive actions either to buy all weapons and its
accessories, such as “AWP, KEVLAR+HELMET, HE GRENADE, FLASH, DEFUSAL KIT, DESERTEAGLE, SMOKE GRENADE, BUY
PRIMARY AMMO, BUY SECONDARY AMMO” or quick assignment of the team tasks. In the FPS games like CS (Counter Strike), while
the game is re-started, it is crucial to buy all the equipments and assign the team tasks as soon as possible, so that you can take
advantage of time and position to combat with your opponents.
Benefits: This example demonstrates the powerful “Keyboard Macro Commands”. With one click on the designated mouse button, all
the weapons and its accessories are consecutively and purchased, and the team tasks are assigned automatically. This functionality
can also be applied to those popular Windows applications such as “Photoshop and Word” to improve the office efficiency.
Example 6: Quick perform settings in the “PROE2001”
This example requires initial setup in the three parts, respectively they are computer settings, PROE software settings and Oscar mouse
editor software settings.
Step 1: Computer Settings
Open "My Computer", on the hard drive D create a new folder "D:\WORK" >>Press "Right Button" of the mouse on "PROE" shortcuts
icon >> select "Properties"
Step 2: PROE Software Settings:
Open "PROE" software; create a new file under the path that you appointed. Then enter "PROE". Click "Function-- Mapkeys--New--Input
the name "D" -- Record -- Feature -- Create-----Surface-------Advanced------Boundaries------Done------Done------Stop-----Confirm-----Save
(The system will produce a config.pro file automatically)------OK. A shortcut is established and you can duplicate the same process to
organize as many shortcuts as you like in the “PROE”.
Step 3: Oscar Mouse Editor Software Settings
A: Open "Oscar Mouse Editor Software", Please follow the steps:
Just double-Click on the “Oscar Editor” icon“
”on the desktop.
OR Go to START >> PROGRAM >> Select Oscar Editor. Now the Oscar “Main Menu” will pop up as shown on the right.
B: From the “Oscar Main Menu”, click the “File”, you’ll see
C: Input the "PROE2001" as script file name >>Select a function key
the “Pull-down Menu”.
option (for instance the 4thButton) >>Select “Keyboard” from
>>Select “New”>> "rename"
“Task Pull-down Menu”, then you’ll see the below image. >>Click
"D" key on below keyboard image. >>Click "File" from “Oscar Main
Menu” >>Click “Save as” to save settings>> Click the “Download
to Mouse” to store script file to mouse on-board memory.
After you have finished above settings, a “specific-PROE-purposed” mouse is ready to serve. For instance, to accomplish a PROE solid
surface may require 7 steps and now with one click on the designated 4th button of the mouse, all the tasks are accomplished
automatically and it saves all the processes usually require lots of efforts and time.
Example 7: Except “Scroll up” and “Scroll Down” button options, any button options can be customized to have up to 16 functions at the
same time, such as “Zoom In, Zoom Out, Scroll Left, Scroll Right, Copy /Paste, Previous Page, Next Page…etc.”- All at your
fingertip.
Operation Procedure
Step 1: Double click on the “Oscar Editor” icon“
”on the desktop.
OR Go to START >> PROGRAM >> Select Oscar Editor. Now
the Oscar “Main Menu” will pop up as shown below.
Step 3: From the “Mouse Gesture” Menu, click any one of
arrow-like
“mouse
gesture”,
then
you’ll
see
“Direction Pull-down Menu” pop up and many
functions are available for option.
.
Oscar Main Menu
Step 2: Select “Mouse Gestures” from the “Task Pull-down Menu” of
Oscar Main menu, then you'll see "Mouse Gesture” Menu pop up as
shown on the right.
Step 4: Select and click “
Mouse Gestures Menu
”arrows in “Mouse Gesture” menu, and select “Scroll Up, Scroll Down, Scroll Left, Scroll Right” from
the “Mouse” option respectively;
>> Select and click
arrows in “Mouse Gesture” menu,, and select “Back” and “Forward” from the "Internet” option
respectively;
>>Select and click “
”arrows in “Mouse Gesture” menu, and select “Zoom In” and “Zoom Out” from the “Office Sets”
option;
Step 5: Click “OK” in “Mouse Gesture” menu. >> Click “Download to Mouse” to finish settings.
Step 6: Press the “Designated” button on the mouse and move the mouse towards “
”and “
”directions to perform
““Scroll Up-\Scroll Down-\Scroll Left-\Scroll Right”, “Back- \Forward” or directly enlarge \ shrink your email font size or pictures
to match your eyesight needs.
Available Mouse Gesture list:
For the mouse gestures, there are total 16 functions available and ready for option. And among them, 8 of simple gestures are specially
designed to offer user-definable sensitivity. For instance, you may define the 8 simple gestures on the “wheel button” with the functions
as shown below, then just press the “wheel button” and move the mouse to draw the line as the arrow shows on your screen, then that
function will be executed instantly. You also may easily control function sensitivity by setting the proper numeric value.
Note: Universal 8 directions can be adjusted to get desired sensitivity. They
also can be customized according to your needs.
Let’s check it in “Microsoft Excel”
When press the “wheel button” and move the mouse to draw the lines as the
arrow direction shows on your screen, then you
can browse or edit your spreadsheet in a second with “Scroll Up”, “Scroll Down”, “Scroll Left” or “Scroll Right”. You also may easily
control “Scroll Up”, “Scroll Down”, “Scroll Left” or “Scroll Right” function sensitivity by setting the proper numeric value.
Let’s check it in “Photoshop, Illustrator, Pro-E” or other applications
When press the “wheel button” and move the mouse to draw the lines as the
arrow direction shows on your screen, then you can
enlarge or shrink the image size whether to do some editing to the image or just to view the image more clearly. You also may easily
control the “Zoom In” and “Zoom Out” function sensitivity by setting the proper numeric value.
Let’s check it in “Browsing Web Page”
When press the “wheel button” and move the mouse to draw the lines as the
arrow direction shows on your screen, then “Back”
and “Forward” function will be executed instantly. You also may easily control the “Back” and “Forward” function sensitivity by
setting the proper numeric value.
Benefits: These examples show how to integrate the “Mouse Gestures”, when the “Mouse Gestures” button is pressed and move your
mouse in 16 different directions; you may perform instant functions such as “Zoom In, Zoom Out, Leftwards, Rightwards, Previous
Page, Next Page”, up to 16 functions. It is user-friendly and unprecedented handy tools to use.
Knowing the Oscar Gaming Mouse
Speed mouse report time up to 1ms with Full-speed USB
Adjustable Mouse Key Response Time
You can set mouse key responding time between 3-30ms. It not
Designed with extreme fast report time up to 1ms with
only extends the mouse key switch lifetime but also offers quick
Full-speed USB (Maximum 1000Hz reports/sec), The Mouse
response over your opponents during the game play
allows you to fight 4x4 times faster than the normal USB
mouse.
On-board Memory
Store your favorite macros in the 16K memory, and play on any other computers instantly. No driver is needed.
Moreover, Except “Left Button” and “DPI Setting” buttons, all the buttons are programmable to implement consecutive play commands
as shortcuts by “Oscar Script Editor Software”.
Model: XL-770K
Tilt-Wheel: It provides extra
Weight Tuning System: Use up to 19.5 grams of weight to
convenience while browsing a
customize your mouse with a heft and balance that just fits right for
wide page with “Leftwards” and
your best mouse maneuver needs.
“Rightwards”
scrolling
functionality. Also the 3 buttons
and 2 scroll directions can be
programmed
to
6 DPI-Shift Ability with
Forward
DPI Modes:600 - 800 - 1200 -
implement
1600 - 2000 - 3600 DPI)
consecutive play commands as
shortcuts
by
Editor Software”.
“Oscar
LED Color Indicator (Default
After
Script
installing
software,
Backwar
Click
the
customizable “DPI Button”
with
In the game-play, one click on the button, 3 bullets will be shot sequentially and your
target is destroyed in the seconds. In Windows’ operation, the button works as
“Double Click” and one click on the file will open it instantly.
Oscar
Color
Indicator”
instantly
shifts
multiple
sensitivity
levels
between
100 - 3600 dpi. The mouse
gives you quick access from
pixel-precise
lightning-fast
targeting
to
maneuvers
Model: XL-771K
In the game-play, one click on the button, 3
bullets will be shot sequentially and your
target is destroyed in the seconds. In
Windows’ operation, the button works as
“Double Click” and one click on the file will
6 DPI-Shift Ability with LED Color
Indicator (Default DPI Modes:600 - 800
- 1200 - 1600 - 2000 - 3600 DPI)
After installing Oscar software, Click the
Tilt-Wheel: It provides extra
convenience while browsing a
wide page with “Leftwards”
and
“Rightwards”
customizable “DPI Button” with Color
Forward
instantly
Backwar
from
programmed
lightning-fast
implement
multiple
dpi. The mouse gives you quick access
and 2 scroll directions can be
to
shifts
sensitivity levels between 100 - 3600
scrolling
functionality. Also the 3 buttons
Indicator”
pixel-precise
targeting
maneuvers
to
without
consecutive play commands
as shortcuts by “Oscar Script
Built-In Fan & Heater
Editor Software”.
Keeps your hands warm in winter and cool
in summer to maximize your hand comfort
during the most intense game play!
Model: XL-755K
extra
6 DPI-Shift Ability with LED
convenience while browsing a wide
Color Indicator (Default DPI
page with
Modes:600 - 800 - 1200 - 1600 -
Tilt-Wheel:
It
provides
“Leftwards” and
“Rightwards” scrolling functionality.
2000 - 3600 DPI)
Also the 3 buttons and 2 scroll
After installing Oscar software,
directions can be programmed to
implement
consecutive
Forward
play
Click the customizable “DPI
Button” with Color Indicator”
instantly
commands as shortcuts by Oscar
Script Editor Software.
shifts
multiple
sensitivity levels between 100 -
Backward
3600 dpi. The mouse gives you
quick access from pixel-precise
In the game-play, one click on the button,
3 bullets will be shot sequentially and
your target is destroyed in the seconds.
In Windows’ operation, the button works
as “Double Click” and one click on the file
will open it instantly.
targeting
to
lightning-fast
5Live Thumb-Button is convenient and powerful design;
there are 5 customized buttons for the most intense game
Model: XL-740K
6 DPI-Shift Ability with LED Color
Indicator (Default DPI Modes:600 - 800 1200 - 1600 - 2000 - 3600 DPI)
After installing Oscar software, Click the
customizable “DPI Button” with Color
Indicator”
instantly
shifts
multiple
sensitivity levels between 100 - 3600
dpi. The mouse gives you quick access
from
pixel-precise
lightning-fast
targeting
maneuvers
to
without
Weight Tuning System
Use up to 19.5 grams of weight to customize your mouse with a
heft and balance that just fits right for your best mouse maneuver
Forward
Backwar
In the game-play, one click on
the button, 3 bullets will be shot
sequentially and your target is
destroyed in the seconds. In
Windows’ operation, the button
works as “Double Click” and
one click on the file will open it
instantly
Model: XL-730K
6 DPI-Shift Ability with LED Color
Indicator (Default DPI Modes:600 - 800 1200 - 1600 - 2000 - 3600 DPI)
After installing Oscar software, Click the
Forward
Backwar
customizable “DPI Button” with Color
Indicator”
instantly
shifts
multiple
sensitivity levels between 100 - 3600 dpi.
The mouse gives you quick access from
In the game-play, one click on
the button, 3 bullets will be shot
sequentially and your target is
destroyed in the seconds. In
Windows’ operation, the button
works as “Double Click” and one
click on the file will open it
pixel-precise targeting to lightning-fast
maneuvers without pausing the action.
Model: XL-750K
6 DPI-Shift Ability with LED Color
Indicator (Default DPI Modes:600 - 800 1200 - 1600 - 2000 - 3600 DPI)
After installing Oscar software, Click the
customizable “DPI Button” with Color
Indicator”
instantly
shifts
multiple
sensitivity levels between 100 - 3600
dpi. The mouse gives you quick access
from
pixel-precise
lightning-fast
targeting
maneuvers
to
without
In the game-play, one click on
the button, 3 bullets will be shot
sequentially and your target is
destroyed in the seconds. In
Windows’ operation, the button
works as “Double Click” and
one click on the file will open it
instantly.
Specifications
Oscar Laser Gaming Mouse
MODEL: XL-755K, XL-740K, XL-730K,
Oscar Optical Gaming Mouse
MODEL: X-738K,X-718BK,X-748K
Oscar Optical Gaming Mouse
MODEL: X-755K, X-710K, X-710BK,
XL-750K, XL-750BK, XL-750MK, XL-771K,
X-710MK, X-705K
XL-770K,XL-83K,XL-85K
3,600 DPI X7 Laser Engine
3,200 DPI X7 Optical Engine
2,000 DPI X7 Optical Engine
• Key Response Time (3X Fire Button、Left
• Key Response Time (3X Fire Button, Left
• Key Response Time (3X Fire Button, Left &
& Right Button): 3-30ms
& Right Button): 3-30ms
Right Button): 3-30ms
• Adjustable Resolution: 100~3600 DPI
• Adjustable Resolution: 100~3200 DPI
• Adjustable Resolution: 100~2000 DPI
• Default DPI Modes:600 - 800 - 1200 -
• Default DPI Modes:600 – 800 -1200
• Default DPI Modes:400 - 800 - 1200 - 1600
1600 - 2000 - 3600 DPI
-1600 -2400 -3200 DPI
- 2000 DPI
• Adjustable USB Report Rate:
• Adjustable USB Report Rate:
•
125-250-500-1000Hz(USB Full Speed)
125-250-500-1000Hz(USB Full Speed)
125-250-500-1000Hz(USB Full Speed)
• FPS: 7080 Frames / Second
• FPS: 6500 Frames / Second
• FPS: 6500 Frames / Second
• Image Processing:
• Image Processing:
•
Image
Processing:
6.4
mega
5.8 mega
Adjustable
pixels/second
pixels/second
second
• SPI Time:
• SPI Time:
• SPI Time:
1ms
• Maximum Acceleration:
• Maximum Speed:
20g
45 inches / second*
(*Depending on surface)
1ms
• Maximum Acceleration:
• Maximum Speed:
15g
40 inches /second*
(*Depending on surface)
USB
Report
5.8 mega pixels /
1ms
• Maximum Acceleration:
• Maximum Speed:
(*Depending on surface)
• Cable Diameter: 30 mms
• Cable Diameter: 30 mms
• Cable Length: 1.8 Meters
• Cable Length: 1.8 Meters
• Cable Length: 1.8 Meters
• Button Lifetime:
• Button Lifetime:
• Button Lifetime:
• Mouse Feet Lifetime: 250 Kilometers
8,000,000 Clicks
• Mouse Feet Lifetime: 250 Kilometers
15g
40 inches / second*
• Cable Diameter: 30 mms
8,000,000 Clicks
Rate:
8,000,000 Clicks
• Mouse Feet Lifetime: 250 Kilometers
THIS DEVICE COMPLIES WITH PART 15 OF THE FCC RULES. OPERATION IS SUBJECT TO FOLLOWING TWO CONDITIONS: (1)
THIS DEVICE MAY NOT CAUSE HARMFUL INTERFERENCE AND (2) THIS DEVICE MUST ACCEPT ANY INTERFERENCE RECEIVED,
INCLUDING INTERFERENCE THAT MAY CAUSE UNDESIRED OPERATION.
Federal Communications Commission Requirements
The equipment has been tested and found to comply with the limits for Class B Digital Device, pursuant to part 15 of the FCC Rules.
These limits are designed to provide reasonable protection against harmful interference in a residential installation. This equipment
generates uses and can radiate radio frequency energy and, if not installed and used in accordance with the instruction, may cause
harmful interference to radio communication. However, there is no guarantee that interference will not occur in a particular
installation. If this equipment does cause harmful interference to radio or television reception, which can be determined by turning
the equipment off and on, the user is encouraged to try to correct the interference by one or more of the following measures:
z
Reorient of relocate the receiving antenna.
z
Increase the separation between the equipment and receiver.
z
Connect the equipment into an outlet on a circuit different from that to which the receiver is connected.
z
Consult the dealer or an experienced radio/TV technician for help.
THE CHANGES OR MODIFICATIONS NOT EXPRESSLY APPROVED BY THE PARTY RESPONSIBLE FOR COMPLIANCE COULD VOID
THE USER’S AUTHORITY TO OPERATE THE EQUIPMENT.
This device complies with Part 15 of the FCC Rules. Operation is subject to the following two conditions:
(1) This device may not cause harmful interference, and
(2) This device must accept any interference received, including interference that may cause undesired operation.
FOR LASER MOUSE
REGULATORY INFORMATION:
Tested to comply with FCC (U.S. Federal Communications Commission) Standards. For home or office use. Not intended for use in
machinery, medical or industrial applications. Any changes or modifications not expressly approved by A4Tech could void the user's
authority to operate this device.
INFORMATION ABOUT LASER DEVICES:
This device complies with International Standard IEC 60825-1:2001-08 for a Class 1 laser product. This device also complies with 21 CFR
1040.10 and 1040.11 except for deviations pursuant to Laser Notice No.50, dated July 26, 2001.
- This device emits a collimated (parallel) beam of infrared light (invisible to the user).
- Peak Wavelength range: 832~865 nanometers.
CAUTION
Use of controls or adjustments or performance of procedures other than those specified herein may result in hazardous radiation exposure.
- Do not disassemble the device.
TECH SUPPORT
For tech support, please visit our website at http://support.a4tech.com/ or email us at [email protected]
**Usage, features and specifications of all A4 TECH products are subject to change without notification.