1
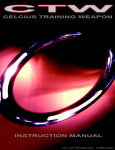
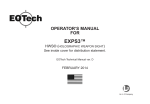
User Manual
Wireless 5-Mode Oscar Editor
Model: AS-6
www.x7.cn
About V-track Wireless Gaming Mouse
▪ V-Track technology, more accurate than Laser engine
▪ You may define 5 macros to perform stunts to win the games effortlessly
▪ 1 click mouse "M" key to shift 5 modes**
▪ 160K onboard memory stores custom macros
▪ Acceleration: 30 G/sec
▪ IPS speed: 75 in/sec
▪ Response time: 3 ms (Regular mouse: 16ms)
▪ Key switch report rate: 125_250_500 Hz (2 ms)
** Before software installation, the M button as default DPI button to shift
mouse sensitivity between 400 - 800 - 1200 - 1600 - 3000 DPI.
After installation, the M button changes to mode button to easily shift modes
(profiles) during game-play.
The mouse sensitivity can be set from 100 to 3000 DPI in each mode
(profile).
2
About Wireless 5-Mode Oscar Editor
A4Tech’s Wireless 5-Mode Oscar Editor allows you to program the preferable scripts to
upgrade your mouse effortlessly and share with others. It breaks through this barrier, users are
able to establish homemade programs by using simple logic commands (such as “Loop”, “If”,
“Equal to”, “Interval Repeat”, “Jump”…etc.) or by using command combinations (like “Change
the Time Delay between commands”, “Control cursor absolute/relative displacements”, “Mouse
simulation”, “Keyboard simulation”, “Record the keyboard & mouse continuous actions”…etc.).
Simplicity, high effectiveness, and the overwhelming power of Oscar will bring you an
unprecedented experience and help you dominate the play!
What is the script? And what the script can do for you?
Before we proceed further, it is recommended to understand the term “Script” thoroughly so
that you can maximize the use of powerful Wireless 5-Mode Oscar Editor.
Script is a special file format used within the Wireless 5-Mode Oscar Editor. It may comprise
of sequential commands of mouse movements, mouse clicks, keyboard keystrokes and
delimited with certain time intervals among them. After the script is compiled, it can be saved in
a script file, and then be downloaded into the mouse built-in memory. Thus, the mouse is
transform to the special script mouse with each keys being tailor-made.
For instance, the sample script file of “CS” is the script file tailor made to the Counter Strike
FPS game, and when it is activated, all the mouse buttons are preset with CS special control
commands.
Oscar classic macros platform
Upload or download your favorite macro commands via X7 website www.x7.cn
3
Install Wireless 5-Mode Oscar Editor
(Note: The software is applicable to Windows 2000/ XP/ 2003/ Vista/ Windows 7)
1. Insert the enclosed CD to start installation, and follow the on-screen steps to finish software
installation.
2. The oscar icon “ ” will appear on your desktop screen, and then you have successfully
installed the Wireless 5-Mode Oscar Editor.
(Otherwise, installation is failed and you have to remove the driver and re-install)
To remove the driver, follow the steps:
Go to START, and then select PROGRAM. If you see “A4TECH Software” >> Click "Wireless
5-Mode Oscar Editor" >> Click “Uninstall Wireless 5-Mode Oscar Editor”
4
How to configure 5 modes
1. Open main menu by double-clicking the icon
Revert / Name
5 modes
Store / apply
the setting
Function list
2. Create a script file by clicking "file" >> "new">>rename"
3. Define macros / Select the function you preferred for each button from the function list.
5
4. Describe the functions which have been set by clicking mouse left button at description of
each button option.
5. Name the modes which you have been set by clicking “Mode Name / Select”
6. Set "Function / Key Reminder" by clicking the icon
at the system tray.
(Note: each function info will indicate at the system tray after pressing the mouse button)
7. Store and apply the setting by clicking "OK".
6
How to shift / apply 5 modes
1.
Press the "M" button to select mode, and then the function info will pop up (as below
figure).
2.
Press mouse button to perform the defined functions.
7
Define gaming macros
1. Open " Macro manager" by the function list of the mouse button.
2. Define gaming macros, follow the steps below:
1). Create a file
2). Define your macros for each button
3). Store and name your macros >> Close the "Macro manager" by clicking "x"
4). Save your settings by click "OK" on main menu
8
. Keyboard simulation area
. Mouse Simulation Area
. Record Button
When you want to record your settings, click on "
" area and:
1). Start to record your actions which you have done by pressing
"F11" on your keyboard.
2). Stop to record your actions which you have done by pressing "F12" on your keyboard.
. Play Macro Once Only & Play Macro Repeatedly
1). If "Play Macro Once Only" is enabled, the macro settings will be performed.
2). When "Play Macro Repeatedly" is enabled, two options below are available :
a). If "Press to start, Re-press to stop" is selected the macro will be performed while the key
is pressed, it will stop till the same key is pressed again.
b). If "Press to start, Release to stop" is selected, the macro will be performed continuously
while the key is pressed and it will stop till the same key is released.
. Modify the macro settings which you have done
. Macro indication Area: Indicate the macro settings which you have done. Each macro
settings you do will be recorded immediately and be showed on the “Macro indication
Area”.
. Advanced logic commands (such as: loop, skip a line, if, equal to, interval repeat, jump…
etc.), it provides simple solution to edit the complicated functions.
. Time Control: You may tick at the box to decide whether to set the delay time of press or
release. And this panel usually is used in conjunction with mouse area or keyboard area, so
that it may delay the time between each command from the other.
. Mouse Actions: Mouse absolute/relative coordinate
Drag the " " icon will capture the absolute position (X, Y) of target.
1). Absolute Position of mouse cursor
2). Mouse cursor's relative position
9
Examples of Application in Office
View the properties of your file
To set up the "Middle Button" as clicking right button on the mouse and pressing "R" key on
the keyboard to view the properties of your file from desktop directly (without moving the
cursor) , follow the steps:
Step 1: Click the "Middle Button" in "Main Menu" , and select "Macro Manager" .
Step 2: Drag the icon
to your file on the desktop.
Step 3: Click "Plug in" at "
mouse movement
Macro Manger
" area (absolute) of "Macro Manager Menu" to record and perform
10
Step 4: Click "Right" at "Mouse Area" >>Click "R" key on "Keyboard Area">> Click on the " "
icon on "Macro Manager", and description page will pop up. >> Use your own words to
describe your Macro file and input "View Properties" as topic name >> Click "Close" to
close "Macro Manager Menu", then the topic "View Properties" will appear in "Main
Menu".
Step 5: Click "Download to mouse" in "Main Menu" to store it in the mouse.
Let’s check it in the application practically.
When "Middle Button" is pressed on the mouse, you can view properties of your file directly.
Examples of Application in Game Play
Example 1: In Windows’ operation, 1click to perform "Double Click" or "One Click"
Step 1: Click on "Play Macro Once Only" of the "Macro Manager Menu" >>Select "Play Macro
Repeatedly" >> Select "Press to start, Release to stop".
Step 3: Tick the box of "Perform delay each time a key is pressed" >>Select "mSec" of time unit
in the "Time unit"
Step 4: Input "64" of time value in "Time" box. >>Click "Left " on "Mouse Simulation Area".
Step 5: Input "200" of time value in "Time" box. >>Click "Left" on "Mouse Simulation
Area". >>Delete "Press _Left Button" and "Release _Left Button".
Step 6: Repeating steps from 4 to 5, now your editing area will look like this as figure.1 shows.
Step 7: Click the
icon to save the settings.
Fig. 1
11
Let’s check it in Windows’ operation practically:
When the "Designated Button" is pressed for a longer time, it will perform "double-click" and
directly open the files or programs. Or, if the "Designated Button" is pressed for a shorter time, it
just like the normal click and the folder is selected instead of opening it.
Benefits: The example shows how useful in practice that users may decide how they will use
the mouse button to perform the "Double-click" or "One-click". The "Recycle Macro" of
"Macro Manager Menu" allows users to freely control the time of macro programming by
example 1.
Example 2: In the "First Person Shooter" game, suppress gun's recoil for
improving precision shooting
Step 1: Tick the box of the "Perform delay each time a key is pressed" and "Perform delay each
time a key is released" at "Macro Manager Menu">> Select "mSec" of time unit in the
"Time unit".
Step 2: Input "64" of time value in "Time" box. >>Click "Left" on "Mouse Simulation Area".
Step 3: Input "70" of time value in "Time" box. >>Click "Left" on "Mouse Simulation Area".
Step 4: Input "85"of time value in "Time" box. >>Click "Left" on "Mouse Simulation Area"
Step 5: Input "95" of time value in "Time" box. >>Click "Left" on "Mouse Simulation Area".
Step 6: Now your editing area will look like this as figure 2 shows.
Step 7: Click the "
" icon to save the settings
12
Macro Manager Menu
Fig. 2
Let’s check it in "First Person Shooter" game practically:
In the real FPS shooting games, the gun's recoil is designed in coincide with each bullet while
it is shooting. For the consecutive shootings, the gun's recoil will accumulated till it is out of
control, and the impact point will be out of expected range. In this instance, we increase time
interval between each shooting and reduce the gun's recoil, hence, it effectively increase the
shooting precision. As result, the gun's recoil is suppressed and the point of impact is highly
concentrated. If you reduce the time interval between each shooting, it may accelerate the
shooting speed and you may have better chance to hit your opponents.
Benefits: This example shows how to suppress gun's recoil and increase shooting precision
that users can decide how fast and how many bullets will be shot according to each rifle or gun
on the FPS games, the time interval of "64 ms" is the shortest testing value for the most of FPS
games that can work in good order. As results, it offers better surviving opportunities over your
opponents!
13
Example 3: In "First Person Shooter" game, 1 click to suppress gun’s recoil by
changing cursor relative displacement.
Step 1: Click on "Play Macro Once Only" at the "Macro Manager Menu"
>>Select "Play Macro Repeatedly">>Select "Press to start, Release to stop".
Step 2: Tick the box of "Perform delay each time a key is released" >>Select "mSec" of time
unit in the "Time unit". >> Input "110" of time value in "Time" box.
Step 3: Click "Left " on "Mouse Simulation Area".
Step 4: Input "3" of coordinate value in "Mouse Relative Coordinate Y Aix " box. >>Click "Plug
In"
Step 5: Repeating Step 4
Step 6: Input "8" of coordinate value in "Mouse Relative Coordinate Y Axis" box. >>Click "Plug
In".
Step7: Repeating 7 times from step 6 to step 7.
Step 8: Now your editing area will look like this as figure 3 shows.
Step 9: Click the "
" icon to save the setting
Fig.3
14
Let’s check it in "First Person Shooter" game practically:
This instance is similar to the example 2, but it offers faster shooting speed while perform the
same effect of suppressing the gun’s recoil. For those FPS professional gamers, they are
capable to perform precise and difficult "manual" actions of suppressing gun’s recoil during the
consecutive shooting by moving the moue back and forth so as to keep the impact at the same
point. Now, by using this instance, you can do the same expertise with one click to the
designated mouse button. In the CS practical testing, we found this instance is very useful for
the rifle types like "AK47" and "M4A1", but for those less recoil rifles such as MP5, you may
reduce the relative displacement value.
Benefits: This example shows how to integrate the "Mouse Relative Displacement" and
"Recycle Macro" to perform the professional actions during the game play. This example
demonstrates how to suppress the gun’s recoil by compensating the "Y relative displacement"
value to reduce each shooting deviation, and hence increase the shooting precision. The Y
relative displacement values are in the reducing order as in the practical game testing, we found
the gun's recoil is increased gradually with each bullet is short. And you may decide how many
bullets will be shot by performing the "Recycle Macro" option; the consecutive shooting will be
ceased while the designated mouse button is released.
Example 4: In the "First Person Shooter" game, 1 click to turn around 180
degrees
Step 1: Input "799" of coordinate value in "Mouse Relative Coordinate X Axis Box" of the
"Macro Manager Menu">>Click "Plug In".
Step 2: Select "mSec" of time unit in the "Time unit" >> Input "23" of time value in "Time"
box. >>Click "Plug In".
Step 3: Repeat three times from step 2 to step 3.
Step 4:Input "500" of coordinate value in "Mouse Relative Coordinate X Axis Box". >>Click
"Plug In".
Step 5:Click "Plug in" in "Time Control Area" of "Macro Manager Menu".
Step 6:Input "50" of coordinate value in "Mouse Relative Coordinate X Axis Box". >>Click
"Plug In".
Step 7:Click "Plug in" in "Time Control Area" of "Macro Manager Menu"
Step 8: Now your editing area will look like this as figure 4 shows.
Step 9: Click the "
" icon to save the setting.
15
Macro Manager Menu
Fig.4
Let’s check it in "First Person Shooter" game practically:
In the real FPS shooting games, in the circumstances that your opponents unexpected turn to,
or show up on your back, it will be almost impossible to instantly turn around and give them a
shot. Or it requires a very high performance mouse to perform "turn around" actions, but usually
it is not fast enough to accomplish the "turn around" action before your opponent starts to fire.
This example demonstrates how powerful it is that it performs automatically the continuous "turn
around" actions in the sudden, while your opponents are not ready to give you the fatal hits!
Benefits: This example shows how to perform the "turn around" action by just one click to the
designated button, and sustain your aiming point at the same level. The given "799" relative
displacement value is due to, after in practical testing, the games only response to the value
less than the maximum horizontal display resolution. For instance, this example is only
applicable to the display resolution of 800x600 mode of your LCD display or monitor, "Overflow"
error may occur in case the value is out of your display boundary. Meanwhile, the time interval
is inserted between each action and the same action is repeated by 6 times, this is due to after
practical testing, we found the FPS games will not properly response for the time interval shorter
than 20 ms.
16
Example 5:In "CS" game, 1 Click to Buy All Weapons and Accessories
Step 1: Tick the box of "Perform delay each time a key is pressed" and "Perform delay each
time a key is released" at the "Macro Manager Menu" . >>Select "mSec" of time unit in
the "Time unit". >> Input "20" of time value in "Time" box.
Step 2: Click "B 4 6 B 1 4 B 8 2 B 6 B 7 O 4 O 3 O 3 O 5 B 8 6" on "Keyboard Simulation Area".
Step 3: Now your editing area will look like this as figure 5 shows.
Step 4: Click the "
" icon to save the setting
Fig. 5
Let’s check it in "First Person Shooter" game practically:
By pressing on the designated mouse button, it will automatically perform all the consecutive
actions either to buy all weapons or its accessories, such as "AWP, KEVLAR+HELMET, HE
GRENADE, FLASH, DEFUSAL KIT, DESERTEAGLE, SMOKE GRENADE, BUY PRIMARY
AMMO, BUY SECONDARY AMMO" or quick assignment of the team tasks. In the FPS games
like CS (Counter Strike), while the game is re-started, it is crucial to buy all the equipments and
assign the team tasks as soon as possible, so that you can take advantage of time and position
to combat with your opponents.
17
Benefits: This example demonstrates how powerful the "Keyboard Macro Commands" is. With
one click on the designated mouse button, all the weapons and its accessories are
consecutively and purchased, and the team tasks are assigned automatically. This functionality
can also be applied to those popular Windows applications such as Photoshop and Word to
improve the office efficiency.
Example 6: Quick perform settings in the "PRO-E2001"
This example requires initial setup in the three parts, respectively they are computer settings,
PRO-E software settings and Wireless 5-Mode Oscar Editor settings.
Step 1: Computer Settings
Open "My Computer", create a new folder on the hard drive D "D:\WORK" >>Right-click the
mouse on "PRO-E" shortcuts icon >> select "Properties"
Step 2: PRO-E Software Settings:
Open "PRO-E" software; create a new file under the path that you appointed. Then enter "PROE". Click "Function – Mapkeys – New -- Input the name "D" -- Record -- Feature -- Create -Surface -- Advanced -- Boundaries -- Done -- Done -- Stop -- Confirm -- Save (The system will
produce a config.pro file automatically)-- OK. A shortcut is established and you can duplicate
the same process to organize as many shortcuts as you like in the "PRO-E".
A: From the "Main Menu", click the "File", you'll see the "Pull-down Menu" >>Select " New">>
"rename"
B: Input the "PRO-E2001" as script file name >>Select a function key option (for instance the
4thButton) >>Select "Keyboard" from "Task Pull-down Menu", then you’ll see the right
image. >>Click "D" key on below keyboard image. >>Click "File" from "Main Menu" >>Click
"Save as" to save settings>> Click the "Download to Mouse" to store script file to mouse onboard memory.
18
After you have finished the above settings, a "specific-PRO-E-purposed" mouse is ready to
serve. For instance, to accomplish a PRO-E solid surface may require 7 steps and now with one
click on the designated 4th button of the mouse, all the tasks are accomplished automatically
and it saves all the processes which usually require lots of efforts and time.
Capture Screen
How to set:
Select "Screen Capture Tool" from the function list of the button
setting.
, then click "OK" to save your
Usage:
1) Press/hold the mouse button
a box around your object.
and drag the mouse cursor to the opposite corner and form
Edit Tool
2) Click
on “Edit Tool” and paste (Ctrl+V) it to any document or during online chatting. after
editing your screenshot (Video capture is only supported on Vista or above)
19
Use the Wireless Mouse for your Presentation
1. TutorPen
Press/hold the defined button to draw a line to remark the objects on your screen. You can
eliminate the lines by double or triple click on the defined button.
You may set the line width in the "TutorPen Setting".
2. Memo
Click the the “Memo” to open Memo screen as below shows, then all the current button settings
will be listed out as the reminder.Then, you can check each button setting and activate them
immediately.
20
3. Open a file or a program
You may set up the defined buttons in association to the documents, programs or shortcuts
required during your presentation. Just press the buttons to open them instantly.
Gesture 16-in-1
Select “Gesture 16-in-1” from the pull-down function list, the setup box will pop up.
Setup Box
You may set up 16 user-friendly functions/commands to the defined gesture button, including
the functions of Keyboard/Mouse simulation, Open a file, Office, Text, Multimedia, Internet, etc.
Usage: Press/hold the gesture button and draw a line in the direction described to perform the
preset functions/commands.
21
as “Zoom In” by default, just press/hold the Gesture button and draw a line
as shown below, and then release the button, the picture or the document will be zoomed in
immediately.
a. Press/hold the gesture button
Example: Using
b. Draw the line as the
arrow direction
c. Release gesture button
Then the picture has been zoomed in.
Original
Zoom In
22
Change the Mouse Wheel to 4-way Wheel
Click the icon
at the system tray and select "4-way Wheel".
a. The 4-way Wheel splits the working screen into 2 areas A and B as shown on the right. When
the cursor locates in area A, the wheel will perform vertical scrolling; when the cursor
locates in area B, the wheel will perform horizontal scrolling
b. You may move the Red split icon to change the ratio of area A and B
(Note: If the "Normal Wheel" is selected, the wheel will perform as a normal mouse wheel, and
“4-way Wheel” function won't be launched.)
23
Power-saving Management
1. Click the icon
at the system tray and select “Gaming/Office Power Management ".
2. Battery status: Click "Check battery remaining power" to see the battery power status.
3. Low battery inform: Tick "Low Battery Inform" and click "Settings" to set the informs. Low
battery inform page will pop up at the right corner of your screen when battery low.
24
Connect New Mice/KBs
The multi-link receiver can link to 5 sets Mice/KBs for specified applications, such as
presentation, meeting or teaching. Please follow the steps to finish the ID pairing of the new
mice/KBs.
1) Click the icon "
" at the system tray and select "Multi Pair Technology".
2) Follow the on-screen instructions to finish the ID pairing and manage the paired devices.
Adjust wireless range
Click the icon
at the system tray and select "Wireless Meeting Range Settings".
25
Adjust Mouse Sensitivity
Select "DPI Settings" in "Main Menu" to adjust mouse sensitivity among 100- 3000 CPI
depending on different display applications.
26
Adjust Mouse Report Rate
Select "Report Rate" in "Main Menu" to adjust mouse report rate.
27
Notice:
To ensure a good wireless connection, please read below instructions for your reference:
1. Avoid channel confliction from auto channel hopping
1) Click the icon
at the system tray and select "RF Channel Settings".
2) Select "Channel-lock" to define a private channel to secure better wireless connection quality.
2. Avoid interference from iron panel of PC
Click the icon
at the system tray and select "Best Wireless Signal Monitoring".
28
If the wireless mouse is not working smoothly due to wireless conflicts, try below methods to get
improvement.
A) Please plug the Multi-link receiver into
to avoid shielding wireless signal instead
of
.
B)
Use USB extension cable to position the Multi-link receiver at a distance to prevent
electromagnetism interference from devices.
Troubleshooting & FAQ
If the mouse is not working:
1. Make sure the mouse power is on
2. Try another USB port
3. Ensure the Multi-link receiver is inserted
4. Check battery and battery installation
Product Support
Need more technical support? Please go to: http://support.a4tech.com/ and our support team
will respond within 72 hours.
**Features and specifications of all A4TECH products are subject to change without notification.
29