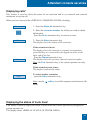
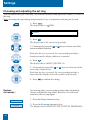
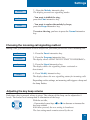
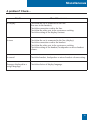
1
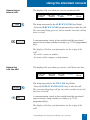
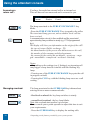
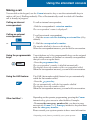
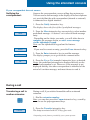
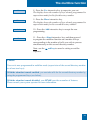
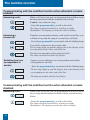
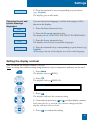
User guide M760E
Attendant console
© AASTRA MATRA Telecom
Table of contents
Description
• Your M760E - attendant console
• Connections
• Recommendations and safety
• Accessories for the M760E
• Installing the attendant console
• Presentation of the M760E
• Interactive display
• Using the interactive keys
1
1
2
2
3
4
6
8
9
Dialling methods
• Using the hands free mode
• Using the micro-headset mode
• Using the loudspeaker mode
• Adjusting the listening volume
• Using the prenumbering mode
• Calling by name a correspondent listed in the internal or
external directories
• Calling an abbreviated number
10
10
11
12
12
12
13
13
Using the attendant console
• Enabling/disabling the attendant console
• Answering calls
Answering an external call
Answering an internal call
Answering a tie lines call
Answering a return call
Managing overload
• Making a call
Calling an internal correspondent
Calling an external correspondent
Using the programmable keys
Using the LNR feature
Other facilities
Consulting the status of the set
Notifying the correspondent
14
14
16
16
17
17
18
18
19
19
19
19
19
19
20
21
I
Table of contents
• During a call
Transferring a call to another extension
Transferring a call to several extensions in succession (chaining)
Returning to the first correspondent
Switching from one correspondent to another
Setting up a conference call
Returning to a correspondent waiting on another CCO
Using the mute feature
Displaying the time
Using the trace function
Storing a correspondent’s number
• Ending a call
21
21
22
22
22
22
23
23
23
24
24
24
Attendant console services
• Reserving outside lines
• Programming and managing the system
Programming abbreviated collective numbers
Checking how many units a telephone has used
Managing limitation modes
Setting the system date
Setting the system time
• Using the hotel function
Declaring an arrival
Declaring a check-out
Programming a wake-up call
Declaring a phone box
• Displaying calls
• Displaying the status of trunk lines
• Monitoring group lines
• Notifying a correspondent
25
25
26
26
27
28
28
29
29
30
30
31
32
33
33
34
34
The programmable keys
• Programming a key
• Deleting, modifying and exiting programming
• Identifying programmed keys
II
35
35
36
38
Table of contents
The supervision function
• Programming the supervision function
• Communicating with the supervision function
39
39
40
The multikey function
• Programming the multikey function
41
41
The multiline function
• Programming the multiline function
• Communicating with the multiline function when attendant
console enabled
• Communicating with the multiline function when attendant
console disabled
42
42
44
44
Settings
• Choosing the display language
• Setting the display contrast
• Choosing and adjusting the set ring
• Choosing the incoming call signalling method
• Adjusting the key beep volume
46
46
47
48
49
49
Miscellaneous
• Glossary (words to know)
• A problem? Check…
50
50
51
III
Description
Your M760E - attendant console
A new set has just been installed for you.
Your M760E digital set gives you access to all the services and features available within the
telephony systems of NeXspan ranges.
Your M760E offers a comprehensive set of features and the latest in performance technology
yet is simple to use.
In attendant mode, it acts as a call management service that performs all those conventional
functions vital to the successful management of incoming and outgoing calls.
Please note: an attendant console can be configurated in Class A or Class B modes ; the present guide is
designed to Class B attendant users.
Note: connected to a line that is not dedicated to the attendant function, your M760E will
again revert to its digital set functions to provide effective communication through:
- an alphabetical keypad (that enables you to call by name),
- the presentation of caller identification associated with a private directory
of 100 numbers,
- a message lamp,
- a set of 20 memory keys (used to program numbers or functions),
- a display unit associated with a navigator.
Let yourself be led step-by-step
One of the prime advantages of your telephone set is its interactive display, which keeps
you informed of available telephone services at appropriate times.
Five interactive keys, each having a correspondence with messages shown on the display,
give you access to these services: simply press the desired key.
You no longer need to look for information in a directory, and no more complicated codes
to remember.
This guide will lead you step-by-step in how to use this new tool. You are recommended to
take a little time out to familiarize yourself with it.
As soon as you have mastered the basic functions, you will be ready to use your new phone.
You will find that there is nothing difficult or complicated to understand in using this
telephone: just read and follow the instructions. You will soon see how fast this telephone
is to use, and how much time it saves you, and you will soon be wondering how you managed
without it before.
So… just follow the guide!
1
Description
Description
Connections
under the trap
Analog options card connector*
Micro-headset cord
connector*
Handset cord connector
Line cord connector
Extension module
connector*
Recommendations and safety
Caution
Do not install the equipment in a damp room or near a water
outlet.
The equipment must be used at a temperature between 5 °C
and 45 °C.
Telephone
connection
This equipment cannot be connected to the public network.
This equipment is designed to be installed with a private
switching system from NeXspan ranges..
The voltage on this network is classed TNV1 (Telephone
Network Voltage) according to standard EN 60-950.
CE marking
This certifies that the equipment conforms with the regulations
which apply in accordance with directive R&TTE 1999/5/CE.
Maintenance
Use a cloth which has been dampened in slightly soapy water,
and then wipe with a dry cloth.
Your equipment will retain its new appearance if you do not
use any solvents of household cleaning products.
2
Description
Accessories for the M760E*
The M760E is designed to accommodate a variety of options (*).
The analog options card
The analog options allow you connect analog peripherals (such
as modem/Minitel, register or external ringer).
The micro-headset
The M760E lets you plug in a micro-headset.
After connection and programming, the headset mode replaces
hands free mode.
The extension
module
The extension module lets you enhance your set by adding a
further 20 programmable keys. You can add up to two extensions,
giving you a total of 60 programmable keys.
A. voyage
A. voyage
Two models are available as an option:
- the M710 simple extension module;
- or the M715 extension module equipped with a charger for
DECT mobile.
The M700 and M705 extension modules equipped with an
icons display, are usable with your M760E too.
Note: alone an M760E set can be configured in attendant mode
and allow all conventional functions vital to the successful
management of incoming and outgoing calls.
However, in some cases, it is advisable to add an extension.
Please consult your system operator for more information.
* Please consult your system operator
3
Description
Installing the attendant console
Your M760E set configuration in attendant mode depends on the associated system version.
We recommend you carry out the following test (after connecting the set) to find out the version of the system to which your set is connected.
To find out the
system version:
- Press successively the
and
keys.
The display will show either:
DISPLAY
The indications and additional features which are highlighted
on the blue backgrounds in this guide apply to your setup (see
§ Multiline function - Settings - Selecting the language).
Otherwise, the display will show:
LANGUAGE
The features highlighted on a blue background in this guide are
not available with your current system version.
Configuring the set in
attendant mode:
The system associated with your M760E allows the system
operator to automatically manage your set’s configuration in
attendant mode. There is no need to configure the set
manually.
Note: Once you have disconnected then reconnected the telephone line (see page 2), the display shows the software version
of the set.
If you are in any doubt,
please consult your
system operator.
Once the system operator has made the necessary adjustments,
you will need to follow the procedure described hereafter to
set up your M760E set in attendant mode.
Note: cancelling attendant mode also involves manually
adjusting the set.
4
Description
Once you have disconnected then reconnected the telephone
line (see page 2),
the display shows the software version of the set:
M760E
__RX.XXXX__
The display then shows the idle screen.
You have 5 seconds to carry out the following operation.
1 - Consecutively press
,
and
keys.
The display asks if you wish to set up the attendant mode:
ATTENDANT CONSOLE/POSTE OPERATEUR ?
No / Non Class.A
Class.B
Class.B
2 - Press Class.A or Class.B (example Class.B).
Note: this choice will depend on the system installed; please
consult your system operator for more information.
The display shows the idle screen in attendant mode.
Your M760E is configured in attendant mode and allows you
to access all management features*.
You can then activate the set (see page 14).
Cancelling the attendant
mode configuration:
No / Non
You have deactivated the attendant set (ON/OFF programmed
key). Follow the aforementioned procedure, i.e.
- disconnect then reconnect the set,
- consecutively press
,
and
.
The display asks if you wish to set up the attendant mode.
- Press No / Non.
Your M760E is no longer in attendant mode.
The system associated with your M760E allows the operator to
cancel attendant mode on your set automatically. When
connected to a line not dedicated to the operator function, the
M760E gives you access to a whole range of features, such as
directories and call logs.
* Depending on the features provided by your system operator
5
Description
Presentation of the M760E
Telephone
handset
PE2:02 PE1:00 INT:01 TL:00
Comm Status Funct.
Interactive display
More
Interactive
keys
Message lamp
(incoming call lamp)
OVERLOAD
Dialling
keypad
ON :/OFF
CCO1
PUBLIC
EXCHANGE 1
CCO2
PUBLIC
EXCHANGE 2
CCO3
TIE LINES
CCO4
SERVICES
LINES
Attendant console
user keys
MAJOR
ALARM
RESERVED
LINES
CCO5
Assistant
CCO6
Show room
Programmable
keys
Shop
Alphabetic
keypad
Microphone
(hands free mode)
Keypad cover
Attendant console user keys:
OVERLOAD
Indicates the overload status:
- level 1, on steady lamp
- level 2, blinking lamp.
CCO: 1 - 2 - 3 - 4
Used to display calls during
processing.
MAJOR ALARM
Indicates an installation failure.
LINES RESERVED
Used to reserve several
external lines for outgoing calls
from the attendant console.
OVERLOAD
6
ON / OFF
CCO1
PUBLIC
EXCHANGE 1
CCO2
PUBLIC
EXCHANGE 2
CCO3
TIE LINES
OVERLOAD
ON / OFF
CCO1
PUBLIC
EXCHANGE 1
CCO2
PUBLIC
EXCHANGE 2
CCO3
TIE LINES
CCO4
SERVICE
LINES
MAJOR
ALARM
LINES
RESERVED
CCO5
Assistant
CCO6
Show room
Shop
ON/OFF
Used to enable or disable
the attendant console.
The associated lamp lights up
when the attendant is disabled.
PUBLIC EXCHANGE
Used to take incoming calls on
the attendant console:
1 - Public network calls
2 - Return public calls
not answered
Tie Lines - Tie lines calls
LOCAL - Local network calls
CCO 5 and 6 (optional)
You can erase the
programming for these keys
Lamps associated with user keys
These are used to display the status of the line of the programmed function.
Four status: out lamp, on steady lamp, blinking lamp, flashing lamp.
Description
Other keys:
Green key: this is used when the set is idle or in communication,
to call back the last number dialled (LNR function).
Red key: this is used
- during a communication, to end the call,
- during programming, to cancel a setting or end a programming
sequence.
Directory key: not available in attendant mode.
Programming key: this is used to access the settings (rings and
contrast).
Loudspeaker key: this is used to enable and disable the loudspeaker
mode.
The associated lamp lights up to remind you that the feature has been
enabled.
Mute key: during a call, this key lets you cut off the microphone
(handset, hands free or micro-headset) and talk without your
correspondent being able to hear you.
The associated lamp lights up to remind you that the feature has been
enabled.
R Key (Flashing): during a call, this key is used to access dialling
(e.g. to call a second correspondent).
Depending on the features available through your system operator.
Navigator: this comprises four direction keys and one central key.
- The
- The
- The
PE2:02 PE1:00 INT:01 TL:00
Comm Status Funct.
OVERLOAD
More
ON :/OFF
CCO1
PUBLIC
EXCHANGE 1
CCO2
PUBLIC
EXCHANGE 2
CCO3
TIE LINES
CCO4
SERVICES
LINES
MAJOR
ALARM
RESERVED
LINES
CCO5
Assistant
CCO6
Show room
and
keys are used to display a selection or a record.
and
keys are used to carry out a setting.
key is used to confirm a choice or a setting.
Alphabetic keypad: this is used
- to make a call using the name of a correspondent and search for a
correspondent in the internal and external directories,
- to enter text when notifying a correspondent.
Open the cover to reveal the keypad.
Shop
7
Description
The interactive display
The M760E features a display unit with 5 interactive keys and a navigator. You can adjust the
display contrast (see § Settings).
The display comprises one line of information and a second showing the functions available
with the interactive keys.
Note: the information shown varies according to the set programming and the associated
system*.
When the set
is idle:
When idle, the display shows the number of incoming calls for
any exchange (1 - 2 - SERVICES or TIE LINES).
PE2:00
Comm.
PE1:00
Status
INT:00
Funct.
TL:01
More
The second line shows the functions available when idle via the
interactive keys.
During a call:
The first line shows the identity of the correspondent during an
incoming call
- internal call:
CALL FROM XXXXXXXXX
Comm Prenum <-Start
Tone
-->
- external call:
PUB.EXCHANGE:XXXXXXXXXX EQ:01/02/04
Comm Prenum <-Start
Tone
-->
The second line shows the functions available during a call via
the interactive keys.
During programming:
The display shows the programming selection:
WHAT DO YOU WANT TO PROGRAM?
Number Superv. Tone
The second line shows the functions available during programming
via the interactive keys.
During setting:
The display shows the setting selection:
RING
The second line shows the functions available during setting via
the interactive keys.
8
* Depending on the features available through your system operator
Description
Using the interactive keys
The display comprises one line of information and a second showing the functions available
through the interactive keys. Each function shown on the second line of the display is assigned
to an interactive key.
Note: in some cases, some interactive keys may not be assigned to any function.
PE2:00
Comm
PE1:00 INT: 00
Status
Funct.
TL:01
More
. To invoke a function, press the interactive key associated with
the desired function (Comm, for example).
Comm
In certain cases, the number of functions available can be greater than five.
-->
More
<--
. To invoke subsequent functions,
press the interactive key --> or More.
. To invoke preceding functions,
press the interactive key <--.
Previous
At any time,
. to return to previously display, press Previous,
Content
. to return to idle display, press Content.
9
Dialling methods
Dialling methods
Your M760E enables you to use a variety of dialling methods to fit in with your activities.
These features complement the conventional handset method (or discreet method):
off-hook the handset to answer or dial a call, and hang-up the handset to end the call.
Using the hands free mode
The hands free feature lets you dial or answer a call without lifting the handset. During a call,
you can switch from hands free mode to handset mode, and vice versa. Caution: when a
micro-headset is connected to a set, micro-headset mode replaces hands free mode.
Answering a call:
PUBLIC
EXCHANGE 1
Making a call:
When a call arrives,
- press PUBLIC EXCHANGE 1 - PUBLIC EXCHANGE 2 TIE LINES or SERVICE LINES key where the lamp is
blinking (e.g. PUBLIC EXCHANGE 1).
Without picking up the handset, you can hold a conversation
in hands free mode.
The lamp associated with the
key illuminates.
- Dial the desired number directly on the keypad.
The number is displayed progressively as you enter it.
Your set automatically enters hands free mode.
When the called correspondent answers, you can hold a
conversation in hands free mode.
Ending a call:
Switching from hands
free mode to handset
mode:
- Press the
red key.
The call is terminated and the lamp associated with the
goes out.
If you are using the hands free mode,
- Simply pick up the handset.
The conversation is held in handset (or discreet) mode.
The lamp associated with the
key goes out.
When the call is finished, you must press the
red key.
Switching from handset
If you are using the handset mode:
mode to hands free mode: - hang up the handset.
The conversation continues in hands free mode.
The lamp of the
key lights up.
When the call is finished, you must press the
red key.
10
key
Dialling methods
Using the micro-headset mode
A micro-headset is connected to your M760E: the micro-headset and the handset are connected
to the dedicated connectors (see § Connections) and the handset is hung up in the handset lodging).
We recommend you to consult your system operator to have more information about other
features associated with the micro-headset.
Answering a call in
micro-headset mode:
PUBLIC
EXCHANGE 1
When a call arrives,
- press PUBLIC EXCHANGE 1 - PUBLIC EXCHANGE 2
- TIE LINES or SERVICE LINES key where the lamp is
blinking (e.g. PUBLIC EXCHANGE 1).
You can converse in micro-headset mode.
The lamp of the
key lights up.
Making a call:
- Dial the desired number directly on the keypad.
The number is displayed progressively as you enter it.
When the called correspondent answers, you can hold a
conversation in micro-headset mode.
Switching from microheadset mode to hands
free mode:
While holding a conversation in micro-headset mode,
- press the key.
The conversation continues in hands free mode.
. To return to micro-headset mode, press again the key.
. To switch from hands free mode to handset mode, pick up
the handset.
Notes :
- You can hang up at any time. The conversation continues in
micro-headset mode.
- In handset mode, press to activate the loudspeaker.
Switching from microheadset mode to
supervision mode:
While holding a conversation in micro-headset mode,
- another person can lift the handset to supervise the conversation
and can hang up at any time.
The conversation continues in micro-headset mode.
Ending a call:
- Press the
red key.
The call is terminated and the lamp associated with the
goes out.
key
11
Dialling methods
Using the loudspeaker mode
Loudspeaker mode lets you listen to a correspondent through the loudspeaker and thereby
allow other people to take part in the conversation.
Enabling loudspeaker
mode:
When you are in discreet mode (handset off-hooked),
- Press the
key.
The conversation will be broadcast over the loudspeaker. The
lamp associated with the key blinks and then illuminates steadily.
Disabling loudspeaker
mode:
- Press the
key again.
The conversation will continue in discreet mode. The lamp
associated with the key goes out.
Adjusting the listening volume
You can adjust the listening volume (8 levels), according to the mode used (handset, hands
free, micro-headset or loudspeaker mode).
- Press the
or
keys consecutively to raise or lower the
volume.
The last setting is stored by the telephone set (except for the
micro-headset mode: return to middle level for the next call).
Using the prenumbering mode
The prenumbering mode enables you to enter and view a number so that you can edit
it if necessary before dialling it (this mode is advantageous for dialling long numbers,
such as international numbers).
Comm
Prenum
1 - Press the Comm interactive key,
2 - Press the Prenum interactive key.
3 - Dial the number of your correspondent.
The number dialled is shown as it is entered.
Erase
Call
. If you make a mistake, press Erase and re-enter the number.
4 - Press the Call interactive key to make the call.
When the person you are calling answers, you can hold a
conversation.
12
Dialling methods
Calling by name a correspondent listed in the internal or external
directories*
If you don't know the number of an internal or external correspondent, you can retrieve the
number by entering the correspondent's name via the alphabetic keypad.
Comm
1 - Press the Comm interactive key.
Int. Name
2 - Press the Int. Name interactive key (or press the -->
interactive key and then press the Ext. Name interactive key).
name xx
3 - Enter the first letters of the correspondent's name via the
alphabetical keypad.
Erase
Consult
Phonet
Next
Previous
Correct
Call
. If you need to correct what you enter, press the Erase
interactive key.
4 - Press the Consult interactive key.
. If you're not sure how the name is spelt, press the Phonet*
interactive key.
The display suggests a name or shows the number of possibilities.
. Press the Next interactive key as many times as necessary
until the desired name is displayed.
. Press the Previous interactive key to return back.
. If necessary, press the Correct interactive key to resume
entering letters.
5 - Press the Call interactive key to dial the correspondent
displayed.
The telephone set automatically dials the number.
When the correspondent answers, you can hold a conversation.
Calling an abbreviated number*
You can save time by using the collective abbreviated numbers. These numbers can be
programmed from the attendant console and are available to all subscribers (see Attendant set
services - Programming and managing the system).
When in idle mode or during a call,
1 - Press the
interactive key.
3xxx
or
_xxx
2 - Enter an abbreviated number (3xxx).
The telephone will dial the number automatically.
When the correspondent answers, you can hold a conversation.
* Depending on the features provided by your system operator
13
Using the attendant console
Using the attendant console
When disabled, the attendant console has no telephone functions.
However, depending on the features provided by the system operator, a disabled attendant
console may receive or make call. Please consult your system operator for more information.
Note: an M760E disabled in attendant mode cannot perform the functions of a digital telephone (directories, call logs...).
Enabling/disabling the attendant console
Enabling the
attendant console:
ON / OFF
Confirm
When the attendant console is disabled, the display shows a
message to remind you that the function is disabled and the
lamp associated with ON / OFF key is on steady.
1 - Press the ON / OFF programmed key.
The display asks you for confirmation.
2 - Press the Confirm interactive key.
The lamp associated with ON / OFF key goes out.
The display shows the information and features needed to
manage the attendant function (detailed hereinafter).
PE2:00
Comm
PE1:01
Status
INT: 00
Funct.
TL:00
More
Note: if you do not confirm within 5 seconds, the attendant
console will revert to disabled mode.
More
MAJOR
ALARM
14
To display the date and time in idle mode:
- press the More interactive key.
. In case of network or supply failure, the lamp associated with
the MAJOR ALARM programmed key blinks.
At that time,
- you have to contact your system operator.
- Then, press the MAJOR ALARM programming key to
acquit the alarm and put out the associated lamp.
Using the attendant console
Disabling the
attendant console:
ON / OFF
Confirm
The attendant console can be deactivated only when not in call
phase, even if calls are waiting on the PUBLIC EXCHANGE 1
and PUBLIC EXCHANGE 2 programmed keys.
Calls waiting are automatically redirected.
1 - Press the ON/OFF programmed key.
The display asks you for confirmation.
2 - Press the Confirm interactive key.
The corresponding lamp lights up.
The display will show a message reminding your that the
attendant console has been disabled.
Note: if you do not confirm within 5 seconds, the attendant
console will revert to enabled mode.
Caution: if incoming calls are not answered on the free attendant
console, the set is disabled automatically after a given time.
Please consult your system operator to adjust this time to suit
your requirements.
After disabling the set and depending on the features provided
by the system operator, incoming calls are forwarded to a
predetermined set or trigger an external ring.
15
15
Using the attendant console
Answering calls
When enabled, the attendant console displays incoming calls and the associated programmed
key lamps blink.
Note: the set is shown to be free when at least one position is available, i.e. when a CCO key is
free (lamp not lit). A CCO is a communication circuit; the CCO keys are used to manage several
calls at the same time.
Incoming calls are arranged in four categories according to their origin: external - internal - TL
(Tie Lines) or return call.
Answering an
external call:
The display will alert you when an external call is received:
PE2:00
Comm
PUBLIC
EXCHANGE 1
PE1:01 INT:00 TL:00
Status
Funct.
More
In addition, the lamp associated to the PUBLIC EXCHANGE 1
key blinks.
- Press the PUBLIC EXCHANGE 1 programmed key to take
the call.
The associated lamp goes out, unless another external call has
been received.
CCO1
A communication circuit is then enabled and the associated
supervision key lamp switches to steady (e.g. CCO1 programmed
key).
The display shows you information on the origin of the call*:
. location,
. caller’s name (where possible, the caller’s number will also
be shown).
16
* Depending on the features provided by your system operator
Using the attendant console
Answering an
internal call:
The display tells you when you receive an internal call:
PE2:00
Comm
SERVICE
LINES
PE1:00
Status
INT:01
Funct.
TL:00
More
The lamp associated to the SERVICE LINES key blinks.
- Press the SERVICE LINES programmed key to take the call.
The associated lamp goes out, unless another external call has
been received.
CCO2
A communication circuit is then enabled and the associated
supervision key lamp switches to steady (e.g.: CCO2 programmed
key).
The display will show you information on the origin of the
call*:
. the caller’s name or number,
. the name of the company or department.
Answering
a tie line call:
The display tells you when you receive a call from a tie line:
PE2:00
Comm
PE1:00
Status
INT:00
Funct.
TL:01
More
The lamp associated to the TIE LINE key blinks.
TIE LINES
CCO3
- Press the PUBLIC EXCHANGE 2 key to take the call.
The corresponding lamp will go out, unless another local call
has been received.
A communication circuit is then enabled and the associated
supervision key lamp switches to steady (e.g. CCO3
programmed key).
The display will show you information on the origin of the
call*.
* Depending on the features provided by your operator
17
Using the attendant console
Answering a
return call*:
You have forwarded an external call to an internal set.
This call has not been answered and is returned to you.
PE2:01
Comm
PUBLIC
EXCHANGE 2
CCO4
PE1:00
Status
INT: 00
Funct.
TL:00
More
The lamp associated to the PUBLIC EXCHANGE 2 key
blinks.
- Press the PUBLIC EXCHANGE 2 key to speak to the caller.
The associated lamp goes out, unless another local call has
been received.
A communication circuit is then enabled and the associated
supervision key lamp switches to steady (e.g. CCO4 programmed
key).
The display will show you information on the origin of the call*:
. the type of return (Public exchange - TL)
. the name/number of the person who did not answer the call,
. the number of the company and the department,
. the reason for the return (do not disturb - no answer - engaged - unavailable - transferred - not listed - blocked).
Notes:
- Depending on the settings (see § Settings), an incoming call
may trigger a beep timed to coincide with the flashing key
lamp.
- Pressing one of the PUBLIC EXCHANGE keys puts the call
in progress on hold.
- Pressing the CCO key with the blinking lamp recovers a call
waiting.
Managing overload:
OVERLOAD
OVERLOAD
The lamp associated to the OVERLOAD key informs about
arriving of one or more no answered calls:
- first level overload: the key lamp switches to steady.
- second level overload : the key lamp blinks.
Note: this overloads start up after a given time.
Please consult your system operator to adjust this time to suit
your requirements.
. Press the OVERLOAD key to display the waiting calls.
18
* Depending on the features provided by your system operator
Using the attendant console
Making a call
You can dial on the keypad, use the Comm interactive key or use the customizable keys to
make a call (see § Dialling methods). This will automatically result in a dual call if another
call is already in progress.
Calling an internal
correspondent:
To call an internal correspondent,
Calling an external
correspondent:
To call an external correspondent,
1 - Dial the access code for obtaining an external line (0 by
default).
or
2 - Dial the correspondent’s number.
The number dialled is shown on the display.
When the correspondent answers, you can hold a conversation.
Using the programmable
keys:
Your telephone set’s free programmable keys can be assigned
to the phone numbers of (internal or external) correspondents
that you call on a regular basis.
- Press the programmed key.
The correspondent’s number is dialled automatically.
The display shows the number of the correspondent called.
When the correspondent answers, you can hold a conversation.
DUPONT
- Dial the correspondent’s extension number.
The correspondent’s name is displayed*.
Using the LNR feature:
The LNR (last number redial) feature lets you automatically
redial the last number called.
- Press the
green key.
The set automatically calls the last number dialled.
The display shows the number called.
When the correspondent answers, you can hold a conversation.
Other facilities* :
Depending on the operator programming, pressing the Comm
interactive key gives access to other facilities. Example :
. To access the emergency numbers list, you have to press
successively Comm (-->*), Emergcy interactive keys and then
enter the emergency number.
Please consult your system operator to have more information.
* Depending on the features provided by your system operator
19
Using the attendant console
Consulting the
status of a set:
Prenum
Status
This feature lets you check the status of a set in the company
while conducting a conversation with the caller.
Note: when idle, you can also access this feature.
During a call,
1 - Press the Prenum interactive key.
2 - Press the Status interactive key
Note: when the set is in idle mode, the display enables direct
access to this function.
This display asks you to dial the number of the extension you
wish to consult.
3 - Dial the first extension number.
The display shows the status of the set.
Call
Call
Recover
-->
Intrude
Mute
. To call a free extension
- Press the Call interactive key.
The display shows the different features available during a call
(see § During a call).
. To alert an extension in use
- Press the Call interactive key.
A beep tells the correspondent you are calling; he can answer
or not.
. If you want to recover the correspondent who was on hold,
press the Recover interactive key.
. To interrupt a call
1 - Press successively the --> and Intrude interactive keys.
You enter in the communication with the two correspondents.
2 - Press the Mute interactive key to speak to the internal
correspondent; the other party is placed on hold.
Recover
3 - Press the Recover interactive key to end the interruption.
Recover
4 - Press the Recover interactive key again to revert to the
caller waiting.
. If you want to call another extension, press the Other interactive
key. Press the Previous interactive key to quit this menu.
20
Using the attendant console
If your corespondent does not answer:
Notifying the
correspondent:
Notify
More
Suppose the correspondent you are calling does not answer.
You can send a short message to the display of his/her telephone
set, provided that the said correspondent (internal or external)
is connected to a digital interface.
1 - Press the Notify interactive key.
The display shows the first of the 6 predefined messages.
2 - Press the More interactive key successively to select another
predefined message - if desired - or to select a blank message
entry.
. Depending on the choice you make, you will either have to
complete the message shown, or enter a new message
via the alphabetic keypad.
Note: use the alphabetical keypad and its features.
Erase
. If you need to correct an entry, press the Erase interactive key.
Enter
3 - Press the Enter interactive key to send the message.
The display prompts you to get back the communication.
No
4 - Press the Yes or No (example) interactive keys, as desired.
Notes: the predefined messages are displayed directly on the
notified corespondent’s set. However, a free message is not
displayed directly: the other correspondent is informed of the
arrival of a written message, and must choose to read it.
During a call
Transferring a call to
another extension:
During a call, if you wish to forward the call to an internal
extension.
1 - Dial the extension number.
Note: you can also press the Comm interactive key, search by
name or use the preprogrammed keys.
Transfer
2 - Press the Transfer interactive key.
The lamp associated with CCO key goes out*.
* Depending on the features provided by your system operator
21
Using the attendant console
Forwarding a call to several The external correspondent wishes to speak to several different
extensions in succession people in succession.
(chaining):
-->
Chaining
1 - Press the --> interactive key.
2 - Press the Chaining interactive key.
3 - Dial the first extension number.
Note: you can also search by name or use the programmed
keys.
You can wait - or not - for the correspondent to answer before
transferring.
At the end of the call, when the internal correspondent hangs up,
the external correspondent will automatically call the attendant
console on PUBLIC EXCHANGE 2 to request to be transferred
to another internal extension.
Returning to the first
correspondent:
Recover
Switching from one
correspondent to
another:
Shuttle
Setting up a
conference call:
-->
Conf
22
If an internal correspondent you have called doesn’t answer,
- Press the Recover interactive key.
You can also press the
red key.
You recover the correspondent who was on hold.
Suppose you want to switch from one correspondent to
another.
- Press the Shuttle interactive key.
You can converse alternatively with each of the
correspondents, but they cannot converse with each other.
The correspondent shown on the right-hand side of the display
is always the one on hold.
You want to talk to the two parties at the same time (this
feature is only available if you have initiated the last call).
- Press successively the --> and Conf interactive keys.
A three-way conference call is set-up between you and your
two parties.
If one of them hangs up, you remain on-line with the other.
Using the attendant console
Suppose you want to leave your two parties to talk to each
other during the conference call.
Transfer
Returning to a
correspondent
waiting on another
CCO:
CCO4
Using the mute feature:
. To terminate the conference call,
- Press the Transfer interactive key.
The two parties remain on-line with each other.
Note: in the event of a failure, your telephone set rings again.
Pressing one of the PUBLIC EXCHANGE 1 - PUBLIC
EXCHANGE 2 - TIE LINES or SERVICE LINES keys
places a call on hold.
- Press the CCO key associated with the blinking lamp.
You recover the correspondent who was on hold.
Note: you cannot set up a conference call between two
correspondents on two different CCO.
Suppose you are holding a telephone conversation and you want
to say something without the other correspondent hearing you.
1 - Press the
key.
The microphone of the handset, the hands free system or the
micro-headset is silenced and the lamp associated with the key
illuminates steadily.
The correspondent will not be able to hear you speak.
2 - To resume talking with the other correspondent, press
the
interactive key.
The lamp associated with the key goes out.
Displaying the time:
-->
Time
To display the date and time instead of the distant correspondent's
name or number:
1 - Press the --> interactive key.
2 - Press the Time interactive key.
The display will now show the date and time.
23
Using the attendant console
Using the trace
function:
-->
Trace
Storing a
correspondent’s
number:
-->
Memory
Suppose you want the number of the called or calling correspondent (internal or external) to be registered in the log, to
identify a nuisance call, for example.
1 - Press the --> interactive key.
2 - Press the Trace interactive key.
The number will automatically be stored in the log, which can
be consulted by the system operator.
You can save the distant correspondent's number to a
programmable key, whether the call is incoming or outgoing.
1 - Press (successively) the --> interactive key.
2 - Press the Memory interactive key.
3 - Press a programmable key.
M. DUPONT
The number will automatically be stored, and can be dialled
by pressing the programmable key in question.
Note: Write the correspondent's name on the label beside the
programmable key.
Ending a call
- Press the
red key.
If the set is in hands free mode, the
lamp goes out.
The correspondent is released and the call ended.
Note: when the attendant console returns to idle mode following a
call, the display remains clear for a few seconds. However, the
attendant console continues to function normally and any
operations (such as answering a call) are registered.
24
Attendant console services
Attendant console services
The attendant console features a number of services that you can customize.
Funct.
1 - Press the Funct. interactive key.
Server
2 - Press the Server interactive key.
The display shows the first available heading.
More
- Press successively the More interactive key to display the
other headings.
Access
Previous
Content
3 - Press the Access interactive key when the display shows the
heading you want.
When consulting a record,
- press Previous to go back to the beginning of the heading,
- press Content to go back to the list of headings.
Reserving external lines*
This feature allows you to reserve several external lines for outgoing calls from the attendant
console*.
Note: this function can also be accessed using the LINES RESERVED programmed key
(see § Description).
When you have accessed the «EXTERNAL LINE RESERVATION» heading.
Reserv
To reserve a line
- Press the Reserv interactive key.
Cancel
To cancel a reserved line
- Press the Cancel interactive key.
Note: use the
mode.
LINES
RESERVED
red key to end a sequence and return to idle
You can access this menu directly from idle mode by pressing
the LINES RESERVED key.
The associated lamp key switches to steady to remind you that
the line is reserved.
* Depending on the features provided by your system operator
25
Attendant console services
Programming and managing the system*
This feature allows you to:
- program abbreviated numbers (available to all system users),
- consult charges billed to an extension,
- manage limitation mode,
- set the date and time.
Once you have accessed the «SYSTEM MANAGEMENT» heading.
Programming abbreviated This feature is used to manage the installation abbreviated
collective numbers:
numbers.
To enter a new abbreviated number:
Abbrev#
1 - Press the Abbrev# interactive key.
Create
2 - Press the Create interactive key.
The display shows the first available number.
Next
Modify
To display the next free number,
- press the Next interactive key.
3 - Press the Modify interactive key.
The display asks you to enter the number.
4 - Enter the correspondent’s number (preceded by the code
needed to obtain an outside line, where applicable (0 by
default).
. Press the Erase interactive key to correct an error.
Enter
Yes
Wording
26
5 - Press the Enter interactive key.
The display asks if you have finished entering the entire number.
6 - If the number is correct, press the Yes interactive key.
. If the number is that of a company which uses direct selection
on arrival, you may choose to enter only the fixed part of the
number. You will need to:
- press the No interactive key, then
- enter the following numbers then press the Enter interactive
key,
- alternatively, press the Open interactive key if the number
may vary.
7 - Use the alphabetical keypad to enter the extension Wording
(e.g. name of the correspondent or company).
. Press the Erase interactive key to correct an error.
* Depending on the features provided by the system operator
Attendant console services
Enter
8 - Press Enter when you are finished.
The display shows the number programmed.
. You may also use Modify and Cancel to change or delete the
number shown.
Abbrev#
See
Enter
Next
Consulting charges
billed to an extension:
Invoice
To consult the abbreviated numbers programmed:
1 - Press the Abbrev# interactive key.
2 - Press the See interactive key.
3 - Dial the extension number.
4 - Press the Enter interactive key.
5 - Press the Next interactive key consecutively to display the
numbers.
Note: use the
red key to end the sequence and return to idle
mode.
This feature is used to see the number of billing units charged
by the network operator to a given extension since the billing
counters were last reset.
1 - Press the Invoice interactive key.
The display asks you to enter the number of the extension for
which you wish to check the number of units used.
2 - Enter the extension number.
. Press the Erase interactive key to correct an error.
Enter
Cancel
Yes
Other
3 - Press the Enter interactive key.
The display shows the counter and the date it was last reset.
To reset the counter:
- press the Cancel interactive key, then
- press the Yes interactive key to confirm.
Note: the password is required only for the first cancel operation,
as long as you are still in the Invoice menu. You can obtain
this password from your system operator.
To check another extension:
- press Other.
Note: use the
mode.
red key to end the sequence and return to idle
27
Attendant console services
Managing limitation
modes:
Timetab.
Night
User entitlements on the system may vary according to the time
of day.
Example: extensions may be authorized to make international
calls during the day, but only local calls at night or on weekends.
This means that the system can be set to operate in one of the
given modes.
1 - Press the Timetab. interactive key.
The display asks you to enter the operating mode.
2 - Press the Day or Night interactive key (e.g. Night).
The display will confirm the selected limitation.
Note: use the
mode.
Setting the system date:
Date
red key to end the sequence and return to idle
This feature is used to change the date programmed in the
system.
1 - Press the Date interactive key.
The display asks you to enter the new date.
DDMMYYYY
2 - Enter the new date (e.g. 12072001 for July 12 2001).
Enter
3 - Press the Enter interactive key when you are finished.
The display shows the date programmed.
Modify
The change the date:
- press the Modify interactive key.
You can also change the time by pressing the Time
interactive key (see below).
Note: use the
mode.
28
red key to end the sequence and return to idle
Attendant console services
Setting the system time:
Time
HH MM SS
This feature is used to change the time programmed in the
system.
1 - Press the Time interactive key.
The display asks you to enter the new time.
2 - Enter the new time (HH MM SS format, i.e. hour, minutes
and seconds) and press Enter when you are finished.
Enter
. You can also go forward or back an hour by pressing the
corresponding interactive key (+ 1H or - 1H).
The display shows the programmed time.
Modify
To change the time:
- press the Modify interactive key.
Note: use the
mode.
red key to end the sequence and return to idle
Using the hotel function*
This feature is used to access to a range of features linked to a given room or customer.
- declaring an arrival,
- declaring a check-out,
- programming a wake-up call,
- declaring a phone box.
Important: if you frequently use these functions, your system operator can assign programmed
keys for direct access to each function.
When you have accessed the «HOTEL MANAGEMENT» heading.
* Depending on the features provided by your operator
29
Attendant console services
Declaring an
arrival:
Arrival
This feature is used to open access to the public phone network
for a telephone in a room.
1 - Press the Arrival interactive key.
The display asks you to enter the room’s extension number.
2 - Enter the extension number.
. Press the Erase interactive key to correct an error.
Enter
3 - Press the Enter interactive key.
The display confirms the operation and asks you if you wish to
declare another arrival.
Note: use the
mode.
Declaring a
check-out:
Depart.
red key to end the sequence and return to idle
This feature is used to bar access to the public phone networks
from a telephone in a room.
1 - Press the Depart. interactive key.
The display asks you to enter the room’s extension number.
2 - Enter the extension number.
. Press the Erase interactive key to correct an error.
Enter
Euro
Ticket
Confirm
Cancel
3 - Press the Enter interactive key.
The display shows you the cost (in the local currency) of the
calls made from the room since the guest arrived.
To display the cost in euros:
- press the Euro interactive key.
Press the Change interactive key to again display the cost in
the local currency.
To print out a copy of the calls made:
- press the Ticket interactive key.
To close the room’s account:
- press the Confirm interactive key.
The display asks you if you wish to declare another check-out.
To cancel the check-out declaration:
- press Cancel.
Note: use the
mode.
30
red key to end the sequence and return to idle
Attendant console services
Programming a
wake-up call:
Wake-up
This feature is used to programme a wake up call for a given
room.
1 - Press the Wake-up interactive key.
The display asks you to enter the room’s extension number.
2 - Enter the extension number.
. Press Erase to correct an error.
Enter
3 - Press the Enter interactive key.
Activ.
4 - Press the Activ. interactive key.
HH MM
Enter
5 - Enter the required wake-up time
(HH MM, i.e. hours and minutes).
. Press the Erase interactive key to correct an error.
6 - Press the Enter interactive key.
The display confirms the programmed wake-up time.
Modify
To change the wake-up time:
- press the Modify interactive key.
Cancel
To cancel the wake-up call:
- press the Cancel interactive key.
Next
To programme a wake-up call for another room:
- press the Next interactive key.
The extension will ring at the programmed time.
Note: use the
mode.
red key to end the sequence and return to idle
31
Attendant console services
Declaring a phone box:
Phonebox
This feature is used to temporarily authorise calls from a phone
box managed by the attendant console.
1 - Press the Phonebox interactive key.
The display asks you to enter the phone number.
2 - Enter the extension number for the phone box.
. Press Erase to correct an error.
The display asks if you wish to assign the phone box to a guest
or only use it temporarily.
Guest
3 - Press the Guest interactive key, for example.
The display asks you to enter the guest’s extension number.
4 - Enter the guest’s extension number.
. Press the Erase interactive key to correct an error.
Enter
5 - Press the Enter interactive key.
The cost of calls made is automatically billed to the room
account.
. If the phone is for temporary use only,
you have to press the Visitor interactive key.
A few moments after the call has ended, the attendant console
will ring.
You have to press the SERVICE LINES programmed key.
The display shows the cost of the call in units:
«CALLBACK PHONEBOX XXX
COST XXXXX UNITS».
Caution: In both cases and depending on the features provided
by the system operator, the phone box cannot be used again for
external calls until it has again been activated from the attendant
console.
Note: use the
mode.
32
red key to end the sequence and return to idle
Attendant console services
Displaying calls*
This feature is used to check the status of an extension and to see internal and external
extensions in a given call.
When you have accessed the «DISPLAY COMMUNICATIONS» heading.
Phone bk
1 - Press the Phone bk interactive key.
2 - Enter the extension number for which you wish to obtain
information.
. Press the Erase interactive key to correct an error.
Enter
Distant
3 - Press the Enter interactive key.
The display shows the status of the extension.
If the extension is in use:
The display shows the internal or external correspondent
(provided they are connected to the digital network) on the
other end of the line.
. Press the Distant interactive key.
The display shows the previous entered extension number.
Note: the Port interactive key is for system operator use only.
If the extension is not in use:
The display confirms this status.
Other
To select another extension:
- press the Other interactive key.
Note: use the
mode.
red key to end the sequence and return to idle
Displaying the status of trunk lines*
This feature is used to display the status of trunk lines and is more specifically designed for
system operator use.
The display shows «DISPLAY STATUS OF TRUNK LINES».
33
Attendant console services
Monitoring grouped lines*
This feature is used to display calls made for a group of extensions.
You can obtain the numbers called from your system operator.
When you have accessed the «GROUPED LINE SUPERVISION» heading.
The display asks you to enter the grouped line number.
1 - Enter the grouped line number for which you wish to
obtain information.
. Press Erase to correct an error.
Enter
More
Previous
2 - Press the Enter interactive key.
The display shows the number of calls waiting.
For more information:
- press the More interactive key.
The display shows the time before return call to the attendant
console.
To display the status of another group:
- press the Previous interactive key and proceed from step 1.
Note: use the
red key to end the sequence and return to idle
mode.
Notifying a corespondent
This feature (also available during a call, see § Using the attendant console), is used to send a
short message to a corespondent, provided he/she is connected to a digital interface.
Funct.
In idle mode,
1 - press successively the Funct. and Notify interactive keys.
Notify
Enter
More
Erase
Enter
34
2 - Enter the number of the correspondent you wish to notify
then press the Enter interactive keys.
The display shows the first 6 predefined messages.
3 - Use More to select another predefined message.
. According to your choice, you will need to complete the
message shown or enter a free message on the alphabetical
keypad.
. Press the Erase interactive keys to correct an entry.
4 - Press the Enter interactive keys to send the message.
The display will confirm that the message has been sent.
* Please consult your system operator
The programmable keys
The programmable keys
You may call certain correspondents or colleagues several times per day.
Or maybe you make frequent use of certain telephone features such as call forwarding or
supervision. Your set’s programmable keys will allow you to store these numbers or functions
for easy access to the available services.
Notes:
. If your set does not have an extension module, you can customize six keys not dedicated to
attendant console functions.
. If your set uses one or two extension modules*, you can customize and use the additional
keys in the same manner.
Programming a key
Whatever the type of programming used (number or function), the access procedure is the
same.
1 - Press the Funct interactive key.
Funct
Program
Key
2 - Press the Progam interactive key.
The display shows «WHAT DO YOU WANT TO PROGRAM ?».
3 - Press the Key interactive key.
The display asks you to select a programmable key.
4 - Press a programmable key.
The lamp associated with this key illuminates steadily, and the
display shows the programming status of the said key.
Modify
5 - Press the Modify interactive key.
WHAT DO YOU WANT TO PROGRAM?
Number Feature Superv. Filter Tone
During the programming procedure, the lamp associated
with the key flashes.
You have access to various types of programming, which are
explained briefly below. You are recommended to refer to the
sections that cover these functions in depth, for more information about the features available to you.
* Please consult your system operator
35
The programmable keys
Programming
a number:
Number
You can program the telephone number of an internal
or external correspondent.
1 - Press the Number interactive key.
The display prompts you to enter the number.
2 - Enter the correspondent's number, without forgetting to
enter the access code to an external line in the case of an external
correspondent (0 by default).
Erase
. If you make a mistake, using the Erase interactive key.
Enter
3 - Press the Enter interactive key to accept the programming.
The display shows the programming.
You can now call this correspondent simply by pressing
this key.
Programming
supervision:
Superv.
Extens.
Yes
Enter
36
Suppose you wish to program the supervision feature for another
extension or your own extension (multikey and multiline
functions).*
1 - Press the Superv. interactive key.
The display prompts you to select a supervision (mailbox,
extension number or external number).
2 - Press the Extens. interactive key, for example.
The display prompts you to supervise your extension
or another extension.
3 - Press the Yes interactive key to supervise another
extension, for example.
The display prompts you to enter the number of the extension
that you want to supervise.
4 - Enter the extension number and then press the Enter
interactive key.
The display prompts you to select the manner in which
the supervised extension will notify you.
* Depending on the features provided by your system operator
The programmable keys
Mute
5 - Press the Mute interactive key.
The display shows the programming.
This way, the lamp associated with the programmed key
will inform you about telephone usage by the co-worker
concerned, and you will be able to call the correspondent
by simply pressing the key.
Programming
a series of codes:
Tone
sequence
Enter
This involves programming a series of codes that will be
interpreted by the set during the progress of a call.
You can, for example, program the sequence for access to
a server.
1 - Press the Tone interactive key.
The display prompts you to enter the code.
2 - Enter the Sequence.
Example: enter the access code to a server followed by #.
. If you make a mistake, use the Erase interactive key.
. To insert a pause between two series of codes, press the
Pause1 or Pause2 interactive keys*.
3 - Press the Enter interactive key to accept the programming.
The display shows the programming.
This way, simply pressing this key when using the set
during a call will provide you with all expected information
and will give you fast access to the expected service.
Deleting, modifying and exiting programming
After having programmed a key, The display shows
the programming status of this key, and will give you various
possibilities.
Erase
- Press the Erase interactive key to erase the programming
shown.
* Depending on the features provided by your system operator
37
The programmable keys
- Press the Modify interactive key and resume programming
as explained above, in order to modify the programming
displayed.
Modify
- Press the <- Start interactive key to resume at the beginning,
in order to program another key.
<- Start
- Press the End interactive key to exit programming mode.
End
Reminder: during programming,
- pressing the
red key aborts the setting in progress;
- two keystrokes on the
red key terminates
the programming sequence.
Identifying programmed keys
PE2:02 PE1:00 INT:01 TL:00
Comm Status Funct.
OVERLOAD
The paper label enables you to mark the names of correspondents
or functions programmed on each group of 10 keys.
Caution: use the specific attendant label; the name of
programmed user keys are printed.
More
ON :/OFF
CCO1
PUBLIC
EXCHANGE 1
CCO2
PUBLIC
EXCHANGE 2
CCO3
TIE LINES
CCO4
SERVICES
LINES
1 - Remove the transparent cover over the label, by lifting
the bottom of the label (insert a pointed object into each notch
one after the other).
MAJOR
ALARM
RESERVED
LINES
CCO5
Assistant
CCO6
Show room
Shop
Label
2 - Write the name of the programmed correspondent or
function on the label, next to the key.
3 - Refit the transparent cover in position.
38
The supervision function
The supervision function
Programming supervision of a range of extensions* on your telephone allows you to:
- ascertain the status of the extension you are supervising (free or busy),
- call these extensions directly.
Note: you can also program supervision of an external line or a trunk line. In these cases, we
recommend you consult your system operator.
Programming the supervision function
Suppose you want to program the supervision of an extension on a customizable key.
Funct.
Program
Key
1 - Press the Funct. interactive key.
2 - Press the Program interactive key.
The display shows «WHAT DO YOU WANT TO PROGRAM?».
3 - Press the Key interactive key.
The display asks you to select a programmable key.
4 - Press a programmable key.
The lamp associated with this key illuminates steadily, and the
display shows the programming status of the said key.
Modify
Superv.
Extens.
Yes
Enter
5 - Press the Modify interactive key.
The display shows the message "WHAT DO YOU WANT
TO PROGRAM?"
6 - Press the Superv. interactive key.
The display shows the message "WHAT DO YOU WANT
TO SUPERVISE?"
7 - Press the Extens. interactive key.
The display prompts you to supervise your extension or
another extension.
8 - Press the Yes interactive key to supervise another extension.
The display prompts you to enter the number of the extension
you want to supervise.
9 - Enter the extension number and then press the Enter
interactive key.
The display prompts you to select the manner in which
the supervised extension will notify you.
* Depending on the features provided by your system operator
39
The supervision function
Mute
10 - Press the Mute interactive key.
Notes:
. In attendant mode, the supervision function is not associated
with a sound signal.
. A customizable key must be programmed for each extension
supervised.
. A given extension can be supervised by several other
extensions.
Communicating with the supervision function
You have programmed the supervision function for one extension on a programmable key.
On your set, the status of the lamp associated with the key programmed for supervision will
vary depending on the status of the extension supervised.
SUPERV
EXTENS 1
SUPERV
EXTENS 1
Transferring the call
received to the
supervised extension:
SUPERV
EXTENS 1
Transfer
Calling the supervised
extension:
SUPERV
EXTENS 1
40
. When the supervised extension is idle, the lamp associated
with the key will be extinguished.
. When the line of the supervised extension is busy, the lamp
associated with the key will be illuminated.
Suppose you are in communication with a correspondent and
want to transfer the said correspondent to the supervised
extension.
- Press the programmed key and then press the Transfer
interactive key.
The lamp associated with the programmed key will illuminate.
Suppose you want to call the supervised extension.
- Press the programmed key.
The lamp associated with the programmed key will illuminate.
The multikey function
The multikey function
By default, an attendant console has a single directory number* but has six customized keys
allowing it to handle several calls in parallel (CCO1 to CCO6).
You can increase the number of programmed keys or CCO. The new CCO programmed keys are
used in exactly the same manner as that described in the section § Using the attendant console.
Example: to cope with eight calls at the same time, you will need to program the multikey
function on an additional two keys.
Programming the multikey function
Suppose you wish to program the multikey function.
Funct.
Program
Key
1 - Press the Funct. interactive key.
2 - Press the Program interactive key.
The display shows «WHAT DO YOU WANT TO PROGRAM?».
3 - Press the Key interactive key.
The display asks you to select a programmable key.
4 - Press a programmable key.
The lamp associated with this key illuminates steadily, and the
display shows the programming status of the said key.
Modify
5 - Press the Modify interactive key.
The display shows «WHAT DO YOU WANT TO PROGRAM?».
Superv.
6 - Press the Superv. interactive key.
The display asks «WHAT DO YOU WANT TO SUPERVISE?».
Extens.
7 - Press the Extens. interactive key.
The display asks if you wish to supervise your set or another set.
Yes
Add
<-Start
8 - Press the Yes interactive key to supervise your set.
The display shows the number of keys already programmed for
this function (by default, 6 on an attendant console).
9 - Press the Add interactive key to accept the new
programming.
10 - Press the <-Start interactive key, and then proceed
to program the multikey function to at least one other
customizable key.
Note: use the
idle screen.
red key to cancel a setting or return to the
* Depending on the features provided by your system operator
41
The multiline function
The multiline function*
An attendant console used in multiline mode has a second directory stored on one or more
programmable keys (dual call management).
This function is mainly used for programming on the attendant console, with a private number
used to make and receive calls:
Examples:
Attendant console enabled,
this involves using a private number for operators also performing assistant functions.
Attendant console disabled,
this involves forwarding calls to a predetermined number.
Programming the multiline function
Suppose you wish to program the supervision function for the second directory number.
Funct.
Program
Key
1 - Press the Funct. interactive key.
2 - Press the Program interactive key.
The display shows «WHAT DO YOU WANT TO PROGRAM?».
3 - Press the Key interactive key.
The display asks you to select a programmable key.
4 - Press a programmable key.
The lamp associated with this key illuminates steadily, and the
display shows the programming status of the said key.
Modify
42
5 - Press the Modify interactive key.
Superv.
6 - Press the Superv. interactive key.
The display asks «WHAT DO YOU WANT TO SUPERVISE?».
Extens.
7 - Press the Extens. interactive key.
The display asks if you wish to supervise your set or another set.
* Depending on the features provided by your system operator
The multiline function
Yes
8 - Press the Yes interactive key to supervise your set.
The display shows the number of keys already programmed in
supervision mode for this first directory number.
More
9 - Press the More interactive key.
The display shows the number of keys already programmed in
supervision mode for this second directory number.
Add
10 - Press the Add interactive key to accept the new
programming.
<-Start
11 - Press the <-Start interactive key, and then proceed
to program the multiline function on a number of keys
corresponding to the number of calls you wish to process
simultaneously on this second directory number.
Note: use the
sequence.
red key to cancel a setting or end the
Caution
Your set is now programmed in multiline mode (supervision of the second directory number
to at least two keys).
With the attendant console enabled, you can take calls for the second directory number by
using the programmed keys (see below).
With the attendant console disabled, your M760E provides a number of features.
Please consult your system operator for more information.
43
The multiline function
Communicating with the multiline function when attendant console
enabled
Answering a call:
KEY 1
KEY 1
Answering a
second call:
When a call arrives on your set programmed in multiline mode,
the lamp associated with the customized key blinks.
Caution : the set doesn’t ring.
- Press this programmed key to talk to the caller.
The lamp associated with the key switches to steady
illumination. The display presents the caller's identity.
If another correspondent initiates a call on the second line, you
will hear a beep and the lamp of a second key will flash.
KEY 2
- Press the programmed key associated with the blinking lamp.
KEY 2
You will be connected to the second caller.
The key lamp lights up and the display shows the identity of the
correspondent on the other end of the line.
KEY 1
The first correspondent will be placed on hold.
The lamp associated with this key flashes.
Switching from one
correspondent to
another:
KEY 2
KEY 1
Suppose you are talking to one correspondent and another
correspondent is on hold.
- Press the programmed key associated with the flashing lamp.
The key lamp lights up and the display shows the identity of the
correspondent on the other end of the line.
The lamp associated with this key flashes.
Communicating with the multiline function when attendant console
disabled
Answering a call:
KEY 1
KEY 1
44
When a call arrives on your set programmed in multiline mode,
the set rings and the lamp associated with the customized key
blinks.
- Press this programmed key to talk to the caller.
The lamp associated with the key switches to steady
illumination. The display presents the caller's identity
The multiline function
These features are specific to
the individual sets and depend
on programming*.
Consult your system operator
to have more information.
During a call, other features are available:
. Press the Parking interactive key to continue the conversation
with the correspondent on another extension in another office.
On the second extension, you have to press successively the
Pick-up and Park interactive keys before dialling the extension number.
. Press successively the --> and Record (*) to record the
conversation in progress.
Warning: Recording a conversation against a person’s will may
be an offence in the eyes of the law.
Answering
a second call:
KEY 2
Wait
Divert
Answer
KEY 2
KEY 1
Switching from one
correspondent to
another:
If another correspondent initiates a call on the second line, you
will hear a beep and the lamp of a second key will flash.
1 - Press the Wait interactive key to view the caller's identity.
If you don't want to answer:
- press the Divert interactive key;
- then dial the extension number to which you want to divert
the call.
2 - Press the Answer interactive key.
You can also press the programmed key associated with the
blinking lamp.
You are on-line with the second caller.
The lamp for this key switches to steady illumination and the
displays presents the on-line caller's identity.
The first caller is placed on hold.
The lamp associated with his/her key flashes.
When you are talking to one correspondent and another
correspondent is on hold.
- Press the programmed key associated with the blinking lamp.
KEY 2
The lamp associated with the key of the correspondent in
conversation will be illuminated steadily.
KEY 1
The lamp associated with the key of the correspondent on hold
will flash.
45
Settings
Settings
Choosing the display language
Messages broadcast by the display are from two sources: messages from the set and messages
specific to the associated system.
If your set is installed with a recent version system, you have access to only one menu.
The language synchronization is supplied automatically by the system.
Otherwise, a specific menu will let you choose the language in which messages from the set
are displayed.
Choosing the set internal This setting is used to choose the language in which internal
message language:
messages of the set are displayed.
1 - Press
.
The display shows « RING».
2 - Press the
key until the display shows
« LANGUAGE».
3 - Press
.
The display shows the first available languages.
CHOOSE DISPLAY LANGUAGE:
Français English Deutsch Nederl.
--->
English
Choosing the system
message language:
Funct.
Program
Lang.
46
--->
. Press the --> interactive key to display the other languages, if
necessary.
4 - Press the interactive key corresponding to your choose (e.g.:
English).
Two beeps are emitted to confirm the language setting.
Depending on the choice, the display presents system
information in the selected language.
To choose the language in which messages from the system are
shown:
1 - Press the Funct interactive key.
2 - Press the Program interactive key.
The display shows «WHAT DO YOU WANT TO PROGRAM?».
3 - Press the Lang. interactive key.
The display shows the first available languages.
Settings
English
Choosing the set and
system message
languages:
Funct.
Program
Lang.
English
4 - Press the interactive key corresponding to your choose
(e.g.: English).
The display goes to idle mode.
You can choose the language in which all messages will be
shown on the display.
1 - Press the Funct interactive key.
2 - Press the Program interactive key.
The display shows «WHAT DO YOU WANT TO PROGRAM?».
3 - Press the Lang. interactive key.
The display shows the first available languages.
4 - Press the interactive key corresponding to your choose (e.g.:
English).
All messages shown by the display are in the same language.
Setting the display contrast
You can adjust the display contrast (8 levels).
Note: accessing the contrast setting using interactive keys is inoperative and may not be used.
1 - Press
.
The display shows « RING».
2 - Press
.
The display shows « DISPLAY».
DISPLAY
3 - Press
.
The display indicates the contrast setting.
4 - Consecutively press keys
or
to adjust display contrast.
Each time the key is pressed, the contrast changes and the
display indicates the new level.
5 - Press
to confirm the setting.
47
Settings
Choosing and adjusting the set ring
You can choose the type of melody (16 different melodies) and adjust the volume (7 levels) of
the ring.
Note: accessing the ring setting using interactive keys is inoperative and may not be used.
1 - Press
.
The display shows « RING».
RING
2 - Press
.
The display shows the current ring melody.
3 - Consecutively press the
sixteen available melodies.
or
keys to choose one of the
Each time the key is pressed, the corresponding melody is
broadcast and the display indicates its number.
4 - Press
.
The display shows «RING VOLUME: X».
5 - Consecutively press the
or
keys to select one of the
seven ring volume levels.
Each time the key is pressed, the corresponding melody is
played and the display shows the number of the melody.
6 - Press
Replace
the melody :
Funct.
Program
48
to confirm the setting.
On arriving calls, you can replace temporarily the melody
(beep) or inhibit the ring (chut). However, if a call is not
answered, the set rings again.
1 - Press the Funct interactive key.
2 - Press the Program interactive key.
The display shows «WHAT DO YOU WANT TO PROGRAM?».
Settings
Melody
Chut
Beeps
3 - Press the Melody interactive key.
The display presents two signalling modes.
. You want to inhibit the ring,
press the Chut interactive key.
. You want to replace the melody by beeps,
press the Beeps interactive key.
To restore the ring, you have to press the Normal interactive
key.
Choosing the incoming call signalling method
During a call, you can choose to use a beep to tell you when you receive a new incoming call.
Funct.
Program
1 - Press the Funct interactive key.
2 - Press the Program interactive key.
The display shows «WHAT DO YOU WANT TO PROGRAM?».
Signal
3 - Press the Signal interactive key.
The display shows the signalling status: activated or
deactivated.
Modify
4 - Press Modify interactive key.
The display shows the new signalling status for incoming calls.
Depending on the settings, an incoming call triggers a beep and
the lamp flashes.
Adjusting the key beep volume
Each time a key is pressed, a beep is given. The volume of this beep can be adjusted to 8
levels. The lowest level corresponds to elimination of the beep.
With the set idle,
- Consecutively press keys
or
to decrease or increase the
key beep volume.
Each time pressed, the new setting is broadcast.
The last setting made remains stored by the set.
49
Miscellaneous
Miscellaneous
Glossary (words to know)
Conference call
Call between three parties, using a call between two parties.
Digital
A set with access to ISDN network services is called a digital
set.
Directory of internal names
This is the shared directory of the names of internal
correspondents recorded in the system by the system operator.
Directory of external names This is the shared directory of the names of external
correspondents recorded in the system by the system operator.
Directory of collective
abbreviated numbers
This is the directory of collective abbreviated numbers recorded
in the system by the user of the set.
External line
Public switched network
Hands free
Telephone mode in which calls can be made or answered
without picking up the handset.
Intercept group
All sets associated with a given group and authorized to
intercept calls intended for this group.
Tie Lines
Automatic tie line directly connects a site in a company to another site.
50
Miscellaneous
A problem? Check…
Fault
Possible causes
No display
Check that the set is connected to the line
(line tone in the handset).
Check the connection cord to the line.
Check that the other sets in the system are working.
Check the setting of the display contrast.
No tone
Check that the set is connected to the line (display).
Check the connection cord to the handset.
Check that the other sets in the system are working.
Check the setting of the handset, loudspeaker or micro-headset
volume.
No sound
Check the handset, loudspeaker or micro-headset volume setting.
Messages displayed in a
foreign language
Check the choice of display language.
51
Notes
52
AASTRA MATRA Telecom - SAS with a registered capital of 25 031 712 Euros - 398 414 425 RCS Versailles
PS10073BENBA01
© AASTRA MATRA Telecom
Information subject to change without notice.
AASTRA MATRA Telecom reserves the right to
make changes without notice, in equipment design as engineering or manufacturing consideration
may warrant. All rights reserved.
This product’s elimination is subjected to
national regulations on elimination of both
electric and electronic equipments’wastes.
AASTRA MATRA Telecom
1 rue Arnold Schoenberg
Rond-point des Saules
78286 Guyancourt Cedex - France
Tél. : + 33 (0)1 30 96 42 00
Fax : + 33 (0)1 30 96 43 00
www.aastra-matra.com