1
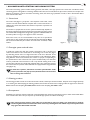
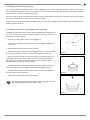
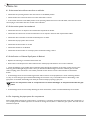
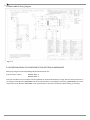
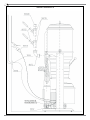
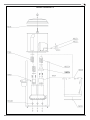
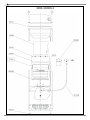
3 MAINTENANCE When emptying the dust canister and cleaning the filter as well as whenever any other kind of maintenance is being carried out, the operating switch must be in the 0 position (section 3.1) and under pressure must be removed by opening a wall inlet. Be careful not to touch the motor or the side channel blower that protrude from the back of the unit. The temperature of these may be as high as 80°C. There are no parts in the electric motor, the side channel blower or other electric equipment that need to be serviced by the user. In case of faults, the system must be disconnected from the power supply by removing the three-phase plug from the power socket, for example, and an authorised Allaway service dealer must be contacted. 3.1 Cleaning and replacing the filter The filter of the central unit is cleaned by washing, or replaced once the suction power has decreased, after the dust canister has been emptied 20-30 times. The filter can be washed at 40°C using normal detergent. The majority of dirt is rinsed away prior to washing. After the wash, while the filter is still slightly damp, it must be brushed smooth. The filter must be dry prior to installation. The filter can be tumble-dried at a low temperature. D E Figure 8 The filter usually lasts for 5-8 washes. After washing, filters must be inspected carefully; worn or damaged filters must be replaced. F Only use filters supplied by Allaway, product number 18028. G The filter is washed or replaced as follows: Turn the operating switch to the 0 position. Shake 2.4. the dust off the filter and empty the dust canister as outlined in section Remove the eye nut (D) on top of the central unit and remove the cap (E) of the central unit [figure 8]. Figure 9 H Remove the eye nuts (F) located at the side of the central unit and open the hose tightener (G) at the back of the central unit [figure 9]. Lift the filter chamber (H) off its place [figure 10]. Undo the tightening collar of the filter [figure 10; I]. Undo the attachment strings of the filter [figure 11; J]. Replace or wash the filter as instructed. Clean the surfaces of the filter chamber and the tightening collar of the filter. Install in opposite order. I Figure 10 A Tighten the filter so that slight periodical resistance can be felt when turning the shake lever [A]. Tighten the tightening collar of the filter carefully. Replace the tightening collar if necessary. Turn the operating switch to the AUTO position. Figure 11 6 J