1
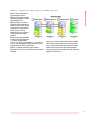
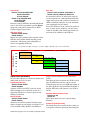
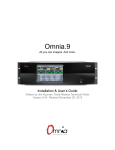
ATTO ExpressRAID
Installation and Operation Manual
Macintosh® OS 8.6 to 9.x
© 2003 ATTO Technology, Inc. All rights reserved. All brand or product names are trademarks of their
respective holders. No part of this manual may be reproduced in any form or by any means without the
express written permission of ATTO Technology, Inc.
10/2003
Document Control Number: PRMA-0113-000MD
Contents
1 RAID Overview
..................................................................................1
RAID Level 0
RAID Level 1
ATTO Recommendations
2 Installation and Quick Start Instructions ..........................................3
3 ExpressRAID Displays Bus, Device, Volume ...................................5
Device Window
SCSI Bus Information
Scanning busses
Volume Window
4 Using ExpressRAID ............................................................................7
Auto Detection
Unallocated Volume Space
Update the ATTO Driver
Ignoring Auto Detection
Adjust other parameters
5 ExpressRAID Provides Hard Disk Utilities .......................................9
Configure Mode Pages
Erase a Drive
Low-Level Format
Scanning Busses
Spin Drive Down
Spin Drive Up
6 Volume control with ExpressRAID ....................................................10
Create Standard Volume
Re-initializing a Volume
Mount a Volume
Unmount a Volume
Remove a Volume
Update drivers across volumes
Optimize volumes with mode pages
Verify Mirrored Volume
Equalize Mirrored Volume
Separate Mirrored Volume
ATTO Options
ExpressWatch Build in Background (RAID1 only)
7 Benchmarking a Volume ....................................................................13
Test parameters
Reading Benchmark results
8 Configure ExpressPCI Fibre Channel Adapters ..............................15
Safeguard buttons
Configuration parameters
Connection mode options
9 Configuring ExpressPCI SCSI Adapters ...........................................17
Safeguard buttons
Configuration utilities
Adapter configurations
Reconfigure device IDs
SCSI ID configuration options
Adjust other parameters
10 ExpressRAID Provides Driver Information .....................................21
11 FireWire Support ...............................................................................22
12 Error, Alert & Status Messages .......................................................23
Appendix A: Glossary ...........................................................................i
Appendix B: SCSI Host Adapter Selection Guide ...............................iii
Appendix C: Fibre Channel Host Adapter Guide ................................iv
Appendix D: Contact ATTO Technology, Inc. .....................................v
1 RAID Overview
Originally Redundant Array of Inexpensive Disks, now Redundant Array of Independent Drives, RAID is a
storage system using multiple disk drives. ATTO ExpressRAID creates virtual disk arrays on physical drives to
increase capacity and performance.
RAID (Redundant Array of Independent Disks) is a
storage system using multiple disk drives to increase
capacity and performance.
Large amounts of data can be supported over many
smaller drives when the drives are combined into one
large “virtual” drive. Management is easier because,
instead of several drives to consider when deploying
data as in a JBOD (Just a Bunch of Disks)
configuration, the system only has one address or LUN
on a storage bus or network.
RAID overlaps disk seeks, minimizing aggregate seek
time delays for the storage group as a whole. Data are
written in equal, short operations to each member of
the RAID group in turn so that when the first member
of a group begins writing to disk, the second member
is available to take data. This continues until the last
member of a group is writing to disk, and the first
member of a group is ready for data.
RAID also takes advantage of the Macintosh® OS
ability to create partitions and volumes.
RAID Level 1
Disk RAID Level 1 (mirroring) ensures the security of
data by writing data simultaneously to two or more
drives. This application is for users with critical data,
which cannot be lost or corrupted due to the failure of
a single drive. With mirroring, users are protected from
loss of data because Data are stored in two or more
places. If a drive does fail, valuable data will not be
lost.
ATTO Recommendations
❖Although RAID 0 volumes can be created
among different types and models of drives,
use similar types/models to ensure access
time will be equal to the average access time
of a single drive rather than the access time
of the slowest drive.
❖For maximum performance, use a dual
channel host adapter with drives equally
distributed across busses.
❖A logical partition is a separate portion of a
disk space used to allow multiple storage
volumes to coexist on a single disk drive.
❖Use RAID 0 in environments that demand
high I/O rates such as video production and
editing, image editing and prepress.
❖A volume is a quantity of storage composed
of one or more partitions residing on one or
more physical drives. A standard volume
creates a partition on a single drive.
❖Since RAID 0 does not provide fault
tolerance, establish a backup policy to
protect data stored on RAID 0 volumes.
RAID Level 0
RAID Level 0 is commonly used when performance is
more important than data protection. RAID Level 0, or
striping, achieves higher I/O performance by breaking
data into smaller units (volumes), then writing the data
to separate physical drives. These striped volumes can
then be read from the separate, physical drives, and reassembled into the actual data. You must have at least
two physical drives to create a striped volume. You
should strictly follow a backup policy to protect data
stored on RAID 0 volumes.
1 ATTO Technology ExpressRAID for Macintosh
❖ATTO ExpressRAID is designed to work
with any SCSI Manager 4.3 compatible
SCSI bus, but it has been optimized for use
with ATTO ExpressPCI SCSI-3 and Fibre
Channel host adapters.
❖For the absolute highest performance using
SCSI, connect each of the drives to be
striped to a separate ATTO ExpressPCI
SCSI-3 host adapter. Multiple host adapters
increase performance by allowing data to be
transferred to all striped drives
simultaneously.
A graphical representation of data storage in RAID configurations.
RAID overview
Exhibit 1-1
◗Each cylinder represents a
separate physical drive.
◗Each physical drive has been
divided into partitions, labeled
logical partition (LP)
◗Physical Drive 4 has been
initialized and is empty with no
partitions or data. This volume
can be used to create either a
standard or a striped volume.
◗LP7 and LP11 are free
partitions that can be used to
create standard or striped
volumes.
◗Data has been striped (RAID
Level 0) across physical drives
1, 2 and 3, using partitions
LP1, LP 2 and LP3, named Volume 1. LP4, LP5 and
LP6 are also examples of striping data across three
separate physical drives into Volume 2.
◗LP8 is a standard volume using one partition.
◗LP9, LP 10, LP12, LP 13 and LP14 are also standard
volumes.
Note: If you create a striped volume across multiple
physical drives and the partitions are not the same
size, you will only be able to use the portion of each
partition equal to the size of the smallest partition,
leaving unused and inaccessible space on the larger
partitions in the volume.
2
2 Installation and Quick Start Instructions
To install ATTO ExpressRAID, put the ExpressRAID CD in the CD-ROM player, double click on the
program icon, then the installer icon. Drag the ExpressRAID icon to the hard drive and open the
program. To ensure complete installation and ease of use, take a few minutes to read this manual before
attempting installation.
2b Set volume parameters. ATTO
ExpressRAID automatically creates
partitions based on the parameters you set
To successfully install and use ATTO ExpressRAID
you need:
❖A Macintosh compatible computer with SCSI
Manager 4.3
❖Macintosh Operating System 7.5.2 to 9.x. This
version of ATTO ExpressRAID currently does
not support Mac OS X.
❖Two or more hard drives (SCSI or Fibre
Channel)
❖The ExpressRAID CD including ExpressRAID
and ExpressWatch (required if you are creating
volumes without Auto Detection.)
To install ATTO ExpressRAID
2c
To create a RAID 0 volume
2a Click Create RAID 0 Volume.
2b Set volume parameters. ATTO
ExpressRAID automatically creates
partitions based on the parameters you set
2c
Insert the ATTO ExpressRAID CD.
2
Double click on the ExpressRAID disk icon.
3
Double click the ATTO ExpressRAID
Installer.
4
Drag the ATTO ExpressRAID icon to the
drive where you want to install
ExpressRAID.
2b
A screen will ask if you want to install
ExpressWatch. Choose Yes if you plan to
create a volume without Auto Detection.
2d
Note:Building a RAID group in the
background takes longer than in foreground,
especially when larger volumes are made.
Note: If you try to shut down the system while
building a volume in background, a screen
will warn that ExpressWatch will have to
reequalize drives upon startup.
To create a volume with Auto Detection
Double click the ATTO ExpressRAID icon.
2
If new or unused drives are present, Auto
Detection prompts you select one of the
following
Create a Standard Volume
Create a RAID Level 0 Volume
Click OK.
2e Quit ExpressRAID while volumes are
continuing to be built in the background.
Background equalization will continue until
complete.
Click Quit.
1
Click the Mirror button.
2c Create Mirror Volume window appears.
Select necessary options.
Note: Refer to Chapter 4 for the benefits of
using the Auto Detection feature.
6
Click OK.
To create a RAID 1 volume:
2a ExpressWatch must be enabled/active
to build a volume in the background.
1
5
Click OK.
To create a volume without Auto Detection
1
Double click the ATTO ExpressRAID Icon.
2
At the main screen, select one of the
following
Create A RAID Level 1 Volume
Create a Standard Volume
Nothing
Create a RAID Level 0 Volume
To create a standard volume
2a Click Create Standard Volume.
Create A RAID Level 1 Volume
3 ATTO Technology ExpressRAID for Macintosh
Nothing
Create a RAID 0 volume
2a Click Create RAID 0 Volume.
2b Select drives you wish to include in the
RAID volume. To select multiple drives hold
the Shift key and click on the drives.
Note: If you try to shut down the system while
building a volume in background, a screen
will warn that ExpressWatch will have to re
equalize drives upon start-up.
2c Set volume parameters. ATTO
ExpressRAID automatically creates
partitions based on the parameters you set.
2d
Click OK.
Create a RAID 1 volume
2a ExpressWatch must be enabled/active
to build a volume in the background.
Note: Building a RAID group in the
background takes longer than in foreground,
especially when larger volumes are made.
2b Select multiple drives by holding the
Shift key and clicking on the drives to be
mirrored.
2c
Click the Mirror button.
2d Create Mirror Volume window appears.
Select necessary options.
2e
Click OK.
Installation, quick start
2f Quit ExpressRAID while volumes are
continuing to be built in the background.
Background equalization will continue until
complete.
Create a RAID 1 volume with data on an
existing drive
1
Select the volume. The mirror button will
become available.
2
Click the Mirror button.
3
A list of available drives appears.
4
Select 1 or more drives to mirror data on.
5
Click OK.
6
Create Mirror Volume window appears.
Volumes will be listed as mirrored when the
process completes.
Note: Mirroring an existing drive can be done
in either the foreground or background.
4
3 ExpressRAID Displays Bus, Device, Volume
The ATTO ExpressRAID Device Window displays busses, IDs and devices. The Volumes window
displays information about the volumes available.
The amount of information shown in the device
and volume windows depends on the settings. An
information button next to any item in either
window provides more information about that
item. Clicking on a device in the device window
highlights the associated volumes in the volume
window, and vice versa. Other choices may be
presented after clicking on certain items in either
window.
Device Window
On the left side of the ExpressRAID main window
is the device window. This window displays SCSI
and Fibre Channel busses, IDs and devices. Next
to each item is an information button. Clicking on
a device in the device window highlights the
associated volumes in the volume window. The
amount of information shown depends on the
setting chosen in the device window menu.
Device Window Menu The device window menu,
above the device window, presents three options.
❖Busses and Drives: Displays all SCSI and
Fibre Channel busses and hard drives
attached to them. Other devices which
ExpressRAID does not affect, such as CDROM drives, tape drives and scanners, are
not shown in the device window when this
is selected.
❖Busses and Devices: displays all SCSI and
Fibre Channel busses and devices attached to
them. This setting is useful for determining
what devices are attached to your computer
and what IDs are available for additional
devices.
❖Busses and All IDs Displays all SCSI and
Fibre Channel busses and all IDs, whether a
device is at that ID or not. This option is most
useful when configuring individual IDs using the
ExpressPCI Configuration Options.
5 ATTO Technology ExpressRAID for Macintosh
SCSI Bus Information
SCSI bus information is displayed in bold type.
Clicking on the triangle to the left displays or
hides a SCSI ID and the devices attached to it. The
information displayed includes the bus number,
bus manufacturer and the version number of the
bus, if available. Double click on a bus or click on
its information button to reveal more information
about that bus, including the bus version, width
and transfer speed. If the bus is an ATTO bus,
additional parameters are accessible.
ExpressPCI 3300/3305 models also have a Data
Rate field. Autonegotiate is the default. Choices
are autonegotiate, 1-gigabit or 2-gigabit.
Because of the way Fibre Channel and SCSI
translate IDs, a single Fibre Channel host adapter
will appear in the device window as eight separate
busses, allowing the ATTO ExpressPCI FC host
adapter to support the 126 IDs available in Fibre
Channel. There is really only a single host adapter
or bus, not eight. Changes made to any one of the
eight apparent busses will be made to the other
seven busses.
SCSI device ID information
❖SCSI address of the device, where X is the
bus number, Y is the SCSI ID Number and
Z is the Logical Unit Number.
❖Type of device at the address
❖Device manufacturer
❖Amount of drive space available to create
new volumes. A completely initialized
drive appears as having 0.0 MB free.
❖Double click on a SCSI ID or click on its
information button for more information
on the device ID, including drive vendor,
model number, capacity and partition
information. If the ID is on an ATTO bus,
additional parameters are accessible.
❖SCSI address of the device, where X is the
bus number, Y is the ID Number and Z is
the Logical Unit Number. The SCSI
address shown is translated from the
FC_AL address.
❖Type of device at that address
❖Manufacturer of the device
❖Amount of space available on the drive for
creating new volumes: a completely
initialized drive is shown as having 0.0 MB
free.
❖Double click on a Fibre Channel ID or click
on its information button to reveal more
information about that device ID,
including the drive vendor, model number,
capacity and partition information. Fibre
Channel IDs on an ATTO bus may only be
changed uniformly.
Scanning busses
Drives may not be seen by ExpressRAID at startup, such as when a drive is not powered up. If you
believe other drives are on a bus but are not visible
in the ExpressRAID device window, the busses
can be rescanned. Rescanning the bus checks
every ID of every bus for devices. Any devices
found are displayed in the device window.
Displays
Fibre Channel Device ID Information
To rescan the bus, select the Rescan Bus option
from the Utilities Menu or click the Rescan Bus
button in the main window.
Volume Window
The Volume Window is on the right hand side of
the ExpressRAID main window. It displays all
Macintosh volumes on all SCSI and Fibre
Channel busses. Clicking on a volume in the
volume window highlights the associated drives
in the device window. Next to each item is an
information button.
Device ID Information includes the volume name,
volume type, status and volume size. An
unmounted volume has an asterisk in front of its
name. Double clicking on a volume or clicking its
information button accesses additional
information, including the volume type, volume
status and partition information.
6
4 Using ExpressRAID
ATTO ExpressRAID is designed to be simple to use. Auto Detection, prompts, pull-down menus and
other devices provide information and choices.
Auto Detection
Upon startup, ExpressRAID searches drives for
unallocated space and determines the ATTO
driver version, if present. If you have unallocated
space or are using an older version of the ATTO
driver, ExpressRAID prompts you to allocate the
free space or update the ATTO driver.
Choices: enabled, disabled
Default: enabled
If Auto Detection is enabled upon startup,
ATTO ExpressRAID searches the drives for
unallocated space and determines the version
of any present ATTO driver.
1
ATTO ExpressRAID automatically prompts
you to allocate the free space or update the
ATTO driver to the current version.
2
If only one drive with free space is detected,
you will be able to create only a standard,
single-drive volume. Click on Create a
Standard Volume.
3
If more than one drive with free space is
detected and you wish to use the ATTO
ExpressRAID recommended settings, click
on the appropriate selection:
Create a Standard Volume
Create a RAID 0 volume or
Create a RAID 1 volume
4
ATTO ExpressRAID recommends settings
for creating a new volume.
5
If ATTO ExpressRAID detects one or more
drives with an older version of an ATTO
driver, you will be asked if you want to
update all drives to the latest version. Click
Yes. If you want to avoid seeing this
message each time you scan the bus, click
Don’t Display this Message Again.
6
After restarting your computer, open the
ATTO ExpressRAID program.
7 ATTO Technology ExpressRAID for Macintosh
7
Pull down the Options Menu and select
Enable Auto Detection or Disable Auto
Detection. If Enable Auto Detection has a
check mark in front of it, then Auto
Detection is enabled.
8
If Auto Detection does not locate any
unallocated disk space or an older driver on
disk, the main screen appears.
Unallocated Volume Space
If ExpressRAID detects two or more volumes
with available space, you may create a RAID
volume or a standard, single-drive volume. To
continue creating new volumes using the
recommendations provided by ExpressRAID,
select Create a Standard Volume and click OK.
ExpressRAID recommends settings for a new
volume. To create volumes without Auto
Detection, refer to Chapter 6.
Update the ATTO Driver
If ExpressRAID detects one or more drives with
an older version of an ATTO driver, you are
prompted to update all drives. To update drives
with the latest ATTO driver, click Yes. To leave the
current driver on your drive, click No. To avoid
seeing this message at each bus scan, click Don’t
Display this Message Again.
Ignoring Auto Detection
Auto Detection gives you opportunities to find
and use any unused disk space, as well as
determine which driver you are currently using.
You may choose to ignore it.
To turn off ATTO ExpressRAID Auto Detection,
click Don’t Display this Message Again! in the
Auto Detection window and click OK. Auto
Detection can also be disabled or enabled using
the options menu in the main window. To enable
or disable Auto Detection, pull down the options
If you would like to ignore Auto Detection, select
Nothing, proceed to Main Window and click OK.
Returning to the Main Window allows other
options to be selected.
If you want to ignore Update ATTO Drivers,
select Nothing, proceed to Main Window and click
No for Update ATTO Drivers. Returning to the
Main Window allows you to select other options.
Adjust other parameters
To access these options, go to the device window
and double click on a device or drive. These
options are stored on disk and apply to the
ExpressRAID driver only.
Tag Command Queuing
Choices: enable, disable
Default: disabled
A feature of SCSI-2 and SCSI-3 protocols, allows
SCSI commands to be executed out of order by a
supporting SCSI device to increase speed for large
amounts of small I/Os.
Non-ATTO LUNs Enabled
Choices: enable, disable
Default: disabled
Using ExpressRAID
menu and select Enable Auto Detection. (If
Enable Auto Detection has a check mark (9) in
front of it, then it is enabled).
Allows non-zero LUNs attached to third party
host adapters to mount on your desktop at boot
time. If you create an ATTO volume (RAID or
non-RAID) on LUN(s), then the ATTO driver will
control those LUN(s).
This applies to both zero and non-zero LUNs. At
boot-time, the ATTO driver will not scan for nonzero LUNs unless the device is on an ATTO host
adapter. If the disk at LUN 0 has the Non-ATTO
LUNs Enabled, then the ATTO driver will
continue to scan LUNs at this ID.
Spindown before shutdown/restart
Choices: enable, disable
Default: disabled
Spins a drive down so it can be removed during
shutdown.
Canister (Pseudo-Removable) RAID 0 only
Choices: enable, disable
Default: disabled
Treats hard drives like removable media to allow
you to swap drives. The drive spins down when
dragged to the trash. The drive will automatically
remount when reinserted.
8
5 ExpressRAID Provides Hard Disk Utilities
Hard disk utilities for the Macintosh OS include configuring mode pages and formatting and erasing
drives.
Configure Mode Pages
Mode pages are device-specific parameters stored
on the hard drive which control a variety of
functions, including drive cache management,
error detection and error recovery. ATTO has
determined the best settings for these mode pages
when working with digital video and prepress.
To optimize a new volume for digital video or
prepress
1
2
3
Select Configure Mode Pages
Click Optimize for Digital Video or Optimize for
Prepress.
ExpressRAID examines your drive and
selects the optimum mode page settings for
digital video capture and playback or
prepress applications. If your application is
not digital video or prepress, you can
choose to set the drive’s mode pages to
their factory defaults or leave the mode
pages as they are.
Erase a Drive
Erasing a drive removes all data and volume
information from a disk drive, allowing you to
create all new volumes on a drive. Erasing a drive
affects all volumes on that disk. Clicking on a
drive in the device window highlights volumes
which use space on that drive.
To erase a drive
1
2
Highlight the drive in the device window
Select Erase Disk from the Utilities Menu.
Erase Disk provides an optional Erase with
Security Overwrite which writes a random
pattern of data on the whole drive, making
the data unrecoverable. Erase a Disk with
Security Overwrite may take several hours to
complete on larger disk drives.
Low-Level Format
Most hard drives are shipped from the vendor preformatted so low-level formatting is not
necessary. However, sometimes drives are
shipped unformatted.
9 ATTO Technology ExpressRAID for Macintosh
If your drive is unformatted, or you suspect the
drive contains bad sectors, you can format the
drive by selecting Low-Level Format.
Note: Formatting a drive is time consuming
and erases all data on that drive.
ExpressRAID supports asynchronous formatting,
allowing several drives to be formatted
simultaneously, while still allowing you to run
other applications on your computer. It typically
takes 20 to 30 minutes per Gigabyte.
If you try to communicate with a drive being
formatted, there will be a delay during which you
will have no control of the system. Control will
return after the formatting operation is complete.
Scanning Busses
ATTO ExpressRAID may not see drives at startup. For example, a drive may not be powered up
or a drive module may be plugged into a dockable
drive bay after starting ATTO ExpressRAID. If
you believe drives on a bus are not visible in the
ATTO ExpressRAID device window, rescan the
busses so that ATTO ExpressRAID checks every
ID of every bus for devices. Located devices are
displayed in the device window. To re-scan the
bus, select the Rescan Bus option from the
Utilities Menu or click the Rescan Bus button in
the Main Window.
Spin Drive Down
Spins down a hard drive so it can safely be
removed but it does not unmount any volumes on
the drive.
To use the drive again
❖Remove and reinsert it.
❖Cycle power to the drive or
❖Use the Drive Spin Up command.
Spin Drive Up
Spins drive up if it has previously been spun
down.
6 Volume control with ExpressRAID
Volumes are a usable quantities of storage composed of one or more partitions residing on one or more
physical drives. A standard volume creates a partition on a single drive. ATTO ExpressRAID creates,
mounts, unmounts and configures volumes in the Macintosh OS environment.
ExpressRAID is used to create new Macintosh OS
volumes from drives (except ATA drives) on any SCSI
Manager 4.3 compatible bus. Physical devices and
busses are shown in the left hand Device Window.
Macintosh OS volumes are shown in the right hand
Volume Window.
Create RAID volumes summary
1
2
3
Determine how large you want your RAID
volume to be
Determine what level of RAID volume you
want (striped or mirrored)
Select the drives to create the volume.
You may create both mirrored and stripe groups on the
same drives. Partitions separate the groups. However,
enough drive space must be available to create another
volume.
When creating Mac OS extended volumes, the volume
size must be higher than 32 MB. The application will
not allow anything smaller.
All SCSI or Fibre Channel hard drives installed on
your computer appear under their respective SCSI
busses in the device window. Next to each drive is the
amount of space available on that drive. A completely
partitioned drive has zero Megabytes of free space.
If you are not using the Auto Detection feature to
create a new volume, select any drive with available
free space from the device window by clicking on it:
you must have two drives with available space to
create a RAID volume. To select more than one drive,
hold down the shift key and click on each drive.
Create Standard Volume
To create a new Mac OS standard volume:
1
2
3
Select one or more drives from the device
window. Shift-click to select multiple drives.
Select the Create Standard Volume option
from the Utilities Menu (or click the Create
Standard Volume button).
Fill in a name for the volume. Names may be
any combination of characters up to 27
characters long and use any character
except the colon. Names may be changed
once the volume is mounted on the desktop.
4
Fill in the desired volume size (in
Megabytes).
The Max. Size in Megabytes shown in the New Volume
Window is equal to the largest possible volume (RAID
or standard). The largest RAID 0 volume is equal to
the smallest available block of free space multiplied by
the number of drives used in the RAID 0 volume.
RAID 1 volumes are all the same size.
The default setting for the desired size of the volume is
equal to the maximum size available on the disk. If you
wish to create more than one volume, set the Desired
Size to the size of the volume you wish to create. If the
desired size is less than the maximum size available on
the disk, additional free space is available to create
another volume.
5
6
Click OK.
Repeat Steps 1 through 5 for each volume
you wish to create.
Re-initializing a Volume
Initializing a volume is the last step in creating a new
volume. If a drive is not initialized, it cannot be used.
This option should be on when creating a new volume.
All data on a volume is removed when initialized.
Re-initializing a volume creates an empty volume of
the same size with the same name.
To re-initialize a volume
1
2
Select the volume from the volume window
Select Initialize Volume from the Utilities
Menu.
Mount a Volume
Mounting a volume places its icon on the desktop. The
volume can then be accessed for reading and writing
data. Volumes initialized with ExpressRAID have a
diamond shaped ATTO icon.
To mount a volume
1
2
Select the volume from the volume window
by clicking on it
Select Mount Volume from the Utilities Menu
or click the Mount button.
10
Selecting a drive in the device window and clicking the
mount button mounts all volumes created from that
drive. Unmounted volumes are marked with an
asterisk (*) before their names.
Unmount a Volume
Unmounting a volume removes its icon on the desktop,
but does not erase or change data on the volume in any
way. The volume cannot be accessed until it is
mounted again.
To unmount a volume
1
2
Select the volume from the volume window
by clicking on it
Select Unmount Volume from the Utilities
Menu or click the Unmount button.
Selecting a drive in the device window and clicking the
unmount button unmounts all volumes created from
that drive. Unmounted volumes have an asterisk (*)
before their names.
Remove a Volume
2
Select Set for Video or Set for Prepress from
the Utilities Menu
ExpressRAID examines the drive and selects the
optimum mode page settings for digital video capture
and playback or prepress.
If you are not doing digital video or prepress work,
choose the drive’s factory defaults.
Verify Mirrored Volume
Verifying a mirrored volume is useful when you
suspect a mirrored volume has been damaged. The
volume will highlight and flash. You will be informed
if the volume is repairable or not repairable.
Equalize Mirrored Volume
If a mirrored volume is damaged and appears to be
repairable, you can repair the damaged volume by
equalizing it, restoring all information to the damaged
drive.
Separate Mirrored Volume
Removing a volume erases all data and volume
information it. The disk space used by the volume
becomes available space used for creating new
volumes.
To remove a volume
When a damaged mirrored volume is unrecoverable,
you should separate the mirrored volumes, then run a
disk diagnostic program on each drive separately.
When you find the bad or damaged drive, you can
create a new mirror group with one of the good or
undamaged drives.
1
2
ATTO Options
Highlight the volume in the volume window
Select Remove Volume from the Utilities
Menu.
Update drivers across volumes
For optimum system performance, all drives on a
system should use the same disk driver. The install
driver option allows you to install the ExpressRAID
driver on all drives without altering the volumes on the
drive.
To install the ExpressRAID Driver
1 Select the drive from the device window
2 Select Install Driver from the Utilities Menu.
CAUTION Back up all hard drives before installing a new
driver to prevent loss of data if errors occur.
Optimize volumes with mode pages
Mode pages are device-specific parameters stored on
the hard drive which control a variety of functions
including drive cache management, error detection
and error recovery.
To optimize a new volume for digital video or
prepress
1
Select Configure Mode Pages
11 ATTO Technology ExpressPro-Tools Installation and Operation Manual
To access these options double click on a drive.
Tag Command Queuing allows SCSI commands to
be executed out of order by a supporting SCSI device
to increase speed.
Non-ATTO LUNs Enabled Allows non-zero LUNs
attached to third party host adapters to mount on your
desktop at boot time. If you create an ATTO volume
(RAID or non-RAID) on LUN(s), then the ATTO
driver will control those LUN(s).
Note: This applies to both zero and non-zero LUNs. At boottime, the ATTO driver will not scan for non-zero LUNs
unless the device is on an ATTO host adapter. If the disk at
LUN 0 has Non-ATTO LUNs Enabled, then the ATTO
driver will continue to scan LUNs at this ID.
ExpressWatch Build in Background (RAID1 only)
ExpressWatch runs continuously in the background to
monitor the status of RAID 1 volumes created by
ExpressRAID, and alerts you if a RAID member fails.
This means that when a RAID 1 group is first created,
all of the data on one disk (the source or primary disk)
must be copied (mirrored) to other, a time consuming
process with large volumes. However, you can do
Log to File The driver’s error notification is written
Volumes
other tasks, including using the new RAID 1 volume,
while ExpressWatch performs equalization in the
background.
Several options are available through ExpressWatch:
Busy/Timeout Retry Count Determines the number
of times a command to a physical device should be
tried after errors have been returned to the driver logic.
into a log file.
Bring Monitor to Foreground Enables a dialog box
informing you of errors.
Audible Warning You would hear an audible alert
(repeating beep) if an error occurs. It will continue
until you acknowledge the dialog box.
12
7 Benchmarking a Volume
ExpressRAID includes a utility for benchmarking drives to measure peak and sustained throughput for
disk reads and disk writes.
To measure disk reads and writes, use the
ExpressRAID benchmarking utility:
1
Highlight a volume in the volume window.
2
Select Benchmark from the Utilities Menu.
3
Modify test parameters.
4
Click Start.
Additional volumes can be tested by selecting
them from the menu in the lower left corner of the
benchmark utility.
Test parameters
Your benchmark results may be tuned using the
following parameters.
Max. Transfer Size
Choices: 32 KB, 128 KB, 512 KB, 2 MB, 8 MB
Default: 512 KB
The ExpressRAID Benchmark performs disk
reads and writes of varying sizes on the volume
tested. The Max. Transfer Size option determines
the size of the transfers.
To test a drive for applications which transfer
smaller blocks of data, select a smaller value, such
as 32 Kilobytes. To test a drive for applications
which transfer larger blocks of data, select a larger
transfer size.
To run benchmark tests with a 2 megabyte
maximum transfer size, allocate more memory to
ExpressRAID: quit ExpressRAID, select its icon,
select Get Info from the file menu, and change the
preferred memory setting to a higher value.
Expected Peak
Choices: 10MB/sec. to 400 MB/sec.
Default: 20 MB/sec.
Allows adjustment of the scale of the Transfer
Rate axis on the benchmark graph, adjustable
from 10 MB/sec. to 200 MB/sec. After a
benchmark test is finished, the transfer rate axis of
the graph automatically adjusts to best fit the
performance of the volume tested.
13 ATTO Technology ExpressRAID for Macintosh
Sample Size
Choices: 1, 2, 4, 8
Default: 2
Adjusting the sample size changes the number of
times each transfer is done during the benchmark
test. The transfers are then averaged for the final
result. A larger sample size provides more
accurate results, but causes the benchmark test to
take longer.
Read and Write Tests
Choices: Enabled, Disabled
Default: Enabled
By default, ExpressRAID performs both read and
write tests on the drive being tested. These
benchmarks are non-destructive, meaning they
will not harm data on these volumes in any way.
If, however, you wish to test only disk reads or
writes, the read and write tests can be turned off
by disabling the Reads and Writes boxes.
System Disk Cache
Choices: Enabled, Disabled
Default: Disabled
The default provides a more accurate test of the
disk and SCSI bus performance. Enabling the
system disk cache provides a more accurate
assessment of overall system I/O performance.
Volume Name
Selecting the volume allows you to benchmark
several drives on the same graph so you can
compare the results. Any Macintosh-compatible
volume can be benchmarked.
Reading Benchmark results
Once the benchmark tests are completed,
ExpressRAID graphically displays the test results
and determines the peak and sustained values for
the read and write tests performed.
Read tests are shown in green and write tests in
red.
The sustained read or write, shown as a relatively
flat line on the graph, indicates the true
performance of the drive.
The peak value is also commonly referred to as
the burst transfer rate.
When the system disk cache is turned on, the
performance of a volume may appear to exceed
the maximum performance of the bus because
sometimes Data are being transferred to or from
the System Disk Cache (system RAM) rather than
to or from the disk being tested.
Benchmarking
A spike in the graph indicates a disk read or write
to or from the system cache or the cache
incorporated in the disk being tested. The top of
this spike is normally the peak read or write value.
14
8 Configuring ExpressPCI Fibre Channel Adapters
ExpressRAID may be used to configure ATTO ExpressPCI adapters, however, entering invalid values
may cause your ExpressPCI adapter to function incorrectly. You may only configure Fibre Channel
busses labeled ATTO Technology. To access the configuration options for the ATTO ExpressPCI host
adapter, double-click the appropriate bus or click the information button next to it.
Access ExpressRAID utilities by clicking on the
drives or devices you wish to modify in the device
window or by clicking the information button next
to the device or drive.
ID. Hard Address Enable permits the host to
select the value entered in the Hard Address field.
Safeguard buttons
Safeguard buttons save your work or revert
settings to previously saved versions. You must
select a Safeguard button if you make changes to
the ExpressPCI adapter configuration.
Defaults: Reverts the current ExpressPCI adapter
configuration options to default settings.
Cancel: Cancels edits and returns to the
ExpressRAID main window.
OK: Accepts edits and returns to ExpressRAID
main window. Changes made are saved to the
Flash ROM of your ExpressPCI adapter when
quitting ExpressRAID. Restart computer for
changes to take effect.
Changes the size of the packet of information
being sent. Changing this setting to a larger value
may not affect performance.
Configuration parameters
You may only configure Fibre Channel busses
labeled ATTO Technology.
To access the configuration options for the ATTO
ExpressPCI host adapter, double-click the
appropriate Fibre Channel bus or click the
information button next to it.
Works in conjunction with Retry Delay to adjust
the number of times the host adapter tries to
access a device after a busy signal. If this number
is exceeded, the command automatically aborts.
WARNING You do not need to change options for ATTO
ExpressPCI host adapters in ATTO ExpressRAID.
Entering invalid values may cause your ExpressPCI
adapter to function incorrectly. Back up system data when
changing or installing hardware.
Hard Address
Values: 0-126 Display Only
Displays the loop ID for the host adapter.
Hard Address Enable
Choices: Enable, Disable
Default: Disabled
When a Fibre Channel loop is initialized, each
device selects and configures itself to an available
15 ATTO Technology ExpressRAID for Macintosh
Maximum Frame Length
Choices: 512, 1024, 2048
Default: 1024
Maximum IOCBs Per Port
Choices: 1-512
Default: 256
Changes the number of concurrent I/Os or
commands that remain outstanding in the buffer.
Maximum Simultaneous Commands Per Port
Choices: 1-255
Default: 16
Changes the maximum number of concurrent
commands active at a port.
Retry Count
Choices: 0-255
Default: 8
Retry Delay
Choices: 0-255
Default: 5
Adjusts the amount of time to wait before trying
to access a device again after an initial attempt to
access the device results in an error.
Node Name
Display Only
A display of the International Electrical and
Electronics Engineers (IEEE) 64-bit value unique
to each Fibre Channel device. The IEEE is a
professional standards organization.
Enable LUNs
Choices: Enable, Disable
Default: Enabled
Enables/disables Logical Unit Numbers (LUNs)
Video Tuner
Choices: Enable, Disable
Default: Disabled
If you are not using a Radius capture board, keep
at the default (disabled) setting. Enable may
increase performance for Radius users.
Device Discovery
Choices: Node WWN, Port WWN
Default: Node WWN
Certain RAID controllers require discovery using
port WWN for proper operation.
Inhibit Driver Loading
Choices: Enable, Disable
Default: Disabled
Enable delays loading volumes until later in the
boot process to prevent memory problems
associated with a large quantity of volumes.
Full Duplex
Choices: Enable, Disable
Default: Enabled
Allows simultaneous transfer of data in both
directions (transmit and receive).
Reset Delay
Choices: 0-255
Default: 5
Sets the time delay between the reset and
scanning of the bus. Increase this value if some
devices are not recognized at startup.
Data Rate (ExpressPCI FC 3300/3305 only)
Choices: 1Gb/sec., 2GB/sec., Auto-Negotiate
Default: Auto-Negotiate
Selects between the 1-Gigabit and 2-Gigabit/sec.
data transfer rates available with the ExpressPCI
FC 3300 or 3305 host adapter.
Heartbeat (For EPCI FC64 only)
Enable only when using an ATTO ExpressPCI FC
host adapter connected to Seagate Barracuda
drives. Resolves issues where commands could
occasionally remain outstanding on the drives.
Disable if the host adapter is connected to a Vixel
Rapport 4000 switch also connected to Seagate
Barracuda drives. The performance loss to the
Barracuda drive is less severe than losing the
switch connection to the Vixel Rapport 4000.
Configuring ExpressPCI adapters
for a particular ID. LUNs label multiple storage
units that share the same ID. Disabling LUNs
affects all target IDs connected to the host adapter.
Connection mode options
Arbitrated Loop (AL): Connects to either an FCAL Arbitrated Loop or a Fabric Loop Port (FL_
Port) on a switch.
Point to Point (PTP): Connects to a direct Fabric
connection, such as an F port on a switch.
AL Preferred Loop: Allows the card to determine
what kind of connection to use, but tries to
connect in loop mode first, then point-to-point
mode.
PTP Preferred Point-to-Point: Allows the card to
determine what kind of connection to use, but
tries to connect in loop mode first, then point-topoint mode.
Class 2: Enables the card to communicate with
Class 2 devices.
Arbitration Loop Fairness: Should be enabled.
Arbitration loop fairness is an algorithm which
ensures that all NL_Ports on an arbitrated loop
will have equal access to the loop. Each L_Port
has an arbitration priority assigned to it based on
its AL_PA (arbitrated loop physical address).
The access fairness algorithm creates an access
window in which all L_Ports are given an
opportunity to win access to the loop, regardless
of assigned priority, to prevent a device with a
high priority to dominate the loop.
Some loops may require certain NL_Ports to have
more access to the loop than just one access per
window. You may need to disable Loop
Arbitration Fairness.
Some Fibre Channel devices cannot execute
arbitration fairness algorithms. Change this
setting if you have exhausted the obvious
configuration issues and drivers do not load or
performance is intermittent.
16
9 Configuring ExpressPCI SCSI Adapters
ExpressRAID may be used to configure ATTO ExpressPCI adapters, however, entering invalid values
may cause your ExpressPCI adapter to function incorrectly. You may only configure SCSI busses labeled
ATTO Technology. To access the configuration options for the ATTO ExpressPCI host adapter, doubleclick the appropriate bus or click the information button next to it.
WARNING You do not need to change options for ATTO
ExpressPCI host adapters in ATTO ExpressRAID.
Entering invalid values may cause your ExpressPCI
adapter to function incorrectly. Back up system data when
changing or installing hardware.
advised to change them by an ATTO Technology
Technical Support representative.
Access the utilities you wish to use by clicking on
drives or devices in the device window or by clicking
the information button next to the device or drive.
ExpressPCI adapters are set to SCSI ID 7 because ID
7 has the highest priority on the bus.
Safeguard buttons
Safeguard buttons save your work or revert settings to
previously saved versions. You must select a safeguard
button if you make changes to the ExpressPCI adapter
configuration.
Defaults: Reverts the current ExpressPCI adapter
configuration options to default settings.
Cancel: Cancels edits and returns to the ExpressRAID
main window.
OK: Accepts edits and returns to ExpressRAID main
window. Changes made are saved to the Flash ROM of
your ExpressPCI adapter when quitting ExpressRAID.
Restart computer for changes to take effect.
Configuration utilities
Controller ID
Choices: 0-15
Default: 7
WARNING Do not change this setting unless advised by
an ATTO Technical Support representative. Multiple
devices on the same SCSI bus with the same controller
ID may cause data corruption or may cause your system
to stop responding.
Termination
Choices: Automatic, High (UItra320)
Choices: Automatic, High, None (Ultra 3,
Ultra/WIDE)
Default: Automatic
ExpressPCI differential cards do not use this option.
This setting can be used with the ExpressPCI-PSC to
override its automatic termination setting. If you are
using both internal and external SCSI busses, you must
enable termination. Refer to the chart below to
determine the proper setting for your device
configuration.
ExpressRAID graphically displays all SCSI Manager
4.3 compatible busses found on your computer. While
using the ATTO ExpressRAID, you are able to view
information on all busses and devices attached to your
computer.
Wide Devices refer to 16-bit Ultra/Wide SCSI or 16bit Fast/Wide SCSI.
You may change a variety of settings for the SCSI bus
by accessing the Channel menu. SCSI busses are
identified on the ExpressRAID device window in bold
type. You may only configure SCSI busses labeled
ATTO Technology.
Exhibit 9.-1 Termination Selection Chart
Internal
External
Termination
Connection
Connection
Selection
Narrow Device
Wide Device
High
Wide Device
Narrow Device
High
Narrow Device
Narrow Device
High
To access the configuration options for the ExpressPCI
adapter, double-click the SCSI bus or click the
information button next to it.
Adapter configurations
Do not configure these features unless you have a
thorough understanding of how they function or are
17 ATTO Technology ExpressRAID for Macintosh
Narrow Devices refer to 8-bit Fast UltraSCSI, 8-bit
Fast SCSI-2, or 8-bit SCSI-1.
If you use a combination of Wide and Narrow devices,
the Wide devices must be connected first followed by
the Narrow devices. This rule applies to both internal
and external channels. For more information, check
your devices’ documentation.
Allows you to access Wide devices that may reside at
these ID locations without affecting Wide data transfer
capability. This option is included for compatibility
with some older, 8-bit SCSI devices.
Video Tuner (Ultra3, Ultra/WIDE)
Choices: Enable, Disable
Default: Disabled
If you are not using a Radius capture board, keep at the
default (disabled) setting. Enable may increase capture
and playback performance for Radius users.
Selection Timeout
Choices: 1 ms - 1 sec
Default: 250 ms
Sets the amount of time a device has to respond to
being selected. You can lower this value to speed boot
process. If the value is lower than the recommended
250 milliseconds, it may be too fast and some devices
may not have enough time to respond.
Pre-4.3 SCSI Manager (Ultra3, Ultra/WIDE)
Choices: Enabled, Disabled
Default: Enabled
Allows support for pre-4.3 SCSI manager devices such
as older scanners and CD-ROMs. This setting does not
apply to the ExpressPCI Ultra 320 host adapter
because it is not compatible with pre-4.3 SCSI
manager devices
Fall Back Sync Rate
Choices: 1.8/3.6 MB/sec. - 20/40 MB/sec.
Default: 20 (Ultra/Narrow), 40 (Ultra/Wide)
Sets the maximum synchronous transfer rate on the
SCSI bus to account for the cabling and device
restrictions of Single-Ended UltraSCSI. You may set
the SCSI bus transfer rate to Fast/Wide SCSI transfer
rates to eliminate the cabling and device limitations of
UltraSCSI.
Quick Arbitrate & Select (Ultra320 only)
Choices: Disabled, Enabled
Default: Enabled
If enabled, Ultra320 QAS functionality is available.
This feature improves performance by reducing the
time required to process commands. QAS can only be
enabled if all target settings are set to Sync DT-IU
Reconfigure device IDs
Configuring ExpressPCI adapters
Enable Wide IDs (8 - 15)
Choices: Enabled, Disabled
Default: Enabled
You can configure a variety of settings for each
individual SCSI ID found on the ATTO SCSI bus. To
access all SCSI IDs, whether devices are attached or
not, use the device window menu to select busses and
all SCSI IDs.
Identify the SCSI ID you want to adjust under the
appropriate ATTO SCSI bus and double click on that
device or click its information button.
SCSI ID configuration options
WARNING Do not configure features unless you have a
thorough understanding of how they function or are
advised to change them by an ATTO Technical Support
representative.
Synchronous Transfers
Choices: Enabled, Disabled
Default: Enabled
Allows synchronous communication with devices.
Synchronous communication is generally faster than
asynchronous, but some devices may not function
efficiently in synchronous mode. Toggle this switch to
Disabled to initiate asynchronous data transfers.
Wide Transfers
Choices: Enabled, Disabled
Default: Enabled
Ultra3 Choice: Wide (default)
The ExpressPCI adapter tries to transfer SCSI data in
a Wide mode to all devices when enabled. It may be
disabled for older, Narrow devices that do not respond
properly to Wide transfer negotiation.
Allow Disconnect
Choices: Enable, Disable
Default: Enabled
Controls whether the ExpressPCI adapter allows the
device to use the SCSI disconnect/reconnect
mechanism. Allowing SCSI disconnects increases
performance in systems with a software-based array.
Allowing disconnect can increase the SCSI bus
overhead time, and decrease performance.
Enable LUNs
Choices: Disable ID, 0, 0-7, 0-63
Default: 0-63
Allows the use of Logical Unit Numbers (LUNs) for
this particular SCSI ID. IDs may be disables or set to
recognize a group of LUNs. For example, selecting
the 0-7 setting scans LUNs 0-7, while selecting the 063 setting scans LUNs 0-63.
18
Synch Offset
Choices: 0-16 for Ultra/Wide SCSI
0-62 for Ultra3 SCSI
0-127 for Ultra320
Default: 16 for Ultra/Wide SCSI
62 for Ultra3 SCSI
127 for Ultra320
Sync Rate
Choices: varies by adapter, see Exhibit 9.-2
Default: varies by adapter, see Exhibit 9.-2
If synchronous transfers are enabled, the synch rate
sets the maximum rate at which the ExpressPCI host
adapter will negotiate with each device attached to it.
ATTO recommends setting the rate to the maximum
value supported by the host adapter.
Extensive testing by ATTO has determined this default
value to offer the best performance possible. Do not
change this setting unless instructed by an ATTO
Technical Support representative.
If excessive SCSI errors occur, you have long cables or
there are many devices on the bus, you may want to
reduce the SyncRate value. Slowing the transfer rate
may increase the reliability of the SCSI bus.
SCSI Parity Check
Choices: Enable, Disable
Default: Enabled
Initiates error parity checking of data transfers over the
SCSI bus when enabled without degrading system
performance. This option assists compatibility of
devices not supporting SCSI parity.
Exhibit 9.-2
All possible SyncRate settings for each host adapter. Default values are in bold italics.
SyncRate (MB/sec.)
Sync DT IU
320
UL4D, UL4S
160
UL4D, UL4S
80
40
Sync DT
Sync ST WIDE
UL3D, UL3S, UL4D
UL4S
UL3D, UL3S, UL4D
UL4S
UL3D, UL3S UL4D,
UL4S
UL3D, UL3S, UL4D
UL4S
UL3D, UL3S, UL4D,
UL4S, DC PSC, PSCd
Sync ST Narrow
All
20
All
All
10
All
All
5
All
5
NA
NA
Adjust other parameters
To access these options, go to the device window and
double click on a device or drive.
Tag Command Queuing
Choices: Enable, Disable
Default: Disabled
A feature of SCSI-2 and SCSI-3 protocols, allows
SCSI commands to be executed out of order by a
supporting SCSI device to increase speed for large
numbers of small I/Os.
Non-ATTO LUNs
Choices: Enable, Disable
Default: Enabled
Allows non-zero LUNs attached to third party host
adapters to mount on your desktop at boot time. If you
create an ATTO volume (RAID or non-RAID) on
19 ATTO Technology ExpressPro-Tools Installation and Operation Manual
Async
All
LUN(s), then the ATTO driver will control those
LUN(s).
This applies to both zero and non-zero LUNs. At boot
time, the ATTO driver will not scan for non-zero
LUNs unless the device is on an ATTO host adapter. If
the disk at LUN 0 has the Non-ATTO LUNs Enabled,
then the ATTO driver will continue to scan LUNs at
this ID.
Spindown before shutdown/restart
Choices: On, Off
Default: Off
Spins a drive down so it can be removed during
shutdown.
Canister (Pseudo-Removable)
Treats hard drives like removable media to allow you
to swap drives. The drive spins down when dragged to
PCI Burst Rate (Ultra3, Ultra/WIDE)
Choices: 16 to 512 bytes
Default: 512 bytes
slows the host adapter card. Do not change this rate
unless you are told to do so by an application or
technical support for your application. Lowering the
PCI burst rate does help some applications.
Configuring ExpressPCI adapters
the trash. The drive will automatically remount when
reinserted.
SCSI only: May be changed to intervals between 16
and 512 bytes. Lowering the PCI burst rate for a device
20
10 ExpressRAID Provides Driver Information
Devices (floppy drives, serial ports, hard drives, tape drives, CD-ROMs, etc.) communicate with the Operating
System, and with applications, through special programs called device drivers. ExpressRAID handles drivers
automatically.
A device driver typically controls a specific
device: the driver controlling your floppy drive is
different from the driver controlling your CDROM drive. Each driver has a unique driver
reference number or refNum.
ExpressRAID is only concerned with SCSI device
drivers. A panel on the left side of the main
application window displays all SCSI devices and
controllers found during scanning. Doubleclicking on a device or pressing the information
button displays a device information window.
This window displays the name and reference
number of the device driver controlling the
device. If this device is a disk drive, and has an
ATTO driver physically installed in its driver
partition, it also displays the name and version of
that driver.
The drive(s) used in the creation of the volume(s)
need to be controlled by a driver.
Standard HFS volumes are controlled by either
.ATTOMGDAHFS driver, a single-purpose HFS
driver created by ExpressRAID, or a third-party
driver which you supply.
The ATTO driver may be loaded off an ATTO
extension .ExpressRAID extension:ExpressRAID
Ext (version)
Installing the ExpressRAID Driver For optimum
system performance, all drives on a system should
use the same disk driver. The install driver option
allows you to install the ExpressRAID Driver on
all SCSI Drives without altering the volumes on
that drive.
To install the ExpressRAID Driver on a drive
1
select that drive from the Device Window
2
Select Install Driver from the Utilities Menu.
NOTE Always backup hard drives before installing a new
driver to prevent the loss of data if any errors occur. In
some cases the driver partition already on a drive may not
be big enough for the ExpressRAID driver so you would
have to re-initialize the volume to install it.
21 ATTO Technology ExpressRAID for Macintosh
What’s the difference between the driver in
memory... and the driver on the disk? The driver
in memory controls the device, and continues to
control the device until you shut your system
down.
The driver on disk is usually where the driver in
memory was loaded from. Only one ATTO driver
needs to be in memory. At boot-time, each disk
attempts to load (and run) its driver. The ATTO
drivers have the intelligence to load only once.
Only one .ATTOMGDAHFS driver can be loaded
into memory.
Sequence for finding ATTO drivers at boot-time
1
All SCSI controllers are scanned for
devices.
2
If an ATTO driver is found on a disk, it is
loaded into memory.
3
If an older driver is loaded first, the newer
driver will never be used. If ExpressRAID
senses an older driver on your system, it
suggests that you replace it with the newer
driver. Unless you’ve been instructed by
ATTO Tech Support to specifically use an
older driver, you would want the latest
driver.
The extension loads up an
ATTO driver for each Direct-Access or Optical
(Type 0 or 7) SCSI device (other than a CD-ROM)
that isn’t already being controlled by another
third-party driver. If you later install a cartridge in
your removable drive, it is controlled by the
ATTO driver loaded from the extension.
If you have a drive with its own driver, you should
probably use it. Removable drive manufacturers
usually supply drivers in the form of an extension.
Our extension is named so that it loads last,
allowing other driver extensions to control their
devices rather than asking the ExpressRAID
driver to control the device.
Removable cartridges.
11 FireWire Support
ATTO ExpressRAID supports FireWire IEEE1394 Standard when using an Indigita SCSI Interface Module (SIM).
FireWire is a high-speed serial input/output
technology used to connect peripherals to a
computer. ATTO ExpressRAID supports the
IEEE (Institute of Electrical and Electronic
Engineers) 1394 standard for FireWire when used
with an Indigita SCSI Interface Module (SIM).
Please check our website
(www.attotech.com/technology.html) for a list of
supported FireWire drives and vendors, including
the tested Indigita SIM and bridge products.
For specific technical information about IEEE
1394 FireWire, check the Apple website
(www.apple.com).
22
12 Error, Alert & Status Messages
Some errors are reported by ExpressRAID from sense data from devices or from information gathered
by ExpressRAID itself, generally from the Macintosh OS.
Sense data messages
Sense data messages report information via a
device on a bus in a numerical sense-data code.
ExpressRAID reports sense-data with a dialog
box detailing the bus and ID of the reporting
device.
Frequent sense-data messages include error or
status messages. If you receive other sense-data
messages, contact ATTO Technology or your
storage vendor for more information.
Device appears not to be formatted. Try formatting
the device.
No information can be read from the device at the
indicated ID. The drive may be unformatted or
may have become corrupt to the point that it
requires reformatting. Before formatting the
drive, try running a disk-repair utility, replacing
the cable, verifying correct termination, turning
the drive off and back on, and restarting your
computer.
Device reset occurred.
Try rescanning the bus. The bus was reset recently
so the information in the Device Window of
ExpressRAID may no longer be correct. Click the
Rescan button to rescan the bus and verify which
devices are attached.
Unit not ready.
Check the device, wait a few seconds, and then
rescan the bus. The device may not have been able
to respond to the ExpressRAID commands
because the cartridge was just inserted, the device
was not fully powered up, or the device was being
accessed by another user.
Medium not present.
Insert a cartridge into the drive before using.
Defect list error.
The device most likely needs to be formatted.
23 ATTO Technology ExpressRAID for Macintosh
The defect list is a list of bad blocks on a disk
drive. If this becomes corrupt, the drive needs to
be formatted for the drive to be reliable. Running
a disk repair utility may help.
New media was inserted.
Rescan the bus to ensure update of complete
information. A new cartridge has been inserted in
a removable drive since the last time the device
was polled by ExpressRAID. Click the Rescan
button to ensure that ExpressRAID is using the
correct device information.
No further information is available.
The reported sense-Data are not a common error
message. For more information, please record the
sense-data values and contact your storage vendor
or ATTO Technology Technical Support.
Other error messages
Some error messages are not based on sense-data
reported by a device, but rather by other
information gathered by ExpressRAID. Usually
these errors are based on error messages
generated by the Macintosh OS.
Error Mounting Volume: Volume Name
ExpressRAID was unable to mount the volume
requested. Try rebooting your system with the
shift key down to rule out a software conflict. If
this doesn’t help, try replacing the cable, verifying
correct termination, turning the drive off and back
on, and restarting your computer. If none of these
things help, try reinstalling the driver using the
Install Driver option, and restart.
Error Unmounting Volume: Volume Name
ExpressRAID was unable to unmount the volume
requested.
Can’t unmount volume because it is in use.
ExpressRAID was unable to unmount the
requested volume. It is either in use by another
user, or a file or application on that volume is
currently open.
Some mode page settings of the selected drives
did not match the expected settings. To prevent
any damage or corruption, these unrecognized
settings will not be changed. Please report the
model of this drive to ATTO Technology
Technical Support so that its mode page settings
can be added to future versions of ExpressRAID.
Can’t install driver to disk! There is not enough room
unless the disk is repartitioned.
You have attempted to use the Install Driver
option to put the ExpressRAID driver on a
volume. Unfortunately the driver partition created
by the previous formatting software was not large
enough for the ExpressRAID driver. This volume
must be erased and re-partitioned for the
ExpressRAID driver to be used.
Re-initializing the drive will erase all data on the
disk.
Error writing driver to disk!
ExpressRAID was unable to successfully write its
driver to the volume selected. Replace the cable,
verify correct termination, turn the drive off and
back on, and restart your computer. If this does
not help, re-initialize the disk.
Re-initializing the drive will erase all data on the
disk.
Driver was installed to disk successfully! It will take
control of the drive the next time you restart the
system.
The Install Driver command was successfully
completed. The drive will continue to use the old
driver, if there is one, until the system is restarted.
After restart, the drive will use the ExpressRAID
driver and will be represented on the desktop by
an ExpressRAID icon.
Errors, alerts, status messages
Problem configuring Mode Pages for this drive!
Unconfigurable pages will be left unchanged.
Program aborting because the Macintosh OS SCSI
Manager 4.3 cannot be accessed! In order to run the
program, please ensure that your System Software is
up to date, intact and includes SCSI Manager 4.3.
ExpressRAID requires Apple’s SCSI Manager
4.3 to operate. SCSI Manager 4.3 is built into
every Power Macintosh and the Quadra 840AV.
Other Macintosh compatible systems require
SCSI Manager to be loaded using the SCSI
Manager 4.3 extension included with the
operating system.
Drive’s block size is 0! The drive may need to be lowlevel formatted.
Click the Rescan button. If this message
reappears, the drive appears to be damaged or
corrupted, and may need to be formatted. Before
formatting the drive, try replacing the cable,
verifying correct termination, turning the drive off
and back on and restarting your computer.
Unrecoverable error accessing drive.
Click the Rescan button. If this message
reappears, ExpressRAID was unable to
successfully communicate with the selected drive.
Try replacing the cable, verifying correct
termination, turning the drive off and back on, and
restarting your computer.
Error formatting drive.
Click the Rescan button. If this message still
comes up, ExpressRAID was unable to format the
selected drive. The drive may be defective. Try
replacing the cable, verifying correct termination,
turning the drive off and back on and restarting
your computer.
24
Appendix A Glossary
Some common terms used in the storage industry are defined below. More information about Fibre
Channel, SCSI and Storage Area Networks is available through the ATTO Technology website
(www.attotech.com), the Fibre Channel Industry Association (www.fibrechannel.org), the Fibre Channel
Consortium (www.iol.unh.edu/consortiums, click on FC), the SCSI Trade Association (www.scsita.org),
and the Storage Area Networking Industry Association (www.snia.org).
Term
Definition
address
a specific location in memory
ANSI
American National Standards Institute
asynchronous
a method of sending data over a bus in which an initiator sends data then waits for an
acknowledgement (ACK) that the data has been received. See synchronous.
ATTO
ExpressRAID
Extension
The ATTO ExpressRAID_EXT_x.x (x.x represents the software version) is placed in your extensions
folder during installation of ATTO ExpressRAID to support removable cartridge drives and, in some
cases, for ATTO ExpressRAID to support devices that use LUNs (Logical Unit Numbers), such as the
ATTO SCSI Expander and some hardware controlled RAID arrays.
BER
Bit Error Rate: a measure of transmission accuracy; the ratio of bits received in error to bits sent
bit
Smallest unit of data a computer can process: a single binary digit with a value of either 0 or 1
block
a sector of a disk which stores a group of bytes that must be read or written together. Most systems
and hard disks use 512 bytes in a block.
burst speed
maximum speed data can be transferred
Byte
an ordered set of 8 bits
CRC
Cyclic Redundancy Check: an error-correcting code which calculates a numeric value for received
and transmitted data. If no error has occurred during transmission, the CRC for both received and
transmitted data should be the same.
destination
address
a value in the frame header of each frame which identifies the port in the node where the frame is
being sent
ExpressWatchTM monitors the activity of RAID 1 volumes. If a drive failure occurs in a RAID 1 group, ExpressWatch
detects and reports the failure and prompts you to launch ExpressRAID to repair the volume.
ExpressWatch Build in Background (RAID 1 only) equalizes new RAID 1 volumes in the background.
FC
Fibre Channel
firmware
Software stored in read-only memory (ROM) or programmable ROM (PROM). Firmware is often
responsible for the behavior of a system when it is first switched on.
frame
an indivisible unit for transfer of information in Fibre Channel
frame header
the first field in the frame containing the address and other control information about the frame.
full duplex
a communication protocol which allows transmission in both directions at the same time
half duplex
a communication protocol which allows transmission in both directions, but only one direction at a
time
Heartbeat
(For EPCI-FC64 only) The heartbeat signal resolves issues if commands remain outstanding on the
Seagate Barracuda drives when using an ATTO ExpressPCI FC host adapter. Do not use it if the host
adapter is connected to a Vixel Rapport 4000 switch. Turn heartbeat off if you are using a Vixel
Rapport 4000 connected to Seagate Barracuda drives. The performance loss to the Barracudas is
less severe than losing the switch connection to the Vixel Rapport 4000.
i ATTO Technology ExpressRAID for Macintosh
Definition
host
a processor, usually a CPU and memory, which communicates with devices over an interface
initiator device
A component which originates a command
JBOD
Just a Bunch Of Disks: a storage subsystem using multiple independent disk drives with or without
RAID configuration.
LUN
Logical Unit Number: a SCSI or Fibre Channel identifier of a device
Maximum
Allowable
Volume Size
The Mac OS determines the maximum partition size. When using System 7.5.2 or later on a PCIbased Macintosh compatible computer, the maximum allowable volume size is 2 Terabytes. On a
NuBus based Macintosh, maximum allowable volume size is 4 Gigabytes. Any standard or RAID
volume may not be greater than the maximum allowable volume size. Refer to your operating system
user’s manual for more information.
originator
an initiating device; a component which originates a command
partition
a logically separate portion of a disk used to allow multiple systems to coexist on a single disk drive.
payload
the part of the data field in a frame left after optional headers are removed
PCI
Peripheral Component Interconnect: a bus which allows devices to communicate with the CPU.
RAID
Originally Redundant Array of Inexpensive Disks, now Redundant Array of Independent Drives: a
storage system spanning multiple disk drives. The following standard RAID specifications will be used
here:
Glossary
Term
RAID 0: disk striping in which fixed-length sequences of data are mapped to member disks in a
regular rotating pattern.
RAID 1: Mirrored arrays: information written to one disk is also written to another simultaneously. Also
known as disk shadowing, real-time copy, and t1 copy.
RAID 10: Striped array with mirroring
receiver
the ultimate destination of data transmission; a terminal device
SCSI
Small Computer Systems Interface: a processor-independent standard for system-level interface
between a computer and intelligent devices including hard disks, floppy disks, CD-ROM, printers,
scanners, etc.
synchronous
a way of sending data over a bus in which an initiator sending data does not wait for an
acknowledgement (ACK) that the data has been received before sending more data. See
asynchronous. Both the initiator and receiver must support synchronous mode.
target
a device which responds to commands by an initiator
topology
logical layout of the parts of a computer system or network and their interconnections
transfer rate
the rate at which bytes or bits are transferred, as in megabytes or gigabits per second.
volume
a usable quantity of storage composed of one or more partitions residing on one or more physical
drives. A standard volume creates a partition on a single drive.
ii
Appendix B SCSI Host Adapter Selection Guide
ATTO Technology offers a number of SCSI and Fibre Channel solutions for storage. The following chart
compares the features of ExpressPCI SCSI host adapters.
Supported platforms: Sun Solaris; Linux; NetWare; SCO Unix; Windows 2000, 95/98, NT, and Macintosh
OS and OS X.
Complete RAID packages are also available and include an ExpressPCI SCSI host adapter, ExpressRAID
software and appropriate cable(s). Add "-KIT" suffix to host adapter product code (i.e. EPCI-UL3D-KIT)
Specific features
Single Channel
Max. transfer rate
LVD
ExpressPCI Ultra 320
Express PCI Ultra 3
Express PCI Ultra
Wide
Express PCI Ultra
Wide Differential
320 MB/sec
160 MB/sec.
40 MB/sec.
40 MB/sec.
✔
✔
✔
HVD
✔
✔
✔
✔
✔
133 MHz PCI-X
✔
✔
✔
✔
Bus ID support
30
30
15
15
EPCI-UL4S
EPCI-UL3S
EPCI-PSC
EPCI-PSCd
ExpressPCI Ultra 320
Express PCI Ultra 3
Express PCI Ultra Wide
640 MB/sec
320 MB/sec.
80 MB/sec.
✔
✔
✔
✔
133 MHz PCI-X
✔
✔
✔
✔
✔
Bus ID support
30
30
30
EPCI-UL4D
EPCI-UL3D
EPCI-DC
64-bit PCI
32-bit PCI
33/66 MHz PCI
Part number
Dual Channel--- 2
independent channels
Max. transfer rate
LVD
64-bit PCI
32-bit PCI
33/66 MHz PCI
Part number
iii ATTO Technology ExpressRAID for Macintosh
✔
Appendix C Fibre Channel Host Adapter Guide
Complete RAID packages are also available and include an ExpressPCI host adapter, ExpressRAID
software and appropriate cable(s). Add “-KIT” suffix to host adapter product code (i.e. EPCI-3300KIT).
2-Gigabit Adapters
Fibre Channel ports
Optical interface
FC 3342
FC 3322
FC 3321
FC 3300
FC 3305
4
2
2
1
1
SW, LC, SFP
SW, LC, SFP
SW, LC, SFF
Fixed SW LC
Copper interface
HSSDC
Max. transfer rate 400 MB/sec per
channel
2, 3
Full duplex
7
66/33 MHz PCI 66 MHz only
Class transfers
compatible
133 MHz PCI-X
compatible
64- and 32-bit PCI
compatible
Windows® XP/2000/NT
Windows Server 2003
400 MB/sec
per channel
400 MB/sec per
channel
400 MB/sec
400 MB/sec
2, 3
7
7
2, 3
7
7
2, 3
7
7
2, 3
7
7
7
7
64-bit only
7
7
7
7
7
7
7
7
Linux
7
7
Linux
Mac OSX
Mac OSX
7
7
7
7
7
7
7
7
7
7
7
7
300m @ 2-Gb
500m @ 1-Gb
300m @ 2-Gb
500m @ 1-Gb
25 m
(175m with
MIA)
Solaris/Linux
Mac OS X
Mac OS 9
RAID support
Maximum cable length 300m @ 2-Gb
500m @ 1-Gb
300m @ 2-Gb
500m @ 1-Gb
i
Appendix D Contact ATTO Technology, Inc.
While we do our best to provide you all the information you will need to use our products, we recognize
that additional assistance is sometime required. If you have questions about installing, using or
obtaining any of our products, you may contact us at:
ATTO Technology, Inc.
155 CrossPoint Parkway
Amherst, NY 14068
The information you need to answer your questions may be available 24-hours a day on our web site
(http://www.attotech.com/). You may also contact our support departments at the following e-mail
addresses.
Sales Support:
[email protected]
Technical Support: [email protected]
Telephone customer service and sales support is available Monday through Friday between 8 a.m. and
5 p.m. EST at the following numbers:
(716) 691-1999
(716) 691-9353
voice
fax
v ATTO Technology ExpressRAID for Macintosh
Appendix D
vi