1
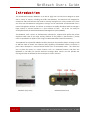
Accelerated Concepts Wi-Fi Extender NetReach Users Guide www.acceleratedconcepts.com NetReach Users Guide Preface Accelerated Concepts reserves the right to revise this publication and to make changes in the content thereof without obligation to notify any person or organization of any revisions or changes. V ERSION D ATE 1.0 01/01/2011 2.0 04/06/13 D ESCRIPTION INITIAL V ERSION O F D OCUMENT N EW F ORMAT M ANUAL A UTHOR NP SO Copyright © 2013 by Accelerated Concepts, Inc. All rights reserved. This publication may not be reproduced, in whole or in part, without prior expressed written consent from Accelerated Concepts, Inc. 2 of 27 Copyright Accelerated Concepts, Inc. © 2013 NetReach Users Guide Table of Contents Introduction ........................................................................................................................... 4 NetReach AC-‐NR-‐102 Specifications ........................................................................................ 5 Shipped Components .............................................................................................................. 6 Device Configuration .............................................................................................................. 7 Device Configuration Using ANMS Portal ................................................................................ 8 Login Page ........................................................................................................................................ 8 Adding / Configuring the NetReach .................................................................................................. 9 Creating a NetReach Configuration ................................................................................................. 12 Administration: .................................................................................................................................. 12 Time ................................................................................................................................................... 13 Wi-‐Fi Configuration ............................................................................................................................ 14 Wireless Distribution Setup (WDS) .................................................................................................... 15 Syslogs ............................................................................................................................................... 16 Proxy Configuration ........................................................................................................................... 16 SSID 1 / SSID 2 .................................................................................................................................... 17 NetReach Local Maintenance Panel ...................................................................................... 19 Connecting to the Login Page ......................................................................................................... 19 Setup Wizard .................................................................................................................................. 20 Wi-‐Fi Redundancy ................................................................................................................. 23 Setting Up Redundancy .................................................................................................................. 23 Setting Up a Wireless Distribution System ............................................................................ 24 Support ................................................................................................................................ 25 Appendix A ........................................................................................................................... 26 3 of 27 Copyright Accelerated Concepts, Inc. © 2013 NetReach Users Guide Introduction The Accelerated Concepts NetReach is an 802-‐11 b/g/n Wi-‐Fi Access Point designed to work with a variety of routers, including the AT&T VPN Gateway. The Netreach was designed for enterprises and small business that need to centrally manage one or many remote sites. There are more than 30 NetReach configuration settings can be maintained and distributed from a central management location. This allows an enterprise to rapidly distribute and then manage a large number of remote locations in a short amount of time. All of this can easily be accomplished with the Accelerated Network Management System (ANMS). The NetReach, with a choice of authentication alternatives, supports both public and private wirelesses LANs. One of the major security features of the product is that business / private traffic is separated from public traffic using its VLAN and Stateful Firewall functionality. The NetReach has a powerful 400mW variable transmitter that provides indoor coverage of 100 to 300 feet. With its Power over Ethernet (PoE) capability, the NetReach allows a customer to place a Wi-‐Fi Hotspot in a remote location distant from its associated router. This allows the user to place the router in a secure location, such as a hardened location, and place the NetReach in the lobby for optimal customer coverage. Most routers can also provide URL filtering and other UTM features that can be part of a Wi-‐Fi solution. NetReach (Top View) NetReach (Back View) 4 of 27 Copyright Accelerated Concepts, Inc. © 2013 NetReach Users Guide NetReach AC-NR-102 Specifications The technical specifications for the NetReach are: • • • • • • Wireless: 802.11b, 802.11g, 802.11n Wired: 802.3, 802.3u MAC access control and hidden SSID function Support remote power with Passive POE WDS supported with WEP, TKIP and AES encryption Compliant with FCC Part 15.247 for US, ETS 300 328 for EMEA Interface LAN: 2 -‐ RJ-‐45 port 10/100 Security 64/128-‐bit WEP, WPA, WPA2, WPA2 Enterprise, TKIP and AES encryption Channel USA 11, Europe 13 Data Rate 802.11b: 1, 2, 5.5, and 11Mbps 802.11g: 6, 9, 12, 18, 24, 36, 48, and 54 Mbps 802.11n: up to 150 Mbps 5 of 27 Transmit Power 400mW Range Coverage Indoor 35~100 meters; 114~328 feet Power External: DC 12V, 1A Copyright Accelerated Concepts, Inc. © 2013 NetReach Users Guide Shipped Components The NetReach Wi-‐Fi Extender is shipped with all the components required to make it operational. In the box you will find the following items: 1. NetReach 2. Antenna 3. Ethernet Cable 4. Power Supply Unit 5. PoE Injector Cable Antenna NetReach Ethernet Cable Power Supply Unit PoE Injector 6 of 27 Copyright Accelerated Concepts, Inc. © 2013 NetReach Users Guide Device Configuration The Accelerated Concepts NetReach can be configured in two ways. If no Internet connectivity is available the local maintenance panel can be used to setup the device. The local user interface can be reached at its default administrative address 192.168.2.1. If the attached router assigned a private address you must enter that address instead. If the unit does have Internet connectivity, the preferred method for configuring the device is to use the cloud-‐based Accelerated Concepts Network Management System (ANMS) portal. 7 of 27 Copyright Accelerated Concepts, Inc. © 2013 NetReach Users Guide Device Configuration Using ANMS Portal The Accelerated Network Management System (ANMS) is a cloud-‐based portal that you can use to manage your Accelerated Concepts NetReach. When you or your company subscribes to our management portal services, an account is set up on your behalf. Once the account is set up, you will receive an initial password to log in to ANMS. Your username will be your e-‐mail address. To sign in to ANMS go to the anms.accns.com URL. This will take you to the main Login page. Login Page Enter your email and password and click the Login button. There is a password-‐reset function located below the login form if you have forgotten your password. 8 of 27 Copyright Accelerated Concepts, Inc. © 2013 NetReach Users Guide Adding / Configuring the NetReach To add a new device select the Devices tab on the left side of the screen. From the drop-‐down menu that appears click on Wi-‐Fi tab. This will display all Wi-‐Fi Access Points defined for your current organization. To add the new device, select the Add New Device icon (+) at the top right of the screen. You will be taken to the new device configuration page as shown below: This page is used to set which organization the new device will belong to, and enter the device’s MAC address. Select the organization that you wish the device to belong to from the drop down list (Assigned Organization). Enter the 12 digits of the MAC address in the Mac Address field. Assign a Site ID for where the device is located. Click on Create to generate a new device record. 9 of 27 Copyright Accelerated Concepts, Inc. © 2013 NetReach Users Guide Once the new device has been validated and created you will be taken to the device definition screen to finish the configuration. To complete the creation of the new device you can change the default configuration that was assigned by your organization. Clicking the Configuration drop down and selecting a different configuration file accomplishes this. If you need to create a new configuration select Configurations from the Menu and then select WIFI Configurations. This will display the configurations available for your organization. Select the plus icon (+) at top right of panel to add a new configuration. 10 of 27 Copyright Accelerated Concepts, Inc. © 2013 NetReach Users Guide You also have the ability to associate a Hostname with the new device along with the Site ID. ANMS also provides for manually entering the location of the device (location can be updated by the system for AT&T VPN Gateways). To enter the device’s location you must fill in the address in the location section of the screen. Once all the information is entered press Update to complete the entry. A map will automatically be displayed of the location and the new device. The device marker on the map will indicate the status of the device and when it was last contacted. 11 of 27 Copyright Accelerated Concepts, Inc. © 2013 NetReach Users Guide Creating a NetReach Configuration The NetReach configuration panels allow you to specify all the parameters that are required for your particular installation. Each item has onscreen help available simply by clicking on the highlighted question mark (?). When there are predefined options, they are available in a drop-‐ down box associated with the entry. Below are the parameters available for change via ANMS: Configuration Panel Administration: Configuration Name – this is the unique name by which you will refer to this configuration. We recommend that it is descriptive for your organization and device type. Organization – this drop-‐down entry will let you select the organization to which the new configuration will belong. Only organizations under the users scope of control are available. Firmware – specify the firmware version that should be loaded on the device. Configuration Check Interval – this field allows you to specify the amount of time between when the unit checks the configuration server. The value is in minutes and can be from 10 to 1440 (one day). During initial setup you can specify a low value to allow for tuning the units configuration. When the unit is fully configured the time can be lengthened if desired. Enable Admin Access – this check box lets you enable local login to the device. If you only wish to configure this device through ANMS leave this box unchecked. User ID – the Userid that can be used by the local administrator. 12 of 27 Copyright Accelerated Concepts, Inc. © 2013 NetReach Users Guide Password – the password for the local administration Userid. Time Enable DST – indicate whether you wish to enable day light savings time for this device. Timezone – the time zone in which the device is located. This drop-‐down will have all major time zones available for selection. 13 of 27 Copyright Accelerated Concepts, Inc. © 2013 NetReach Users Guide Configuration Panel (Wi-‐Fi) Wi-‐Fi Configuration Network Mode – the mode of the WiFi network to run. The drop-‐down box will indicate all the types of 802.11 network modes available. Country Code – the ISO country code where this device will be operating. The 802.11 standard y documents use in three distinct frequency ranges, 2.4 GHz, 3.6 GHz and 4.9/5.0 GHz bands. Each range is divided into a multitude of channels. Countries apply their own regulations to both the allowable channels, allowed users and maximum power levels within these frequency ranges. For a complete description of channels and regions see http://en.wikipedia.org/wiki/List_of_WLAN_channels. Channel – Lets you specify which channel to use for the Wi-‐Fi network. If you specify zero (0) the channel will be auto selected. Channel Region – this is the region code that identifies which channels can be used. The valid values are: 0 = channels 1 – 11 1 = channels 1 – 13 2 = channels 10 – 11 3 = channels 10 – 13 4 = channel 14 5 = channels 1 – 14 6 = channels 3 – 9 Power Percent – this parameter allows you to control the signal strength of the devices SSID. The values can range from 25-‐100%. 14 of 27 Copyright Accelerated Concepts, Inc. © 2013 NetReach Users Guide Wireless Distribution Setup (WDS) A Wireless Distribution System (WDS) is a system that enables the wireless interconnection of multiple access points in an IEEE 802.11 network. This feature can be used to extend the range of the wireless network to reach remote clients, or to link isolated network segments to an Internet connection. Mode – this parameter indicates whether WDS mode is enabled. If it is enabled, you can specify whether it should run in Bridge, Repeater, or Lazy mode. WDS Network Type – allows you to specify the network type to be used for the WDS configuration. The values are: CCK – 802.11b OFDM – 802.11g HTMIX – 802.11n WDS Security Type – this parameter lets you indicate the type of security to be used. The values are: None – no security TKIP -‐ Temporal Key Integrity Protocol security AES – Advanced Encryption Standard security MAC Address #1/#2/#3 – the MAC address of the devices in the WDS. The MAC address should be 12 characters in length. 15 of 27 Copyright Accelerated Concepts, Inc. © 2013 NetReach Users Guide Syslogs Enable Syslogs – specify whether the device should transmit its syslog’s to the monitoring system. IPv4 Address – the destination address for sending the syslog. This field should only be changed when directed to do so. Note: The NetReach device uses port 514 to communicate with the collection server. Insure that any security or firewall software does not block port 514. Proxy Configuration Host – the IP address of the Proxy host. This is used for sending syslog traffic over HTTP connections. Port – the communications port of the Proxy Host. 16 of 27 Copyright Accelerated Concepts, Inc. © 2013 NetReach Users Guide SSID 1 / SSID 2 Enabled – the check box lets you enable or disable the SSID for the device. SSID – the SSID name of the Wi-‐Fi connection. Advertise SSID – lets you specify whether this SSID should be openly advertised. VLAN ID – this is the VLAN number to be associated with the SSID. The valid values are from 1-‐4050. Security – Indicates the type of security associated with this SSID. The drop-‐down box will give you the following options: None WEP Open WEP Shared WPA Personal WPA2 Personal WPA2 Mixed WPA Enterprise WPA/WPA2 Mixed Mode Enterprise WPA2 Enterprise Pass Phrase Type – this drop-‐down field lets you specify if the pass phrase is in character or hexadecimal. WPA/WPA2 Cipher – this field lets you specify the cipher to be used for WPA and WPA2 security. 17 of 27 Copyright Accelerated Concepts, Inc. © 2013 NetReach Users Guide Passphrase -‐ this passphrase is used to authenticate the user to the SSID. This field is required for all security entries except “NONE” 18 of 27 Copyright Accelerated Concepts, Inc. © 2013 NetReach Users Guide NetReach Local Maintenance Panel The NetReach Access Point provides a user-‐friendly web-‐based management interface for the configuration of all the unit’s features. Any personal computer directly attached to the unit via an Ethernet connection can access the management interface using a web browser. If the NetReach is connected to a router that has assigned a private IP address to the NetReach, you can access the interface by entering the private IP address in your browser. Connecting to the Login Page The best way to make initial configuration changes to the NetReach is by connecting a PC directly to the NetReach Access Point’s LAN port. The NetReach Access Point has a default IP address of 192.168.2.1 and a subnet mask of 255.255.255.0. You must set your personal computer IP address to be on the same subnet as the NetReach Access Point (that is, the PC and NetReach Access Point addresses must both start 192.168.2.x). To access the NetReach Access Point’s management interface, follow these steps: 1. Use your web browser to connect to the management interface using the default IP address, or router provided private address. When the login screen appears enter the Userid: ADMIN and the password: ADMIN. You will now be taken to the Setup Wizard screen shown below. 19 of 27 Copyright Accelerated Concepts, Inc. © 2013 NetReach Users Guide Setup Wizard The Wizard is designed to help you configure the basic settings required to get the NetReach up and running. There are only a few basic steps you need to set up the access point. Follow these steps: Step 1 -‐ Language ENGLISH is the only valid selection at this time. Click Next to proceed to the next step of the wizard. Step 2 – Time The second step of the Wizard configures time zone and SNTP settings. Select a time zone according to where the device is operated. 20 of 27 Copyright Accelerated Concepts, Inc. © 2013 NetReach Users Guide The following items are displayed on this page: Current Time — Receives a time and date stamp from an SNTP server. Sync with host — Updates the unit's time from the system time. Time Zone — Select the time zone that is applicable to your region. SNTP Server — Enter the address of an SNTP server to receive time updates. SNTP synchronization (hours) — Specify the interval between SNTP server updates. • • • • • Click Next after completing the setup. The next configuration panel will complete the wizard setup after which the unit will be operational. The following options must be entered on this page before continuing: SSID Choice — The name of the wireless network service provided by the NetReach. Clients that want to connect to the network must set their SSID to the same as that of the NetReach. Security Mode — Specifies the security mode for the SSID. Select the security method and then configure the required parameters. (Options: Disabled, Open, Shared, WEP-‐AUTO, WPA-‐PSK, WPA2-‐PSK, WPA-‐PSK_WPA2-‐PSK, WPA, WPA2, WPA1_WPA2, 802.1X; Default: Disabled NOTE: To keep your wireless network protected and secure, you should implement the highest security possible. For small networks, it is recommended to select WPA2-‐PSK using AES encryption as the most secure option. However, if you have older wireless devices in the network that do not support AES encryption, select TKIP as the encryption algorithm. 21 of 27 Copyright Accelerated Concepts, Inc. © 2013 NetReach Users Guide Access Policy — The NetReach provides a MAC address filtering facility. The access policy can be set to allow or reject specific station MAC addresses. This feature can be used to connect known wireless devices that may not be able to support the configured security mode. After completion of the Wizard, the unit will be restarted and ready for use. The local configuration panel also allows you to modify the following parameters of the NetReach. Operation Mode Network Settings Wireless Settings Administration However, the NetReach was designed to be remotely configured and managed therefore these parameters should be modified using the Accelerated management portal (ANMS). 22 of 27 Copyright Accelerated Concepts, Inc. © 2013 NetReach Users Guide Wi-Fi Redundancy The NetReach is designed for enterprise customers that require not only ease of installation, but high availability. To achieve this the Accelerated Concepts NetReach allows for automatic failover of redundant NetReach devices. This enables a Wi-‐Fi user to seamlessly move to a secondary NetReach device should the primary device fail. This low cost solution prevents potentially costly downtime for Wi-‐Fi users and unhappy customers. The user can easily setup a redundant access point using the following steps: Setting Up Redundancy 1. Install a 2nd NetReach device in the same location as the primary NetReach. 2. Assign the same SSID to both NetReach Devices. 3. Assign the same Security to both NetReach Devices. a. Ensure the same Pass Phrase is used. 4. Assign NetReach Devices to different Channels. a. Separate channels by at least 5. I.E. NetReach device 1 to channel 5, NetReach device 2 to channel 11. 5. Customers will only see one Network SSID and will connect to it normally. They will not be aware of the redundancy. 6. If there is a NetReach failure, the customer will not lose their connection. Simply replace and reconfigure the new NetReach Device. 23 of 27 Copyright Accelerated Concepts, Inc. © 2013 NetReach Users Guide Setting Up a Wireless Distribution System A Wireless Distribution System (WDS) is a system that enables the wireless interconnection of multiple access points in an IEEE 802.11 network. The interface of the NetReach can be configured to operate in a mode that allows it to forward traffic directly to other Wireless Access Points/ Repeaters or Routers. This feature can be used to extend the range of the wireless network to reach remote clients, or to link isolated network segments to an Internet connection. The recommended way to configure a WDS is to use ANMS. In ANMS select the devices menu item and click on Wi-‐Fi. Select the device that will serve as your primary WDS unit. The device must be connected via an Ethernet port to a connected router. This will bring up the device information for that unit. Select Edit to modify the current configuration. Once the configuration panel is displayed, select Wireless Distribution Setup from the Settings panel. There are multiple ways to configure a WDS. The recommended way is to select “Repeater” in the mode field. Then enter in the MAC addresses of the NetReach units that will be connecting to this NetReach. Up to three NetReach devices can connect to a Repeater Mode NetReach. Connect your additional NetReach units that will be part of this WDS via Ethernet to the router. You will need to repeat this process for each NetReach that will participate in the WDS. Once the NetReach is configured it can be moved to any location desired and no Ethernet connection will be required. 24 of 27 Copyright Accelerated Concepts, Inc. © 2013 NetReach Users Guide Support Technical Support If there are any problems installing any of our products and require technical assistance, please call or email our help desk. • [email protected] • +1 (813) 699-‐0295 • Support hours are 9:00am to 5:00pm EST 25 of 27 Copyright Accelerated Concepts, Inc. © 2013 NetReach Users Guide Appendix A Supported Routers: • Apple Airport Extreme (requires PoE injector cable) • Apple Time Capsule (requires PoE injector cable) • Cradlepoint MBR1400 (Requires PoE injector cable) • Cradlepoint IBR600 (Requires PoE injector cable) • Cradlepoint MBR95 • VPN8100 • VPN8200 • VPN8300 • NetBridge 4G • 6300-‐DX 26 of 27 Copyright Accelerated Concepts, Inc. © 2013 NetReach Users Guide Copyright © 2013 by Accelerated Concepts, Inc. All rights reserved. 27 of 27 Copyright Accelerated Concepts, Inc. © 2013