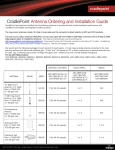
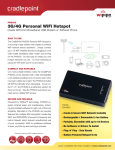
1
WiPipe Central User Manual WiPipe Central | USER MANUAL Preface CradlePoint reserves the right to revise this publication and to make changes in the content thereof without obligation to notify any person or organization of any revisions or changes. Manual Revisions Revision Date Description Author 1.0 Sept. 20, 2010 Version 1 David Rush 2.0 Aug 31, 2011 Version 2.0 P. Magnuson 2.1 Apr. 9, 2012 Version 2.1 Jeremy Cramer 2.2 Jan. 14, 2013 Version 2.4 Jeremy Cramer Trademarks CradlePoint and the CradlePoint logo are registered trademarks of CradlePoint, Inc. in the United States and other countries. All other company or product names mentioned herein are trademarks or registered trademarks of their respective companies. Copyright © 2013 by CradlePoint, Inc. All rights reserved. This publication may not be reproduced, in whole or in part, without prior expressed written consent from CradlePoint, Inc. ` WiPipe Central | USER MANUAL Table of Contents 1 INTRODUCTION ......................................................................... 2 1.1 1.2 1.3 1.4 1.5 WIPIPE CENTRAL OVERVIEW ............................................ 2 SECURITY ........................................................................ 3 ENTERPRISE CLOUD DATA CENTER .................................. 3 SUPPORTED CRADLEPOINT DEVICES ................................ 3 DATA USAGE .................................................................... 3 5.2 DATA USAGE ALERTS ..................................................... 32 5.3 ALERT MANAGEMENT ..................................................... 33 5.4 ALERT EMAIL .................................................................. 36 6 REPORTS .................................................................................. 37 6.1 GENERATE REPORT ....................................................... 39 2 GETTING STARTED ..................................................................... 5 2.1 ACCOUNT SETUP.............................................................. 5 2.2 ADDING DEVICES.............................................................. 5 2.3 DEVICE CHECK-IN ............................................................ 7 2.4 NAVIGATING THE USER INTERFACE ................................... 8 2.5 MANAGING ACCOUNT USERS ............................................ 9 2.6 UNDERSTANDING THE MANAGEMENT STRUCTURE WITH WIPIPE CENTRAL .................................................................... 11 3 DEVICES ................................................................................... 12 3.1 DEVICE LIST ................................................................... 12 3.2 CONFIGURE ................................................................... 15 3.3 COMMANDS .................................................................... 17 4 GROUPS ................................................................................... 19 4.1 4.2 4.3 4.4 MANAGING THE GROUPS LIST ......................................... 20 SELECTING A GROUP ...................................................... 22 GROUP MENU ................................................................ 23 ADDITONAL CONFIGURATION TABS ................................. 28 5 ALERTS .................................................................................... 30 5.1 GROUP ALERT CONFIGURATION...................................... 30 ` WiPipe Central | USER MANUAL 1 INTRODUCTION 1.1 WiPipe Central Overview Design, deployment, and management of distributed enterprise networks is a challenge for network and IT professionals. The challenge increases for organizations with many branch/retail locations, particularly when those locations don't have full-time IT support staff. Heavier reliance on cloud-based applications and services has increased the need for WAN/Internet reliability—approaching ‘five nines’ availability—making failover WAN connectivity a necessity. Cellular 3G/4G networks have become a fast, reliable, and affordable option for WAN/Internet failover for branch/retail locations and primary connection for M2M, kiosks, and digital signage. Managing routers, wireless lines, data usage, and carrier accounts with 3G/4G presents enterprises with unique challenges. For enterprises with more than ten locations, cloud-based software tools are a must for effectively managing these remote locations. At the LAN level, the explosion of mobility applications has driven the need for WiFi solutions for internal and guest applications. This furthers the need for cloud-based solutions to help manage wireless LAN configurations, access, and security policies for employee and guest mobility. CradlePoint created WiPipe Central to help enterprise IT managers address the challenges outlined above. WiPipe Central provides an enterprise-class, cloud-based software platform to help manage up to thousands of remote primary/failover WAN/WWAN locations. WiPipe Central delivers a powerful platform to help IT and network managers: • • Plan for and deploy wireless primary/failover networks with CradlePoint routers on all wireless (or wired) carriers Manage the CradlePoint 3G/4G routers remotely, including firmware updates and device configuration © 2013 CRADLEPOINT, INC. PLEASE VISIT HTTP://KNOWLEDGEBASE.CRADLEPOINT.COM/ FOR MORE HELP AND RESOURCES PAGE 2 WiPipe Central | USER MANUAL • • • • Control and manage CradlePoint WiFi access points Monitor the ‘network health’, including connectivity, failover analytics, and proactive alarms Set access and security policies and monitor compliance Manage wireless lines, data usage, alarms, and data plan analytics to manage costs 1.2 Security • • • • Device authentication using SSL encryption protocols HTTPS certificates between server & browser interface Authenticated user accounts and passwords Devices easily and securely registered to management accounts 1.3 Enterprise Cloud Data Center • • • Secure Tier 3 server with 24/7 staffing and monitoring Redundant power and redundant high-speed Internet Fire suppression and disaster resistance 1.4 Supported CradlePoint Devices • Series 3 Routers o CBR400 o CBR450 o IBR600 (COR) o IBR650 (COR) o MBR1200B o MBR1400 (including ARC MBR1400) • Series 2 Routers o CBA750 (including ARC CBA750) • Series 2 Routers--Legacy Products o CBA250 o CTR500 o MBR800 o MBR900 o MBR1000 o MBR1100 o MBR1200 1.5 Data Usage The default WiPipe Central configuration generates the approximate data usage presented below. Protocol and carrier overhead can increase these values but these values do provide a generally good rule of thumb for data generated by the use of WiPipe Central. © 2013 CRADLEPOINT, INC. PLEASE VISIT HTTP://KNOWLEDGEBASE.CRADLEPOINT.COM/ FOR MORE HELP AND RESOURCES PAGE 3 WiPipe Central | USER MANUAL • Heartbeats: .0004 GB/month By default a heartbeat that is approximately 50 bytes is sent to WiPipe Central every 5 minutes. So 288 heartbeats/day x 50 bytes = 14400 bytes/day, 14400 bytes/day x 30 = 432000 bytes/month (.0004 GB/month). • Status Reports: .014 GB/month By default Status Reports that are approximately10-20 KB per report (depending on how many WAN devices are utilized on the CradlePoint router) are sent to WiPipe Central every hour. So 20 KB/hour x 24 = 480 KB/day; 480 KB/day x 30 = 14400 KB/month (.014 GB/month). • Log Reports: .069 GB/month By default Log Reports that are approximately 100 KB (depending on how many events are logged on the router) are sent to WiPipe Central every hour. These reports can vary in size dramatically depending on events that are logged on the router; client connects/disconnect, modem state, etc. So a minimum amount of data sent would be 100 KB/hour x 24 hours = 2400 KB/day. 2400 KB/day x 30 = 72000 KB/month (.069 GB/month). IMPORTANT: Things that could dramatically increase your data usage: 1) enabling logging, stats, and alerting; 2) a high number of events being logged on the router; 3) firmware upgrades pushed from WiPipe Central; and 4) modem disconnecting and reconnecting loops. © 2013 CRADLEPOINT, INC. PLEASE VISIT HTTP://KNOWLEDGEBASE.CRADLEPOINT.COM/ FOR MORE HELP AND RESOURCES PAGE 4 WiPipe Central | USER MANUAL 2 GETTING STARTED Throughout this manual, WPC is used as an abbreviation for WiPipe Central. 2.1 Account Setup When you purchase WiPipe Central Services, an account is set up on your behalf. Once the account is set up, you will receive your username and password to log in to WiPipe Central at https://services.cradlepoint.com. NOTE: You can try a live demo of WiPipe Central at https://services.cradlepoint.com and log in with the following information: • • Username: Demo Password: Demo 2.2 Adding Devices Adding devices to a WiPipe Central account is one of the most critical operations. It is extremely important that the correct devices be assigned to the correct WPC accounts. In order to prevent misappropriation of devices or inadvertent assignment to the incorrect account, individual users may only add devices to which they have login credentials. After you have placed an order for devices to be managed by WiPipe Central, the MAC address of each router or device needs to be added to the system. CradlePoint offers two ways to add devices: • • The user adds the devices: (See below for further instructions.) The customer enables the Registration URL in WiPipe Central and loads each router individually with the provided Registration URL. In this case the administrator has physical access to the device and the administrator login information for the device, which helps ensure correct assignments. CradlePoint adds the devices: If requested by the customer, CradlePoint will collect the MAC addresses before shipment and load them into WiPipe Central automatically. © 2013 CRADLEPOINT, INC. PLEASE VISIT HTTP://KNOWLEDGEBASE.CRADLEPOINT.COM/ FOR MORE HELP AND RESOURCES PAGE 5 WiPipe Central | USER MANUAL 2.2.1 Device Registration: User Instructions Once you have an account set up, you can register your devices individually by using the Registration URL. First you need the Registration URL from WiPipe Central. 1) Log in to WiPipe Central and click on the Devices heading. 2) Click on Configure in the upper left-hand corner (below the Devices heading) to open a dropdown menu. Click on Remote Registration. 3) Select “Enable Remote Registration.” This will reveal your Registration URL. Copy this URL. After you have copied the Registration URL, you need to log in to your device and enter this URL on the Managed Services page. 1) Log in to your device and select the Managed Services menu item (System Settings → Managed Services). 2) On the Managed Services screen, enter the Registration URL provided by WPC. 3) Make sure Enable Services is selected. Click Apply to save this setting. Once this registration is complete, the router is tied to the WiPipe Central account and cannot be moved by other users to a different account. © 2013 CRADLEPOINT, INC. PLEASE VISIT HTTP://KNOWLEDGEBASE.CRADLEPOINT.COM/ FOR MORE HELP AND RESOURCES PAGE 6 WiPipe Central | USER MANUAL 2.3 Device Check-in When a CradlePoint router is turned on and connected to the Internet, it will automatically check in to the WPC server. The server will tell it what account and group it is associated with. If it has not been assigned to a user-defined group it will be placed in the default UNASSIGNED group. If it has already been assigned to a group, it will download and apply the settings relevant to that group, including router settings and firmware. From this point forward, the WPC Client Agent in each device is configured to check in to the server at periodic intervals. The user of WPC has full control over the frequency of check-ins and configuration synchronization. Another feature of the WPC system is that devices are protected from Factory Reset events. Whenever a device is enabled on WPC, the WPC Client Agent in the device will always check in with the server at power-on or when the WAN (3G/4G/Ethernet) is connected. Thus when a router is reset, WPC will reconfigure the device to the settings of the desired group. © 2013 CRADLEPOINT, INC. PLEASE VISIT HTTP://KNOWLEDGEBASE.CRADLEPOINT.COM/ FOR MORE HELP AND RESOURCES PAGE 7 WiPipe Central | USER MANUAL 2.4 Navigating the User Interface The WiPipe Central user interface has a main menu across the top and another menu along the left side. 2.4.1 Main Menu The main menu includes the following headings: • Devices: Shows a list of registered devices and their statuses. Select to register new devices or configure individual devices. • Groups: Shows a list of configured groups. Add a new group or select a group to manage within this interface. • Alerts: View and manage alerts (warning messages) from all groups. • Reports: Generate a report by selecting a group and the specific information you want reported. • Help: Click to access this WiPipe Central manual for help managing your devices. 2.4.2 Left Menu The menu on the left sidebar includes: 1) A list of configured groups, which always includes the UNASSIGNED group for devices that have not been added to another group. Click on a group name for configuration options for that group. 2) Administration options for the user: • Device Administration: Reveals the following administrative options: o Account Settings: Configure account specific settings. You have the option to select “Accept Router Names,” which will cause WPC to save a router’s Gateway Name or System Identifier (when sent in a Status Report) as the Device Name. o Account Users: Click to manage other WPC users. See section 2.5 below for details. o Manage Groups: A shortcut to the Groups page. o Unassigned: Click to configure unassigned devices. • My account: View your account history and/or edit account settings including email address, password, and time zone. Time zone is set automatically based on the web browser’s time zone. • Log out: Click this to log out of WiPipe Central. © 2013 CRADLEPOINT, INC. PLEASE VISIT HTTP://KNOWLEDGEBASE.CRADLEPOINT.COM/ FOR MORE HELP AND RESOURCES PAGE 8 WiPipe Central | USER MANUAL 2.5 Managing Account Users The primary administrator of the WiPipe Central account has the ability to create new users. Created users are designated as either “Full Access” or “Read Only” users. • • Full Access users can perform all the functions that the primary administrator can except manage other users. Read Only users can log in to WPC to view statuses, generate reports, and manage alerts, but they cannot make configuration changes to the devices. To navigate to the Account Users page, Click on Device Administration in the left menu. In the submenu that appears under Device Administration, click on Account Users. (This option is only available to the primary administrator of the WPC account.) 2.5.1 Manage a User Account You can change the email address, password, or access level for a user account. Select the account name from the dropdown menu and then change the information as desired. Click Update to save changes. © 2013 CRADLEPOINT, INC. PLEASE VISIT HTTP://KNOWLEDGEBASE.CRADLEPOINT.COM/ FOR MORE HELP AND RESOURCES PAGE 9 WiPipe Central | USER MANUAL 2.5.2 Create a New User Account Input the appropriate information in the following fields to create an account for a new user. • • • • • 2.5.3 Account Name (Must be unique) Email Address (Must be unique) Password Confirm Password Access Level (Select one) o Full Access o Read Only Delete a User To delete a user account, select from the dropdown list and click Delete. © 2013 CRADLEPOINT, INC. PLEASE VISIT HTTP://KNOWLEDGEBASE.CRADLEPOINT.COM/ FOR MORE HELP AND RESOURCES PAGE 10 WiPipe Central | USER MANUAL 2.6 Understanding the Management Structure with WiPipe Central You have three ways to configure settings on CradlePoint devices: 1) Through WiPipe Central Device management 2) Through WiPipe Central Group management 3) Directly through the device’s administration pages These separate configuration paths layer on top of each other. When there are conflicts, WiPipe Central Device settings overrule WiPipe Central Group settings, which in turn overrule setting changes made on the device. The simplest way to ensure consistent results with your WiPipe Central devices is to use WiPipe Central to manage all settings. Use the Group configuration for most settings, and Device configuration when needed for individual devices. Management Hierarchy: Strongest WiPipe Central Device WiPipe Central Group Weakest 2.6.1 Individual device administration pages Tables Whenever there are “tables” (such as the MAC Filter List or Port Forwarding Rules tables—see sample tables to the right), data created through different management interfaces cannot be merged into one table. Instead, the data created in the strongest interface will replace all the data created in another interface. © 2013 CRADLEPOINT, INC. PLEASE VISIT HTTP://KNOWLEDGEBASE.CRADLEPOINT.COM/ FOR MORE HELP AND RESOURCES PAGE 11 WiPipe Central | USER MANUAL 3 DEVICES The Devices heading provides access to a list of all account devices. 3.1 Device List You can view all the devices associated with your account. Devices are listed with the following attributes: • Status – Icons indicate whether the device is online and reporting, as well as the status of configuration changes. Device is reporting; it is online and active. Device is overdue to report and is considered inactive. Device has missed a report but is not yet considered inactive. © 2013 CRADLEPOINT, INC. PLEASE VISIT HTTP://KNOWLEDGEBASE.CRADLEPOINT.COM/ FOR MORE HELP AND RESOURCES PAGE 12 WiPipe Central | USER MANUAL Device update pending. A configuration change has been made in WPC that has not yet been confirmed by the router. Device configured. A configuration update was made and confirmed by the router. Shows that one (or more) of the following commands is pending—hover over the icon to see which one(s): • Reboot Device § Restore to Defaults § Resume Configuration Updates See 3.3 for details about commands. Rollback shield: Indicates that a WPC configuration change knocked the router offline, so the router rolled back to the prior configuration. The rollback function is only for Series 3 devices with at least firmware 3.6. • • • • • • • • • • Product – Router model. Device Name – User-assigned name. IP Address MAC Address Firmware Version Group Config – This number increases by one every time there is a group configuration change (however minor). Device Config – This number increases by one every time there is a device configuration change (however minor). Group Name – User-defined name or “Unassigned.” View Status – Link to view the device’s status. This includes the Device Log and Device Statistics. o Device Log: The device log displays the latest set of events from the device. The log history is limited to 5 MB; older events are truncated. To store older logs before they are truncated, export them to a CSV file. You can adjust the log capture rate on the Sync Config page. A log upload can be as large as 200k. o Device Statistics: The latest set of LAN, WAN, WWAN, and System statistics uploaded from the device. You can adjust the statistics capture rate on the Sync Config page. A typical statistics upload is 4k. Last Checkin This view is customizable to include any combination of these attributes in a user-defined order and can be sorted by each attribute ascending or descending. A WiMAX column is hidden by default. This shows the WiMAX FW version (applicable only for Series 2 devices). © 2013 CRADLEPOINT, INC. PLEASE VISIT HTTP://KNOWLEDGEBASE.CRADLEPOINT.COM/ FOR MORE HELP AND RESOURCES PAGE 13 WiPipe Central | USER MANUAL To reveal the WiMAX Version column, click on the dropdown arrow beside one of the other columns. When you hover over “Columns” in the dropdown menu, it displays a list of possible columns. Click on “WiMAX Version” to add it to the list of displayed columns. The top bar of the Device List includes options for managing individual devices or the list itself: • • • • Configure (see 3.2 below for more information) Commands (see 3.3 below for more information) Export: Select to export a page of the Device List or the entire Device List to a CSV file (select whether this file is for Excel). Search: Search this list by first choosing the column that you would like to search. Select from the following dropdown options: o Product o Device Name o IP Address o MAC Address o Group Name o Firmware Version o Group Config o Device Config o WiMAX Version o Last Checkin Once you have selected a column to search, enter a substring and click the search icon (or press Enter) to search the list. © 2013 CRADLEPOINT, INC. PLEASE VISIT HTTP://KNOWLEDGEBASE.CRADLEPOINT.COM/ FOR MORE HELP AND RESOURCES PAGE 14 WiPipe Central | USER MANUAL 3.2 Configure Click Configure to reveal a dropdown menu with the following options for configuring individual devices. • • • • • Settings Clear Settings Config Summary Remote Registration Unassign Device Settings: Select a single device and click on Configure → Settings to open a popup window with device configuration options. Series 2 and Series 3 devices will have different options in this window that match the configuration options in the administration pages of the individual device. The Settings window for a Series 3 device is shown. © 2013 CRADLEPOINT, INC. PLEASE VISIT HTTP://KNOWLEDGEBASE.CRADLEPOINT.COM/ FOR MORE HELP AND RESOURCES PAGE 15 WiPipe Central | USER MANUAL Clear Settings: Select one or more devices and then select Configure → Clear Settings to clear the device settings. A warning window will pop up to make sure that you want to clear the settings. Config Summary: Select Configure → Config Summary to view a summary of the configuration changes that were made through this interface. © 2013 CRADLEPOINT, INC. PLEASE VISIT HTTP://KNOWLEDGEBASE.CRADLEPOINT.COM/ FOR MORE HELP AND RESOURCES PAGE 16 WiPipe Central | USER MANUAL Remote Registration: Select Configure → Remote Registration to securely add devices to the WiPipe Central server. Click Enable Remote Registration to reveal the Registration URL associated with your WPC account. Once you have copied this URL, log in to your device separately and go to System Settings → Managed Services. Add this URL to the Managed Services page. Unassign Device: Select one or more devices and then select Configure → Unassign Device to move the device(s) from a named group to the “Unassigned” group. A warning window will pop up to ensure that you want to move the device. 3.3 Commands This is a dropdown menu with the following options for giving commands to individual devices: • • • © 2013 CRADLEPOINT, INC. Reboot Device Restore to Defaults Resume Configuration Updates PLEASE VISIT HTTP://KNOWLEDGEBASE.CRADLEPOINT.COM/ FOR MORE HELP AND RESOURCES PAGE 17 WiPipe Central | USER MANUAL Reboot Device: Select one or more devices and then select Commands → Reboot Device to reboot the device(s). A warning window will pop up to make sure that you want to reboot. Restore to Defaults: Select one or more devices and then select Commands → Restore to Defaults to reset the selected device(s). A warning window will pop up to make sure that you want to return to factory defaults. Whenever a device is reset, it will check in with WPC. If the device is part of a group, WPC will reconfigure the device to the settings of the group. Resume Configuration Updates: Select one or more devices and then select Commands → Resume Configuration Updates to restart configuration updates. This is part of a rollback feature (Series 3 devices; firmware version 3.6 or higher) in case a configuration change causes a router to go offline. The router will automatically roll back to the previous configuration. Once you have determined the problem with the configuration change and fixed it, you can resume your configuration updates. A window will appear with the following warning when you select this option: This operation should only be performed after determining the cause of the configuration issue and updating the group or device configuration in WiPipe Central. Are you sure you want to resume configuration updates? © 2013 CRADLEPOINT, INC. PLEASE VISIT HTTP://KNOWLEDGEBASE.CRADLEPOINT.COM/ FOR MORE HELP AND RESOURCES PAGE 18 WiPipe Central | USER MANUAL 4 GROUPS Within the Groups heading the administrator can view and manage their groups. Groups are used to manage batches of similar devices with one set of commands and settings. When a router belongs to a group, it will automatically acquire all the settings and attributes defined for that group per the administrator’s settings. A list of all groups is shown with the following attributes for each group: Group Name, Devices (number), Online (percentage of devices online), Product Name, Config Version, Firmware Version, and Created (date). There is also a WiMAX Version column that is hidden by default (this is only applicable to Series 2 devices), To reveal the WiMAX Version column, click on the dropdown arrow beside one of the other columns. © 2013 CRADLEPOINT, INC. When you hover over “columns”, it displays a list of possible columns. Click on “WiMAX Version” to add it to the list of displayed columns. PLEASE VISIT HTTP://KNOWLEDGEBASE.CRADLEPOINT.COM/ FOR MORE HELP AND RESOURCES PAGE 19 WiPipe Central | USER MANUAL 4.1 Managing the Groups List The top bar of the Groups List includes options for managing individual groups or the list itself: • • • • • Configure (see below for more information) Add (see below for more information) Delete Export: Select to export a page of the Groups List (or the entire Groups List) to a CSV file. Choose whether this is for Excel. Search: Search this list by first choosing the column that you would like to search. Select from the following dropdown options: o Group Name o Product Name o Config Version o Firmware Version o WiMAX Version o Created Once you have selected a column to search, enter a substring and click the search icon (or press Enter) to search the list. Configure: Click to open a dropdown menu with the following options: • • • Copy: First select a group to copy its settings so that you can paste those settings to another group. Paste: Select a group and choose the type of settings you want pasted from the group you copied. o Alert Config: Can be copied and pasted from any group to any group. o Device Config: Both the product type and firmware version must match to copy and paste. o Sync Config: Can be copied and pasted from any group to any group. Config Summary: Displays configuration changes made within the Groups interface. See a sample Config Summary in the Devices section of this manual, section 3.2. © 2013 CRADLEPOINT, INC. PLEASE VISIT HTTP://KNOWLEDGEBASE.CRADLEPOINT.COM/ FOR MORE HELP AND RESOURCES PAGE 20 WiPipe Central | USER MANUAL Adding a Group: Select Add to create a new group. A popup window will appear with the following options: • • • Group Name: Choose a name that makes sense to you. Product: Select the device type from the dropdown list. All the devices in a group must be the same product type. Firmware Version: Once you have the product selected, choose the firmware version from the dropdown list. The highest number shown is the most recent firmware, and therefore the recommended choice in most circumstances. Series 2 and Series 3 devices have completely separate release sequences, both of which are distinct from WPC’s numbering. (As of the publication of this manual version, the most recent release for Series 2 is 2.1.0, for Series 3 is 4.0.3, and for WPC is 2.4.0). © 2013 CRADLEPOINT, INC. PLEASE VISIT HTTP://KNOWLEDGEBASE.CRADLEPOINT.COM/ FOR MORE HELP AND RESOURCES PAGE 21 WiPipe Central | USER MANUAL 4.2 Selecting a Group When you select a group, the Group / Device List page shows. You now have a menu that will allow you to change the configuration of the group. This page includes information about the group and a list of all devices in the group with several pieces of information about each device. These attributes are a subset of the attributes found on the Device List page (see 3.1 of this manual for details; also see more about the Group / Device List page in 4.3.3). © 2013 CRADLEPOINT, INC. PLEASE VISIT HTTP://KNOWLEDGEBASE.CRADLEPOINT.COM/ FOR MORE HELP AND RESOURCES PAGE 22 WiPipe Central | USER MANUAL 4.3 Group Menu Within each group there is a menu with 4 or 5 tabs that allow you to set the configuration for the routers in the group. The configuration options differ significantly between Series 2 and Series 3 devices: • Series 3 devices include the following menu items: Group, Network Settings, Internet, and System Settings. • Series 2 devices include the following menu items: Group, Basic, Advanced, Modem, and Tools. With the exception of the items under the Group heading, all the configuration options match those available within the administration pages of the individual devices. These menus are used to set the configuration of the group just as they are used for an individual device. With WPC, the configuration applies to all devices in the group. See 4.4 for a list of these device configuration options. For more information, see the specific product user manual available at http://www.cradlepoint.com. (Find the product on the website. The Product Manual is available under the “Support & Documents” tab on the individual product page.) © 2013 CRADLEPOINT, INC. PLEASE VISIT HTTP://KNOWLEDGEBASE.CRADLEPOINT.COM/ FOR MORE HELP AND RESOURCES PAGE 23 WiPipe Central | USER MANUAL Group tab The Group tab has a dropdown menu with the following options, all of which are unique to WPC. (This is the Series 3 list. The Series 2 list has only slight differences.) • • • • • • • 4.3.1 Alert Config Commands Device List Edit Name Firmware Sync Config WiMAX Driver (Only applicable to Series 2 devices) Alert Config This menu option allows you to set up notification of Alerts for the Group. Refer to section 5.1 – Group Alert Configuration. 4.3.2 Commands Send one of the following commands to all routers in this group: Reboot Devices, Restore devices to factory defaults, or Clear group configuration. • • • Reboot Devices: Causes a device-restart at the next synchronization. Restore devices to factory defaults: Causes a device-restart and resets all configuration settings to the factory defaults. At the next check-in, the device will receive a new configuration from WPC. Clear group configuration: Restores the group configuration to factory defaults. Changes the WPC configuration for the group (and all devices) back to defaults. By selecting Clear group configuration and then Restore devices to factory defaults, all devices will be set back to factory defaults. Further configuration changes should only be made after all devices have completed the reset. © 2013 CRADLEPOINT, INC. PLEASE VISIT HTTP://KNOWLEDGEBASE.CRADLEPOINT.COM/ FOR MORE HELP AND RESOURCES PAGE 24 WiPipe Central | USER MANUAL 4.3.3 Device List This shows a list of the devices in the group with attributes including Status, Name, MAC, IP Address, Firmware Version, WiMAX Version (Series 2 devices only; column hidden by default), Config Version, View Status and Last Checkin. This is the default page whenever a particular group is selected. The list of attributes is a subset of the list of attributes available in Devices, and it includes all of the same functions. See section 3.1 in this manual for details about the Device List attributes. This also shows the number of devices in the group and the percentage of devices that are online. Devices can be Renamed, Unassigned (removed from the named group and sent to the “Unassigned” group), or Moved, and the list can be exported to CSV (Excel) or CSV. 4.3.4 Edit Name Rename the group here. 4.3.5 Firmware Each group has a firmware version selection to be used on all devices in the group. Choose the firmware version for this group to use by selecting it from the list. Firmware versions are made available on WPC as CradlePoint releases them for the devices. NOTE: Using this facility allows the firmware version to be downgraded as well as upgraded. In some cases when the FW version for a group is changed, the Group configuration must be rebuilt to match customer needs. When changing FW versions, it is recommended to create a new Group with the new FW version and then move devices into this Group. © 2013 CRADLEPOINT, INC. PLEASE VISIT HTTP://KNOWLEDGEBASE.CRADLEPOINT.COM/ FOR MORE HELP AND RESOURCES PAGE 25 WiPipe Central | USER MANUAL 4.3.6 Sync Config Within Sync Config the administrator can control the parameters that define how often the routers in the group talk to the server. You can define when, how often, and how (Ethernet only or over modem), each type of communication happens. Configuration and Firmware Updates Routers send a synchronization request on a userdetermined schedule to determine if there are any pending commands, firmware upgrades, or configuration changes. Set the Frequency for updates in days, hours, and minutes. (Default: 1 hour.) You can set firmware and/or configuration updates to take place only over Ethernet connections. NOTE: CradlePoint does NOT recommend these settings. Only select these options if you use a second modem as failover for your primary Ethernet connection and are concerned about bandwidth for the backup modem. Even then, these updates do not take a large amount of bandwidth. Enable Schedule: You can set these updates to only occur during certain time windows (such as to avoid peak traffic times). Heartbeat Notification The Heartbeat signals WiPipe Central that the device is up and running. Set the Frequency for Heartbeats in days, hours, and minutes. (Default: 5 min.) Status Reporting Routers can send detailed reports on modems, WiFi clients, memory usage, etc. (Default: Disabled. 1 day.) Status Reporting can also be restricted to Ethernet only. Select this option only if Ethernet is your primary WAN source and you are concerned about data usage on a failover modem. © 2013 CRADLEPOINT, INC. PLEASE VISIT HTTP://KNOWLEDGEBASE.CRADLEPOINT.COM/ FOR MORE HELP AND RESOURCES PAGE 26 WiPipe Central | USER MANUAL Log Reporting Routers can send their logs on a regular basis, allowing the server to archive them; otherwise logs are lost when the routers reboot or when the logs roll over. (Default: Disabled. 1 day.) Usage Reporting (Series 2 only) Devices can send reports when they reach a user-defined usage threshold. These reports can include Ethernet WAN, Ethernet LAN, and Modem WAN usage data. (Default: Disabled, 50 MB). 4.3.7 WiMAX Driver Series 2 groups each have a WiMAX driver definition. Multiple groups can share the same definition. Choose the WiMAX driver definition for this group to use by selecting it from the list. NOTE: Series 2 only. On Series 3, the WiMAX driver is included in the base Firmware. © 2013 CRADLEPOINT, INC. PLEASE VISIT HTTP://KNOWLEDGEBASE.CRADLEPOINT.COM/ FOR MORE HELP AND RESOURCES PAGE 27 WiPipe Central | USER MANUAL 4.4 Additonal Configuration Tabs To the right of the Group tab are additional menu tabs for configuring the devices in a group. These menus vary depending on the device type of the group. The largest variation is between Series 2 and Series 3 devices. The individual device settings are not covered in this manual. For additional information and device configuration options, please refer to the appropriate product user manual for the devices. (Go to the CradlePoint website: http://www.cradlepoint.com. Find your product. The Product Manual is available under the “Support & Documents” tab on the individual product page.) Series 3 menu (MBR1400 shown) Menu Heading Group Network Settings Internet System Settings Submenu Alert Config Content Filtering Connection Manager Administration Commands DHCP Server Data Usage Device Alerts Device List DNS GRE Tunnels Hotspot Services Edit Name Firewall VPN Tunnels Managed Services Firmware MAC Filtering / Logging WiFi as WAN / Bridge Serial Redirector Sync Config Routing WAN Affinity / Load Balancing System Control WiFi / Local Networks WiPipe QoS © 2013 CRADLEPOINT, INC. PLEASE VISIT HTTP://KNOWLEDGEBASE.CRADLEPOINT.COM/ FOR MORE HELP AND RESOURCES PAGE 28 WiPipe Central | USER MANUAL Series 2 menu (CBA750 shown) Menu Heading Group Basic Advanced Modem Tools Submenu Alert Config DHCP Routing Failover Admin Command IP Passthru Settings Data Usage Device List Network Dynamic DNS Edit WAN Managed Services © 2013 CRADLEPOINT, INC. Firmware Schedules Sync Config SysLog WiMax Driver Time PLEASE VISIT HTTP://KNOWLEDGEBASE.CRADLEPOINT.COM/ FOR MORE HELP AND RESOURCES PAGE 29 WiPipe Central | USER MANUAL 5 ALERTS Beginning with Version 2.0 of WiPipe Central, Device Alert Management is available to further simplify management of large numbers of remote devices. Alert management provides a set of Alert conditions that are significant to the user. When these Alert conditions are detected, the user is notified via email as to the situation. The WPC alert system is designed to notify WPC customers of important router events. Alerts are detected and reported by the router and also through the WPC reporting/overdue monitor. A new top-level heading called Alerts has been added to the toolbar. Clicking this tab displays all the unresolved alerts for devices managed by the current user. The administrator can review all of the recent alerts received by WPC by clicking the 'History' toolbar button. Alerts are retained in the database for 6 weeks. If you want to save older alerts, export the Alerts list as a CSV file every few weeks. NOTE: All Alert examples will use Series 3 device examples. 5.1 Group Alert Configuration Alert configuration can be customized for each group in the User account. Alert Management begins with the Group > Alert Config menu item. Using this menu, the User can determine the priority of each Alert type and configure the email notification when Alerts are detected. The Group / Alert Config is used to set up how Alerts are handled when received. Each type of Alert can be enabled, a severity assigned, and a Throttle parameter assigned. © 2013 CRADLEPOINT, INC. PLEASE VISIT HTTP://KNOWLEDGEBASE.CRADLEPOINT.COM/ FOR MORE HELP AND RESOURCES PAGE 30 WiPipe Central | USER MANUAL The following alerts are reported by WPC: • • • • • • • • Device Reporting/Overdue Modem Up/Down Modem Inserted/Removed Failed Login Attempt Data Usage Configuration Change Device Reboot Unrecognized MAC Address NOTE: All Alerts are available when using Series 3 devices. Only the Device Reporting/Overdue Alerts are generated on Series 2 devices. • • • • Severity is user-assigned based on the needs of the group and devices. The user-assigned severity is reflected on all Alert lists. The Throttle parameter is an additional configuration to determine if an email is sent. When the Throttle parameter is set to 15 minutes, additional Alerts of the same type will not generate additional emails during those 15 minutes. This helps control the amount of email received when there are network disturbances that generate multiple events. The default setting for Throttle is “None,” which indicates that all events will be sent to the user. If an Alert is throttled, it will still be listed in the Alert History even though an email is not sent. 5.1.1 Notification Settings Email Address: Input an email address if you want to receive emails associated with particular alert events. Send email for each alert: Select from the dropdown menu to set the Minimum Severity that will cause an email to be sent. Send email summary: Use the dropdown menus to set how often and the time for summary emails to be sent. © 2013 CRADLEPOINT, INC. PLEASE VISIT HTTP://KNOWLEDGEBASE.CRADLEPOINT.COM/ FOR MORE HELP AND RESOURCES PAGE 31 WiPipe Central | USER MANUAL 5.2 Data Usage Alerts Series 3 routers, beginning with Version 3.3.0, provide data usage monitoring. Users have great flexibility in setting up data usage thresholds that will trigger Alert notifications back to WPC. Multiple data usage thresholds can be created for each group and its devices. To create a Data Usage threshold, access the Internet → Data Usage menu. The Data Usage Management & Alerts screen provides configuration of the Data Usage Alerts. The feature should first be Enabled with the button. Users should read and understand the disclaimer. The numbers provided are strictly estimates and may vary from the final numbers the carrier uses for billing purposes. In no event, shall CradlePoint be held liable for any fees charged by the carrier for customer usage even in the event the numbers provided by CradlePoint are lower than the carrier numbers and result in additional fees charged to the customer. You should set your data limits lower than your Data Allowance and regularly compare the numbers provided by the router with the numbers from your carrier. Next, click on ADD to create a Data Usage Threshold rule. The pop-up dialog box allows for creation of the Data Usage rule. Users can enter a data usage value and a period (day, week, month) over which the data usage will be measured. The check box for “Send Alert on Cap:” must be checked for WPC to receive the resulting Alert. For each rule, a secondary alert can also be defined. This could be used as either an early warning of the alert or as a second reminder after the primary Alert has been sensed. Multiple Alert Rules can be defined for each group & devices. If needed Alerts can be defined for daily usage, weekly usage & monthly usage. © 2013 CRADLEPOINT, INC. PLEASE VISIT HTTP://KNOWLEDGEBASE.CRADLEPOINT.COM/ FOR MORE HELP AND RESOURCES PAGE 32 WiPipe Central | USER MANUAL 5.3 Alert Management The Alerts menu option provides access to the primary Alerts reporting screen. By default, all active alerts are listed here. Users can “Clear” Alerts and remove them from this screen. Cleared Alerts are kept in the History table for review if needed. The list of Alerts can be sorted on any display field. Display fields can also be customized based on the user preference. Search fields are also provided to narrow the Alert display. © 2013 CRADLEPOINT, INC. PLEASE VISIT HTTP://KNOWLEDGEBASE.CRADLEPOINT.COM/ FOR MORE HELP AND RESOURCES PAGE 33 WiPipe Central | USER MANUAL For each alert the following information is displayed: • Status – Critical - Alert received & user-assigned priority is Critical Major - Alert received & user-assigned priority is Major Recovered - A paired event has been received which corrects the alert condition. For example, a Modem Up is received after a Modem Down. • • • • • • • • 5.3.1 Minor - Alert received & user-assigned priority is Minor Info - Alert received & user-assigned priority is Info Snooze - User has performed a Snooze command on this event Cleared - User has Cleared the event. Event will only be listed in the History MAC Address of the reporting device Alert – Name of reported Alert Description – more detailed information regarding the Alert State – Active, Throttled, Snoozed, Cleared, Recovered. By default the Alert lists are grouped by the State field. Severity as assigned by user for this Alert type Detected – date and time of the Alert Recovered – date and time when an Alert moves to the Recovered state Notify – set to Sent when the email for the Alert has been sent Alert States When a new Alert is received by the system, it is assigned the ‘Active’ state. Active Alerts indicate problems that have not yet been resolved. Once the administrator resolves the issue, the user can remove the Alert by moving it to the 'Cleared' state. Cleared Alerts are only displayed in the Alert History view. Some alerts are state alerts which means they have both a 'Down' alert and an 'Up' alert. For example, the Modem Up/Down Alert is composed of two Alerts. When the “Modem Down” Alert is received, the Alert is assigned the active state. When the “Modem Up” Alert is received the Alert is assign the recovered state and the original Modem Down Alert's recovered time is updated. © 2013 CRADLEPOINT, INC. PLEASE VISIT HTTP://KNOWLEDGEBASE.CRADLEPOINT.COM/ FOR MORE HELP AND RESOURCES PAGE 34 WiPipe Central | USER MANUAL 5.3.2 Snooze Alert An administrator can decide to snooze an Alert if they can't resolve the issue right away but prefer to review the problem later. A snoozed Alert is assigned the snoozed state. After the snooze time expires, the alert is restored to “active” or “recovered” depending on the type of alert. 5.3.3 Disabled Alerts If an alert is disabled in the configuration, it is assigned the disabled state on reception and moved to the alert history. Alerts that have been cleared, snoozed, or disabled can be restored, placing the Alert back into the active or recovered states. The top buttons on the screen provide several functions to manage the Alerts. • • • • • • • Clear – moves the alert to the History table of Alerts. Snooze – moves the alert to the Snoozed state for a time selected by user. This allows some Alerts to be cleared from the Active state and removed from the list of most urgent Alerts. Restore – move the Alert from History to the Active display Comment – attach a comment to a Alert(s) for future reference Details – display all the Alert details Export – export Alert report to a CSV file History – toggle display between Active & History display © 2013 CRADLEPOINT, INC. PLEASE VISIT HTTP://KNOWLEDGEBASE.CRADLEPOINT.COM/ FOR MORE HELP AND RESOURCES PAGE 35 WiPipe Central | USER MANUAL 5.4 Alert Email Alerts can generate both individual and summary emails. The notification system can be enabled to send an email for each Alert with a minimum severity. The notification system can also send a summary Alert email periodically that contains all the alerts received since the last summary report. 5.4.1 Individual Alert Email When configured for the Group, WPC will send an Alert Notification for each Alert detected. These emails are subject to the Throttling parameters. 5.4.2 Summary Alert Email When configured for the Group, WPC will send a Summary Email listing all alerts received since the last Summary Email. © 2013 CRADLEPOINT, INC. PLEASE VISIT HTTP://KNOWLEDGEBASE.CRADLEPOINT.COM/ FOR MORE HELP AND RESOURCES PAGE 36 WiPipe Central | USER MANUAL 6 REPORTS Reports were introduced in version 2.1. Reports allow the user to select from a list of fields to create a summary of information about a group. Select the Date Range, Group(s), and Fields to produce a report. You also control a few additional Options for the types of information given in the report. Saved Reports: You have the option to save a report structure and later generate reports with the same selections. Once you have made the desired selections for a report, click New to save those settings. Then simply choose a name for that report structure. To access a saved report structure, select from the dropdown list of saved reports. This will auto-fill all the selection options. You can then click Generate Report or tweak the settings as needed. If you change the settings for a saved report and would like to lock in the changes, click Update after making your changes. Date Range: Choose from a dropdown list of preset date ranges, or input a custom Start Date and End Date by using the popup calendar tool (or you can simply manually input dates). © 2013 CRADLEPOINT, INC. PLEASE VISIT HTTP://KNOWLEDGEBASE.CRADLEPOINT.COM/ FOR MORE HELP AND RESOURCES PAGE 37 WiPipe Central | USER MANUAL Select Groups: Choose one or more of your groups to generate a report about. Select Fields: Select from the following fields. You can also click “Field Name” at the top to select all (or deselect all). • • • • • • • • • • • • • • • • • • • • • • • • • • • • • Channel: WiFi channel number Device Name ESN/GSN/IMEI: Modem unique identifier Input Bytes per second Input Bytes Total Input Dropped per second Input Dropped Total Input Errors per second Input Errors Total Modem DBM Average: Cellular signal strength in decibels Modem DBM Current Modem ECIO Average: Energy per chip per power density Modem ECIO Current Output Bytes per second Output Bytes Total Output Collisions per second Output Collisions Total Output Errors per second Output Errors Total Product Serial Signal Strength Average: Modem signal strength Signal Strength Current Time: Device time of last report Timestamp Uptime WiFi Clients Average: Number of WiFi clients WiFi Clients Current WiFi RSSI Average: WiFi receive signal strength indication © 2013 CRADLEPOINT, INC. PLEASE VISIT HTTP://KNOWLEDGEBASE.CRADLEPOINT.COM/ FOR MORE HELP AND RESOURCES PAGE 38 WiPipe Central | USER MANUAL • WiFi RSSI Current Select Options: Select from the following options. You can also click “Option Name” at the top to select all (or deselect all). • • • • Grand total report values: Depending on the Date Range you have selected, the data in the report will be divided into hourly or daily segments by default. Select this option to report total values instead. Include LAN Interfaces: Include LAN interfaces as separate report rows. (Select LAN and/or WAN or some fields will be left empty.) Include WAN interfaces: Include WAN interfaces as separate report rows. (Select LAN and/or WAN or some fields will be left empty.) Use GMT Time Format: All timestamps are reported in GMT (Greenwich Mean Time). This helps standardize for routers in different time zones. 6.1 Generate Report After making your selections, click Generate Report at the bottom of the screen. Your computer will download the report as a CSV file. This is a portion of a sample report as displayed in Microsoft Excel: © 2013 CRADLEPOINT, INC. PLEASE VISIT HTTP://KNOWLEDGEBASE.CRADLEPOINT.COM/ FOR MORE HELP AND RESOURCES PAGE 39 WiPipe Central | USER MANUAL http://www.cradlepoint.com/ Copyright © 2013 by CradlePoint, Inc. All rights reserved. © 2013 CRADLEPOINT, INC. PLEASE VISIT HTTP://KNOWLEDGEBASE.CRADLEPOINT.COM/ FOR MORE HELP AND RESOURCES PAGE 40