1
SECTION D. MAINTENANCE & SERVICE
TIPS FOR THE SERVICE TECHNICIAN
The User should be aware of service that must be done on a regular schedule to keep the refrigerator
operating properly. The service should only be performed by a qualified technician.
1. REFRIGERATOR REMOVAL
F.
Before working on the refrigerator, make sure the AC voltage
and DC voltage leads are disconnected. Shut off the gas
supply. Disconnect the gas supply line. Cap the gas supply
line, loosen the screws anchoring the refrigerator to the
enclosure and slide the refrigerator out of the compartment.
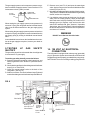
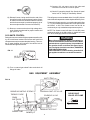
The 2-way AES model is equipped with 2 fuses, one for the
refrigerator control system and one for the AC cartridge
heater. (See Table below).
To replace fuse(s) proceed as follows:
1. Disconnect the wall plug, and the 12 volt wires.
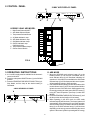
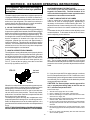
2. Remove the power module cover. See FIG. 6.
3. Snap the fuse out of the fuse holder.
4. Fit a new fuse in to the fuse holder.
5. Replace the power module cover.
Replacement is the reverse of removal. Check all connections for gas leaks. Refer to Section A, Item 1 to 13 of
Installation Instructions.
FUSES
Control System
AC Heater
2. PERIODIC MAINTENANCE
To keep your Dometic refrigerator operating efficiently and
safely, periodic inspection and cleaning of several components once or twice a year is recommended.
3-amp
5-amp
3. TROUBLESHOOTING
A. It is important to keep the area at the back of the
refrigerator clean. Check the lower vent, upper vent and
area between these openings for any obstructions such
as bird/insect nests, spider webs, etc. Clean the coils on
the back of the refrigerator. Use a soft bristled brush to
dust off the coils.
Refrigerator Does Not Cool Properly
A. Burner jet clogged.
Clean. See Section D. Maintenance & Service, Item 1.
Periodic Maintenance, Paragraph E. Item 19.
B. Check level of refrigerator.
C. Venting problem.
Restriction in air flow across cooling unit.
D. Heavy frost buildup on evaporator fins.
Defrost.
E. Flue baffle not inserted properly in flue tube.
F. Improperly set thermostat.
See Section C. Operating Instructions, Item 4.
Paragraph F.
G. Burner dirty.
Clean. See Section D. Maintenance & Service, Item 1.
Periodic Maintenance, Paragraph E.8.
H. LP gas pressure low at burner.
Set main regulator so pressure does not drop below 11
inches water column at pressure tap.
I. Burner not located properly under flue tube.
Relocate.
J. Burner damaged.
Replace.
K. Odors and fumes.
1. Dislocated burner
2. Damaged burner
3. Dirty flue tube
L. FUSES
1. Refrigerator AC Supply
2. Refrigerator DC Supply
3. Control system. See Section D. Maintenance &
Service, Item 2. Paragraph F.
It is important to keep the refrigerator area free from
combustible material, gasoline and other flammable
vapors or liquids.
NOTE: AVOID SPRAYING WATER THROUGH THE REFRIGERATOR VENTS WHILE WASHING YOUR RV.
B. Check all connections in the LP gas system (at the back
of the refrigerator) for gas leaks. The LP gas supply must
be turned on. Apply a noncorrosive bubble solution to all
LP gas connections. The appearance of bubbles indicates a leak and should be repaired immediately by a
QUALIFIED SERVICEMAN WHO IS FAMILIAR WITH
LP GAS SYSTEMS AND REFRIGERATORS.
DO NOT USE A FLAME TO CHECK FOR GAS LEAKS.
C. Check the AES control system by connecting/disconnecting 120 volt AC power, start/stop the engine, etc.
Compare the operation with the operation described in
Section C. Operation Instructions.
Contact an authorized service center for parts
and repairs as needed.
12