1
Preparing for Installation
Power Supply Preparation
warning
The electrical power supply for the dishwasher must be
installed only by a licensed electrician as specified below.
It is the owner’s responsibility to ensure that the electrical
connection of this appliance is performed by a licensed
electrician.
Electrical Specifications
The electrical installation, including minimum supply
wire size and grounding, must be in accordance with the
National Electric code ANSI/NFPA* (or latest revision) and
local codes and ordinances.
Plumbing Preparation
• The water pressure must be between 20 and 120 psi
(138-827 kPa). The household hot water heater must
supply a minimum of 120 °F water to the dishwasher
location for best results.
• Install a valve for the hot water supply line where it is
easily accessible after the dishwasher is installed.
• A flexible braided hot water inlet hose is highly
recommended for connection to the hot water supply.
Connect it to the unit just prior to installation into the
cabinet. The dishwasher ships with a 3/8” (10 mm) male
compression fitting on the hot water inlet to facilitate
installation.
*A copy of this standard may be obtained from:
National Fire Protection Association
1 Batterymarch Park
Quincy, Massachusetts 02269-9101
Power supply requirements:
• The dishwasher requires a grounded, dedicated
120 Vac, 60 Hz circuit protected by a 15 Amp. circuit
breaker or time delay fuse installed by a licensed
electrician.
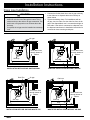
• It must be located to the right or left of the cut-out, in an
adjacent cabinet, so that power can be disconnected
without removing the dishwasher.
• The ground terminal (or lead) on the appliance must be
connected to a grounded, metallic, permanent wiring
system or grounding conductor installed by a licensed
electrician.
• Do not ground the appliance or appliance wiring to a
gas pipeline or to the neutral (white) power supply wire.
• Do not install a fuse in the neutral or ground circuit.
The dishwasher can be connected to:
A UL/CSA approved, grounded, three-prong receptacle (if
local code permits). This method is the easiest to install.
OR
Directly to the house wiring. Hard-wire the dishwasher
according to local code directly to a three wire grounded,
single phase connection in a junction box.
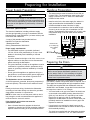
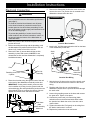
Loop in
drain hose,
do not remove
or change
Back of
dishwasher
Drain line 44"
(1118 mm) long
from chassis
strap
5 1/2"
Chassis strap
(do not remove) (140 mm) C
Hot water inlet
L
Preparing the Drain
CAUTION
Keep the factory installed high loop drain hose in
place to ensure proper dishwasher operation. Do not
cut, tie, strap or lower it. If it is necessary to lengthen
it, install an aftermarket drain extension kit, available
at most home improvement stores.
IMPORTANT: A drain hose is supplied with the product
(see above). Should a longer drain hose be required, use a
hose approved for detergents and high temperature water.
The drain hose supplied with the dishwasher meets an
AHAM DW-1 test standard. Longer drain hoses should not
be longer than a total of 12 ft. in length.
If the electrical service does not meet the
specifications above:
• You must install an air gap in the drain if the drain hose
is connected to household plumbing lower than 20 in.
(50.8 cm) from the floor or if required by local codes.
Plan for the air gap in the sink or countertop area
adjacent to the dishwasher. A section of drain hose (not
provided) needs to be installed from the air gap to the
disposal or waste tee.
• Have a licensed electrician prepare the electrical
receptacle or junction box for final connection inside the
adjacent cabinet according to the specifications above.
• If an air gap is not required, the drain hose must be
installed to an inlet or waste tee above the drain trap in
the household plumbing.
NOTE: In either case, be sure the power cable or wire is
long enough to remain connected when the appliance is
removed from the cut-out for service.
• The drain hose supplied with the dishwasher should be
connected to a minimum 1/2 in. I.D. drain connection.
5