1
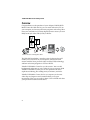
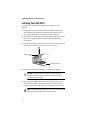
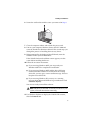
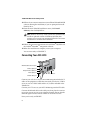
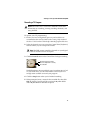
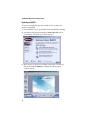
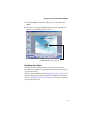
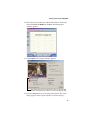
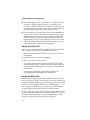
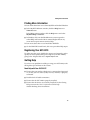
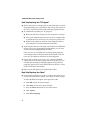
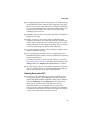
VideOh! DVD Media Center
PCI Edition
AVC-2410
Getting Started
R
DISCLAIMER: This product may be designed to assist you in reproducing materials. In doing so,
you must have permission from the copyright owner of the materials to avoid violating
copyright law and being subject to payment of damages and other remedies.
In this Guide...
Overview
2
What’s in the Kit
3
Three Simple Steps
3
Installing Your AVC-2410
4
Connecting Your AVC-2410
6
Creating a TV Project with WinDVR and MyDVD
7
Creating a Video Project with MyDVD
14
Finding More Information
19
Registering Your AVC-2410
19
Getting Help
19
1
VideOh! DVD Media Center: Getting Started
Overview
Congratulations on the purchase of your Adaptec VideOh! DVD
Media Center kit. With this kit, you can watch television (TV) on
your computer, and convert television programs and analog video
from your camcorder or VCR into digital format to create you own
Hollywood style video CDs (VCDs) or DVDs.
TV
S-VIDE
O IN
VIDEO
AUDIO
IN
IN
Connect TV source or analog video device
This VideOh! kit includes a complete suite of software that will
enable you to watch TV on your computer, control television
content with the latest personal video recorder (PVR) technology,
and burn television programs to VCDs or DVDs.
VideOh! DVD Media Center lets you be creative. You can add
backgrounds and menus to your videos for easy navigation. With
VideOh! DVD Media Center you can also perform even more
sophisticated editing, like adding music, transitions, and titles.
VideOh! DVD Media Center also lets you capture you favorite
video clips and organize and customize them to suit your
imagination. Then you are ready to burn a VCD or DVD and share
your personalized content with others.
2
What’s in the Kit
What’s in the Kit
Your Adaptec VideOh! DVD Media Center kit includes:
■
AVC-2410 PCI card
■
Remote control and 2 AA batteries
■
Standard 6-foot Audio/Visual cable
■
Audio Y cable
■
Infrared cable
■
VideOh! CD, including drivers, software, and User’s Guide
■
Getting Started guide
Three Simple Steps
Get up and running with VideOh! DVD Media Center in three
basic steps:
■
Install — Install your hardware and software.
■
Connect — Connect your video device (camcorder, VCR) or TV
source (cable, receiver, antenna).
■
Create — Capture a video, customize it a bit, then burn it. Or,
use your AVC-2410 to record a TV program for later viewing or
long-term storage on DVD or VCD.
These steps are described in the rest of this booklet. For more
details, see the User’s Guide included on the CD or go to the online
Help system when you’re using the software.
3
VideOh! DVD Media Center: Getting Started
Installing Your AVC-2410
To install your VideOh! DVD Media Center hardware and
software:
1 Discharge any static electricity build-up before handling the
AVC-2410 card by touching a grounded metal object (such as
the exposed metal parts on the back of your computer).
2 Turn off power to the computer and disconnect the power cord.
Open the computer cabinet, following the manufacturer’s
instructions.
3 Locate an unused PCI expansion slot and remove the expansion
slot cover. Save the slot cover screw for use in Step 6.
Expansion slot
cover
PCI expansion slots
4 Remove the AVC-2410 card from its antistatic packaging.
!
Caution: Always handle the card by its edges or metal
bracket. Do not touch the gold PCI connector or any
components on the card.
5 Insert the AVC-2410 card into the PCI expansion slot. Press
down firmly until the card clicks into place. When installed
properly, the card should appear level with the expansion slot.
Note: Depending on the tightness of the PCI slot, gentle but
firm force may be required to insert the card.
4
Installing Your AVC-2410
6 Secure the card bracket with the screw you removed in Step 3.
7 Close the computer cabinet and reattach the power cord.
8 Turn on your computer. Windows detects the AVC-2410 and
starts the Found New Hardware Wizard. This wizard steps you
through the process of installing the necessary driver.
9 When prompted by the hardware Install Wizard, insert the
VideOh! CD into your CD-ROM drive.
If the VideOh! Software Installation screen appears, exit this
screen before installing the drivers.
10 Follow the on-screen instructions.
■
If you are using Windows 98SE, you may need your
Windows 98SE CD to complete the installation.
■
If you are using Windows 98SE and the driver file being
installed from the VideOh! CD is older than the existing
driver file, you may get a version conflict message. Select to
keep the newer driver file.
■
If you are using Windows XP, you may see a warning
message about Microsoft Windows logo certification. Click
Continue Anyway.
You are now ready to install the software.
Note: If MyDVD or WinDVR are already installed on your
system, uninstall them before continuing.
11 Use Windows Explorer to display the VideOh! CD contents,
then click autorun.exe.
5
VideOh! DVD Media Center: Getting Started
12 Follow the on-screen instructions to install InterVideo® WinDVR
software. During the installation, if you are prompted to install
DirectX, do so.
13 From the main VideOh! Installation screen, click Install
Software, then click MyDVDTM.
Note: Windows 98SE only—Your system may automatically
install an updated version of Windows Installer, then
prompt you to restart your computer. Follow the on-screen
instructions to continue the installation.
14 Follow the on-screen instructions to install Sonic® MyDVD and
the ArcSoft® ShowBizTM companion software.
15 When the installation is complete, restart your computer.
You are now ready to CONNECT.
Connecting Your AVC-2410
Antenna/cable connector (TV)
TV
S-Video Input port
S-VI
DEO
IN
Composite Video Input port
Audio Input port
VIDE
O IN
AUD
IO IN
PCI connector
Infrared cable port
Connect your video device to your AVC-2410 using the included A/V
cables or the proprietary cable that came with your device. S-Video
users can use an S-Video cable and the A/V cables included in the
VideOh! kit.
Connect your TV source to your AVC-2410 using standard TV cable.
Connect the Infrared cable to the cable port, then place the receiver
in an open area on or near your computer monitor. Ensure that the
Infrared signal from the remote control can reach the receiver.
Now you’re ready to CREATE.
6
Creating a TV Project with WinDVR and MyDVD
Creating a TV Project with WinDVR and MyDVD
These instructions give you the basic steps for capturing TV
programming, trimming it, and burning it to DVD or CD.
Note: Refer to the User’s Guide on the VideOh! CD for a more
comprehensive overview of how to use InterVideo WinDVR
to watch and record TV programs.
Note: To create a video project, see page 14.
Before you begin creating:
■
Make sure your TV source is connected to the AVC-2410.
(See page 6.)
■
If you have an external DVD/CD recorder, make sure it is
connected to your computer and switched on. You need a
DVD-Recordable drive and appropriate media to burn DVDs.
DVD-ROM, CD-R, and CD-RW drives do not have the
capability to burn DVD discs. However, a CD-Recordable drive
can burn a Video CD that you can play back on a compatible
DVD player.
■
Ensure that Sonic MyDVD is not open.
!
Caution: Do not attempt to run the WinDVR and MyDVD
applications simultaneously. Close one application before
opening the other one.
7
VideOh! DVD Media Center: Getting Started
Using WinDVR (An Overview)
When WinDVR is opened, two windows appear on your desktop—
the Display Window and the Control Panel.
The Display Window is where you view live or captured TV
programs. You can move and resize the window to suit your needs.
The Display Window may be black or show static until an available
channel is selected.
The Control Panel buttons (shown below) are similar to the buttons
on a standard VCR control panel. Click ? on the Control Panel to
find more detailed information about each button.
Volume
Basic controls—Play,
Stop, channel selection,
and so on.
8
Forward/Back controls
Online Help
Sub-Panel button
(opens Panel Menu)
Creating a TV Project with WinDVR and MyDVD
Navigating WinDVR
The Control Panel buttons can be navigated by mouse, or by
keyboard shortcuts. See the User’s Guide on the VideOh! CD, or
click ? on the Control Panel for more information on keyboard
shortcuts.
Time Shift Controls
The remote control runs on two AA batteries (included in the kit)
and features buttons and functions similar to standard TV remote
controls. Its special features are explained in the Figure below.
Activates Time
Shift mode
Displays live view
of program in
Time Shift mode
Pauses live TV;
switches to Time
Shift mode
POWER
LIVE
TIME SHIFT SCAN
1
2
3
4
5
6
7
8
MUTE
0
Stops recorded program;
stops Time Shift
VOL–
OSD
Jumps ahead a few
seconds
REPLAY
Jumps back a few
seconds
VOL+
Rewinds
Displays current
channel and other
settings
SKIP
CH+
ENTER
Displays available
channels
9
FULL SCREEN
PLAY/PAUSE STOP
Opens and closes
WinDVR
(see Note below)
CC
Fast-forwards
CH–
R
Turns closed captioning
on or off.
Note: The Power button opens the WinDVR software. It does
not power on your computer.
You can use the remote control to perform most WinDVR
functions. Refer to the User’s Guide on the CD for more information.
Note: If you have connected a digital cable or satellite receiver
to your AVC-2410, you must use the set-top box remote
control to tune your TV signal. The channel selection buttons
on the Control Panel/keyboard/remote control will not work.
9
VideOh! DVD Media Center: Getting Started
Opening WinDVR
To open WinDVR, double-click the InterVideo WinDVR
icon (shown at right) on your desktop, or press the Power
button on the remote control. (See Navigating WinDVR on
page 9 for more information.)
Completing the Initial Setup
The first time you open WinDVR after installation, a wizard opens
to lead you through the initial setup. Follow the on-screen
instructions to configure the software to meet your specific needs.
1 In the Device window:
■
Set Device to Adaptec PCI Capture Device.
■
Set Source to TV.
■
Do not adjust the Standard setting. WinDVR will
automatically adjust it to match the geographical area you
choose in Step 2.
2 In the TV window:
■
Set Tuner to Antenna if you are using an antenna; otherwise,
select Cable.
■
Set Country or Region to your geographical location.
WinDVR uses this information to set the device standard,
and provide TV programming schedules for your location
through an electronic program guide (EPG).
3 Leave all options in the iEPG window at their default settings.
4 In the Channel window, click Autoscan.
An Autoscan lets WinDVR know which channels are available.
You can perform an Autoscan at any time in the Setup window.
5 Adaptec recommends that you not change the default
information in the Storage window. Keep the default Storage
Location information.
Note: For more information on settings, see the User’s Guide on
the VideOh! CD, or click ? on the WinDVR Control Panel.
10
Creating a TV Project with WinDVR and MyDVD
Recording a TV Program
Note: Refer to the User’s Guide on the VideOh! CD for more
information on recording, creating recording schedules, and
using the EPG.
To capture your TV programming:
1 Ensure you have enough disk space on your hard drive to
accommodate the new file. Refer to the Getting Help section of
the User’s Guide on the CD for help estimating capture file sizes.
2 Select the channel you want, using the Control Panel, keyboard,
remote control, or your set-top box controls.
Note: WinDVR cannot control the channels on your digital
cable or satellite receiver set-top box.
3 Click the Record button on the Control Panel to begin recording.
Stop button (grayed-out until
Record or Play button is clicked)
Record button
WinDVR indicates how much disk space (recording time) is left
on your hard drive. Use this information to ensure you have
enough room available to record your program.
4 Click the Stop button when you’re finished recording.
5 When prompted, enter a name for the recorded file, then click
OK. By default, your file will be saved to the My Video folder
under My Documents in Windows Explorer.
11
VideOh! DVD Media Center: Getting Started
Importing to MyDVD
To burn a recorded program onto a DVD or CD, you must first
import it to MyDVD.
1 Close WinDVR. Do not open MyDVD when WinDVR is running.
2 Start MyDVD by double-clicking the Sonic MyDVD icon on
your desktop. The Welcome window appears.
3 Move the mouse pointer over either DVD-Video or Video CD,
then click Create or Modify a... Project. The Main project
window appears.
12
Creating a TV Project with WinDVR and MyDVD
4 Click Get Movies. Select the video file you want, then click
Open.
5 Your file is loaded into MyDVD and appears as a thumbnail
picture on your Main project window.
The layout shown in the MyDVD Main project window is what
your DVD menu will look like on your TV.
Completing Your Project
Now that you’ve captured your TV program, you can trim it,
customize it, and burn it onto DVD or VCD for long-term storage
or personal viewing.
See the sections beginning with Trimming Your Video on page 17 for
detailed editing, previewing, and DVD/VCD burning instructions.
Then see Sharing Your DVD or VCD on page 18 for tips on watching
your new DVD or VCD.
13
VideOh! DVD Media Center: Getting Started
Creating a Video Project with MyDVD
These instructions give you the basic steps for capturing video,
trimming it, and then burning it to DVD or CD. To create a DVD
from TV programming, see page 7.
To get more information, refer to the online tutorial included with
Sonic MyDVD. Or, at any time while you’re using this software,
click ? or Help, to display detailed information about any step you
want to perform.
Before you begin creating:
■
Make sure your analog video device (such as a camcorder or
VCR) is connected to the AVC-2410 and switched on.
■
If you have an external DVD/CD recorder, make sure it is
connected to your computer and switched on. You need a
DVD-Recordable drive and appropriate media to burn DVDs.
DVD-ROM, CD-R, and CD-RW drives do not have the capability
to burn DVD discs. However, a CD-Recordable drive can burn a
Video CD that you can play back on most DVD players.
Capturing Your Video
To successfully capture your video, make sure you complete each
step in the order given.
1 Start MyDVD by clicking the Sonic MyDVD icon on your
desktop. The Welcome window appears.
Click here for more information
14
Creating a Video Project with MyDVD
2 Move the mouse pointer over either DVD-Video or Video CD,
then click Create or Modify a... Project. The Main project
window appears.
3 Click Capture. The Capture window appears.
These buttons won’t operate your analog video device. Use the Play, Stop,
and other control buttons on your device to control your analog video tape.
4 Press the Play button on your analog video device. The video
image appears in the Capture window, as shown in Step 3.
15
VideOh! DVD Media Center: Getting Started
5 To begin transferring your video to your computer, click Start
Capturing.
MyDVD captures your video, including the audio.
Note: If you get any error messages at this point in your
video capturing, stop your analog video device and see
Need Help Capturing Your Video? on page 20.
6 When you want to stop transferring your video to your
computer, click Stop Capturing, then stop or pause your analog
video device.
7 On the Save As screen, enter the file name of your video clip
and click Save. The file name you choose, becomes the title of
your video clip and is displayed on the Main project window.
8 Click Done when finished.
Your video clip is saved and you will see a thumbnail picture on
your Main project window.
The layout shown in the
MyDVD Main project
window is what your
DVD menu will look like
on your TV.
Note: If you plan to do multiple video captures in the same
session, save your project, then close and relaunch MyDVD
every six captures (or sooner, if prompted by a system
resource message).
16
Creating a Video Project with MyDVD
Trimming Your Video
Now that you’ve captured some video footage, you can trim it. For
example, you can change your Start and End points. You can also
choose the specific video frame that you want to use as the
thumbnail picture that is displayed in your Main project window.
1 From the Main project window, double-click the thumbnail for
the video clip you want to trim.
2 Use the controls in the Trimming window to trim your video.
You can trim
out unwanted
video footage
Drag the red
bracket to
choose an
End Frame
Drag the thumb to choose a Thumbnail image
Drag the green bracket to choose a Start Frame
3 Click OK when finished.
Note: For more advanced editing functions, use the ArcSoft
Showbiz companion software included with MyDVD. For
more information, see Finding More Information on page 19.
Previewing Your Project
It’s a good idea to see how your DVD/VCD project will look before
you burn it to the disc. To preview your project, press Preview at
the bottom of your Main project window, then double-click the
thumbnail clip you want to look at.
When you have previewed your project, press Stop.
17
VideOh! DVD Media Center: Getting Started
■
If playback appears fuzzy and unclear (for example, the edges
of objects, especially objects in motion, are feathered), it is
because of a difference between how televisions and computer
monitors display video. This effect is not noticeable when you
play back the finished DVD or VCD disc on your TV.
■
If your computer’s processing speed is less than 800 MHz or if
you are using a slower video card, your preview video in the
MyDVD capture window may appear choppy. However, the
finished DVD or VCD, played back on your TV, will be fine.
Updating the drivers for your computer’s video and/or audio
card may minimize this problem. Check your video or sound
card manufacturer’s website for driver updates.
Burning Your DVD or VCD
When you are satisfied with how your DVD or VCD project looks,
you are ready to burn it onto a recordable DVD or CD.
1 Insert a recordable DVD or CD into your computer’s DVD or
CD recorder.
2 On the Main project window, click Burn.
3 Follow the on-screen instructions.
You will be notified when your DVD or VCD is successfully
completed. On average, a 30 minute DVD or VCD can take up
to 2 hours to burn (depending on the speed of your computer
and burner).
You can play your newly created DVD or VCD on any
compatible DVD/CD-ROM drive or DVD player.
Sharing Your DVD or VCD
Now that you’ve captured your video and burned it to a DVD or
CD, you’re ready to share it. You can play your newly created DVD
on most compatible DVD players. You can play your newly created
VCD on most compatible DVD players or CD-ROM drives.
You can play your DVDs the way you play any standard DVD,
using the controls on your DVD player or remote control.
To play a VCD, you need to select the video clip you want to view
by using the number pad on the video player remote control. If you
have more than 6 video clips, you can navigate between menu
screens by using the skip forward and back controls.
18
Finding More Information
Finding More Information
To learn more about how to use Sonic MyDVD and ArcSoft Showbiz:
■
In the MyDVD Welcome window, click the Help button or
Tutorial button.
In the Main project window, click the Help menu and select
MyDVD Help or Tutorial.
■
In Showbiz, click ? on the ShowBiz main screen to open the
online Help and Learn the Basics tutorial. Right-click on any
screen item to open context-sensitive Help.
To learn more about how to use InterVideo WinDVR:
■
On the WinDVR Control Panel, click ? to open online Help topics.
Registering Your AVC-2410
To make sure that you’re eligible for support and upgrades, and to
qualify for future promotions, please register your AVC-2410 by
going to the Adaptec Web site at register.adaptec.com.
Getting Help
If you have any problems installing or using your AVC-2410, work
through the tips and hints in this section.
Need Help with Your AVC-2410?
■
Ensure that your analog video device is connected and powered
on, or that your TV source (cable, receiver, antenna) is properly
connected.
■
Double-check all cable connections.
■
Ensure that the AVC-2410 is properly installed.
■
Ensure that the drivers are correctly installed. See the Getting
Help section in the User’s Guide on the CD for help
double-checking driver installation.
19
VideOh! DVD Media Center: Getting Started
Need Help Capturing Your TV Program?
■
Ensure that you have enough room on your hard drive to record
the programming you want. Refer to the Getting Help section of
the User’s Guide on the CD for help estimating capture file size.
■
To schedule the recording of a TV program:
■
■
Ensure that the date and time on your computer is accurate.
■
Leave your computer powered on. If you have a digital cable
or satellite receiver, also leave your set-top box powered on.
■
Disable sleep/hibernate mode on your computer. Refer to
your computer’s documentation for instructions.
Your computer must be connected to the Internet and WinDVR
must be set to your geographical location before you can view
current and future programming schedules.
Once you have set a schedule for recording future programs,
your computer can be disconnected from the Internet. You do
not need a live Internet connection to record programs.
■
Digital cable or satellite receiver users only—Because WinDVR
cannot control the channel setting of your set-top box, you can
schedule the recording of multiple programs only if all those
programs appear on the same channel. Refer to the User’s Guide
on the CD for more information.
■
Refer to your EPG Web site for help using the EPG.
Need Help Capturing Your Video?
■
If your analog video device, such as a VCR or camcorder, is not
powered on, after about 1 minute, you will get an error message.
To allow MyDVD to recognize and capture the video:
a Click OK to close the error message.
b Click Done to close the Capture window.
c Press the Power on button on your video device.
d Click Capture.
e Click Start Capturing.
20
Getting Help
■
For optimum quality when creating DVDs, use the Best setting
(in the MyDVD Capture window) when capturing video clips.
However, if you have limited disk space, Adaptec recommends
that you choose the Better or Good capture setting. Refer to the
Getting Help section of the User’s Guide on the CD for help
estimating capture file size.
■
MyDVD may not be able to recognize video from a damaged or
degraded video tape.
■
If there are gaps in your analog video tape, MyDVD stops
capturing. To continue, start capturing a new clip after the gap.
Gaps in video footage are often caused by stops, pauses, static,
or unrecorded space in the original recording. They can also be
caused by old, damaged, or deteriorated video tapes.
■
Set your computer monitor’s screen resolution to 1024 x 768 or
higher for optimum viewing.
■
If you are playing your video and it is not appearing on the
MyDVD Main project window, make sure MyDVD is capturing
from the correct device.
To check your device, go to the Capture window (as shown in
Step 3 of Capturing Your Video) and under Record Settings, click
Change. Make sure Adaptec PCI Capture Device is selected.
■
To avoid choppy video in a captured file, especially a long video
clip, users should disable any scanning background programs
such as virus software or any CPU-loaded software.
Need Help Burning Your DVD?
■
In rare instances, while burning your video to DVD, an error
message may appear, such as Bit rate too high. If this happens,
double-click the thumbnail in MyDVD’s Main project window.
Select the End Frame on the Trimming window and remove
about 5 to 10 seconds of video from the end. Close the
Trimming window, save the project and try again. If the
message persists, open the Trimming window again and check
the video for static. If the static exists on the video, trim back to
a point on the video where static does not exist.
21
VideOh! DVD Media Center: Getting Started
Getting Help from Adaptec
If you have questions about installing or using your Adaptec
product, check this document first—you will find answers to most
of your questions here. If you need further assistance:
■
Search the Adaptec Support Knowledgebase (ASK) at
ask.adaptec.com for articles, troubleshooting tips, and frequently
asked questions for your product.
■
For support via Email, submit your question to Adaptec's
Technical Support Specialists at ask.adaptec.com.
■
To order Adaptec products, including accessories and cables,
call +1 408-957-7274.
Before contacting Technical Support, you need your unique
12-digit TSID number. The TSID number is included in your
package on two white, bar-coded labels, like the example below.
Affix a TSID label here for safe-keeping:
22
R
Adaptec, Inc.
691 South Milpitas Boulevard
Milpitas, CA 95035 USA
©2003 Adaptec, Inc.
All rights reserved. Adaptec and the Adaptec logo
are trademarks of Adaptec, Inc. which may be
registered in some jurisdictions.
Part Number: 513615-06, Ver. AA, LB 04/03