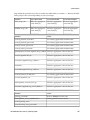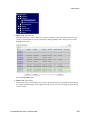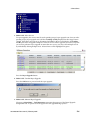
1
Oracle® Communications
Platform 6.0 Configuration Procedure Reference
909-2209-001 Revision G
February 2014
Oracle® Communications Platform 6.0 Configuration Procedure Reference
Copyright © 2010 , 2014, Oracle and/or its affiliates. All rights reserved.
This software and related documentation are provided under a license agreement containing restrictions
on use and disclosure and are protected by intellectual property laws. Except as expressly permitted in your
license agreement or allowed by law, you may not use, copy, reproduce, translate, broadcast, modify, license,
transmit, distribute, exhibit, perform, publish, or display any part, in any form, or by any means. Reverse
engineering, disassembly, or decompilation of this software, unless required by law for interoperability, is
prohibited.
The information contained herein is subject to change without notice and is not warranted to be error-free.
If you find any errors, please report them to us in writing.
If this is software or related documentation that is delivered to the U.S. Government or anyone licensing it
on behalf of the U.S. Government, the following notice is applicable:
U.S. GOVERNMENT RIGHTS Programs, software, databases, and related documentation and technical
data delivered to U.S. Government customers are "commercial computer software" or "commercial technical
data" pursuant to the applicable Federal Acquisition Regulation and agency-specific supplemental regulations.
As such, the use, duplication, disclosure, modification, and adaptation shall be subject to the restrictions
and license terms set forth in the applicable Government contract, and, to the extent applicable by the terms
of the Government contract, the additional rights set forth in FAR 52.227-19, Commercial Computer Software
License (December 2007). Oracle America, Inc., 500 Oracle Parkway, Redwood City, CA 94065.
This software or hardware is developed for general use in a variety of information management applications.
It is not developed or intended for use in any inherently dangerous applications, including applications
that may create a risk of personal injury. If you use this software or hardware in dangerous applications,
then you shall be responsible to take all appropriate fail-safe, backup, redundancy, and other measures to
ensure its safe use. Oracle Corporation and its affiliates disclaim any liability for any damages caused by
use of this software or hardware in dangerous applications.
Oracle and Java are registered trademarks of Oracle and/or its affiliates. Other names may be trademarks
of their respective owners.
Intel and Intel Xeon are trademarks or registered trademarks of Intel Corporation. All SPARC trademarks
are used under license and are trademarks or registered trademarks of SPARC International, Inc. AMD,
Opteron, the AMD logo, and the AMD Opteron logo are trademarks or registered trademarks of Advanced
Micro Devices. UNIX is a registered trademark of The Open Group.
This software or hardware and documentation may provide access to or information on content, products,
and services from third parties. Oracle Corporation and its affiliates are not responsible for and expressly
disclaim all warranties of any kind with respect to third-party content, products, and services. Oracle
Corporation and its affiliates will not be responsible for any loss, costs, or damages incurred due to your
access to or use of third-party content, products, or services.
Table of Contents
Chapter 1: 1 Introduction..............................................................................9
1.1 References........................................................................................................................................10
1.2 Acronyms........................................................................................................................................10
1.3 Terminology....................................................................................................................................11
1.4 Customer Care Center...................................................................................................................12
Chapter 2: 2 Acquiring Firmware..............................................................15
2.1 Acquiring Firmware......................................................................................................................16
Chapter 3: 3 Procedures...............................................................................17
3.1 Aggregation Switch - NetConfig Procedures.............................................................................18
3.1.1 Configure Cisco 4948/4948E/4948E-F aggregation switches (PM&C
installed)(netConfig)..........................................................................................................18
3.1.2 Configure Cisco 4948/4948E/4948E-F aggregation switches (RMS system no
PM&C)(netConfig).............................................................................................................35
3.1.3 Replace a failed 4948/4948E/4948E-F switch (PM&C Installed) (netConfig).......51
3.1.4 Replace a failed 4948/4948E/4948E-F switch (RMS system no
PM&C)(netConfig).............................................................................................................57
3.1.5 Backup Cisco 4948/4948E/4948E-F Aggregation Switch and/or Cisco 3020
Enclosure Switch (netConfig)...........................................................................................62
3.1.6 SwitchConfig to NetConfig Repository Configuration.............................................63
3.1.7 Cisco 4948/4948E/4948E-F switchconfig to netConfig Migration..........................72
3.2 C-Class Enclosure Switch - NetConfig Procedures...................................................................74
3.2.1 Configure Cisco 3020 switch (netConfig)....................................................................74
3.2.2 Reconfigure a failed 3020 switch (netConfig).............................................................84
3.2.3 Configure HP 6120XG switch (netConfig)..................................................................85
3.2.4 Reconfigure a failed HP 6120XG switch (netConfig).................................................89
3.2.5 Backup 6120XG Enclosure Switch................................................................................90
3.2.6 Configure Port Mirroring on Cisco 3020 and/or HP 6120XG Switches.................92
3.2.7 HP 6120XG switchconfig to netConfig Migration......................................................94
3.2.8 Cisco 3020 switchconfig to netConfig Migration........................................................96
3.2.9 Upgrade 3020 Switch IOS Firmware............................................................................97
3.2.10 Upgrade HP 6120XG Switch Firmware...................................................................106
909-2209-001 Revision G, February 2014
iii
3.2.11 Configure QoS (DSCP and/or CoS) on HP 6120XG Switches..............................111
3.3 Brocade Switch - SwitchConfig Procedures.............................................................................112
3.3.1 Configure Brocade Switches........................................................................................112
3.3.2 Upgrade Brocade Switch Firmware...........................................................................115
3.3.3 Configure Zones in Brocade Switches.......................................................................118
3.3.4 Configure Brocade Switch SNMP Trap Target.........................................................123
3.4 SAN Storage Arrays Procedures................................................................................................126
3.4.1 Set IP on Fibre Channel Disk Controllers..................................................................126
3.4.2 Configuring Fibre Channel Disk Controllers............................................................127
3.4.3 Configuring Advanced Settings on MSA2012fc Fibre Channel Disk
Controllers.........................................................................................................................129
3.4.4 Configuring Advanced Settings on P2000 Fibre Channel Disk Controllers.........130
3.4.5 Upgrade Firmware on MSA 2012Fc Disk Controllers.............................................131
3.4.6 Upgrade Firmware on MSA P2000 Disk Controllers...............................................133
3.4.7 Replacing a Failed Disk in MSA 2012Fc Array.........................................................134
3.4.8 Replacing a Failed Disk in MSA P2000 Disk Array.................................................135
3.5 Blade Server Procedures.............................................................................................................139
3.5.1 Upgrade Blade Server Firmware................................................................................139
3.5.2 Confirm/Upgrade Blade Server BIOS Settings........................................................143
3.5.3 Configure Blade Server iLO Password for Administrator Account......................144
3.5.4 Accessing the c-Class iLO Virtual Serial Port...........................................................146
3.5.5 Configure Syscheck Default Route Ping Test...........................................................146
3.5.6 Preparing HP Blade System for Extended Power Outage......................................147
3.5.7 Bringing up HP Blade System After Extended Power Outage..............................148
3.6 C7000 Enclosure Procedures......................................................................................................148
3.6.1 Configure Initial OA IP................................................................................................148
3.6.2 Configure initial OA settings via configuration wizard..........................................149
3.6.3 Configure OA Security.................................................................................................160
3.6.4 Upgrade or Downgrade OA Firmware......................................................................161
3.6.5 Store OA Configuration on Management Server.....................................................164
3.6.6 Restore OA Configuration from Management Server.............................................166
3.6.7 Adding a redundant Onboard Administrator to enclosure...................................168
3.6.8 Replacing Onboard Administrator.............................................................................168
3.6.9 Add SNMP trap destination on OA...........................................................................172
3.6.10 Delete SNMP trap destination on OA.....................................................................174
3.7 DL360 and DL380 Server Procedures........................................................................................176
3.7.1 IPM DL360 or DL380 Server........................................................................................176
3.7.2 Upgrade DL360 or DL380 Server Firmware.............................................................176
3.8 PM&C Procedures.......................................................................................................................186
3.8.1 Deploying Virtualized PM&C Overview..................................................................186
3.8.2 Installing TVOE on the Management Server............................................................189
909-2209-001 Revision G, February 2014
iv
3.8.3 TVOE Network Configuration....................................................................................189
3.8.4 Deploy PM&C Guest....................................................................................................195
3.8.5 Setup PM&C..................................................................................................................197
3.8.6 Configure PM&C application......................................................................................201
3.8.7 Add Cabinet and Enclosure to the PM&C system inventory.................................204
3.8.8 Edit an Enclosure in the PM&C system inventory...................................................207
3.8.9 Adding ISO Images to the PM&C Image Repository..............................................209
3.8.10 IPM Servers Using PM&C Application...................................................................213
3.8.11 Install/Upgrade Applications Using PM&C..........................................................216
3.8.12 Install PM&C on redundant DL360 or DL380........................................................219
3.8.13 Configure Management Server SNMP trap target.................................................222
3.8.14 PM&C NetBackup Client Installation and Configuration....................................222
3.8.15 Add Rack Mount Server to the PM&C System Inventory....................................224
3.8.16 Edit Rack Mount Server in the PM&C System Inventory.....................................227
3.8.17 Finding and Adding a Rack Mount Server to the PM&C System
Inventory............................................................................................................................230
3.8.18 Accepting Upgrades Using PM&C...........................................................................233
3.8.19 Rejecting Upgrades Using PM&C............................................................................235
3.8.20 Initialize PM&C Application.....................................................................................237
3.8.21 Configure PM&C application guest Netbackup virtual disk..............................237
3.8.22 PM&C Guest Migrate NetBackup Client to New File System............................239
3.8.23 Initialize PM&C Application using CLI...................................................................240
3.8.24 Initialize PM&C Application using the GUI...........................................................241
3.9 Configuring SAN.........................................................................................................................248
3.9.1 Configure SAN Storage Using PM&C Application.................................................248
3.9.2 Remove SAN Volume from Blade Server Without Preserving Existing TPD
Installation.........................................................................................................................251
3.10 Virtualization Procedures.........................................................................................................252
3.10.1 Create guest server using PM&C application.........................................................252
3.10.2 Delete guest server using PM&C application.........................................................257
3.10.3 Create guest server from guest archive using PM&C application.......................260
3.11 General TPD Based Application Procedures.........................................................................266
3.11.1 Backup Procedure for TVOE.....................................................................................266
3.11.2 Configure NTP on TPD based Application.............................................................270
3.11.3 Add SNMP trap destination on TPD based Application......................................271
3.11.4 Delete SNMP trap destination on TPD based Application...................................274
3.11.5 Application NetBackup Client Install/Upgrade Procedures...............................277
3.11.6 Changing SNMP Configuration settings for iLO2.................................................280
3.11.7 Changing SNMP Configuration Settings for iLO 3 and iLO4..............................284
3.11.8 Netbackup Client Install/Upgrade with nbAutoInstall........................................288
3.11.9 Netbackup Client Install/Upgrade with platcfg....................................................289
909-2209-001 Revision G, February 2014
v
3.11.10 Create LV and Filesystem for Netbackup Client Software.................................295
3.11.11 Migrate Netbackup Client to New Filesystem......................................................295
3.11.12 Create Netbackup Client Config File.....................................................................296
3.12 TVOE Host Procedures.............................................................................................................297
3.12.1 Enable Virtual Guest Watchdogs as appropriate for the application..................297
3.12.2 TVOE Netbackup Client Configuration..................................................................298
Appendix A: Appendix A Using WinSCP............................................299
A.1 Using WinSCP.............................................................................................................................300
Appendix B: Appendix B P2000 MSA USB Driver Installation.......302
B.1 P2000 MSA USB Driver Installation..........................................................................................303
Appendix C: Appendix C Determining which Onboard
Administrator is Active.........................................................................306
C.1 Determining Which Onboard Administrator is Active.........................................................307
Appendix D: Appendix D Accessing Tekelec Customer Support
Site.............................................................................................................308
D.1 Accessing Tekelec’s Customer Support Site...........................................................................309
Appendix E: Appendix E Disabling TFTP............................................310
E.1 Turning off TFTP.........................................................................................................................311
909-2209-001 Revision G, February 2014
vi
List of Figures
Figure 1: Example Of An Instruction That Indicates The Server To Which It Applies.........................11
909-2209-001 Revision G, February 2014
vii
List of Tables
Table 1: Acronyms............................................................................................................................................10
Table 2: Terminology.......................................................................................................................................11
909-2209-001 Revision G, February 2014
viii
Chapter
1
1 Introduction
Topics:
•
•
•
•
1.1 References.....10
1.2 Acronyms.....10
1.3 Terminology.....11
1.4 Customer Care Center.....12
This document describes the procedures to configure
the hardware and platform components of an HP
c-Class system. An HP c-class system consists of
enclosures and server blades. In addition, it may
include components such as switches, SAN
controllers, and management servers. It is assumed
that prior to executing any procedures in this
document, power is available to each component
and all networking cabling is in place.
The procedures in this document are not in any
specific order. Each procedure describes a discrete
action. It is expected that application engineers will
reference individual procedures within this
document in their specific installation and
configuration procedures. It is the application
documentation that will provide the proper
sequencing of procedures, application specific
supplemental steps, and the passwords to be used
during the configuration.
Procedures from this document can be referenced
by their section numbers. For example: "Execute
Section 3.10.1 "Upgrade DL360 or DL380 Server
Firmware" of 909-2209-001."
FOR PLATFORM 4.2, REFER TO REVISION D
OF 909-1620-001.
FOR PLATFORM 5.X, REFER TO LATEST
REVISION OF 909-1620-001.
909-2209-001 Revision G, February 2014
9
1 Introduction
1.1 References
Internal References
1. Formal Peer Review Process, PD001866, v6.21, Nov 2008
2. 909-1638-001 Disaster Recovery for HP c-Class
3. HP Solutions Firmware Upgrade Pack, 795-0000-2xx, v2.2.x (latest recommended, 2.2.1 minimum)
4. TR006683: NOAMP on HP DL380 Network Interconnect
5. TR006851: Platform 5.0 Generic HP c-Class Networking Interconnect
Refer to D.1 Accessing Tekelec’s Customer Support Site to access the Tekelec documentation.
External References
6. 909-2130-001 Initial Product Manufacture
1.2 Acronyms
An alphabetized list of acronyms used in the document:
Table 1: Acronyms
Acronym
Definition
BIOS
Basic Input Output System
CD
Compact Disk
DVD
Digital Versatile Disc
EBIPA
Enclosure Bay IP Addressing
FRU
Field Replaceable Unit
HP c-Class
HP blade server offering
iLO
Integrated Lights Out remote management port
IE
Internet Explorer
IPM
Initial Product Manufacture – the process of
installing TPD on a hardware platform
MSA
Modular Smart Array
OA
HP Onboard Administrator
OS
Operating System (e.g. TPD)
PM&C
Platform Management & Configuration
909-2209-001 Revision G, February 2014
10
1 Introduction
Acronym
Definition
RMS
Rack Mount Server
SAN
Storage Area Network
SFTP
Secure File Transfer Protocol
SNMP
Simple Network Management Protocol
TPD
Tekelec Platform Distribution
VSP
Virtual Serial Port
1.3 Terminology
Multiple server types may be involved with the procedures in this manual. Therefore, most steps in
the written procedures begin with the name or type of server to which the step applies. For example:
Figure 1: Example Of An Instruction That Indicates The Server To Which It Applies
Table 2: Terminology
Management Server
An HP ProLiant DL 360/DL 380 server that i has
physical connectivity required to configure
switches and may host the PM&C application or
serve other configuration purposes.
PM&C
An application that supports platform-level
management of Tekelec HP systems, such as the
capability to manage and provision platform
components of the system, so they can host
applications.
Virtual PM&C
Additional term for PM&C - used in networking
procedures to distinguish activities done on a
PM&C guest and not the TVOE host running on
the Management server.
909-2209-001 Revision G, February 2014
11
1 Introduction
Server
A generic term to refer to a server, regardless of
underlying hardware, be it physical hardware or
a virtual TVOE guest server.
Non-Segregated Network
PM&C network interconnect where all networks
(control, management, and others as needed)
utilize the same physical network (i.e. same bond,
same switch infrastructure). Typically, this means
the control VLAN is optionally tagged, and the
management and other possible VLANs are
required to be tagged.
Segregated Network
PM&C network interconnect where networks
(control, management, and others as needed)
utilize separate physical networks (i.e. separate
bonds, separate switch infrastructure). Typically,
this means the networks are untagged and on
separate bond interfaces.
NetBackup Feature
Feature that provides support of the Symantec
NetBackup client utility on an application server.
1.4 Customer Care Center
The Tekelec Customer Care Center is your initial point of contact for all product support needs. A
representative takes your call or email, creates a Customer Service Request (CSR) and directs your
requests to the Tekelec Technical Assistance Center (TAC). Each CSR includes an individual tracking
number. Together with TAC Engineers, the representative will help you resolve your request.
The Customer Care Center is available 24 hours a day, 7 days a week, 365 days a year, and is linked
to TAC Engineers around the globe.
Tekelec TAC Engineers are available to provide solutions to your technical questions and issues 7
days a week, 24 hours a day. After a CSR is issued, the TAC Engineer determines the classification of
the trouble. If a critical problem exists, emergency procedures are initiated. If the problem is not critical,
normal support procedures apply. A primary Technical Engineer is assigned to work on the CSR and
provide a solution to the problem. The CSR is closed when the problem is resolved.
Tekelec Technical Assistance Centers are located around the globe in the following locations:
Tekelec - Global
Email (All Regions): [email protected]
• USA and Canada
Phone:
1-888-FOR-TKLC or 1-888-367-8552 (toll-free, within continental USA and Canada)
1-919-460-2150 (outside continental USA and Canada)
TAC Regional Support Office Hours:
909-2209-001 Revision G, February 2014
12
1 Introduction
8:00 a.m. through 5:00 p.m. (GMT minus 5 hours), Monday through Friday, excluding holidays
• Caribbean and Latin America (CALA)
Phone:
+1-919-460-2150
TAC Regional Support Office Hours (except Brazil):
10:00 a.m. through 7:00 p.m. (GMT minus 6 hours), Monday through Friday, excluding holidays
• Argentina
Phone:
0-800-555-5246 (toll-free)
• Brazil
Phone:
0-800-891-4341 (toll-free)
TAC Regional Support Office Hours:
8:00 a.m. through 5:48 p.m. (GMT minus 3 hours), Monday through Friday, excluding holidays
• Chile
Phone:
1230-020-555-5468
• Colombia
Phone:
01-800-912-0537
• Dominican Republic
Phone:
1-888-367-8552
• Mexico
Phone:
001-888-367-8552
• Peru
Phone:
0800-53-087
• Puerto Rico
Phone:
1-888-367-8552 (1-888-FOR-TKLC)
• Venezuela
Phone:
909-2209-001 Revision G, February 2014
13
1 Introduction
0800-176-6497
• Europe, Middle East, and Africa
Regional Office Hours:
8:30 a.m. through 5:00 p.m. (GMT), Monday through Friday, excluding holidays
• Signaling
Phone:
+44 1784 467 804 (within UK)
• Software Solutions
Phone:
+33 3 89 33 54 00
• Asia
• India
Phone:
+91-124-465-5098 or +1-919-460-2150
TAC Regional Support Office Hours:
10:00 a.m. through 7:00 p.m. (GMT plus 5 1/2 hours), Monday through Saturday, excluding
holidays
• Singapore
Phone:
+65 6796 2288
TAC Regional Support Office Hours:
9:00 a.m. through 6:00 p.m. (GMT plus 8 hours), Monday through Friday, excluding holidays
909-2209-001 Revision G, February 2014
14
Chapter
2
2 Acquiring Firmware
Topics:
•
2.1 Acquiring Firmware.....16
909-2209-001 Revision G, February 2014
15
2 Acquiring Firmware
2.1 Acquiring Firmware
Several procedures in this document pertain to the upgrading of firmware on various servers and
hardware devices that are part of the Platform 6.0 configuration. The required firmware media and
binaries are managed and distributed as part of the HP Solutions Firmware Upgrade Pack 2.2.x, released
under Tekelec Part Number 795-0000-2yy The minimum firmware release required for Platform 6.0
is HP Solutions Firmware Upgrade Pack 2.2.1 (PN: 795-0000-211) although the latest 2.2.x release is
recommended.
The HP Solutions Firmware Upgrade Pack contains multiple BOM items including media and
documentation. This document only requires access to the media (DVD or ISOs) as well as the Release
Notes [3] document. The Upgrade Procedures document is not used as the firmware upgrade procedures
specific to this document are provided here.
The two pieces of required firmware media provided in the HP Solutions Firmware Upgrade Kit 2.2.x
releases are:
• HP Support Pack for Proliant ISO
• HP Misc Firmware ISO
Refer to the Release Notes of the target release of the HP Solutions Firmware Upgrade Pack [3] used to
determine specific media part numbers to use and the specific firmware versions provided.
Platform 6.0 Servers and devices requiring possible firmware updates are:
• HP c7000 BladeSystem Enclosure Components:
•
•
•
•
•
Onboard Administrator
Cisco 3020 Enclosure Switches
HP6120XG Enclosure Switches
Brocade Fibre Channel Switches
Blade Servers (BL460/BL620)
• HP Rack Mount Servers (DL360 / DL380)
• HP External Storage Systems
•
•
•
•
MSA2012fc
D2200sb (Storage Blade)
D2700
P2000
• Cisco 4948/4948E/4948E-F Rack Mount Network Switch
1
Where yy is a 2-digit number which increases with every new release.
909-2209-001 Revision G, February 2014
16
Chapter
3
3 Procedures
Topics:
•
•
•
•
•
•
•
•
•
•
•
•
3.1 Aggregation Switch - NetConfig
Procedures.....18
3.2 C-Class Enclosure Switch - NetConfig
Procedures.....74
3.3 Brocade Switch - SwitchConfig
Procedures.....112
3.4 SAN Storage Arrays Procedures.....126
3.5 Blade Server Procedures.....139
3.6 C7000 Enclosure Procedures.....148
3.7 DL360 and DL380 Server Procedures.....176
3.8 PM&C Procedures.....186
3.9 Configuring SAN.....248
3.10 Virtualization Procedures.....252
3.11 General TPD Based Application
Procedures.....266
3.12 TVOE Host Procedures.....297
909-2209-001 Revision G, February 2014
17
3 Procedures
3.1 Aggregation Switch - NetConfig Procedures
3.1.1 Configure Cisco 4948/4948E/4948E-F aggregation switches (PM&C
installed)(netConfig)
This procedure will configure 4948/4948E/4948E-F switches with an appropriate IOS and configuration
from a single management server and virtual PM&C for use with the c-Class or RMS platform.
This procedures assumes a Platform 6.0 interconnect. If the system being configured follows a
Platform 5.0 interconnect, then Platform 5.0 procedures should be followed.
Prerequisites:
•
•
•
•
3.8.2 Installing TVOE on the Management Server,
3.8.3 TVOE Network Configuration,
3.8.4 Deploy PM&C Guest, and
Application management network interfaces must be configured on the management servers prior
to executing this procedure.
• Application username and password for creating switch backups must be configured on the
management server prior to executing this procedure.
Procedure Reference Tables:
Steps within this procedure may refer to variable data indicated by text within "<>". Refer to this table
for the proper value to insert depending on your system type.
Variable
Serial Port
<switch1A_serial_port>
ttyS4
<switch1B_serial_port>
ttyS5
Variable
Cisco WS C4948
Cisco WS C4948E
Cisco WS C4948E-F
<IOS_image_file>
Fill in the appropriate
value from [3]:
___________
Fill in the appropriate
value from [3]:
_____________
Fill in the appropriate
value from [3]:
_____________
<PROM_image_file>
Fill in the appropriate
value from [3]:
___________
Fill in the appropriate
value from [3]:
___________
Fill in the appropriate
value from [3]:
___________
Variable
Value
<switch_platform_username>
See referring application documentation
<switch_platform_password>
See referring application documentation
<switch_console_password>
See referring application documentation
<switch_enable_password>
See referring application documentation
909-2209-001 Revision G, February 2014
18
3 Procedures
<management_server_mgmtVLAN_ip_address> Fill in the appropriate value for this site:
<pmac_mgmtVLAN_ip_address>
Fill in the appropriate value for this site:
<switch_mgmtVLAN_id>
Fill in the appropriate value for this site:
<switch1A_mgmtVLAN_ip_address>
Fill in the appropriate value for this site:
<mgmt_Vlan_subnet_id>
Fill in the appropriate value for this site:
<netmask>
Fill in the appropriate value for this site:
<switch1B_mgmtVLAN_ip_address>
Fill in the appropriate value for this site:
<switch_Internal_VLANS_list>
Fill in the appropriate value for this site:
<management_server_mgmtInterface>
Fill in the appropriate value for this site:
<management_server_iLO_ip>
Fill in the appropriate value for this site:
<customer_supplied_ntp_server_address>
Fill in the appropriate value for this site:
Variable
Value
<platcfg_password>
Refer to TR006061 for this value
<management_server_mgmtInterface>
Value gathered from site survey
<switch_backup_user>
pmacadmin
<switch_backup_user_password>
Refer to TR006061
Note: The onboard administrators are not available during the configuration of Cisco
4948/4948E/4948E-F switches.
Note: Uplinks must be disconnected from the customer network prior to executing this procedure.
One of the steps in this procedure will instruct when to reconnect these uplink cables. Refer to the
application appropriate schematic or procedure for determining which cables are used for customer
uplink.
Needed Material:
•
•
•
•
HP Misc. Firmware DVD
HP Solutions Firmware Upgrade Pack Release Notes [3]
Application specific documentation (documentation that referred to this procedure)
Template xml files on the application media.
Note: Filenames and sample command line input/output throughout this section do not specifically
reference the 4948E-F. Template settings are identical between the 4948E and 4948E-F. The original
4948 switch -- as opposed to the 4948E or the 4948E-F is referred to simply by the model number 4948.
Where all three switches are being referred to, this will be made clear by reference to '4948 / 4948E /
4948 E-F' switches.
Note: If a procedural STEP fails to execute successfully, STOP and contact the Customer Care Center
by referring to the 1.4 Customer Care Center section of this document.
1. Management server iLO: Login and launch the integrated remote console.
909-2209-001 Revision G, February 2014
19
3 Procedures
On Server1A login to iLO in IE using password provided by application:
http://<management_server_iLO_ip>
Click in the Remote Console tab and launch the Integrated Remote Console on the server.
Click Yes if the Security Alert pops up.
If not already done so, login as root.
2. Management server: Procedure pre-check - verify hardware type
Certain steps in this procedure require enabling and disabling ethernet interfaces. This procedure
supports DL360 and DL380 servers. The interfaces that are to be enabled and disabled are different
for each server type.
To determine the interface name, on the server, execute the following command:
# cat /proc/net/bonding/bond0 | grep Interface
Slave Interface: eth01
Slave Interface: eth02
#
Note the slave interface names of ethernet interfaces to use in subsequent steps. The first line will
be the value for <ethernet_inteface_1> and the second line will be the value for
<ethernet_interface_2>.
For example, from the sample output provided, <ethernet_inteface_1> would be eth01 .
If the output from the above command is not successful, refer back to the application documentation.
3. Management server: Procedure pre-check determine Platform version.
On each management server, determine the Platform version of the system by issuing the following
command:
# appRev
If the following is shown in the output, the Platform version is 6.0 :
Base Distro Release: 6.0.x-x.x.x
The values of x-x.x.x do not matter. The value of 6.0 shows the platform verison. If the command
shows A Base Distro Release version lower than 6.0 or fails to execute, stop this procedure and
refer back to application procedures. It is possible the wrong version of TVOE/TPD is installed.
4. Management Server: Procedure pre-check - verify virtual PM&C is installed.
PM&C is required to be installed prior to this procedure being attempted. Verify virtual PM&C
installation by issuing the following commands as root on the management server:
# virsh list --all
Id Name
State
---------------------------------6 vm-pmac1A
running
If this command provides no output, it is likely that a virtual instace of PM&C is not installed.
Refer to application documentation or contact Tekelec Customer Service.
909-2209-001 Revision G, February 2014
20
3 Procedures
5. Management server: Setup conserver serial access for switch1A and switch1B and open the firewall
to allow for future tftp use in this procedure.
From management server, configure the conserver service to enable serial access to the switches:
For switch1A:
# conserverAdm --addConsole --name=switch1A_console --device=/dev/ttyS4
For switch1B:
# conserverAdm --addConsole --name=switch1B_console --device=/dev/ttyS5
Open the conserver port on the firewall of the TVOE management server:
# iptables -I INPUT -s <pmac_mgmtVLAN_ip_address>/255.255.255.255 -p all -j ACCEPT
# service iptables save
You should be returned to the command line prompt. If so, continue to the next step; if not, contact
Customer Care Center for assistance.
6. Virtual PM&C: Login to the console of the virtual PM&C.
Note: On a TVOE host, If you launch the virsh console, i.e "# virsh console X" or from the
virsh utility "virsh # console X" command and you get garbage characters or output is not quite
right, then more than likely there is a stuck "virsh console" command already being run on the
TVOE host. Exit out of the "virsh console", then run "ps -ef |grep virsh", then kill the existing
process "kill -9 <PID>". Then execute the "virsh console X" command. Your console session
should now run as expected.
From management server, log into the console of the virtual pmac instance found in step 4.
# virsh console vm-pmac1A
Connected to domain vm-pmac1A
Escape character is ^]
<Press ENTER key>
CentOS release 6.2 (Final)
Kernel 2.6.32-220.7.1.el6prerel6.0.0_80.13.0.x86_64 on an x86_64
vm-pmac1A login: root
Password:
Last login: Fri May 25 16:39:04 on ttyS4
If this command fails, it is likely that a virtual instance of PM&C is not installed. Refer to application
documentation or contact Tekelec Customer Service.
7. Virtual PM&C: Verify PM&C release version.
Verify the pmac release version.
# appRev
If the following is shown in the output, the PM&C version is 5.0:
Product Name: PMAC
Product Release: 5.0.0_x.x.x
909-2209-001 Revision G, February 2014
21
3 Procedures
If the output does not contain "Product Name: PMAC" or does not contain a PMAC version of 5.0
or higher, then stop this procedure and refer back to the application instructions
8. Virtual PM&C: Get IOS image and PROM information on the switches.
Note: ROM & PROM are intended to have the same meaning for this procedure
Connect to switch1A, check the IOS and PROM version.
Connect serially to switch1A by issuing the following command.
# /usr/bin/console -M <management_server_mgmtVLAN_ip_address> -l platcfg
switch1A_console
Enter platcfg@pmac5000101's password: <platcfg_password>
[Enter `^Ec?' for help]
Press Enter
Switch> show version | include image
System image file is "bootflash:cat4500-ipbasek9-mz.122-53.SG2.bin"
Switch> show version | include ROM
ROM: 12.2(31r)SGA1
System returned to ROM by reload
Note the IOS image & ROM version for comparison in a following step.
To exit from the console, enter <ctrl-e><c><.> and you will be returned to the server prompt.
Connect to switch1B, check the IOS and PROM version.
Connect serially to switch1B by issuing the following command:
# /usr/bin/console -M <management_server_mgmtVLAN_ip_address> -l platcfg
switch1B_console
Enter platcfg@pmac5000101's password: <platcfg_password>
[Enter `^Ec?' for help]
Press Enter
Switch> show version | include image
System image file is "bootflash:cat4500-ipbasek9-mz.122-53.SG2.bin"
Switch> show version | include ROM
ROM: 12.2(31r)SGA1
System returned to ROM by reload
Note the IOS image & ROM version for comparison in a following step.
To exit from the console, enter <ctrl-e><c><.> and you will be returned to the server prompt.
9. Virtual PM&C: Determine if switch IOS and/or PROM upgrade is required
Compare the IOS and PROM version from previous step with the version specified in the Firmware
Upgrade Pack Release Notes [3] for the switch model being used.
Check the version from the previous step against the version from the release notes referenced. If
the versions are different, or if the IOS version from the previous step does not have "k9" in the
name, then an upgrade is necessary. Check below for the appropriate action.
FOLLOW ONE OF THESE CHOICES:
• If switch1A or both switches require an upgrade, then continue to the next step.
• If switch1B requires an upgrade, skip to step 23.
• If neither switch requires an upgrade, then skip to step 25.
909-2209-001 Revision G, February 2014
22
3 Procedures
10. Virtual PM&C: Verify IOS & PROM images on the system. If the appropriate image does not exist,
copy the image to the management server and upload the switch.
Determine if the IOS & PROM images for the 4948/4948E/4948E-F is on the management server.
# ls /var/TKLC/smac/image/<IOS_image_file>
# ls /var/TKLC/smac/image/<PROM_image_file>
If the file exists, skip the remainder of this step and continue with the next step. If the file does not
exist, copy the file from the firmware media and ensure the file is specified by the Firmware Upgrade
Pack Release Notes [3]
11. Virtual PM&C: Prepare the Virtual PM&C for tftp transfer of IOS file.
Ensure that the tftp service is not running. A zero is expected.
# tpdProvd --client --noxml --ns=Xinetd getXinetdService service tftp
Login on Remote: platcfg
Password of platcfg:
0
#
If the above command returns a 1, stop it first by executing the following command:
# tpdProvd --client --noxml --ns=Xinetd stopXinetdService service tftp force yes
Login on Remote: platcfg
Password of platcfg:
1
#
This should return a 1, if not then run the command again..
Then run Appendix E Disabling TFTP to ensure tftp is turned off.
Edit the /etc/xinetd.d/tftp file for the values in bold so that tftp will work appropriately:
# vim /etc/xinetd.d/tftp
service tftp
{
socket_type
protocol
wait
user
server
server_args
disable
per_source
cps
flags
}
#
=
=
=
=
=
=
=
=
=
=
dgram
udp
yes
root
/usr/sbin/in.tftpd
-s /var/TKLC/smac/image
no
11
100 2
IPv4
Ensure that the tftp service is now running. A "1" is expected.
# tpdProvd --client --noxml --ns=Xinetd getXinetdService service tftp
Login on Remote: platcfg
Password of platcfg:
1
#
909-2209-001 Revision G, February 2014
23
3 Procedures
If the output is "0" then, execute the commands that enable tftp transfer.
# tpdProvd --client --noxml --ns=Xinetd startXinetdService service tftp
Login on Remote: platcfg
Password of platcfg: <platcfg_password>
12. Virtual PM&C -> Management Server: Manipulate host server physical interfaces.
Note: On a TVOE host, If you launch the virsh console, i.e., "# virsh console X" or from the
virsh utility "virsh # console X" command and you get garbage characters or output is not quite
right, then more than likely there is a stuck "virsh console" command already being run on the
TVOE host. Exit out of the "virsh console", then run "ps -ef |grep virsh", then kill the existing
process "kill -9 <PID>". Then execute the "virsh console X" command. Your console session
should now run as expected.
Exit from the virtual pmac console, by entering < ctrl-] > and you will be returned to the server
prompt.
If upgrading the IOS or PROM on switch1A:
Ensure that the interface of the server connected to switch1A is the only interface up and obtain
the IP address of the management server management interface by performing the following
commands:
# ifdown <ethernet_interface_2>
# ifup <ethernet_interface_1>
# ip addr show <management_server_mgmtInterface> | grep inet
The command output should contain the IP address of the variable
<management_server_mgmtVLAN_ip_address>
If upgrading the IOS or PROM on switch1B:
Ensure that the interface of the server connected to switch1B is the only interface up and obtain
the IP address of the management server management interface by performing the following
commands:
# ifdown <ethernet_interface_1>
# ifup <ethernet_interface_2>
# ip addr show <management_server_mgmtInterface> | grep inet
The command output should contain the IP address of the variable
<management_server_mgmtVLAN_ip_address>
Connect to the Virtual PMAC by logging into the console of the virtual pmac instance found in
step 4.
# virsh console vm-pmac1A
13. Virtual PM&C: Attach to switch console.
If upgrading the firmware on switch1A, connect serially to switch1A by issuing the following
command as root on management server:
# /usr/bin/console -M <management_server_mgmtVLAN_ip_address> -l platcfg
switch1A_console
Enter platcfg@pmac5000101's password: <platcfg_password>
909-2209-001 Revision G, February 2014
24
3 Procedures
[Enter `^Ec?' for help]
Press Enter
If the switch is not already in enable mode ("switch#" prompt) then issue the "enable" command,
otherwise continue with the next step.
Switch> enable
Switch#
If upgrading the firmware on switch1B, connect serially to switch1B by issuing the following
command as root on management server:
# /usr/bin/console -M <management_server_mgmtVLAN_ip_address> -l platcfg
switch1B_console
Enter platcfg@pmac5000101's password: <platcfg_password>
[Enter `^Ec?' for help]
Press Enter
If the switch is not already in enable mode ("switch#" prompt), then issue the "enable" command,
otherwise continue with the next step.
Switch> enable
Switch#
14. Virtual PM&C (switch console session): Configure ports on the 4948/4948E/4948E-F switch. To
ensure connectivity, ping the management server's management vlan ip address from the switch.
Platform version specific to be on the management vlan:
Switch# conf t
If upgrading the firmware on switch1A, use these commands:
Switch(config)# vlan <switch_mgmtVLAN_id>
Switch(config-vlan)# int vlan <switch_mgmtVLAN_id>
Switch(config-if)# ip address <switch1A_mgmtVLAN_ip_address> <netmask>
Switch(config-if)# no shut
Switch(config-if)# int gi1/40
If upgrading the firmware on switch1B, use these commands:
Switch(config)# vlan <switch_mgmtVLAN_id>
Switch(config-vlan)# int vlan <switch_mgmtVLAN_id>
Switch(config-if)# ip address <switch1B_mgmtVLAN_ip_address> <netmask>
Switch(config-if)# no shut
Switch(config-if)# int gi1/40
If the model is C4948, execute these commands:
Switch(config-if)# switchport trunk encap dot1q
Switch(config-if)# switchport mode trunk
Switch(config-if)# spanning-tree portfast trunk
Switch(config-if)# end
Switch# write memory
909-2209-001 Revision G, February 2014
25
3 Procedures
If the model is C4948E or 4948E-F, execute these commands:
Switch(config-if)# switchport mode trunk
Switch(config-if)# spanning-tree portfast trunk
Switch(config-if)# end
Switch# write memory
Now issue ping command:
Note: The ip address<pmac_mgmtVLAN_ip_address> should be in the reference table at the
beginning of this procedure.
Switch# ping <pmac_mgmtVLAN_ip_address>
Type escape sequence to abort.
Sending 5, 100-byte ICMP Echos to <pmac_mgmtVLAN_ip_address>, timeout
is 2 seconds:
!!!!!
Success rate is 100 percent (5/5), round trip min/avg/max = 1/1/4 ms
If ping is not successful , double check that the procedure was completed correctly by repeating
all steps up to this point. If after repeating those steps, ping is still unsuccessful, contact Customer
Care Center.
15. Virtual PM&C (Switch console session): Upgrade PROM
If upgrading the PROM, continue, otherwise skip to step 19.
Switch# copy tftp: bootflash:
Address or name of remote host []? <pmac_mgmt_VLAN_ip_address>
Source filename []? <PROM_image_file>
Destination filename [<PROM_image_file>]? [Enter]
Accessing tftp://<pmac_mgmt_VLAN_ip_address>/<PROM_image_file>...
Loading <PROM_image_file> from <pmac_mgmt_VLAN_ip_address> (via Vlan2): !!!!!!
[OK – 45606 bytes]
45606 bytes copied in 3.240 secs (140759 bytes/sec)
Switch#
16. Virtual PM&C (Switch console session): Reload the switch
Switch# reload
System configuration has been modified. Save? [yes/no]: no
Proceed with reload? [confirm] [Enter]
=== Boot messages removed ===
Type [Control-C] when Type control-C to prevent autobooting is displayed on the screen.
17. Virtual PM&C (Switch console session): Upgrade PROM
rommon 1 > boot bootflash:<PROM_image_file>
=== PROM upgrade messages removed ===
System will reset itself and reboot within few seconds....
18. Virtual PM&C (Switch console session): Verify Upgrade
909-2209-001 Revision G, February 2014
26
3 Procedures
The switch will reboot when the firmware upgrade completes. Allow it to boot up. Wait for the
following line to be printed:
Press RETURN to get started!
Would you like to terminate autoinstall? [yes]: [Enter]
Switch> show version | include ROM
ROM: 12.2(31r)SGA1
System returned to ROM by reload
Review the output and look for the ROM version. Verify that the version is the desired new version.
If the switch does not boot properly or has the wrong ROM version, contact Tekelec Customer
Care.
19. Virtual PM&C (switch console session): Upload the IOS to the switch and set it to be the active
IOS and delete the previous IOS verison.
On the switch, copy the IOS file over to the switch by issuing the following command sequence:
Switch> en
Switch# copy tftp: bootflash:
Address or name of remote host []? <pmac_mgmtVLAN_ip_address>
Source filename []? <IOS_image_file>
Destination filename [<IOS_image_file>]? Enter
Press Enter here, you do NOT want to change the filename.
Accessing tftp://<pmac_mgmtVLAN_ip_address>/<IOS_image_file>...
Loading <IOS_image_file> from <pmac_mgmtVLAN_ip_address> (via Vlan2):
!!!!!! [OK – 45606 bytes]
45606 bytes copied in 3.240 secs (140759 bytes/sec)
Switch# dir bootflash:
Directory of bootflash:/
1 -rwx 17779888 May 11 2011 02:25:23 -05:00
cat4500-entservicesk9-mz.122-53.SG.bin
2 -rwx 17779888 May 11 2011 02:25:23 -05:00
cat4500-ipbasek9-mz.122-53.SG2.bin
60817408 bytes total (43037392 bytes free)
20. Virtual PM&C (switch console session): Set the active IOS image and config-register from the
switch console session that was established.
Set the active IOS image:
Switch# conf t
Switch(config)# boot system flash bootflash:<ios_image_file>
Switch(config)# no boot system flash bootflash:<OLD_IOS_image_file>
Switch(config)# config-register 0x2102
Switch(config)# end
Switch# write memory
Switch#
Verify the changes:
Switch> en
Switch# show run | include boot
boot-start-marker
boot system flash bootflash: <ios_image_file>
boot-end-marker
909-2209-001 Revision G, February 2014
27
3 Procedures
Switch# show version | include register
Configuration register is 0xXXXX (will be 0x2102 at next reload)
Switch# reload
Proceed with reload? [confirm]
Wait until the switch reloads, then issue the following command to ensure the switch is at the
appropriate IOS version:
Switch> show version | include image
System image file is "bootflash:cat4500-ipbasek9-mz.122-53.SG2.bin"
If the switch is not at the appropriate version, stop here and contact Customer Care Center. If it is,
move on to the next step.
21. Virtual PM&C (switch console session): Delete any other IOS images if there are multiple IOS
images on the switch, delete the unused images.
Switch>en
Switch# show bootflash:
-#- --length-- -----date/time------ path
1 25771102 Jan 20 2012 08:20:08 <ios_image_file>
2 16332568 Jan 24 2012 18:54:44 <OLD_IOS_image>
Switch# delete /force /recursive bootflash:<OLD_IOS_image>
Repeat this step until the only image on the switch is <ios_image_file>
22. Virtual PM&C (switch console session): Reset switch to factory defaults
Note: There might be a switch message saying some default vlans will not be deleted, it is ok to
ignore this.
Note: There might be messages from the switch, if asked to confirm, press enter. If asked yes or
no, type in no and press enter.
Switch# conf t
Switch(config)# config-register 0x2101
Switch(config)# no vlan 2-4094
Switch(config)# end
Switch# write erase
Switch# reload
Wait until the switch reloads, then exit from console, enter <ctrl-e><c><.> and you will be returned
to the server prompt.
23. Virtual PM&C: Repeat for switch1B.
Repeat steps 12-22 for switch1B, then continue to the next step.
24. Virtual PM&C: Turn off the tftp service of the virtual PM&C.
Execute the commands that disable tftp transfer.
# tpdProvd --client --noxml --ns=Xinetd stopXinetdService service tftp
Login on Remote: platcfg
Password of platcfg: <platcfg_password>
1
#
909-2209-001 Revision G, February 2014
28
3 Procedures
Ensure that the tftp service is not running. A zero is expected.
# tpdProvd --client --noxml --ns=Xinetd getXinetdService service tftp
Login on Remote: platcfg
Password of platcfg:
0
#
If it returns a 1, stop the process by executing this command:
# tpdProvd --client --noxml --ns=Xinetd stopXinetdService service tftp force yes
Login on Remote: platcfg
Password of platcfg:
1
#
This should return a 1. Repeat this process until stopXinetdService returns a 1.
Then run Appendix E Disabling TFTP to ensure tftp is turned off.
Restore networking to original state:
# service network restart
25. Virtual PM&C:
Verify the initialization xml template file and configuration xml template file is present on the
system and is the correct version for the system.
# more /usr/TKLC/smac/etc/xml/switch/switch1A_4948_4948E_init.xml
# more /usr/TKLC/smac/etc/xml/switch/switch1B_4948_4948E_init.xml
# more /usr/TKLC/smac/etc/xml/switch/4948_4948E_configure.xml
If either file does not exist, copy the files onto the virtual pmac from the application media using
application provided procedures. .
26. Virtual PM&C: Modify switch1A_4948_4948E_init.xml and switch1B_4948_4948E_init.xml files
for information needed to initialize the switch.
Update the init.xml files for all values preceded by a dollar sign. For example, if a value has
$some_variable_name, that value will be modified and the dollar sign must be removed during
the modification.
When done editing the file, save and exit to return to the command prompt.
27. Virtual PM&C: Modify 4948_4948E_configure.xml for information needed to configure the
switches.
Update the configure.xml file for all values preceded by a dollar sign. For example, if a value has
$some_variable_name, that value will be modified and the dollar sign must be removed during
the modification.
When done editing the file, save and exit to return to the command prompt.
28. Virtual PM&C: Setup netConfig repository with necessary console information.
Use netConfig to create a repository entry that will use the conserver service that was configured
in the previous steps. This command will give the user several prompts. The prompts with
909-2209-001 Revision G, February 2014
29
3 Procedures
<variables> as the answers are site specific that the user MUST modify. Other prompts that don't
have a <variable> as an answer must be entered EXACTLY as they are shown here.
# netConfig --repo addService name=console_service
Service type? (tftp, ssh, conserver, oa) conserver
Service host? <management_server_mgmtVLAN_ip_address>
Enter an option name (q to cancel): user
Enter a value for user: platcfg
Enter an option name(q to cancel): password
Enter a value for password: <platcfg_password>
Verify password: <platcfg_password>
Enter an option name(q to cancel): q
Add service for console_service successful
To check that you entered the information correctly, use the following command:
# netConfig --repo showService name=console_service
and check the output, which will be similar to the one shown below:
# netConfig --repo showService name=console_service
Services:
Service Name: console_service
Type: conserver
Host: 10.240.8.47
Options:
password: D8396824B3B2B9EE
user: platcfg
#
29. Virtual PM&C: Setup netConfig repository with necessary tftp information.
Use netConfig to create a repository entry that will use the tftp service. This command will give
the user several prompts. The prompts with <variables> as the answers are site specific that the
user MUST modify. Other prompts that don't have a <variable> as an answer must be entered
EXACTLY as they are shown here.
# netConfig --repo addService name=tftp_service
Service type? (tftp, ssh, conserver, oa) tftp
Service host? <pmac_mgmtVLAN_ip_address>
Enter an option name (q to cancel): dir
Enter a value for user: /var/TKLC/smac/image/
Enter an option name(q to cancel): q
Add service for tftp_service successful
To check that you entered the information correctly, use the following command:
# netConfig --repo showService name=tftp_service
and check the output, which will be similar to the one shown below (Note: only the tftp service
info has been shown in this example. If the previous step and this step were done correctly, both
the console_service and tftp_service entries would show up)
# netConfig --repo showService name=tftp_service
Services:
Service Name: tftp_service
Type: tftp
Host: 10.240.8.4
Options:
909-2209-001 Revision G, February 2014
30
3 Procedures
dir: /var/TKLC/smac/image
#
30. Virtual PM&C: Setup netConfig repository with necessary ssh information.
Use netConfig to create a repository entry that will use the ssh service. This command will provide
the user with several prompts. The prompts with <variables> as the answers are site specific that
the user MUST modify. Other prompts that don't have a <variable> as answer must be entered
EXACTLY as they are shown here.
# netConfig --repo addService name=ssh_service
Service type? (tftp, ssh, conserver, oa) ssh
Service host? <pmac_mgmtVLAN_ip_address>
Enter an option name <q to cancel>: user
Enter the value for user: <switch_backup_user>
Enter an option name <q to cancel>: password
Enter the value for password: <switch_backup_user_password>
Verify Password: <switch_backup_user_password>
Enter an option name <q to cancel>: q
Add service for ssh_service successful
#
To ensure that you entered the information correctly, use the following command and inspect the
output, which will be similar to the one shown below.
# netConfig --repo showService name=ssh_service
Service Name: ssh_service
Type: ssh
Host: 10.240.8.4
Options:
password: C20F7D639AE7E7
user: root
#
31. Virtual PM&C: Setup netConfig repository with switch information.
Use netConfig to create a repository entry for switch1A. This command will give the user several
prompts. The prompts with <variables> as the answers are site specific that the user MUST modify.
Other prompts that don't have a <variable> as an answer must be entered EXACTLY as they are
shown here.
Note: The model can be 4948, 4948E, or 4948E-F depending on the model of the device. If you do
not know, stop now and contact Customer Care Center.
# netConfig --repo addDevice name=switch1A --reuseCredentials
Device Vendor? Cisco
Device Model? 4948E
Should the init oob adapter be added (y/n)? y
Adding consoleInit protocol for switch1A using oob...
What is the name of the service used for OOB access? console_service
What is the name of the console for OOB access? switch1A_console
What is the device console password? <switch_console_password>
Verify Password: <switch_console_password>
What is the platform access username? <switch_platform_username>
What is the platform user password? <switch_platform_password>
Verify Password: <switch_platform_password>
What is the device privileged mode password? <switch_enable_password>
Verify Password: <switch_enable_password>
Should the live network adapter be added (y/n)? y
Adding cli protocol for switch1A using network...
909-2209-001 Revision G, February 2014
31
3 Procedures
What is the address used for network device access? <switch1A_mgmtVLAN_ip_address>
Should the live oob adapter be added (y/n)? y
Adding cli protocol for switch1A using oob...
OOB device access already set: console_service
Device named switch1A successfully added.
To check that you entered the information correctly, use the following command:
# netConfig --repo showDevice name=switch1A
and check the output, which will be similar to the one shown below.
# netConfig --repo listDevices
Device: switch1A
Vendor:
Cisco
Model:
4948E
FW Ver:
0
Access:
Network: 10.240.64.34
Access:
OOB:
Service: console_service
Console: switch1A_console
Init Protocol Configured
Live Protocol Configured
#
32. Virtual PM&C: Setup netConfig repository with switch information
Use netConfig to create a repository entry for switch1B. This command will give the user several
prompts. The prompts with <variables> as the answers are site specific that the user MUST modify.
Other prompts that don't have a <variable> as an answer must be entered EXACTLY as they are
shown here.
Note: The model can be 4948, 4948E, or 4948E-F depending on the model of the device. If you do
not know, stop now and contact Customer Care Center.
Note: The switch name must not exceed 20 characters
# netConfig --repo addDevice name=switch1B --reuseCredentials
Device Vendor? Cisco
Device Model? 4948E
Should the init oob adapter be added (y/n)? y
Adding consoleInit protocol for switch1A using oob...
What is the name of the service used for OOB access? console_service
What is the name of the console for OOB access? switch1B_console
What is the device console password? <switch_console_password>
Verify Password: <switch_console_password>
What is the platform access username? <switch_platform_username>
What is the platform user password? <switch_platform_password>
Verify Password: <switch_platform_password>
What is the device privileged mode password? <switch_enable_password>
Verify Password: <switch_enable_password>
Should the live network adapter be added (y/n)? y
Adding cli protocol for switch1A using network...
What is the address used for network device access? <switch1B_mgmtVLAN_ip_address>
Should the live oob adapter be added (y/n)? y
Adding cli protocol for switch1A using oob...
OOB device access already set: console_service
Device named switch1B successfully added.
909-2209-001 Revision G, February 2014
32
3 Procedures
To check that you entered the information correctly, use the following command:
# netConfig --repo showDevice name=switch1B
and check the output, which will be similar to the one shown below.
# netConfig --repo showDevice name=switch1B
Device: switch1A
Vendor:
Cisco
Model:
4948E
FW Ver:
0
Access:
Network: 10.240.64.35
Access:
OOB:
Service: console_service
Console: switch1B_console
Init Protocol Configured
Live Protocol Configured
#
33. Virtual PM&C: Initialize each switch
Initialize switch1A by issuing the following command:
# netConfig --file=/usr/TKLC/smac/etc/switch/xml/switch1A_4948_4948E_init.xml
Processing file: /usr/TKLC/smac/etc/switch/xml/switch1A_4948_4948E_init.xml
#
Note: This step takes about 2-3 minutes to complete.
Check the output of this command for any errors. If this fails for any reason, stop this procedure
and contact Customer Care Center.
A successful completion of netConfig will return the user to the prompt.
Use netConfig to get the hostname of the switch, to verify that the switch was initialized properly,
and to verify that netConfig can connect to the switch.
# netConfig --device=switch1A getHostname
Hostname: switch1A
#
Note: If this command fails, stop this procedure and contact Customer Care Center
Initialize switch1B by issuing the following command:
# netConfig --file=/usr/TKLC/smac/etc/switch/xml/switch1B_4948_4948E_init.xml
Processing file: /usr/TKLC/smac/etc/switch/xml/switch1B_4948_4948E_init.xml
#
Note: This step takes about 2-3 minutes to complete.
Check the output of this command for any errors. If this fails for any reason, stop this procedure
and contact Customer Care Center.
A successful completion of netConfig will return the user to the prompt.
909-2209-001 Revision G, February 2014
33
3 Procedures
Use netConfig to get the hostname of the switch, to verify that the switch was initialized properly,
and to verify that netConfig can connect to the switch.
# netConfig --device=switch1B getHostname
Hostname: switch1B
#
Note: If this command fails, stop this procedure and contact Customer Care Center
34. Virtual PM&C: Configure both switches
Configure both switches by issuing the following command:
# netConfig --file=/usr/TKLC/smac/etc/switch/xml/4948_4948E_configure.xml
Processing file: /usr/TKLC/smac/etc/switch/xml/4948_4948E_configure.xml
#
Note: step takes about 2-3 minutes to complete.
Check the output of this command for any errors. If this fails for any reason, stop this procedure
and contact Customer Care Center.
A successful completion of netConfig will return the user to the prompt.
35. Virtual PM&C: Verify switch configuration
Ping each of the switches' SVI (router interface) addresses to verify switch configuration.
# ping <switch1A_mgmtVLAN_IP>
# ping <switch1B_mgmtVLAN_IP>
36. Virtual PM&C: Verify the switch is using the proper IOS image per Platform version.
Issue the following commands to verify the IOS release on each switch:
# netConfig --device=switch1A listFirmware
Image: cat4500-ipbasek9-mz.122-53.SG2.bin
# netConfig --device=switch1B listFirmware
Image: cat4500-ipbasek9-mz.122-53.SG2.bin
37. Cabinet: Connect network cables from customer network
Attach switch1A customer uplink cables. Refer to application documentation for which ports are
uplink ports.
Note: If the customer is using standard 802.1D spanning-tree, the links may take up to 50 seconds
to become active
38. Virtual PM&C: Verify access to customer network
Verify connectivity to the customer network by issuing the following command:
# ping <customer_supplied_ntp_server_address>
PING ntpserver1 (10.250.32.51) 56(84) bytes of data.
64 bytes from ntpserver1 (10.250.32.51): icmp_seq=0 ttl=62 time=0.150 ms
64 bytes from ntpserver1 (10.250.32.51): icmp_seq=1 ttl=62 time=0.223 ms
64 bytes from ntpserver1 (10.250.32.51): icmp_seq=2 ttl=62 time=0.152 ms
39. Cabinet: Connect network cables from customer network
909-2209-001 Revision G, February 2014
34
3 Procedures
Attach switch1B customer uplink cables and detach switch1A customer uplink cables. Refer to
application documentation for which ports are uplink ports.
Note: If the customer is using standard 802.1D spanning-tree, the links may take up to 50 seconds
to become active.
40. Virtual PM&C: Verify access to customer network
Verify connectivity to the customer network by issuing the following command:
# ping <customer_supplied_ntp_server_address>
PING ntpserver1 (10.250.32.51) 56(84) bytes of data.
64 bytes from ntpserver1 (10.250.32.51): icmp_seq=0 ttl=62 time=0.150 ms
64 bytes from ntpserver1 (10.250.32.51): icmp_seq=1 ttl=62 time=0.223 ms
64 bytes from ntpserver1 (10.250.32.51): icmp_seq=2 ttl=62 time=0.152 ms
41. Cabinet: Connect network cables from customer network
Re-attach switch1A customer uplink cables. Refer to application documentation for which ports
are uplink ports.
Note: If the customer is using standard 802.1D spanning-tree, the links may take up to 50 seconds
to become active
42. Management Server: Restore the TVOE host back to its original state.
Exit from the virtual pmac console, by entering <ctrl-]> and you will be returned to the server
prompt.
Restore the server networking back to original state:
# service network restart
43. Perform 3.1.5 Backup Cisco 4948/4948E/4948E-F Aggregation Switch and/or Cisco 3020 Enclosure Switch
(netConfig) for each switch configured in this procedure.
3.1.2 Configure Cisco 4948/4948E/4948E-F aggregation switches (RMS system no
PM&C)(netConfig)
This procedure will configure 4948/4948E/4948E-F switches with an appropriate IOS and configuration
from two management servers for use with the rack mount server platform.
This procedures assumes a Platform 6.0 interconnect. If the system being configured follows a
Platform 5.0 interconnect, then Platform 5.0 procedures should be followed.
Prerequisites:
• 3.7.1 IPM DL360 or DL380 Server is required to be complete before this procedure is attempted.
• Application management network interfaces must be configured on the management servers prior
to executing this procedure
• Application username and password for creating switch backups must be configured on the
management server prior to executing this procedure.
• netConfig is installed.
Procedure Reference Tables
909-2209-001 Revision G, February 2014
35
3 Procedures
Steps within this procedure may refer to variable data indicated by text within "<>". Refer to this table
for the proper value to insert depending on your system type.
Variable
Cisco WS-C4948
Cisco WS-C4948E
<IOS_image_file>
Fill in the appropriate Fill in the appropriate Fill in the appropriate
value from [3]:
value from [3]:
value from [3]:
__________________________ __________________________ ______________________________
<PROM_image_file>
Fill in the appropriate
value from [3]:
___________
Fill in the appropriate
value from [3]:
___________
Cisco WS-C4948E-F
Fill in the appropriate
value from [3]:
___________
Variable
Value
<switch_platform_username>
See referring application documentation
<switch_platform_password>
See referring application documentation
<switch_console_password>
See referring application documentation
<switch_enable_password>
See referring application documentation
<management_server1A_mgmtVLAN_ip_address Fill in the appropriate value for this site:
>
____________________________________
<switch_mgmtVLAN_id>
Fill in the appropriate value for this site:
____________________________________
<switch1A_mgmtVLAN_ip_address>
Fill in the appropriate value for this site:
____________________________________
<netmask>
Fill in the appropriate value for this site:
____________________________________
<switch1B_mgmtVLAN_ip_address>
Fill in the appropriate value for this site:
____________________________________
<switch_Internal_VLANS_list>
See referring application documentation
<swtich_mgmtVlan_id>
Fill in the appropriate value for this site:
____________________________________
<management_server1A_iLO_ip>
Fill in the appropriate value for this site:
____________________________________
<customer_supplied_ntp_server_address>
Fill in the appropriate value for this site:
____________________________________
Variable
Value
<platcfg_password>
Refer to TR006061 for this value
<management_server_mgmtInterface>
Value gathered from site survey
<switch_backup_user>
<switch_backup_user_password>
909-2209-001 Revision G, February 2014
36
3 Procedures
Note: Uplinks must be disconnected from the customer network prior to executing this procedure.
One of the steps in this procedure will instruct when to reconnect these uplink cables. Refer to the
application appropriate schematic or procedure for determining which cables are used for customer
uplink.
Needed Material:
•
•
•
•
•
HP Misc. Firmware DVD
HP Solutions Firmware Upgrade Pack Release Notes [3]
Application specific documentation (documentation that referred to this procedure)
Template xml files in an application ISO on an application CD.
Application ISO's with netConfig and its required RPMs.
Note: Filenames and sample command line input/output throughout this section do not specifically
reference the 4948E-F. Template settings are identical between the 4948E and 4948E-F. The original
4948 switch -- as opposed to the 4948E or the 4948E-F is referred to by the model number 4948. Where
all three switches are being referred to, this will be made clear by reference to '4948 / 4948E / 4948
E-F' switches.
Note: If a procedural STEP fails to execute successfully, STOP and contact the Customer Care Center
by referring to the 1.4 Customer Care Center section of this document
1. Management server iLO: Login and launch the integrated remote console for server1A
Note: If the server iLO connects to the aggregation switches, this procedure will not work
appropriately. The iLO must be connected to the customer network directly or to a field service
PC.
Server1A:
Login to iLO in IE using password provided by application:
http://<management_server1A_iLO_ip>
Click in the Remote Console tab and launch the Integrated Remote Console on the server.
Click Yes if the Security Alert pops up.
If not already done so, login as root.
2. Management Server: Procedure pre-check - Verify Hardware Type
Certain steps in this procedure require enabling and disabling ethernet interfaces. This procedure
supports DL360 and DL380 servers. The interfaces that are to be enabled and disabled are different
for these servers.
Execute the following command:
# cat /proc/net/bonding/bond0 | grep Interface
Slave Interface: eth01
Slave Interface: eth02
#
Note the slave interface names of ethernet interfaces to use in subsequent steps. The first line will
be the value for <ethernet_interface_1> and the second line will be the value for
<ethernet_interface_2>.
For example, from the sample output provided, <ethernet_interface_1> would be eth01.
909-2209-001 Revision G, February 2014
37
3 Procedures
If the output from the above command is not successful, refer back to the application documentation.
3. Management Server: Procedure pre-check - Determine Platform Version
Determine Platform version of the system by issuing the following command:
# appRev
If the following is shown in the output, the Platform version is 6.0:
Base Distro Release: 6.0.x-x.x.x
The values of x-x.x.x do not matter. The value of 6.0 shows the platform version. If the command
shows a Base Distro Release version lower than 6.0, or fails to execute, stop this procedure and
refer back to application procedures. It is possible the wrong version of TPD is installed.
4. Management Server: Setup conserver serial access for siwtch1A
Configure the conserver service to enable serial access to the switches:
For switch1A:
# conserverAdm --addConsole --name=switch1A_console --device=/dev/ttyS4
For switch1B:
# conserverAdm --addConsole --name=switch1B_console --device=/dev/ttyS5
You should be returned to the command line prompt. If so, continue to the next step; if not, contact
Customer Care Center for assistance.
5. Management Server: Get IOS image and PROM information on the switches.
Connect to switch1A, check the IOS and PROM version.
Connect serially to switch1A by issuing the following command:
# /usr/bin/console -M <management_server1A_mgmtVLAN_ip_address> -l platcfg
switch1A_console
Enter platcfg@localhost's password: <platcfg_password>
[Enter `^Ec?' for help]
Press Enter
Switch> show version | include image
System image file is "bootflash:cat4500-ipbasek9-mz.122-53.SG2.bin"
Switch> show version | include ROM
ROM: 12.2(31r)SGA1
System returned to ROM by reload
Note the image version for comparison in a following step.
To exit from console, enter <ctrl+e> , <c> , <.> and you will be returned to the server prompt.
Connect serially to switch1B, check the IOS and PROM version:
# /usr/bin/console -M <management_server1A_mgmtVLAN_ip_address> -l platcfg
switch1B_console
Enter platcfg@localhost's password: <platcfg_password>
[Enter `^Ec?' for help]
909-2209-001 Revision G, February 2014
38
3 Procedures
Press Enter
Switch> show version | include image
System image file is "bootflash:cat4500-ipbasek9-mz.122-53.SG2.bin"
Switch> show version | include ROM
ROM: 12.2(31r)SGA1
System returned to ROM by reload
Note the image version for comparison in a following step.
To exit from console enter <ctrl+e> , <c> , <.> and you will be returned to the server prompt.
6. Management Server: Determine if switch IOS and/or PROM upgrade is required.
Compare the IOS and PROM version from previous step with the version specified in the Firmware
Upgrade Pack Release Notes [3] for the switch model being used.
Check the version from the previous step against the version from the release notes referenced. If
the versions are different, or if the IOS version from the previous step does not have "k9" in the
name, then an upgrade is necessary. Check below for the appropriate action.
FOLLOW ONE OF THESE CHOICES:
• If switch1A or both switches require an upgrade, then continue to the next step.
• If switch1B requires an upgrade, skip to step 21.
• If neither switch requires an upgrade, then skip to step 23.
7. Management Server: Verify IOS & PROM images o the system. If the appropriate image does not
exist, copy the image to the management server and upload to the switch.
Determine if the IOS & PROM image for the 4948/4948E/4948E-F is on the management server
# ls /var/lib/tftpboot/<IOS_image_file>
# ls /var/lib/tftpboot/<PROM_image_file>
If the file exists, skip the remainder of this step and continue with the next step. If the file does not
exist, execute the following command, then copy the file from the firmware media and ensure the
file is specified by the Firmware Upgrade Pack Release Note [3].
8. Management Server: Enable tftp on the system for tftp transfer of IOS upgrade file.
Execute the commands that enable tftp transfer.
# tpdProvd --client --noxml --ns=Xinetd startXinetdService service tftp
Login on Remote: platcfg
Password of platcfg: <platcfg_password>
1
#
9. Management Server: Manipulate server interfaces
If upgrading the IOS on switch1A: Ensure that the interface of the server connected to switch1A
is the only interface up and obtain the IP address of the management server management interface
by performing the following commands:
# ifdown <ethernet_interface_2>
# ifup <ethernet_interface_1>
# ip addr show <management_server1A_mgmtInterface> | grep inet
909-2209-001 Revision G, February 2014
39
3 Procedures
The command output should contain the IP address of the variable
<management_server1A_mgmtVLAN_ip_address>.
If upgrading the IOS on switch 1B: Ensure that the interface of the server connected to switch1B is
the only interface up and obtain the IP address of the management server management interface
by performing the following commands:
# ifdown <ethernet_interface_1>
# ifup <ethernet_interface_2>
# ip addr show <management_server_mgmtInterface> | grep inet
The command output should contain the IP address of the variable
<management_server_mgmt_ip_address>.
10. Management Server: Attach to switch console
If upgrading the IOS or ROM on switch1A, connect serially to switch1A by issuing the following
command as root on the management server:
# /usr/bin/console -M <management_server1A_mgmtVLAN_ip_address> -l platcfg
switch1A_console
Enter platcfg@localhost's password: <platcfg_password>
[Enter `^Ec?' for help]
Press Enter
If the switch is not already in enable mode ("switch#" prompt), then issue the "enable" command,
otherwise continue with the next step.
Switch> enable
Switch#
If upgrading the firmware on switch1B, connect serially to switch1B by issuing the following
command as root on the management server:
# /usr/bin/console -M <management_server1A_mgmtVLAN_ip_address> -l platcfg
switch1B_console
Enter platcfg@localhost's password: <platcfg_password>
[Enter `^Ec?' for help]
Press Enter
If the switch is not already in enable mode ("switch#" prompt), then issue the "enable" command,
otherwise continue with the next step.
Switch> enable
Switch#
11. Management Server (switch console session): Configure ports on switch1A of type
4948/4948E/4948E-F.
On the switch, create the management vlan, create and configure the router interface of the
management vlan, and configure the appropriate port on the switch (this is Platform version
specific) to be on the management vlan:
Switch# conf t
Switch(config)# vlan <mgmtVLAN_id>
Switch(config)# int vlan <mgmtVLAN_id>
909-2209-001 Revision G, February 2014
40
3 Procedures
If configuring switch1A, use this comand:
Switch(config-if)# ip address <switch1A_mgmtVLAN_ip_address> <netmask>
If configuring switch1B, use this command:
Switch(config-if)# ip address <switch1B_mgmtVLAN_ip_address> <netmask>
Continue with these commands:
Switch(config-if)#
Switch(config-if)#
Switch(config-if)#
Switch(config-if)#
no shut
int range gi1/2 - 4
shut
int range gi1/1, gi1/40
If the model is C4948, execute this command:
Switch(config-if)# switchport trunk encap dot1q
Continue with these commands:
Switch(config-if)# switchport mode trunk
Switch(config-if)# spanning-tree portfast trunk
Switch(config-if)# end
Switch# write memory
Now issue ping command:
Note: The ip address <management_server_mgmt_ip_address> is the one obtained in Step 9.
Switch# ping <management_server1A_mgmtVLAN_ip_address>
Type escape sequence to abort.
Sending 5, 100-byte ICMP Echos to <management_server1A_mgmtVLAN_ip_address>,
timeout is 2 seconds:
!!!!!
Success rate is 100 percent (5/5), round trip min/avg/max = 1/1/4 ms
If ping is not successful the first time, repeat the ping. If unsuccessful again, double check that the
procedure was completed correctly by repeating all steps up to this point. If after repeating those
steps, ping is still unsuccessful, contact Customer Care Center.
12. Management Server (Switch console session): Upgrade ROM
If upgrading the ROM continue, otherwise skip to step 16.
Switch# copy tftp: bootflash:
Address or name of remote host []? <management_server1A_mgmtVLAN_ip_address>
Source filename []? <PROM_image_file>
Destination filename [cat4500-ios-promupgrade-122_31r_SGA1]? [Enter]
Accessing tftp://<management_server1A_mgmtVLAN_ip_address>/<PROM_image_file>...
Loading <PROM_image_file> from < management_server1A_mgmtVLAN_ip_address> (via
Vlan2): !!!!!! [OK – 45606 bytes]
45606 bytes copied in 3.240 secs (140759 bytes/sec)
Switch#
909-2209-001 Revision G, February 2014
41
3 Procedures
13. Management Server (Switch console session): Reload the switch
Switch# reload
System configuration has been modified. Save? [yes/no]: no
Proceed with reload? [confirm] [Enter]
=== Boot messages removed ===
Type [Control-C] when Type control-C to prevent autobooting is displayed on the screen.
14. Management Server (Switch console session): Upgrade PROM
rommon 1 > boot bootflash:<PROM_image_file>
=== PROM upgrade messages removed ===
System will reset itself and reboot within few seconds....
15. Management Server (Switch console session): Verify Upgrade
The switch will reboot when the firmware upgrade completes. Allow it to boot up. Wait for the
following line to be printed:
Press RETURN to get started!
Would you like to terminate autoinstall? [yes]: [Enter]
Switch> show version | include ROM
ROM: 12.2(31r)SGA1
System returned to ROM by reload
Review the output and look for the ROM version. Verify that the version is the desired new version.
If the switch does not boot properly or has the wrong ROM version, contact Tekelec Customer
Care.
16. Management Server (switch console session): Upload the IOS to the switch. The command is the
same regardless if you are upgrading switch1A or switch1B, that is why neither switch is called
out specifically in this step. These commands apply to whatever switch you are upgrading the IOS
on.
On the switch, copy the IOS file over to the switch by issuing the following command sequence:
Switch# copy tftp: bootflash:
Address or name of remote host []? <management_server1A_mgmtVLAN_ip_address>
Source filename []? <IOS_image_file>
Destination filename [<IOS_image_file>]? <ENTER>
Press Enter here, you do NOT want to change the filename
Accessing tftp://<management_server1A_mgmtVLAN_ip address>/<IOS_image_file>...
Loading <IOS_image_file> from <management_server1A_mgmtVLAN_ip_address> (via
Vlan2): !!!!!! [OK – 45606 bytes]
45606 bytes copied in 3.240 secs (140759 bytes/sec)
Switch# dir bootflash:
Directory of bootflash:/
1 -rwx 17779888 May 11 2011 02:25:23 -05:00
cat4500-entservicesk9-mz.122-53.SG.bin
2 -rwx 17779888 May 11 2011 02:25:23 -05:00
cat4500-ipbasek9-mz.122-53.SG2.bin
60817408 bytes total (43037392 bytes free)
909-2209-001 Revision G, February 2014
42
3 Procedures
Note: Take note which filename matches with <IOS_image_file> because the other filename is the
value for the variable <OLD_ios_image> which will be used to define which file is deleted.
17. Management Server (switch console session): Set the active IOS image and config-register from
the switch console session that was established.
Set the active IOS Image:
Switch# conf t
Switch(config)# boot system flash bootflash:<ios_image_file>
Switch(config)# config-register 0x2102
Switch(config)# end
Switch# write memory
Switch#
Verify the changes:
Switch# show run | include boot
boot-start-marker
boot system flash bootflash: <ios_image_file>
boot-end-marker
Switch# show version | include register
Configuration register is 0xXXXX (will be 0x2102 at next reload)
Switch# reload
Proceed with reload? [confirm]
Wait until the switch reloads, then issue the following command to ensure the switch is at the
appropriate IOS version:
Switch> show version | include image
System image file is "bootflash:cat4500-ipbasek9-mz.122-53.SG2.bin"
If the switch is not at the appropriate version, stop here and contact Customer Care Center. If it is,
move on to the next step.
18. Management Server (switch console session): Delete any other IOS images if there are multiple
IOS images on the switch, delete the unused images.
Switch> en
Switch# show bootflash:
-#- --length-- -----date/time------ path
1 25771102 Jan 20 2012 08:20:08 <ios_image_file>
2 16332568 Jan 24 2012 18:54:44 <OLD_IOS_image>
Switch# delete /force /recursive bootflash:<OLD_IOS_image>
Repeat this step until the only image on the switch is <ios_image_file>
Exit from console, enter <ctrl+e> , <c> , <.> and you will be returned to the server prompt.
19. Management Server: Reset the switch to factory defaults.
If switch1A was configured/upgraded then from server1A, access switch1A console and then issue
the following command:
# /usr/bin/console -M <management_server1A_mgmtVLAN_ip_address> -l platcfg
switch1A_console
Enter platcfg@localhost's password: <platcfg_password>
[Enter `^Ec?' for help]
909-2209-001 Revision G, February 2014
43
3 Procedures
Press Enter
Switch> en
Switch# conf t
Switch(config)# config-register 0x2101
Switch(config)# no vlan 2-4094
Switch(config)# end
Switch# write erase
[confirm] <enter>
Switch# reload
To exit from console enter <ctrl+e> , <c> , <.> and you will be returned to the server prompt.
If switch1B was configured/upgraded then from server1A, access switch1B console and then issue
the following command:
# /usr/bin/console -M <management_server1A_mgmtVLAN_ip_address> -l platcfg
switch1B_console
Enter platcfg@localhost's password: <platcfg_password>
[Enter `^Ec?' for help]
Press Enter
Switch> en
Switch# conf t
Switch(config)# config-register 0x2101
Switch(config)# no vlan 2-4094
Switch(config)# end
Switch# write erase
[confirm] <enter>
Switch# reload
To exit from console enter <ctrl+e> , <c> , <.> and you will be returned to the server prompt.
Note: It takes approximately 3 to 4 minutes for a switch to finish rebooting.
20. Management Server: If determined by step 6, upgrade switch1B.
Execute steps 9-20 for switch1B, if deemed necessary by step 6.
21. Management Server: Force server interface activity and disable tftp
Execute the commands that disable tftp transfer.
# tpdProvd --client --noxml --ns=Xinetd stopXinetdService service tftp
Login on Remote: platcfg
Password of platcfg: <platcfg_password>
1
#
Ensure that the tftp service is not running by executing the following command. A zero is expected.
# tpdProvd --client --noxml --ns=Xinetd getXinetdService service tftp
Login on Remote: platcfg
Password of platcfg:
0
#
909-2209-001 Revision G, February 2014
44
3 Procedures
If it returns a 1, stop the process by executing this command:
# tpdProvd --client --noxml --ns=Xinetd stopXinetdService service tftp force yes
Login on Remote: platcfg
Password of platcfg:
1
#
This should return a 1. Repeat this process until stopXinetdService returns a 1.
Then run Appendix E Disabling TFTP to ensure tftp is turned off.
Ensure that the interfaces of the server connected to switch1A & switch1B are up by performing
the following commands:
# ifup <ethernet_interface_1>
# ifup <ethernet_interface_2>
22. Management Server: Verify the initialization template xml file in existence on the management
server. If no template file present, copy over the from application media.
Verify the initialization xml template file and configuration xml template file is present on the
system and is the correct version for the system.
# more /usr/TKLC/plat/etc/switch/xml/switch1A_4948_4948E_init.xml
# more /usr/TKLC/plat/etc/switch/xml/switch1B_4948_4948E_init.xml
# more /usr/TKLC/plat/etc/switch/xml/4948_4948E_configure.xml
If either file does not exist, copy the files onto the management server from the application media
using application provided procedures.
23. Management Server: Setup netConfig repository with necessary console information.
Use netConfig to create a repository entry that will use the conserver service that was configured
in the previous steps. This command will give the user several prompts. The prompts with
<variables> as the answers are site specific that the user MUST modify. Other prompts that don't
have a <variable> as an answer must be entered EXACTLY as they are shown here.
# netConfig --repo addService name=console_service
Service type? (tftp, ssh, conserver, oa) conserver
Service host? <management_server1A_mgmtVLAN_ip_address>
Enter an option name (q to cancel): user
Enter a value for user: platcfg
Enter an option name(q to cancel): password
Enter a value for password: <platcfg_password>
Verify password: <platcfg_password>
Enter an option name(q to cancel): q
Add service for console_service successful
To check that you entered the information correctly, use the following command:
# netConfig --repo showService name=console_service
and check the output, which will be similar to the one shown below:
# netConfig --repo showService name=console_service
Services:
Service Name: console_service
Type: conserver
909-2209-001 Revision G, February 2014
45
3 Procedures
Host: 10.240.64.36
Options:
password: D8396824B3B2B9EE
user: platcfg
#
24. Management server: Setup netConfig repository with necessary tftp information.
Use netConfig to create a repository entry that will use the tftp service. This command will give
the user several prompts. The prompts with <variables> as the answers are site specific that the
user MUST modify. Other prompts that don't have a <variable> as an answer must be entered
EXACTLY as they are shown here.
# netConfig --repo addService name=tftp_service
Service type? (tftp, ssh, conserver, oa) tftp
Service host? <management_server1A_mgmtVLAN_ip_address>
Enter an option name (q to cancel): dir
Enter a value for user: /tftpboot/
Enter an option name(q to cancel): q
Add service for tftp_service successful
To check that you entered the information correctly, use the following command:
# netConfig --repo showService name=tftp_service
and check the output, which will be similar to the one shown below.
Note: Only the tftp service info has been shown in this example. If the previous step and this step
were done correctly, both the console_service and tftp_service entries would show up.
# netConfig --repo showService name=tftp_service
Service Name: tftp_service
Type: tftp
Host: 10.240.64.36
Options:
dir: /tftpboot/
#
25. Management Server: Setup netConfig repository with necessary ssh information.
Use netConfig to create a repository entry that will use the ssh service. This command will the user
several prompts. The prompts with <variables> as the answers are site specific that the user MUST
modify. Other prompts that don't have a <variable> as answer must be entered EXACTLY as they
are shown here.
# netConfig --repo addService name=ssh_service
Service type? (tftp, ssh, conserver, oa) ssh
Service host? <management_server1A_mgmtVLAN_ip_address>
Enter an option name <q to cancel>: user
Enter the value for user: <switch_backup_user>
Enter an option name <q to cancel>: password
Enter the value for password: <switch_backup_user_password>
Verify Password: <switch_backup_user_password>
Enter an option name <q to cancel>: q
Add service for ssh_service successful
#
909-2209-001 Revision G, February 2014
46
3 Procedures
To ensure that you have entered the information correctly, use the following command and inspect
the output, which will be similar to the one shown below.
# netConfig --repo showService name=ssh_service
Service Name: ssh_service
Type: ssh
Host: 10.240.64.36
Options:
password: C20F7D639AE7E7
user: root
#
26. Management Server: Setup netConfig repository with switch information
Use netConfig to create a repository entry for switch1A. This command will give the user several
prompts. The prompts with <variables> as the answers are site specific that the user MUST modify.
Other prompts that don't have a <variable> as an answer must be entered EXACTLY as they are
shown here.
Note: The model will be either 4948, 4948E, or 4948E-F depending on the model of the device. If
you do not know, stop now and contact Customer Care Center.
Note: Switch name must not exceed 20 characters.
# netConfig --repo addDevice name=switch1A --reuseCredentials
Device Vendor? Cisco
Device Model? 4948
Should the init oob adapter be added (y/n)? y
Adding consoleInit protocol for switch1A using oob...
What is the name of the service used for OOB access? console_service
What is the name of the console for OOB access? switch1A_console
What is the device console password? <switch_console_password>
Verify password: <switch_console_password>
What is the platform access username? <switch_platform_username>
What is the platform user password? <switch_platform_password>
Verify password: <switch_platform_password>
What is the device privileged mode password? <switch_enable_password>
Verify password: <switch_enable_password>
Should the live network adapter be added (y/n)? y
Adding cli protocol for switch1A using network...
What is the address used for network device access? <switch1A_mgmtVLAN_ip_address>
Should the live oob adapter be added (y/n)? y
Adding cli protocol for switch1A using oob...
OOB device access already set: console_service
Device named switch1A successfully added.
To check that you entered the information correctly, use the following command:
# netConfig --repo showDevice name=switch1A
and check the output, which will be similar to the one shown below (Note: only the switch1A info
has been shown in this example.
# netConfig --repo showDevice name=switch1A
Devices:
Device: switch1A
Vendor: Cisco
Model: 4948
Access: Network: 10.240.8.2
Access: OOB:
909-2209-001 Revision G, February 2014
47
3 Procedures
Service: console_service
Console: switch1A_console
Init Protocol Configured
Live Protocol Configured
#
Note: The model will be either 4948, 4948E, or 4948E-F depending on the model of the device. If
you do not know, stop now and contact Customer Care Center.
Add switch1B to the repository:
# netConfig --repo addDevice name=switch1B --reuseCredentials
Device Vendor? Cisco
Device Model? 4948
Should the init oob adapter be added (y/n)? y
Adding consoleInit protocol for switch1B using oob...
What is the name of the service used for OOB access? console_service
What is the name of the console for OOB access? switch1B_console
What is the device console password? <switch_console_password>
Verify password: <switch_console_password>
What is the platform access username? <switch_platform_username>
What is the platform user password? <switch_platform_password>
Verify password: <switch_platform_password>
What is the device privileged mode password? <switch_enable_password>
Verify password: <switch_enable_password>
Should the live network adapter be added (y/n)? y
Adding cli protocol for switch1A using network...
What is the address used for network device access? <switch1B_mgmtVLAN_ip_address>
Should the live oob adapter be added (y/n)? y
Adding cli protocol for switch1B using oob...
OOB device access already set: console_service
Device named switch1B successfully added.
To check that you entered the information correctly, use the following command:
# netConfig --repo showDevice name=switch1B
and check the output, which will be similar to the one shown below.
Note: Only the switch1A info has been shown in this example.
# netConfig --repo showDevice name=switch1B
Devices:
Device: switch1A
Vendor: Cisco
Model: 4948
Access: Network: 10.240.8.2
Access: OOB:
Service: console_service
Console: switch1B_console
Init Protocol Configured
Live Protocol Configured
#
27. Management Server: Modify switch1A_4948_4948E_init.xml and switch1B_4948_4948E_init.xml
files for information needed to initialize the switch.
Update the switch1A_4948_4948E_init.xml and switch1B_4948_4948E_init.xml files for site specific
information. Values to be edited in those files are preceded with a dollar sign, an example is $
some_variable_name . When done editing the file, save and quit.
909-2209-001 Revision G, February 2014
48
3 Procedures
28. Management Server: Modify 4948_4948E_configure.xml file for information needed to initialize
the switch
Update the 4948_4948E_configure.xml file for site specific information. Values to be edited in those
files are preceded with a dollar sign, an example is $ some_variable_name . When done editing
the file, save and quit.
29. Management Server: Initialize each switch
Initialize switch1A by issuing the following command:
# netConfig --file=/usr/TKLC/plat/etc/switch/xml/switch1A_4948_4948E_init.xml
Processing file: /usr/TKLC/plat/etc/switch/xml/switch1A_4948_4948E_init.xml
#
This step takes about 2-3 minutes to complete.
Check the output of this command for any errors. If this fails for any reason, stop this procedure
and contact Customer Care Center.
A successful completion of netConfig will return the user to the prompt.
Use netConfig to get the hostname of the switch, to verify that the switch was initialized properly,
and to verify that netConfig can connect to the switch.
# netConfig --device=switch1A getHostname
Hostname: switch1A
#
Note: If this command fails, stop this procedure and contact Customer Care Center
Initialize switch1B by issuing the following command:
# netConfig --file=/usr/TKLC/plat/etc/switch/xml/switch1B_4948_4948E_init.xml
Processing file: /usr/TKLC/plat/etc/switch/xml/switch1B_4948_4948E_init.xml
#
Note: This step takes about 2-3 minutes to complete
Check the output of this command for any errors. If this fails for any reason, stop this procedure
and contact Customer Care Center.
A successful completion of netConfig will return the user to the prompt.
Use netConfig to get the hostname of the switch, to verify that the switch was initialized properly,
and to verify that netConfig can connect to the switch.
# netConfig --device=switch1B getHostname
Hostname: switch1B
#
Note: If this command fails, stop this procedure and contact Customer Care Center.
30. Management Server: Configure both switches
909-2209-001 Revision G, February 2014
49
3 Procedures
Configure the switch by issuing the following command:
# netConfig --file=/usr/TKLC/plat/etc/switch/xml/4948_4948E_configure.xml
Processing file: file=/usr/TKLC/plat/etc/switch/xml/4948_4948E_configure.xml
#
Note: This step takes about 2-3 minutes to complete.
Check the output of this command for any errors. If this fails for any reason, stop this procedure
and contact Customer Care Center.
A successful completion of netConfig will return the user to the prompt.
31. Management Server:Set firmware boot image
Issue the following commands from server1A to set the IOS release on each switch:
# netConfig --device=switch1A setFirmware filename=<ios_image_file>
# netConfig --device=switch1B setFirmware filename=<ios_image_file>
32. Cabinet: Connect network cables from customer network
Attach switch1A customer uplink cables. Refer to application documentation for which ports are
uplink ports.
Note: If the customer is using standard 802.1D spanning-tree, the links may take up to 50 seconds
to become active
33. Management Server: Verify access to customer network.
Verify connectivity to the customer network by issuing the following command:
# ping <customer_supplied_ntp_server_address>
PING ntpserver1 (10.250.32.51) 56(84) bytes of data.
64 bytes from ntpserver1 (10.250.32.51): icmp_seq=0 ttl=62 time=0.150 ms
64 bytes from ntpserver1 (10.250.32.51): icmp_seq=1 ttl=62 time=0.223 ms
64 bytes from ntpserver1 (10.250.32.51): icmp_seq=2 ttl=62 time=0.152 ms
34. Cabinet: Connect network cables from customer network
Attach switch1B customer uplink cables and detach switch1A customer uplink cables. Refer to
application documentation for which ports are uplink ports.
Note: If the customer is using standard 802.1D spanning-tree, the links may take up to 50 seconds
to become active
35. Management Server: Verify access to customer network
Verify connectivity to the customer network by issuing the following command:
# ping <customer_supplied_ntp_server_address>
PING ntpserver1 (10.250.32.51) 56(84) bytes of data.
64 bytes from ntpserver1 (10.250.32.51): icmp_seq=0 ttl=62 time=0.150 ms
64 bytes from ntpserver1 (10.250.32.51): icmp_seq=1 ttl=62 time=0.223 ms
64 bytes from ntpserver1 (10.250.32.51): icmp_seq=2 ttl=62 time=0.152 ms
36. Cabinet: Connect network cables from customer network
Re-attach switch1A customer uplink cables. Refer to application documentation for which ports
are uplink ports.
909-2209-001 Revision G, February 2014
50
3 Procedures
Note: If the customer is using standard 802.1D spanning-tree, the links may take up to 50 seconds
to become active
37. Perform 3.1.5 Backup Cisco 4948/4948E/4948E-F Aggregation Switch and/or Cisco 3020 Enclosure Switch
(netConfig) for each switch configured in this procedure.
3.1.3 Replace a failed 4948/4948E/4948E-F switch (PM&C Installed) (netConfig)
The procedure details the steps necessary to replace a failed 4948/4948E/4948E-F switch.
This procedures assumes a Platform 6.0 interconnect. If the system being configured follows a
Platform 5.0 interconnect, then Platform 5.0 procedures should be followed.
Prerequisites:
•
•
•
•
•
3.8.2 Installing TVOE on the Management Server,
3.8.3 TVOE Network Configuration,
3.8.4 Deploy PM&C Guest, and
3.8.5 Setup PM&C are required to perform this procedure.
A fully configured and operational redundant switch must be in operation (1 and 3 have been
completed on the redundant switch). If this is not ensured, connectivity may be lost to the end
devices.
Procedure Reference Tables:
Steps within this procedure may refer to variable data indicated by text within "<>". Refer to this table
for the proper value to insert depending on your system type.
Variable
Cisco WS-C4948
Cisco WS-C4948E
Cisco WS_C4948E-F
<PROM_image_file> Fill in the appropriate Fill in the appropriate Fill in the appropriate value
value from [3]:
value from [3]:
from [3]:
__________________________ __________________________ ______________________________
<IOS_image_file>
Fill in the appropriate Fill in the appropriate Fill in the appropriate value
value from [3]:
value from [3]:
from [3]:
__________________________ __________________________ ______________________________
Variable
Value
<switch_console_password>
See referring application documentation
<switch_enable_password>
See referring application documentation
<management_server_mgmtVLAN_ip_address
>
Fill in the appropriate value for this site:
____________________________________
<switch1A_mgmtVLAN_ip_address>
Fill in the appropriate value for this site:
____________________________________
<switch1B_mgmtVLAN_ip_address>
Fill in the appropriate value for this site:
____________________________________
<switch_mgmtVlan_id>
Fill in the appropriate value for this site:
____________________________________
909-2209-001 Revision G, February 2014
51
3 Procedures
<management_server_mgmtInterface>
Fill in the appropriate value for this site:
____________________________________
<management_server_iLO_ip>
Fill in the appropriate value for this site:
____________________________________
<netmask>
Fill in the appropriate value for this site
________________________________________
Ethernet Interface
DL360
DL380
<ethernet_interface_1>
eth01
eth01
<ethernet_interface_2>
eth02
eth03
Variable
Platform 6.0
<management_server_switchport>
gi1/40
Variable
Value
<mgmt_VLAN_ID>
Value gathered from site survey
<switch_backup_user>
pmacadmin
<switch_backup_user_password>
Refer to TR006061 for this value
Note: The onboard administrators that are connected to the failed switch will be unavailable during
this procedure.
Needed Material:
•
•
•
•
HP Misc. Firmware DVD
HP Solutions Firmware Upgrade Pack Release Notes [3]
Application specific documentation (documentation that referred to this procedure)
Template xml files in an application ISO on an application CD.
Note: Filenames and sample command line input/output throughout this section do not specifically
reference the 4948E-F. Template settings are identical between the 4948E and 4948E-F. The original
4948 switch -- as opposed to the 4948E or the 4948E-F is referred to simply by the model number 4948.
Where all three switches are being referred to, this will be made clear by reference to '4948 / 4948E /
4948 E-F' switches.
Note: If a procedural STEP fails to execute successfully, STOP and contact the Customer Care Center
by referring to the 1.4 Customer Care Center section of this document.
1. Cabinet: Power off failed switch
If not already done so, power off the failed switch.
If the failed switch is DC powered, power off using the cabinet breakers, then remove the DC power
and ground cables.
If the failed switch is AC powered, remove the AC power cords from the unit.
2. Cabinet: Find and prepare to replace switch
909-2209-001 Revision G, February 2014
52
3 Procedures
If not already done so, determine whether switch1A or switch1B failed, locate the failed switch,
and detach all network and console cables from the failed switch.
Note: If needed label cables prior to removal.
3. Cabinet: Replace switch
If not already done so, remove failed switch and replace with new switch of same model.
4. Cabinet: Power on replacement switch
If the switch is DC powered, attach the DC power and ground cables, then power on the replacement
switch using the appropriate cabinet breakers.
Otherwise, connect the AC power cords to the unit (AC).
5. Cabinet: Attach cables to new switch
Connect all network and console cables to the new switch except the customer uplink cables. Ensure
each cable is connected to the same ports of the replacement switch as they were in the failed switch.
Note: Refer to appropriate application schematic or procedure for determining which cables are
used for customer uplink.
6. Virtual PM&C: Prepare for PROM upgrade
Execute 3.1.1 Configure Cisco 4948/4948E/4948E-F aggregation switches (PM&C installed)(netConfig),
steps 1-3 and then 6-7.
7. Virtual PM&C: Verify current PROM release
Execute 3.1.1 Configure Cisco 4948/4948E/4948E-F aggregation switches (PM&C installed)(netConfig),
step 8.
8. Virtual PM&C: Verify need for PROM upgrade
Compare the PROM version from step 8 with the PROM version specified in the Firmware Upgrade
Pack Release Notes [3] for the switch model found in step 8.
If the version from step 8 is equal or greater than the version from the release notes, then skip to
step 15, there is no PROM upgrade necessary for this switch.
Otherwise, continue with the next step.
9. Virtual PM&C: Prepare for PROM upgrade
Execute 3.1.1 Configure Cisco 4948/4948E/4948E-F aggregation switches (PM&C installed)(netConfig),
steps 9-12.
10. Virtual PM&C: Attach to replacement switch
If replacing switch1A, complete sub-step (a). If replacing switch1B, complete sub-step (b).
a) Connect serially to switch1A by issuing the following command:
# usr/bin/console -M <management_server_mgmtVLAN_ip_address> -l platcfg
switch1A_console
Press RETURN to get started.
Press Enter
909-2209-001 Revision G, February 2014
53
3 Procedures
If the "autoinstall" line below does not appear, the switch may not be in factory default condition,
continue with the step, disregarding this line:
Would you like to terminate autoinstall? [yes]: Enter
Switch> enable
Switch#
If "enable" command above prompts for a password, the switch in not in factory default
configuration. If this is the case, do not proceed and contact Customer Care Center for corrective
action. This procedure is for a replacement switch with manufacturing default state.
b) Connect serially to switch1B by issuing the following command:
# /usr/bin/console -M <management_server_mgmtVLAN_ip_address> -l platcfg
switch1B_console
Press RETURN to get started.
Press Enter
If the "autoinstall" line below does not appear, the switch may not be in factory default condition,
continue with the step, disregarding this line:
Would you like to terminate autoinstall? [yes]: Enter
Switch> enable
Switch#
If "enable" command above prompts for a password, the switch is not in factory default
configuration. If this is the case, do not proceed and contact Customer Care Center for corrective
action. This procedure is for a replacement switch with manufacturing default state.
11. Virtual PM&C (switch console session): Configure port on 4948/4948E/4948E-F
For Platform 6.0, the port to be configured is gi1/40.
To ensure connectivity, ping the management server's management vlan ip address from the switch.
On the switch, create vlan <mgmt_VLAN_ID>, create and configure the router interface of vlan
<mgmt_VLAN_ID>, and configure the appropriate port on the switch (this is Platform version
specific) to be on vlan <mgmt_VLAN_ID>:
Switch# conf t
Switch(config)# vlan <mgmt_VLAN_ID>
Switch(config)# int vlan <mgmt_VLAN_ID>
If configuring switch1A, use this command:
Switch(config-if)# ip address <switch1A_mgmtVLAN_ip_address> <netmask>
If configuring switch1B, use this command:
Switch(config-if)# ip address <switch1B_mgmtVLAN_ip_address> <netmask>
If configuring either switch1A or switch1B, execute these commands:
Switch(config-if)# no shut
Switch(config-if)# int <management_server_switchport>
909-2209-001 Revision G, February 2014
54
3 Procedures
If configuring either switch1A or switch1B, and the model is C4948, execute this command:
Switch(config-if)#
Switch(config-if)#
Switch(config-if)#
Switch(config-if)#
Switch(config-if)#
Switch(config-if)#
Switch(config-if)#
Switch(config-if)#
Switch(config-if)#
switchport trunk encap dot1q
switchport mode trunk
spanning-tree portfast trunk
int range gi1/1 – 4
switchport trunk encap dot1q
switchport mode trunk
spanning-tree portfast trunk
channel-group 8 mode active
end
If configuring either switch1A or switch1B, and the model is C4948E or C4948E-F, execute this
command:
Switch(config-if)#
Switch(config-if)#
Switch(config-if)#
Switch(config-if)#
Switch(config-if)#
Switch(config-if)#
Switch(config-if)#
switchport mode trunk
spanning-tree portfast trunk
int range gi1/1 – 4
switchport mode trunk
spanning-tree portfast trunk
channel-group 8 mode active
end
Now issue ping command:
Switch# ping <management_server_mgmtVLAN_ip_address>
Type escape sequence to abort.
Sending 5, 100-byte ICMP Echos to <management_server_mgmtVLAN_ip_address>, timeout
is 2 seconds:
!!!!!
Success rate is 100 percent (5/5), round trip min/avg/max = 1/1/4 ms
If ping is not successful , double check that the procedure was completed correctly by repeating
all steps up to this point. If after repeating those steps, ping is still unsuccessful, contact Customer
Care Center.
12. Virtual PM&C (switch console session): Upgrade PROM
Execute 3.1.1 Configure Cisco 4948/4948E/4948E-F aggregation switches (PM&C installed)(netConfig),
steps 15-18.
13. Virtual PM&C: Cleanup
Cleanup PROM upgrade file:
# rm –f /var/TKLC/smac/image/<PROM_image_file>
14. Virtual PM&C: Initialize switches and verify network connectivity.
Execute 3.1.1 Configure Cisco 4948/4948E/4948E-F aggregation switches (PM&C installed)(netConfig)
steps 6-22, 24, and 32 for the switch being replaced.
15. Virtual PM&C: Restore the switch to the latest known good configuration.
Navigate to the <switch_backup_user> home directory.
# cd ~<switch_backup_user>
909-2209-001 Revision G, February 2014
55
3 Procedures
Verify your location on the server
# pwd
/some/user/home/dir/path
16. Virtual PM&C: Copy the switch backup files to the current directory
# cp /usr/TKLC/smac/etc/backup/<swname>-backup* .
Get a list of the file copied over.
Note: 'switch1A' is shown as an example.
# ls
switch1A-backup
switch1A-backup.info
switch1A-backup.vlan
17. Virtual PM&C: Verify switch is initialized
Verify switch is at least initialized correctly and connectivity to the switch by verifying hostname.
# netConfig --device=<switch_name> getHostname
Hostname: switch1A
#
Note: The value beside 'Hostname:' should be the same as the <switch_name> variable.
18. Virtual PM&C: Issue the restore command
# netConfig --device=<switch_name> restoreConfiguration service=ssh_service
filename=<switch_name>-backup
19. Virtual PM&C: Verify switch configuration
Ping each of the switches' SVI (router interface) addresses to verify switch configuration.
# ping <switch1A_mgmtVLAN_IP>
# ping <switch1B_mgmtVLAN_IP>
20. Virtual PM&C: Verify the switch is using the proper IOS image per Platform version
Issue the following commands to verify the IOS release on each switch:
# netConfig --device=switch1A listFirmware
Image: cat4500-ipbasek9-mz.122-53.SG2.bin
# netConfig --device=switch1B listFirmware
Image: cat4500-ipbasek9-mz.122-53.SG2.bin
21. Cabinet: Connect network cables from customer network
Attach the customer uplink cables of the switch being replaced and disconnect the uplink cables
from the other switch.
22. Virtual PM&C: Verify access to customer network
Verify connectivity to the customer network by issuing the following command:
# ping <customer_supplied_ntp_server_address>
PING ntpserver1 (10.250.32.51) 56(84) bytes of data.
64 bytes from ntpserver1 (10.250.32.51): icmp_seq=0 ttl=62 time=0.150 ms
909-2209-001 Revision G, February 2014
56
3 Procedures
64 bytes from ntpserver1 (10.250.32.51): icmp_seq=1 ttl=62 time=0.223 ms
64 bytes from ntpserver1 (10.250.32.51): icmp_seq=2 ttl=62 time=0.152 ms
23. Cabinet: Connect network cables from customer network
Re-attach the uplink cables that were disconnected in step 21.
3.1.4 Replace a failed 4948/4948E/4948E-F switch (RMS system no PM&C)(netConfig)
The procedure details the steps necessary to replace a failed 4948/4948E/4948E-F switch.
This procedures assumes a Platform 6.0 interconnect. If the system being configured follows a
Platform 5.0 interconnect, then Platform 5.0 procedures should be followed.
Prerequisites:
• 3.7.1 IPM DL360 or DL380 Server is required to be completed before this procedure is attempted.
• A fully configured and operational redundant switch must be in operation (2 and 4 have been
completed on the redundant switch). If this is not ensured, connectivity may be lost to the end
devices.
• Application username and password for creating switch backups must be configured on the
management server prior to executing this procedure.
Procedure Reference Tables:
Steps within this procedure may refer to variable data indicated by text within "<>". Refer to this table
for the proper value to insert depending on your system type.
Variable
management server
Serial Port (DL380)
<switch1A_serial_port>
server1A
ttyS4
<switch1B_serial_port>
server1A
ttyS5
Variable
Cisco WS-C4948
Cisco WS-C4948E
Cisco WS-C4948E-F
<PROM_image_file> Fill in the appropriate Fill in the appropriate Fill in the appropriate value
value from [3]:
value from [3]:
from [3]:
__________________________ __________________________ ______________________________
<IOS_image_file>
Fill in the appropriate Fill in the appropriate Fill in the appropriate value
value from [3]:
value from [3]:
from [3]:
__________________________ __________________________ ______________________________
Variable
Value
<switch_console_password>
See referring application documentation
<switch_enable_password>
See referring application documentation
<management_server1A_mgmtVLAN_ip_address Fill in the appropriate value for this site:
>
____________________________________
<management_server1B_mgmtVLAN_ip_address Fill in the appropriate value for this site:
>
____________________________________
909-2209-001 Revision G, February 2014
57
3 Procedures
<switch1A_mgmtVLAN_ip_address>
Fill in the appropriate value for this site:
____________________________________
<switch1B_mgmtVLAN_ip_address>
Fill in the appropriate value for this site:
____________________________________
<switch_mgmtVlan_id>
Fill in the appropriate value for this site:
____________________________________
<management_server1A_iLO_ip>
Fill in the appropriate value for this site:
____________________________________
<management_server1B_iLO_ip>
Fill in the appropriate value for this site:
____________________________________
<netmask>
Fill in the appropriate value for this site:
________________________________________
<switch_backup_user>
<switch_backup_user_password>
Ethernet Interface
DL360
DL380
<ethernet_interface_1>
eth01
eth01
<ethernet_interface_2>
eth02
eth03
Note: The onboard administrators that are connected to the failed switch will be unavailable during
this procedure
Needed material:
•
•
•
•
HP Misc. Firmware DVD
HP Solutions Firmware Upgrade Pack Release Notes [3]
Application specific documentation (documentation that referred to this procedure)
Template xml files in an application ISO on an application CD.
Note: Filenames and sample command line input/output throughout this section do not specifically
reference the 4948E-F. Template settings are identical between the 4948E and 4948E-F. The original
4948 switch -- as opposed to the 4948E or the 4948E-F is referred to simply by the model number 4948.
Where all three switches are being referred to, this will be made clear by reference to '4948 / 4948E /
4948 E-F' switches.
Note: If a procedural STEP fails to execute successfully, STOP and contact the Customer Care Center
by referring to the 1.4 Customer Care Center section of this document.
1. Cabinet: Power off failed switch
If not already done so, power off the failed switch.
If the failed switch is DC powered, power off using the cabinet breakers, then remove the DC power
and ground cables.
If the failed switch is AC powered, remove the AC power cords from the unit.
2. Cabinet: Find and prepare to replace switch
909-2209-001 Revision G, February 2014
58
3 Procedures
If not already done so, determine whether switch1A or switch1B failed, locate the failed switch,
and detach all network and console cables from the failed switch.
Note: If needed label cables prior to removal.
3. Cabinet: Replace switch
If not already done so, remove failed switch and replace with new switch of same model.
4. Cabinet: Attach power and ground cables and power on replacement switch
If the switch is DC powered, attach the DC power and ground cables, then power on the replacement
switch using the appropriate cabinet breakers.
Otherwise, connect the AC power cords to the unit (AC).
5. Cabinet: Attach data cables to a new switch
Connect all network and console cables to the new switch except the customer uplink cables. Ensure
each cable is connected to the same ports of the replacement switch as they were in the failed switch.
Note: Refer to appropriate application schematic or procedure for determining which cables are
used for customer uplink.
6. Management server: Login to appropriate management server as root
Log in to iLO in IE using password provided by application.
http://<management_server1A_iLO_IP>
Then click in the Remote Console tab and launch the Integrated Remote Console on the server.
Click Yes if the Security Alert pops up.
If not already done so, login as root.
7. Management server: Attach to replacement switch
If replacing switch1A, complete sub-step (a). If replacing switch1B, complete sub-set (b).
a) Connect serially to switch1A by issuing the following command:
# /usr/bin/console -M <management_server1A_mgmtVLAN_ip_address> -l platcfg
switch1A_console
Enter platcfg@localhost's password: <platcfg_password>
[Enter `^Ec?' for help]
Press Enter
If the "autoinstall" line below does not appear, the switch may not be in factory default condition,
continue with the step, disregarding this line:
Would you like to terminate autoinstall? [yes]: Enter
Switch> enable
Switch#
If "enable" command above prompts for a password, the switch is not in factory default
configuration. If this is the case, do not proceed and contact Customer Care Center for resolution.
This procedure is for a replacement switch with manufacturing default state.
To exit from console, enter CTRL+E+c+. and you will be returned to the server prompt.
909-2209-001 Revision G, February 2014
59
3 Procedures
b) Connect serially to switch1B by issuing the following command:
# /usr/bin/console -M <management_server1A_mgmtVLAN_ip_address> -l platcfg
switch1B_console
Enter platcfg@localhost's password: <platcfg_password>
[Enter `^Ec?' for help]
Press Enter
If the "autoinstall" line below does not appear, the switch may not be in factory default condition,
continue with the step, disregarding this line:
Would you like to terminate autoinstall? [yes]: Enter
Switch> enable
Switch#
If "enable" command above prompts for a password, the switch in not in factory default
configuration. If this is the case, do not proceed and contact Customer Care Center for resolution.
This procedure is for a replacement switch with manufacturing default state.
To exit from console, enter CTRL+E+c+. and you will be returned to the server prompt.
8. Management server: Verify current PROM release
Execute 3.1.2 Configure Cisco 4948/4948E/4948E-F aggregation switches (RMS system no
PM&C)(netConfig), step 5.
9. Management server: Verify need for PROM upgrade
Compare the PROM version from step 8 with the PROM version specified in the Firmware Upgrade
Pack Release Notes [3] for the switch model found in step 8.
If the version from step 8 is equal or greater than the version from the release notes, then skip to
step 16, there is no PROM upgrade necessary for this switch.
Otherwise, continue with the next step.
10. Management server: Prepare for PROM upgrade
Execute 3.1.2 Configure Cisco 4948/4948E/4948E-F aggregation switches (RMS system no
PM&C)(netConfig), steps 7-15.
While logged in to each switch, issue the reload command to ensure that all commands are applied
to the switch.
11. Management server: Cleanup and stop tftp service
Cleanup PROM upgrade file:
# rm –f /tftpboot/<PROM_image_file>
# tpdProvd --client --noxml --ns=Xinetd stopXinetdService service tftp
Login on Remote: platcfg
Password of platcfg: <platcfg_password>
Then run Appendix E Disabling TFTP to ensure tftp is turned off.
12. Management server: Initialize and configure switches, and verify network connectivity.
Execute 3.1.2 Configure Cisco 4948/4948E/4948E-F aggregation switches (RMS system no
PM&C)(netConfig) steps 12-24 for the switch being replaced.
909-2209-001 Revision G, February 2014
60
3 Procedures
13. Management Server: Restore the switch to the latest known good configuration.
Navigate to the <switch_backup_user> home directory.
# cd ~<switch_backup_user>
Verify your location on the server
# pwd
/some/user/home/dir/path
14. Management Server: Copy the switch backup files to the current directory
# cp /usr/TKLC/plat/etc/switch/backup/<swname>-backup* .
Get a list of the file copied over.
Note: 'switch1A' is shown as an example.
# ls
switch1A-backup
switch1A-backup.info
switch1A-backup.vlan
15. Management Server: Verify switch is initialized
Verify switch is at least initialized correctly and connectivity to the switch by verifying hostname.
# netConfig --device=<switch_name> getHostname
Hostname: switch1A
#
Note: The value beside 'Hostname:' should be the same as the <switch_name> variable.
16. Management Server: Issue the restore command
# netConfig --device=<switch_name> restoreConfiguration service=ssh_service
filename=<switch_name>-backup
17. Management Server: Verify switch configuration
Ping each of the switches SVI (router interface) addresses to verify switch configuration.
# ping <switch1A_mgmtVLAN_IP>
# ping <switch1B_mgmtVLAN_IP>
18. Management Server: Verify the switch is using the proper IOS image per Platform version.
Issue the following commands to verify the IOS release on each switch:
# netConfig --device=switch1A listFirmware
Image: cat4500-ipbasek9-mz.122-53.SG2.bin
# netConfig --device=switch1B listFirmware
Image: cat4500-ipbasek9-mz.122-53.SG2.bin
19. Cabinet: Connect network cables from customer network
Attach the customer uplink cables of the switch being replaced and disconnect the uplink cables
from the other switch.
20. Management Server: Verify access to customer network
909-2209-001 Revision G, February 2014
61
3 Procedures
Verify connectivity to the customer network by issuing the following command:
# ping <customer_supplied_ntp_server_address>
PING ntpserver1 (10.250.32.51) 56(84) bytes of data.
64 bytes from ntpserver1 (10.250.32.51): icmp_seq=0 ttl=62 time=0.150 ms
64 bytes from ntpserver1 (10.250.32.51): icmp_seq=1 ttl=62 time=0.223 ms
64 bytes from ntpserver1 (10.250.32.51): icmp_seq=2 ttl=62 time=0.152 ms
21. Cabinet: Connect network cables from customer network.
Re-attach the uplink cables that were disconnected in step 23.
3.1.5 Backup Cisco 4948/4948E/4948E-F Aggregation Switch and/or Cisco 3020 Enclosure
Switch (netConfig)
Tekelec Provided Aggregation Switch Prerequisites for RMS system:
• 3.7.1 IPM DL360 or DL380 Server must be completed.
• 3.1.2 Configure Cisco 4948/4948E/4948E-F aggregation switches (RMS system no PM&C)(netConfig)
• Application username and password for creating switch backups must be configured on the
management server prior to executing this procedure.
Tekelec Provided Aggregation Switch Prerequisites for c-Class system:
•
•
•
•
•
3.7.1 IPM DL360 or DL380 Server must be completed
3.8.2 Installing TVOE on the Management Server must be completed
3.8.3 TVOE Network Configuration must be completed
3.8.4 Deploy PM&C Guest must be completed
3.1.1 Configure Cisco 4948/4948E/4948E-F aggregation switches (PM&C installed)(netConfig))
Prerequisites for Cisco 3020 Enclosure switches:
•
•
•
•
•
3.7.1 IPM DL360 or DL380 Server must be completed
3.8.2 Installing TVOE on the Management Server must be completed
3.8.3 TVOE Network Configuration must be completed
3.8.4 Deploy PM&C Guest must be completed
3.2.1 Configure Cisco 3020 switch (netConfig)
Procedure Reference Tables:
Variable
Value
<switch_backup_user>
(also needed in switch
configuration procedure)
<switch_backup_user_password>
(also needed in switch
configuration procedure)
<switch_name>
hostname of the switch
<switch_backup_directory> Non-PM&C System
PM&C System
/usr/TKLC/plat/etc/switch/backup /usr/TKLC/smac/etc/switch/backup
909-2209-001 Revision G, February 2014
62
3 Procedures
1. Verify switch is at least initialized correctly and connectivity to the switch by verifying hostname
# netConfig --device=<switch_name> getHostname
Hostname: switch1A
#
Note: The value beside "Hostname:" should be the same as the <switch_name> variable.
2. Run command "netConfig --repo showService name=ssh_service" and look for ssh service.
# netConfig --repo showService name=ssh_service
Service Name:
ssh_service
Type:
ssh
Host:
10.250.62.85
Options:
password: C20F7D639AE7E7
user: root
#
In the ssh_service parameters, the value for 'user:' will be the value for the variable
<switch_backup_user>.
3. Navigate to the <switch_backup_user> home directory.
# cd ~<switch_backup_user>
Verify your location on the server
# pwd
/some/user/home/dir/path
4. Execute the backup command
# netConfig --device=<switch_name> backupConfiguration service=ssh_service
filename=<switch_name>-backup
5. Verify switch configuration was backed up by cat <switch_name>-backup and inspect its contents
to ensure it reflects the latest knwon good switch configurations. Then, copy the files over to the
backup directory.
# ls <switch_name>-backup*
#
# cat <switch_name>-backup
#
# mv <switch_name>-backup* <switch_backup_directory>/
6. Repeat steps 1, 3-5 for each switch to be backed up.
3.1.6 SwitchConfig to NetConfig Repository Configuration
This procedure will configure the netConfig repository with the necessary services and switches from
a single management server for use with the c-Class platform.
Prerequisites:
• 3.7.1 IPM DL360 or DL380 Server,
909-2209-001 Revision G, February 2014
63
3 Procedures
3.8.2 Installing TVOE on the Management Server,
3.8.3 TVOE Network Configuration,
3.8.4 Deploy PM&C Guest, and
3.8.5 Setup PM&C are required to be completed before this procedure is attempted.
Application management network interfaces must be configured on the management servers prior
to executing this procedure.
• Application username and password for creating switch backups must be configured on the
management server prior to executing this procedure.
•
•
•
•
•
Procedure Reference Tables:
Steps within this procedure may refer to variable data indicated by text within "<>". Refer to this table
for the proper value to insert depending on your system type.
Variable
Serial Port
<switch1A_serial_port>
ttyS4
<switch1B_serial_port>
ttyS5
Variable
Value
<switch_platform_username>
See referring application documentation
<switch_platform_password>
See referring application documentation
<switch_console_password>
See referring application documentation
<switch_enable_password>
See referring application documentation
<management_server1A_mgmtVLAN_ip_address> Fill in the appropriate value for this site:
<management_server1B_mgmtVLAN_ip_address> Fill in the appropriate value for this site:
<pmac_mgmtVLAN_ip_address>
Fill in the appropriate value for this site:
<switch_mgmtVLAN_id>
Fill in the appropriate value for this site:
<switch1A_mgmtVLAN_ip_address>
Fill in the appropriate value for this site:
<mgmt_Vlan_subnet_id>
Fill in the appropriate value for this site:
<netmask>
Fill in the appropriate value for this site:
<switch1B_mgmtVLAN_ip_address>
Fill in the appropriate value for this site:
<switch_Internal_VLANS_list>
Fill in the appropriate value for this site:
<switch_mgmtVlan_id>
Fill in the appropriate value for this site:
<management_server_mgmtInterface>
Fill in the appropriate value for this site:
<management_server1A_iLO_ip>
Fill in the appropriate value for this site:
<management_server1B_iLO_ip>
Fill in the appropriate value for this site:
Variable
Value
<platcfg_password>
Refer to TR006061 for this value
909-2209-001 Revision G, February 2014
64
3 Procedures
<management_server_mgmtInterface>
Value gathered from site survey
<switch_backup_user>
pmacadmin
<switch_backup_user_password>
Refer to TR006061
Note: The onboard administrators are not available during the configuration of Cisco
4948/4948E/4948E-F switches.
Note: Uplinks must be disconnected from the customer network prior to executing this procedure.
One of the steps in this procedure will instruct when to reconnect these uplink cables. Refer to the
application appropriate schematic or procedure for determining which cables are used for customer
uplink.
Needed Material:
•
•
•
•
HP Misc. Firmware DVD
HP Solutions Firmware Upgrade Pack Release Notes [3]
Application specific documentation (documentation that referred to this procedure)
Template xml files on the application media.
Note: If a procedural STEP fails to execute successfully, STOP and contact the Customer Care Center
by referring to the 1.4 Customer Care Center section of this document.
1. Management server iLO: Login and launch the integrated remote console.
On Server1A login to iLO in IE using password provided by application:
http://<management_server1A_iLO_ip>
Click in the Remote Console tab and launch the Integrated Remote Console on the server.
Click Yes if the Security Alert pops up.
If not already done so, login as root.
2. management Server: Procedure pre-check - verify hardware type
Certain steps in this procedure require enabling and disabling ethernet interfaces. This procedure
supports DL360 and DL380 servers. The interfaces that are to be enabled and disabled are different
for each server type.
To determine the interface name, on the server, execute the following command:
# cat /proc/net/bonding/bond0 | grep Interface
Slave Interface: eth01
Slave Interface: eth02
#
Note the slave interface names of ethernet interfaces to use in subsequent steps. The first line will
be the value for <ethernet_inteface_1> and the second line will be the value for
<ethernet_interface_2> .
For example, from the sample output provided, <ethernet_inteface_1> would be eth01 . If the
output from the above command is not successful, refer back to the application documentation.
3. Management Server: Procedure pre-check - determine Platform version
909-2209-001 Revision G, February 2014
65
3 Procedures
On each management server, determine the Platform version of the system by issuing the following
command:
# appRev
If the following is shown in the output, the Platform version is 6.0:
Base Distro Release: 6.0.x-x.x.x
The values of x-x.x.x do not matter. The value of 6.0 shows the platform verison. If the command
shows a Base Distro Release version lower than 6.0, or fails to execute, stop this procedure and
refer back to application procedures. It is possible the wrong version of TVOE/TPD is installed.
4. Management Server: Procedure pre-check - verify virtual PM&C is installed
PM&C is required to be installed prior to this procedure being attempted. Verify virtual PM&C
installation by issuing the following commands as root on the management server:
# virsh list --all
Id Name State
---------------------------------6 vm-pmac1A running
If this command provides no output, it is likely that a virtual instance of PM&C is not installed.
Refer to application documentation or contact Tekelec Customer Service.
5. Management server1A: Setup conserver serial access for switch1A and switch1B and open the
firewall to allow for future tftp use in this procedure.
Note: If there are no aggregation switches in this deployment, skip to the next step.
From management server1A, configure the conserver service to enable serial access to the switches:
For switch1A:
# conserverAdm --addConsole --name=switch1A_console --device=/dev/ttyS4
For switch1B:
# conserverAdm --addConsole --name=switch1B_console --device=/dev/ttyS5
Open the conserver port on the firewall of the TVOE management server:
# iptables -I INPUT -s <pmac_mgmtVLAN_ip_address>/255.255.255.255 -p all -j ACCEPT
# service iptables save
You should be returned to the command line prompt. If so, continue to the next step; if not, contact
Customer Care Center for assistance.
6. Virtual PM&C: Login to the console of the virtual PM&C.
Note: On a TVOE host, If you launch the virsh console, i.e., "$ virsh console X" or from the
virsh utility "virsh $ console X" command and you get garbage characters or output is not quite
right, then more than likely there is a stuck "virsh console" command already being run on the
TVOE host. Exit out of the "virsh console", then run "ps -ef |grep virsh", then kill the existing
process "kill -9 <PID>". Then execute the "virsh console X" command. Your console session
should now run as expected.
909-2209-001 Revision G, February 2014
66
3 Procedures
From management server1A, log into the console of the virtual pmac instance found in step 4.
# virsh console vm-pmac1A
Connected to domain vm-pmac1A
Escape character is ^]
<Press ENTER key>
CentOS release 6.2 (Final)
Kernel 2.6.32-220.7.1.el6prerel6.0.0_80.13.0.x86_64 on an x86_64
vm-pmac1A login: root
Password:
Last login: Fri May 25 16:39:04 on ttyS4
If this command fails, it is likely that a virtual instance of PM&C is not installed. Refer to application
documentation or contact Tekelec Customer Service.
7. Virtual PM&C: Verify PM&C release version.
Verify the PM&C release version.
# appRev
If the following is shown in the output, the PM&C version is 5.0:
Product Name: PMAC
Product Release: 5.0.0_x.x.x
If the output does not contain "Product Name: PMAC" or does not contain a PMAC version of 5.0
or higher, then stop this procedure and refer back to the application instructions.
8. Virtual PM&C: Setup netConfig repository with necessary console information.
Note: If there are no aggregation switches in this deployment, skip to the next step.
Use netConfig to create a repository entry that will use the conserver service that was configured
in the previous steps. This command will give the user several prompts. The prompts with
<variables> as the answers are site specific that the user MUST modify. Other prompts that don't
have a <variable> as an answer must be entered EXACTLY as they are shown here.
# netConfig --repo addService name=console_service
Service type? (tftp, ssh, conserver, oa) conserver
Service host? <management_server1A_mgmtVLAN_ip_address>
Enter an option name (q to cancel): user
Enter a value for user: platcfg
Enter an option name(q to cancel): password
Enter a value for password: <platcfg_password>
Verify password: <platcfg_password>
Enter an option name(q to cancel): q
Add service for console_service successful
To check that you entered the information correctly, use the following command:
# netConfig --repo showService name=console_service
and check the output, which will be similar to the one shown below:
# netConfig --repo showService name=console_service
Services:
Service Name: console_service
Type: conserver
Host: 10.240.8.4
909-2209-001 Revision G, February 2014
67
3 Procedures
Options:
password: D8396824B3B2B9EE
user: platcfg
#
9. Virtual PM&C: Setup netConfig repository with necessary tftp information.
Use netConfig to create a repository entry that will use the tftp service. This command will give
the user several prompts. The prompts with <variables> as the answers are site specific that the
user MUST modify. Other prompts that don't have a <variable> as an answer must be entered
EXACTLY as they are shown here.
# netConfig --repo addService name=tftp_service
Service type? (tftp, ssh, conserver, oa) tftp
Service host? <pmac_mgmtVLAN_ip_address>
Enter an option name (q to cancel): dir
Enter a value for user: /var/TKLC/smac/image/
Enter an option name(q to cancel): q
Add service for tftp_service successful
To check that you entered the information correctly, use the following command:
# netConfig --repo showService name=tftp_service
and check the output, which will be similar to the one shown below (Note: only the tftp service
info has been shown in this example. If the previous step and this step were done correctly, both
the console_service and tftp_service entries would show up)
# netConfig --repo showService name=tftp_service
Services:
Service Name: tftp_service
Type: tftp
Host: 10.240.8.4
Options:
dir: /var/TKLC/smac/image
#
10. Virtual PM&C: Setup netConfig repository with necessary ssh information.
Use netConfig to create a repository entry that will use the ssh service. This command will provide
the user with several prompts. The prompts with <variables> as the answers are site specific that
the user MUST modify. Other prompts that don't have a <variable> as answer must be entered
EXACTLY as they are shown here.
# netConfig --repo addService name=ssh_service
Service type? (tftp, ssh, conserver, oa) ssh
Service host? <pmac_mgmtVLAN_ip_address>
Enter an option name <q to cancel>: user
Enter the value for user: <switch_backup_user>
Enter an option name <q to cancel>: password
Enter the value for password: <switch_backup_user_password>
Verify Password: <switch_backup_user_password>
Enter an option name <q to cancel>: q
Add service for ssh_service successful
#
909-2209-001 Revision G, February 2014
68
3 Procedures
To ensure that you entered the information correctly, use the following command and inspect the
output, which will be similar to the one shown below.
# netConfig --repo showService name=ssh_service
Service Name: ssh_service
Type: ssh
Host: 10.250.62.85
Options:
password: C20F7D639AE7E7
user: root
#
11. Virtual PM&C: Setup netConfig repository with Aggregation switch information.
Note: If there are no aggregation switches in this deployment, skip to the next step.
Use netConfig to create a repository entry for switch1A and switch1B. This command will give the
user several prompts. The prompts with <variables> as the answers are site specific that the user
MUST modify. Other prompts that don't have a <variable> as an answer must be entered EXACTLY
as they are shown here.
Note: The model can be 4948, 4948E, or 4948E-F depending on the model of the device. If you do
not know, stop now and contact Customer Care Center.
# netConfig --repo addDevice name=switch1A --reuseCredentials
Device Vendor? Cisco
Device Model? 4948E
Should the init oob adapter be added (y/n)? y
Adding consoleInit protocol for switch1A using oob...
What is the name of the service used for OOB access? console_service
What is the name of the console for OOB access? switch1A_console
What is the device console password? <switch_console_password>
Verify Password: <switch_console_password>
What is the platform access username? <switch_platform_username>
What is the platform user password? <switch_platform_password>
Verify Password: <switch_platform_password>
What is the device privileged mode password? <switch_enable_password>
Verify Password: <switch_enable_password>
Should the live network adapter be added (y/n)? y
Adding cli protocol for switch1A using network...
What is the address used for network device access? <switch1A_mgmtVLAN_ip_address>
Should the live oob adapter be added (y/n)? y
Adding cli protocol for switch1A using oob...
OOB device access already set: console_service
Device named switch1A successfully added.
To check that you entered the information correctly, use the following command:
# netConfig --repo showDevice name=switch1A
and check the output, which will be similar to the one shown below.
# netConfig --repo listDevices
Device: switch1A
Vendor: Cisco
Model: 4948E
FW Ver: 0
Access: Network: 10.240.64.34
Access: OOB:
Service: console_service
909-2209-001 Revision G, February 2014
69
3 Procedures
Console: switch1A_console
Init Protocol Configured
Live Protocol Configured
#
Create the Repository entry for switch1B
Note: The model can be 4948, 4948E, or 4948E-F depending on the model of the device. If you do
not know, stop now and contact Customer Care Center.
# netConfig --repo addDevice name=switch1B --reuseCredentials
Device Vendor? Cisco
Device Model? 4948E
Should the init oob adapter be added (y/n)? y
Adding consoleInit protocol for switch1A using oob...
What is the name of the service used for OOB access? console_service
What is the name of the console for OOB access? switch1B_console
What is the device console password? <switch_console_password>
Verify Password: <switch_console_password>
What is the platform access username? <switch_platform_username>
What is the platform user password? <switch_platform_password>
Verify Password: <switch_platform_password>
What is the device privileged mode password? <switch_enable_password>
Verify Password: <switch_enable_password>
Should the live network adapter be added (y/n)? y
Adding cli protocol for switch1A using network...
What is the address used for network device access? <switch1B_mgmtVLAN_ip_address>
Should the live oob adapter be added (y/n)? y
Adding cli protocol for switch1A using oob...
OOB device access already set: console_service
Device named switch1B successfully added.
To check that you entered the information correctly, use the following command:
# netConfig --repo showDevice name=switch1B
and check the output, which will be similar to the one shown below.
# netConfig --repo showDevice name=switch1B
Device: switch1A
Vendor: Cisco
Model: 4948E
FW Ver: 0
Access: Network: 10.240.64.35
Access: OOB:
Service: console_service
Console: switch1B_console
Init Protocol Configured
Live Protocol Configured
#
12. Virtual PM&C: Setup netConfig repository with switch information.
Note: If there are no 3020s in this deployment, skip to the next step.
Use netConfig to create a repository entry for each 3020. This command will give the user several
prompts. The prompts with <variables> as the answers are site specific that the user MUST modify.
Other prompts that don't have a <variable> as an answer must be entered EXACTLY as they are
shown here. If you do not know, stop now and contact Customer Care Center.
909-2209-001 Revision G, February 2014
70
3 Procedures
Note: The device name must be 20 characters or less
# netConfig --repo addDevice name=C3020_IOBAY1 --reuseCredentials
Device Vendor? Cisco
Device Model? 3020
Should the init network adapter be added (y/n)? y
Adding netBootInit protocol for C3020_IOBAY1 using network...
What is the address used for network device access? <enclosure_switch_IP>
What is the platform access username? <switch_platform_username>
What is the platform user password? <switch_platform_password>
Verify Password: <switch_platform_password>
What is the device privileged mode password? <switch_enable_password>
Verify Password: <switch_enable_password>
Should the init file adapter be added (y/n)? y
Adding netBootInit protocol for C3020_IOBAY1 using file...
What is the name of the service used for TFTP access? tftp_service
Should the live network adapter be added (y/n)? y
Adding cli protocol for C3020_IOBAY1 using network...
Network device access already set: 10.240.8.7
Device named C3020_IOBAY1 successfully added."
To check that you entered the information correctly, use the following command:
# netConfig --repo listDevices
and check the output, which will be similar to the one shown below
Note: Only the switch1B info has been shown in this example. If the previous step and this step
were done correctly, both switch1A and switch1B entries would show up.
# netConfig --repo listDevices
Devices:
Device: C3020_IOBAY1
Vendor: Cisco
Model: 3020
Access: Network: 10.240.8.7
Init Protocol Configured
Live Protocol Configured
[root@pmac5000101 ~]#
Repeat for each 3020, using appropriate values for those 3020s.
13. Virtual PM&C: setup netConfig repository
Note: If there are no 6120s in this deployment, skip to the next step.
Use netConfig to create a repository entry for each 6120XG. This command will give the user several
prompts. The prompts with <variables> as the answers are site specific that the user MUST modify.
Other prompts that don't have a <variable> as an answer must be entered EXACTLY as they are
shown here. If you do not know, stop now and contact Customer Care Center.
# netConfig --repo addDevice name=6120XG_IOBAY1 --reuseCredentials
Device Vendor? HP
Device Model? 6120
Should the live network adapter be added (y/n)? y
Adding cli protocol for 6120XG_IOBAY1 using network...
What is the address used for network device access? <enclosure_switch_IP>
What is the platform access username? <switch_platform_username>
What is the platform user password? <switch_platform_password>
Verify Password: <switch_platform_password>
909-2209-001 Revision G, February 2014
71
3 Procedures
What is the device privileged mode password? <switch_enable_password>
Verify Password: <switch_enable_password>
Should the live oob adapter be added (y/n)? n
Should the init network adapter be added (y/n)? y
Adding sshInit protocol for 6120XG_IOBAY1 using network...
Network device access already set: 10.240.8.9
Device named 6120XG_IOBAY1 successfully added.
#
To check that you entered the information correctly, use the following command:
# netConfig --repo showDevice name=6120XG_IOBAY1
and check the output, which will be similar to the one shown below:
Note: If the previous step and this step were done correctly, both switch1A and switch1B entries
would show up.
# netConfig --repo showDevice name=6120XG_IOBAY1
Device: 6120XG_IOBAY1
Vendor: HP
Model: 6120
FW Ver: 0
Access: Network: 10.240.8.10
Init Protocol Configured
Live Protocol Configured
[root@pmac5000101 ~]#
Repeat for each 6120, using appropriate values for those 6120s.
14. Perform the 'switchconfig to netConfig migration procedure' for all switches in the system.
3.1.7 Cisco 4948/4948E/4948E-F switchconfig to netConfig Migration
This procedure configures a Cisco 4948/4948E/4948E-F switch to migrate from switchconfig to
netConfig.
Needed Materials:
•
•
•
•
HP Misc. Firmware DVD,
HP Solutions Firmware Upgrade Pack Release Notes [3],
Application specific documentation (documentation that referred to this procedure), and
Template xml files in an application ISO on an application CD.
Variable
Serial Port
<switch1A_serial_port>
ttyS4
<switch1B_serial_port>
ttyS5
Variable
Value
<switch_platform_username>
See referring application documentation
<switch_platform_password>
See referring application documentation
<switch_console_password>
See referring application documentation
909-2209-001 Revision G, February 2014
72
3 Procedures
<switch_enable_password>
See referring application documentation
<management_server1A_mgmtVLAN_ip_address> Fill in the appropriate value for this site:
<management_server1B_mgmtVLAN_ip_address> Fill in the appropriate value for this site:
<pmac_mgmtVLAN_ip_address>
Fill in the appropriate value for this site:
<switch_mgmtVLAN_id>
Fill in the appropriate value for this site:
<switch1A_mgmtVLAN_ip_address>
Fill in the appropriate value for this site:
<mgmt_Vlan_subnet_id>
Fill in the appropriate value for this site:
<netmask>
Fill in the appropriate value for this site:
<switch1B_mgmtVLAN_ip_address>
Fill in the appropriate value for this site:
<switch_Internal_VLANS_list>
Fill in the appropriate value for this site:
<switch_mgmtVlan_id>
Fill in the appropriate value for this site:
<management_server_mgmtInterface>
Fill in the appropriate value for this site:
<management_server1A_iLO_ip>
Fill in the appropriate value for this site:
<management_server1B_iLO_ip>
Fill in the appropriate value for this site:
Variable
Value
<platcfg_password>
Refer to TR006061 for this value
<management_server_mgmtInterface>
Value gathered from site survey
<switch_backup_user>
pmacadmin
<switch_backup_user_password>
Refer to TR006061
Note: If a procedural STEP fails to execute successfully, STOP and contact the Customer Care Center
by referring to the 1.4 Customer Care Center section of this document.
1. Virtual PM&C: Verify network connectivity to 4948/4948E/4948E-F switches
For each 4948 switch, verify network reachability.
# ping -w3 <switch1A/1B_mgmtVLAN_IP_address>
2. Virtual PM&C: Login to the Switch
Login to the 4948/4948E/4948E-F switch using Telnet
# telnet <switch1A/1B_mgmtVLAN_IP_address>
3. Switch CLI: Apply netConfig required commands:
From the 4948/4948E/4948E-F CLI, apply the following commands required by netConfig:
Switch# config t
Switch(config)# hostname <switch_name>
Switch(config)# no service config
Switch(config)# service password-encryption
909-2209-001 Revision G, February 2014
73
3 Procedures
Switch(config)# crypto key generate rsa usage-keys label sshkeys modulus 768
Switch(config)# aaa new-model
Switch(config)# aaa authentication login onconsole line
Switch(config)# username <switch_platform_username> secret
<switch_platform_password>
Switch(config)# enable secret <switch_enable_password>
Switch(config)# line vty 0 15
Switch(config-line)# no password
Switch(config-line)# transport input ssh
Switch(config)# exit
Switch(config)# line console 0
Switch(config-line)# login authentication onconsole
Switch(config-line)# password <switch_console_password>
Switch(config)# exit
Switch(config)# ip ssh version 2
Switch(config)# no ip http server
Switch(config)# no ip http secure-server
Switch(config)# no ip domain lookup
Switch(config)# end
Switch# write memory
4. Switch CLI: Reload the switch and verify configuration
Reload the switch and verify the configuration from step 3. If a command was not applied, repeat
step 3.
Switch# reload
If prompted, answer yes.
5. Virtual PM&C: Verify netConfig connectivity.
Perform the following netConfig command to verify netConfig can communicate with the switch.
# netConfig getHostname --device=<switch_name>
Hostname: <switch_name>
6. Backup the Configuration
Perform the 3.1.5 Backup Cisco 4948/4948E/4948E-F Aggregation Switch and/or Cisco 3020 Enclosure
Switch (netConfig) procedure and then return to this procedure and continue with step 7 of this
procedure
7. Restore the Configuration
Perform steps 6-24 of the 3.1.3 Replace a failed 4948/4948E/4948E-F switch (PM&C Installed) (netConfig)
procedure.
3.2 C-Class Enclosure Switch - NetConfig Procedures
3.2.1 Configure Cisco 3020 switch (netConfig)
This procedure will configure 3020 switches from the PM&C server using templates included with an
application.
909-2209-001 Revision G, February 2014
74
3 Procedures
Prerequisites:
•
•
•
•
It is essential that PM&C is installed. In addition,
3.6.1 Configure Initial OA IP and
3.6.2 Configure initial OA settings via configuration wizard must be completed. Also,
It is essential that 3.2.9 Upgrade 3020 Switch IOS Firmware has been completed successfully.
Conditional Prerequisite:
If the aggregation switches are provided by Tekelec, then the Cisco 4948/4948E/4948E-F switches
must be configured using 3.1.1 Configure Cisco 4948/4948E/4948E-F aggregation switches (PM&C
installed)(netConfig) If the aggregation switches are provided by the customer, the user must ensure
that the customer aggregation switches are configured as per requirements provided in the Application
physical Site Survey and related IP/Network Site survey. If there is any doubt as to whether the
aggregation switches are provided by Tekelec or the customer, contact Tekelec Technical Services and
ask for assistance.
This procedure requires that no IPM activity is occurring or will occur during the execution of this
procedure.
Needed materials:
•
•
•
•
HP Misc. Firmware DVD
HP Solutions Firmware Upgrade Pack Release Notes [3]
Application specific documentation (documentation that referred to this procedure)
Template xml files in an application ISO on an application CD.
Note: If a procedural STEP fails to execute successfully, STOP and contact the Customer Care Center
by referring to the 1.4 Customer Care Center section of this document.
1. Virtual PM&C: Prepare for switch configuration
Login as root to the management server, then run:
# ping -w3 <mgmtVLAN_gateway_address>
2. Virtual PM&C: Verify network connectivity to 3020 switches
For each 3020 switch, verify network reachability.
# ping -w3 <enclosure_switch_IP>
3. Virtual PM&C: Remove the previous network-config file, if it exists.
To determine if the file exists, perform the following command:
# ls -al /var/TKLC/smac/image/network-confg
-rw-r--r-- 1 root root 130 Aug 12 14:16 /var/TKLC/smac/image/network-confg
If the file exists, delete it with the following command:
# rm -f /var/TKLC/smac/image/network-confg
Otherwise, proceed to the next step.
4. Virtual PM&C: Check TFTP Service Configuration
Check the TFTP configuration file to verify it is configured properly.
909-2209-001 Revision G, February 2014
75
3 Procedures
If the /etc/xinetd.d/tftp file matches the output below, proceed to step 6. If the
/etc/xinetd.d/tftp file does not match the output below then proceed to step 5.
# cat /etc/xinetd.d/tftp
service tftp
{
socket_type = dgram
protocol = udp
wait = yes
user = root
server = /usr/sbin/in.tftpd
server_args = -s /var/TKLC/smac/image
disable = no
per_source = 11
cps = 100 2
flags = IPv4
}
5. Virtual PM&C: Configure TFTP Service
Ensure that the tftp service is not running. A zero is expected.
# tpdProvd --client --noxml --ns=Xinetd getXinetdService service tftp
Login on Remote: platcfg
Password of platcfg:
0
#
If it returns a 1, stop it first by executing this command.
To stop it, do this:
# tpdProvd --client --noxml --ns=Xinetd stopXinetdService service tftp force yes
Login on Remote: platcfg
Password of platcfg:
1
#
This should return a 1.
Then run Appendix E Disabling TFTP to ensure tftp is turned off.
Edit the /etc/xinetd.d/tftp file until it matches the output in Step 4.
6. Virtual PM&C: Modify PM&C Feature to allow TFTP
Enable the DEVICE.NETWORK.NETBOOT feature with the management role to allow tftp traffic:
# pmacadm editFeature --featureName=DEVICE.NETWORK.NETBOOT --enable=1
--role=management
# pmacadm resetFeatures
Note: This may take up to 60 seconds to complete.
7. Virtual PM&C: Verify netConfig Services
Verify that the netConfig tftp_service has been configured. If the service is configured the output
will look similar to below:
# netConfig --repo showService name=tftp_service
Services:
909-2209-001 Revision G, February 2014
76
3 Procedures
Service Name:
tftp_service
Type:
tftp
Host:
10.240.8.4
Options:
dir: /var/TKLC/smac/image
[root@pmac5000101 ~]#
If tftp_service is already configured, skip to step 9. Otherwise, continue on to step 8.
8. Virtual PM&C: Setup netConfig repository with necessary tftp information
Use netConfig to create a repository entry that will use the tftp service. This command will give
the user several prompts. The prompts with <variables> as the answers are site specific that the
user MUST modify. Other prompts that don't have a <variable> as an answer must be entered
EXACTLY as they are shown here.
# netConfig --repo addService name=tftp_service
Service type? (tftp, ssh, conserver, oa) tftp
Service host? <pmac_mgmtVLAN_ip_address>
Enter an option name (q to cancel): dir
Enter a value for user: /var/TKLC/smac/image/
Enter an option name(q to cancel): q
Add service for tftp_service successful
To check that you entered the information correctly, use the following command:
# netConfig --repo showService name=tftp_service
and check the output, which will be similar to the one shown below (Note: only the tftp service
info has been shown in this example. If the previous step and this step were done correctly, both
the console_service and tftp_service entries would show up)
# netConfig --repo showService name=tftp_service
Services:
Service Name:
tftp_service
Type:
tftp
Host:
10.240.8.4
Options:
dir: /var/TKLC/smac/image
[root@pmac5000101 ~]#
9. Virtual PM&C: Setup netConfig repository with switch information.
Use netConfig to create a repository entry for each 3020. This command will give the user several
prompts. The prompts with <variables> as the answers are site specific that the user MUST modify.
Other prompts that don't have a <variable> as an answer must be entered EXACTLY as they are
shown here. If you do not know, stop now and contact Customer Care Center.
Note: Switch Name must not exceed 20 characters.
# netConfig --repo addDevice name=C3020_IOBAY1 --reuseCredentials
Device Vendor? Cisco
Device Model? 3020
Should the init network adapter be added (y/n)? y
Adding netBootInit protocol for C3020_IOBAY1 using network...
909-2209-001 Revision G, February 2014
77
3 Procedures
What is the address used for network device access? <enclosure_switch_IP>
What is the platform access username? <switch_platform_username>
What is the platform user password? <switch_platform_password>
Verify Password: <switch_platform_password>
What is the device privileged mode password? <switch_enable_password>
Verify Password: <switch_enable_password>
Should the init file adapter be added (y/n)? y
Adding netBootInit protocol for C3020_IOBAY1 using file...
What is the name of the service used for TFTP access? tftp_service
Should the live network adapter be added (y/n)? y
Adding cli protocol for C3020_IOBAY1 using network...
Network device access already set: 10.240.8.7
Device named C3020_IOBAY1 successfully added."
To check that you entered the information correctly, use the following command:
# netConfig --repo showDevice name=C3020_IOBAY1
and check the output, which will be similar to the one shown below
Note: Only the switch1B info has been shown in this example. If the previous step and this step
were done correctly, both switch1A and switch1B entries would show up
# netConfig --repo showDevice name=C3020_IOBAY1
Devices:
Device: C3020_IOBAY1
Vendor:
Cisco
Model:
3020
Access:
Network: 10.240.8.7
Init Protocol Configured
Live Protocol Configured
[root@pmac5000101 ~]#
Repeat for each 3020, using appropriate values for those 3020s.
10. Management server: Verify the initialization template xml file is in existence. If no template file is
present, copy over from application media.
Verify the initialization xml template file and configuration xml template file is present on the
system and is the correct version for the system.
#
#
more /usr/TKLC/smac/etc/switch/xml/3020_init.xml
more /usr/TKLC/smac/etc/switch/xml/3020_configure.xml
If either file does not exist, copy the files from the application media into the directory shown
above.
If 3020_init.xml file exists, page through the contents to verify it is devoid of any site specific
configuration information other than the device name. If the template file is appropriate, then skip
the remainder of this step and continue with the next step.
If 3020_configure.xml file exists, page through the contents to verify it is the appropriate file for
the this site and edited for this site. All network information is necessary for this activity. If the
template file is appropriate, then skip the remainder of this step and continue with the next step.
11. Virtual PM&C: Modify 3020_configure.xml file for information needed to configure the switch.
909-2209-001 Revision G, February 2014
78
3 Procedures
Update the 3020_configure.xml file for the values noted in the next sentence. Values to be modified
by the user will be notated in this step by a preceding dollar sign. So a value that has
$some_variable_name will need to be modified, removing the dollar sign and the less than, greater
than sign. When done editing the file, save and quit.
12. Virtual PM&C: Prepare the system for tftp
Note: Before executing this step, ensure that no IPM activity is taking place
First, look at the /etc/xinetd.d/tftp file to ensure proper values.
# cat /etc/xinetd.d/tftp | grep server_args
server_args
= -s /var/TKLC/smac/image
#
If the command does not show the directory, edit the file so that it has the appropriate values.
Then, turn on tftp:
# tpdProvd --client --noxml --ns=Xinetd startXinetdService service tftp
Login on Remote: platcfg
Password of platcfg: <platcfg_password>
Note: This should return a '1'. If it does not, retry the command. If it fails a second time, stop this
procedure & contact Tekelec Customer Service
Check to ensure the firewall is configured properly by issuing the following command:.
# service iptables status | grep dpt:69
1
ACCEPT
udp -- 10.240.8.0/26
#
0.0.0.0/0
udp dpt:69
If the output is not similar to the one shown above, stop the procedure and contact Tekelec Customer
Service. Otherwise, continue to the next step.
13. Virtual PM&C/OA GUI: Reset switch to factory defaults
If the switch has been configured before using netConfig, use netConfig to reset the switch to
factory defaults by executing the following command:
# netConfig --device=<switch_name> setFactoryDefault
If the above command failed, log onto the OA GUI and click on the interconnect bay for the 3020
to be configured on the Rear View image of the middle pane. Alternatively, on the left pane, one
could expand Interconnect Bays , then click on the Cisco 3020 to be configured.
Then click on Management Console.
909-2209-001 Revision G, February 2014
79
3 Procedures
A new page will be opened. If you are asked for a username and password, leave the username
blank and use the appropriate password provided by the application documentation. Then click
OK.
If you are prompted with the "Express Setup" screen, click Refresh.
909-2209-001 Revision G, February 2014
80
3 Procedures
If you are prompted with "Do you want a secured session with the switch?", click on No.
Then a new Catalyst Blade Switch 3020 Device Manager will be opened.
14. OA GUI: Restore switch to factory defaults
Navigate to Configure > Restart/Reset.
909-2209-001 Revision G, February 2014
81
3 Procedures
Click the circle that says "Reset the switch to factory defaults, and then restart the switch". Then
click the "Submit" button.
A pop-up window will appear that looks like this:
Click OK and the switch will be reset to factory defaults and reloaded.
15. Virtual PM&C: Initialize the switch
Note: This command must be entered at most 5 minutes after step 12 is completed. If it is not,
repeat step 12.
Initialize switch by issuing the following command:
# netConfig --file=/usr/TKLC/smac/etc/switch/xml/3020_init.xml
Processing file: /usr/TKLC/smac/etc/switch/xml/3020_init.xml
Note: This step takes about 4-510-15 minutes to complete, it is imperative that you wait until
returned to the command prompt. DO NOT PROCEED UNTIL RETURNED TO THE COMMAND
PROMPT.
909-2209-001 Revision G, February 2014
82
3 Procedures
Check the output of this command for any errors. If this fails for any reason, stop this procedure
and contact Customer Care Center.
A successful completion of netConfig will return the user to the prompt.
Go back to step 9 and repeat for each 3020 switch.
16. Virtual PM&C: Configure the switches
Configure both switches by issuing the following command:
# netConfig --file=/usr/TKLC/smac/etc/switch/xml/3020_configure.xml
Processing file: /usr/TKLC/smac/etc/switch/xml/3020_configure.xml
#
Note: This step takes about 2-3 minutes to complete
Check the output of this command for any errors. If this fails for any reason, stop this procedure
and contact Customer Care Center.
A successful completion of netConfig will return the user to the prompt.
17. Virtual PM&C: Verify switch configuration
To verify the configuration was completed successfully, ssh to each switch and attempt to log in.
If log in is successful, configuration was successful.
18. Virtual PM&C: Turn off tftp
Execute the commands that disable tftp transfer.
# tpdProvd --client --noxml --ns=Xinetd stopXinetdService service tftp
Login on Remote: platcfg
Password of platcfg: <platcfg_password>
1
#
Ensure that the tftp service is not running. A zero is expected when executing the following
command:
# tpdProvd --client --noxml --ns=Xinetd getXinetdService service tftp
Login on Remote: platcfg
Password of platcfg:
0
#
If it returns a 1, stop the process by executing this command:
# tpdProvd --client --noxml --ns=Xinetd stopXinetdService service tftp force yes
Login on Remote: platcfg
Password of platcfg:
1
#
This should return a 1. Repeat this process until stopXinetdService returns a 0.
Then run Appendix E Disabling TFTP to ensure tftp is turned off.
19. Perform 3.1.5 Backup Cisco 4948/4948E/4948E-F Aggregation Switch and/or Cisco 3020 Enclosure Switch
(netConfig) for each switch configured in this procedure
909-2209-001 Revision G, February 2014
83
3 Procedures
3.2.2 Reconfigure a failed 3020 switch (netConfig)
The procedure describes all of the required steps to configure a replacement 3020 switch.
Prerequisite:
Prerequisites for this procedure are to follow the prerequisites for procedures referenced in the steps
of this procedure. It also assumed the user can determine which switch is the failed switch.
Note: If a procedural STEP fails to execute successfully, STOP and contact the Customer Care Center
by referring to the 1.4 Customer Care Center section of this document.
1. Replace switch
Replace the failed switch with the replacement switch.
2. Install cables
Install all cables in the new switch. Be sure all cables are placed in the same ports in the replacement
switch as they were used on the failed switch.
3. Virtual PM&C: Remove the previous network-config file, if it exists.
To determine if the file exists, perform the following command:
# ls -al /var/TKLC/smac/image/network-confg
-rw-r--r-- 1 root root 130 Aug 12 14:16 /var/TKLC/smac/image/network-confg
If the file exists, delete it with the following command:
# rm -f /var/TKLC/smac/image/network-confg
Otherwise, proceed to the next step.
4. Upgrade IOS
Perform 3.2.9 Upgrade 3020 Switch IOS Firmware and then proceed with step 5 of this procedure
5. Apply configuration
Perform 3.2.1 Configure Cisco 3020 switch (netConfig), steps 7-12, then step 15, replacing the values
for the switch being replaced.
6. Virtual PM&C: Restore the switch to the latest known good configuration.
Navigate to the <switch_backup_user> home directory.
# cd ~<switch_backup_user>
Verify your location on the server
# pwd
/some/user/home/dir/path
7. Virtual PM&C: Copy the switch backup files to the current directory
# cp /usr/TKLC/smac/etc/backup/<swname>-backup* .
Get a list of the file copied over.
909-2209-001 Revision G, February 2014
84
3 Procedures
Note: 'switch1A' is shown as an example.
# ls
switch1A-backup
switch1A-backup.info
switch1A-backup.vlan
8. Virtual PM&C: Verify switch is initialized
Verify switch is at least initialized correctly and connectivity to the switch by verifying hostname.
# netConfig --device=<switch_name> getHostname
Hostname: switch1A
#
Note: The value beside 'Hostname:' should be the same as the <switch_name> variable.
9. Virtual PM&C: Issue the restore command
# netConfig --device=<switch_name> restoreConfiguration service=ssh_service
filename=<switch_name>-backup
10. Virtual PM&C: Verify Connectivity
Perform 3.2.1 Configure Cisco 3020 switch (netConfig) step 17.
3.2.3 Configure HP 6120XG switch (netConfig)
This procedure will configure the HP 6120XG switches from the PM&C server & the command line
interface using templates included with an application.
Prerequisites:
•
•
•
•
•
It is essential that PM&C is installed. In addition,
3.6.1 Configure Initial OA IP and
Configure initial OA settings via configuration wizard must be completed.
This procedure requires the reader to issue commands on the switch command line interface.
It is also essential that 3.2.10 Upgrade HP 6120XG Switch Firmware has been completed. IF THIS IS
NOT COMPLETED, THE COMMANDS PERFORMED BELOW WILL NOT WORK.
Conditional Prerequisites: If the aggregation switches are provided by Tekelec, then the Cisco
4948/4948E/4948E-F switches need to be configured using 3.1.1 Configure Cisco 4948/4948E/4948E-F
aggregation switches (PM&C installed)(netConfig). If the aggregation switches are provided by the
customer, the user must ensure that the customer aggregation switches are configured as per
requirements provided in the Application physical Site Survey and related IP/Network Site survey.
If there is any doubt as to whether the aggregation switches are provided by Tekelec or the customer,
contact Tekelec Technical Services and ask for assistance.
Needed materials:
•
•
•
•
HP Misc. Firmware DVD
HP Solutions Firmware Upgrade Pack Release Notes [3]
Application specific documentation (documentation that referred to this procedure)
Template xml files in an application ISO on an application CD.
Note: If a procedural STEP fails to execute successfully, STOP and contact the Customer Care Center
by referring to the 1.4 Customer Care Center section of this document.
909-2209-001 Revision G, February 2014
85
3 Procedures
1. Virtual PM&C: Prepare for switch configuration
If the aggregation switches are provided by Tekelec, login to the management server, then run:
# ping -w3 <switch1A_mgmtVLAN_address>
# ping -w3 <switch1B_mgmtVLAN_address>
# ping -w3 <switch_mgmtVLAN_VIP>
If the aggregation switches are provided by the customer, login to the management server, then
run:
# ping -w3 <mgmtVLAN_gateway_address>
2. Virtual PM&C: Verify network connectivity to 6120XG switches
For each 6120XG switch, verify network reachability.
# ping -w3 <enclosure_switch_IP>
3. Virtual PM&C: Restore switch to factory defaults
If the 6120XG switch has been configured prior to this procedure, clear out the configuration using
the following command:
# ssh manager@<enclosure_switch_IP>
Switch# config
Switch(config)# no password all
Password protection for all will be deleted, continue [y/n]? y
Switch(config)# end
Switch# erase startup-config
Configuration will be deleted and device rebooted, continue [y/n]? y
(switch will automatically reboot, reboot takes about 120-180 seconds)
Note: You may need to press [ENTER] twice. You may also need to use previously configured
credentials.
If the above procedures fails, log in via telnet and reset the switch to manufacturing defaults. If the
above ssh procedures fails, log in via telnet and reset the switch to manufacturing defaults
# telnet <enclosure_switch_IP>
Switch# config
Switch(config)# no password all (answer yes to question)
Password protection for all will be deleted, continue [y/n]? y
Switch(config)# end
Switch# erase startup-config
(switch will automatically reboot, reboot takes about 120-180 seconds)
Note: The console connection to the switch must be closed, or the initialization (step 8) will fail.
4. Virtual PM&C: Copy switch configuration template from media to the tftp directory.
Copy switch initialization template and configuration template from the media to the tftp directory.
# cp /<path to media>/6120XG_init.xml /usr/TKLC/smac/etc/switch/xml
# cp /<path to media>/6120XG_[single,LAG]Uplink_configure.xml
/usr/TKLC/smac/etc/switch/xml
# cp
/usr/TKLC/plat/etc/TKLCnetwork-config-templates/templates/utility/addQOS_trafficTemplate_6120XG.xml
/usr/TKLC/smac/etc/switch/xml
909-2209-001 Revision G, February 2014
86
3 Procedures
• Where [single,LAG] are variables for either one of 2 files-see the following:
• 6120XG_SingleUplink_configure.xml is for one uplink per enclosure switch topology
• 6120XG_LAGUplink_configure.xml is for LAG uplink topology
5. Virtual PM&C: verify the switch configuration file template in the tftp directory
Verify the switch initialization template file and configuration file template are in the correct
directory.
# ls -l /usr/TKLC/smac/etc/switch/xml/*6120XG*.xml
-rw-r--r-- 1 root root 1955 Feb 16 11:36
/usr/TKLC/smac/etc/switch/xml/6120XG_init.xml
-rw-r--r-- 1 root root 1955 Feb 16 11:36
/usr/TKLC/smac/etc/switch/xml/6120XG_[single,LAG]Uplink_configure.xml
-rw-r--r-- 1 root root 702 Sep 10 10:33 addQOS_trafficTemplate_6120XG.xml
6. Virtual PM&C: Edit the switch configuration file template for site specific information
Edit the switch initialization file and switch configuration file template for site specific addresses,
VLAN IDs, and other site specific content. Values to be modified by the user will be notated in this
step by a preceding dollar sign. So a value that has $<some_variable_name> will need to be
modified, removing the dollar sign and the less than, greater than sign.
# vi /usr/TKLC/smac/etc/switch/xml/6120XG_init.xml
# vi /usr/TKLC/smac/etc/switch/xml/6120XG_[single,LAG]Uplink_configure.xml
# vi /usr/TKLC/smac/etc/switch/xml/addQOS_trafficTemplate_6120XG.xml
7. Virtual PM&C: Setup netconfig repository
Verify the ssh service is configured by running command "netConfig --repo showService
name=ssh_service" and look for ssh service.
# netConfig --repo showService name=ssh_service
Service Name: ssh_service
Type: ssh
Host: 10.240.8.4
Options:
password: C20F7D639AE7E7
user: root
#
If the ssh service does not exist, a “Service not found” message will be returned. If this occurs, then
do the following:
Setup netConfig repository with necessary ssh information. Use netConfig to create a repository
entry that will use the ssh service. This command will provide the user with several prompts. The
prompts with <variables> as the answers are site specific that the user MUST modify. Other prompts
that don't have a <variable> as answer must be entered EXACTLY as they are shown here.
# netConfig --repo addService name=ssh_service
Service type? (tftp, ssh, conserver, oa) ssh
Service host? <pmac_mgmtVLAN_ip_address>
Enter an option name <q to cancel>: user
Enter the value for user: <switch_backup_user>
Enter an option name <q to cancel>: password
Enter the value for password: <switch_backup_user_password>
Verify Password: <switch_backup_user_password>
Enter an option name <q to cancel>: q
909-2209-001 Revision G, February 2014
87
3 Procedures
Add service for ssh_service successful
#
To ensure that you entered the information correctly, use the following command and inspect the
output, which will be similar to the one shown below.
# netConfig --repo showService name=ssh_service
Service Name: ssh_service
Type: ssh
Host: 10.240.8.4
Options:
password: C20F7D639AE7E7
user: root
#
8. Virtual PM&C: Apply include-credentials command to the switch
Login to the switch using SSH
# ssh manager@<enclosure_switch_IP>
Switch# config
Switch(config)# include-credentials
If prompted, answer yes to both questions.
Log out of the switch.
Switch(config)# logout
Do you want to log out [y/n]? y
Do you want to save current configuration [y/n/^C]?
y
Continue to the next step.
9. Virtual PM&C: Initialize the switch
Initialize the switch
# netConfig --file=/usr/TKLC/smac/etc/switch/xml/6120XG_init.xml
This could take up to 2-3 minutes.
Note: Upon successful completion of netConfig, the user will be returned to the PM&C command
prompt. If netConfig fails to complete successfully, contact Tekelec Customer Service
10. Virtual PM&C: Configure the switch
Configure the switch
# netConfig
--file=/usr/TKLC/smac/etc/switch/xml/6120XG_[single,LAG]Uplink_configure.xml
This could take up to 2-3 minutes.
Note: Upon successful completion of netConfig, the user will be returned to the PM&C command
prompt. If netConfig fails to complete successfully, contact Tekelec Customer Service
11. Virtual PM&C: Apply QoS Settings
909-2209-001 Revision G, February 2014
88
3 Procedures
Apply the QoS traffic template settings.
# netConfig --file=/usr/TKLC/smac/etc/switch/xml/addQOS_trafficTemplate_6120XG.xml
Note: The switch will reboot after this command. This step will take 2-5 minutes.
12. Virtual PM&C: Verify proper configuration of HP 6120XG switches
Once each HP 6120XG has finished booting from the previous step, verify network reachability
and configuration.
# ping -w3 <enclosure_switch_IP>
[root@localhost ~]# ssh <switch_platform_username>@<enclosure_switch_IP>
<switch_platform_username>@<enclosure_switch_IP>'s password:
<switch_platform_password>
Switch# show run
Inspect the output of show run, and ensure that it is configured as per site requirements.
13. Virtual PM&C: Repeat steps for each HP 6120XG
For each HP 6120XG, repeat steps 3-12.
14. Perform 3.2.5 Backup 6120XG Enclosure Switch for each switch configured in this procedure.
3.2.4 Reconfigure a failed HP 6120XG switch (netConfig)
The procedure describes all of the required steps to configure a replacement HP 6120XG switch.
Prerequisite: Prerequisites for this procedure are to follow the prerequisites for procedures referenced
in the steps of this procedure. It is also assumed the user can determine which switch is the failed
switch.
Note: If a procedural STEP fails to execute successfully, STOP and contact the Customer Care Center
by referring to the 1.4 Customer Care Center section of this document.
1. Replace switch
Replace the failed switch with the replacement switch.
2. Upgrade Firmware
Perform 3.2.10 Upgrade HP 6120XG Switch Firmware and then return to this procedure and continue
with step 3.
3. Initialize Switch
Perform 3.2.3 Configure HP 6120XG switch (netConfig), steps 3, 6 (init.xml only), and then step 9.
Then return to this procedure and continue with step 4.
4. Virtual PM&C: Restore the switch to the latest known good configuration.
Navigate to the <switch_backup_user> home directory.
# cd ~<switch_backup_user>
Verify your location on the server:
# pwd
/some/user/home/dir/path
909-2209-001 Revision G, February 2014
89
3 Procedures
5. Virtual PM&C: Copy the switch backup files to the current directory
# cp /usr/TKLC/smac/etc/switch/backup/<swname>-backup* .
6. Backup File: Remove Uplink-Failure-Detection
Note: These lines will be used later, take note of <trackID> and <linksToMonitor>.
On the backup file, execute the following command and note the output:
# cat <swname>-backup* | grep uplink
uplink-failure-detection
uplink-failure-detection track 1 links-to-monitor 17 links-to-disable 1-16
#
Now edit the file, removing the 2 lines shown in the previous output.
7. Virtual PM&C: Issue the restore command
# netConfig --device=<switch_name> restoreConfiguration service=ssh_service
filename=<switch_name>-backup
8. Virtual PM&C: Configure Uplink-Failure-Detection
Note: The <trackID> variable is the digit following "track" in the output in step 6.
Note: The <linksToMonitor> value will be as follows:
If in the output in step 6, the link-to-monitor was a digit (ie, 17), then the linksToMonitor value is
tenGE<digit> (ie, tenGE17)
If in the output in step 6, the link-to-monitor was trk followed by a digit (ie, trk2), then the
linksToMonitor value is LAG<digit> (ie, LAG2)
# netConfig --device=<switch_name> enableLinkStateTracking id=<trackID>
interface=<linksToMonitor>
9. Install Cables
Install all cables in the new switch. Be sure all cables are placed in the same ports in the replacement
switch as they were used on the failed switch.
10. Virtual PM&C: Verify connectivity
Perform 3.2.3 Configure HP 6120XG switch (netConfig), step 13.
3.2.5 Backup 6120XG Enclosure Switch
This procedure should be executed after every change to the switch configuration after completing
3.2.3 Configure HP 6120XG switch (netConfig)
Prerequisites:
•
•
•
•
•
3.7.1 IPM DL360 or DL380 Server must be completed
3.8.2 Installing TVOE on the Management Server must be completed
3.8.3 TVOE Network Configuration must be completed
3.8.4 Deploy PM&C Guest must be completed
3.2.3 Configure HP 6120XG switch (netConfig)
909-2209-001 Revision G, February 2014
90
3 Procedures
Procedure Reference Tables:
Variable
Value
<switch_name>
hostname of the switch
1. Verify switch is at least initialized correctly and connectivity by verifying hostname
# netConfig --device=<switch_name> getHostname
Hostname: 6120_IOBAY3
#
Note: The value beside "Hostname:" should be the same as the <switch_name> variable.
2. Verify the ssh service is configured by running command "netConfig --repo showService
name=ssh_service" and look for ssh service.
# netConfig --repo showService name=ssh_service
Service Name: ssh_service
Type: ssh
Host: 10.240.8.4
Options:
password: C20F7D639AE7E7
user: root
#
If the ssh service does not exist, a “Service not found” message will be returned. If this occurs, then
do the following.
Setup netConfig repository with necessary ssh information. Use netConfig to create a repository
entry that will use the ssh service. This command will provide the user with several prompts. The
prompts with <variables> as the answers are site specific that the user MUST modify. Other prompts
that don't have a <variable> as answer must be entered EXACTLY as they are shown here.
# netConfig --repo addService name=ssh_service
Service type? (tftp, ssh, conserver, oa) ssh
Service host? <pmac_mgmtVLAN_ip_address>
Enter an option name <q to cancel>: user
Enter the value for user: <switch_backup_user>
Enter an option name <q to cancel>: password
Enter the value for password: <switch_backup_user_password>
Verify Password: <switch_backup_user_password>
Enter an option name <q to cancel>: q
Add service for ssh_service successful
#
To ensure that you entered the information correctly, use the following command and inspect the
output, which will be similar to the one shown below.
# netConfig --repo showService name=ssh_service
Service Name: ssh_service
Type: ssh
Host: 10.250.62.85
Options:
password: C20F7D639AE7E7
user: root
#
909-2209-001 Revision G, February 2014
91
3 Procedures
3. Ensure the directory where the backups will be stored exists.
# ls -l /usr/TKLC/smac/etc/switch/backup
If you receive an error such as the following:
-bash: ls: /usr/TKLC/smac/etc/switch/backup: No such file or directory
Then the directory must be created by issuing the following command:
# mkdir -p /usr/TKLC/smac/etc/switch/backup
4. Navigate to the backup directory.
# cd /usr/TKLC/smac/etc/switch/backup
5. Execute the backup command
# netConfig --device=<switch_name> backupConfiguration service=ssh_service
filename=<switch_name>-backup
6. Verify switch configuration was backed up by cat <switch_name> and inspecting its contents to
ensure it reflects the latest known good switch configurations.
# ls <switch_name>-backup*
#
# cat <switch_name>-backup
#
7. Go back to the home directory
# cd ~
8. Repeat steps 1, 4-7 for each HP 6120XG switch to be backed up.
3.2.6 Configure Port Mirroring on Cisco 3020 and/or HP 6120XG Switches
Prerequisites:
• It is essential that all switches have been configured successfully using:
• 3.2.1 Configure Cisco 3020 switch (netConfig) and/or
• 3.2.3 Configure HP 6120XG switch (netConfig) and/or
• 3.1.1 Configure Cisco 4948/4948E/4948E-F aggregation switches (PM&C installed)(netConfig)
Variable
Value
<switch_name>
See Application Documentation and step 2
<switch_model>
Fill in appropriate value from step 2
<switch_IP>
Fill in appropriate value from step 2
<srcInterface>
See Application Documentation
909-2209-001 Revision G, February 2014
92
3 Procedures
<destInterface>
See Application Documentation
<switch_platform_username>
See Application Documentation
<srcVlanid>
See Application Documentation
1. Virtual PM&C: Log into the PM&C Guest
Log into the PM&C Guest.
2. Virtual PM&C: Determine the port mirror source devices
use netConfig to list the devices in its repository and determine which devices should be configured
with port mirroring.
# netConfig --repo listDevices
Devices:
Device: 6120XG_IOBAY3
Vendor:
HP
Model:
6120
Access:
Network: 10.240.8.9
Init Protocol Configured
Live Protocol Configured
Device: C3020_IOBAY1
Vendor:
Cisco
Model:
3020
Access:
Network: 10.240.8.7
Init Protocol Configured
Live Protocol Configured
Device: cClass-switch1A
Vendor:
Cisco
Model:
4948E
Access:
Network: 10.240.8.3
Access:
OOB:
Service: console_service
Console: cClass-sw1A-console
Init Protocol Configured
Live Protocol Configured
Note: Refer to application documentation to determine which switches to configure source
monitoring devices, making a note of the DEVICE NAME, MODEL and IP ADDRESS of each
switch. These will be used as <switch_name>,<switch_model>,<switch_IP> in future steps and
the model will determine the command.
3. Virtual PM&C: Configure port mirroring
Using the information from the previous step, use the following command to configure port
mirroring. Pay close attention to the device model.
For VLAN Monitoring (Cisco Devices Only):
# netConfig --device=<switch_name> addPortMirror session=1 vlan=<srcVlanid>
destInterface=<mirrorPort> direction=both
909-2209-001 Revision G, February 2014
93
3 Procedures
For Port Mirroring:
# netConfig --device=<switch_name> addPortMirror session=1
interface=<srcInterface> destInterface=<mirrorPort> direction=both
Note: The interface option allows for more than one source interface. The value can be entered as
a single interface ex: GE1 (1Gb port) or tenGE1 (10Gb port) or it can be entered as a range of interfaces
separated by commas and dashes ex: GE1-5,GE7,tenGE9-10.
Note: The only direction supported by the HP6120XG is 'both.' If the direction option is used on
an HP6120XG, it will be ignored and 'both' is applied.
VLAN Example:
# netConfig --device=C3020_IOBAY1 addPortMirror session=1 vlan=2 destInterface=GE10
direction=both
Port Example:
# netConfig --device=6120XG_IOBAY3 addPortMirror session=1 interface=tenGE1,tenGE3
destInterface=tenGE2
4. Virtual PM&C: Verify the Port Mirroring configuration on the switch
Verify the port monitoring session is configured:
# netConfig listPortMirrors --device=6120XG_IOBAY3
Destination: 2
Source: = (
tenGE1
tenGE3
)
5. Virtual PM&C: Backup the switch configuration
For Cisco:
Perform the 3.1.5 Backup Cisco 4948/4948E/4948E-F Aggregation Switch and/or Cisco 3020 Enclosure
Switch (netConfig) procedure.
For 6120XG:
Perform the 3.2.5 Backup 6120XG Enclosure Switch procedure.
6. Virtual PM&C: Repeat steps 3-5 for each monitor source device.
Repeat steps 3-5 for each monitor source device.
3.2.7 HP 6120XG switchconfig to netConfig Migration
This procedure configures a 6120XG switch to migrate from switchconfig to netConfig.
Needed Materials:
•
•
•
•
HP Misc. Firmware DVD,
HP Solutions Firmware Upgrade Pack Release Notes [3],
Application specific documentation (documentation that referred to this procedure), and
Template xml files in an application ISO on an application CD.
909-2209-001 Revision G, February 2014
94
3 Procedures
Note: If a procedural STEP fails to execute successfully, STOP and contact the Customer Care Center
by referring to the 1.4 Customer Care Center section of this document.
1. Management Server: Verify network connectivity to 6120XG switches
For each 6120XG switch, verify reachability.
# ping -w3 <enclosure_switch_IP>
2. Management Server: Login to the Switch
Login to the 6120XG switch using SSH/Telnet
# ssh manager@<enclosure_switch_IP>
If the above command fails, log in using telnet:
# telnet <enclosure_switch_IP>
3. Switch CLI: Apply netConfig required commands:
From the 6120XG CLI, apply the following commands required by netConfig:
Switch# config
Switch(config)# hostname <switch_name>
Switch(config)# no password all
Password protection for all will be deleted, continue [y/n]? y
Switch(config)# include-credentials
Note: If prompted after 'include-credentials' answer yes to both questions.
Switch(config)# password manager user-name <platform_username> plaintext
<platform_enable_password>
Switch(config)# console flow-control none
Switch(config)# ip ssh listen oobm
Switch(config)# ip ssh filetransfer
Switch(config)# no tftp client
Switch(config)# no tftp server
Switch(config)# no telnet-server
Switch(config)# end
Switch# write memory
4. Switch CLI: Reload the switch and verify configuration
Reload the switch and verify the configuration from step 3. If a command was not applied, repeat
step 3.
Switch# reload
If prompted, answer yes.
5. Management Server: Verify netConfig connectivity.
Perform the following netConfig command to verify netConfig can communicate with the switch.
# netConfig getFirmware --device=<switch_name>
Version: Z.14.32
Image: Secondary
909-2209-001 Revision G, February 2014
95
3 Procedures
6. Backup the Configuration
Perform the 3.2.5 Backup 6120XG Enclosure Switch procedure and then return to this procedure and
continue with step 7 of this procedure.
7. Restore the Configuration
Perform steps 3-8 of the 3.2.4 Reconfigure a failed HP 6120XG switch (netConfig) procedure and
continue with step 8 of this procedure.
8. Verify the Configuration
Once each HP 6120XG has finished booting from the previous step, verify network reachability
and configuration.
[root@localhost ~]# ping -w3 <enclosure_switch_IP>
[root@localhost ~]# ssh <switch_platform_username>@<enclosure_switch_IP>
Switch# show run
Inspect the output of show run, and ensure that it is configured as per site requirements.
3.2.8 Cisco 3020 switchconfig to netConfig Migration
This procedure configures a Cisco 3020 switch to migrate form switchconfig to netConfig.
Needed materials:
•
•
•
•
HP Misc. Firmware DVD
HP Solutions Firmware Upgrade Pack Release Notes [3]
Application specific documentation (documentation that referred to this procedure)
Template xml files in an application ISO on an application CD.
Note: If a procedural STEP fails to execute successfully, STOP and contact the Customer Care Center
by referring to the 1.4 Customer Care Center section of this document.
1. Virtual PM&C: Verify network connectivity to 3020 switches
For each 3020 switch, verify network reachability.
# ping -w3 <enclosure_switch_IP>
2. Virtual PM&C: Login to the Switch
Login to the 3020 switch using Telnet
# telnet <enclosure_switch_IP>
3. Switch CLI: Apply netConfig required commands:
From the 3020 CLI, apply the following commands required by netConfig:
Switch# config t
Switch(config)# hostname <switch_name>
Switch(config)# no service config
Switch(config)# service password-encryption
Switch(config)# crypto key generate rsa usage-keys label sshkeys modulus 768
Switch(config)# aaa new-model
Switch(config)# username <switch_platform_username> secret
<switch_platform_password>
Switch(config)# enable secret <switch_enable_password>
909-2209-001 Revision G, February 2014
96
3 Procedures
Switch(config)# line vty 0 15
Switch(config-line)# no password
Switch(config-line)# transport input ssh
Switch(config)# exit
Switch(config)# ip ssh version 2
Switch(config)# no ip http server
Switch(config)# no ip http secure-server
Switch(config)# no ip domain lookup
Switch(config)# end
Switch# write memory
4. Switch CLI: Reload the switch and verify configuration.
Reload the switch and verify the configuration from step 3. If a command was not applied, repeat
step 3.
Switch# reload
If prompted, answer yes.
5. Management Server: Verify netConfig connectivity.
Perform the following netConfig command to verify netConfig can communicate with the switch.
# netConfig getHostname --device=<switch_name>
Hostname: <switch_name>
6. Backup the Configuration
Perform the 3.1.5 Backup Cisco 4948/4948E/4948E-F Aggregation Switch and/or Cisco 3020 Enclosure
Switch (netConfig) procedure and then return to this procedure and continue with step 7 of this
procedure.
7. Restore the Configuration
Perform steps 4-8 of the 3.2.2 Reconfigure a failed 3020 switch (netConfig) procedure and continue
with step 8 of this procedure.
8. Verify the Configuration
Once the 3020 has finished booting from the previous step, verify network reachability and
configuration.
[root@localhost ~]# ping -w3 <enclosure_switch_IP>
[root@localhost ~]# ssh <switch_platform_username>@<enclosure_switch_IP>
Switch# show run
Inspect the output of show run, and ensure that it is configured as per site requirements.
3.2.9 Upgrade 3020 Switch IOS Firmware
This procedure will describe the steps how to upgrade IOS firmware for the 3020 switches.
Prerequisites:
• It is essential that PM&C is installed
• 3.6.1 Configure Initial OA IP must be completed
• 3.6.2 Configure initial OA settings via configuration wizard must be completed
909-2209-001 Revision G, February 2014
97
3 Procedures
• Must be familiar with "vim" command line editing tool
Needed material:
• HP Misc. Firmware ISO or DVD
• HP Solutions Firmware Upgrade Pack Release Notes [3]
• Application specific documentation (documentation that referred to this procedure)
Note: If a procedural STEP fails to execute successfully, STOP and contact the Customer Care Center
by referring to the 1.4 Customer Care Center section of this document.
1. Virtual PM&C:
Login as root to the Virtual PM&C server.
Then verify prerequisite network reachability with the following command:
# ping -w3 <mgmtVLAN_gateway_address>
2. Virtual PM&C:
Copy the appropriate version of Cisco 3020 IOS firmware, as specified by the HP Solutions Firmware
Upgrade Pack Release Notes [3], from the HP Misc Firmware ISO or DVD to the
/var/TKLC/smac/image directory. Then check to make sure it is present in the
/var/TKLC/smac/image directory:
# ls /var/TKLC/smac/image
The output of the command should show the appropriate 3020 IOS firmware file among the files
listed. Example:
cbs30x0-ipbasek9-tar.122-58.SE1.tar
3. Virtual PM&C:
Check the TFTP configuration file to verify it is configured properly.
If the /etc/xinetd.d/tftp file matches the output below, proceed to step 6. If the /etc/xinetd.d/tftp
file does not match the output below then proceed to step 4.
# cat /etc/xinetd.d/tftp
service tftp
{
socket_type = dgram
protocol = udp
wait = yes
user = root
server = /usr/sbin/in.tftpd
server_args = -s /var/TKLC/smac/image
disable = no
per_source = 11
cps = 100 2
flags = IPv4
}
4. Virtual PM&C:
909-2209-001 Revision G, February 2014
98
3 Procedures
Ensure that the tftp service is not running. A zero is expected.
# tpdProvd --client --noxml --ns=Xinetd getXinetdService service tftp
Login on Remote: platcfg
Password of platcfg:
0
#
If this command returns a 1 perform the steps in Appendix E Disabling TFTP and then continue this
procedure at the next step.
5. Virtual PM&C:
Edit the /etc/xinetd.d/tftp file until it matches the output in Step 3.
6. Virtual PM&C:
Modify PM&C Feature to allow TFTP. Enable the DEVICE.NETWORK.NETBOOT feature with
the management role to allow tftp traffic:
# pmacadm editFeature --featureName=DEVICE.NETWORK.NETBOOT --enable=1
--role=management
# pmacadm resetFeatures
Note: This may take up to 60 seconds to complete.
7. Virtual PM&C:
Verify that the netConfig tftp_service has been configured. If the service is configured the output
will look similar to below:
# netConfig --repo showService name=tftp_service
Services:
Service Name: tftp_service
Type: tftp
Host: 10.240.8.4
Options:
dir: /var/TKLC/smac/image
#
If tftp_service is already configured, skip to step 9. Otherwise, continue on to step 8.
8. Virtual PM&C:
Use netConfig to create a repository entry that will use the tftp service. This command will give
the user several prompts. The prompts with <variables> as the answers are site specific that the
user MUST modify. Other prompts that don't have a <variable> as an answer must be entered
EXACTLY as they are shown here.
# netConfig --repo addService name=tftp_service
Service type? (tftp, ssh, conserver, oa) tftp
Service host? <pmac_mgmtVLAN_ip_address>
Enter an option name (q to cancel): dir
Enter a value for user: /var/TKLC/smac/image/
Enter an option name(q to cancel): q
Add service for tftp_service successful
909-2209-001 Revision G, February 2014
99
3 Procedures
To check that you entered the information correctly, use the following command:
# netConfig --repo showService name=tftp_service
and check the output, which will be similar to the one shown below (Note: only the tftp service
info has been shown in this example. If the previous step and this step were done correctly, both
the console_service and tftp_service entries would show up)
# netConfig --repo showService name=tftp_service
Services:
Service Name: tftp_service
Type: tftp
Host: 10.240.8.4
Options:
dir: /var/TKLC/smac/image
#
9. Virtual PM&C:
Create and edit a file named "network-confg" in the /var/TKLC/smac/image directory by entering
the following command:
# vim /var/TKLC/smac/image/network-confg
10. Virtual PM&C:
Once in the "vim" editor modify the "network-confg" file to contain only the following lines:
enable secret tklc
line vty 0 15
password tklc
transport input telnet
Once the contents of the "network-confg" file match the above lines save the file and exit the "vim"
editor.
11. Virtual PM&C:
Check that the "network-confg" file was created and edited successfully:
# cat /var/TKLC/smac/image/network-confg
enable secret tklc
line vty 0 15
password tklc
transport input telnet
The output above should be seen.
12. Virtual PM&C:
Verify network reachability to the 3020 switch:
# ping -w3 <enclosure_switch_IP>
13. Virtual PM&C:
Prepare the system for tftp.
909-2209-001 Revision G, February 2014
100
3 Procedures
First, look at the /etc/xinetd.d/tftp file to ensure proper values.
# cat /etc/xinetd.d/tftp | grep server_args
server_args = -s /var/TKLC/smac/image
#
If the command does not show the directory, edit the file so that it has the appropriate values.
Then, turn on tftp:
# tpdProvd --client --noxml --ns=Xinetd startXinetdService service tftp
Login on Remote: platcfg
Password of platcfg: <platcfg_password>
Note: This should return a '1'. If it does not, retry the command. If it fails a second time, stop this
procedure & contact Tekelec Customer Service
Check to ensure the firewall is configured properly by issuing the following command:
# service iptables status | grep 69
1 ACCEPT udp -- 10.240.8.0/26 0.0.0.0/0 udp dpt:69
#
If the output is not similar to the one shown above, stop the procedure and contact Tekelec Customer
Service. Otherwise, continue to the next step.
14. OA GUI:
Login to the OA GUI and click on the interconnect bay for the 3020 to be configured on the Rear
View image of the middle pane. Alternatively, on the left pane, one could expand Interconnect
Bays and then click on the Cisco 3020 to be upgraded.
Then click on Management Console.
A new page will be opened. If you are asked for a username and password, leave the username
blank and use the appropriate password provided by the application documentation. Then click
OK.
909-2209-001 Revision G, February 2014
101
3 Procedures
If you are prompted with the "Express Setup" screen, click Refresh.
If you are prompted with "Do you want a secured session with the switch?" click on No.
909-2209-001 Revision G, February 2014
102
3 Procedures
Then a new Catalyst Blade Switch 3020 Device Manager will be opened.
15. OA GUI
Restore switch to factory defaults.
Navigate to Configure > Restart/Reset.
Click the circle that says "Reset the switch to factory defaults, and then restart the switch". Then
click the Submit button.
A pop-up window will appear that looks like this:
909-2209-001 Revision G, February 2014
103
3 Procedures
Click OK and the switch will be reset to factory defaults and reloaded.
16. 3020 Switch CLI:
Use telnet to connect to the command line interface of the 3020 switch once it has had time to restart
and acquire the configuration from the "network-confg" file.
Then login and enter enabled mode:
User Access Verification
Password:tklc
Switch>en
Password:tklc
Switch#
17. 3020 Switch CLI:
Begin the firmware download:
Switch#archive download-sw /overwrite /force-reload
tftp://<pmac_mgmtVLAN_ip_address>/<cisco_3020_IOS_firmware_file>
Example:
Switch#archive download-sw /overwrite /force-reload
tftp://10.240.34.10/cbs30x0-ipbasek9-tar.122-58.SE1.tar
The firmware download will take several minutes. The following is some of the output that will
be seen during the upgrade:
Loading cbs30x0-ipbasek9-tar.122-58.SE1.tar from 10.240.34.10 (via FastEthernet0):
!!!!!!!!!!!!!!!!!!!!!!!!!!!!!!!!!!!!!!!!!!!!!!!!!!!!!!!!!!!!!!!!!!
[OK - 16455680 bytes]
Loading cbs30x0-ipbasek9-tar.122-58.SE1.tar from 10.240.34.10 (via FastEthernet0):
!!!!!!!!!!!!!!!!!!!!!!!!!!!!!!!!!!!!!!!!!!!!!!!!!!!!!!!!!!!!!!!!!!!
examining image...
extracting info (110 bytes)
extracting cbs30x0-ipbasek9-mz.122-58.SE1/info (390 bytes)
extracting info (110 bytes)
System Type:
Ios Image File Size:
Total Image File Size:
Minimum Dram required:
Image Suffix:
Image Directory:
Image Name:
Image Feature:
0x00000000
0x00D59A00
0x00FB1A00
0x08000000
ipbasek9-122-58.SE1
cbs30x0-ipbasek9-mz.122-58.SE1
cbs30x0-ipbasek9-mz.122-58.SE1.bin
IP|LAYER_3|SSH|3DES|MIN_DRAM_MEG=128
Old image for switch 1: same as image to overwrite
909-2209-001 Revision G, February 2014
104
3 Procedures
Image to be installed already exists...will be removed before download.
Deleting `flash:cbs30x0-ipbasek9-mz.122-58.SE1' to create required space
Extracting images from archive into flash...
cbs30x0-ipbasek9-mz.122-58.SE1/ (directory)
extracting cbs30x0-ipbasek9-mz.122-58.SE1/cbs30x0-ipbasek9-mz.122-58.SE1.bin
(13988491 bytes)
Skipping many lines beginning with "extracting".
The following output will be seen once the firmware installation is done and the switch is reloaded
into the new firmware image:
Installing (renaming): `flash:update/cbs30x0-ipbasek9-mz.122-58.SE1' ->
`flash:/cbs30x0-ipbasek9-mz.122-58.SE1'
New software image installed in flash:/cbs30x0-ipbasek9-mz.122-58.SE1
All software images installed.
Requested system reload in progress...
Switch#
18. 3020 Switch CLI:
Use telnet to connect to the command line interface of the 3020 switch once it has had time to restart
and acquire the configuration from the "network-confg" file.
Then login and enter enabled mode:
User Access Verification
Password:tklc
Switch>en
Password:tklc
Switch#
19. 3020 Switch CLI:
Check the installed IOS firmware version to verify the upgrade completed:
Switch#show version
After scrolling to the bottom of the output produced by this command, the following will be seen
or similar:
SW Version
---------12.2(58)SE1
SW Image
---------CBS30X0-IPBASEK9-M
Make sure the "SW Version" column matches the appropriate version indicated in the HP Solutions
Firmware Upgrade Pack Release Notes [3] and that the "SW Image" column includes the wording
"IPBASEK9".
Once the installed IOS version is verified, exit the telnet connection to the switch:
Switch#exit
20. Virtual PM&C:
909-2209-001 Revision G, February 2014
105
3 Procedures
Disable TFTP.
Perform the steps in Appendix E Disabling TFTP and then continue at the next step
21. Virtual PM&C:
Clean up the network-confg and 3020 IOS firmware files, answering "yes" when prompted. The
3020 IOS filename used is an example. Make sure to remove any 3020 IOS firmware files present.
# rm /var/TKLC/smac/image/network-confg
rm: remove regular file `/var/TKLC/smac/image/network-confg'?yes
# rm /var/TKLC/smac/image/cbs30x0-ipbasek9-tar.122-58.SE1.tar
rm: remove regular file
`/var/TKLC/smac/image/cbs30x0-ipbasek9-tar.122-58.SE1.tar'?yes
22. OA GUI:
Perform step 14 again, using "tklc" as the password if prompted, to reset the 3020 back to factory
defaults now that the firmware has been upgraded.
23. Virtual PM&C
Make sure this procedure has been run for all 3020 switches to be upgraded.
3.2.10 Upgrade HP 6120XG Switch Firmware
This procedure will describe the steps how to upgrade firmware for the 6120XG switches
Prerequisite:
• 3.6.1 Configure Initial OA IP and
• Configure initial OA via configuration wizard must be completed.
Needed material:
•
•
•
•
HP Misc. Firmware DVD
HP Solutions Firmware Upgrade Pack Release Notes [3]
WinSCP
SSH client (eg. PuTTY)
1. Local Workstation:
Copy the appropriate version of HP 6120XG firmware, as specified by the HP Solutions Firmware
Upgrade Pack Release Notes[3]
2. 6120XG Switch: Login
Login to the switch as manager via ssh (accepting switch's key if prompted):
login as: manager
Press any key to continue as prompted by the switch
3. 6120XG Switch: Enter global configuration
Switch# config
909-2209-001 Revision G, February 2014
106
3 Procedures
4. 6120XG Switch: Find current firmware version and compart to release notes
Switch(config)# show version
Image stamp:
/sw/code/build/vern(Z 14 zin t4b)
Sep 23, 2010 16:48:29
z.14.12
31
Boot Image:
Secondary
Record the firmware version (z.14.12 in this case) and the current Boot Image location being used
(Secondary in this case). Compare the firmware version currently being used to the latest version
specified in the HP Solutions Firmware Upgrade Pack Release Notes [3]. Continue with this upgrade
procedure if necessary
Whatever Boot Image is being used the opposite one will be upgrade. So in this case since the
Secondary Boot Image is being used the Primary Boot image will be upgraded.
5. 6120XG Switch: Record current firmware version of boot image to be upgraded.
Record the current version of the Boot Image to be upgraded. This will be used to compare after
upgrading to check for success of the upgrade. (Primary Image in this case)
Switch(config)#
Image
------Primary Image
Secondary Image
show flash
Size(Bytes)Date
Version
----------- -------- -------: 7595562
8/17/10 z.14.09
: 7732899
9/23/10 z.14.12
Boot Rom Version
Default Boot
: z.14.09
: Secondary
6. 6120XG Switch: Make sure Secure Copy is enabled
Switch(config)# show ip ssh
SSH Enabled
: Yes
TCP Port Number
: 22
Host Key Type
: RSA
Secure Copy enabled : Yes
Timeout (sec)
: 120
Host Key Size
: 2048
Ciphers :
MACs
:
Ses
--1
. . .
Type
| Source IP
Port
------- + ---------------------------------------------------- -----console |
.
Look at the output of show ip ssh. If Secure Copy Enabled = Yes, then continue to the next
step. If Secure Copy Enabled = No, then perform the command below:
Switch(config)# ip ssh filetransfer
Tftp and auto-tftp have been disabled.
Switch(config)#
Enter show ip ssh again to make sure Secure Copy has been enabled
7. 6120XG Switch: Open the event log
909-2209-001 Revision G, February 2014
107
3 Procedures
Go into the switch's menu interface and type "y" to save the configuration
Switch(config)# menu
Do you want to save current configuration [y/n/^C]? y
Select:
4. Event Log
Then Select:
End
Keep this terminal window open.
8. Local Workstatiion:
•
•
•
•
•
•
•
•
•
•
Open WinSCP on the local workstation
Click on "Preferences" in the list on the left
Select the "Commander" interface (click on the circle next to it)
Then click on the "Preferences..." button
Click on "Transfer in the list on the left"
Unselect the checkbox next to "Preserve timestame" is (empty the checkbox).
Click on "Endurance" in the list on the left
Click on the circle next to "disable" to select it (make sure a dot is in the circle)
Click the OK button
Click on "Session" in the list on the left
9. Local Workstation: With WinSCP, login to the 6120XG switch
• With WinSCP still on the "Session" screen, enter the 6120XG's ip address under Host name and
use manager for the User Name.
• Leave the Port number at 22
• Leave File protocal at SFTP and select the checkbox next to Allow SCP fallback.
• Click the Login button.
• If prompted to "add host key to the cache", click the Yes button
10. Local Workstation: Copy the new firmware to the switch Boot Image to be updated
909-2209-001 Revision G, February 2014
108
3 Procedures
• Once WinSCP logs into the switch, in the left window find the fimware file that was copied to
the local workstation in Step 1.
• In the right window on the switch, oopen the folder labeld "os"
• Drag the firmware file on the left to the window on the right.
• A copy window pop up with "/os/*.*" written will appear. Replace *.* with either primary or
secondary depending on which boot image is being upgraded. (in this example it would be
primary)
• Click the Copy button.
11. 6120XG Switch: Go back to the Event Log on the SSH session with the switch.
Go back to the switch ssh window where the Event Log is open. If the connection has timed out,
redo Steps 2,3, and 6. Watch for the following log event (it can take a few minutes):
update: Primary Image updated
In this example, the Primary Image is being updated. If the user were updating the Secondary
Image it would say "Secondary" instead of "Primary".
12. 6120XG Switch: Get Back to the Command Line Interface (CLI).
Now that the "updated" message has appeared, select:
Back
909-2209-001 Revision G, February 2014
109
3 Procedures
Then select:
5. Command Line (CLI)
Switch(config)#
13. 6120XG Switch: Check the firmware version.
Run the show flash command to make sure the Image being updated has the correct firmware
versiion. (in this example Primary Image has changed to z.14.22)
Switch(config)# show flash
Image
Size(Bytes)Date
Version
-------------------------Primary Image
: 7732899
10/21/10
Secondary Image : 7193633
06/23/10
Boot Rom Version: z.14.09
Default Boot
: Secondary
-------z.14.22
z.14.12
14. 6120XG Switch: Reboot into the new firmware.
Now reboot the switch into the new Boot Image. (primary in this example). If the Secondary Image
has been updated, replace "primary" with "secondary" in the command below:
Switch(config)# boot system flash primary
Device will be rebooted, do you want to continue [y/n]? y
15. 6120XG Switch: Log back in.
Once the switch has rebooted, log back into the switch as manager bia ssh.
login as: manager
Press any key to continue as prompted by the switch.
Switch#
16. 6120XG Switch: Re-enter global configuration.
Switch# config
17. 6120XG Switch: Make sure the switch has booted properly into the new firmware image.
Run the show version. Make sure the new firmware version is displayed.
Switch(config)# show version
Image stamp:/sw/code/build/vern(Z_14_zin_t4b)
Oct 21 2010 16:48:29
Z.14.22
31
Boot Image:
Primary
18. 6120XG Switch: Verify the "Default Boot" has changed.
Run the show flash command, checking to make sure the image that was upgraded has been set
as the "default Boot". (Primary in this example).
6120XG_IOBAY1# show flash
Image
Size(Bytes)
Date
Version
-------------- -------- ------Primary Image
: 7798047
03/07/12 Z.14.32
909-2209-001 Revision G, February 2014
110
3 Procedures
Secondary Image : 7732899
Boot Rom Version: Z.14.09
Default Boot
: Primary
10/21/10 Z.14.22
3.2.11 Configure QoS (DSCP and/or CoS) on HP 6120XG Switches
Prerequisites:
• It is essential that all switches have been configured successfully using 3.2.3 Configure HP 6120XG
switch (netConfig)
Variable
Value
<switch_name>
See Application Documentation and step 2
<dscp value>
See Application Documentation (if present)
<cos value>
See Application Documentation (if present)
<switch_platform_username>
See Application Documentation
<Vlanid>
See Application Documentation
1. Virtual PM&C: Login to the PM&C Guest
Login to the PM&C Guest.
2. Virtual PM&C: Determine which devices require QoS Policies
Use netConfig to list the devices in its repository and determine which devices should be configured
with QoS.
# netConfig --repo listDevices
Devices:
Device: 6120XG_IOBAY3
Vendor: HP
Model: 6120
Access: Network: 10.240.8.9
Init Protocol Configured
Live Protocol Configured
Device: C3020_IOBAY1
Vendor: Cisco
Model: 3020
Access: Network: 10.240.8.7
Init Protocol Configured
Live Protocol Configured
Device: cClass-switch1A
Vendor: Cisco
Model: 4948E
Access: Network: 10.240.8.3
Access: OOB:
Service: console_service
Console: cClass-sw1A-console
Init Protocol Configured
Live Protocol Configured
Note: Refer to application documentation to determine which switches or pairs of switches to
configure with QoS, making a note of the DEVICE NAME of each 6120XG switch. These will be
referred to as <switch_name> in the following steps
909-2209-001 Revision G, February 2014
111
3 Procedures
3. Virtual PM&C:Add DSCP and/or CoS Policy.
Using the information from the previous step, use one of the following commands to configure
DSCP and/or CoS marking on the device.
For DSCP and CoS Marking:
# netConfig addQOS --device=<switch_name> vlan=<vlanid> dscp=<dscp value> cos=<cos
value> name=<user defined name>
For DSCP Marking Only:
# netConfig addQOS --device=<switch_name> vlan=<vlanid> dscp=<dscp value>
name=<user defined name>
For CoS Marking Only:
# netConfig addQOS --device=<switch_name> vlan=<vlanid> cos=<cos value>
4. Virtual PM&C: Verify the QoS configuration on the switch
Verify the QoS configuration:
# netConfig getQOS --device=<switch_name> vlan=<vlanid>
Example Output:
# netConfig getQOS --device=6120XG_IOBAY3 vlan=2
Policy: = (
VLAN priorities
VLAN ID Apply rule | DSCP
Priority
2
DSCP
| 000011 3
)
5. Virtual PM&C: Repeat steps 3-4 for each Policy
Repeat steps 3-4 for each policy that needs to be applied to the switch.
6. Backup the Switch.
Execute the 3.2.5 Backup 6120XG Enclosure Switch procedure.
7. Virtual PM&C: Repeat steps 3-6 for each switch.
Repeat steps 3-6 for each switch identified in step 2.
3.3 Brocade Switch - SwitchConfig Procedures
3.3.1 Configure Brocade Switches
This procedure will configure names, user passwords and NTP settings for Brocade switches and back
up the configuration to the management server hosting PM&C.
Prerequisites:
909-2209-001 Revision G, February 2014
112
3 Procedures
•
•
•
•
3.6.1 Configure Initial OA IP,
3.8.2 Installing TVOE on the Management Server,
3.8.3 TVOE Network Configuration, and
3.8.4 Deploy PM&C Guest
Note: If a procedural STEP fails to execute successfully, STOP and contact the Customer Care Center
by referring to the 1.4 Customer Care Center section of this document.
1. OA shell: Login to the active OA
Login to OA via ssh as root user.
login as: root
-------------------------------------------------------WARNING: This is a private system. Do not attempt to login unless you are an
authorized user.
Any authorized or unauthorized access and use may be moni-
tored and can result in criminal or civil prosecution under applicable law.
-------------------------------------------------------Firmware Version: 3.00
Built: 03/19/2010 @ 14:13
OABayNumber: 1
OARole:
Active
[email protected]'s password:
If the OA Role is not Active, login into the other OA the enclosure system
2. OA shell: Login to the Brocade switch console
Run the following command to get Brocade switches bay IDs:
> show interconnect list
OA-001F296DB1BB> show interconnect list
BayInterconnect Type Manufacturer Power Health UIDManagement IP
--- ----------------- -------------------- ------- --------- --- 1 Ethernet
Cisco Systems, Inc. On
OK
Off 10.240.4.70
2 Ethernet
Cisco Systems, Inc. On
OK
Off 10.240.4.71
3 Fibre ChannelBROCADE
On
OK
Off 10.240.4.50
4 Fibre ChannelBROCADE
On
OK
Off 10.240.5.51
5 [Absent]
6 [Absent]
7 [Absent]
8 [Absent]
Totals: 4 interconnect modules installed, 4 powered on.
# connect interconnect <bay_id_number>
NOTICE: This pass-thru connection to the integrated I/O
console is provided for convenience and does not supply additional access control.
For security reasons, use the password features of the integrated switch.
Connecting to integrated switch 4 at 9600,N81...
Escape character is '<Ctrl>_' (Control + Shift + Underscore)
Press [Enter] to display the switch console:
909-2209-001 Revision G, February 2014
113
3 Procedures
Press Enter Enter (Enter twice) and log in as root user.
swd77 console login: root
Password:
Please change passwords for switch default accounts now.
Use Control-C to exit or press 'Enter' key to proceed.
Press Enter to see the prompt.
3. Brocade switch console : Set root user password
swd77:root> passwd root
Changing password for root
Enter new password:
Re-type new password:
passwd: all authentication tokens updated successfully
Saving password to stable storage.
Password saved to stable storage successfully.
4. Brocade switch console : Set factory user password
swd77:root> passwd factory
5. Brocade switch console : Set admin user password
swd77:root> passwd admin
6. Brocade switch console : Set user user password
swd77:root> passwd user
7. Brocade switch console : Set switch name for the FC switch
Run the following command, the bay id number is the same as the one used in step 1 to connect:
swd77:root> switchName bay<bay_id_number>
Committing configuration...
Done.
8. Brocade switch console : Set chassis name for the FC switch
Use the enclosure name used during the OA setup, prepended by alphabetical character. (e.g.
c505_05_01)
swd77:root> chassisName <chassis_name>
Note: The chassis name must begin with alphabetical character.
9. Brocade switch console : Set NTP server on the FC switch
swd77:root> tsclockserver <NTP_server_ip>
Updating Clock Server configuration...done.
Updated with the NTPservers
909-2209-001 Revision G, February 2014
114
3 Procedures
Check if the change was applied with:
swd77:root> tsclockserver
Active NTPServer
10.250.32.10
Configured NTPServer List 10.250.32.10
10. Brocade switch console : Backup configuration
swd77:root> configUpload
Protocol (scp, ftp, local) [ftp]: scp
Server Name or IP Address [host]: <PM&C_ip>
User Name [user]: pmacadmin
File Name [config.txt]: /var/TKLC/smac/backup/<chassis_switch_bay>
Section (all|chassis [all]):
pmacadmin@<ip>‘s password:
configUpload complete: All config parameters are uploaded
where <chassis_switch_bay> would be 500_05_01_bay3 for instance
11. Brocade switch console : Logout
swd77:root> logout
Press control + shift + underscore and then D to logout from FC switch console.
12. Repeat for second Brocade switch
Repeat step 2-11 for the second Brocade switch.
13. OA : Logout
> exit
3.3.2 Upgrade Brocade Switch Firmware
This procedure will describe how to upgrade firmware for the Brocade switches. The procedure covers
either 4/24 or 8/24 Brocade switches.
Prerequisites:
• 3.6.1 Configure Initial OA IP and
• 3.8.9 Adding ISO Images to the PM&C Image Repository have been completed using Misc. Firmware
CD.
Needed material:
• HP Misc. Firmware DVD
• HP Solutions Firmware Upgrade Pack Release Notes [3]
Note: If a procedural STEP fails to execute successfully, STOP and contact the Customer Care Center
by referring to the 1.4 Customer Care Center section of this document.
1. OA shell: Login to the active OA
909-2209-001 Revision G, February 2014
115
3 Procedures
Login to OA via ssh as root user.
login as: root
-------------------------------------------------------WARNING: This is a private system. Do not attempt to login unless you are an
authorized user. Any authorized or unauthorized access and use may be monitored and can result in criminal or civil prosecution under applicable law.
-------------------------------------------------------Firmware Version: 3.00
Built: 03/19/2010 @ 14:13
OA BayNumber: 1
OARole:
Active
[email protected]'s password:
If the OA Role is not Active, login into the other OA the enclosure system
2. OA shell: Login to the brocade switch console
Login to OA via ssh as root user.
Run the following command to get Brocade switches bay IDs:
> show interconnect list
OA-001F296DB1BB> show interconnect list
BayInterconnect Type Manufacturer Power Health UIDManagement IP
--- ----------------- -------------------- ------- --------- --- 1 Ethernet
Cisco Systems, Inc. On
OK
Off 10.240.4.70
2 Ethernet
Cisco Systems, Inc. On
OK
Off 10.240.4.71
3 Fibre ChannelBROCADE
On
OK
Off 10.240.4.50
4 Fibre ChannelBROCADE
On
OK
Off 10.240.5.51
5 [Absent]
6 [Absent]
7 [Absent]
8 [Absent]
Totals: 4 interconnect modules installed, 4 powered on.
# connect interconnect <bay_id_number>
NOTICE: This pass-thru connection to the integrated I/O
console is provided for convenience and does not supply additional access control.
For security reasons, use the password features of the integrated switch.
Connecting to integrated switch 4 at 9600,N81...
Escape character is '<Ctrl>_' (Control + Shift + Underscore)
Press [Enter] to display the switch console:
Press Enter Enter ( Enter twice) and log in as admin user.
swd77 console login: admin
Password: <admin_password>
Please change passwords for switch default accounts now.
Use Control-C to exit or press 'Enter' key to proceed.
Press Control-C to skip changing passwords.
3. Brocade switch console : Verify upgrade of Brocade switches is required
swd77:admin> firmwareshow
Appl
Primary/Secondary Versions
909-2209-001 Revision G, February 2014
116
3 Procedures
-----------------------------------------FOS
v6.2.1b
v6.2.1b
Check the FOS version.
If the version is at level recommended by the Firmware Release Notes [3] there is no need to upgrade
the firmware on this switch. Skip the rest of this procedure if firmware version of both switches
has been verified.
4. Management server: Prepare to upgrade Brocade switch firmware
Note: This step only needs to be done once on the management server.
If needed , login to the management server as root. Then execute :
# mkdir /var/TKLC/upgrade/brocade
# cd /var/TKLC/upgrade/brocade
# tar xvzf
/usr/TKLC/smac/html/TPD/HPFW--872-2488-XXX--HPFW/files/<brocade_firmware_version>.tar.gz
Refer to Release Notes [3] to identify the correct brocade firmware file.
5. Brocade switch console : Upgrade Brocade switch firmware
swd77:admin> firmwaredownload
Server Name or IP Address: <PM&C_management_network_IP>
User Name: pmacadmin
FileName: /var/TKLC/upgrade/brocade/<brocade_firmware_version>
Network Protocol(1-auto-select, 2- FTP, 3- SCP) [1]: 3
Password: <pmacadmin_password>
Checking system settings for firmwaredownload...Server IP: <ip>, Protocol IPv4
System settings check passed.
You can run firmwaredownloadstatus to get the status of this command.
This command will cause a warm/non-disruptive boot on the switch,but will require
that existing telnet, secure telnet or SSH
sessions be restarted
Do you want to continue [Y]: y
After few minutes, the upgrade will complete. The switch will automatically reboot after the
following output:
HA Rebooting ...
Loopback backup before go standby
2010/03/09-20:29:07, [FSSM-1002], 385,, INFO,
SilkWorm4024, HA State is in sync.
late cleanup
2010/03/09-20:29:08, [FSSM-1003], 386,, WARNING,
SilkWorm4024, HA State out of sync.
RCS_RCV_FSS_HALT, rc 0, close sock 27
sysctrld: all services Standby
909-2209-001 Revision G, February 2014
117
3 Procedures
Restarting system.
6. Brocade switch console :
After the switch reboots, the console login prompt will appear.
swd77 console login: admin
Password: <admin_password>
Please change passwords for switch default accounts now.
Use Control-C to exit or press 'Enter' key to proceed.
Press Control-C to skip changing passwords.
swd77:admin> firmwaredownloadstatus
[1]: Tue Mar 9 20:21:37 2010
Firmware is being downloaded to the switch. This step may take up to 30 minutes.
[2]: Tue Mar 9 20:28:39 2010
Firmware has been downloaded to the secondary partition of the switch.
[3]: Tue Mar 9 20:33:02 2010
The firmware commit operation has started. This may take
up to 10 minutes.
Wait until the following output appears:
Firmwaredownload command has completed successfully.
Use version to verify the firmware version:
swd77:admin> firmwareshow
Appl
Primary/Secondary Versions
-----------------------------------------FOS
v6.2.1b
v6.2.1b
Check the FOS version.
To exit brocade switch console press Control + Shift + Underscore
7. Upgrade the other Brocade switch
Repeat Steps 3-6 on the second Brocade switch.
8. Management server: Remove temporary files
# cd
# rm –rf /var/TKLC/upgrade/brocade
3.3.3 Configure Zones in Brocade Switches
This optional procedure should be applied on both Brocade switches that are part of the same enclosure.
Zone settings have to be the same for both switches.
909-2209-001 Revision G, February 2014
118
3 Procedures
Prerequisites:
• 3.3.1 Configure Brocade Switches has been completed.
• Knowing the network cabling and SAN requirements by blade server is required.
Note: If a procedural STEP fails to execute successfully, STOP and contact the Customer Care Center
by referring to the 1.4 Customer Care Center section of this document.
1. General guide
This procedure is optional. Skipping this procedure will allow switches to connect to all ports.
Note: This procedure should be used with requirements provided by the application. There are
general guidelines typically used, but the application documentation is the authoritative source:
• The rules for the zone configureation: There should be one zone per one storage array in the
Fibre Channel Switch
• Identical zones need to be created in each Brocade in the same enclosure
• The members of such zone will be all ports from the management storage array and all servesr
that need access to it.
• Be sure to create zones for all management storage array controllers. If a Brocade port is not in
a zone, then it cannot communicate.
• After configuring specific zones create another "catch-all" zone that covers the rest of the devices.
2. OA GUI: Log into the Fibre Channel switch
Log into the OA select the Fibre Channel switch
Select Enclosure Information > Interconnect Bays > Brocade ... > Management Console
Fibre Channel console will be loaded. Login as administrative user.
909-2209-001 Revision G, February 2014
119
3 Procedures
3. Fibre Channel switch console: Navigate to Zone Admin
Navigate to Zone Admin.
4. Fibre Channel switch console: Create new zone
Select Zone tab.
Click on New Zone.
909-2209-001 Revision G, February 2014
120
3 Procedures
Type in an appropriate name and click OK.
5. Fibre Channel switch console : Add port members into the zone
In the popup menu choose the zone where ports should be added.
Expand the Ports and Attached Devices twice. Select the appropriate ports under Ports and
Attached Devices.
A single Brocade port should be just in a single zone.
Press the Add Member button.
Then create “catch-all“ zone that covers all the remaining devices (blade servers and ports) that
are not in the zones specified above.
6. Fibre Channel switch console : Create Zone Config
Click on the Zone Config tab.
To create a new zone config click on the New Zone Config button.
909-2209-001 Revision G, February 2014
121
3 Procedures
Enter appropriate name such as "Production_Zone_Config" and click OK.
7. Fibre Channel switch console : Add Zones into Zone Config
Expand the Zones Selection List.
Select all desired zones and press Add Member button.
Press Save Config and then Yes.
909-2209-001 Revision G, February 2014
122
3 Procedures
Observe the status at the botton of the screen. Make sure that the "Successfully committed
the changes to the fabric" message is displayed in blue at the bottom of the window.
8. Fibre Channel switch console : Enable Zone Config
Press Enable Config
Use the pull down menu to select the Zone Config to apply.
Press OK
Press Yes
Observe the status at the botton of the screen. Make sure Successfully committed the
changes to the fabric appears in blue at the bottom of the window.
9. Repeat on the second switch
Repeat steps 2-8 on second switch in the same enclosure. The two switches should have identical
configurations.
3.3.4 Configure Brocade Switch SNMP Trap Target
This procedure will configure SNMP settings for Brocade switches.
Prerequisites:
• 3.3.1 Configure Brocade Switches has been completed.
• Knowing the network cabling and SAN requirements by blade server is required.
Note: If a procedural STEP fails to execute successfully, STOP and contact the Customer Care Center
by referring to the 1.4 Customer Care Center section of this document.
1. OA: Login to Brocade switch console
Login to OA via ssh as root user. Run the following command to get Brocade switches bay IDs:
> show interconnect list
OA-001F296DB1BB> show interconnect list
Bay Interconnect Type Manufacturer Power Health UIDManagement IP
--- ----------------- -------------------- ------- --------- --- 1 Ethernet
Cisco Systems, Inc. On
OK
Off 10.240.4.70
2 Ethernet
Cisco Systems, Inc. On
OK
Off 10.240.4.71
3 Fibre Channel BROCADE
On
OK
Off 10.240.4.50
4 Fibre Channel BROCADE
On
OK
Off 10.240.5.51
5 [Absent]
6 [Absent]
7 [Absent]
8 [Absent]
Totals: 4 interconnect modules installed, 4 powered on.
Run:
# connect interconnect <bay_id>
This will connect the user to the FC switch console. Press Enter twice and log in as admin user.
Note: The switch will be configured to reject SNMP sets and gets. Only the hosts listed in step 4
will be able to receive traps.
909-2209-001 Revision G, February 2014
123
3 Procedures
2. Brocade switch console: Set the SNMP parameters to the default values
swd77:admin> snmpconfig --default snmpv1
*****
This command will reset the agent's SNMPv1 configuration back to factory default
*****
SNMPv1 community and trap recipient configuration:
Community 1: Secret C0de (rw)
No trap recipient configured yet
Community 2: OrigEquipMfr (rw)
No trap recipient configured yet
Community 3: private (rw)
No trap recipient configured yet
Community 4: public (ro)
No trap recipient configured yet
Community 5: common (ro)
No trap recipient configured yet
Commnity 6: FibreChannel (ro)
No trap recipient configured yet
*****
Are you sure? (yes, y, no, n): [no] yes
3. Brocade switch console: Set security level (to disable SNMP sets and gets)
swd77:admin> snmpconfig --set seclevel
See output. A prompt for security level will appear:
Select 1 and press Enter.
Select SNMP GET Security Level
(0 = No security, 1 = Authentication only, 2 =
Authentication and Privacy, 3 = No Access): (0..3) [0] 1
Select 3 and press Enter.
Select SNMP SET Security Level
(0 = No security, 1 = Authentication only, 2 =
Authentication and Privacy, 3 = No Access): (3..3) [3] 3
Verify settings:
swd77:admin> snmpconfig --show seclevel
4. Brocade switch console:
Set SNMP trap recipient IP addresses
swd77:admin> snmpconfig --set snmpv1
SNMPcommunity and traprecipient configuration:
Community (rw): [Secret C0de] <new_password_rw>
Trap Recipient's IPaddress : [0.0.0.0
Community (rw): [OrigEquipMfr] <new_password_rw>
Trap Recipient's IPaddress : [0.0.0.0]
Community (rw): [private] <new_password_rw>
Trap Recipient's IPaddress : [0.0.0.0]
Community (ro): [public] <new_password>
Trap Recipient's IP address : [0.0.0.0] <trap_recipient_ip>
909-2209-001 Revision G, February 2014
124
3 Procedures
Trap recipient Severity level : (0..5) [0] 2
Trap recipient Port : (0..65535) [162]
Community (ro): [common] <new_password>
Trap Recipient's IP address : [0.0.0.0] <trap_recipient_ip>
Trap recipient Severity level : (0..5) [0] 2
Trap recipient Port : (0..65535) [162]
Community (ro): [FibreChannel] <new_password>
Trap Recipient's IPaddress : [0.0.0.0]
Committing configuration...done.
Replace the passwords in the following examples with the appropriate passwords provided by the
application. If only one trap recipient is required, set the IP address to 0.0.0.0.:
Verify the settings:
swd77:admin> snmpconfig --show snmpv1
5. Brocade switch console: Set access control
Set access control to make sure the right hosts get access. If only one trap recipient is required, set
the IP address to 0.0.0.0.:
swd77:admin> snmpconfig --set accessControl
SNMPaccess list configuration:
Access host subnet area : [0.0.0.0] <trap_recipient_ip>
Read/Write? (true, t, false, f): [true] f
Access host subnet area : [0.0.0.0] <trap_recipient-ip>
Read/Write? (true, t, false, f): [true] f
Access host subnet area : [0.0.0.0]
Read/Write? (true, t, false, f): [true] f
Access host subnet area : [0.0.0.0]
Read/Write? (true, t, false, f): [false] f
Access host subnet area : [0.0.0.0]
Read/Write? (true, t, false, f): [false] f
Access host subnet area : [0.0.0.0]
Read/Write? (true, t, false, f): [false] f
Committing configuration...done.
Verify the settings are correct:
swd77:admin> snmpconfig --show accessControl
6. Brocade switch console:
Set system location
Set the system location so it is clear where the trap originates from:
swd77:admin> snmpconfig --set systemGroup
Customizing MIB-II system variables ...
At each prompt, do one of the following:
o <Return> to accept current value,
o enter the appropriate new value,
o <Control-D> to skip the rest of configuration, or
o <Control-C> to cancel any change.
To correct any input mistake:
<Backspace> erases the previous character,
<Control-U> erases the whole line,
909-2209-001 Revision G, February 2014
125
3 Procedures
sysDescr: [Fibre Channel Switch.]
sysLocation: [End User Premise.]
<e.g Cab7enclosure1iobay3>
sysContact: [Field Support.]
authTrapsEnabled (true, t, false, f): [true]
Committing configuration...done.
Verify the settings are correct:
swd77:admin> snmpconfig --show systemGroup
7. Brocade switch console: Log out
swd77:aadmin> logout
8. Configure settings for the other Brocade switch
Repeat steps 1 through 7 on the other Brocade switch in the enclosure.
3.4 SAN Storage Arrays Procedures
3.4.1 Set IP on Fibre Channel Disk Controllers
This procedure will set IP address for fibre channel disk controllers.
Note: This procedure needs to be executed only for one of the two controllers.
Needed material:
General:
• Serial access cable that ships with the given controller and laptop running Microsoft Windows
with USB port are required for console access.
P2000:
• If setting IP address for P2000, the user may need to install the P2000 MSA USB driver on the laptop,
use HP Misc. Firmware CD and follow Appendix B (B.1 P2000 MSA USB Driver Installation).
• If setting IP address for P2000, the user may need HP Solutions Firmware Upgrade Pack Release Notes
[3].
Note: If a procedural STEP fails to execute successfully, STOP and contact the Customer Care Center
by referring to the 1.4 Customer Care Center section of this document.
Disk array serial console: Configure IP address on Fibre Channel Disk Controller
Connect to the disk array serial console with following settings:
• 115200 bps, 8 data bits, no parity, 1 stop bit, no flow control
Proprietary cable that ships with the conroller is required for console access
909-2209-001 Revision G, February 2014
126
3 Procedures
The user may have to log in using the manage username and the corresponding password. Once
at the prompt (#), execute the following commands:
# set network-parameters ip <controller_A_IP_address> netmask <netmask> gateway
<gateway_IP_address> controller a
# set network-parameters ip <controller_B_IP_address> netmask <netmask> gateway
<gateway_IP_address> controller b
To verify the values were entered correctly, run the following command and check the output:
# show network-parameters
Since the user is currently logged in at the cli, execute the following command at this time to make
sure the expansion disk arrays will be identified correctly:
# rescan
3.4.2 Configuring Fibre Channel Disk Controllers
This procedure will configure security and user settings for fibre channel disk controllers.
Prerequisite: 3.4.1 Set IP on Fibre Channel Disk Controllers has been completed.
Note: If a procedural STEP fails to execute successfully, STOP and contact the Customer Care Center
by referring to the 1.4 Customer Care Center section of this document.
1. Login to the Fibre Channel Disk Controller
Login to Fibre Channel Disk Controller via ssh as a manage user.
Output similar to the following will appear:
login as: manage
[email protected]'s password: <manage_password>
HPStorageWorks MSA2012fc
System Name: Platform IXP MSA2012fc
System Location: 500.07 U17 Brocade Ports 17 and 18
Version: W420R45
#
2. Fibre Channel Disk Controller: Disable http
# set protocols http disabled
3. Fibre Channel Disk Controller: Disable telnet
# set protocols telnet disabled
4. Fibre Channel Disk Controller: Disable ftp
# set protocols ftp disabled
909-2209-001 Revision G, February 2014
127
3 Procedures
5. Fibre Channel Disk Controller: Delete ftp user
# delete user ftp
6. Fibre Channel Disk Controller Delete admin user
Note: This step only required if device is a P2000 G3 array
# delete user admin
This account is an additional management account added by HP and is not needed
7. Fibre Channel Disk Controller: Change password for manage account
# set password manage
Use the appropriate password provided by the application documentation.
8. Fibre Channel Disk Controller: Change password for monitor account
# set password monitor
Use the appropriate password provided by the application documentation.
9. Fibre Channel Disk Controller: Set NTP and timezone
# set controller-date <month> <day> <hh>:<mm>:<ss> <year> <time-zone> ntp enabled
ntpaddress <PM&C_management_network_IP>
where
month: jan|feb|mar|apr|may|jun|jul|aug|sep|oct|nov|dec
day: 1-31
hh: 0-23
mm: 0-59
ss: 0-59
year: four-digit number
time-zone: offset from Universal Time (UT) in hours (e.g.: -7)
For example:
# set controller-date sep 22 13:45:0 2007 -7 ntp enabled
ntpaddress 69.10.36.3
Check the time settings:
# show controller-date
# show ntp-status
10. Fibre Channel Disk Controller: Verify settings:
909-2209-001 Revision G, February 2014
128
3 Procedures
Verify service and security protocols status:
# show protocols
Verify user settings:
# show users
11. Fibre Channel Disk Controller: Configure SNMP trap host
# set snmp-parameters enable crit add-trap-host <target_IP>
This will enable delivery of critical events to the target destination.
12. Fibre Channel Disk Controller: Logout
Logout from the Fibre Channel Disk Controller console.
# exit
3.4.3 Configuring Advanced Settings on MSA2012fc Fibre Channel Disk Controllers
This procedure configures advanced settings on each MSA2012fc controller.
Prerequisites:
• 3.4.1 Set IP on Fibre Channel Disk Controllers and
• 3.4.2 Configuring Fibre Channel Disk Controllers have been completed.
Note: If a procedural STEP fails to execute successfully, STOP and contact the Customer Care Center
by referring to the 1.4 Customer Care Center section of this document.
1. Fibre Channel Disk Controller GUI: Login to the Fibre Channel disk controller
Login to Fibre Channel Disk Controller GUI as a manage user using https:
https://<fibre_channel_disk_controller_IP>
2. Fibre Channel Disk Controller GUI: Navigate to system configuration
Navigate to MANAGE > GENERAL CONFIG > System configuration
3. Fibre Channel Disk Controller GUI: Change advanced settings
Make sure that:
Dynamic Spare Configuration is disabled
Background Scrub is enabled
Partner Firmware Upgrade is enabled
909-2209-001 Revision G, February 2014
129
3 Procedures
Press Change System Configuration.
4. Fibre Channel Disk Controller GUI: Verify advanced settings
Verify that the following message appears above the System Configuration area:
5. Fibre Channel Disk Controller GUI: Logout
Logout by pressing the LOG OFF button on the left hand side.
3.4.4 Configuring Advanced Settings on P2000 Fibre Channel Disk Controllers
This procedure configures advanced settings on each P2000 controller.
Prerequisites:
• 3.4.1 Set IP on Fibre Channel Disk Controllersand
• 3.4.2 Configuring Fibre Channel Disk Controllers have been completed.
Note: If a procedural STEP fails to execute successfully, STOP and contact the Customer Care Center
by referring to the 1.4 Customer Care Center section of this document.
1. Login to fibre channel disk controller
Connect to Fibre Channel Disk Controller via ssh as a manage user.
Output similar to the following will appear:
login as: manage
[email protected]'s password: <manage_password>
HPStorageWorks MSAStorage P2000G3 FC/iSCSI
System Name: Uninitialized Name
System Location: Uninitialized Location
Version: L100R010
#
909-2209-001 Revision G, February 2014
130
3 Procedures
2. Fibre Channel Disk Controller: Configure advanced settings
# set advanced-settings dynamic-spares disabled
Info: Command completed successfully. - Parameter 'dynamic-spares' was set to
'disabled'.
Success: Command completed successfully. - The settings were changed successfully.
# set advanced-settings background-scrub enabled
Info: Command completed successfully. - Parameter
'background-scrub' was set to 'enabled'.
Success: Command completed successfully. - The settings
were changed successfully.
# set advanced-settings partner- firmware-upgrade enabled
Info: Command completed successfully. - Parameter
'partner- firmware-upgrade' was set to 'enabled'.
Success: Command completed successfully. - The settings
were changed successfully.
3. Fibre Channel Disk Controller: Verify advanced settings
# show advanced-settings
4. Fibre Channel Disk Controller: Logout
Logout from the Fibre Channel Disk Controller console.
# exit
3.4.5 Upgrade Firmware on MSA 2012Fc Disk Controllers
This procedure will upgrade the firmware of the MSA 2012fc disk controllers.
Prerequisites:
• 3.4.3 Configuring Advanced Settings on MSA2012fc Fibre Channel Disk Controllers has been completed.
• 3.8.9 Adding ISO Images to the PM&C Image Repository has been completed using Misc. Firmware
CD.
Needed material:
• HP Misc. Firmware CD
• HP Solutions Firmware Upgrade Pack Release Notes [3]
Note: Only the Acontroller needs to have the steps in this section executed; B controller will be
upgraded automatically after the Acontroller.
Note: If a procedural STEP fails to execute successfully, STOP and contact the Customer Care Center
by referring to the 1.4 Customer Care Center section of this document.
1. Fibre Channel Disk Controller GUI: Login
Login to Fibre Channel Disk Controller A GUI as a manage user using https:
https://<fibre_channel_disk_controller_A_IP>
2. Fibre Channel Disk Controller GUI: Verify firmware upgrade is required
909-2209-001 Revision G, February 2014
131
3 Procedures
In the left column, click on MANAGE, then click on UPDATE SOFTWARE and if needed, controller
software
Look at the Current Storage Controller Code Version. If the version is at the level
required by the Release Notes [3] or greater, there is no need to upgrade. Skip the remainder of this
procedure.
3. Management server: Prepare to upgrade Fibre Channel disk controller
Copy the following file from the management server to the PC using an scp client:
/usr/TKLC/smac/html/TPD/HPFW--872-2488-XXX--HPFW/files/<MSA_firmware_version>.zip
Windows users: Refer to Appendix A(A.1 Using WinSCP) to copy the zip file to the PC.
Unzip the file on the PC.
4. Fibre Channel Disk Controller GUI: Upgrade controller firmware
In the browser opened in step 2, execute the following commands:
Click Browse…
Browse to the location of the file unzipped in step 3. and select the “bin” file.
Click Open
Click Load Software Package File
Click Proceed with Code Update
Writing of the file to the flash memory of the MSA Storage will take several minutes, followed by
Partner Firmware Upgrade that also takes several minutes to complete.
5. Fibre channel disk controller GUI: Verify new firmware
909-2209-001 Revision G, February 2014
132
3 Procedures
After about 20 minutes the user should be able to login to one of the controllers as in step 1 and
verify the firmware version as in step 2.
3.4.6 Upgrade Firmware on MSA P2000 Disk Controllers
This procedure will upgrade the firmware of the MSA P2000 disk controllers.
Prerequisites:
• 3.4.4 Configuring Advanced Settings on P2000 Fibre Channel Disk Controllers has been completed.
• 3.8.9 Adding ISO Images to the PM&C Image Repository has been completed using Misc. Firmware
CD.
Needed material:
• HP Misc. Firmware CD
• HP Solutions Firmware Upgrade Pack Release Notes [3]
Note: Only the Acontroller needs to have the steps in this section executed; the B controller will be
upgraded automatically after the Acontroller. This will also upgrade any I/O modules of P2000 JBOD
enclosures cascaded from the P2000 controller being upgraded.
Note: If a procedural STEP fails to execute successfully, STOP and contact the Customer Care Center
by referring to the 1.4 Customer Care Center section of this document.
1. Fibre channel disk controller GUI: Login
Login to Fibre Channel Disk Controller A GUI using https as a manage user.
https://<fibre_channel_disk_controller_A_IP>
2. Fibre channel disk controller GUI: Verify firmware upgrade is required
In the Configuration View panel, right-click the system if needed (if the blue bar offering
options such as View is missing) and then on the right hand side blue bar menu select Tools >
Update Firmware. The table titled Current Controller Versions shows the currently installed
versions.
If the Bundle Version is the minimum supported version in the Release Notes [3]
or greater, there is no need to upgrade. Skip the remainder of this procedure.
909-2209-001 Revision G, February 2014
133
3 Procedures
3. Prepare to upgrade Fibre Channel disk controller
Copy the following file from the management server to the PC using an scp client:
/usr/TKLC/smac/html/TPD/HPFW--872-2488-XXX--HPFW/files/<P200_firmware_version>.bin
Windows users:
Refer to Appendix A (A.1 Using WinSCP) to copy the file to the PC.
4. Fibre channel disk controller GUI: Upgrade firmware
In the browser opened in step 2, execute the following commands:
Click Browse…
Browse to the location of the file copied in step 3. and select the “bin” file.
Click Install Controller-Module Firmware File. It takes approximately 10 minutes for the firmware
to load and for the automatic restart to complete on the controller the user is connected to.
Wait for the progress messages to specify that the update has completed. Because the Partner
Firmware Update is enabled, allow an additional 20 minutes for the partner controller to be updated.
5. Fibre channel disk controller GUI: Verify new firmware
Login to one of the controllers as in step 1 and verify the Bundle Version as instructed in step 2.
3.4.7 Replacing a Failed Disk in MSA 2012Fc Array
The MSA 2012fc arrays should be configured with spare disks. The designation and the type of spare
should always be recorded for future reference.
When a disk fails, the system looks for a dedicated spare first in order to reconstruct the vdisk. If it
does not find a properly sized dedicated spare, it looks for a global spare. A properly sized vdisk spare
is one whose capacity is equal to or greater than that of the largest disk in the vdisk. A properly sized
global spare is one whose capacity is equal to or greater than that of the largest disk in the disk array.
Ideally, the disk that failed in the first place should still be physically replaced by a new disk and
designated as the dedicated spare or a global spare, the decision depends on what kind of spare was
used to reconstruct the vdisk.
If no properly sized spares are available, the vdisk reconstruction does not start automatically. To start
reconstruction manually, replace each failed disk by appropriately sized disk and then add each new
disk as a dedicated spare.
During the vdisk reconstruction, you can continue to use the vdisk. When a spare replaces a disk in
a vdisk, the spare’s icon in the enclosure view changes to match the other disks in that vdisk.
The array can indicate that a failure has occurred in several ways:
• SNMP trap will be sent (if controller is configured to send SNMP traps (it should be)).
• Failed drive will have amber LED illuminated.
• If you log into the disk controller, a pop up will be shown which indicates which disk(s) failed.
Prerequisites:
• 3.4.1 Set IP on Fibre Channel Disk Controllers and
• 3.4.2 Configuring Fibre Channel Disk Controllers have been completed.
909-2209-001 Revision G, February 2014
134
3 Procedures
Note: The vdisk reconstruction can take hours or days to complete, depending on the vdisk RAID
level and size, disk speed, utility priority, and other processes running on the storage system. You can
stop reconstruction only by deleting the vdisk.
Note: If a procedural STEP fails to execute successfully, STOP and contact the Customer Care Center
by refering to the 1.4 Customer Care Center section of this document.
1. Fibre channel disk controller GUI: Login
Login to Fibre Channel Disk Controller GUI using https as a manage user.
https://<fibre_channel_disk_controller_IP>
2. Fibre Channel Disk Controller GUI: Clear metadata
If the replacement disk has been used in another MSA2012fc array, it will have metadata stored
on it. This data must be cleared before the disk can be used in the new array. The disks which need
their metadata to be cleared will be in a "Leftover" or "L" state.
Navigate to MANAGE > UTILITIES > disk drive utilities > clear metadata.
Select the disk(s) that are in an "L" state
Click Clear Metadata for Selected Disk Drives button
3. Fibre Channel Disk Controller GUI: Add a global spare disk
If you choose to add a global spare to reconstruct a vdisk, navigate to MANAGE > VIRTUAL
DISK CONFIG. Click on global spare menu and then on add global spares.
Select the disk that was replaced by clicking the check box on it. It should be the bright green with
an “A” on it.
Click the Add Global Spares button towards the bottom of the screen.
Verify that the color of the disk changes and a “G” appears on the disk. If there is a problem, new
popup will explain the failure. Popups must be allowed for this message to be seen.
4. Fibre Channel Disk Controller GUI: Add a dedicated spare disk
If you choose to add a dedicated spare to reconstruct a vdisk, navigate to MANAGE > VIRTUAL
DISK CONFIG. Click on vdisk configuration and then on add vdisk spares
Select the appropriate vdisk at the top of the page. You should see that the disk that was replaced
should be bright green with an “A” (“A” means Available) on it.
After ensuring the disk is in the correct enclosure, select the disk by clicking the check box on it.
Click the Add Vdisk Spares button towards the bottom of the screen. The disk changes from a
state “A” to being the same shade of blue (grey) as the rest of the disks in the enclosure. If there is
a problem a popup will explain the failure. Popups must be allowed for this message to be seen.
Log off of the disk controller by clicking LOG OFF.
3.4.8 Replacing a Failed Disk in MSA P2000 Disk Array
The MSA P2000 arrays should be configured with spare disks. The designation and the type of spare
should always be recorded for future reference.
909-2209-001 Revision G, February 2014
135
3 Procedures
When a disk fails, the system looks for a dedicated spare first in order to reconstruct the vdisk. If it
does not find a properly sized dedicated spare, it looks for a global spare. A properly sized vdisk spare
is one whose capacity is equal to or greater than that of the largest disk in the vdisk. A properly sized
global spare is one whose capacity is equal to or greater than that of the largest disk in the disk array.
Ideally, the disk that failed in the first place should still be physically replaced by a new disk and
designated as the dedicated spare or a global spare, the decision depends on what kind of spare was
used to reconstruct the vdisk
If no properly sized spares are available, the vdisk reconstruction does not start automatically. To start
reconstruction manually, replace each failed disk by appropriately sized disk and then add each new
disk as a dedicated spare.
During the vdisk reconstruction, you can continue to use the vdisk. When a spare replaces a disk in
a vdisk, the spare’s icon in the enclosure view changes to match the other disks in that vdisk.
The array can indicate that a failure has occurred in several ways:
• SNMP trap will be sent (if controller is configured to send SNMP traps (it should be)).
• Failed drive will have amber LED illuminated.
• If you log into the disk controller, a pop up will be shown which indicates which disk(s) failed.
Prerequisites:
• 3.4.1 Set IP on Fibre Channel Disk Controllers and
• 3.4.2 Configuring Fibre Channel Disk Controllers have been completed.
Note: The vdisk reconstruction can take hours or days to complete, depending on the vdisk RAID
level and size, disk speed, utility priority, and other processes running on the storage system. You can
stop reconstruction only by deleting the vdisk.
Note: If a procedural STEP fails to execute successfully, STOP and contact the Customer Care Center
by referring to the 1.4 Customer Care Center section of this document.
1. Fibre channel disk controller GUI: Login
Login to Fibre Channel Disk Controller GUI using https as a manage user.
https://<fibre_channel_disk_controller_IP>
2. Fibre Channel Disk Controller GUI: Clear metadata
If the replacement disk has been used in another P2000 array, it will have metadata stored on it.
This data must be cleared before the disk can be used in the new array. The disks which need their
metadata to be cleared will be in a LEFTOVR state.
To clear metadata from leftover disks:
In the Configuration View panel, right-click the system and then select Tools > Clear Disk
Metadata.
In the main panel, select the disk(s) that are in an LEFTOVR state
Click Clear Metadata.
When processing is complete a success dialog appears.
Click OK.
3. Fibre Channel Disk Controller GUI: Add a global spare disk
909-2209-001 Revision G, February 2014
136
3 Procedures
If you choose to add a global spare to reconstruct a vdisk, in the Configuration View panel,
right-click the system . Then in the right hand side blue bar menu click Provisioning and select
Manage Global Spares
Switch to Graphical representation if needed . Select the disk that was replaced by clicking the
check box on it. It should be labeled with an AVAIL on it.
Click the Modify Spares button .
Verify that the color of the disk changes to blue and a GLOBALSP appears on the disk. If there is a
problem, new popup will explain the failure. Popups must be allowed for this message to be seen.
4. Fibre Channel Disk Controller GUI: Add a dedicated spare disk
If you choose to add a dedicated spare to reconstruct a vdisk, in the Configuration View panel,
right-click appropriate vdisk and navigate to Configuration > Manage Dedicated Spares
909-2209-001 Revision G, February 2014
137
3 Procedures
Switch to Graphical representation if needed . After ensuring the disk is in the correct enclosure,
select the replaced disk by clicking the check box on it. It should be labeled with an AVAIL on it.
Click the Modify Spares button .
Verify that the color of the disk changes to green and SPARE appears on the disk. If there is a
problem, new popup will explain the failure. Popups must be allowed for this message to be seen.
Log off of the disk controller by clicking Log off.
909-2209-001 Revision G, February 2014
138
3 Procedures
3.5 Blade Server Procedures
3.5.1 Upgrade Blade Server Firmware
This procedure will provide the steps to upgrade the firmware on the Blade servers.
The HP Support Pack for Proliant installer automatically detects the firmware components available
on the target server and will only upgrade those components with firmware older than what is on the
current ISO.
Prerequisites:
• TPD has to have been installed on the server
Needed Materials:
•
•
•
•
Tekelec's HP Service Pack for Proliant (SPP) ISO File
Tekelec's HP Misc Firmware ISO file (for errata updates if applicable)
HP Solutions Firmware Upgrade Pack Release Notes [3]
USB Flash Drive (1GB or larger)
Note: If a procedural STEP fails to execute successfully, STOP and contact the Customer Care Center
by referring to the 1.4 Customer Care Center section of this document.
1. Local Workstation: Prepare the USB Flash Drive
Copy the HP Support Pack for Proliant ISO to the USB Flash Drive.
2. Insert USB Flash Drive
Insert the USB Flash Drive with the HP Support Pack for Proliant ISO into the USB port of the
Active OA Module.
3. Active OA GUI: Login
Navigate to the IP address of the active OA, using Appendix C (C.1 Determining Which Onboard
Administrator is Active). Login as an administrative user.
4. OA Web GUI: Access the Device Summary page
On the left pane, expand the Device Bays node to display the Device Bay Summary window.
Select the individual blades to be upgraded by clicking and enabling the corresponding UID
checkbox.
909-2209-001 Revision G, February 2014
139
3 Procedures
Note: A maximum of 8 blades should be upgraded concurrently at one time. If the c7000enclosure
has more than 8 blades they will need to be upgraded in multiple sessions.
5. OA Web GUI: Connect to USB Drive
Once the blades are selected, connect them to the ISO on the USB Drive, by selecting the Connect
to usb… item from the DVD menu.
6. OA Web GUI: Verify Drive Connection
Once each blade has mounted the ISO media the Device List table should indicate an iLO DVD
Status as Connected for each blade that was previously selected.
909-2209-001 Revision G, February 2014
140
3 Procedures
Note: The Refresh button may need to be clicked in order to see the current status of all blades.
7. OA Web GUI: Power Down Blades
If needed, reselect the UID checkbox for each blade to be upgraded and then select the Momentary
Press option under the Virtual Power menu.
When prompted click the OK button to confirm the action.
8. OA Web GUI: Verify Power Down
The power down sequence can take several minutes to complete. When it completes the Device
List table will indicate the Power State of each select blade to be Off.
909-2209-001 Revision G, February 2014
141
3 Procedures
Note: The Refresh button may need to be clicked in order to see the current status of all blades.
9. OA Web GUI: Initiate Firmware Upgrade
To power the blades back on and begin the automated firmware upgrade process, repeat Steps 7
and 8 this time being sure the Power State indicates On for each selected blade.
10. OA Web GUI: Monitor Firmware Upgrade
From this point on each blade will boot into an automated firmware upgrade process that will last
between 20 to 25 minutes. During this time all feedback is provided through the UID lights. While
the update process is running, the UID light blinks.
Upon a successful firmware upgrade, the Device List table will list each blade with a Status of
OK, UID of Off and the iLO DVD Status as Disconnected. At this time the blades will
automatically be rebooted.
Note: Make sure all blades have disconnected before continuing. If any blades are still connected
after their UIDs have stopped blinking and Status=OK, disconnect them manually by selecting
Disconnect Blade from DVD/ISO from the DVD menu. If the UID led is solid, a failure has occurred
909-2209-001 Revision G, February 2014
142
3 Procedures
during the firmware upgrade. Use the iLO's integrated remote console or a kvm connection to view
the error.
If necessary, repeat Steps 4 through 10 for the remaining blades in the enclosure to be upgraded.
Proceed to the next step.
11. Remove USB Flash Drive
The USB flash drive may now safely be removed from the Active OA module.
12. Update Firmware Errata
Check the HP Solutions Firmware Upgrade Pack Release Notes [3] to see if there are any firmware
errata items that apply to the server being upgraded.
If there is, there will be a directory matching the errata's ID in the /errata directory of the HP Misc
Firmware ISO. The errata directories contain the errata firmware and a README file detailing the
installation steps.
3.5.2 Confirm/Upgrade Blade Server BIOS Settings
This procedure will provide the steps to confirm and update the BIOS boot order on the blade servers.
Prerequisite: 3.5.1 Upgrade Blade Server Firmwarehas been completed.
Note: If a procedural STEP fails to execute successfully, STOP and contact the Customer Care Center
by referring to the 1.4 Customer Care Center section of this document.
1. Active OA GUI: Login
Navigate to the IP address of the active OA, using Appendix C (C.1 Determining Which Onboard
Administrator is Active). Login as an administrative user.
2. Active OA GUI: Navigate to device Bay Settings
Navigate to Enclosure Information > Device Bays > <Blade 1>
Click on Boot Options tab.
909-2209-001 Revision G, February 2014
143
3 Procedures
3. Active OA GUI: Verify/update Boot device Order
Verify that the Boot order is as follows. If it is not, use the up and down arrows to adjust the order
to match the picture below, then click on Apply
4. Active OA GUI: Repeat for the remaining blades
Repeat Steps 2 and 3 for the remaining blades. Once done, exit out of the OA GUI.
3.5.3 Configure Blade Server iLO Password for Administrator Account
This procedure will change the blade server iLO password for Administrator account for blade Servers
in an enclosure.
Prerequisites:
• 3.6.1 Configure Initial OA IP,
• 3.8.2 Installing TVOE on the Management Server,
• 3.8.3 TVOE Network Configuration, and
909-2209-001 Revision G, February 2014
144
3 Procedures
• 3.8.4 Deploy PM&C Guest
Note: If a procedural STEP fails to execute successfully, STOP and contact the Customer Care Center
by referring to the 1.4 Customer Care Center section of this document.
1. PM&C: Log into the PM&C as root using ssh.
2. PM&C: Create xml file
In /usr/TKLC/smac/html/public-configs create an xml file with information similar to the
following example. Change the Administrator password field only as instructed by the application.
<RIBCL VERSION="2.0">
<LOGIN USER_LOGIN="root" PASSWORD="password">
<USER_INFO MODE="write">
<MOD_USER USER_LOGIN="Administrator">
<PASSWORD value="<new Administrator password>"/>
</MOD_USER>
</USER_INFO>
</LOGIN>
</RIBCL>
Save this file as change_ilo_admin_passwd.xml
3. OA shell: Login to the active OA
Login to OA via ssh as root user.
login as: root
-------------------------------------------------------WARNING: This is a private system. Do not attempt to login unless you are an
authorized user. Any authorized or unauthorized access and use may be monitored and can result in criminal or civil prosecution under applicable law.
-------------------------------------------------------Firmware Version: 3.00
Built: 03/19/2010 @ 14:13 OA
Bay
Number: 1 OA
Role:
Active
[email protected]'s password:
If the OA Role is not Active, login into the other OA the enclosure system
4. OA shell: Run hponcfg
Run the following command:
> hponcfg all http://<pmac_ip>/public-configs/change_ilo_admin_passwd.xml
5. OA shell: Check the output
Observe the output for error messages and refer to the HP Integrated Lights-Out
Management Processor Scripting and Command Line Resource Guide for
troubleshooting
6. OA shell: Logout
Logout from the OA
909-2209-001 Revision G, February 2014
145
3 Procedures
7. PM&C: Remove temporary file
On the PM&C remove the configuration file you created. This is done for security reasons, so that
no one can reuse the file:
# rm –rf /usr/TKLC/smac/html/public-configs/change_ilo_admin_passwd.xml
3.5.4 Accessing the c-Class iLO Virtual Serial Port
This procedure describes the steps how to access iLO VSP.
Prerequisite: 3.5.3 Configure Blade Server iLO Password for Administrator Accounthas been completed.
Note: If a procedural STEP fails to execute successfully, STOP and contact the Customer Care Center
by referring to the 1.4 Customer Care Center section of this document.
iLO shell: Access VSP
Login via ssh to the iLO IP as Administrator user:
# ssh Administrator@<ilo_ip>
Administrator@<ilo_ip>'s password:
User:Administrator logged-in to
ILOUSE8068S2T.nc.tekelec.com(10.250.36.71)
iLO Advanced 1.50 at 17:30:27 INT=4Mar 12 2008
Server Name: localhost.localdomain
Server Power: On </>hpiLO->
</>hpiLO-> vsp
Starting virtual serial port
Press 'ESC (' to return to the
CLI Session
</>hpiLO-> Virtual Serial Port active: IO=0x03F8
Press Enter to refresh the screen.
Note: press ESC( to escape VSP console.
3.5.5 Configure Syscheck Default Route Ping Test
This procedure will provide the steps how configure ping test on the blade system
Prerequisite: TPD must be installed on the blade server.
Note: Repeat this test for every bladeserver in the blade system.
Note: If a procedural STEP fails to execute successfully, STOP and contact the Customer Care Center
by referring to the 1.4 Customer Care Center section of this document.
Blade Server: Configure syscheck default route test
Log in to blade server as root.
Enable the syscheck default router test:
# syscheckAdm net defaultroute -enable
909-2209-001 Revision G, February 2014
146
3 Procedures
Run syscheck to verify that the test is working:
# syscheck -v net defaultroute
Running modules in class net...
OK
LOG LOCATION: /var/TKLC/log/ syscheck/fail_log
Restart syscheck:
# service syscheck restart
Repeat for each blade.
3.5.6 Preparing HP Blade System for Extended Power Outage
This procedure describes how to properly shutdown the HP blade system for extended period of time
such as in the event of shipment from Manufacturing to the customer site.
Note: If a procedural STEP fails to execute successfully, STOP and contact the Customer Care Center
by referring to the 1.4 Customer Care Center section of this document.
1. Power down all blade servers
Refer to instructions provided by application to correctly power down all blade servers.
2. OA GUI: Login
Navigate to the IP address of the active OA, using Appendix C (C.1 Determining Which Onboard
Administrator is Active). Login as root.
3. OA GUI: Verify blade servers shutdown
Verify the power light on all blade servers is amber.
4. Fibre channel controller shell: Shutdown fibre channel switch
Login via ssh into one controller in each MSA as manage.
Run:
# shutdown both
5. Power down disk arrays
Power down disk arrays using power switches on each array.
6. Management server: Power off
Login to the management server via ssh as root.
Run:
# shutdown -h
7. Power off aggregation switches
If the aggregation switches are provided by Tekelec, power off the 4948/4948E switches.
909-2209-001 Revision G, February 2014
147
3 Procedures
If the aggregation switches are provided by the customer, request that the customer follow their
policies for preparing devices for an extended power outage.
3.5.7 Bringing up HP Blade System After Extended Power Outage
This procedure describes the steps how to properly power up the HP blade system.
Note: If a procedural STEP fails to execute successfully, STOP and contact the Customer Care Center
by referring to the 1.4 Customer Care Center section of this document.
1. Power on device cabinet
Power on the cabinets that house the devices.
2. Power on aggregation switches
If the aggregation switches are provided by Tekelec, power on the 4948/4948E switches.
3. Power on management server
Turn on the management server by depressing the power button on the front of the server.
4. Power on disk arrays
Turn power switches "on" on all disk arrays.
5. Power on remaining cabinets
Power on remaining cabinets.
Ensure all power supply LEDs are green on all equipment.
6. Power on blade servers
Power up each blade server.
3.6 C7000 Enclosure Procedures
3.6.1 Configure Initial OA IP
This procedure will set initial IP address for Onboard Administrator in location OA Bay 1 (left as
viewed from rear) and Bay 2, using the front panel display.
Prerequisite: Onboard Administrator must be present in the OA Bay 1 location.
Note: The enclosure should be provisioned with two Onboard Administrators. This procedure needs
to be executed only for OABay 1, regardless of the number of OA’s installed in the enclosure.
Note: If a procedural STEP fails to execute successfully, STOP and contact the Customer Care Center
by referring to the 1.4 Customer Care Center section of this document.
Configure OA’s IP
Configure OA Bay1 IP address using insight display on the front side of the enclosure.
909-2209-001 Revision G, February 2014
148
3 Procedures
You will see following:
Navigate to Enclosure Settings and press OK.
Navigate to the OA1 Ipv4 and press OK. Navigate again to the OA1 Ipv4 and press OK.
On the OA1 Network Mode screen choose static and press OK.
On the OA1 IP address screen fill in IP, mask and gateway. Press OK and then press Accept All.
Navigate to "OA2 Ipv4" on the Insight display and repeat the above steps to assign the IP parameters
of OA2.
3.6.2 Configure initial OA settings via configuration wizard
This procedure will configure initial OA settings using a configuration wizard. This procedure should
be used for initial configuration only and should be executed when the Onboard Administrator in OA
Bay 1 (left as viewed from rear) is installed and active.
Prerequisites:
• If the aggregation switches are provided by Tekelec, then the Cisco 4948/4948E switches need to
be configured using 3.1.1 Configure Cisco 4948/4948E/4948E-F aggregation switches (PM&C
installed)(netConfig).
• If the aggregation switches are provided by the customer, the user must ensure that the customer
aggregation switches are configured as per requirements provided in the Application physical Site
survey and related IP/Network Site survey.
• In addition,3.6.1 Configure Initial OA IP must be completed.
• If there is any doubt as to whether the aggregation switches are provided by Tekelec or the customer,
contact Tekelec Technical Services and ask for assistance.
• Both OAs are installed.
909-2209-001 Revision G, February 2014
149
3 Procedures
Note: The enclosure should be provisioned with two Onboard Administrators. Note that the OA in
Bay 2 will automatically acquire it’s configuration from the OA in Bay 1 once the configuration is
complete.
Note: This procedure should be used for initial configuration only. Follow 3.6.8 Replacing Onboard
Administrator to learn how to correctly replace one of the Onboard Administrators.
Note: If a procedural STEP fails to execute successfully, STOP and contact the Customer Care Center
by referring to the 1.4 Customer Care Center section of this document.
1. OA GUI: Login
Open your web browser and navigate to the OA Bay1 IP address assigned in 3.6.1 Configure Initial
OA IP.
http://<OA1_ip>
You will see following:
Login as an administrative user. Original password is on paper card attached to each OA.
2. OA GUI: Run First Time Setup wizard
You will see the main wizard window:
909-2209-001 Revision G, February 2014
150
3 Procedures
Note: If needed Navigate to Wizards > First Time Setup to get to the screen above.
Click on Next to choose enclosure you want to configure.
You will see Rack and Enclosure Settings:
3. OA GUI: Select enclosure
Choose enclosure:
909-2209-001 Revision G, February 2014
151
3 Procedures
Click on Next.
4. OA GUI: Skip Configuration Management
You will see Configuration Management. Skip this step. Click Next.
5. OA GUI: Rack and Enclosure Settings
You should see this screen:
909-2209-001 Revision G, February 2014
152
3 Procedures
Fill in Rack Name in format xxx_xx.
Fill in Enclosure name in format <rack name>_<position>
Example:
Rack Name: 500_03
Enclosure Name: 500_03_03
Note: Enclosure positions are numbered from 1 at the bottom of the rack to 4 at the top.
Check Set time using an NTP server item and fill in Primary NTP server (which is recommended
to be set to the <customer_supplied_ntp_server_address>).
Set Poll interval to 720.
Set Time Zone to UTC if customer does not have any specific requirements.
Click on Next.
6. OA GUI: Change administrator password
You can see Administrator Account Setup:
909-2209-001 Revision G, February 2014
153
3 Procedures
Change Administrator’s password (refer to application documentation) and click onNext.
7. OA GUI: Create pmacadmin and root user
On the Local User Accounts screen click on New to add pmacadmin user.
You will see User Settings screen. Fill in User Name and Password. Privilege Level set to
Administrator. Refer to the application documentation for the password.
Verify that all of the blades have been checked before proceeding to check the checkbox for Onboard
Administrator Bays under the User Permissions section.
Then click on Add User.
In the same way create root user.
Then click on Next.
8. OA GUI: EBIPA settings
On the EBIPA Settings (Enclosure Bay IP Addressing) screen click on Next to continue or Skip
if you have already done it. If you pressed Skip, go to Step 9 of this procedure.
Note: Setting up the EBIPA addresses is required.
909-2209-001 Revision G, February 2014
154
3 Procedures
Go to the Device List section of the EBIPA Settings Screen (at the top).
Fill in the iLO IP, Subnet Mask and Gateway fields for Device Bays 1-16.
Do not fill in the iLO IP, subnet Mask or Gateway fields for Device Bays 1A-16A and 1B-16B
Note: Bays 1A-16A and 1B-16B are used for double-density blades (f.e. BL2x220c) which are not
supported in this release.
Click Enabled on each Device Bay 1 through 16 that is in use.
Note: Any unused slots should have an ip address assigned, but should be disabled
Note: Do not use autofill as this will fill the entries for the Device Bays 1A through 16B
Scroll down to the Interconnect List (below Device Bay 16B)
909-2209-001 Revision G, February 2014
155
3 Procedures
Fill in the EBIPA Address, Subnet Mask and Gateway fields for each Interconnect Bay in use. Click
Enable on each Interconnect Bay in use.
By clicking Next you will apply those settings. System may restart devices such as interconnect
devices or iLOs to apply new addresses. After finishing check the IP addresses to ensure that apply
was successful.
9. OA GUI: Skip Directory Groups step
To skip Directory Groups step, click Next.
10. OA GUI: Skip Directory Settings step
To skip Directory Settings step, click Next.
11. OA GUI: OA network settings
On the Onboard Administrator Network Settings tab you can assign or modify the IP
address and the other network settings for the Onboard Administrator(s).
The Active Administrator Network Settings pertain to the active OA ( OA Bay 1 location
during initial configuration). If the second Onboard Administrator is present, the Standby
Onboard Administrator Network Settings will be displayed as well. Click on "Use static
IP settings for each Standby Onboard Administrator". Fill in the IP Address, Subnet mask and
Gateway for the Standard OA.
909-2209-001 Revision G, February 2014
156
3 Procedures
Click on Next.
Note: If you change the IP address of the active OA, you will be disconnected. Then you will have
to close your browser and sign in again using the new IP address.
12. OA GUI: SNMP Settings
Mark Enable SNMP.
909-2209-001 Revision G, February 2014
157
3 Procedures
Fill in System Location that is equal to Enclosure name you have filled in Step 5.
Do not set Read Community and Write Community.
Note: This step does not set an SNMP Trap Destination, to do that please see section 3.6.9 Add
SNMP trap destination on OA..
Click on Next.
13. OA GUI: Power Management
The Power Mode setting on the Power Management screen must be configured for power supply
redundancy. The first available setting on the Power Management screen will be either "AC
Redundant" or "Redundant" depending on whether the Enclosure is powered by AC or DC. In
either case, select the second radio button, "Power Supply Redundant".
AC-powered Enclosures:
909-2209-001 Revision G, February 2014
158
3 Procedures
DC-powered Enclosures:
For all other settings on the Power Management screen, leave the default settings unchanged.
Click on Next.
14. OA GUI: Finish First Time Setup Wizard
Click on Finish.
Note: If only one OA has been configured, skip the following step.
15. OA GUI: Set Link Loss Failover
Navigate to Enclosure Information > Enclosure Settings > Link Loss Failover
909-2209-001 Revision G, February 2014
159
3 Procedures
Check the Enable Link Loss Failover and specify Failover Interval to be 180 seconds.
Click Apply.
3.6.3 Configure OA Security
This procedure will disable telnet access to OA.
Prerequisite: Configure initial OA settings via configuration wizard has been completed.
Note: If a procedural STEP fails to execute successfully, STOP and contact the Customer Care Center
by referring to the 1.4 Customer Care Center section of this document.
1. Active OA GUI: Login
Navigate to the IP address of the active OA, using Appendix C (C.1 Determining Which Onboard
Administrator is Active). Login as an administrative user.
2. OA GUI: Disable telnet
Navigate to Enclosure Information > Enclosure Settings > Network Access
909-2209-001 Revision G, February 2014
160
3 Procedures
Then uncheck the Enable Telnet
Click on Apply.
3.6.4 Upgrade or Downgrade OA Firmware
This procedure will update the firmware on the OA’s.
Prerequisites:
• Obtain any customer approval needed for OA firmware updates. This procedure can change the
version of firmware installed in one or both OAs.
909-2209-001 Revision G, February 2014
161
3 Procedures
• 3.8.9 Adding ISO Images to the PM&C Image Repository has been completed using Misc. Firmware
CD/ISO.
• 3.2.9 Upgrade 3020 Switch IOS Firmware MUST be completed before proceeding with this procedure,
if the OA firmware is upgraded and the 3020 switch IOS is NOT upgraded, there could be a loss
of connectivity for the blades.
Needed material:
• HP Misc. Firmware CD/ISO
• HP Solutions Firmware Upgrade Pack Release Notes [3]
Note: The enclosure should be provisioned with two Onboard Administrators. This procedure will
install the same firmware version on both Onboard Administrators.
Note: This procedure should be used to upgrade or downgrade firmware or to ensure both OA’s have
the same firmware version. When the firmware update is initiated, the standby OA is automatically
updated first.
Note: If a procedural STEP fails to execute successfully, STOP and contact the Customer Care Center
by referring to the 1.4 Customer Care Center section of this document.
1. OA GUI: Login
Navigate to the IP address of the active OA, using Appendix C(C.1 Determining Which Onboard
Administrator is Active). Login as an administrative user.
2. OA GUI: Check OA firmware versions.
In the left navigation area, navigate to Enclosure Information > Active Onboard Administrator >
Firmware Update
Examine the Firmware Version shown in the Firmware Information table. Verify the
version meets the minimum requirement specified by Release Notes [3] and that the firmware
versions match for both OA’s. If it is so the firmware does not need to be changed. Skip the rest of
this procedure.
3. Save All OA Configuration
If one of the two OAs has a later version of firmware than the version provided by the HP Solutions
Firmware Upgrade Pack 795-000-2xx [3], this procedure will downgrade it to that version. A
firmware downgrade can result in the loss of OA configuration. Before proceeding, ensure that
you have a record of the initial OA configuration necessary to execute the following OA
configuration procedures, as required by the customer and application:
1.
2.
3.
4.
3.6.1 Configure Initial OA IP
Configure Initial OA settings via configuration wizard
3.6.3 Configure OA Security
3.6.9 Add SNMP trap destination on OA.
4. OA GUI: Initiate OA firmware upgrade
If the firmware needs to be upgraded, click on Firmware Update in the left navigation area.
Enter the appropriate URL in the bottom text box labeled “Image URL”. The syntax is:
https://<PM&C_Management_Network_IP>/TPD/<HPFW_mount_point>/files/<OA_firmware_version>.bin
909-2209-001 Revision G, February 2014
162
3 Procedures
Note: The HPFW_mount_point can be determined by running the following command on the
management server: exportfs
For example:
https://10.240.4.198/TPD/HPFW--872-2488-XXX--HPFW/files/hpoa300.bin
Check the Force Downgrade box if present.
Click Apply
If a confirmation dialog is displayed, click "OK".
Note: The upgrade may take up to 25 minutes.
5. OA GUI: Observe OA firmware upgrade progress
You should observe the following updates during the upgrade.
6. OA GUI: Reload the HP OA application
The upgrade is complete when the following is displayed:
Clear your browser‘s cache and click to reload the application . The login page should appear
momentarily.
909-2209-001 Revision G, February 2014
163
3 Procedures
7. OA GUI: Verify the firmware upgrade
Login to the OA again. It may take few minutes before the OA is fully functional and accepts the
credentials.
In the left navigation area, navigate to Enclosure Information > Active Onboard Administrator >
Firmware Update
Examine the Firmware Version shown in the Firmware Information table. Verify the
firmware version information is correct.
8. OA GUI: Check/re-establish OA configuration
Ensure that all OA configuration established by the following procedures is still intact after the
firmware update. Re-establish any settings by performing the procedure(s):
1.
2.
3.
4.
3.6.1 Configure Initial OA IP
Configure Initial OA settings via configuration wizard
3.6.3 Configure OA Security
3.6.9 Add SNMP trap destination on OA.
3.6.5 Store OA Configuration on Management Server
This procedure will backup OA settings on the management server .
Prerequisites:
• If the aggregation switches are provided by Tekelec, then the Cisco 4948/4948E switches need to
be configured using 3.1.1 Configure Cisco 4948/4948E/4948E-F aggregation switches (PM&C
installed)(netConfig).
• If the aggregation switches are provided by the customer, the user must ensure that the customer
aggregation switches are configured as per requirements provided in the Application physical Site
Survey and related IP/Network Site survey.
• In addition, Configure initial OA settings via configuration wizard,
• 3.8.2 Installing TVOE on the Management Server,
• 3.8.3 TVOE Network Configuration, and
• 3.8.4 Deploy PM&C Guest
• If there is any doubt as to whether the aggregation switches are provided by Tekelec or the customer,
contact Tekelec Technical Services and ask for assistance.
Note: If a procedural STEP fails to execute successfully, STOP and contact the Customer Care Center
by referring to the 1.4 Customer Care Center section of this document.
1. OA GUI: Login
Navigate to the IP address of the active OA, using Appendix C (C.1 Determining Which Onboard
Administrator is Active). Login as root.
2. OA GUI: Store configuration file
Navigate to the Enclosure Information > Enclosure Settings > Configuration scripts
On the Configuration script open the first configuration file (current settings for enclosure):
909-2209-001 Revision G, February 2014
164
3 Procedures
Store this file on local disk.
For example:
Press ctrl+s, choose file name, path, and as type choose text file.
f.e. you may choose the following syntax for the configuration file name:
<enclosure ID>_<timetag>.conf
3. Management server: Backup configuration file
Do the following to backup the file on the management server :
Under directory /usr/TKLC/smac/etc you can create your own subdirectory structure. Login
to management server via ssh as root and create the target directory:
# mkdir -p /usr/TKLC/smac/etc/OA_backups/OABackup
Next, copy the configuration file to the created directory.
For unix users:
# scp ./<cabinet_enclosure_backup file>.conf \
root@<management_server_ip>:/usr/TKLC/smac/etc/OA_backups/OABackup
Windows users: Refer to Appendix A (A.1 Using WinSCP) to copy the file to the management
server.
4. PM&C: Perform PM&C application backup to capture the OA backup
# pmacadm backup
PM&C backup been successfully initiated as task ID 7
[root@PMACDev3 ~]#
Note: The backup runs as a background task. To check that status of the background task use the
PM&C GUI Task Monitor page, or issue the command "$ sudo /usr/TKLC/smac/bin/pmaccli
getBgTasks". The result should eventually be "PM&C Backup successful" and the background task
should indicate "COMPLETE".
Note: The "pmacadm backup" command uses a naming convention which includes a date/time
stamp in the file name (Example file name: backupPmac_20111025_100251.pef ). In the example
909-2209-001 Revision G, February 2014
165
3 Procedures
provided, the backup file name indicates that it was created on 10/25/2011 at 10:02:51 am server
time.
5. PM&C: Verify the Backup was successful
Note: If the background task shows that the backup failed, then the backup did not complete
successfully. STOP and contact the Customer Care Center by referring to the 1.4 Customer Care
Center section of this document.
The output of pmaccli getBgTasks should look similar to the example below:
# pmaccli getBgTasks
2: Backup PM&C COMPLETE - PM&C Backup successful
Step 2: of 2 Started: 2012-07-05 16:53:10 running: 4 sinceUpdate: 2 taskRecordNum:
2 Server Identity:
Physical Blade Location:
Blade Enclosure:
Blade Enclosure Bay:
Guest VM Location:
Host IP:
Guest Name:
TPD IP:
Rack Mount Server:
IP:
Name:
::
6. PM&C: Save the PM&C backup
If the NetBackup feature has not been configured for this PM&C, or the Redundant PM&C is not
configured in this system, the PM&C backup must be moved to a remote server. Transfer, (sftp,
scp, rsync, or preferred utility), the PM&C backup to an appropriate remote server.
7. OA GUI: Log out
Log out from the OA by pressing Sign Out at the top-right corner.
3.6.6 Restore OA Configuration from Management Server
This procedure will restore configuration backup from the management server and apply it on the
OA’s.
Prerequisites:
• If the aggregation switches are provided by Tekelec, then the Cisco 4948/4948E switches need to
be configured using 3.1.1 Configure Cisco 4948/4948E/4948E-F aggregation switches (PM&C
installed)(netConfig).
• If the aggregation switches are provided by the customer, the user must ensure that the customer
aggregation switches are configured as per requirements provided in the Application physical Site
Survey and related IP/Network Site survey.
• In addition, Configure initial OA settings via configuration wizard,
• 3.8.2 Installing TVOE on the Management Server,
• 3.8.3 TVOE Network Configuration, and
• 3.8.4 Deploy PM&C Guest
It is assumed that:
909-2209-001 Revision G, February 2014
166
3 Procedures
• 3.6.5 Store OA Configuration on Management Server has been performed in the past.
• 3.6.1 Configure Initial OA IP has been completed prior to this procedure.
If there is any doubt as to whether the aggregation switches are provided by Tekelec or the customer,
contact Tekelec Technical Services and ask for assistance.
Note: If a procedural STEP fails to execute successfully, STOP and contact the Customer Care Center
by referring to the 1.4 Customer Care Center section of this document.
1. Obtain configuration file
Obtain configuration files from the management server :
Unix user:
# scp root@<management_server_IP>:/usr/TKLC/smac/etc
OA_backups/OABackup/<backup_config_filename> \ ./<cabinet_enclosure_backup
file>.conf
Windows users: Refer to Appendix A (A.1 Using WinSCP) to copy the file to your PC.
2. OA GUI: Login
Navigate to the IP address of the active OA, using Appendix C (C.1 Determining Which Onboard
Administrator is Active). Login as an administrative.
3. OA GUI: Restore configuration
Navigate to the Enclosure Information > Enclosure Settings > Configuration scripts
Use Local file form to upload and run configuration script:
The restore can take up to 5-10 minutes.
909-2209-001 Revision G, February 2014
167
3 Procedures
A pop up appears after the restore is complete. This will contain logs from the restoration process.
Check if there are any errors.
4. OA GUI: Log out
Log out from the OA by pressing Sign Out at the top-right corner.
3.6.7 Adding a redundant Onboard Administrator to enclosure
This procedure has become obsolete with Platform 5.0.
3.6.8 Replacing Onboard Administrator
This procedure describes how to replace OA in an enclosure with Redundant OA.
Prerequisites:
• Obtain any customer approval needed for OA firmware updates. This procedure can change the
version of firmware installed in one or both OAs.
• If the aggregation switches are provided by Tekelec, then the Cisco 4948/4948E switches need to
be configured using 3.1.1 Configure Cisco 4948/4948E/4948E-F aggregation switches (PM&C
installed)(netConfig).
• If the aggregation switches are provided by the customer, the user must ensure that the customer
aggregation switches are configured as per requirements provided in the Application physical Site
Survey and related IP/Network Site survey.
• In addition, 3.6.3 Configure OA Security must be completed.
• If there is any doubt as to whether the aggregation switches are provided by Tekelec or the customer,
contact Tekelec Technical Services and ask for assistance.
Note: The transfer of configuration occurs only from OA in Bay 1 to OA in Bay 2. Therefore in order
to keep the current configuration of the system, the insertion of new OA into the OABay 1 location
should be avoided.
Note: If a procedural STEP fails to execute successfully, STOP and contact the Customer Care Center
by referring to the 1.4 Customer Care Center section of this document.
1. OA GUI: Login to the active OA
Navigate to the IP address of the active OA, using Appendix C (C.1 Determining Which Onboard
Administrator is Active ). Login as root.
You will see the following page.
909-2209-001 Revision G, February 2014
168
3 Procedures
2. OA GUI: Record the IP configuration of the Active and Standby OAs.
Navigate to Enclosure Information > Active Onboard Administrator > TCP/IP Settings. Record
the Active OA's IP Address, Subnet Mask, and Gateway here:
Active OA IP Address:
Active OA Subnet Mask:
Active OA Gateway:
Navigate to Enclosure Information > Standby Onboard Administrator TCP/IP Settings. Record
the Standby OA's IP Address, Subnet Mask, and Gateway here:
Standby OA IP Address:
Standby OA Subnet Mask:
Standby OA Gateway:
3. OA GUI: Note the location of the active OA
Note the location of the active onboard administrator within the enclosure. The active OA will
have the Active LED on, as in the figure below. You may also mouse over the OA and see its role.
909-2209-001 Revision G, February 2014
169
3 Procedures
If the OA you would like to replace is not the active OA for the enclosure, skip to step 5. Otherwise,
continue with step 4.
4. OA GUI: Force active OA into standby mode
On the left-hand side navigate to Enclosure Information > Enclosure Settings > Active to Standby,
then click on the Transition Active to Standby button.
Answer OK the following question:
909-2209-001 Revision G, February 2014
170
3 Procedures
Wait about five minutes , until the application reloads itself and the following page appears:
5. Remove the OA to be replaced
If you need to replace the Onboard Administrator from the OA Bay 2 location (right as viewed
from rear) , remove it and skip to step 7.
If you need to replace the Onboard Administrator from the OA Bay 1 location (left as viewed from
rear), remove it and proceed with step 6.
6. Move the OA from OA Bay 2 location into the OA Bay 1 location
Move the OA from OA Bay 2 location into the OA Bay 1 location. Wait five minutes so that the
Onboard Administrator can initialize.
7. Install the new OA
Insert the new Onboard Administrator into OA Bay 2 of the enclosure and wait five minutes so it
can get its configuration from the other OA and to initialize itself.
8. OA GUI: Login to the active OA
Navigate to the IP address of the active OA, using Appendix C (C.1 Determining Which Onboard
Administrator is Active). Login as root.
9. OA GUI: Re-establish the OA's IP configuration
Refer to the OA IP configuration settings recorded in Step 2 of this procedure. The current settings
of each OA should be unique and should match the recorded settings for either the Active or
Standby OA. The Active OA may now have the Standby OA's recorded settings and vice versa. If
changes are needed, perform "3.6.1 Configure Initial OA IP".
10. OA GUI: Verify the status of Onboard Administrators
909-2209-001 Revision G, February 2014
171
3 Procedures
On the Rear View mouse over each OA and verify the that the Status value is OK. If the status
of one OA or the other is shown as "Degraded" because of a firmware version mismatch, perform
"3.6.4 Upgrade or Downgrade OA Firmware".
11. PM&C CLI: Delete OA SSH keys
Log in to the PM&C CLI as the root user. Execute these three commands:
# ssh-keygen -R <Active-OA-IP> -f ~pmacd/.ssh/known_hosts
# ssh-keygen -R <Standby-OA-IP> -f ~pmacd/.ssh/known_hosts
# chown pmacd:pmacd ~pmacd/.ssh/known_hosts
New SSH keys will be established by PM&C the next time it logs in to each OA.
3.6.9 Add SNMP trap destination on OA.
This procedure will add an SNMP trap destination from the Onboard Administrator.
1. Active OA GUI: Login
Navigate to the IP address of the active OA. Use Appendix C Determining which Onboard Administrator
is Active to determine the active OA. Login as an administrative user.
2. OA GUI: Add SNMP trap destination
Navigate to Enclosure Information > Enclosure Settings > SNMP Settings.
909-2209-001 Revision G, February 2014
172
3 Procedures
Type the host destination information into the 'Host:' box (indicated by the red arrow in the following
figure). Additionally, type the community string to the 'Community String:' box (indicated by the
green arrow in the following figure). Finally, click the Add button to the trap destination to the
configuration.
909-2209-001 Revision G, February 2014
173
3 Procedures
The SNMP trap destination has now been added to the configuration and should show up in the
list of configured destinations. Click Apply to activate the configuration. The following progress
meter may appear.
When the progress meter disappears, the configuration has been applied.
3.6.10 Delete SNMP trap destination on OA.
This procedure will remove an SNMP trap destination from the Onboard Administrator.
1. Active OA GUI: Login
Navigate to the IP address of the active OA. Use Appendix C Determining which Onboard Administrator
is Active to determine the active OA. Log in as an administrative user.
2. OA GUI: Remove SNMP trap destination
Navigate to Enclosure Information > Enclosure Settings > SNMP Settings
909-2209-001 Revision G, February 2014
174
3 Procedures
All configured SNMP trap destinations will be shown in the box in the center of the SNMP Settings
page.
Select the trap destination that will be removed and click the Remove button.
The SNMP trap destination has now been removed from the configuration and will no longer be
listed as a configured destination. Click Apply to activate the configuration. The following progress
meter will appear.
909-2209-001 Revision G, February 2014
175
3 Procedures
When the progress meter disappears the configuration has been applied.
3.7 DL360 and DL380 Server Procedures
3.7.1 IPM DL360 or DL380 Server
This procedure provides instructions for configuring and IPMing the DL360 or DL380 server.
Needed material:
• 909-2130-001 Initial Product Manufacture [4]
• TPD or TVOE installation media to be used for IPM.
Note: If a procedural STEP fails to execute successfully, STOP and contact the Customer Care Center
by referring to the 1.4 Customer Care Center section of this document.
1. Configure and IPM the DL360 or DL380 server
Follow 909-2130-001 Initial Product Manufacture, section 3.1 through 3.4 to configure and IPM the
management server
For a DL360/G5 server, the correct options to use for the IPM of the management server are:
TPDnoraid console=tty0
For a DL360 G6/G7 or DL380 G6 server, the correct options to use for the IPM of the management
server are:
TPDnoraid console=tty0 diskconfig=HPHW,force
2. Verify the initial product manufacture
Follow 909-2130-001 Initial Product Manufacture, section 3.5 to verify the IPM completed successfully.
3.7.2 Upgrade DL360 or DL380 Server Firmware
This procedure will upgrade the DL360 or DL380 server firmware
The service Pack for Proliant (SPP) installer automatically detects the firmware components available
on the target server and will only upgrade those components with firmware older than what is on the
current ISO.
Prerequisites:
909-2209-001 Revision G, February 2014
176
3 Procedures
• 3.7.1 IPM DL360 or DL380 Server has been completed
Procedure Reference Tables:
Variable
Value
<ilo_IP>
Fill in the IP address of the iLO for the server
being upgraded
_______________________________
<ilo_admin_user>
Fill in the username of the iLO's Administrator
User ________________________________
<ilo_admin_password>
Fill in the password for the iLO's Administrator
User ________________________________
<local_HPSPP_image_path>
Fill in the filename for the HP Support Pack for
Proliant ISO ___________________________
<root_password>
Fill in the password for the root user for the server
being upgraded ___________________________
Needed Material:
• Tekelec's HP Service Pack for Proliant (SPP) ISO file
• Tekelec's HP Misc Firmware ISO file (for errata updates if applicable)
• HP Solutions Firmware Upgrade Pack Release Notes [3]
Important Notes for this Procedure: The following procedure has some instructions meant for a
production system in the field and you should be aware of the following notes regarding this procedure:
• Ignore references to the "Copy the ISO Images to the Workstation" procedure. Know that you must
have the ISO files listed in the "Needed Material" section above.
• Ignore the <local_HPSUF_image_path> variable.
• For the "Update Firmware Errata" step check the HP Solutions Firmware Upgrade Pack Release Notes
[3] to see if there are any firmware errata items that apply to the server being upgraded. If there
is, there will be a directory matching the errata's ID in the /errata directory of the HP Misc Firmware
ISO. The errata directories contain the errata firmware and a README file detailing the installation
steps.
Note: If a procedural STEP fails to execute successfully, STOP and contact the Customer Care Center
by referring to the 1.4 Customer Care Center section of this document.
1. Local Workstation: Access the iLO Web GUI.
Access the ProLiant Server iLO Web Login Page from an Internet Explorer ® session using the
following URL:
https://<ilo_IP>/
2. iLO Web GUI: Login to iLO as an "administrator" user.
909-2209-001 Revision G, February 2014
177
3 Procedures
Username = <ilo_admin_user>
Password = <ilo_admin_password>
3. Determine which iLO steps to take
a) If you are upgrading a G6 (iLO 2) server, continue at the next step.
b) If you are upgrading a G7/Gen8 (iLO3/iLO4) server, continue at step 12.
4. iLO 2 Web GUI:
Select Virtual Media page.
Click the Virtual Media tab from the System Summary page.
5. iLO 2 Web GUI:
Open the Virtual Media Applet .
Click on the Virtual Media Applet link to launch the Virtual Media application
The iLO GUI should open to the Virtual Media page.
909-2209-001 Revision G, February 2014
178
3 Procedures
6. iLO 2 Web GUI: Acknowledge Security Warning.
If a dialog similar to the one below is presented, click Yes to acknowledge the issue and proceed.
If other warning dialogs are presented you may also acknowledge them as well to proceed to the
Virtual Media applet.
7. iLO 2 VM Applet: Select the HP Support Pack for Proliant ISO.
In the Virtual CD/DVD-ROM Panel, select the Local Image File option and click the Browse button.
Navigate to the HP Smart Update Firmware ISO file copied to the workstation in the Copy the ISO
images to the workstation procedure.
Select ISO image file and click Open.
Image File Name: <local_HPSPP_image_path> (See Copy the ISO images to the workstation)
909-2209-001 Revision G, February 2014
179
3 Procedures
8. iLO 2 VM Applet: Create Virtual Drive Connection.
Click the Connect button to create a virtual DVD-ROM connection to the ISO image file.
When created the LED Light icon should be green.
At this point, DO NOT close the applet but rather go back to the browser window containing the
iLO Web GUI.
9. iLO 2 Web GUI: Access the Remote Console Page.
At the ILO2 Web GUI, click on the Remote Console tab.
909-2209-001 Revision G, February 2014
180
3 Procedures
10. iLO 2 Web GUI: Launch the Remote Console Applet.
On the Remote Console page, click on the Remote Console link to launch the console applet.
11. iLO 2 - Java Security Prompt: Acknowledge Security Warning
If a dialog similar to the one below is presented, click Yes to acknowledge the issue and proceed.
Then skip to step 16.
If other warning dialogs are presented you may also acknowledge them as well to proceed to the
Java Integrated Remote Console applet.
12. iLO3/iLO4 Web GUI: Launch the Java Integrated Remote Console applet.
909-2209-001 Revision G, February 2014
181
3 Procedures
On the menu to the left navigate to the Remote Console page. Click on the Java Integrated Remote
Console to open it.
13. iLO3/iLO4 - Java Security Prompt: Acknowledge Security Warning.
If a dialog similar to the one below is presented, click Yes to acknowledge the issue and proceed.
If other warning dialogs are presented you may also acknowledge them as well to proceed to the
Java Integrated Remote Console applet.
14. iLO3/iLO4 - Remote Console: Create Virtual Drive Connection
Click on the Virtual Drives drop down menu. Goto CD/DVD then click on Virtual Image.
909-2209-001 Revision G, February 2014
182
3 Procedures
Navigate to the HP Support Pack for Proliant ISO ISO file copied to the workstation from the Copy
the ISO images to the workstation procedure.
Select the ISO image file and click Open.
15. iLO3/iLO4 - Remote Console: Verify Virtual Image connection.
At the bottom of the remote console window you should now see a green highlighted drive icon
and "VirtualM" written next to it.
16. Remote Console: Reboot the server.
Once the remote console application opens to the login prompt, login to the server as root.
localhost login: root
Password: <root_password>
Next, initiate server reboot by executing the following command:
# init 6
909-2209-001 Revision G, February 2014
183
3 Procedures
17. Remote Console: Perform an unattended firmware upgrade.
The server will reboot into the HP Support Pack for Proliant ISO ISO and present the following boot
prompt.
Press [Enter] to select the Automatic Firmware Update procedure.
If no key is pressed in 30 seconds the system will automatically perform an Automatic Firmware
Update.
18. Remote Console: Analyze System.
The firmware install will perform a system scan of the server in which it will identify all of the
firmware components that are eligible for upgrade. This process may take up to 10 minutes and,
during that time, the following screen is displayed on the console.
909-2209-001 Revision G, February 2014
184
3 Procedures
Note: No progress indication is displayed during the system scan and analysis stage. In about 10
minutes, the installation will automatically proceed to the next step.
19. Remote Console: Monitor Installation.
Once analysis is complete, the installer will begin to upgrade the eligible firmware components.
A progress indicator is displayed at this time, as shown below.
Note: If the iLO firmware is to be upgraded, it will be upgraded last. At this point the iLO2 session
will be terminated and you will lose the remote console, virtual media and Web GUI connections
to the server. This is expected and will not impact the firmware upgrade process.
20. Local Workstation: Clean up.
Once the firmware updates have been completed the server will automatically be rebooted.
• If you are upgrading a G5/G6 (iLO 2) server; at this time you may close the remote console
and virtual media applet windows and the iLO2 Web GUI browser session.
• If you are upgrading a G7/Gen8 (iLO3/iLO4) server; closing the remote console window will
disconnect the Virtual Image and you can close the iLO3/iLO4 Web GUI browser session.
Note: Servers running TPD 3.3.x need to have their iLO 2 immediately downgraded before moving
on. In the HP Solutions Firmware Upgrade Release Notes refer to the section "HP Errata Firmware
Components".
21. Local Workstation: Verify server availability
Wait 3 to 5 minutes and verify the server has rebooted and is available by gaining access to the
login prompt.
22. Update Firmware Errata:
909-2209-001 Revision G, February 2014
185
3 Procedures
Refer to the Proliant Server Firmware Errata section to determine if this HP Solutions Firmware
Update Pack contains additional firmware errata updates that should be applied to the server at
this time.
3.8 PM&C Procedures
3.8.1 Deploying Virtualized PM&C Overview
Deployment Procedure
Deploying a VM guest in the absence of a PM&C is a bit complicated. To facilitate this, the PM&C
media will include a guest archive and a script that will deploy the running PMAC into a state where
the Initialization process can begin.
• Install TVOE 2.0 on the management server via the ILO
• Create and configure the management bridge
• Determine if NetBackup Feature is enabled for this system. If enabled, install appropriate NetBackup
client to the PM&C TVOE host.
• Attach PM&C media to the TVOE (CDR, USB)
• Mount the media
• Use the <mount-point>/upgrade/pmac-deploy script to create the VM and configure the guest
on the first boot.
• Navigate browser to the management IP address of the deployed PM&C.
• Perform Initial Configuration.
What You Will Need -- Worksheet
Use the collected site survey information to fill in the appropriate data in this Procedure's Reference
tables. The following are provided to aid with the data collection for the TVOE management server
and the PM&C Application hosted on the Management Server TVOE.
• Determine if the network configuration of this management server is Non-Segregated or Segregated.
• Determine the TVOE management server's required network interface, bond, and Ethernet device,
and route data.
• Determine if the control network on the TVOE management server is to be tagged. If appropriate
fill in the <control VLAN ID> value in the table, otherwise the control network is not tagged.
• Determine if the management network on the TVOE management Server is to be tagged. If
appropriate fill in the <management_VLAN_ID> value in the table, otherwise the management
network is not tagged.
• Determine the bridge name to be used on the TVOE management server for the management
network. Fill in the <TVOE_Management_Bridge> value in the table.
• Determine if the NetBackup feature is enabled
909-2209-001 Revision G, February 2014
186
3 Procedures
• Determine the NetBackup network on the TVOE management server is to be tagged. If
appropriate fill in the <NetBackup_VLAN_ID> value in the table, otherwise the NetBackup
network is not tagged.
• Determine the bridge name to be used on the TVOE management server for the netbackup
network. Fill in the <TVOE_NetBackup_Bridge> value in the table.
• Determine if the NetBackup network is to be configured with jumbo frames. If appropriate fill
in the <NetBackup_MTU_size> value in the table, otherwise the NetBackup network will use
the default MTU size.
• If the PM&C NetBackup feature is enabled, and the backup service will be routed, with a source
interface different than the management interface where the default route is applied, then define
the route during PM&C initialization as a host route to the NetBackup server.
• The PM&C initialization profiles have been designed to configure the PM&C's networks and
features. Profiles must identify interfaces. Existing profiles provided by PM&C use standard named
interfaces (control, management). No vlan tagging is expected on the PM&C's interfaces, all tagging
should be handled on the TVOE management server configuration.
Network
Interface
DL360
(without HP
NC364T 4pt
Gigabit )
DL360 (with
DL380
HP NC364T
4pt Gigabit in
PCI Slot 2)
DL380 (with HP
4pt Gigabit in
PCI Slot 1)
DL380 (with
HP 4pt
Gigabit in PCI
Slot 3)
<ethernet_interface_1> eth01
eth01
eth01
eth01
eth01
<ethernet_interface_2> eth02
eth02
eth02
eth02
eth02
<ethernet_interface_3>
eth21
eth03
eth03
eth03
<ethernet_interface_4>
eth22
eth04
eth04
eth04
<ethernet_interface_5>
eth23
eth11
eth31
PM&C Interface Alias
TVOE Bridge Name
TVOE Bridge Interface
control
control
bond0
management
Fill in the appropriate value for Fill in the appropriate value for
this site:
this site:
netbackup
__________________________
___________________________
<TVOE_Management_Bridge
<TVOE_Management_Bridge_Interface>
Fill in the appropriate value for Fill in the appropriate value for
this site:
this site:
__________________________
___________________________
<TVOE_Netbackup_Bridge>
<TVOE_NetBackup_Bridge_Interface>
909-2209-001 Revision G, February 2014
187
3 Procedures
Variable
Value
Description
<control_VLAN_ID>
Fill in the appropriate value for For non-segregated networks,
this site: __________________
the control network may have a
VLAN id assigned. In most
cases, there is none.
<management_VLAN_ID>
Fill in the appropriate value for For non-segregated networks,
this site: __________________
the management network will
be on a tagged VLAN coming in
on bond0
<mgmtVLAN_gateway_address> Fill in the appropriate value for Gateway address used for
this site: __________________
routing on the management
network.
<NetBackup_server_IP>
Fill in the appropriate value for The IP address of the remote
this site: __________________
NetBackup Server.
<NetBackup_VLAN_ID>
Fill in the appropriate value for For non-segregated networks,
this site: __________________
the netbackup network will be
on a tagged VLAN coming in on
bond0
<NetBackup_gateway_address> Fill in the appropriate value for Gateway address used for
this site: __________________
routing on the netbackup
network.
<NetBackup_network_ip>
Fill in the appropriate value for The Network IP for the
this site: __________________
NetBackup network
<PMAC_NetBackup_netmask> Fill in the appropriate value for The IP netmask assigned to the
this site: __________________
PM&C for participation in the
netbackup network
<PMAC_NetBackup_ip_address> Fill in the appropriate value for The IP Address assigned to the
this site: __________________
PM&C for participation in the
netbackup network
<NetBackup_MTU_size>
Fill in the appropriate value for If desired, the MTU size can be
this site: __________________
set to tune the netbackup
network traffic.
<management_server_mgmt_ip_address> Fill in the appropriate value for The TVOE Management Server's
this site: __________________
IP address on the management
network.
<PMAC_mgmt_ip_address>
Fill in the appropriate value for The PM&C Application's IP
this site: __________________
address on the management
network.
<mgmt_netmask>
Fill in the appropriate value for The IP netmask for the
this site: __________________
management network.
<PMAC_control_ip_address>
Fill in the appropriate value for The PM&C Application's IP
this site: __________________
address on the control network.
909-2209-001 Revision G, February 2014
188
3 Procedures
Variable
Value
<control_netmask>
Fill in the appropriate value for The IP netmask for the control
this site: __________________
network.
Network Bond Interface
Enslaved Interface 1
bond0
Fill in the appropriate value for Fill in the appropriate value for
this site:
this site:
__________________________
Description
Enslaved Interface 2
___________________________
For Segregated Networks Only
bond1
Fill in the appropriate value for Fill in the appropriate value for
this site:
this site:
__________________________
bond2
___________________________
Fill in the appropriate value for Bonding used for abstraction
this site:
only, not multiple interfaces
__________________________
3.8.2 Installing TVOE on the Management Server
Install the TVOE Hypervisor platform on the Management Server
The PM&C is not available to do an IPM of the TVOE management server. It is possible using the iLO
interface to attach a virtual image of the TVOE media, or to physically provide the TVOE media via
a USB or optical.
Prerequisites:
• TVOE installation media
Install TVOE onto the Management Server
Follow 3.7.1 IPM DL360 or DL380 Server Server to IPM the management server with TVOE.
3.8.3 TVOE Network Configuration
Prerequisites:
• 3.8.2 Installing TVOE on the Management Server
1. TVOE Management Server iLO: Login and launch the integrated remote console
Login to iLO in IE using password provided by application:
http://<management_server_iLO_ip>
Click in the Remote Console tab and launch the Integrated Remote Console on the server.
Click Yes if the Security Alert pops up.
2. TVOE Management Server: Verify the control network bond
909-2209-001 Revision G, February 2014
189
3 Procedures
Note: The output below is for illustrative purposes only. It shows the control bond configured.
# netAdm query --device=<TVOE_Control_Bridge_Interface>
Protocol: none
On Boot: yes
IP Address:
Netmask:
Bonded Mode: active-backup
Enslaving: <ethernet_interface_1> <ethernet_interface_2>
If the bond has been configured, skip to the next step.
Note: The output below is for illustrative purposes only. The site information for this system will
determine the network interfaces, (network devices, bonds, and bond enslaved devices), to configure.
Create control bond (<TVOE_Control_Bridge_Interface>).
# netAdm add --device=<TOVE_Control_Bridge_Interface> --onboot=yes --type=Bonding
--mode=active-backup --miimon=100
Interface <TVOE_Control_Bridge_Interface> added
# netAdm set --device=<ethernet_interface_1> --type=Ethernet
--master=<TVOE_Control_Bridge_Interface> --slave=yes --onboot=yes
Interface <ethernet_interface_1> updated
# netAdm set --device=<ethernet_interface_2> --type=Ethernet
--master-<TVOE_Control_Bridge_Interface> --slave=yes --onboot=yes
Interface <ethernet_interface_2> updated
3. TVOE Management Server: Verify the control network bridge
Note: The output below is for illustrative purposes only. It shows the control bridge configured.
# netAdm query --type=Bridge --name=control
Bridge Name: control
On Boot: yes
Protocol: dhcp
Persistent: yes
Promiscuous: no
Hwaddr: 00:24:81:fb:29:52
MTU:
Bridge Interface: bond0
If the bridge has been configured, skip to the next step.
Note: The output below is for illustrative purposes only. The site information for this system will
determine the network interfaces, (network devices, bonds, and bond enslaved devices), to configure.
Create control bridge (<TVOE_Control_Bridge>).
# netAdm add --type=Bridge --name=<TVOE_Control_Bridge> --bootproto=dhcp
--onboot=yes --bridgeInterfaces=<TVOE_Control_Bridge_Interface>
4. TVOE Management Server: Verify the tagged/non-segregated management network
Note: This step only applies if the management network is tagged (non-segregated).
909-2209-001 Revision G, February 2014
190
3 Procedures
Note: The output below is for illustrative purposes only. It shows the management bridge
configured on a non-segregated network setup.
# netAdm query --device=bond0.2
Protocol: none
On Boot: yes
IP Address: 10.240.5.2
Netmask: 255.255.255.0
Bridge: Member of bridge management
If the device has been configured, skip to the next step.
Note: The output below is for illustrative purposes only. The site information for this system will
determine the network interfaces, (network devices, bonds, and bond enslaved devices), to configure.
Note: The example below illustrates a PM&C management server configuration in a Non-Segregated
network, an un-tagged control network, and a tagged management network.
For this example created tagged device for management device.
# netAdm add --device=<TVOE_Management_Bridge_Interface> --onboot=yes
Interface <TVOE_Management_Bridge_Interface> added
5. TVOE Management Server: Verify the untagged/segregated management network
Note: This step only applies if the management network is untagged (segregated).
Note: The output below is for illustrative purposes only. It shows the management bond configured
on a segregated network setup.
# netAdm query --device=<TVOE_Management_Bridge_Interface>
Protocol: none
On Boot: yes
IP Address:
Netmask:
Bonded Mode: active-backup
Enslaving: <ethernet_interface_3> <ethernet_interface_4>
If the bond has been configured, skip to the next step.
Note: The output below is for illustrative purposes only. The site information for this system will
determine the network interfaces, (network devices, bonds, and bond enslaved devices), to configure.
# netAdm add --device=<TVOE_Management_Bridge_Interface> --onboot=yes
--type=Bonding --mode=active-backup --miimon=100
Interface <TOVE_Management_Bridge_Interface> added
# netAdm set --device=<ethernet_interface_3> --type=Ethernet
--master=<TVOE_Management_Bridge_Interface> --slave=yes --onboot=yes
Interface <ethernet_interface_3> updated
# netAdm set --device=<ethernet_interface_4> --type=Ethernet
--master=<TVOE_Management_Bridge_Interface> --slave=yes --onboot=yes
Interface <ethernet_interface_4> updated
6. TVOE Management Server: Verify the management bridge
909-2209-001 Revision G, February 2014
191
3 Procedures
Note: The output below is for illustrative purposes only. It shows the management bridge
configured on a non-segregated network setup.
# netAdm query --type=Bridge --name=management
Bridge Name: management
On Boot: yes
Protocol: none
IP Address: 10.240.4.86
Netmask: 255.255.255.0
Promiscuous: no
Hwaddr: 00:24:81:fb:29:52
MTU:
Bridge Interface: bond0.2
If the bridge has been configured, skip to the next step.
Note: The output below is for illustrative purposes only. The site information for this system will
determine the network interfaces, (network devices, bonds, and bond enslaved devices), to configure.
For this example created tagged device for management bridge.
# netAdm add --type=Bridge --name=<TVOE_Management_Bridge>
--address=<management_server_mgmtVLAN_IP> --netmask=<mgmtVLAN_netmask> --onboot=yes
--bridgeInterfaces=<TVOE_Management_Bridge_Interface>
7. TVOE Management Server: Verify the netbackup network (if needed)
If the NetBackup feature is not needed, skip to the next step.
Note: The output below is for illustrative purposes only. It shows the NetBackup bridge is
configured.
# netAdm query --type=Bridge --name=netbackup
Bridge Name: netbackup
On Boot: yes
Protocol: none
IP Address: 10.240.6.2
Netmask: 255.255.255.0
Promiscuous: no
Hwaddr: 00:24:81:fb:29:58
MTU:
Bridge Interface: bond2
If the bridge has been configured, skip to the next step.
Note: The output below is for illustrative purposes only. The site information for this system will
determine the network interfaces, (network devices, bonds, and bond enslaved devices), to configure.
Note: The example below illustrates a TVOE management server configuration with the NetBackup
feature enabled. The NetBackup network is configured with a non-default MTU size.
Note: The MTU size must be consistent between a network bridge, device, or bond, and associated
VLANs.
Select only one of the following configurations:
• Option 1: Create netbackup bridge using a bond containing an untagged interface.
# netAdm add --device=<TVOE_NetBackup_Bridge_Interface> --onboot=yes --type=Bonding
--mode=active-backup --miimon=100 --MTU=<NetBackup_MTU_size>
Interface <TVOE_NetBackup_Bridge_Interface> added
909-2209-001 Revision G, February 2014
192
3 Procedures
# netAdm set --device=<ethernet_interface_5> --type=Ethernet
--master=<TVOE_NetBackup_Bridge_Interface> --slave=yes --onboot=yes
--MTU=<NetBackup_MTU_size>
Interface <ethernet_interface_5> updated
# netAdm add --type=Bridge --name=<TVOE_NetBackup_Bridge> --bootproto=none
--onboot=yes --MTU=<NetBackup_MTU_size>
--bridgeInterfaces=<TVOE_NetBackup_Bridge_Interface> --address=<TVOE_NetBackup_IP>
--netmask=<TVOE_NetBackup_Netmask>
• Option 2: Create netbackup bridge using an untagged native interface.
# netAdm add --type=Bridge --name=<TVOE_NetBackup_Bridge> --bootproto=none
--onboot=yes --MTU=<NetBackup_MTU_size> --bridgeInterfaces=<Ethernet_interface_5>
--address=<TVOE_NetBackup_IP> --netmask=<TVOE_NetBackup_Netmask>
• Option 3: Create netbackup bridge using a tagged device.
# netAdm add --device=<TVOE_NetBackup_Bridge_Interface> --onboot=yes
Interface <TVOE_NetBackup_Bridge_Interface> added
# netAdm add --type=Bridge --name=<TVOE_NetBackup_Bridge> --onboot=yes
--MTU=<NetBackup_MTU_size> --bridgeInterfaces=<TVOE_NetBackup_Bridge_Interface>
--address=<TVOE_NetBackup_IP> --netmask=<TVOE_NetBackup_Netmask>
8. TVOE Management Server: Setup syscheck
syscheck must be configured to monitor bonded interfaces. Replace "bondedInterfaces" with
"bond0" or "bond0,bond1" if segregated networks are used:
# syscheckAdm net ipbond --set --var=DEVICES --val=<bondedInterfaces>
# syscheckAdm net ipbond --enable
# syscheck -v net ipbond
9. TVOE Management Server: Verify the default route
Note: The output below is for illustrative purposes only. It shows the default route on the
management bridge is configured.
# netAdm query --route=default --device=management
Routes for TABLE: main and DEVICE: management
* NETWORK: default
GATEWAY: 10.240.4.1
If the route has been configured, skip to the next step.
Note: The output below is for illustrative purposes only. The site information for this system will
determine the network interfaces, (network devices, bonds, and bond enslaved devices), to configure.
For this example add default route on management network.
# netAdm add --route=default --device=<TVOE_Management_Bridge>
--gateway=<mgmt_gateway_address>
Route to <TVOE_Management_Bridge> added
10. TVOE Management Server: Verify the NetBackup route (optional)
If the NetBackup network is a unique network for NetBackup data, verify the existence of the
appropriate NetBackup route.
909-2209-001 Revision G, February 2014
193
3 Procedures
Note: The output below is for illustrative purposes only. It shows the route on the NetBackup
bridge is configured.
If the netbackup route is to be a network route, then:
# netAdm query --route=net --device=<TVOE_NetBackup_Bridge>
Routes for TABLE: main and DEVICE: netbackup
* NETWORK: net
GATEWAY: 169.254.253.1
If the netbackup route is to be a host route then:
# netAdm query --route=host --device=<TVOE_NetBackup_Bridge>
Routes for TABLE: main and DEVICE: netbackup
* NETWORK: host
GATEWAY: 169.254.253.1
If the route has been configured, skip to the next step.
Note: The output below is for illustrative purposes only. The site information for this system will
determine the network interfaces (network devices, bonds, and bond enslaved devices) to configure.
For this example add network route on management network.
# netAdm add --route=net --device=<TVOE_Management_Bridge>
--gateway=<NetBackup_gateway_address> --address=<NetBackup_network_IP>
--netmask=<TVOE_NetBackup_Netmask>
Route to <TVOE_NetBackup_Bridge> added
For this example add host route on management network.
Note: For the configuration of a host route, the <TVOE_NetBackup_Netmask> will be set to
"255.255.255.255".
# netAdm add --route=host --device=<TVOE_Management_Bridge>
--gateway=<NetBackup_Server_IP> --address=<NetBackup_Server_IP>
--netmask=<TVOE_NetBackup_Netmask>
Route to <TVOE_NetBackup_Bridge> added
11. TVOE Management Server: Set hostname
# su – platcfg
1.
2.
3.
4.
Navigate to Server Configuration > Hostname and set the hostname.
Set TVOE Management Server hostname
Press OK.
Navigate out of Hostname
12. TVOE Management Server: set time zone and/or hardware clock
1.
2.
3.
4.
5.
Navigate to Server Configuration > Time Zone.
Select Edit.
Set the time zone and/or hardware clock.
Press OK.
Navigate out of Server Configuration
13. Execute 3.11.2 Configure NTP on TPD based Application on the Management Server.
909-2209-001 Revision G, February 2014
194
3 Procedures
Note: It is recommended that you use the <customer_supplied_ntp_server_address>
14. TVOE Management Server: Ensure time set correctly.
a) Set time based on NTP Server
# service ntpd stop
# ntpdate ntpserver1
# service ntpd start
b) Reboot the server
# init 6
15. Execute 3.11.3 Add SNMP trap destination on TPD based Application on the Management Server.
16. If the NetBackup feature is enabled for this system, configure the appropriate NetBackup client on
the PM&C TVOE host.
Based on the table below, execute the appropriate commands.
TVOE Base TPD Release
Command to Execute
Before 6.0.0_80.22.0
NetBackup Client is not installedon the PM&C
TVOE Host
6.0.0_80.22.0 and after
Execute 3.12.2 TVOE Netbackup Client
Configuration
17. TVOE Management Server: Verify server health
# alarmMgr –alarmStatus
This command should return no output on a healthy system. If any alarms are reported, contact
Customer Care Center.
18. TVOE Management Server: Perform a TVOE backup
Execute 3.11.1 Backup Procedure for TVOE.
Note: This section performs the TVOE backup. Subsequent to the TVOE backup the 3.11.1 Backup
Procedure for TVOE section directs the operator to move the TVOE backup ISO off to a remote
customer server. The TVOE backup can be found in the "/var/TKLC/bkp/" directory, and is
prefixed by the server hostanem. An example of a TVOE backup ISO follows:
/var/TKLC/bkp/RMS503u14-plat-app-201210301505.iso
3.8.4 Deploy PM&C Guest
The pmac-deploy script is responsible for deploying a PM&C guest in the absence of a PM&C to
create the guest and install the OS and application. This is all done a build-time and the system disk
image is kept on the PM&C media, along with this script. Once the PM&C media is mounted, the
pmac-deploy script can be found in the upgrade directory of the media.
Prerequisites:
909-2209-001 Revision G, February 2014
195
3 Procedures
• 3.8.2 Installing TVOE on the Management Server,
• 3.8.3 TVOE Network Configuration, and
• PM&C Installation Media.
1. TVOE Management Server iLO: Login and launch the integrated remote console
Login to iLO in IE using password provided by application:
http://<management_server_iLO_ip>
Click in the Remote Console tab and launch the Integrated Remote Console on the server.
Click Yes if the Security Alert pops up.
2. TVOE Management Server: Mount the PM&C media to the TVOE Management server.
For a sample of mounting a DVD media:
# getCDROM
DV-W28E-RW|sr0
/dev/sr0
# mount -t iso9660 /dev/sr0 /mnt/upgrade/
For a sample of mounting a USB media
# ls /media/*/*.iso
/media/usb/872-2441-104-5.0.0_50.8.0-PMAC-x86_64.iso
# mount -o loop /media/usb/872-2441-104-5.0.0_50.8.0-PMAC-x86_64.iso /mnt/upgrade
3. TVOE Management Server: Validate the PM&C media.
Execute the self-validating media script:
# cd /mnt/upgrade/upgrade
# .validate/validate_cd
Validating cdrom...
UMVT Validate Utility v2.2.2, (c)Tekelec, June 2012
Validating <device or ISO>
Date&Time: 2012-10-25 10:07:01
Volume ID: tklc_872-2441-106_Rev_A_50.11.0
Part Number: 872-2441-106_Rev_A
Version: 50.11.0
Disc Label: PMAC
Disc description: PMAC
The media validation is complete, the result is: PASS
CDROM is Valid
If the media validation failes, the media is not valid and should not be used.
4. TVOE Management Server: Using the pmac-deploy script, deploy the PM&C instance using the
configuration captured during the site survey.
For this example, deploy a PM&C without netbackup feature
# cd /mnt/upgrade/upgrade
# ./pmac-deploy --guest=<PMAC_Name> --hostname=<PMAC_Name>
--controlBridge=<TVOE_Control_Bridge> --controlIP=<PMAC_Control_ip_address>
909-2209-001 Revision G, February 2014
196
3 Procedures
--controlNM=<PMAC_Control_netmask> --managementBridge=<PMAC_Management_Bridge>
--managementIP=<PMAC_Management_ip_address>
--managementNM=<PMAC_Management_netmask>
--routeGW=<PMAC_Management_gateway_address>
--ntpserver=<TVOE_Management_server_ip_address>
For this example, deploy a PM&C with the netbackup feature. Deploying a PM&C with the
NetBackup feature requires the "--netbackupVol" option, which creates a separate netbackup logical
volume on the TVOE host of PM&C. If the NetBackup feature's source interface is different than
the management interface include the "--bridge" and the "--nic" as in the example below.
# cd /mnt/upgrade/upgrade
# ./pmac-deploy --guest=<PMAC_Name> --hostname=<PMAC_Name>
--controlBridge=<TVOE_Control_Bridge> --controlIP=<PMAC_Control_ip_address>
--controlNM=<PMAC_Control_netmask> --managementBridge=<PMAC_Management_Bridge>
--managementIP=<PMAC_Management_ip_address>
--managementNM=<PMAC_Management_netmask>
--routeGW=<PMAC_Management_gateway_address>
--ntpserver=<TVOE_Management_server_ip_address>
--netbackupVol
--bridge=<TVOE_NetBackup_Bridge>
--nic=netbackup
Note: Setting the ntpserver to the TVOE Management Server IP is the officially supported
configuration.
5. The PM&C will deploy and boot. The management and control network will come up based on
the settings that were provided to the pmac-deploy script.
6. TVOE Management Server: Unmount the media and remove.
# cd /
# umount /mnt/upgrade
Remove the media
3.8.5 Setup PM&C
The steps in this section configures the Management Server TVOE host guest PM&C application
environment up to, but not including initialization. At the conclusion of this section, the PM&C
application environment is sufficiently configured to allow configuration of system network assets
associated with the Management Server.
Note: The PM&C application initialization must be performed for the application to function properly.
The consumer of this document must perform the initialization subsequent to the configuration of the
network assets.
Prerequisites:
• 3.8.4 Deploy PM&C Guest
1. Login with PM&C root credentials
Note: On a TVOE host, If you launch the virsh console, i.e., "$ sudo /usr/bin/virsh console
X" or from the virsh utility "virsh # console X" command and you get garbage characters or
output is not quite right, then more than likely there is a stuck "virsh console" command already
being run on the TVOE host. Exit out of the "virsh console", then run "ps -ef |grep virsh",
909-2209-001 Revision G, February 2014
197
3 Procedures
then kill the existing process "kill -9 <PID>". Then execute the "virsh console X" command.
Your console session should now run as expected.
Login using virsh, and wait until you see the login prompt:
virsh # list
Id Name State
---------------------------------13 myTPD running
20 pmacdev7 running
virsh # console pmacdev7
[Output Removed]
Starting ntdMgr: [ OK ]
Starting atd: [ OK ]
'TPD Up' notification(s) already sent: [ OK ]
upstart: Starting tpdProvd...
upstart: tpdProvd started.
CentOS release 6.2 (Final)
Kernel 2.6.32-220.17.1.el6prerel6.0.0_80.14.0.x86_64 on an x86_64
pmacdev7 login:
2. Verify the PM&C configured correctly on first boot.
Run the following command (there should be no output):
# ls /usr/TKLC/plat/etc/deployment.d/
#
3. Determine the TimeZone to be used for the PM&C
Note: Valid time zones can be found on the server in the directory "/usr/share/zoneinfo". Only
the time zones within the sub-directories (i.e. America, Africa, Pacific, Mexico, etc…..) are valid
with platcfg.
4. Set the TimeZone
Run:
# set_pmac_tz.pl <timezone>
For Example:
# set_pmac_tz.pl America/New_York
5. Verify the TimeZone has been updated
Run:
# date
6. Execute 3.11.3 Add SNMP trap destination on TPD based Application on PM&C if necessary.
7. Reboot the server to ensure all processes are started with the new TimeZone.
909-2209-001 Revision G, February 2014
198
3 Procedures
Run:
# init 6
8. Gather and prepare configuration files that must be resident on the PM&C. These might be required
to proceed with the Application installation after the PM&C has been deployed but before it has
been initialized. These files are usually located within a given ISO on physical media (USB or
CDROM).
Note: This is an optional step only required if needed by an Application.
a) Once the PM&C has completed rebooting, but prior to initializing, SSH to the PM&C Host server
as root using the PM&C Management Network IP.
b) Create any necessary destination directories on the PM&C that are required if not using an
existing directory to transfer files.
c) Make the media available to the TVOE Host server. Mount the media on the TVOE Host using
one of the following methods:
1. If the Application ISO is on a physical CDROM disk:
a. Insert the disk into the CDROM drive of the TVOE Host Server.
b. Determine the CDROM of the TVOE Host server by executing the following command:
# getCDROM
Example: /dev/sr0
Note: sr0 is always designated as the CDROM device. There could be additional devices
listed by the command if in use.
c. Make a temporary mount point and mount the optical media.
# mkdir /media/cdrom
# mount /dev/sr0 /media/cdrom
Note: Once mounted, this gives a direct path to the ISO on the CDROM device.
2. If using a USB Drive:
a. Insert the USB into an available USB slot on the TVOE Host server and execute the
following command to determine its location and the ISO to be mounted:
# ls /media/*/*.iso
Example: /media/sdd1/872-2441-104-5.0.0_50.8.0-PMAC-x86_64.iso
Note: The USB device is immediately added to the list of media devices once it is inserted
into a USB slot on the TVOE Host server.
b. Note the device directory name under the media directory. This could be sdb1, sdc1,
sdd1, sde1, depending on the USB slot the media was inserted into.
c. Loop mount the ISO to the standard TVOE Host mount point (if it is not already in use):
# mount -o loop /media/<device directory>/<ISO Name>.iso /mnt/upgrade
909-2209-001 Revision G, February 2014
199
3 Procedures
d) Execute the following commands to copy the required files from the TVOE host to the PM&C
guest.
Wildcards can be used as necessary.
1. If the application is on a physical disk:
# scp -R /media/cdrom/<path to files>/* root@<PMAC Management_IP Address>:/<path
to destination directory>
2. If using a USB Drive:
# scp -R /mnt/upgrade/<path to files>/* root@<PMAC Management_IP Address>:/<path
to destination directory>
e) Remove the application media from the TVOE host:
1. If the application is on a physical disk:
# umount /media/cdrom
# rmdir /media/cdrom
2. If using a USB Drive:
# umount /mnt/upgrade
9. Perform a system healthcheck on PM&C
# alarmMgr –alarmStatus
This command should return no output on a healthy system.
# sentry status
All Processes should be running, displaying output similar to the following:
PM&C Sentry Status
-----------------sentryd started: Mon Jul 23 17:50:49 2012
Current activity mode: ACTIVE
Process
PID
Status
StartTS
------------------ ------ ----------- ------------------------smacTalk
9039
running
Tue Jul 24 12:50:29 2012
smacMon
9094
running
Tue Jul 24 12:50:29 2012
hpiPortAudit
9137
running
Tue Jul 24 12:50:29 2012
snmpEventHandler
9176
running
Tue Jul 24 12:50:29 2012
eclipseHelp
9196
running
Tue Jul 24 12:50:30 2012
NumR
---2
2
2
2
2
Fri Aug 3 13:16:35 2012
Command Complete.
10. Verify the PM&C application release
Verify that the PM&C application Product Release is as expected.
909-2209-001 Revision G, February 2014
200
3 Procedures
Note: If the PM&C application Product Release is not as expected, STOP and contact the Customer
Care Center by referring to the 1.4 Customer Care Center section of this document.
# appRev
Install Time: Fri Sep 28 15:54:04 2012
Product Name: PMAC
Product Release: 5.0.0_50.10.0
Part Number ISO: 872-2441-905
Part Number USB: 872-2441-105
Base Distro Product: TPD
Base Distro Release: 6.0.0_80.22.0
Base Distro ISO: TPD.install-6.0.0_80.22.0-CentOS6.2-x86_64.iso
OS: CentOS 6.2
11. Logout of the TVOE console
Use the telnet escape sequence ("control-]") to exit the PM&C console.
Run:
^]
virsh # exit
#
12. Management Server iLO: Exit the TVOE console.
Run:
# logout
You may now close the iLO browser window.
3.8.6 Configure PM&C application
Configuration of the PM&C application is typically performed using the PM&C GUI. This procedure
defines application and network resources. At a minimum, you should define network routes and
DHCP pools. Unlike initialization, configuration is incremental, so you may execute this procedure
to modify the PM&C configuration.
Prerequisites:
• PM&C has been deployed and initialized, but possibly not fully configured.
• Aggregation switches have been properly configured.
Note: The installer must be knowledgeable of the network and application requirements. The final
step will configure and restart the network and the PM&C application; network access will be briefly
interrupted.
Note: If a procedural STEP fails to execute successfully, STOP and contact the Customer Care Center
by referring to the 1.4 Customer Care Center section of this document.
1. PM&C GUI: Load GUI and navigate to the Configuration view
Open web browser and enter:
https://<pmac_management_network_ip>
Login as pmacadmin user.
909-2209-001 Revision G, February 2014
201
3 Procedures
Navigate to Main Menu > Administration > PM&C Configuration.
2. PM&C GUI: Configure optional features
Click on "Feature Configuration" in the navigation pane.
The "Features" view allows you to enable/disable PM&C features, and manage the feature's network
role. Application documentation will direct these decisions. The following image is for reference
only:
The "Enabled" checkbox selects the desired features. The "Role" field provides a drop-down list
of known network roles that the feature may be associated with. The "Description" may be edited
if desired.
If the feature should be applied to a new network role (e.g. "NetBackup"), click on the "Add Role"
button. Enter the name of the new role and click on "Add". (Note: role names are not significant,
they are only used to associate features with networks). The new role name will appear in the
"Role" drop-down field for features.
909-2209-001 Revision G, February 2014
202
3 Procedures
When done, click on the "Apply" button. This foreground task will take a few moments, and then
refresh the view with an Info or Error notice to verify the action. To discard changes, just navigate
away from the view.
3. PM&C GUI: Reconfigure PM&C networks
Note: The Network reconfiguration enters a tracked state. After you click on "Reconfigure", you
should use a "Cancel" button to abort.
Click on "Network Configuration" in the navigation pane, and follow the wizard through the
configuration task.
1. Click on "Reconfigure" to display the "Network" view. The default "management" and "control"
networks should be configured correctly. Networks may be added, deleted or modified from
this view. They are defined with IPv4 dotted-quad addresses and netmasks. When complete,
click on "Next".
2. On the "Network Roles" view, you may change the role of a network. Network associations
can be added (e.g. "netbackup") or deleted. You cannot add a new role since roles are driven
from features. When complete, click on "Next".
3. On the "Network Interfaces" view, you may add or delete interfaces, and change the IP address
within the defined network space. If you add a network (again, e.g. "netbackup"), the "Add
Interface" view is displayed when clicking on "Add". This view provides an editable drop-down
field of known interfaces. You may add a new device here if necessary. The Address must be
an IPv4 host address in the network. When complete, click on "Next".
4. On the "Routes" view, you may add or delete route destinations. The initial PM&C deployment
does not define routes. Most likely you will want to add a default route - the route already
exists, but this action defines it to PM&C so it may be displayed by PM&C. Click on "Add". The
Add Route view provides an editable drop-down field of known devices. Select the egress
device for the route. Enter IPv4 dotted-quad addresses and netmask for the route destination,
and next-hop gateway. Then click on "Add Route". When complete, click on "Next".
5. On the "DHCP Ranges" view, you will need to define DHCP pools used by servers that PM&C
manages. Click on the "Add" button. Enter the starting and ending IPv4 address for the range
on the network used to control servers (by default, the "control" network). Click on "Add DHCP
Range". Only one range per network may be defined. When all pools are defined, click on
"Next".
6. The "Configuration Summary" provides a view of your reconfigured PM&C. Click "Finish" to
launch the background task that will reconfigure the PM&C application. A Task and Info or
Error notice is displayed to verify your action.
7. Verify your reconfiguration task completes. Navigate to: Main Menu > Task Monitoring. As
the network is reconfigured, you will have a brief network interruption. From the Background
Task Monitoring view, verify the "Reconfigure PM&C" task succeeds.
4. PM&C GUI: Set the PM&C Application GUI Site Settings
Navigate to Main Menu > Administration > GUI Site Settings
Set the "Site name" to a descriptive name, and set the "Welcome Message" that is displayed upon
login.
5. PM&C: Perform PM&C application backup.
# pmacadm backup
PM&C backup been successfully initiated as task ID 7
[root@PMACDev3 ~]#
909-2209-001 Revision G, February 2014
203
3 Procedures
Note: The backup runs as a background task. To check the status of the background task use the
PM&C GUI Task Monitor page, or issue the command " pmaccli getBgTasks ". The result should
eventually be "PM&C Backup successful" and the background task should indicate "COMPLETE".
Note: The "pmacadm backup" command uses a naming convention which includes a date/time
stamp in the file name (Example file name: backupPmac_20111025_100251.pef ). In the example
provided, the backup file name indicates that it was created on 10/25/2011 at 10:02:51 am server
time.
6. PM&C: Verify the Backup was successful
Note: If the background task shows that the backup failed, then the backup did not complete
successfully. STOP and contact the Customer Care Center by referring to the 1.4 Customer Care
Center section of this document.
The output of pmaccli getBgTasks should look similar to the example below:
# pmaccli getBgTasks
2: Backup PM&C COMPLETE - PM&C Backup successful
Step 2: of 2 Started: 2012-07-05 16:53:10 running: 4 sinceUpdate: 2 taskRecordNum:
2 Server Identity:
Physical Blade Location:
Blade Enclosure:
Blade Enclosure Bay:
Guest VM Location:
Host IP:
Guest Name:
TPD IP:
Rack Mount Server:
IP:
Name:
::
7. PM&C: Save the PM&C backup
The PM&C backup must be moved to a remote server. Transfer (sftp, scp, rsync, or preferred
utility), the PM&C backup to an appropriate remote server.
3.8.7 Add Cabinet and Enclosure to the PM&C system inventory
This procedure provides the instructions for adding a cabinet and an enclosure to the PM&C system
inventory.
Prerequisite: The 3.8.6 Configure PM&C application procedure has been completed.
Note: If a procedural STEP fails to execute successfully, STOP and contact the Customer Care Center
by referring to the 1.4 Customer Care Center section of this document.
1. PM&C GUI: Login
Open your web browser and enter:
https://<pmac_management_network_ip>
Login as the pmacadmin user.
2. PM&C GUI: Navigate to Configure Cabinets
Navigate to Main Menu > Hardware > System Configuration > Configure Cabinets.
909-2209-001 Revision G, February 2014
204
3 Procedures
3. PM&C GUI: Add Cabinet
On the Configure Cabinets panel, press the Add Cabinet button
4. PM&C GUI: Enter Cabinet ID
Enter the CabinetID and press the Add Cabinet button.
5. PM&C GUI: Check errors
If no error is reported to the user you will see the following:
Or you will see an error message:
909-2209-001 Revision G, February 2014
205
3 Procedures
6. PM&C GUI: Navigate to Configure Enclosures
Navigate to Main Menu > Hardware > System Configuration > Configure Enclosures.
7. PM&C GUI: Add Enclosure
On the Configure Enclosures panel, press the Add Enclosure button
8. PM&C GUI: Provide Enclosure Details
On the Add Enclosure panel, enter the Cabinet ID, Location ID, and two OA IP addresses
(the enclosure's active and standby OA).
Then click on Add Enclosure.
909-2209-001 Revision G, February 2014
206
3 Procedures
Note: Location ID is used to uniquely identify an enclosure within a cabinet. It can have a value
of 1, 2, 3, or 4. The cabinet ID and location ID will be combined to create a globally unique ID for
the enclosure (for example, an enclosure in cabinet 502 at location 1, will have an enclosure ID of
50201).
9. PM&C GUI: Monitor Add Enclosure
The Configure Enclosures page is then redisplayed with a new background task entry in the Tasks
table. This table can be accessed by pressing the Tasks button located on the toolbar under the
Configure Enclosures heading.
When the task is complete and successful, its text will change to green, and its Progress column
will indicate "100%".
3.8.8 Edit an Enclosure in the PM&C system inventory
This procedure provides the instructions for editing an existing enclosure configuration in the PM&C
system inventory. This action is used to notify PM&C of enclosure OA IP address changes.
Prerequisite: The 3.8.7 Add Cabinet and Enclosure to the PM&C system inventory procedure has been
completed.
Note: If a procedural STEP fails to execute successfully, STOP and contact the Customer Care Center
by referring to the 1.4 Customer Care Center section of this document.
1. PM&C GUI: Login
909-2209-001 Revision G, February 2014
207
3 Procedures
Open your web browser and enter:
https://<pmac_management_network_ip>
Login as the pmacadmin user.
2. PM&C GUI: Navigate to Configure Enclosures
Navigate to Main Menu > Hardware > System Configuration > Configure Enclosures.
3. PM&C GUI: Edit Enclosure
On the Configure Enclosures panel, select a row from the list of provisioned enclosures and
press the Edit Enclosure button
4. PM&C GUI: Confirm Edit Enclosure
Press the OK button to proceed to the Edit Enclosure page.
5. PM&C GUI: Modify Enclosure Details
On the Edit Enclosure panel, modify the OA IP addresses as needed.
Press on the Edit Enclosure button.
909-2209-001 Revision G, February 2014
208
3 Procedures
6. PM&C GUI: Monitor Add Enclosure
The Configure Enclosures page is then redisplayed with a new background task entry in the Tasks
table. This table can be accessed by pressing the Tasks button located on the toolbar under the
Configure Enclosures heading.
When the task is complete and successful, its text will change to green, and its Progress column
will indicate "100%".
3.8.9 Adding ISO Images to the PM&C Image Repository
This procedure provides the steps for adding ISO images to the PM&C repository.
Prerequisite: 3.8.6 Configure PM&C application has been completed.
Note: If a procedural STEP fails to execute successfully, STOP and contact the Customer Care Center
by referring to the 1.4 Customer Care Center section of this document.
1. Make the image available to PM&C
There are three ways to make an image available to PM&C:
• Insert the CD containing an iso image into the removable media drive of the PM&C server.
• Attach the USB device containing the ISO image to a USB port of the Management Server.
• Use sftp to transfer the iso image to the PM&C server in the
/var/TKLC/smac/image/isoimages/home/smacftpusr/ directory as pmacftpusr user:
• cd into the directory where your ISO image is located (not on the PM&C server)
• Using sftp, connect to the PM&C management server
> sftp pmacftpusr@<pmac_management_network_ip>
> put <image>.iso
909-2209-001 Revision G, February 2014
209
3 Procedures
• After the image transfer is 100% complete, close the connection
> quit
Refer to the documentation provided by application for pmacftpusr password.
2. PM&C GUI: Login
Open web browser and enter:
https://<pmac_management_network_ip>
Login as pmacadmin user.
3. PM&C GUI: Attach the software image to the PM&C guest
If in Step 1 the ISO image was transferred directly to the PM&C guest via sftp, skip the rest of this
step and continue with step 4. If the image is on a CD or USB device, continue with this step.
In the PM&C GUI, nevigate to Main Menu > VM Managmenet.. In the "VM Entities" list, select
the PM&C guest. On the resulting "View VM Guest" page, select the "Media" tab.
Under the Media tab, find the ISO image in the "Available Media" list, and click its "Attach" button.
After a pause, the image will appear in the "Attached Media" list.
4. PM&C GUI: Navigate to Manage Software Images
909-2209-001 Revision G, February 2014
210
3 Procedures
Navigate to Main Menu > Software > Manage Software Images
5. PM&C GUI:Add image
Press the Add Image button .
6. PM&C GUI: Add the ISO image to the PM&C image repository.
Select an image to add:
• If in Step 1 the image was transferred to PM&C via sftp it will appear in the list as a local file
"/var/TKLC/...".
• If the image was supplied on a CD or a USB drive, it will appear as a virtual device
("device://…"). These devices are assigned in numerical order as CD and USB images become
available on the Management Server. The first virtual device is reserved for internal use by
TVOE and PM&C; therefore, the iso image of interest is normally present on the second device,
"device://dev/sr1". If one or more CD or USB-based images were already present on the
Management Server before you started this procedure, choose a correspondingly higher device
number.
Enter an appropriate image description and press the Add New Image button.
909-2209-001 Revision G, February 2014
211
3 Procedures
7. PM&C GUI Monitor the Add Image status
The Manage Software Images page is then redisplayed with a new background task entry in
the table at the bottom of the page:
8. PM&C GUI Wait until the Add Image task finishes
When the task is complete, its text changes to green and its Progress column indicates "100%".
Check that the correct image name appears in the Status column:
909-2209-001 Revision G, February 2014
212
3 Procedures
9. PM&C GUI: Detach the image from the PM&C guest
If the image was supplied on CD or USB, return to the PM&C guest's "Media" tab used in Step 3,
locate the image in the "Attached Media" list, and click its "Detach" button. After a pause, the
image will be removed from the "Attached Media" list. This will release the virtual device for future
use.
Remove the CD or USB device from the Management Server.
3.8.10 IPM Servers Using PM&C Application
This procedure provides the steps for installing TPD using an image from the PM&C image repository.
Prerequisites:
• Enclosures containing the blade servers or servers containing a TVOE host targeted for IPM have
been configured using the 3.8.7 Add Cabinet and Enclosure to the PM&C system inventory procedure.
• Rack mount servers targeted for IPM have been configured using the 3.8.15 Add Rack Mount Server
to the PM&C System Inventory procedure.
• A bootable image was added to the PM&C image repository using the 3.8.9 Adding ISO Images to
the PM&C Image Repository procedure.
• The BIOS settings on the servers have been verified using the 3.5.2 Confirm/Upgrade Blade Server
BIOS Settings procedure or section 3.2 of the 909-2130-001 Initial Product Manufacture document..
Note: If you are about to IPM as preparation for SAN configuration, follow the 3.9.2 Remove SAN
Volume from Blade Server Without Preserving Existing TPD Installation procedure.
Note: If a procedural STEP fails to execute successfully, STOP and contact the Customer Care Center
by referring to the 1.4 Customer Care Center section of this document.
1. PM&C GUI: Login
If needed, open web browser and enter:
https://<pmac_management_network_ip>
Login as the pmacadmin user.
2. PM&C GUI: Navigate to the Software Inventory
Navigate to Main Menu > Software > Software Inventory.
909-2209-001 Revision G, February 2014
213
3 Procedures
3. PM&C GUI: Select Servers
Select the servers you want to IPM. If you want to install the same OS on more than one server,
you may select multiple servers by individually clicking multiple rows. Selected rows will be
highlighted in green.
Press the Install OS button.
4. PM&C GUI: Select Image
The left side of the screen displays the servers to be affected by the OS installation. From the list
of available bootable images on the right side of the screen, select the OS image to install on the
selected servers.
909-2209-001 Revision G, February 2014
214
3 Procedures
5. PM&C GUI: Supply Install Arguments (Optional)
Install arguments can be supplied by entering them into the text box displayed under the list of
bootable images. These arguments will be appended to the kernel line during the IPM process. If
no install arguments need to be supplied for the OS being installed, leave the install arguments
text box empty.
6. PM&C GUI: Start Install
Press the Start Install button.
7. PM&C GUI: Confirm OS Install
Press the OK button to proceed with the install.
8. PM&C GUI: Monitor Install OS
Navigate to Main Menu > Task Monitoring to monitor the progress of the Install OS background
task. A separate task will appear for each server affected.
909-2209-001 Revision G, February 2014
215
3 Procedures
When the task is complete and successful, its text will change to green and its Progress column
will indicate "100%".
3.8.11 Install/Upgrade Applications Using PM&C
This procedure provides the steps for performing an application install/upgrade using an image from
the PM&C image repository.
Prerequisites:
• Enclosures containing blade servers or servers containing a TVOE host targeted for application
install/upgrade have been configured using the 3.8.7 Add Cabinet and Enclosure to the PM&C system
inventory procedure.
• Rack mount servers targeted for application install/upgrade have been configured using the 3.8.15
Add Rack Mount Server to the PM&C System Inventory procedure.
• An ungradable image was added to the PM&C image repository using the 3.8.9 Adding ISO Images
to the PM&C Image Repository procedure.
• The BIOS settings on the target servers have been verified using the 3.5.2 Confirm/Upgrade Blade
Server BIOS Settings procedure or section 3.2 of the 909-2130-001 Initial Product Manufacture
document.
Note: Firmware update is only supported for HP c-Class blades and Rack Mount Servers.
Note: Until the target servers are fully discovered by PM&C, the user will be unable to start an
application install or upgrade on the servers (this may take up to 15 minutes after the OS Installs
complete).
Note: If a procedural STEP fails to execute successfully, STOP and contact the Customer Care Center
by referring to the 1.4 Customer Care Center section of this document.
1. PM&C GUI: Login
If needed, open your web browser and enter:
https://<pmac_management_network_ip>
Login as the pmacadmin user.
2. PM&C GUI: Navigate to the Software Inventory
909-2209-001 Revision G, February 2014
216
3 Procedures
Navigate to Main Menu > Software > Software Inventory.
3. PM&C GUI: Select Servers
Select the servers you want to upgrade. If you want to perform an upgrade on more than one server,
you may select multiple servers by individually clicking multiple rows. Selected rows will be
highlighted in green.
Press the Upgrade button.
Note: Until the target servers are fully discovered by PM&C, the user will be unable to start an
application install or upgrade on the servers (this may take up to 15 minutes after the OS Installs
complete). A server that has not yet been discovered is represented by an empty row on the Software
Inventory page (no IP address, hostname, plat name, plat version, etc. is displayed).
4. PM&C GUI: Select Image
The left side of the screen displays the servers to be upgraded. From the list of upgrade images on
the right side of the screen, select the image to install on the selected servers.
909-2209-001 Revision G, February 2014
217
3 Procedures
5. PM&C GUI: Supply Upgrade Arguments (Optional)
Upgrade arguments can be supplied by entering them into the text box displayed under the list of
upgrade images. Each upgrade argument must be of the form key=value and supported by the
version of TPD that the application being installed/upgraded is based on. Multiple arguments
must be separated by spaces or entered on new lines. If no upgrade arguments need to be supplied
for the application being installed/upgraded, leave the upgrade arguments text box empty.
Note: PM&C does not validate supplied firmware update arguments.
6. PM&C GUI: Start Upgrade
Press the Start Upgrade button.
7. PM&C GUI: Confirm Upgrade
Press the OK button to proceed with the upgrade.
8. PM&C GUI: Monitor Upgrade
Navigate to Main Menu > Task Monitoring to monitor the progress of the Upgrade background
task. A separate task will appear for each server being upgraded.
909-2209-001 Revision G, February 2014
218
3 Procedures
When the task is complete and successful its text will change to green and its Progress column will
indicate "100%".
9. PM&C GUI: Verify that the installed/upgraded application is fully functional. The application
must provide the steps necessary for verifying its functionality.
10. PM&C GUI: Accept or Reject Upgrade (Platform 6.0 Applications Only)
If the application you just upgraded or installed is based on a TPD 6.0 release, you must either
accept or reject the upgrade. To accept an upgrade using PM&C, perform the 3.8.18 Accepting
Upgrades Using PM&C procedure. Likewise, to reject an upgrade using PM&C, perform the 3.8.19
Rejecting Upgrades Using PM&C procedure.
3.8.12 Install PM&C on redundant DL360 or DL380
This procedure is optional and required only if the redundant PM&C Server feature is to be deployed.
This procedure will provide the instructions for installing and configuring TVOE on a redundant
DL360 or DL380 server and deploying a redundant PM&C, as well as creating the first backup from
the primary PM&C.
Prerequisites:
• 3.8.9 Adding ISO Images to the PM&C Image Repository has been completed using the TVOE media.
• 3.8.9 Adding ISO Images to the PM&C Image Repository has been completed using the PM&C media.
Make note of the PM&C Image Name; it will be used during the procedure as
<PMAC_Image_Name>.
• 3.8.10 IPM Servers Using PM&C Application has been completed on the redundant management
server using the TVOE media.
• 3.8.3 TVOE Network Configuration has been completed for the redundant management server.
Note: In the event a disaster recovery is required, refer to the recovery procedure in 909-2210-001.
Note: If a procedural STEP fails to execute successfully, STOP and contact the Customer Care Center
by referring to the 1.4 Customer Care Center section of this document.
Note: It is assumed that the use of a redundant PM&C means the NetBackup feature is not in use.
1. Redundant Management Server iLO: Login and launch the integrated remote console.
909-2209-001 Revision G, February 2014
219
3 Procedures
Log in to iLO in IE using the password provided by application:
http://<redundant_management_server_iLO_ip>
Click in the Remote Console tab and launch the Integrated Remote Console on the server.
Click Yes if the Security Alert pops up.
2. Redundant Management Server TVOE: Mount the PM&C upgrade media from the PM&C server.
# mount <primary_pmac_control_ip>:/usr/TKLC/smac/html/TPD/<PMAC_Image_Name>
/mnt/upgrade
#
3. Redundant Management Server TVOE: Using the pmac-deploy script, deploy the PM&C instance
using the configuration captured during the site survey.
For this example, deploy a PM&C without netbackup feature:
# cd /mnt/upgrade/upgrade
# ./pmac-deploy --guest=<Redundant_PMAC_Name> --hostname=<Redundant_PMAC_Name>
--controlBridge=<TVOE_Control_Bridge>
--controlIP=<Redundant_PMAC_Control_ip_address> --controlNM=<PMAC_Control_netmask>
--managementBridge=<PMAC_Management_Bridge>
--managementIP=<Redundant_PMAC_Management_ip_address>
--managementNM=<PMAC_Management_netmask>
--routeGW=<PMAC_Management_gateway_address>
--ntpserver=<Redundant_TVOE_Management_server_ip_address>
4. The PM&C will deploy and boot. The management and control network will come up based on
the settings that were provided to the pmac-deploy script.
5. Redundant Management Server TVOE: Unmount the media.
# cd /
# umount /mnt/upgrade
6. Perform 3.8.5 Setup PM&C on the Redundant PM&C.
Warning: Initialization of the redundant PM&C is to be avoided at all costs
7. Primary PM&C Server GUI: Login
https://<pmac_management_network_ip>
Login as pmacadmin user.
8. Prmiary PM&C Server GUI: Configure the primary PM&C to send backups to the redundant
PM&C
Navigate to Main Menu > Administration > PM&C Backup > Manage Backup
909-2209-001 Revision G, February 2014
220
3 Procedures
On the Manage Backup panel, enter the IP address of the redundant PM&C
(redundant_management_server_mgmtVLAN_IP) and click on Update Settings.
9. Primary PM&C Server GUI: Verify update was successful
Click on the Task Monitoring link to monitor the Update PM&C Backup Data status. Verify the
task completes successfully.
10. Primary PM&C Server GUI: Perform initial backup to the redundant PM&C server
Navigate to Main Menu > Administration > PM&C Backup > Perform Backup.
Select "Remote Server" from the drop down media, enter any desired comment and click Backup.
909-2209-001 Revision G, February 2014
221
3 Procedures
11. Primary PM&C Server GUI: Verify the backup was successful
Click on the Task Monitoring link to monitor the Backup PM&C status. Verify the task completes
successfully.
Note: This backup copies the existing PM&C backup files and all of the images added to the PM&C
image repository from the primary PM&C Server to the redundant PM&C Server.
3.8.13 Configure Management Server SNMP trap target
This procedure will configure SNMP settings for the Management Server.
Prerequisites:
• 3.8.6 Configure PM&C application has been completed.
• Knowing the IP address of the target NMS Server(s) for SNMP traps.
Note: If a procedural STEP fails to execute successfully, STOP and contact the Customer Care Center
by referring to the 1.4 Customer Care Center section of this document.
1. Perform the steps to add an SNMP trap destination.
Perform the steps in 3.11.3 Add SNMP trap destination on TPD based Application, logging into the
Management Server and providing the IP address of each trap destination(s).
2. Ensure the PM&C MIB is available to the SNMP trap destination
PM&C specific MIB files are located in the /usr/TKLC/smac/etc/mib directory on the
Management Server.
The file of interest is pmacAppAlarms.mib.
3.8.14 PM&C NetBackup Client Installation and Configuration
This procedure provides instructions for installing and configuring the NetBackup client software on
a PM&C application.
Prerequisites:
• The PM&C application must be initialized, or subsequent to the initialization configured with the
NetBackup Feature enabled. Additionally the appropriate NetBackup network configuration for
this system must be completed.
• 3.8.20 Initialize PM&C Application, or 3.8.6 Configure PM&C application as is applicable.
Note: If a procedural STEP fails to execute successfully, STOP and contact the Customer Care Center
by referring to the 1.4 Customer Care Center section of this document.
1. PM&C GUI: Verify the PM&C application guest has been configured with "netbackup" virtual
disk.
Execute 3.8.21 Configure PM&C application guest Netbackup virtual disk
2. TVOE Management server iLO: Login and launch the integrated remote console
Log in to iLO in IE using password provided by application:
http://<management_server_iLO_ip>
909-2209-001 Revision G, February 2014
222
3 Procedures
Click in the Remote Console tab and launch the Integrated Remote Console on the server.
Click Yes if the Security Alert pops up.
3. TVOE Management Server iLO: Login with PM&C root credentials
Note: On a TVOE host, If you launch the virsh console, i.e., "$ sudo /usr/bin/virsh console
X" or from the virsh utility "virsh # console X" command and you get garbage characters or
output is not quite right, then more than likely there is a stuck "virsh console" command already
being run on the TVOE host. Exit out of the "virsh console", then run "ps -ef |grep virsh",
then kill the existing process "kill -9 <PID>". Then execute the "virsh console X" command.
Your console session should now run as expected.
Login to PM&C console using virsh, and wait until you see the login prompt:
# virsh
virsh # list
Id Name State
---------------------------------13 myTPD running
20 pmacdev7 running
virsh # console pmacdev7
[Output Removed]
Starting ntdMgr: [ OK ]
Starting atd: [ OK ]
'TPD Up' notification(s) already sent: [ OK ]
upstart: Starting tpdProvd...
upstart: tpdProvd started.
CentOS release 6.2 (Final)
Kernel 2.6.32-220.17.1.el6prerel6.0.0_80.14.0.x86_64 on an x86_64
pmacdev7 login:
4. PM&C: Perform 3.11.5 Application NetBackup Client Install/Upgrade Procedures.
Note: The following data is required to perform the 3.11.5 Application NetBackup Client Install/Upgrade
Procedures:
• The PM&C is a 64 bit application; the appropriate NetBackup client software versions are 7.1
and 7.5.
• The PM&C application NetBackup user is "netbackup"; see appropriate documentation for
password.
• The paths to the PM&C application software NetBackup notify scripts are:
• /usr/TKLC/smac/sbin/bpstart_notify
• /usr/TKLC/smac/sbin/bpend_notify
• For the PM&C application the following is the NetBackup server policy files list:
• /var/TKLC/smac/image/repository/*.iso
• /var/TKLC/smac/backup/backupPmac*.pef
After executing the3.11.5 Application NetBackup Client Install/Upgrade Procedures, the NetBackup
installation and configuration on the PM&C application server is complete.
Note: At the NetBackup Server the NetBackup policy(ies) can now be created to perform the
NetBackup backups of the PM&C application.
909-2209-001 Revision G, February 2014
223
3 Procedures
3.8.15 Add Rack Mount Server to the PM&C System Inventory
This procedure provides instructions to add a rack mount server to the PM&C system inventory.
Prerequisite:
• 3.8.6 Configure PM&C application has been completed.
Note: If a procedural STEP fails to execute successfully, STOP and contact the Customer Care Center
by referring to the 1.4 Customer Care Center section of this document.
1. PM&C GUI: Login
Open web browser and enter:
https://<pmac_management_network_ip>
2. PM&C GUI: Configure RMS
Navigate to Main Menu > Hardware > System Configuration > Configure RMS
3. PM&C GUI: Add RMS
On the Configure RMS panel, click the Add RMS button.
4. PM&C GUI: Enter information
Enter the IP Address of the rack mount server management port (iLO). All the other fields are
optional.
Then click on the Add RMS button.
909-2209-001 Revision G, February 2014
224
3 Procedures
Note: The PM&C contains default credentials for the rack mount server management port (not to
be confused with OS or Application credentials), however if you know the default credentials will
not work then enter the valid credentials for the rack mount server management port.
5. PM&C GUI: Check errors
If no error is reported to the user you will see the following:
Or you will see an error message:
6. PM&C GUI:Verify RMS discovered
Navigate to Main Menu > Hardware > System Inventory > Cabinet xxx > RMS yyy Where xxx
is the cabinet id selected when adding RMS (or "unspecified") and yyy is the name of the RMS.
909-2209-001 Revision G, February 2014
225
3 Procedures
The RMS inventory page is displayed.
Periodically refresh the hardware information using the double arrow to the right of the title
"Hardware Information" until the "Discovery state" changes from "Undiscovered" to "Discovered".
If "Status" displays an error, contact the Customer Care Center for assistance by referring to the
1.4 Customer Care Center section of this document.
909-2209-001 Revision G, February 2014
226
3 Procedures
3.8.16 Edit Rack Mount Server in the PM&C System Inventory
This procedure provides instructions to edit a rack mount server in the PM&C system inventory. This
option is used to modify the name, cabinet, or credentials of an already provisioned rack mount server.
Prerequisite:
• 3.8.15 Add Rack Mount Server to the PM&C System Inventory has been completed.
Note: If a procedural STEP fails to execute successfully, STOP and contact the Customer Care Center
by referring to the 1.4 Customer Care Center section of this document.
1. PM&C GUI: Login
Open web browser and enter:
https://<pmac_management_network_ip>
2. PM&C GUI: Configure RMS
Navigate to Main Menu > Hardware > System Configuration > Configure RMS.
909-2209-001 Revision G, February 2014
227
3 Procedures
3. PM&C GUI: Edit RMS
On the Configure RMS panel, select one row in the list of rack mount servers and click the Edit
RMS button.
4. PM&C GUI: Confirmation
A popup window appears asking you to confirm your desire to edit the rack mount server, click
OK.
5. PM&C GUI: Edit RMS
In the Edit RMS panel, modify the field that needs to be altered.
Then click on the Edit RMSbutton.
909-2209-001 Revision G, February 2014
228
3 Procedures
6. PM&C GUI: Check errors
If no error is reported to the user you will see the following:
Or you will see an error message:
909-2209-001 Revision G, February 2014
229
3 Procedures
3.8.17 Finding and Adding a Rack Mount Server to the PM&C System Inventory
This procedure provides instructions to find and add a rack mount server to the PM&C system
inventory. This option is used to locate rack mount servers already running a Tekelec OS or within a
specified IP Address range and then add those to the PM&C system inventory.
Prerequisites:
• 3.8.6 Configure PM&C application has been completed.
Note: If a procedural STEP fails to execute successfully, STOP and contact the Customer Care Center
by referring to the 1.4 Customer Care Center section of this document
1. PM&C GUI: Login
Open web browser and enter:
https://<pmac_management_network_ip>
2. PM&C GUI: Configure RMS
Navigate to Main Menu > Hardware > System Configuration > Configure RMS
3. PM&C GUI: Find RMS
On the Configure RMS panel, click the Find RMS button.
4. PM&C GUI: Find unprovisioned RMS
On the Find unprovisioned RMS panel, click on the type of find you wish to perform. If the RMS
has a Tekelec OS installed then use the default "Find all unprovisioned RMS" option. If the RMS
does not have a Tekelec OS Installed then PM&C can search a range of IP Addresses for a valid
Management Port (e.g. iLO) connection. Click the Submit button.
909-2209-001 Revision G, February 2014
230
3 Procedures
5. PM&C GUI: Monitor Find RMS
The Find unprovisioned RMS page is then redisplayed with a new background task entry in the
Tasks table. This table can be accessed by pressing the Tasks button located on the toolbar under
the Find unprovisioned RMS heading.
When the task is complete and successful, its text will change to green, and its Progress column
will indicate "100%".
6. PM&C GUI: Found RMS
On the Configure RMS panel, click theFound RMS button.
7. PM&C GUI: Add a found RMS
On the Found RMS panel, click on one of the found RMS, enter values for any of the optional fields
as needed. Press the "Add the selected RMS" button.
909-2209-001 Revision G, February 2014
231
3 Procedures
8. PM&C GUI: Check errors
If no error is reported to the user you will see the following:
9. PM&C GUI:Verify RMS discovered
Navigate to Main Menu > Hardware > System Inventory > Cabinet xxx > RMS yyy Where xxx
is the cabinet id selected when adding RMS (or "unspecified") and yyy is the name of the RMS.
The RMS inventory page is displayed.
Periodically refresh the hardware information using the double arrow to the right of the title
"Hardware Information" until the "Discovery state" changes from "Undiscovered" to "Discovered".
909-2209-001 Revision G, February 2014
232
3 Procedures
If "Status" displays an error, contact the Customer Care Center for assistance by referring to the
1.4 Customer Care Center section of this document.
3.8.18 Accepting Upgrades Using PM&C
This procedure provides the steps for accepting upgrades via PM&C.
Prerequisites:
• Enclosures containing blade servers or servers containing a TVOE host targeted for accept upgrade
have been configured using the 3.8.7 Add Cabinet and Enclosure to the PM&C system inventory
procedure.
• Rack mount servers targeted for accept upgrade have been configured using the 3.8.15 Add Rack
Mount Server to the PM&C System Inventory procedure.
• The BIOS settings on the target servers have been verified using the 3.5.2 Confirm/Upgrade Blade
Server BIOS Settings procedure or section 3.2 of the 909-2130-001 Initial Product Manufacture
document.
• The target servers have been upgraded with an application based on a TPD 6.0 release.
Note: Until the target servers are fully discovered by PM&C, the user will be unable to accept upgrades
on the servers (this may take up to 15 minutes after the upgrades complete).
Note: If a procedural STEP fails to execute successfully, STOP and contact the Customer Care Center
by referring to the 1.4 Customer Care Center section of this document.
1. PM&C GUI: Login
If needed, open your web browser and enter:
https://<pmac_management_network_ip>
Login as the pmacadmin user.
2. PM&C GUI: Navigate to the Software Inventory
Navigate to Main Menu > Software > Software Inventory.
909-2209-001 Revision G, February 2014
233
3 Procedures
3. PM&C GUI: Select Servers
To accept upgrades, the servers must be in the pending accept/reject upgrade state. Servers in the
pending accept/reject upgrade state will have Pending Acc/Rej displayed in their App Version
column. Note that it may take up to 15 minutes for PM&C to discover and display the Pending
Acc/Rej state after an upgrade completes. Select the servers whose upgrades you want to accept.
If you want to perform an accept upgrade on more than one server, you may select multiple servers
by individually clicking multiple rows. Selected rows will be highlighted in green.
Press the Accept Upgrade button
4. PM&C GUI: Confirm Accept Upgrade
Press the OK button to proceed with the accept upgrade.
5. PM&C GUI: Monitor Accept Upgrade
Navigate to Main Menu > Task Monitoring to monitor the progress of the Accept Upgrade
background task. A separate task will appear for each upgrade being accepted.
909-2209-001 Revision G, February 2014
234
3 Procedures
When the task is complete and successful, its text will change to green, and its Progress column
will indicate "100%".
3.8.19 Rejecting Upgrades Using PM&C
This procedure provides the steps for rejecting upgrades via PM&C.
Prerequisites:
• Enclosures containing blade servers or servers containing a TVOE host targeted for reject upgrade
have been configured using the 3.8.7 Add Cabinet and Enclosure to the PM&C system inventory
procedure.
• Rack mount servers targeted for reject upgrade have been configured using the 3.8.15 Add Rack
Mount Server to the PM&C System Inventory procedure.
• The BIOS settings on the target servers have been verified using the 3.5.2 Confirm/Upgrade Blade
Server BIOS Settings procedure or section 3.2 of the 909-2130-001 Initial Product Manufacture
document.
• The target servers have been upgraded with an application based on a TPD 6.0 release.
Note: Until the target servers are fully discovered by PM&C, the user will be unable to reject upgrades
on the servers (this may take up to 15 minutes after the upgrades complete).
Note: If a procedural STEP fails to execute successfully, STOP and contact the Customer Care Center
by referring to the 1.4 Customer Care Center section of this document.
1. PM&C GUI: Login
If needed, open your web browser and enter:
https://<pmac_management_network_ip>
Login as the pmacadmin user.
2. PM&C GUI: Navigate to the Software Inventory
Navigate to Main Menu > Software > Software Inventory.
909-2209-001 Revision G, February 2014
235
3 Procedures
3. PM&C GUI: Select Servers
To reject upgrades, the servers must be in the pending accept/reject upgrade state. Servers in the
pending accept/reject upgrade state will have Pending Acc/Rej displayed in their App Version
column. Note that it may take up to 15 minutes for PM&C to discover and display the Pending
Acc/Rej state after an upgrade completes. Select the servers whose upgrades you want to reject. If
you want to perform a reject upgrade on more than one server, you may select multiple servers
by individually clicking multiple rows. Selected rows will be highlighted in green.
Press the Reject Upgrade button.
4. PM&C GUI: Confirm Reject Upgrade
Press the OK button to proceed with the reject upgrade.
5. PM&C GUI: Monitor Reject Upgrade
Navigate to Main Menu > Task Monitoring to monitor the progress of the Reject Upgrade
background task. A seperate task will appear for each upgrade being rejected.
909-2209-001 Revision G, February 2014
236
3 Procedures
When the task is complete and successful, its text will change to green, and its Progress column
will indicate "100%".
3.8.20 Initialize PM&C Application
Initialization of the PM&C application can be performed using the PM&C CLI if an initialization profile
exists with the desired features. In the case where a PM&C feature needs to be enabled or modified
the PM&C GUI is used to initialize the application. This procedure defines the initialization of the
PM&C application and network resources.
Prerequisites:
• PM&C has been deployed and is not initialized or fully configured.
• Aggregation switches have been properly configured.
Note: The installer must be knowledgeable of the network and application requirements. The final
step will configure and restart the network and the PM&C application; network access will be briefly
interrupted.
Note: If a procedural STEP fails to execute successfully, STOP and contact the Customer Care Center
by referring to the 1.4 Customer Care Center section of this document.
If the PM&C application is to be initialized using the PM&C CLI, execute Initialize PM&C Application
using the CLI, otherwise, execute Initialize PM&C Application using the GUI.
Note: If the NetBackup feature is to be configured on this PM&C, execute 3.8.24 Initialize PM&C
Application using the GUI
3.8.21 Configure PM&C application guest Netbackup virtual disk
1. PM&C GUI: Determine if the PM&C application guest is configured with a "netbackup" virtual
disk.
Navigate to "Virtual Machine Management" view and select the PM&C application guest from
the "VM Entities" list.
2. PM&C GUI: Determine if the "Virtual Disks" list contains the "netbackup" device.
909-2209-001 Revision G, February 2014
237
3 Procedures
If the "netbackup" device exists for the PM&C application guest then return to the procedure that
invoked this procedure. Otherwise continue with this procedure.
3. PM&C GUI: Edit the PM&C application guest to add the "netbackup" virtual disk.
Click "Edit" and enter the following data for the new netbackup virtual disk.
•
•
•
•
Size (MB): "2048"
Host Pool: "vgguests"
Host Vol Name: "<pmacGuestName>_netbackup.img"
Guest Dev Name: "netbackup"
Note: The "Guest Dev Name" must be set to "isoimages" for the PM&C application to mount the
appropriate host device. The <pmacGuestName> variable should be set to this PM&C guest's name
to create a unique volume name on the TVOE host of the PM&C.
4. PM&C GUI:Verify the new netbackup virtual disk data and save.
5. PM&C GUI: Confirm the PM&C application guest edit.
A confirmation dialog will be presented with the message, "Changes to the PMAC guest:
<pmacGuestName> will not take effect until after the next power cycle. Do you wish to continue?".
Click "OK" to continue.
6. PM&C GUI: Confirm the Edit VM Guest task has completed successfully.
Navigate to the Background Task Monitoring view. Confirm the guest edit task has completed
successfully.
7. TVOE Management server iLO: Shutdown the PM&C application guest.
909-2209-001 Revision G, February 2014
238
3 Procedures
Note: In order to configure the PM&C application with the new isoimagesNetBackup virtual disk
the PM&C application guest needs to be shut down and restarted. Refer to PM&C 5.0 Incremental
Upgrade, 909-2207-01, Appendix F. Shutdown PM&C Guest .
Using the virsh utility on TVOE host of PM&C guest, shut down the PM&C guest. Query the list
of guests until the PM&C guest is "shut off".
# virsh
virsh # list --all
Id Name State
---------------------------------20 pmacU14-1 running
virsh # shutdown pmacU14-1
virsh # list --all
Id Name State
---------------------------------20 pmacU14-1 shut off
8. TVOE Management Server iLO: Start the PM&C application guest.
Note: In order to configure the PM&C application with the new isoimages virtual disk the PM&C
application guest needs to be shut down and restarted.
Using virsh utility on TVOE host of PM&C guest, start the PM&C guest. Query the list of guests
until the PM&C guest is "running".
# virsh
virsh # list --all
Id Name State
---------------------------------20 pmacU14-1 shut off
virsh # start pmacU14-1
Domain pmacU14-1 started
virsh # list --all
Id Name State
---------------------------------20 pmacU14-1 running
9. Return to the procedure that invoked this procedure.
3.8.22 PM&C Guest Migrate NetBackup Client to New File System
If the NetBackup client software was installed on a PM&C application guest prior to the "netbackup"
virtual disk being required for a PM&C deploy with NetBackup, execute 3.8.21 Configure PM&C
application guest Netbackup virtual disk.
Note: The procedure above will create a new NetBackup virtual disk for the PM&C guest. The PM&C
guest will be shut down and restarted. The content of the "/usr/openv" directory will be moved to
the new NetBackup virtual disk, and mounted at "/usr/openv".
909-2209-001 Revision G, February 2014
239
3 Procedures
3.8.23 Initialize PM&C Application using CLI
Prerequisites:
• PM&C has been deployed and is not initialized or fully configured.
Note: The installer must be knowledgeable of the network and application requirements. The final
step will configure and restart the network and the PM&C application; network access will be briefly
interrupted.
Note: If a procedural STEP fails to execute successfully, STOP and contact the Customer Care Center
by referring to the 1.4 Customer Care Center section of this document.
1. Login with PM&C root credentials
Note: On a TVOE host, If you launch the virsh console, i.e., "$ sudo /usr/bin/virsh console
X" or from the virsh utility "virsh # console X" command and you get garbage characters or
output is not quite right, then more than likely there is a stuck "virsh console" command already
being run on the TVOE host. Exit out of the "virsh console", then run "ps -ef |grep virsh",
then kill the existing process "kill -9 <PID>". Then execute the "virsh console X" command.
Your console session should now run as expected.
Login using virsh, and wait until you see the login prompt:
virsh # list --all
Id Name State
---------------------------------13 myTPD running
20 pmacdev7 running
virsh # console pmacdev7
Connected to domain pmacdev7
Escape character is ^]
CentOS release 6.2 (Final)
Kernel 2.6.32-220.17.1.el6prerel6.0.0_80.14.0.x86_64 on an x86_64
pmacdev7 login:
2. PM&C: Initialize the PM&C Application with the PM&C profile.
Note: The example below uses the default PM&C profile named TVOE
# pmacadm applyProfile --fileName=TVOE
Profile successfully applied.
# pmacadm finishProfileConfig
Initialization has been started as a background task
3. Wait for the background task to successfully complete. THe command will show "IN_PROGRESS"
for a short time.
Run the following command until a "COMPLETE" or a "FAILED" response is seen similar to the
following:
# pmaccli getBgTasks
1: Initialize PM&C COMPLETE - PM&C initialized
Step 2: of 2 Started: 2012-07-13 08:23:55 running: 29 sinceUpdate: 47
taskRecordNum: 2 Server Identity:
909-2209-001 Revision G, February 2014
240
3 Procedures
Physical Blade Location:
Blade Enclosure:
Blade Enclosure Bay:
Guest VM Location:
Host IP:
Guest Name:
TPD IP:
Rack Mount Server:
IP:
Name:
4. Perform a system healthcheck on PM&C:
# alarmMgr –alarmStatus
This command should return no output on a healthy system.
# sentry status
All Processes should be running, displaying output similar to the following:
PM&C Sentry Status
-----------------sentryd started: Mon Jul 23 17:50:49 2012
Current activity mode: ACTIVE
Process
PID
Status
StartTS
NumR
------------------ ------ ----------- ------------------------- ---smacTalk
9039 running
Tue Jul 24 12:50:29 2012
2
smacMon
9094 running
Tue Jul 24 12:50:29 2012
2
hpiPortAudit
9137 running
Tue Jul 24 12:50:29 2012
2
snmpEventHandler
9176 running
Tue Jul 24 12:50:29 2012
2
eclipseHelp
9196 running
Tue Jul 24 12:50:30 2012
2
Fri Aug 3 13:16:35 2012
Command Complete.
.
5. Logout of the TVOE console
Use the telnet escape sequence ("control-]") to exit the PM&C console.
Run:
^]
virsh # exit
#
6. Management Server iLO: Exit the TVOE console.
Run:
# logout
3.8.24 Initialize PM&C Application using the GUI
Note: You must be logged in as the Admin user to access this page.
1. PM&C GUI: Load GUI and navigate to the Configuration view
Open web browser and enter:
https://<pmac_management_network_ip>
Login as pmacadmin user.
909-2209-001 Revision G, February 2014
241
3 Procedures
2. PM&C GUI: Select the appropriate PM&C initialization profile.
The "PM&C Initialization" view will be presented to the operator. Select the appropriate profile.
909-2209-001 Revision G, February 2014
242
3 Procedures
3. PM&C GUI: Select and enable, appropriate PM&C Features, and if required add new Roles.
Note: In this example the Features view was used to create a "NetBackup" role, and the NetBackup
Feature was enabled.
Enable the appropriate feature and role, and click "Next".
909-2209-001 Revision G, February 2014
243
3 Procedures
4. PM&C GUI: Provision the PM&C application Networks.
Note: In the example below the NetBackup network was provisioned and added.
Provision the appropriate networks and click "Next".
909-2209-001 Revision G, February 2014
244
3 Procedures
5. PM&C GUI: Provision the PM&C application Network Roles.
Note: In the example below the NetBackup role was provisioned and added.
Provision the appropriate network role and click "Next".
6. PM&C GUI: Provision the PM&C application Network Interfaces.
Note: In the example below, the NetBackup interface was provisioned and added.
Provision the appropriate interface and click "Next".
909-2209-001 Revision G, February 2014
245
3 Procedures
7. PM&C GUI:Provision the PM&C application Routes.
Note: In the following example the default route and NetBackup routes were provisioned.
Provision the appropriate routes and click "Next".
909-2209-001 Revision G, February 2014
246
3 Procedures
8. PM&C GUI: Provision the PM&C application DHCP Ranges.
Provision the appropriate DHCP ranges.
909-2209-001 Revision G, February 2014
247
3 Procedures
9. PM&C GUI: Finish the PM&C application initialization.
Verify the PM&C application initialization is correct on the "Configuration Summary" view and
click Finish.
10. PM&C GUI: Verify the PM&C application initialization.
Navigate to the Background Task Monitoring view and verify the "Initialize PM&C" task was
successful.
3.9 Configuring SAN
3.9.1 Configure SAN Storage Using PM&C Application
This procedure will configure a SAN storage using the PM&C application. The end user will be able
to configure the SAN controller and corresponding host volumes using XML files uploaded by the
PM&C application. The XML files will allow the end user to: add virtual disks, delete virtual disks
without an associated volume, add global spares, delete global spares and delete volumes on the SAN
controller and/or host volume. Please refer to the instructions provided by the application to obtain
or create XML files used in this procedure.
Prerequisite:
909-2209-001 Revision G, February 2014
248
3 Procedures
Configure initial OA via configuration wizard and
3.8.6 Configure PM&C applicationhave been completed.
3.4.3 Configuring Advanced Settings on MSA2012fc Fibre Channel Disk Controllers or
3.4.4 Configuring Advanced Settings on P2000 Fibre Channel Disk Controllers have been completed for
given SAN storage type.
• 3.3.3 Configure Zones in Brocade Switches has been completed
•
•
•
•
Note: When a disk fails, the system looks for a dedicated spare first. If it does not find a properly
sized dedicated spare, it looks for a global spare. A best practice is to designate spares for use if disks
fail. Dedicating spares to vdisks is the most secure method, but it is also expensive to reserve spares
for each vdisk. Alternatively, you can assign global spares. A properly sized spare is one whose capacity
is equal to or greater than the largest disk in the vdisk.
Note: If a procedural STEP fails to execute successfully, STOP and contact the Customer Care Center
by referring to the 1.4 Customer Care Center section of this document.
1. Handle failed SAN configuration
Note: If any attempt to add SAN storage components have failed, a partial configuration may
exist. This needs to be cleaned-up before attempting again.
Note: If an attempt to add SAN storage components fails before any configuration is done, such
as an invalid XML file or a wrong disk name, then correct the XML file error and attempt the SAN
storage configuration again.
If a partial configuration exists, follow the instructions provided by application to obtain/create
XML files that will delete the partial configuration and clear the SAN controller or host volume.
Note that after a host volume is deleted or cleared, PM&C will automatically reboot the server
blade. Once the XML file is obtained, continue following 3.9.1 Configure SAN Storage Using PM&C
Application to correctly upload and execute the XML file using the PM&C application. If the end
user desires to IPM the blade server to cleanup host volumes, please refer to 3.8.10 IPM Servers
Using PM&C Application.
2. PM&C server: Provide SAN configuration xml files
Login to management server as root user.
Copy all SAN configuration xml files into /usr/TKLC/smac/etc/storage directory.
3. PM&C server: Update SAN controller password in PM&C
If default password has been changed on SAN controllers, then the stored password in PM&C
must be changed to match. Run this script on PM&C and set the SAN controller password for the
manage user:
# updateCredentials --type=msa
4. PM&C GUI: Login
If needed, open web browser and enter: https://<pmac_management_network_ip>
Login as pmacadmin user.
5. PM&C GUI: Configure SAN
Navigate to Main Menu > Storage > Configure SAN Storage.
909-2209-001 Revision G, February 2014
249
3 Procedures
From the Storage Configuration drop down menu choose SAN configuration file and press
Configure Storage.
Note: Concurrent execution of SAN configuration files is supported. Do not run configuration
files at the same time if the xml files configure either the same bladeserver or the same MSA storage
system, otherwise a failure may occur . Additionally, configuration on a serverblade is being cleared,
or if a host volume is being deleted, then execution may take longer since PM&C will automatically
reboot the serverblade after configuration removal.
If any errors occur with this procedure, collect logs from the affected blade in
/var/TKLC/log/tpdProvd/tpdProvd.log
6. PM&C GUI: Monitor the configuration status
The Configure SAN Storage page is then redisplayed with a new background task entry in
the table at the bottom of the page:
7. Recovery from configuration errors
909-2209-001 Revision G, February 2014
250
3 Procedures
If PM&C is able to successfully parse the XML configuration file, the actual configuration process
is executed. If any error is encountered, the processing is aborted, and the state is left as it was at
the point of failure. For recovery suggestions, please refer to step 1: Handle failed SAN
Configuration.
3.9.2 Remove SAN Volume from Blade Server Without Preserving Existing TPD
Installation
This procedure describes how to remove volumes from the partially installed SAN. This can happen
if the SAN configuration fails. Blade servers are IPMed again.
Note: If a procedural STEP fails to execute successfully, STOP and contact the Customer Care Center
by referring to the 1.4 Customer Care Center section of this document.
1. Management server: Update SAN controller password
If default password has been changed on SAN controllers, then the stored password in the PM&C
must be changed to match. Run this script on PM&C and set the SAN controller password for the
manage user:
# updateCredentials --type=msa
2. Fibre channel controller GUI: Delete all Volumes, Vdisks and global spares from each FC controller
Log into the Fibre Channel Controller GUI as manage
https://<controller_IP_address>
Navigate to Manage > Volume Management > Delete volume and select the volume to delete.
Repeat for all volumes.
Navigate to Virtual Disk Config > Delete a vdisk and select the vdisk to delete. Repeat for all
vdisks.
Navigate to Virtual Disk Config > global spares menu > delete global spares. Select all of the
global spare disks and click Delete Global Spares button.
Repeat this step for second controller.
3. OA GUI: Login to active OA
Navigate to the IP address of the active OA, using Appendix C (C.1 Determining Which Onboard
Administrator is Active). Login as an administrative.
4. OA GUI: Delete zones from Brocade switches
Select one of the Brocade switches and click on Management Console
Login as an administrative user.
Select Zone Admin and click on Clear All.
Wait for success message in bottom left of window and Effective zone Config: Default,
All Access in bottom right of window.
Click Save Config.
909-2209-001 Revision G, February 2014
251
3 Procedures
Repeat for the second switch.
5. Run IPM on the blade servers
Run IPM on blade servers following 3.8.10 IPM Servers Using PM&C Application application.
Note: A new IP address will be assigned to bond0 of each blade at the end of the IPM process, so
the .xml files will need to be updated accordingly.
3.10 Virtualization Procedures
3.10.1 Create guest server using PM&C application
This procedure provides the steps for creating a virtualized guest server on a TVOE host, using the
PM&C web GUI.
Prerequisites:
• Enclosure containing the TVOE host blade server to host the guest has been configured using 3.8.7
Add Cabinet and Enclosure to the PM&C system inventory.
• The TVOE host has been installed using 3.8.10 IPM Servers Using PM&C Application.
Note: PM&C will not prevent over-subscription of memory or CPU resources.
Note: If a procedural STEP fails to execute successfully, STOP and contact the Customer Care Center
by referring to the 1.4 Customer Care Center section of this document.
1. PM&C GUI: Login
If needed, open web browser and enter:
https://<pmac_management_network_ip>
Login as pmacadmin user.
2. PM&C GUI: Navigate to VM Management
Navigate to Main Menu > VM Management.
3. PM&C GUI: Click the "Create Guest" button.
On the Virtual Machine Management page, click the Create Guest button
909-2209-001 Revision G, February 2014
252
3 Procedures
4. PM&C GUI: Enter guest name
Fill in the Name field with something unique to the TVOE host. The name can be identical to a
guest on a different host.
5. PM&C GUI: Select the TVOE Host for the new guest.
Using the dropdown Host field, select the TVOE host on which to create the guest.
6. PM&C GUI: Select the desired initial power state
909-2209-001 Revision G, February 2014
253
3 Procedures
Using the dropdown field to the right, select the initial powerstate for the guest. In this context,
Shutdown and Destroy both behave the same, the guest will not be powered on upon creation.
7. PM&C GUI: Edit the vCPU count and Memory size.
Using the arrows to the right of the fields, adjust the number of virtual CPUs and the amount of
memory (in MBs) to use for the guest. These fields are also manually edittable test fields. PM&C
will not prevent over-subscription of these resources.
8. PM&C GUI: Edit the Watchdog setting (if available)
If this Guest is being created on a version of TVOE having support for virtual guest watchdogs,
the Enable Virtual Watchdog item will be present. Set this checkbox according to whether or not
watchdog support is desired for this Guest.
9. PM&C GUI: Edit the primary virtual disk
A primary disk is specified by default. Changes can be made to the details of the primary disk as
desired. The primary disk will be used to install the OS. See the application requirements for the
desired settings.
Size (MB) : By default, a primary disk is specified with the minimum size supported by TPD, click
on the number to adjust the size via arrow or the keyboard.
Host Pool: The default vgguests storage pool is selected. Using the dropdown box, other pools
that have been configured on the TVOE can be selected.
Host Vol Name: For the primary disk, this will be filled in automatically based on the guest name
provided above. It can be modified manually if needed.
Guest Dev Name: For the primary disk, this value is not set.
909-2209-001 Revision G, February 2014
254
3 Procedures
10. PM&C GUI: Add extra virtual disks
If the application requires extra virtual disks to be specified, repeat this step for each extra disk.
Click on the Add button at the top-right corner of the Virtual Disks pane
Size (MB): Click on the number to adjust the size via arrow or the keyboard.
Host Pool: The default vgguests storage pool is selected. Using the dropdown box, other pools
that have been configured on the TVOE can be selected.
Host Vol Name: Fill in this value. It must be unique amoung all disks on all guest hosted on the
TVOE.
Guest Dev Name: This is the alias that will be used inside of the TPD instance running on the
guest. It will help the application identify the disk.
Repeat, as needed, for all extra disks.
11. PM&C GUI: Add virtual NICs.
By default, the control network is configured, and is required for PM&C to install and upgrade the
guest. If this is removed, one will be added during the guest creation.
To add additional NICs, repeat this step using the insturctions below for each virtual NIC.
Click on the Add button at the top-right corner of the Virtual NICs pane
Host Bridge: Using the dropdown box, select the desired bridge that has been previously configured
on the TVOE.
Guest Dev Name: This is the alias that will be used inside of the TPD instance running on the
guest. It will help the application identify the network.
Repeat, as needed, for all vNICs.
909-2209-001 Revision G, February 2014
255
3 Procedures
12. PM&C GUI: Create the guest.
Verify the guest configuration.
Click on the Create button.
13. PM&C GUI: Verify guest creation started.
If there was an immediate problem, an alert box will report the error, and the vaules can be corrected
and retried. Otherwise, the alert box will confirm the creation of a Background Task.
14. PM&C GUI: Monitor guest create
Navigate to Main Menu > Task Monitoring to monitor the progress of the "VirtAction: Create"
background task.
909-2209-001 Revision G, February 2014
256
3 Procedures
When the task is complete, the text will change to green and the Progress column will indicate
"100%".
3.10.2 Delete guest server using PM&C application
This procedure provides the steps for deleting a virtualized guest server on a TVOE host, using the
PM&C web GUI.
Prerequisites:
• Enclosure containing the host blade server hosting the guest has been configured using 3.8.7 Add
Cabinet and Enclosure to the PM&C system inventory.
Note: All data belonging to this guest server will be lost in the execution of this procedure.
Note: If a procedural STEP fails to execute successfully, STOP and contact the Customer Care Center
by referring to the 1.4 Customer Care Center section of this document.
1. PM&C GUI: Login
If needed, open web browser and enter:
https://<pmac_management_network_ip>
Login as pmacadmin user.
2. PM&C GUI: Navigate to VM Management
Navigate to Main Menu > VM Management.
909-2209-001 Revision G, February 2014
257
3 Procedures
3. PM&C GUI: Select TVOE hosting the guest
Click on the to the left of the TVOE host that contains the guest server to delete. This will expand
the tree to make the guests hosted on the selected TVOE visible.
4. PM&C GUI: Select the guest and delete
The left side of this screen shows the guest servers on the TVOE host. Select the desired guest and
the guest details will be displayed on the right.
909-2209-001 Revision G, February 2014
258
3 Procedures
Then press the Delete button.
5. PM&C GUI: Confirm delete
Take a moment to double-check that the guest name is correct. There will be no further confirmation
and the delete will be final.
Click on the OK button to confirm the delete.
6. PM&C GUI: Monitor guest delete
Navigate to Main Menu > Task Monitoring to monitor the progress of the "VirtAction: Delete"
background task.
909-2209-001 Revision G, February 2014
259
3 Procedures
When the task is complete, the text will change to green and the Progress column will indicate
"100%".
3.10.3 Create guest server from guest archive using PM&C application
This procedure provides the steps for creating a virtualized guest server from a guest archive image
on a TVOE host, using the PM&C web GUI.
Prerequisites:
• Enclosure containing the TVOE host blade server to host the guest has been configured using 3.8.7
Add Cabinet and Enclosure to the PM&C system inventory.
• The TVOE host has been installed using 3.8.10 IPM Servers Using PM&C Application
• The ISO image providing the guest archive image and profile has been provisioned using 3.8.9
Adding ISO Images to the PM&C Image Repository
Note: PM&C will not prevent over-subscription of memory or CPU resources.
Note: The guest archive profiles might not contain values for all required fields.
Note: The values provided by the guest archive profile can be overridden before the guest is created.
Note: If a procedural STEP fails to execute successfully, STOP and contact the Customer Care Center
by referring to the 1.4 Customer Care Center section of this document.
1. PM&C GUI: Login
If needed, open web browser and enter:
https://<pmac_management_network_ip>
Login as pmacadmin user.
909-2209-001 Revision G, February 2014
260
3 Procedures
2. PM&C GUI: Navigate to VM Management
Navigate to Main Menu > VM Management.
3. PM&C GUI: Click the Create Guest button.
On the Virtual Machine Management page, click the Create Guest button.
4. PM&C GUI: Click the Import Profile button
Select the Import Profile button to bring up the pop-in dialog box
909-2209-001 Revision G, February 2014
261
3 Procedures
5. PM&C GUI: Select the desired profile, and click the Select Profile button
Using the drop-down menu, select the desired ISO/Profile (It is possible there will be multiple
profiles on an ISO). Verify the details, then select the Select Profile button.
6. PM&C GUI: Enter guest name
The profile fills in the default name. If a different name is desired, fill in the "Name" field with
something unique to the TVOE host. The name can be identical to a guest on a different host.
909-2209-001 Revision G, February 2014
262
3 Procedures
7. PM&C GUI: Select the TVOE Host for the new guest
Using the dropdown "Host" field, select the TVOE host on which to create the guest.
8. PM&C GUI: Select the desired initial power state.
Using the dropdown field to the right, select the initial powerstate for the guest. In this context,
Shutdown and Destroy both behave the same, the guest will not be powered on upon creation.
9. PM&C GUI: Edit the vCPU count and Memory size
The profile inserted the profile's vCPUs and Memory settings. These can be adjusted using the
arrows to the right of the fields, adjust the number of virtual CPUs and the amount of memory (in
MBs) to use for the guest. These fields are also manually editable test fields. PM&C will not prevent
over-subscription of these resources.
10. PM&C GUI: Edit the Watchdog setting (if available)
If this Guest is being created on a version of TVOE having support for virtaul guest watchdogs,
the Enable Virtual Watchdog item will be present. Set this checkbox according to whether or not
watchdog support is desired for this Guest.
11. PM&C GUI Edit the primary virtual disk
909-2209-001 Revision G, February 2014
263
3 Procedures
The primary disk is specified by the profile. The disk image at the left shows how the disk will be
populated with the archive's image. The only fields that should be modified are the Host Pool, and
Host Vol Name columns.
Host Pool: The desired storage pool can be selected here. It is possible that the profile did not
specify a value for the storage pool. The GUI will not allow you to continue until one is selected.
Host Vol Name: For the primary disk, this will be filled in automatically based on the guest name
provided above. It can be modified manually if needed.
12. PM&C GUI: Modify extra virtual disks
If the profile provides extra virtual disks to be specified they will show up below the primary disk.
If needed, extra virtual disks may be added at this time, as well.
Click on the Add button at the top-right corner of the Virtual Disks pane
Size (MB) : Click on the number to adjust the size via arrow or the keyboard.
Host Pool: The default vgguests storage pool is selected, but using the dropdown box, other pools
that have been configured on the TVOE can be selected.
Host Vol Name: Fill in this value. It must be unique among all disks on all guests hosted on the
TVOE.
Guest Dev Name: This is the alias that will be used inside of the TPD instance running on the
guest. It will help the application identify the disk.
Repeat, as needed, for all extra disks.
13. PM&C GUI: Edit virtual NICs
The required networks should be defined by default, the control network is configured, and is
required for PM&C to install and upgrade the guest. If this is removed, one will be added during
the create.
If additional NICs are required, repeat this step for each virtual NIC.
Click on the Add button at the top-right corner of the Virtual NICs pane
Host Bridge: Using the dropdown box, select the desired bridge that has been previously configured
on the TVOE.
909-2209-001 Revision G, February 2014
264
3 Procedures
Guest Dev Name: This is the alias that will be used inside of the TPD instance running on the
guest. It will help the application identify the network.
Repeat, as needed, for all vNICs
14. PM&C GUI: Create the guest
Verify the guest configuration.
Click on the Create button.
15. PM&C GUI: Verify guest creation started
If there was an immediate problem, an alert box will report the error, and the values can be corrected
and retried. Otherwise, the alert box will confirm the creation of a Background Task.
16. PM&C GUI: Monitor guest create
909-2209-001 Revision G, February 2014
265
3 Procedures
Navigate to Main Menu > Task Monitoring to monitor the progress of the "VirtAction: Create"
background task.
When the task is complete, the text will change to green and the Progress column will indicate
"100%".
3.11 General TPD Based Application Procedures
3.11.1 Backup Procedure for TVOE
This procedure will backup system files which can be used at a later time to restore a failed system
Note: The backup image is to be stored on a customer provided medium.
1. TVOE Host: Login as platcfg user.
Login as platcfg user on the server. The platcfg main menu will be shown.
2. TVOE Host: Navigate to the Backup TekServer Menu page
Select the following menu options sequentially: Maintenance > Backup and Restore > Backup
Platform (CD/DVD). The 'Backup TekServer Menu' page will now be shown.
909-2209-001 Revision G, February 2014
266
3 Procedures
Note: If this operation is attempted on a system without a CD-ROM drive, the following message
will appear:
909-2209-001 Revision G, February 2014
267
3 Procedures
®
3. TVOE Host: Build the backup ISO image.
Select Build ISO file only. The following screen will display:
Note: Creating the ISO image may happen so quickly that this screen may only appear for an
instant.
909-2209-001 Revision G, February 2014
268
3 Procedures
After the ISO is created, platcfg will return to the Backup TekServer Menu as shown in step 2. The
ISO has now been created and is located in the /var/TKLC/bkp/ directory. An example filename
of a backup file that was created is: "hostname1307466752-plat-app-201104171705.iso"
4. TVOE Host: Exit platcfg
Select Exit on each menu until platcfg has been exited. The SSH connection to the TVOE server
will be terminated.
5. Customer Server: Login to the customer server and copy backup image to the customer server
where it can be safely stored.
If the customer system is a Linux system, please execute the following command to copy the backup
image to the customer system.
# scp tvoexfer@<TVOE IP Address>:backup/* /path/to/destination/
When prompted, enter the tvoexfer user password and press Enter.
An example of the output looks like:
# scp tvoexfer@<TVOE IP Address>:backup/* /path/to/destination/
[email protected]'s password:
hostname1301859532-plat-app-301104171705.iso
100% 134MB 26.9MB/s 00:05
If the Customer System is a Windows system please refer to Appendix A Using WinSCP to copy
the backup image to the customer system.
The TVOE backup file has now been successfully placed on the Customer System.
909-2209-001 Revision G, February 2014
269
3 Procedures
3.11.2 Configure NTP on TPD based Application
This procedure will configure NTP servers for a server based on TPD.
1. Server: Login as platcfg user
Login as platcfg user on the server. The plagcfg main menu will be shown.
2. Server: Navigate to Time Servers configuration page
Select the following menu options sequentially: Network Configuration > NTP. The 'Time Servers'
page will now be shown, which shows the configured NTP servers and peers.
3. Server: Update NTP information
Select Edit. The 'Edit Time Servers' page will be displayed.
909-2209-001 Revision G, February 2014
270
3 Procedures
Update the form to reflect the desired NTP configuration and then select OK. NTP has now been
configured on the server.
4. Server: Exit platcfg.
Select Exit on each menu until platcfg has been exited.
3.11.3 Add SNMP trap destination on TPD based Application
This procedure will add an SNMP trap destination to a server based on TPD. All alarm information
will then be sent to the NMS located at the destination.
1. Server: Login as platcfg user
Login as platcfg user on the server. The platcfg main menu will be shown.
2. Server: Navigate to NMS server configuration page
Select the following menu options sequentially: Network Configuration > SNMP Configuration >
NMS Configuration. The 'NMS Servers' page will be shown, which displays all configured NMS
servers for the server.
909-2209-001 Revision G, February 2014
271
3 Procedures
3. Server: Add the SNMP trap destination
Select Edit and then choose Add a New NMS Server. The 'Add an NMS Server' page will be
displayed.
909-2209-001 Revision G, February 2014
272
3 Procedures
Complete the form by entering in all information about the SNMP trap destination. Select OK to
finalize the configuration.
The 'NMS Server Action Menu' will now be displayed. Select Exit. The following dialogue will
then be presented.
909-2209-001 Revision G, February 2014
273
3 Procedures
Select Yes and then wait a few seconds while the Alarm Routing Service is restarted. At that time
the SNMP Configuration Menu will be presented.
4. Server: Exit platcfg
Select Exit on each menu until platcfg has been exited.
3.11.4 Delete SNMP trap destination on TPD based Application
This procedure will remove an SNMP trap destination on a server.
1. Server: Login as platcfg user
Login as platcfg user on the server. The platcfg main menu will be shown.
2. Server: Navigate to NMS server configuration page.
Select the following menu options sequentially: Network Configuration > SNMP Configuration >
NMS Configuration. The 'NMS Servers' page will now be shown, which displays all configured
NMS servers for the server.
909-2209-001 Revision G, February 2014
274
3 Procedures
3. Server: Remove the SNMP trap destination
Select Edit and then choose Delete an Existing NMS Server. The 'NMS Server to Edit' page will
be displayed as shown below.
909-2209-001 Revision G, February 2014
275
3 Procedures
Select the server to remove from the configuration and press ENTER. A confirmation dialouge will
appear. Select Yes to confirm the removal of the NMS server.
The 'NMS Server Action Menu' will now be displayed. Select Exit. The following dialogue will be
presented.
909-2209-001 Revision G, February 2014
276
3 Procedures
Select Yes and then wait a few seconds while the Alarm Routing Service is restarted. At that time
the SNMP Configuration Menu will be presented.
4. Server: Exit platcfg
Select Exit on each menu until platcfg has been exited.
3.11.5 Application NetBackup Client Install/Upgrade Procedures
NetBackup is a utility that allows for management of backups and recovery of remote systems. The
NetBackup suite is for the purpose of supporting Disaster Recovery at the customer site. This procedure
provides instructions for installing or upgrading the NetBackup client software on an application
server.
Disclaimer: Currently the Netbackup 7.1 and Netbackup 7.5 clients are supported by TPD. If the
Netbackup Client that is being installed is not supported, please contact customer support for
guidance on creating a config file that will allow for install of unknown Netbackup Clients. 3.11.12
Create Netbackup Client Config File can be used once the contents of the config are known.
Disclaimer: Failure to install the Netbackup Client properly (i.e. by neglecting to execute this
procedure) may result in the Netbackup Client being deleted during a Tekelec software upgrade.
Prerequisites:
909-2209-001 Revision G, February 2014
277
3 Procedures
• Application server platform installation has been completed.
• Site survey has been performed to determine the network requirements for the application server,
and interfaces have been configured.
• NetBackup server is available to copy, sftp, the appropriate NetBackup Client software to the
application server.
• Filesystem for Netbackup client software has been created (3.11.10 Create LV and Filesystem for
Netbackup Client Software)
Note: For PM&C Application deployed with NetBackup Volume option "--netbackupVol" the
guest virtual disk will be created by deploy.
• Config file has been created if the version of Netbackup Client is not supported (3.11.12 Create
Netbackup Client Config File).
1. Choose Netbackup Client Install Path
There are two different ways to install Netbackup Client. The following is a guide to which method
to use:
• If a customer has a way of transferring and installing the netbackup client without the aid of
TPD tools then use 3.11.8 Netbackup Client Install/Upgrade with nbAutoInstall. This is not common
and if the answer to the previous question is not known then do not use 3.11.8 Netbackup Client
Install/Upgrade with nbAutoInstall.
• If you don't use 3.11.8 Netbackup Client Install/Upgrade with nbAutoInstall, use 3.11.9 Netbackup
Client Install/Upgrade with platcfg.
Chosen Procedure: ____________________________________________
2. Execute the procedure chosen in Step 1
3. Application Console: Use platform configuration utility (platcfg) to modify hosts file with
NetBackup server alias.
Note: If NetBackup Client has successfully been installed then you can find the NetBackup server's
hostname in the "/usr/openv/netbackup/bp.conf" file. It will be identified by the "SERVER"
configuration parameter as is shown in the following output:
List NetBackup servers hostname:
# cat /usr/openv/netbackup/bp.conf
SERVER = nb70server
CLIENT_NAME = pmacDev8
Note: : In the case of nbAutoInstall NetBackup Client may not yet be installed. For this situation
the "/usr/openv/netbackup/bp.conf" cannot be used to find the NetBackup server alias.
Use platform configuration utility (platcfg) to update application hosts file with NetBackup Server
alias.
# su – platcfg
Navigate to Network Configuration > Modify Hosts File
909-2209-001 Revision G, February 2014
278
3 Procedures
Select Edit, the Host Action Menu will be displayed.
Select "Add Host", and enter the appropriate data
909-2209-001 Revision G, February 2014
279
3 Procedures
Select "OK", confirm the host alias add, and exit Platform Configuration Utility
4. Application Console: Create a link for the application provided NetBackup client notify scripts to
path on application server where NetBackup expects to find them.
Note: Link notify scripts from appropriate path on application server for given application.
# mkdir -p /usr/openv/netbackup/bin/
# ln -s <path>/bpstart_notify /usr/openv/netbackup/bin/bpstart_notify
# ln -s <path>/bpend_notify /usr/openv/netbackup/bin/bpend_notify
5. Application Console: NetBackup Client software installation complete; if applicable return to
calling procedure.
3.11.6 Changing SNMP Configuration settings for iLO2
This procedure provides instructions to change the default SNMP settings for the HP ProLiant iLO 2
devices.
Preform this procedure for every iLO 2 device on the network. For instance, for every HP ProLiant
G1/G5/G6 Blade and Rack Mount server.
1. From Workstation: Launch Internet Explorer 7.x or higher and connect to the iLO2 device using
"https://"
909-2209-001 Revision G, February 2014
280
3 Procedures
2. iLO2 Web UI:
The user should be presented the login screen shown below.
Login to the GUI using an Administrator account name and password.
3. iLO2 Web UI: The user should be presented the iLO2 System Status page as shown on the right
909-2209-001 Revision G, February 2014
281
3 Procedures
4. iLO 2 Web UI:
1. Select the [Administration] tab on the top navigation bar.
2. Select the [Management] menu item on the left navigation bar to display the SNMP Settings
page.
5. iLO2 Web UI:
909-2209-001 Revision G, February 2014
282
3 Procedures
The user should be presented the SNMP/Insight Manager Settings page.
1. Select option [Disabled] for each of the 3 SNMP settings as shown to the right
2. Click [Apply Settings] to save the change.
The web page will refresh but no specific indication will be given that settings have been saved.
6. iLO 2 Web UI:
To verify the setting change navigate away from the SNMP/Insight Manager Settings page and
then go back to it to verify the SNMP settings as shown on the right.
1. Click [Log out] link in upper right corner of page to log out of the iLO Web UI.
909-2209-001 Revision G, February 2014
283
3 Procedures
7. Complete for remaining iLO2 devices
Repeat this procedure all remaining iLO 2 devices on network.
3.11.7 Changing SNMP Configuration Settings for iLO 3 and iLO4
This procedure provides instructions to change the default SNMP settings for the HP ProLiant iLO 3
devices.
Perform this procedure for every iLO 3 device on the network. For instance, for every HP ProLiant
G7 Blade and Rack Mount server.
1. From Workstation: Launch Internet Explorer 7.x or higher and connect to the iLO 3/iLO 4 device
using "https://"
909-2209-001 Revision G, February 2014
284
3 Procedures
2. iLO 3/iLO 4 Web UI:
The user should be presented the login screen shown below.
Login to the GUI using an Administrator account name and password.
3. iLO 3/iLO 4 Web UI:
The user should be presented the iLO 3/iLO 4 Overview page as shown below.
4. iLO 3/iLO 4 Web UI:
1. Expand the [Administration] menu item in the left hand navigation pane.
2. Select the [Management] sub-menu item to display the Management configuration page.
909-2209-001 Revision G, February 2014
285
3 Procedures
5. iLO 3/iLO 4 Web UI:
The user should be presented the Management configuration page as shown on the right.
1. Select setting [Disabled] for each of the 3 SNMP Alerts options as shown to the right.
2. Click [Apply] to save the change.
On the iLO 3 the web page will refresh but no specific indication will be given that settings have
been saved.
iLO3 Web UI:
iLO4 Web UI:
909-2209-001 Revision G, February 2014
286
3 Procedures
6. iLO 3/iLO 4 Web UI:
To verify the setting changes navigate away from the Management configuration page and then
go page back to it to verify the SNMP settings as shown on the right.
1. Click [Sign Out] link in upper right corner of page to log out of the iLO Web UI.
909-2209-001 Revision G, February 2014
287
3 Procedures
7. Complete for remaining iLO3/iLO 4 devices
Repeat this procedure all remaining iLO 3/iLO 4 devices on network.
3.11.8 Netbackup Client Install/Upgrade with nbAutoInstall
Executing this procedure will enable TPD to automatically detect when a Netbackup Client is installed
and then complete TPD related tasks that are needed for effective Netbackup Client operation. With
this procedure, the Netbackup Client install (pushing the client and performing the install) is the
responsibility of the customer and is not covered in this procedure.
Note: If the customer does not have a way to push and install Netbackup Client, then use 3.11.9
Netbackup Client Install/Upgrade with platcfg.
Note: It is required that this procedure is executed before the customer does the Netbackup Client
install.
Prerequisites:
• Application server platform installation has been completed.
• Site survey has been performed to determine the network requirements for the application server,
and interfaces have been configured.
• NetBackup server is available to copy, sftp, the appropriate NetBackup Client software to the
application server.
• Filesystem for Netbackup client software has been created (3.11.10 Create LV and Filesystem for
Netbackup Client Software)
• Contact Tekelec to determine if the version of Netbackup Client being installed requires
"workarounds."
1. Follow Tekelec Provided Workarounds
Follow tekelec provided procedures to prepare the server for Netbackup Client install using
nbAutoInstall.
909-2209-001 Revision G, February 2014
288
3 Procedures
2. Enable nbAutoInstall:
Execute the following command:
# /usr/TKLC/plat/bin/nbAutoInstall –-enable
The server will now periodically check to see if a new version of Netbackup Client has been installed
and will perform necessary TPD configuration accordingly.
At any time, the customer may now push and install a new version of Netbackup Client.
3. Return to calling procedure if applicable.
3.11.9 Netbackup Client Install/Upgrade with platcfg
Executing this procedure will push and install Netbackup Client via platcfg menus.
Prerequisites:
• Application server platform installation has been completed.
• Site survey has been performed to determine the network requirements for the application server,
and interfaces have been configured.
• NetBackup server is available to copy, sftp, the appropriate NetBackup Client software to the
application server.
• Filesystem for Netbackup client software has been created Execute 3.11.10 Create LV and Filesystem
for Netbackup Client Software if the application installed on server does not provide an alternative
to creating the NetBackup logical volume.
• Config file has been created if the version of Netbackup Client is greater than 7.5.0.0.
Note: If a procedural STEP fails to execute successfully, STOP and contact the Customer Care Center
by referring to the 1.4 Customer Care Center section of this document.
1. Application server iLO: Login and launch the integrated remote console
Log in to iLO in IE using password provided by application
http://<management_server_iLO_ip>
Click in the Remote Console tab and launch the Integrated Remote Console on the server.
Click Yes if the Security Alert pops up.
2. TVOE Application Server iLO: If the application is a guest on a TVOE host: Login with application
root credentials. If the application is not a guest on a TVOE host continue to step 3.
Note: On a TVOE host, If you launch the virsh console, i.e., "# virsh console X" or from the
virsh utility "virsh # console X" command and you get garbage characters or output is not quite
right, then more than likely there is a stuck "virsh console" command already being run on the
TVOE host. Exit out of the "virsh console", then run "ps -ef |grep virsh", then kill the existing
process "kill -9 <PID>". Then execute the "virsh console X" command. Your console session
should now run as expected.
Login to application console using virsh, and wait until you see the login prompt:
# virsh
virsh # list --all
Id Name State
909-2209-001 Revision G, February 2014
289
3 Procedures
---------------------------------13 myTPD running
20 applicationGuestName running
virsh # console applicationGuestName
[Output Removed]
Starting ntdMgr: [ OK ]
Starting atd: [ OK ]
'TPD Up' notification(s) already sent: [ OK ]
upstart: Starting tpdProvd...
upstart: tpdProvd started.
CentOS release 6.2 (Final)
Kernel 2.6.32-220.17.1.el6prerel6.0.0_80.14.0.x86_64 on an x86_64
applicationGuestName login:
3. Application Console: Configure NetBackup Client on application server
# su – platcfg
Navigate to NetBackup Configuration
4. Application Console: Enable Push of NetBackup Client
Navigate to NetBackup Configuration > Enable Push of NetBackup Client
909-2209-001 Revision G, February 2014
290
3 Procedures
Select Yes to initialize the server and enable the NetBackup client software push.
5. Application Console Enter NetBackup password and select OK.
6. If the version of Netbackup is greater than 7.5.0.0, follow the Tekelec provided procedure for the
version of NetBackup that is being pushed.
7. Application Console: Verify NetBackup Client software push is enabled.
909-2209-001 Revision G, February 2014
291
3 Procedures
Navigate to NetBackup Configuration > Verify NetBackup Client Push
Verify list entries indicate "OK" for NetBackup client software environment.
Select "Exit" to return to NetBackup Configuration menu.
8. NetBackup server: Push appropriate NetBackup Client software to application server
Note: The NetBackup server is not an application asset. Access to the NetBackup server, and
location path of the NetBackup client software is under the control of the customer. Below are the
steps that are required on the NetBackup server to push the NetBackup client software to the
application server. These example steps assume the NetBackup server is executing in a Linux
environment.
Note: The backup server is supported by the customer, and the backup utility software provider.
If this procedural STEP, executed at the backup utility server, fails to execute successfully, STOP
and contact the Customer Care Center of the backup and restore utility software provider that is
being used at this site.
Log in to the NetBackup server using password provided by customer:
Navigate to the appropriate NetBackup Client software path:
909-2209-001 Revision G, February 2014
292
3 Procedures
Note: The input below is only used as an example.
# cd /usr/openv/netbackup/client/Linux/6.5
Execute the sftp_to client NetBackup utility using the application IP address and application
netbackup user;
# ./sftp_to_client 10.240.17.101 netbackup
Connecting to 10.240.17.101...
The authenticity of host '10.240.17.101 (10.240.17.101)' can't be established.
RSA key fingerprint is 9a:e6:fc:55:16:3b:94:b2:7d:9f:30:b2:3c:e6:65:a9.
Are you sure you want to continue connecting (yes/no)? yes
Warning: Permanently added '10.240.17.101' (RSA) to the list of known hosts.
[email protected]'s password:
sftp completed successfully.
Enter application server netbackup user password; the following NetBackup software output is
expected but may vary from this example, observe the sftp completed successfully:
The root user on 10.240.17.101 must now execute the command
"sh /tmp/bp.15030/client_config [-L]". The optional argument, "-L",
is used to avoid modification of the client's current bp.conf file.
#
9. Application Console: Install NetBackup Client software on application server.
Navigate to NetBackup Configuration > Install NetBackup Client
Select Yes to install the NetBackup client software.
Select "Exit" to return to NetBackup Configuration menu.
10. Application Console: Verify NetBackup Client software installation on the application server.
909-2209-001 Revision G, February 2014
293
3 Procedures
Navigate to NetBackup Configuration > Verify NetBackup Client Installation.
Verify list entries indicate "OK" for NetBackup Client software installation.
Select "Exit" to return to NetBackup Configuration menu.
11. Application Console: Disable NetBackup Client software transfer to the application server.
Navigate to NetBackup Configuration > Remove File Transfer User
Select "Yes" to remove the NetBackup file transfer user from the application server.
909-2209-001 Revision G, February 2014
294
3 Procedures
12. Application Console: Verify that the server has been added to the
/usr/openv/netbackup/bp.conf file
cat /usr/openv/netbackup/bp.conf
CLIENT_NAME = 10.240.34.10
SERVER = NB71server
13. Application server iLO: Exit platform configuration utility (platcfg)
14. Return to calling procedure if applicable.
3.11.10 Create LV and Filesystem for Netbackup Client Software
This procedure will carve out storage for the Netbackup Client to reside on. This is necessary so that
the Netbackup Client does not lead to disk shortage in the /usr/ filesystem.
Prerequisites:
• The volume group that the netbackup logical volume will reside in has been previously determined.
You can determine what space is available in each volume group by running the 'vgs' command
and looking at the 'VFree' column. Ultimately applications should decide what volume group that
the netbackup LV should reside in.
1. Server: Login as root user.
2. Server: Create a storageMgr configuration file that defines the LV to be created.
# echo "lv --mountpoint=/usr/openv --size=2G --name=netbackup_lv --vg=$VG" >
/tmp/nb.lvm
The above example uses the $VG as the volume group. Please replace $VG with the desired volume
group as specified by the application group.
3. Server: Create the LV and filesystem by using storageMgr.
# /usr/TKLC/plat/sbin/storageMgr /tmp/nb.lvm
This will create the LV, format it with a filesystem, and mount it under /usr/openv/. Example
output is shown below:
Called with options: /tmp/nb.lvm
VG vgguests already exists.
Creating lv netbackup_lv.
Volume netbackup_lv will be created.
Success: Volume netbackup_lv was created.
Creating filesystem, this may take a while.
Updating fstab for lv netbackup_lv.
Configuring existing lv netbackup_lv.
The LV for netbackup has been created!
3.11.11 Migrate Netbackup Client to New Filesystem
This procedure will migrate the installed files for Netbackup Client from the /usr/ filesystem into a
filesystem dedicated to Netbackup Client.
909-2209-001 Revision G, February 2014
295
3 Procedures
1. Server: Login as root user.
2. Server: Stop the netbackup services using the following two commands:
# service netbackup stop
# service vxpbx_exchanged stop
3. Server: Bind mount /usr/openv to a temporary mount point
# mkdir /tmp/openv
# mount --bind /usr/openv /tmp/openv
4. Server: Follow 3.11.10 Create LV and Filesystem for Netbackup Client Software to create the LV and
filesystem.
5. Server: Move all contents of /tmp/openv to /usr/openv
# mv /tmp/openv/* /usr/openv
6. Server: Unmount bind mount and remove mount point
# umount /tmp/openv
# rmdir /tmp/openv
7. Server: Start the netbackup services.
# service vxpbx_exchanged start
# service netbackup start
3.11.12 Create Netbackup Client Config File
This procedure will copy a Netbackup Client config file into the appropriate location on the TPD based
application server. This config file will allow a customer to install previously unsupported versions
of Netbackup Client by providing necessary information to TPD.
The contents of the config file should be provided by Tekelec. Please contact Tekelec if you are
attempting to install an unsupported version of Netbackup Client.
Prerequisites:
• The TPD-netbackup RPM has been installed on the server.
• The contents of the Netbackup Client config file are known.
1. Server: Create Netbackup Client Config File
Create the Netbackup Client config file on the server using the contents that were previously
determined. The config file should be placed in the /usr/TKLC/plat/etc/netbackup/profiles
directory and should follow the following naming conventions:
NB$ver.conf
Where $ver is the client version number with the periods removed. For the 7.5 client the value of
$ver would be 75 and the full path to the file would be:
/usr/TKLC/plat/etc/netbackup/profiles/NB75.conf
909-2209-001 Revision G, February 2014
296
3 Procedures
Note: The config files must start with "NB" and must have a suffix of ".conf". The server is now
capable of installing the corresponding NetBackup Client.
The server is now capable of installing the corresponding Netbackup Client.
2. Server: Create NetBackup Client config file script.
Create the Netbackup Client config script file on the server using the contents that were previously
determined. The config script file should be placed in the /usr/TKLC/plat/etc/netbackup/scripts
directory. The name of the NetBackup Client config script file should be determined from the
contents of the NetBackup Client config file. As an example for the NetBackup 7.5 client the following
is applicable:
NetBackup Client config:
/usr/TKLC/plat/etc/netbackup/profiles/NB75.conf
NetBackup Client config script:
/usr/TKLC/plat/etc/netbackup/scripts/NB75
3.12 TVOE Host Procedures
3.12.1 Enable Virtual Guest Watchdogs as appropriate for the application
This procedure provides instructions for using the PM&C application on the management server to
enable the Virtual Guest Watchdog on VM Guests after upgrading a TVOE VM Host to a version that
adds watchdog support (TVOE version 2.0.0_80.11.0 or later).
Prerequisites:
• One or more installations of TVOE have been upgraded to TVOE version 2.0.0_80.11.0 or higher.
Note: If a procedural STEP fails to execute successfully, STOP and contact the Customer Care Center
by referring to the 1.4 Customer Care Center section of this document.
1. On the PM&C managing each newly upgraded TVOE server, go to the Main Menu > VM
Management page of the PM&C GUI.
2. In the "VM Entities" list, locate the Host that was just upgraded and click its '+' icon to expand its
list of VM Guests.
3. Using the VM Entities list, for each VM Guest on the TVOE Host that was upgraded, select the VM
Guest and do the following:
If virtual watchdog support is not desired for the current VM Guest, no further action is needed
for this guest. Proceed to the next VM Guest on this TVOE Host.
To enable virtual watchdog support for the current Guest:
a) Shut down the VM Guest by setting its power state to "Shutdown" and clicking the adjacent
"Change to..." button. Wait for the shutdown to complete, as indicated by the Current Power
State field of the GUI.
b) Click the Edit button to enter edit mode for this VM Guest. Click the "Enable Virtual Watchdog"
checkbox to enable the watchdog, and then click Save. Wait for the Edit operation to finish.
909-2209-001 Revision G, February 2014
297
3 Procedures
c) Start the VM Guest by setting the Current Power State back to On and clicking the "Change
to..." button.
d) When the VM Guest's power state indication shows "Running", proceed to the next VM Guest
on this Host.
3.12.2 TVOE Netbackup Client Configuration
This procedure will setup and install Netbackup Client on a TVOE host.
Note: Once the NetBackup Client is installed on TVOE, the NetBackup Master should be configured
to backup the following files from the TVOE host:
• /var/TKLC/bkp/*.iso
1. TVOE Server: Login as root user
2. TVOE Server: Enable and start the TVOE-netbackup service using the following commands:
# service_conf add TVOE-netbackup rc runlevels=345
# service_conf reconfig
# service TVOE-netbackup start
3. TVOE Server: Enable platcfg to show the Netbackup Menu Items by executing the following
commands:
#
#
#
#
#
#
platcfgadm
platcfgadm
platcfgadm
platcfgadm
platcfgadm
platcfgadm
--show
--show
--show
--show
--show
--show
NBConfig;
NBInit;
NBDeInit;
NBInstall;
NBVerifyEnv;
NBVerify;
4. TVOE Server: Create LV and filesystem for Netbackup client software.
Using the vgguests volume group, use 3.11.10 Create LV and Filesystem for Netbackup Client Software
to create an LV and filesystem for the Netbackup Client software.
5. TVOE Server: Install the netbackup client software.
Install the netbackup client software by executing 3.11.5 Application NetBackup Client Install/Upgrade
Procedures.
Note: Skip any steps relating to copying NetBackup "notify" scripts to /usr/openv/netbackup/bin.
The TVOE NetBackup notify scripts are taken care of in the next step.
6. TVOE Server: Create softlinks for TVOE specific netbackup notify scripts.
# ln -s /usr/TKLC/plat/sbin/bpstart_notify /usr/openv/netbackup/bin/bpstart_notify
# ln -s /usr/TKLC/plat/sbin/bpend_notify /usr/openv/netbackup/bin/bpend_notify
909-2209-001 Revision G, February 2014
298
Appendix
A
Appendix A Using WinSCP
Topics:
•
A.1 Using WinSCP.....300
909-2209-001 Revision G, February 2014
299
Appendix A Using WinSCP
A.1 Using WinSCP
The following is an example of how to copy a file from the management server to your PC desktop
1. Download the WinSCP Application
Downlaod the WinSCP application:
http://winscp.net/eng/download.php
2. Connect to the management server
After starting this application, navigate to Session and enter: <management_server_IP> into the
Host name, field, root into the User name field, and <root_password> into the Password field.
Click Login.
3. Copy the target file from the management server
On the left side is your own desktop filesystem. Navigate within it to Desktop directory. On the
right side is the management server file system. Within it, navigate into the location of the file you
would like to copy to your desktop. Highlight the file in the management server file system by
pressing the insert key and press F5 to copy the file.
909-2209-001 Revision G, February 2014
300
Appendix A Using WinSCP
4. Close the WinSCP application
Then close application by pressing F10 and confirm to terminate session by pressing OK.
909-2209-001 Revision G, February 2014
301
Appendix
B
Appendix B P2000 MSA USB Driver Installation
Topics:
•
B.1 P2000 MSA USB Driver Installation.....303
909-2209-001 Revision G, February 2014
302
Appendix B P2000 MSA USB Driver Installation
B.1 P2000 MSA USB Driver Installation
The P2000 USB Driver allows Microsoft Windows to recognize the USB Port on HP StorageWorks
P2000 G3 MSA Controllers. This appendix describes how to install the driver on your laptop.
Prerequisite: 3.8.9 Adding ISO Images to the PM&C Image Repository has been completed using Misc.
Firmware DVD.
Note: If you are unable to detect the P2000 array after installing the USB driver, power cycle the P2000
array once.
Needed material:
• HP Misc. Firmware DVD
• HP Solutions Firmware Upgrade Pack Release Notes [3]
1. Management Server: Obtain the USB driver executable
Copy the following file form the management server to your PC using an scp client:
/usr/TKLC/smac/html/TPD/HPFW--872-2488-XXX--HPFW/files/<USB_Driver>.exe
Windows users:
Refer to Appendix B (A.1 Using WinSCP) to copy the zip file to your PC.
Note: Refer to the Release Notes [3] to select the correct file to copy.
2. Microsoft Windows Laptop: Initiate the setup wizard.
Click the USB Driver executable on your laptop. If a security window pops up asking whether to
run the executable, click Run.
The following window should appear:
Click Install
3. Microsoft Windows Laptop: Agree to install
After brief content extraction, the following window will present itself:
909-2209-001 Revision G, February 2014
303
Appendix B P2000 MSA USB Driver Installation
Click Install. In the next window, click I agree to proceed with the installatioin
4. Microsoft Windows Laptop: Select installation directory
Then use the Browse button to select the folder where to install
Click Install
5. Microsoft Windows Laptop: Verify the installation
The success confirmation window concludes the installation. Click the Close button
909-2209-001 Revision G, February 2014
304
Appendix B P2000 MSA USB Driver Installation
909-2209-001 Revision G, February 2014
305
Appendix
C
Appendix C Determining which Onboard Administrator
is Active
Topics:
•
C.1 Determining Which Onboard Administrator
is Active.....307
909-2209-001 Revision G, February 2014
306
Appendix C Determining which Onboard
Administrator is Active
C.1 Determining Which Onboard Administrator is Active
This appendix describes how to determine which Onboard Administrator is active in an enclosure
with two OAs.
Prerequisite: Configure initial OA settings via configuration wizard has been completed.
OA GUI: Determine which OA is Active
Open your web browser and navigate to the IP address of one of the Administrators:
http://<OA_ip>
If you see the following page, you have navigated to a GUI of the Standby Onboard Administrator
as indicated by the red warning. In such case, navigate to the other Onboard Administrator IP
address.
If you navigate the GUI of active Onboard Administrator GUI, the enclosure overview table is
available in the left part of the login page as below.
909-2209-001 Revision G, February 2014
307
Appendix
D
Appendix D Accessing Tekelec Customer Support Site
Topics:
•
D.1 Accessing Tekelec’s Customer Support
Site.....309
909-2209-001 Revision G, February 2014
308
Appendix D Accessing Tekelec Customer Support
Site
D.1 Accessing Tekelec’s Customer Support Site
Access to Tekelec's Customer Support site is restricted to current Tekelec customers only. This section
describes how to log into the Tekelec Customer Support site and locate a document. Viewing the
document requires Adobe Acrobat Reader, which can be downloaded at www.adobe.com.
1. Log into the Tekelec Customer Support site.
Note: If you have not registered for this new site, click the Register Here link. Have your customer
number available. The response time for registration requests is 24 to 48 hours.
2. Click the Product Support tab.
3. Use the Search field to locate a document by its part number, release number, document name, or
document type. The Search field accepts both full and partial entries.
4. Click a subject folder to browse through a list of related files.
5. To download a file to your location, right-click the file name and select Save Target As.
909-2209-001 Revision G, February 2014
309
Appendix
E
Appendix E Disabling TFTP
Topics:
•
E.1 Turning off TFTP.....311
909-2209-001 Revision G, February 2014
310
Appendix E Disabling TFTP
E.1 Turning off TFTP
1. Turn off the service daemon.
# chkconfig tftp off
2. Kill the existing process if it is still running:
# ps -ef | grep tftp
root
<pid> 10076
root
21232 20520
# kill -9 <pid>
0 12:53 ?
0 12:53 pts/0
00:00:00 in.tftpd -s <server_args>
00:00:00 grep tftp
3. Reload xinetd.
# service xinetd reload
Reloading configuration:
909-2209-001 Revision G, February 2014
[
OK
]
311