1
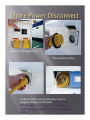
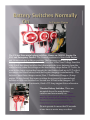
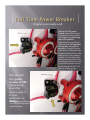
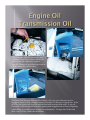
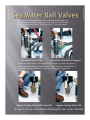
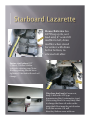
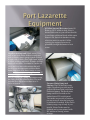
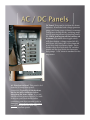
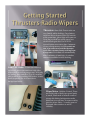
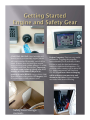
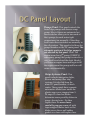
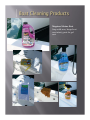
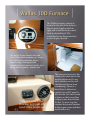
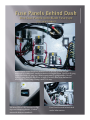
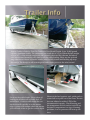
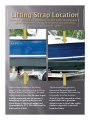
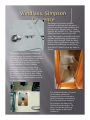
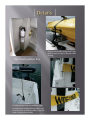
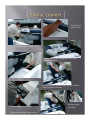
C90 Owners Manual
1
Switch Off Breaker First
Disconnect at Boat
Coil about 12” across and stow next to
propane locker on aft deck. Never leave
hot (breaker on ) a loose cord on dock
could shock swimmers If it was to drop in
water.
The C90 has three main battery switches , House on Off/Off ,Engine On
/Off, and Emergency Parallel. The Normal position is to leave both Engine
and House switches in the on position. The Emergency parallel is off.
Emergency parallel is rarely used as the boat has a Blue Seas Voltage Sensitive
relay (black box above switches that disconnects the house batteries from the
starter battery when the voltage on the start battery drops below 12.7 volts. As
soon as the charge system has brought the start battery back up to 12.7 volts it
reconnects the house battery bank and begins charging it automatically. The
batteries have three charge sources, First, 2 ProMariner Chargers (8 amp
engine, 20 amp house) that come on when shore power is connected and
breakers at dash are switched on. Second two 80 watt solar chargers (10
Amps) while anchored-automatic, third a 125 Amp engine driven alternator.
Thruster Battery Switches, These are
mounted above the main battery
switches and are normally on. These
must be switched off when swimmers
are in the water or for service. The
thrusters are very powerful and will
suck objects in the water toward them.
Do not operate for more that 30 seconds
at one time or motor may over heat.
The C90 fuel system includes two filters and a electric switching valve at the dash. In
normal operation there is no owner/operator activity other than to inspect the Raycor
Filters clear glass bowel for water (clear liquid) and drain in to cup through petcock at
bottom if present. If the boat has set unused for several days the primer plunger on the
white Cummins filter housing should be pressed 8-10 times or until it gets hard, this
speeds crank/starting. This plunger will also be needed to prime should you run out of
fuel. Raycore uses a 10 Micron 500ser diesel filter.
Fuel Tank Switch is located to the left
side of dash. Its is labeled Main and
Aux, Main is the engine side tank, Aux
is the port tank. Depress toggle for tank
desired. You typically will run on one
tank for 3 hrs then switch so tanks drop
equally while underway. Each tank is
40 gallons approximately 36 is usable.
With full fuel at 14Kts you should have
approximately 16 Hrs running time.
This switch also swaps the engines fuel
return lines at the same time.
Engine room inside wall
Always On 12V power
breaker is just inside engine
room door. It is shown here
with flipper tang tucked up
this is ON position.
Depressing the red plunger
will turn it off. Its important
to leave this on except for
service as it supplies power
to the boats 6 automatic bilge
pumps and other devices that
need power to save memory
settings. It is not affected by
battery switch position. After
each engine service be certain
to check this breaker has not
been bumped off. If it is off
there is no bilge pump
protection for leaks.
Here the full
time power
breaker is OFF,
(flipper tang
down) for
service only or
to reset
electronics or
Note: on recent boats this
furnace.
is a RED 50 amp fuse in the
same location.
The Cummins QSD 2.0 liter engine uses
premium 15-40 oil. It’s best to check oils
prior to use. Be carful not to spill or
overfill. Change oil and filter when new at
50 hrs then every 100 hrs after.
The Twin Disk Transmission uses 30 wt motor oil for its gear lubrication and to
engage its clutch. Check oil engine warm/off within 2-3 minutes of shut down. If the
oil is low the clutch will drop out and the boat will stop-find leak-refill. To top off,
it’s easiest to fill through the dip stick opening with supplied funnel check frequently
while filling as overfilling can damage the transmission. Change after 50 Hrs and
then every 100 hrs, clean wire mesh filter.
This Blue Seas Systems
unit separates the house
batteries from the start
batteries automatically
when the house voltage
is bellow 12.7 volts. No
user activity is required.
Engine Room Inside wall
Battery Chargers
These ProMariner automatic chargers
are wired to come on when the boats
shore power is connected and the A/C
breakers at the dash are switched on. The
chargers are 4 stage smart units that
charge aggressively if the battery is low
and then ramp down as it fills. They
then drop out completely when full and
then do a small topping charge weekly.
The design greatly extends battery life
and over charging and subsequent
battery damage. Check battery water
levels monthly ,lower water levels/
exposed plates will damage the batteries
lead plates requiring replacement.
Engine Room Fwd Wall
There are two raw water valves on the boat both in the Starboard
Lazarette (inside hull side fwd). The smaller one ½” is for the head
and the aft deck wash down. The larger one 1.5” is for the engine
cooling water.
Raw Water Valve OFF
Raw Water Valve On, 45 degrees
½ Inch raw water valve is run typically at 45 degrees to reduce its pressure
while underway and stop head overflow. These valves are typically left on
as running the boat with valves closed will damage the engine and
impellers.
Engine Cooling Water Ball Valve Off
Engine Cooling Water ON
Be sure to close valve when cleaning the raw water strainer
House Batteries 2ea
G27 Deep cycle, wet
lead acid, 4” water lift
muffler to left, drain
muffler when stored
for winter with drain
bolt at bottom, resilicone bolt after.
Engine start battery G27
(Center), Teliflex SeaStar
hydraulic steering ram. Note:
Rudder packing should be retightened/checked with each oil
change.
Drip-Less shaft seal oil reservoir,
keep ½ full with ATF type
transmission fluid (automotive type).
If it is using fluid it is very likely time
to change the three oil seals on the
prop shaft. Boat must be out of water
to do this service. Oil will
discolor/darken some with use.
Tip out Bin on early Boats/New boats
have box in Port Cockpit storage locker.
Note: Locker is plumbed with a hose to a
through hull overboard so a gas leak
would not inter the boat. If you ever smell
gas stop-turn off valve and open boat to
clear fumes. Find leak.
Electric shut off valve only comes on if gas
controller by sink is on and sniffer smells no
gas.
To use, make sure hose connection
is tight, open valve, gauge will show
aprox 90 Psi. If you hear a hissing or
smell gas turn valve off ,check
connections. 15 pound tank will
typically last 2+ weeks.
Re-Installing gas box lid is easier if tip out
bin is part way closed. The tank must be
centered in compartment to latch lid in
place.
6 Gallon Seaward Hot water heater SS.
Runs on 120 V while at dock. Note it
draws 2000 watts so you will not be able
to run large additional loads while water
heater is on. Switch its breaker on only
when hot water is needed. While
cruising the engines hot water is
plumbed through the heater to heat
water.
28 gallon holding tank (black water) This
tank as are both water tanks are equipped
with a density sensor gauge system located
to right side of dash, press right hand button
to check holding tank level. If tank is full the
head will not flush. You must be 3 miles off
shore and in a area with current that will
flush to use the macerator switch at dash.
Note :shut boat off to hear change in tone
when tank is empty, running pump dry will
damage its rubber impellers. The tank can
also be emptied at a pump out station using
the fitting near the transom door. The tank
includes two dip tubes so there is no YValve to switch.
Pressure Water Pump and
Strainer: The C90 has two water
tanks (24 gallons port side and 26
gallons Starboard side) each has a
dedicated pump. The fresh water
pump switch is located on the
dashes lower DC switch panel.
Two tanks are provide so owners
can use water to trim the boat port
to starboard if needed. It like fuel is
a heavy cargo, top off only if you
need it. Water Tanks must be
drained and system primed with
RV antifreeze during winter
storage.
Stow fenders and dock lines in port
aft compartment
Switch on Engine Blower, a cool engine is
more efficient.
Fill Water tanks as needed (port
and starboard) Cockpit fwd walls.
Be sure water is good ,taste it! Ask
fellow boaters. During long
inactive periods ad a little chlorine
to keep fresh.
Switch on Refrigerator, lower left DC panel.
The propane control unit is just fwd
of the sink. This units power may be
switched at the dash on early
models. When stove is not in use tap
the control button and turn the gas
off .
Green light When Power is on but
unit is off
Gas is on when the Red Light is ON.
DC Panel: This panel is fed from the house
batteries . It includes both voltage (pressure
gauge) and Amp gauge (volume) to manage
your power during the day, reducing amps
used is most important to extending battery
life. While boating turn all the breakers on
as shown. The small silver toggle switch
will show battery voltage engine (left #1)
and House (#2 center), #3 is not connected
as we have only two battery banks. These
breakers then feed both dash DC switches
panels and the fuse blocks for electronics
and pumps. A DC shunt is standard for the
amp meter.
AC Distribution Panel: This panel is fed
from the 30 Amp shore power
connection. Typically, all the breakers
but the hot water heater are left on
energizing the boats outlets. If you see
the red reverse polarity light lit (2nd bulb
down) see your dock master before
continuing some boat systems could be
damaged. Turn on hot water only when
needed. Both panels are Blue seas
systems premium panels.
The Sensa Tank display reads tank
levels with very reliable density
sensors bonded to the out side of
each tank.
To read tank level:
Press button #1 for Port water tank,
Press #2 for Starboard tank
Press #3 for Waste tank (black
water)
Solar Panel Charge Controller: The Solar
Boost 2000 is a premium charge controller
that helps capture all the suns peak mid day
energy. The unit is automatic and requires
no operator input as the battery's become
fully charged it automatically ramps down its
charge so batteries are not over charged. It
also automatically shuts down if it sense
another charge source (engine or battery
chargers) The slide switch is useful to see
battery banks volts and current input. Note:
If it seems not to be charging while out, the
batteries maybe full or the Kayaks are
blocking the sun. If batteries are low and the
sun is bright the unit will put out up 11
amps.
Thrusters: these Side Power units are
very handy while docking. Once battery
switches are on depress both ON buttons
at the same time, green light will come on.
Now the joy sticks are ready press bow
stick left boat goes left. Use in 20-30
second bursts never more than 3 minuets
of use to keep motors cool. Be certain no
one is in water near boat the thrusters
work like vacuum cleaner sucking from
a large area. Unit shuts off automatically
after 3 minuets of inactivity. A wireless
remote is available for solo docking.
Icom VHF Radio. To turn on rotate top
right knob, most conversations with other
boaters will be on low power, use Ch 16 only
for hailing ,then switch to 72 or 68, weather
also available by pushing WX button. Lower
Knob is squelch use it to turn down
background static.
Wiper Motor –Washer Control, These
are on left side of dash, two speed push
to wash, Wash tank is in back corner of
storage bin behind refrigerator under
helm seat you will have to remove safety
gear for access. Rain – X works great on
front and side windows to aid in
visibility
STARTING ENGINE: Once batteries and
blower are on you can start, engine (starter
will time-out after 20 seconds), switch off-re
crank. If motor does not start open engine
room door and push primer plunger on white
fuel filter until hard, then restart. Important
you must warm engine up slowly over 10-15
minuets at RPMs under 2,000 prior to
running at cruise RPM Do not go above 2,000
Rpm until motor has reached 176 degrees. 80%
of engine wear is while motor is cold.
Safety Gear Storagemanuals
Engine Computer: This is a very useful
instrument. Toggling the propeller
button shuttles you to a variety of data.
It’s fine to push the boat and horizon
button for additional information. Oil
pressure while running will be about 90
Psi, water temperature will be about
176-180. If you hear a horn or beeping
while underway you must stop and
determine the cause. Engine manuals
are under helm seat in blue bag.
Pumps Panel: This panel controls the
boats bilge pumps and shower sump
pump. Most of these are automatic but
these switches allow you to turn each of
the 6 pumps for each water tight
compartment on manually. Other than
fresh water these switches are normally in
the off position . This panel is fed from the
pumps breaker on the DC main panel. The
automatic portion of the bilge pumps is
not affected by this panel. Note: The
engine room has a 7th pump (1100GPH
emergency pump) this pump is wired to a
very loud horn behind the dash. Should
you loose an engine hose and begin to fill
the engine room this pump and horn will
come on automatically.
Ships Systems Panel: This
panel includes navigation lights,
blower and many other ship
systems. It is also fed from the
main DC panel breaker. At dash
center. These panels have separate
automotive blade fuses under the
plastic snap cover ranging from 520 amps. If a fuse has blown
determine cause possibly debree in
pump ,shorted wire . Fix then
replace fuse. To access fuses
careful ly pop grey cover off with
tape wrapped dinner knife or flat
blade screw driver-pull rubber
gasket over fuses and replace fuse.
The C90 is equipped with large trim tabs. This tabs are primarily
used to trim the boat for maximum efficiency and comfort while
cruising. Due to their size and positioning, they can lift a great
deal while creating very limited drag. Typically after setting for
a given throttle RPM you will level and trim down to find the
maximum speed for that RPM. If the seas are choppy you may
find that less trim is a softer ride and dryer. Use your discretion .
I find in 0-12” seas full tabs is often most efficient and a good
ride. In 12-24” seas you will need to reduce tabs to 2/3 or less
and let the bow float through the seas. In larger seas you may
find no tab is best. Please note your best ride in heavy seas
will often be at 14-17Kts. If the boats bouncing or thumping try
something different.
Zero Tabs: Used for large seas 14-20 Kts
½ Tabs used in 2-3ft seas 14-20 Kts
Full Tabs used in 0-1 ft Seas 14-17 Kts
Note: Retract tabs when not in use to protect
actuator shaft from marine growth – barnacles.
First mixer is set to temp, The sink wand lifts
to hanger near door, curtain from shelf behind
door is snapped into ceiling buttons, auto
sump pump under head evacuates water. Dry
door and shower area when done. Door can
be left open or closed when showering. Note:
Boat showers are recommended to conserve
water. IE get wet, turn off, soap up, rinse off.
Sprayer has three positions, Off, On
with button, On full time.
Meguiars Marine Boat
Soap with wax, keeps boat
wax intact, great for gel
coat.
Meguiars Flagship Wax, This
is a premium wax and UV
protectant. Hand wax once per
year in Northern climates,
twice in southern. Wax both
deck and hull. In the south,
even the non skid maybe
waxed with a brush.
T-9 Bowshield, This is wonderful
for your engine rooms metal
parts, all of them, bronze, SS
clamps, Cummins metal parts,
battery connections, bonding
system connections, Honda 2hp .
Keep away from plastic, and belts.
Light re-coat every 6 months.
Wipe up any excess while wet.
303 Aerospace Protectant, This material is for
plastic that’s out in the sun, I.E. Vinyl seats,
Zodiac boats, recoat every 3 months.
The Wallace furnace control is
located to the left of the helm, to
turn on push toggle switch to
right and rotate fan-heat control
knob to desired level. The
controller has no thermostat due
to size of space heated.
The unit is located under the sink.
Note: When first warming up, it may
howl for a few moments, adjust
speed to stop. During its first
operation, it may time out as the fuel
pump did not prime, -restart unit.
Note: If a vent is not
flowing, pop grill off,
twist valve inside open.
The vents are located in the
salon, at the dash and in the
master stateroom. Do not
block the flow as this will
shut the unit down from
overheating. There is a
boost fan for defrosters,
switch it on at DC panel to
left of helm. We have found
at times on the lowest flow
setting it may shut off after
4-6 hrs. To reset, trip the
constant hot power breaker
in the engine room and then
reset breaker on.
To Start, push and hold power
button at top right for three seconds.
Unit will come on in 10 seconds.
Next press Charts
Next Press Navigation Charts
Screen will come up with chart and data fields.
To zoom in or out press + or -. To change page to
sounder press home button and toggle to desired
page.
Note :To dim unit at night tap power button and use
active button to adjust light level. You must turn
back up when done or the screen will be black the
next day, very hard to see buttons.
Tilt Helm, lever under wheel, hydraulic fluid (Teliflex) fills at top, under rubber boo
Running attitude, 16 Kts tabs down
Master Curtain snap in,
labeled Port - Starboard
,arrow shows Fwd. Roll and
store in headboard
bookshelf.
Start
While folding be carful not to lean on Solar Panel glass, rest
support tube carefully on SS Mast, tip in to cockpit, then lift
forward to corner for towing. Note: It’s best to close door before
placing support.
Done
Each of these 4 fuse blocks are dedicated to a specific system and are
powered by a dedicated breaker at dash or in engine room. Hot Float (8 gang
right) Electronics (6 gang top) House equipment (6 gang middle), House
lights (6 gang bottom) Black box to right of helm is Blue seas dimmer for
dash lights. Fuses 3amp-20amp, most 5-10 amp.
300 Watt 12V to 120V inverter for lap
tops and charging phones , Carbon
monoxide detector standard.
Fuse Panel located behind dash
under helm station.
Aspens Trailer is built by Float On Trailers in Vero Beach Florida. It is a 10,000 pound
capacity aluminum trailer. The minimum tow truck size is ¾ Ton. When the ball weight
is set to 6-7% of the towed weight (600-800 pounds) she tows like a dream. Includes a
solid winch stand assembly with stair for access while loading. Show are the optional
mag wheels and electric hydraulic breaks (nice for hilly terrain and backing up steep
driveways. The design is self centering and loads under power to the winch stand.
Show are the guide bunks, Note: when off
loading the fenders will typically be 8-10”
underwater. On west coast ramps the tow
truck tires will typically be at the waters
edge. On east coast ramps which are steeper
you will back in less to get the correct depth.
Shown is the keel capture and guide pads to
center hull as it pulls out of the water. Be sure
tires are inflated to within 5 PSI of the
recommended capacity. Check bearing and
tire temperature with a touch at each fill up.
Increased temperature is a sign of bearing
problems, low air pressure will heat up the
tires.
Arrows show location of the lifting
straps. On the stern the goal is to lift on
the keel (Fiber Glass) about 6” forward
of the Stainless Sand Bar. Be sure to preload the starboard side as tension is
brought up by pulling the cross bar
down closer to the deck/engine load
(approximately 10”.) This will keep the
boat level as it lifts
The forward Sling goes just
forward of the port light well
clear of the thruster. The cross bar
is typically level for the bow.
Note: If you lift one end at a time
to put blocks in to place the
straps be sure to block the trailer
frame to support it or you will
bend the frame.
The Simpson Lawrence windless
mounted on the front deck has power
controls at both the helm and front deck
for ease of use. The unit uses ¼” chain
typically 40’ and 250’ of ½ “ line typically
triple braid that’s been woven to the
chain. The capstan can handle both chain
and line, transitioning automatically as
the line move through. When the line is
new it’s often a good idea to remove the
anchor at its swivel and run the line up
and down 2-3 times to clear any kinks in
the line
The Windlass has a friction clutch built
into the capstan. Its tension is adjusted by
inserting the wrench in the box socket and
tightening clockwise for more friction
counterclockwise for less (wrench is in
owners briefcase). This is a delicate
procedure as to little tension and the
clutch slips when lifting under-load. To
much tension as the anchor comes up into
the roller assembly it can be bent. When
the anchor rode has been purchase from
Aspen it includes depth markers every 30
ft to aid in anchoring.
The Windlass Breaker is located
in the master staterooms
hanging locker just forward of
the bow thrusters service hatch.
Note the anchor line end must
be secured to the bitter end
cleat in the anchor locker. Be
sure to secure the anchor up
with a bungee or line when
underway.
Line after Stacking-detangle
Anchor with snubber bungee
Windlass Wrench
Anchor Depth Markers
Kayak with ratchet straps and foam
pad. Be sure to remove Kayak while
towing
Electrical junction box
Tender Snubber line for medium range
towing to take wind buffeting out. Long
hauls it is best to deflate tender. Line also
used to lower-raise tender.
Store Rods on
transom clip
Un-clip SS support rods
Tip Tender in, leave clipped to boat while
mounting motor.
Support Engine on swim step, step into tenderswing engine to transom
Un buckle engine in Port laz.
Tighten Screw clamps aggressively.
Rinsing engine
with hose