1
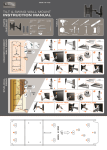
Millennium QUICK INSTALL GUIDE KURZANLEITUNG GUÍA DE INSTALACIÓN RÁPIDA GUIDE PRATIQUE DINSTALLATION RAPIDE GUIDA DI INSTALLAZIONE RAPIDA PODRÊCZNIK INSTALACJI Copyright © 1999 Distributed Processing Technology Corporation All Rights Reserved - Printed in U.S.A. Storage Manager is a trademark of Distributed Processing Technology Corporation. SmartCache, SmartRAID, RAIDstation and DPT are registered trademarks of Distributed Processing Technology Corporation. Microsoft, MS-DOS, Windows NT, Windows, and the Windows logo are either registered trademarks or trademarks of Microsoft Corporation in the United States and/or other countries. OS/2 is a trademark of IBM Corporation. NetWare is a trademark of Novell Corporation. OpenServer, UnixWare and SCO are trademarks of The Santa Cruz Operation. I2O is a registered trademark of Intel Corporation. All other trademarks are property of their respective owners. Contents FCC Statement ............................................................................... 5 VCCI Statement .............................................................................. 5 Limited Product Warranty ................................................................ 6 Technical Support ............................................................................ 8 English Introduction ..................................................................................... 9 Operating System Support .............................................................. 9 Module Installation ........................................................................ 10 Memory Installation ....................................................................... 11 SCSI Termination .......................................................................... 12 Ultra2 SCSI ................................................................................... 13 Fibre Channel ................................................................................ 13 SCSI IDs ....................................................................................... 13 Cabling and Installation ................................................................. 14 Configuration ................................................................................. 15 Software Installation ...................................................................... 15 Deutsch Einführung ..................................................................................... 17 Betriebssystemunterstützung ........................................................ 17 Modulinstallation ........................................................................... 18 Speicherinstallation ....................................................................... 19 SCSI-Abschluß .............................................................................. 20 Ultra2 SCSI ................................................................................... 21 Fibre Channel ................................................................................ 21 SCSI-IDs ....................................................................................... 21 Verkabelung und Installation ......................................................... 22 Konfiguration ................................................................................. 23 Software-Installation ...................................................................... 23 2 Español Introducción ................................................................................... 25 Requisitos del sistema operativo ................................................... 25 Instalación del módulo .................................................................. 26 Instalación de la memoria ............................................................. 27 Terminación de SCSI .................................................................... 28 SCSI Ultra2 ................................................................................... 29 Fibre Channel ................................................................................ 29 Identificaciones de SCSI ............................................................... 29 Cables e instalación ...................................................................... 30 Configuración ................................................................................ 31 Instalación del software ................................................................. 31 Français Introduction ................................................................................... 33 Prise en charge du système dexploitation .................................... 33 Installation des modules ................................................................ 34 Installation de mémoire ................................................................. 35 Terminaison SCSI ......................................................................... 36 Bus et périphériques Ultra2 SCSI ................................................. 37 Technologie Fibre Channel ............................................................ 37 Adresses (ID) SCSI ....................................................................... 37 Câblage et installation ................................................................... 38 Configuration ................................................................................. 39 Installation du logiciel .................................................................... 39 Italiano Introduzione .................................................................................. 41 Integrazione del Sistema Operativo .............................................. 41 Installazione dei Moduli ................................................................. 42 Installazione della Memoria ........................................................... 43 Terminazione SCSI ....................................................................... 44 Ultra2 SCSI ................................................................................... 45 Fibre Channel ................................................................................ 45 Numero di Identificazione SCSI (SCSI ID) .................................... 45 Collegamento dei Cavi ed Installazione ........................................ 46 Configurazione .............................................................................. 47 Installazione del Software ............................................................. 47 3 Polski Wprowadzenie .............................................................................. 49 Systemy Operacyjne ..................................................................... 49 Instalacja Modu³ów ........................................................................ 50 Instalacja Pamiêci ......................................................................... 51 Terminator SCSI ............................................................................ 52 Ultra2 SCSI ................................................................................... 53 Fibre Channel ................................................................................ 53 ID SCSI ......................................................................................... 53 Kable i Instalacja ........................................................................... 54 Konfiguracja .................................................................................. 55 Instalacja Oprogramowania ........................................................... 55 4 FCC Statement Warning: Changes or modifications to this unit not expressly approved by the party responsible for compliance could void the user’s authority to operate the equipment. This equipment has been tested and found to comply with the limits for a Class B digital device, pursuant to Part 15 of the FCC Rules. These limits are designed to provide reasonable protection against harmful interference in a residential installation. This equipment generates, uses, and can radiate radio frequency energy and, if not installed and used in accordance with the instructions, may cause harmful interference to radio communications. However, there is no guarantee that interference will not occur in a particular installation. If this equipment does cause harmful interference to radio or television reception, which can be determined by turning the equipment off and on, the user is encouraged to try to correct the interference by one or more of the following measures: • Reorient or relocate the receiving antenna. • Increase the separation between the equipment and receiver. • Connect the equipment into an outlet on a circuit different from that to which the receiver is connected. • Consult the dealer or an experienced radio TV technician for help. This device complies with Part 15 of the FCC Rules. Operation is subject to the following two conditions: (1) this device may not cause harmful interference, and (2) this device must accept any interference received, including interference that may cause undesired operation. NOTE If the SX4055F Fibre Channel Expansion Module is used, the DPT controller will not meet Class B limits. A DPT controller with an SX4055F module does comply with the limits for a Class A digital device. VCCI Statement This is a Class B product based on the standard of the Voluntary Control Council for Interference from Information Technology Equipment (VCCI). If this is used near a radio or television receiver in a domestic environment, it may cause radio interference. Install and use the equipment according to the instruction manual. 5 Distributed Processing Technology Limited Product Warranty PROOF OF PURCHASE MAY BE REQUIRED. YOU MAY REGISTER YOUR PURCHASE BY RETURNING THE ENCLOSED WARRANTY CARD WITHIN 30 DAYS OF PURCHASE. Distributed Processing Technology Corporation (DPT) warrants to the purchaser of this product that it will be free from defects in material and workmanship for the period as set forth below: PRODUCT TYPE WARRANTY (Years from date of purchase) Hard disks 5 years RAID/SCSI Controllers 3 years Cache Memory, SCSI Expansion and RAID /Caching Modules 3 years Storage Array Cabinets (Tower and Rackmount) 3 years Battery Module 1 year FIRMWARE IS NOT COVERED BY ANY WARRANTY. SOFTWARE IS PROVIDED AS IS. DPT DOES NOT WARRANT THAT THE SOFTWARE WILL MEET YOUR REQUIREMENTS OR THAT ITS USE WILL BE ERROR-FREE OR UNINTERRUPTED. DPT does warrant that the diskette(s) on which the program is furnished will be free from defects in materials and workmanship under normal use for a period of 90 days from the date of purchase. If Distributor or Distributors customer notifies DPT of a defect in the product within the applicable warranty period, DPT shall, at its sole option, either (i) repair the defective product (ii) replace the defective product or (iii) refund the purchase price paid by the Distributor. Replacement parts or products may be new or reconditioned. Product which fails to function upon proper installation shall be deemed dead on arrival (DOA), subject to verification by DPT. DOA product shall be replaced by DPT provided that DPT has been notified of the DOA within forty-five (45) days of the date of purchase by Distributor or Distributors customer. Product returned for any warranty service will not be accepted by DPT unless (i) a return material authorization (RMA) number has been received from DPT along with instructions for returning the product prior to the return, (ii) returned product is in its original or equivalent packaging (to ensure product is not damaged in shipment) and (iii) the product has been returned to DPT within 15 days of issuance of the RMA number. DPT will not be responsible for damage to product during the return shipment to DPT. DPT reserves the right to (i) charge a $20 re-box fee or (ii) reject any returned product not shipped in the original or equivalent packaging. Freight charges associated with improperly packed product rejected by DPT will be the responsibility of the customer. At its option, DPT may require proof of purchase. Distributor or Distributors customer shall be responsible for all costs of shipping products for warranty service unless the product is DOA, in which event DPT shall be responsible for the cost of return shipment to the customer. If DPT determines that the product is not defective within the terms of the warranty, customer shall pay the cost of repair at DPTs then prevailing rate. This limited warranty is contingent upon proper use of the product and does not cover product which has been modified, or subjected to unusual physical or electrical stress, unauthorized service, or failure to perform preventative maintenance. Replaced parts or products become the property of DPT. DPT MAKES NO OTHER EXPRESS OR IMPLIED WARRANTY INCLUDING THE WARRANTIES OF MERCHANTABILITY OR FITNESS FOR A PARTICULAR PURPOSE. IN NO EVENT WILL DPT BE LIABLE TO YOU FOR ANY DAMAGES, INCLUDING LOST PROFITS, LOSS OF DATA OR OTHER INCIDENTAL OR CONSEQUENTIAL DAMAGES. DPTs LIABILITY FOR BREACH OF WARRANTY IS LIMITED EXCLUSIVELY TO REPAIR OR REPLACEMENT OF PRODUCTS. Some states do not allow the exclusion of implied warranties or limitations of liability for incidental or consequential damages, so the above exclusions may not apply to you. This warranty gives you specific legal rights. You may have other rights, which vary from state to state. 6 Distributed Processing Technology 140 Candace Drive Maitland, Florida 32751 USA Phone +1 407 830-5522 Fax +1 407 260-5366 World Wide Web: http://www.dpt.com Distributed Processing Technology End-User Software License Agreement You may (i) use the software on a single machine; (ii) make only one copy of the software into any machine-readable or printed form for backup purposes; (iii) merge the software into other software for your use on the single machine (provided that any portion of the software merged into other software will continue to be subject to the terms and conditions of this license); (iv) transfer the software and this license to another party if the other party agrees to accept the terms and conditions of this license; and (v) not make copies of any written materials. If you transfer the software you must either transfer all copies of the software and accompanying materials to the same party or destroy any copies not transferred. You may not attempt to defeat any protection method implemented by DPT to prevent unauthorized use of the software, and you may not modify, adapt, translate, reverse engineer, decompile or disassemble either software or written materials nor create derivative works based upon the software or written materials. This license is effective until terminated by you by destroying the software together with all copies. This license shall terminate automatically if you fail to comply with any term or condition of this license. This agreement is governed by the laws of the State of Florida. U.S. Government Restricted Rights: The software and any manuals are provided with restricted rights. If the software and manuals are acquired under the terms of a DOD Contract, use, duplication or disclosure by the Government is subject to restrictions as set forth in subparagraph (c)(I)(ii) of the Rights in Technical Data and Computer Software Clause at 252.227-7013. If acquired under the terms of a civilian agency contract, use, reproduction or disclosure is subject to 52.227-19(a) through (d). 7 Technical Support Our technical support staff is available Monday – Friday between 6 am and 6 pm Eastern time. Between 6 pm and 8 pm, you can leave a callback message. You can contact us by fax or e-mail 24 hours a day. Telephone: +1 407-830-5522 (Press 6 and follow the prompts.) Fax: +1 407-830-4793 Internet: http://www.dpt.com/techsup/supporthelp.html DPT offers priority Technical Support as a fee-based option. If you choose this option your call is given priority over all other support calls. +1 900-555-4378 at the rate of $1.35 per minute +1 407-830-5522 Press 6 and select the Priority Technical Support option. The rate is $30 for the first hour and $1.00 per minute after the first hour. Product information and the latest versions of DPT drivers and utilities can be obtained at no charge from the DPT FTP site (ftp.dpt.com) or from the Technical Support section of our World Wide Web site 24 hours a day. 8 English Quick Install Guide Introduction This guide will help you to configure and install your DPT Millennium controller into a new system. If you are replacing an existing controller, the controller is being installed in a system that does not use an Intel CPU, or it will not be the only peripheral controller in the system, refer to the SmartRAID V User’s Manual for more complete information. All SmartRAID V controllers are PCI 2.2 compliant and are designed to operate in host systems that are also PCI 2.2 compliant. SmartRAID V controllers include a PCI bridge device and the host system must be able to recognize PCI bridge devices. Read the SmartRAID V Release Notes: For the latest information, select HelpView README Information in Storage Manager or view the READ.ME file in the DPT install directory. Operating System Support To use the controller, you will need an I2O device driver. DPT provides drivers for Linux, SCO Unix, SCO OpenServer, Windows NT and Windows 95/98. DPT also provides a Novell-authored OSM for NetWare. I2O drivers for SCO UnixWare and BSD/OS 4.1 can be obtained directly from the operating system manufacturer. Refer to the documentation for your operating system and the SmartRAID V User’s Manual for additional information about using I2O drivers. 9 English Quick Install Guide Module Installation n To add channels to a Millennium SCSI controller, install an SX4055U2 Bus Expansion Module (Figure 1A). To add a second Fibre Channel to a PM3755F controller, install an SX4055F Bus Expansion module. 1A n Replace the mounting bracket on the controller with the one shipped with the SX4055U2 (Figure 1B). 1B n To use the battery backup feature of the PM3775U2B, attach the BB4050 battery module using the three supplied fasteners as shown (Figure 1C). 1C 10 English Quick Install Guide Memory Installation n PM3754U2 and PM3755F controllers support up to 256MB of cache, using 16MB or 64MB low-profile, single-sided 60ns EDO SIMMs. Fill the sockets with SIMMs of identical type and capacity starting with socket 1 (Figure 2). All memory modules must be of the same type. Do not mix DPT SIMMs and non-DPT SIMMs. 2 n PM3755U2B controllers support up to 256MB of cache, using 16MB or 64MB DPT memory modules. Fill the sockets with DIMMs of identical type and capacity starting with socket 1 (Figure 3). All memory modules must be of the same capacity. Do not install or remove DIMMs with the BB4050 Battery Module attached. Damage may occur. 3 11 English Quick Install Guide SCSI Termination Terminate the SCSI devices as shown in the examples, ensuring that only the devices at the ends of the cables are terminated. SmartRAID V controller termination is set to Auto by default and can be changed using Storage Manager on ROM (SMOR). If you are using Ultra2 SCSI devices, refer to the “Ultra2 SCSI” section. For an Ultra device, refer to the documentation that came with the device By using a 68-pin to 50-pin SCSI cable adapter, an 8-bit SCSI device can be attached to a Wide SCSI cable along with Wide SCSI devices. However, the device at the end of the cable must be a Wide SCSI device so that all SCSI signals are terminated. For internal and external cables where one cable is an 8-bit (Narrow) SCSI cable, set the controller termination to High Only. Internal Narrow SCSI Internal Wide SCSI T T External Narrow SCSI External Wide SCSI T T SmartRAID V Termination = High Only SmartRAID V Termination = Auto or Disabled Internal Narrow SCSI T Internal Wide SCSI T External Wide SCSI T T Internal Wide SCSI External Wide SCSI T T T SmartRAID V Termination = Auto External Narrow SCSI T SmartRAID V Termination = High Only T = Terminated 12 English Quick Install Guide Ultra2 SCSI The following apply to the Ultra2 SCSI controllers and SX405xU2 modules: n SmartRAID V Ultra2 (LVD) SCSI buses support both LVD and singleended devices, which may be mixed on the SCSI bus. Connecting a singleended device to an Ultra2 bus will result in the entire bus running at a maximum 20MHz Ultra speed. ! Do not connect older, non-Ultra2 Differential SCSI devices to an Ultra2 Low Voltage Differential (LVD) SCSI bus. They will damage the Ultra2 hardware. n Ultra2 devices typically do not have built-in termination. DPT supplies an Ultra2 terminator on the end of the cable supplied with the controller. Fibre Channel If you are using a PM3755F or have installed an SX405xF expansion module, the following apply: n Fibre Channel devices and controllers do not require termination. Refer to your Fibre Channel Enclosure documentation for information about installing a loop-back plug for the enclosure. n Fibre Channel controllers and devices automatically configure device IDs during boot. n DPT Fibre Channel controllers and expansion modules use High Speed Serial Data Connectors (HSSDC). SCSI IDs Ensure that each SCSI device has a unique SCSI ID. n SCSI device IDs are usually set through jumpers or switches on the device. n By default, ID 7 is used for the controller. You can use SMOR to change the controller’s ID at power-up. n Wide SCSI devices can be assigned IDs 0 to 15. Narrow SCSI devices can only use IDs 0 to 7. n If you have installed an SX405xU2 Bus Expansion Module, configure the device SCSI IDs for each channel independently. 13 English Quick Install Guide Cabling and Installation n Attach the computer’s disk activity LED cable to connector P6 on the controller. n Attach an internal SCSI cable to the controller and internal SCSI devices. Optionally, attach an internal SCSI cable to the SX405xU2 (if installed) and to additional internal SCSI devices. One internal Ultra2 SCSI cable is supplied with the SmartRAID V controller. If you require additional cables, contact DPT Sales or use our online Webstore at www.dpt.com. n Plug the controller into an available PCI slot. Using a SmartRAID V 64-bit controller in a 32-bit PCI will result in reduced performance. n PM3755F & SX4055F: Attach an external Fibre Channel cable between the controller and the external Fibre Channel enclosure. If you have a Fibre Channel enclosure with a dual port kit installed and are configuring a Fibre Channel dual loop, be aware that DPT does not currently support dual-loop redundancy. Refer to the documentation for your Fibre Channel enclosure. n Attach an external SCSI cable between the controller and external SCSI devices. Optionally, attach external SCSI cables between the SX405xU2 (if installed) and to additional external SCSI devices. Optionally, attach a Fibre Channel cable between the SX405xF (if installed) and the external Fibre Channel enclosure. Multichannel external cabling requires the use of a 68-pin VHDCI offset cable. This offset cable allows you to connect two or more external cables without interference between the cable connectors. If you are using Ultra2 SCSI devices, the cable must be an Ultra2-qualified cable. If you require external offset cables, contact DPT Sales or use our online Webstore at www.dpt.com. If you are using non-DPT cables, refer to the SmartRAID V User’s Manual for additional information about cable requirements. 14 English Quick Install Guide Configuration n Turn on the host computer. Run Storage Manager on ROM (SMOR) by pressing Ctrl+D when prompted during the system boot process. n If necessary, change the default settings for the controller SCSI ID and termination on the Configuration tab of the controller Information view. n Save the new settings. n Verify that all connected SCSI devices are visible in the SMOR Device Tree. n Create disk arrays if desired. Refer to the “Storage Manager on ROM” chapter in the SmartRAID V User’s Manual. Software Installation On a new system, the normal software installation sequence is: n Install the Operating System n Install the DPT device driver or OSM n Install Storage Manager Refer to the SmartRAID V User’s Manual for complete information. 15 Deutsch Kurzanleitung 16 Kurzanleitung Einführung Sämtliche SmartRAID V Controller sind PCI 2.2-konform und für den Betrieb in einem Hostsystem entwickelt, das ebenfalls PCI 2.2-konform ist. Millennium Controller sind mit einer PCI-Bridge ausgestattet. Das Hostsystem muß daher in der Lage sein, PCI-Bridges zu erkennen. Lesen Sie die SmartRAID V-Versionshinweise: Wählen Sie HelpView README Information in “Storage Manager” (Speicher-Manager), oder lesen Sie die Datei READ.ME auf der DPT-Installationsdiskette. Dort finden Sie die neuesten Informationen Betriebssystemunterstützung Um den PM3755U2B Controller zu verwenden, benötigen Sie einen I2OGerätetreiber (OSM). DPT liefert Treiber für Windows NT, Windows 95/98 und SCO Unix. Ein Novell-autorisierter Treiber für NetWare wird ebenfalls gestellt. Sollten Sie eine andere Plattform benutzen, setzen Sie sich bitte mit dem Hersteller Ihres Betriebssystems in Verbindung. Erkundigen Sie sich über die Verfügbarkeit von I2O-OSM (Operating System Module, Betriebssystemmodul) für dieses Gerät. Weitere Informationen entnehmen Sie bitte der Dokumentation, die Sie mit Ihrem Betriebssystem erhalten haben. 17 Deutsch Diese Anleitung wird Ihnen dabei behilflich sein, den DPT Millennium Controller in einem neuen System zu konfigurieren und installieren. Falls Sie einen bereits vorhandenen Controller ersetzen, den Controller in einem System installieren, das keinen Intel-Prozessor verwendet oder dieser Controller nicht der einzige Peripherie-Controller im System sein wird, schlagen Sie bitte im SmartRAID V User’s Manual (SmartRAID VBenutzerhandbuch) nach, um weitere Informationen zu erhalten. Kurzanleitung Modulinstallation Deutsch n Um zu einem PM3755U2B Controller Kanäle hinzuzufügen, installieren Sie ein SX405x Bus-Erweiterungsmodul (Abbildung 1A). Um einen zweiten Fibre Channel zu einem PM3755F Controller hinzuzufügen, installieren Sie ein SX405xF Bus-Erweiterungsmodul. 1A n Ersetzen Sie die Halterung des Controllers mit der mit dem SX405xU2 (Abbildung 1B) gelieferten. Ersetzen Sie die Halterung des Controllers mit der mit dem SX405xF (Abbildung 1B) gelieferten. 1B n Um die Batterie-Sicherungsfunktion auf dem PM3775U2B zu verwenden, schließen Sie das BB4050 Batteriemodul an. Verwenden Sie dazu, wie dargestellt, die drei mitgelieferten Halterungen (Abbildung 1C). 1C 18 Kurzanleitung Speicherinstallation Sämtliche Speichermodule müssen vom gleichen Typ sein. Mischen Sie auf keinen Fall DPT SIMMs und andere SIMMs. 2 n Der PM3755U2B nimmt bis zu 256 MB Cache auf. Er verwendet 16 MB oder 64 MB DPT-Speichermodule. Setzen Sie DIMMs des gleichen Typs und gleicher Kapazität in die Sockets ein. Fangen Sie bei Socket 1 an (Abbildung 3). Sämtliche Speichermodule müssen vom gleichen Typ sein. Installieren oder entfernen Sie keine DIMMS, wenn das Batteriemodul BB4050 angeschlossen ist. Das könnte zu Beschädigungen führen. 3 19 Deutsch n Der PM3755F nimmt bis zu 256 MB Cache auf. Er verwendet 16 MB oder 64 MB Low-profile, einseitige 60ns-EDO SIMMs. Setzen Sie SIMMs des gleichen Typs und gleicher Kapazität in die Sockets ein. Fangen Sie bei Socket 1 an (Abbildung 2). Kurzanleitung Deutsch SCSI-Abschluß Schließen Sie die SCSI-Geräte wie in den Beispielen gezeigt ab. Stellen Sie sicher, daß die Geräte am Ende der Kabel abgeschlossen sind. Der SmartRAID V Controller-Abschluß ist standardmäßig auf Auto eingestellt und kann durch Verwendung des “Storage Manager on ROM” (SMOR) geändert werden. Falls Sie Ultra2 SCSI-Geräte verwenden, lesen Sie bitte den Abschnitt “Ultra2 SCSI”. Bei einem Ultra-Gerät schlagen Sie bitte in der Dokumentation nach, die mit dem Gerät geliefert wurde. Durch Verwendung eines 68-poligen zu 50-poligen SCSI-Kabeladapters kann ein 8-Bit-Gerät zusammen mit Wide SCSI-Geräten an ein Wide SCSI-Kabel angeschlossen werden. Das Gerät am Ende des Kabels muß jedoch ein Wide SCSI-Gerät sein, so daß alle SCSI-Signale abgeschlossen werden. Interne Narrow SCSI Interne Wide SCSI T T Externe Narrow SCSI Externe Wide SCSI T T SmartRAID V Abschluß = Nur High SmartRAID V Abschluß = Auto oder Deaktiviert Interne Narrow SCSI T Interne Wide SCSI T Externe Wide SCSI T T Interne Wide SCSI Externe Wide SCSI T T T SmartRAID V Abschluß = Auto Externe Narrow SCSI T SmartRAID V Abschluß = Nur High T = Abgeschlossen (Terminated) 20 Kurzanleitung Ultra2 SCSI Folgende Angaben treffen auf den PM3755U2 und SX405xU2 zu (falls installiert: ! Schließen Sie keine nicht Ultra2 differential-SCSI-Geräte an einen Ultra2 LVD-SCSI-Bus an. Dadurch wird die Ultra2Hardware beschädigt. n Ultra2-Geräte sind normalerweise nicht abgeschlossen. Im Lieferumfang ist ein Ultra2-Terminator (am Kabelende) enthalten. Fibre Channel n Fibre Channel-Geräte und Controller erfordern keinen Abschluß. Schlagen Sie bitte in der Dokumentation des Fibre Channel-Gehäuses nach. Dort wird beschrieben, wie der Prüfschleifenstecker des Gehäuses installiert wird. n Die Geräte-IDs werden von Fibre Channel Controller und -Geräten automatisch beim Starten konfiguriert. SCSI-IDs Jedes SCSI-Gerät muß eine eindeutige SCSI-ID haben. n SCSI-Geräte-IDs werden gewöhnlich durch Jumper oder Schalter auf dem Gerät festgelegt. n Wide SCSI-Geräte können IDs von 0 bis 15 zugewiesen werden. Narrow SCSI-Geräte können nur IDs von 0 bis 7 haben. n Standardmäßig wird ID 7 für den Controller verwendet. Sie können SMOR verwenden, um die Controller-ID beim Starten zu ändern. n Falls Sie ein SX405xU2-Bus-Erweiterungsmodul installiert haben, konfigurieren Sie die SCSI-Geräte für jeden Kanal unabhängig. 21 Deutsch n SmartRAID V Ultra2 (LVD) SCSI-Busse unterstützen LVD und einseitig abgeschlossene Geräte, die auf dem SCSI-Bus gemischt werden können. Der Anschluß eines einseitig abgeschlossenen Geräts an einen Ultra2-Bus führt dazu, daß der gesamte Bus mit maximal 20 MHz UltraGeschwindigkeit läuft. Kurzanleitung Verkabelung und Installation Deutsch n Verbinden Sie das Kabel der Festplatten-Aktivitätsanzeige (LED) des Computers mit dem Anschluß P6 auf dem Controller. n Verbinden Sie den Controller und interne SCSI-Geräte über ein internes SCSI-Kabel. Optional verbinden Sie den SX405xU2 (falls installiert) und zusätzliche interne SCSI-Geräte über ein internes SCSI-Kabel. Ein internes Ultra2 SCSI-Kabel wird mit dem SmartRAID V Controller geliefert. Falls Sie weitere Kabel benötigen, setzen Sie sich mit der Vertriebsabteilung von DPT in Verbindung, oder besuchen Sie unser Online-Web-Geschäft: www.dpt.com. n Schieben Sie den Controller in einen verfügbaren 64-Bit PCI-Steckplatz. Der Controller kann an einem 32-Bit PCI-Steckplatz angeschlossen werden. Sie werden jedoch Leistungseinbußen wahrnehmen. n PM3755F & SX4055F: Optional schließen Sie ein externes Fibre Channel-Kabel zwischen dem Controller und einem externen Fibre Channel-Gehäuse an. Optional schließen Sie ein Fibre Channel-Kabel zwischen dem SX405xF (falls installiert) und dem externen Fibre Channel-Gehäuse an. Schlagen Sie in der Dokumentation des Fibre Channel-Gehäuse nach, falls Sie ein Fibre Channel-Gehäuse mit einem installierten Doppelanschluß haben, und Sie die Doppelprüfschleife eines Fibre Channel konfigurieren. n Verbinden Sie den Controller und externe SCSI-Geräte über ein externes SCSI-Kabel. Optional verbinden Sie den SX405xU2 (falls installiert) und zusätzliche externe SCSI-Geräte über ein externes SCSI-Kabel. Optional schließen Sie ein Fibre Channel-Kabel zwischen dem SX405xF (falls installiert) und dem externen Fibre Channel-Gehäuse an. Eine externe Verkabelung für Mehrfachkanal erfordert den Einsatz eines 68-poligen Offset-VHDCI-Kabels. Mit diesem Offset-Kabel können Sie zwei oder mehrere externe Kabel ohne Störung zwischen den Kabelsteckern anschließen. Falls Sie Ultra2 SCSI-Geräte verwenden, muß das Kabel Ultra2 tauglich sein. Falls Sie externe Offset-Kabel benötigen, setzen Sie sich mit der Vertriebsabteilung von DPT in Verbindung, oder besuchen Sie unser Online-Web-Geschäft: www.dpt.com. Schlagen Sie imSmartRAID V-Benutzerhandbuch (SmartRAID V User’s Manual) nach, falls Sie andere Kabel verwenden. 22 Kurzanleitung Konfiguration n Stellen Sie sicher, daß alle angeschlossenen Geräte in der Baumansicht des SMOR sichtbar sind. n Falls erwünscht, erstellen Sie Disk-Arrays. Für weitere Informationen, schlagen Sie im Kapitel “Storage Manager on ROM” im SmartRAID VBenutzerhandbuch (SmartRAID V User’s Manual) nach. Software-Installation Auf einem neuen System wird die Software normalerweise in folgender Reihenfolge installiert: n Installieren Sie das Betriebssystem n Installieren Sie den DPT Gerätetreiber oder das I2O OSM n Installieren Sie den Storage Manager Weitere Informationen erhalten Sie im SmartRAID V-Benutzerhandbuch (SmartRAID V User’s Manual). 23 Deutsch n Schalten Sie den Computer ein. Führen Sie “Storage Manager on ROM” (SMOR) aus, indem Sie während des Starts bei der Aufforderung Strg+D drücken. Español Guía de Instalación Rápida 24 Guía de Instalación Rápida Introducción Esta guía le servirá para configurar e instalar el controlador Millennium de DPT en un sistema nuevo. Si va a reemplazar un controlador existente, el controlador va a ser instalado en un sistema que no dispone de una CPU Intel o el controlador no va a ser el único controlador de periféricos del sistema, consulte el Manual del usuario del SmartRAID V (SmartRAID V User’s Manual) donde encontrará información más detallada sobre el tema. Lea las notas de versión del SmartRAID V: Si desea leer la información más actual, seleccione HelpView README Information en Storage Manager o abra el archivo READ.ME en el directorio de instalación DPT. Requisitos del sistema operativo Para poder utilizar el controlador, necesitará un software de control de dispositivos de I2O. DPT proporciona software de control para Linux, SCO Unix, SCO OpenServer, Windows NT y Windows 95/98. DPT también ofrece un OSM de Novell para NetWare. Los programas de software de control de I2O para SCO UnixWare y BSD/OS 4.1 los puede obtener directamente a través del fabricante del sistema operativo. Consulte la documentación de su sistema operativo y el Manual del usuario de SmartRAID V si necesita información adicional sobre el uso del software de control de I2O. 25 Español Todos los controladores SmartRAID V cumplen con la normativa PCI 2.2 y han sido diseñados para funcionar en sistemas centrales que también cumplan con esta normativa. Los controladores SmartRAID V incluyen un dispositivo puente PCI, por lo que será necesario que el sistema central sea capaz de reconocer este tipo de dispositivos. Guía de Instalación Rápida Instalación del módulo n Para añadir canales a un controlador SCSI Millennium, instale un módulo de expansión de bus SX4055U2 (Figura 1A). Para añadir un Fibre Channel a un controlador PM3755F, instale un módulo de expansión de bus SX4055F. Español 1A n Reemplace la consola de montaje que viene con el controlador con la que se incluye con el módulo SX4055U2 (Figura 1B). 1B n Si desea utilizar la función de batería de respaldo del PM3775U2B, conecte a él un módulo de batería BB4050 y sujételo con las tres abrazaderas incluidas como se muestra en la Figura 1C. 1C 26 Guía de Instalación Rápida Instalación de la memoria n Los controladores PM3754U2 y PM3755F aceptan hasta 256MB de memoria caché, con SIMM 60ns EDO delgados de una sola cara de 16MB o 64MB. Llene los conectores con SIMM del mismo tipo y capacidad empezando por el conector 1 (Figura 2). 2 n Los controladores PM3755U2B aceptan un máximo de 256MB de memoria caché, con módulos de memoria de DPT de 16MB o 64MB. Llene los conectores con SIMM del mismo tipo y capacidad empezando por el conector 1 (Figura 3). Todos los módulos de memoria deben tener la misma capacidad. No instale ni desmonte ningún DIMM mientras el módulo de batería BB4050 esté conectado a él. Podría dañar el DIMM. 3 27 Español Todos los módulos de memoria deben ser del mismo tipo. No mezcle módulos SIMM de DPT con módulos SIMM que no sean de DPT. Guía de Instalación Rápida Terminación de SCSI Español Termine los dispositivos SCSI como se demuestra en los ejemplos y asegúrese de que sólo estén terminados los dispositivos que se encuentran al final de los cables. El controlador SmartRAID V viene configurado de fábrica en Auto, aunque se puede cambiar con el Storage Manager en la ROM (SMOR). Si está utilizando dispositivos SCSI Ultra2 , consulte la sección “SCSI Ultra2”. Si desea información sobre un dispositivo Ultra, consulte la documentación que se incluye con dicho dispositivo. Para conectar un dispositivo SCSI de 8 bits a un cable Wide SCSI (SCSI ancha) junto con los dispositivos SCSI, utilice un adaptador de cables SCSI de 68 a 50 clavijas. Tenga en cuenta, sin embargo, que el dispositivo que quede al final del cable debe ser el de la Wide SCSI para que todas las señales SCSI queden terminadas. En el caso de cables internos y externos donde uno de ellos sea un cable SCSI de 8 bits (Narrow), configure la terminación del controlador en High Only (sólo alto). Narrow SCSI interna Wide SCSI Interna T T Narrow SCSI externa Wide SCSI externa T T SmartRAID V Terminación = High Only (Sólo alto) SmartRAID V Terminación = Auto o Disabled (Inhabilitado) Narrow SCSI T Wide SCSI Interna T T T Wide SCSI externa Wide SCSI Interna T T T SmartRAID V Terminación = Auto T = Terminado 28 Wide SCSI externa Narrow SCSI externa T SmartRAID V Terminación = High Only (Sólo alto) Guía de Instalación Rápida SCSI Ultra2 Las siguientes características son aplicables a los controladores SCSI Ultra2 y a los módulos SX405xU2: ! No conecte dispositivos diferenciales SCSI antiguos que no sean Ultra2 al bus SCSI diferencial de baja tensión (Low Voltage Differential [LVD]) Ultra2. Estos dispositivos dañarían el hardware Ultra2. n Los dispositivos Ultra2 no llevan generalmente una terminación incorporada. DPT incluye un terminador Ultra2 en el extremo del cable que viene con el controlador. Fibre Channel Si está utilizando un PM3755F o tiene instalado un módulo de expansión SX405xF, lo siguiente será aplicable a su sistema: n Los dispositivos y controladores de Fibre Channel no necesitan terminación. Consulte la documentación del armario de Fibre Channel (Fibre Channel Enclosure) si necesita instrucciones para instalar un enchufe de circuito en bucle para el armario. n Los dispositivos y controladores de Fibre Channel configuran automáticamente las identificaciones (ID) de los dispositivos durante la iniciación.. n Los controladores y los módulos de expansión de Fibre Channel de DPT utilizan conectores de datos en serie de alta velocidad (High Speed Serial Data Connector [HSSDC]). Identificaciones de SCSI Asegúrese de que cada dispositivo SCSI tenga una identificación (ID) de SCSI exclusiva. n Las identificaciones de dispositivo SCSI se establecen generalmente por medio de puentes o conmutadores en el dispositivo mismo. n La ID 7 viene seleccionada de fábrica para que la utilice el controlador. Puede utilizar SMOR para cambiar la identificación del controlador en el momento del encendido. 29 Español n Los buses SCSI SmartRAID V Ultra2 (LVD) permiten la conexión tanto de dispositivos LVD como de dispositivos uniterminación, que pueden mezclarse en el bus SCSI. Si se conecta un dispositivo uniterminación a un bus Ultra2, este último funcionará a una Ultra velocidad máxima de 20MHz. Guía de Instalación Rápida n A los dispositivos Wide SCSI se les asigna las identificaciones de la 0 a la 15. Los dispositivos Narrow SCSI (SCSI estrecha) sólo pueden recibir las identificaciones de la 0 a la 7. Español n Si tiene instalado un módulo de expansión de bus SX405xU2, configure las identificaciones de SCSI para dispositivos de cada canal de forma independiente. Cables e instalación n Conecte el cable del diodo fotoemisor (LED) de actividad de disco de la computadora al conector P6 del controlador. n Conecte el cable SCSI interno al controlador y a los dispositivos SCSI internos. También tiene la opción de conectar el cable SCSI interno al SX405xU2 (si está instalado) y a otros dispositivos SCSI internos. El controlador SmartRAID V lleva un cable SCSI Ultra2 . Si necesita más cables, comuníquese con el departamento de ventas de DPT o visite nuestra tienda en la red mundial www.dpt.com. n Enchufe el controlador en una ranura PCI vacía. Si utiliza un controlador SmartRAID V de 64 bits en una PCI de 32 bits empeorará con ello el rendimiento. n PM3755F y SX4055F: Conecte un cable de Fibre Channel entre el controlador y el armario de Fibre Channel externo. Si su armario tiene un grupo doble de puertos instalado y va a configurar un bucle doble para el Fibre Channel, tenga en cuenta que DPT no incluye en estos momentos redundancia de bucle doble. Consulte la documentación de su armario de Fibre Channel. n Conecte un cable SCSI externo entre el controlador y los dispositivos SCSI externos. Como opción, también puede conectar cables SCSI externos entre el SX405xU2 (si está instalado) y otros dispositivos SCSI externos. Además puede conectar un cable de Fibre Channel entre el SX405xF (si está instalado) y el armario de Fibre Channel externo. Cuando existen cables externos multicanal es necesario utilizar un cable de derivación VHDCI de 68 clavijas. Este cable permite conectar dos o más cables externos sin que se produzca interferencia entre los conectores de dichos cables. Si va a trabajar con dispositivos SCSI Ultra2, tendrá que utilizar un cable con clasificación Ultra2. Si necesita obtener cables de derivación externos, comuníquese con el departamento de ventas de DPT o visite nuestra tienda en la red mundial www.dpt.com. Si va a utilizar cables que no sean de DPT, infórmese de los cables necesarios en el Manual del usuario de SmartRAID V. 30 Guía de Instalación Rápida Configuración n Encienda la computadora central. Ejecute Storage Manager en ROM (SMOR). Para hacerlo oprima Ctrl+D cuando el sistema se lo pida durante el proceso de inicio. n Cambie la configuración por omisión de identificación SCSI y terminación del controlador si lo considera necesario en la ficha Configuration de la pantalla Information. Español n Guarde la nueva configuración. n Asegúrese de que todos los dispositivos SCSI conectados aparezcan en el árbol de dispositivos (Device Tree) SMOR. n Cree grupos de discos si lo desea. Consulte la sección “Storage Manager en ROM” del Manual del usuario de SmartRAID V. Instalación del software Esta es la secuencia de instalación de software en un sistema nuevo: n Instale el sistema operativo n Instale el software de control de dispositivos DPT o el OSM n Instale Storage Manager Consulte el Manual del usuario de SmartRAID V si desea más información. 31 Français Guide Pratique dinstallation Rapide 32 Guide Pratique dinstallation Rapide Introduction Vous trouverez dans ce guide abrégé toutes indications utiles pour une installation rapide des contrôleurs DPT Millennium dans un nouveau système. Si vous remplacez un contrôleur déjà en place et si vous installez le nouveau contrôleur dans un système non équipé d’un processeur Intel, ou si ce contrôleur n’est pas le seul et unique contrôleur de périphériques de ce système, consultez le manuel d’utilisation SmartRAID V (SmartRAID V User’s Manual) pour informations plus détaillées. Les notes spécifiques les plus récentes accompagnant le lancement des SmartRAID V sont accessibles en sélectionnant dans le menu Help de Storage Manager, l’option View README Information ou en allant dans le fichier READ.ME du répertoire d’installation de DPT. Prise en charge du système dexploitation Pour pouvoir utiliser le contrôleur, il vous faut un logiciel de pilotage de périphérique (ou driver) de type I2O. DPT fournit des pilotes pour Linux, SCO Unix, SCO OpenServer, Windows NT, Windows 95/98. DPT fournit également un OSM pour NetWare autorisé par Novell. Les pilotes I2O pour SCO UnixWare et BSD/OS 4.1 peuvent être obtenus directement auprès des éditeurs de votre système d’exploitation. Consultez la documentation livrée avec votre système d’exploitation et le manuel utilisateur de SmartRAID V pour en savoir plus sur l’utilisation des pilotes I2O. 33 Français Tous les contrôleurs SmartRAID V sont conformes à la norme PCI 2.2 et conçus pour fonctionner dans des systèmes hôtes également compatibles PCI 2.2. Les contrôleurs SmartRAID V comportent un périphérique PCI passerelle (PCI bridge), il est impératif que le système hôte reconnaisse les périphériques de ce type. Guide Pratique dinstallation Rapide Installation des modules n Pour ajouter des canaux supplémentaires à un contrôleur Millennium, il suffit d’installer un module d’extension du bus SX4055U2 (figure 1A). Pour ajouter un deuxième canal Fibre Channel au contrôleur PM3755F, installez un module d’expansion SX4055F. Français 1A n Si vous installez cette option, vous devez remplacer la plaque de fixation de la carte contrôleur par celle qui est livrée avec le module SX4055U2 (figure 1B). 1B n Pour utiliser l’alimentation de secours du PM3755U2B, rattachez le module batterie BB4050 en utilisant les 3 attaches fournies (figure 1C). 1C 34 Guide Pratique dinstallation Rapide Installation de mémoire n Les contrôleurs PM3754U2 et PM3755F supporte un maximum de 256 Mo de mémoire cache sous forme de modules SIMM EDO simple face de 16 ou 64 Mo fonctionnant à 60ns. Les modules SIMM doivent être de même type et de même capacité et être installés en commençant par le support de SIMM 1 (figure 2). Tous les modules SIMM doivent être de même type. Ne pas mélanger les modules SIMM DPT avec des modules SIMM nonDPT. Français 2 n Le contrôleur PM3755U2B supporte un maximum de 256 Mo de mémoire cache sous forme de modules DIMM DPT de 16 ou 64 Mo. Les modules DIMM doivent être de même type et de même capacité et être installés en commençant par le support de DIMM 1 (figure 3). Tous les modules mémoire doivent être de même capacité. Attention, ne pas installer ou retirer les modules DIMM quand le module batterie BB4050 est installé ou vous risquez d’endommager votre matériel. 3 35 Guide Pratique dinstallation Rapide Terminaison SCSI Français Veillez à ce que la chaîne des périphériques SCSI soit pourvue d’une terminaison, comme représenté dans les exemples ci-après ; notez que seuls les périphériques installés en fin de câble doivent être équipés d’un terminateur. Par défaut, l’option SmartRAID V controller termination (terminaison du contrôleur SmartRAID V) est en mode Auto mais ce paramètre peut être modifié via le Gestionnaire de stockage en ROM (SMOR). Si vous utilisez des périphériques Ultra2 SCSI, consultez la section consacrée à la norme Ultra2. Pour les périphériques Ultra SCSI, reportezvous à la documentation qui les accompagne. En utilisant un câble d’adaptation SCSI 68 broches vers 50 broches, vous pouvez connecter un périphérique SCSI 8-bits à un câble Wide SCSI et le raccorder en chaîne avec d’autres périphériques Wide SCSI. Toutefois, il faut que le périphérique situé en fin de câble soit de type Wide SCSI afin que la terminaison s’applique à tous les signaux SCSI. Si l’un des câbles utilisés, en interne ou en externe, est de type 8 bits (Narrow) SCSI, la terminaison du contrôleur doit être configurée en mode High Only. Narrow SCSI Interne Wide SCSI Interne T T Narrow SCSI Externe Wide SCSI Externe T T SmartRAID V Terminaison = High Only SmartRAID V Terminaison = Auto ou Disabled (désactivé) Narrow SCSI Interne T Wide SCSI Interne T T T Wide SCSI Externe Wide SCSI Interne T T T SmartRAID V Terminaison = Auto T = Terminé 36 Wide SCSI Externe Narrow SCSI Externe T SmartRAID V Terminaison = High Only Guide Pratique dinstallation Rapide Bus et périphériques Ultra2 SCSI Les informations qui suivent s’appliquent au contrôleur et au module SX405xU2, s’il est installé : n Les bus Ultra2 SCSI (procédé LVD) du contrôleur SmartRAID V prennent en charge les périphériques LVD et single-ended qui peuvent être installés sur un même bus SCSI. Notez toutefois que si vous connectez un périphérique single-ended à un bus Ultra 2, l’ensemble du bus fonctionnera à une vitesse maximale Ultra de 20 Mhz. ! Français Ne raccordez pas d’anciens périphériques différentiels SCSI non-Ultra 2 à un bus SCSI de type LVD (Low Voltage Differential), car ceux-ci endommageraient le matériel Ultra 2. n Les périphériques Ultra2 ne possèdent généralement pas de terminaison SCSI. Le câble livré par DPT est pourvu d’un terminateur Ultra 2 à son extrémité. Technologie Fibre Channel Si vous avez installé un module d’expansion SX4055F sur un contrôleur PM3755F, les remarques suivantes vous concernent : n Les périphériques et contrôleurs utilisant la technologie Fibre Channel ne nécessitent pas de terminaison. Consultez la documentation de votre station Fibre Channel pour savoir comment installer le bouchon de bouclage de boucle (loop back) de la station. n Les contrôleurs et périphériques Fibre Channel configurent automatiquement les adresses des périphériques lors de l’amorçage du système. n Les connections Fibre Channel de DPT utilisent un connecteur de type High Speed Serial Data Connector (HSSDC) Adresses (ID) SCSI Vérifiez que tous les périphériques SCSI possèdent une adresse (ID) SCSI unique. n Pour sélectionner les adresses des périphériques SCSI, on utilise généralement des cavaliers ou des micro-contacts situés sur le périphérique lui-même. n Par défaut, l’adresse 7 est utilisée par le contrôleur. Pour modifier l’adresse du contrôleur, vous pouvez utiliser le Gestionnaire de stockage en ROM (SMOR, Storage Manager on ROM) lors du processus de mise sous tension. 37 Guide Pratique dinstallation Rapide n Les adresses 0 à 15 peuvent être affectées aux périphériques Wide SCSI tandis que les périphériques Narrow SCSI (8 bits) peuvent recevoir les adresses 0 à 7. n Si vous avez installé le module d’extension du bus SX405xU2, configurez séparément les adresses SCSI de chacun des canaux. Câblage et installation Français n Reliez le fil de la diode indiquant l’activité du disque de l’ordinateur au connecteur P6 du contrôleur. n Raccordez un câble SCSI interne au contrôleur et aux périphériques SCSI internes. Si vous avez installé le module SX405xU2 en option, utilisez un câble SCSI interne pour le connecter et connectez s’il y a lieu les autres périphériques SCSI internes. Un câble SCSI Ultra 2 interne est fourni avec le contrôleur SmartRAID V. Si des câbles supplémentaires sont nécessaires, contactez votre revendeur DPT ou passez votre commande directement auprès de notre Webstore à l’adresse www.dpt.com. n Installez la carte contrôleur dans un connecteur d’extension PCI disponible. Si vous installez un contrôleur SmartRAID V 64 bits dans un slot PCI 32 bits, attendez-vous à une réduction des performances. n PM3755F et SX4055F: connectez un cable Fibre Channel externe entre le contrôleur et votre station Fibre Channel externe. Si votre station Fibre Channel possède un kit double port et que vous souhaitez installer une configuration en dual loop, notez que DPT ne supporte pas actuellement la redondance en dual loop. Consultez la documentation de votre station Fibre Channel. n Reliez le contrôleur et les périphériques SCSI externes à l’aide d’un câble SCSI externe. Si vous avez installé le module SX405xU2 en option, utilisez un câble SCSI externe pour le connecter s’il y a lieu aux autres périphériques SCSI externes. Si vous disposez d’une station externe Fibre Channel et que le module SX4055F est installé, vous pouvez connecter ce dernier à la station à l’aide d’un câble Fibre Channel. Si vous utilisez plusieurs canaux externes, il est nécessaire d’utiliser un câble 68 broches de type VHDCI décentré. Ce câble décentré permet de connecter au moins 2 câbles externes sans interférence entre les connecteurs. Si vous utilisez des périphériques Ultra 2 SCSI, le câble utilisé doit être certifié Ultra 2. Pour vous procurer des câbles externes décentrés, contactez votre revendeur DPT ou passez votre commande directement auprès de notre Webstore à l’adresse www.dpt.com. 38 Guide Pratique dinstallation Rapide n Si vous utilisez d’autres câbles que ceux qui sont livrés avec le contrôleur, consultez le manuel d’utilisation du contrôleur SmartRAID V pour des informations supplémentaires sur les spécifications requises pour les câbles. Configuration n Allumez l’ordinateur hôte. Pendant le processus d’amorçage du système, lancez l’exécution du Gestionnaire de stockage en ROM (SMOR, Storage Manager on ROM) en appuyant simultanément sur les touches Ctrl+D lorsque le message vous y invite. Français n Si nécessaire, changez les paramètres par défaut relatifs à l’adresse (ID) SCSI et à la terminaison du contrôleur sous l’onglet Configuration de la fenêtre d’informations du contrôleur. n Enregistrez les nouveaux paramètres. n Vérifiez que tous les périphériques SCSI connectés apparaissent dans l’arborescence Tree View du Gestionnaire de stockage en ROM (SMOR). n Si vous le souhaitez, vous pouvez créer des sous-systèmes de disques RAID. Pour plus d’informations, consultez le chapitre consacré au Gestionnaire de stockage en ROM, dans le manuel d’utilisation de SmartRAID V. Installation du logiciel Le processus normal d’installation logicielle sur un nouveau système est le suivant : n Installer le système d’exploitation n Installer le logiciel pilote du périphérique DPT ou le module OSM n Installer le Gestionnaire de stockage “Storage Manager” Pour des informations plus détaillées, consultez le manuel d’utilisation de SmartRAID V. 39 Italiano Guida di Installazione Rapida 40 Guida di Installazione Rapida Introduzione Questa guida vi aiuterà ad installare e configurare il vostro controller DPT Millennium in un nuovo sistema. Se sostituite un controller già esistente, se il controller viene installato in un sistema che non utilizza una CPU Intel, o se non sarà l’unico controller periferico installato nel sistema, consultate il Manuale Utente per lo SmartRAID V (SmartRAID V User’s Manual) per informazioni più dettagliate. Tutti i controller SmartRAID V sono compatibili con PCI 2.2, e sono progettati per funzionare in sistemi host anch’essi PCI 2.2 compatibili. I controller SmartRAID V includono un PCI bridge, che il sistema host deve essere in grado di riconoscere. Leggete le Release Notes di SmartRAID V: Per le informazioni più recenti, selezionate Help–View README Information nello Storage Manager, oppure visualizzate il file READ.ME nella directory di installazione DPT. Per utilizzare il controller vi servirà un driver I2O. DPT fornisce i driver per Linux, SCO Unix, SCO OpenServer, Windows NT e Windows 95/98, nonchè un OSM Novell per NetWare. I driver I2O per SCO UnixWare e BSD/OS 4.1 si possono richiedere direttamente dal produttore del sistema operativo. Per ulteriori informazioni riguardo all’uso dei driver I2O consultate la documentazione del vostro sistema operativo ed il Manuale Utente per SmartRAID V. 41 Italiano Integrazione del Sistema Operativo Guida di Installazione Rapida Installazione dei Moduli n Per aggiungere canali ad un controller Millennium SCSI, installate un modulo di espansione SX4055U2 (Figura 1A). Per aggiungere un secondo canale in fibra ad un controller PM3755F, installate un modulo di espansione SX4055F. Italiano 1A n Sostituite la staffa di montaggio presente sul controller con quella fornita assieme al modulo SX4055U2 (Figura 1B). 1B n Per utilizzare la funzione di backup di batteria del controller PM3775U2B, collegate il modulo batteria BB4050 utilizzando i tre dispositivi di fissaggio forniti come illustrato (Figura 1C). 1C 42 Guida di Installazione Rapida Installazione della Memoria n I controller PM3754U2 e PM3755F supportano fino a 256MB di cache, usando moduli di memoria SIMM 60ns EDO da 16MB o 64MB, low-profile, a faccia singola. Inserite nelle prese solamente moduli SIMM dello stesso tipo e aventi la stessa capacità, partendo dalla presa 1 (Figura 2). Tutti i moduli di memoria devono essere dello stesso tipo. Non usate contemporaneamente moduli SIMM DPT e non DPT. 2 Tutti i moduli di memoria devono avere la stessa capacità. Non installate o rimuovete i moduli DIMM con il Modulo batteria BB4050 collegato. Ciò potrebbe provocare dei danni. 3 43 Italiano n I controller PM3755U2B supportano fino a 256MB di cache, usando moduli di memoria DPT da 16MB o 64MB. Inserite nelle prese solamente moduli DIMM dello stesso tipo e aventi la stessa capacità, partendo dalla presa 1. Guida di Installazione Rapida Terminazione SCSI Terminate i dispositivi SCSI come illustrato negli esempi, assicurandovi che la terminazione sia fatta solamente ai dispositivi alle estremità dei cavi. La terminazione del controller SmartRAID V viene impostata su Auto per default, e può essere modificata mediante lo Storage Manager su ROM (SMOR). Se usate dispositivi Ultra2 SCSI, consultate la sezione “Ultra2 SCSI”. Se avete un dispositivo Ultra, consultate la documentazione fornita assieme al dispositivo. Usando un adapter per cavi SCSI da 68 pin fino a 50 pin è possibile collegare un dispositivo SCSI da 8 bit ad un cavo Wide SCSI insieme ai dispositivi Wide SCSI. Tuttavia il dispositivo all’estremità del cavo deve essere un Wide SCSI, in modo che tutti i segnali SCSI siano terminati. Italiano Per cavi interni ed esterni dei quali uno sia un cavo SCSI da 8 bit (Narrow), impostate la terminazione del controller su High Only. Narrow SCSI Interno Wide SCSI Interno T T Narrow SCSI Esterno Wide SCSI Esterno T T Terminazione SmartRAID V = High Only Terminazione SmartRAID V = Auto o Disabilitata Narrow SCSI Interno T Wide SCSI Interno T Wide SCSI Esterno T T Wide SCSI Interno Wide SCSI Esterno T T T Terminazione SmartRAID V = Auto Narrow SCSI Esterno T Terminazione SmartRAID V = High Only T = Terminato 44 Guida di Installazione Rapida Ultra2 SCSI Quanto segue vale per i controller Ultra2 SCSI e per i moduli SX405xU2: n I bus SmartRAID V Ultra2 (LVD) SCSI supportano sia dispositivi LVD, sia dispositivi single-ended, che possono essere messi assieme sul bus SCSI. Se si collega un dispositivo single-ended ad un bus Ultra2, l’intero bus funzionerà alla velocità massima di 20MHz Ultra. ! Non collegate dispositivi SCSI Differenziali più vecchi, che non siano Ultra2, ad un bus SCSI Ultra2 Low Voltage Differential (LVD), in quanto questo provocherebbe dei danni all’hardware Ultra2. n I dispositivi Ultra2 non sono provvisti di terminazione integrata. DPT fornisce un terminatore Ultra2 all’estremità del cavo venduto assieme al controllore. Italiano Fibre Channel Se utilizzate un controller PM3755F o avete installato un modulo di espansione SX405xF, è valido quanto segue: n Dispositivi e Controllori Fibre Channel non richiedono terminazione. Per informazioni sull’installazione di un plug di loop-back per l’enclosure consultate la documentazione della vostra Fibre Channel Enclosure. n I controllori e dispositivi Fibre Channel configurano automaticamente l’ID del dispositivo durante l’avvio. n I controllori ed i moduli di espansione DPT Fibre Channel utilizzano connettori seriali ad alta velocità (High Speed Serial Data Connectors HSSDC). Numero di Identificazione SCSI (SCSI ID) Assicuratevi che ogni dispositivo SCSI abbia un proprio numero di identificazione unico. n Gli ID dei dispositivi SCSI vengono solitamente impostati per mezzo di jumper o switch presenti sul dispositivo. n Per default, l’ID 7 viene usato per il controller. Potete usare lo SMOR per modificare l’ID del controller all’accensione. n Ai dispositivi Wide SCSI si possono assegnare gli ID da 0 a 15. Ai dispositivi Narrow SCSI invece si possono assegnare solamente gli ID da 0 a 7. n Se avete installato un modulo di espansione SX405xU2, configurate gli ID SCSI del dispositivo indipendentemente per ciascun canale. 45 Guida di Installazione Rapida Collegamento dei Cavi ed Installazione n Collegate il cavo del LED di attività del disco al connettore P6 del controller. n Collegate il controller ai dispositivi SCSI interni per mezzo di un cavo SCSI interno. Potete anche collegare un cavo SCSI interno al modulo SX405xU2 (se installato) ed agli ulteriori dispositivi SCSI interni. Assieme al controller viene fornito anche un cavo SCSI Ultra2 interno. Se vi servono altri cavi, rivolgetevi all’Ufficio Vendite DPT oppure acquistateli direttamente sul il nostro Webstore www.dpt.com. Italiano n Inserite il controller in una slot PCI libera. L’uso di un controller SmartRAID V a 64 bit in un PCI a 32 bit comporta una riduzione delle prestazioni. n PM3755F & SX4055F: Collegate il controller all’enclosure Fibre Channel esterna mediante un cavo Fibre Channel esterno. Se avete un’enclosure Fibre Channel con kit dual port installato e state configurando un dual loop Fibre Channel, tenete presente che il DPT attualmente non supporta la ridondanza di dual-loop. Consultate la documentazione della vostra enclosure Fibre Channel. n Collegate il controller ai dispositivi SCSI esterni per mezzo di un cavo SCSI esterno. Potete anche collegare dei cavi SCSI esterni al modulo SX405xU2 (se installato) ed agli ulteriori dispositivi SCSI esterni. E’ anche possibile collegare il modulo SX405xF (se installato) all’enclosure Fibre Channel Esterna con un cavo Fibre Channel. Il cablaggio esterno multichannel richiede l’uso di un cavo di offset a 68 pin VHDCI. Questo cavo di offset vi permette di collegare due o più cavi esterni senza interferenza tra i connettori dei cavi. Se state utilizzando dispositivi SCSI Ultra2, il cavo deve essere approvato per Ultra2. Se vi servono cavi offset esterni rivolgetevi all’Ufficio vendite DPT oppure acquistateli direttamente sul nostro Webstore www.dpt.com. Se state usando cavi non DPT, consultate il Manuale Utente per SmartRAID V per ulteriori informazioni sui requisiti dei cavi. 46 Guida di Installazione Rapida Configurazione n Accendete il computer host. Avviate lo Storage Manager su ROM (SMOR) premendo Ctrl+D quando richiesto durante l’avviamento del sistema. n Se necessario cambiate le impostazioni di default del Numero di Identificazione SCSI e della terminazione del controller nella tabella di Configurazione della finestra di Informazioni del controller. n Salvate le nuove impostazioni. n Verificate che tutti i dispositivi SCSI collegati siano visibili nel Device Tree dello SMOR. n Se si desidera, è possibile creare delle disk array. Consultate il capitolo “Storage Manager su ROM” nel Manuale Utente per SmartRAID V. Installazione del Software Italiano In un sistema nuovo, la normale sequenza di installazione del software è la seguente: n Installazione del Sistema Operativo n Installazione del driver per il dispositivo DPT o OSM n Installazione dello Storage Manager Per informazioni più complete consultate il Manuale Utente per SmartRAID V. 47 Polski Podrêcznik Instalacji 48 Podrêcznik Instalacji Wprowadzenie Instrukcja ta pomo¿e skonfigurowaæ i zainstalowaæ kontroler DTP Millennium w nowym systemie. W przypadku wymiany istniej¹cego kontrolera, instalacji kontrolera w systemie nie opartym na procesorze firmy Intel lub gdy kontroler nie bêdzie jedynym kontrolerem urz¹dzenia peryferyjnego w systemie, nale¿y zajrzeæ do Podrêcznika U¿ytkownika SmartRAID V (SmartRAID V User’s Manual) w celu uzyskania pe³nych informacji. Wszystkie kontrolery SmartRAID V s¹ zgodne ze standardem PCI 2.2 i zaprojektowane do pracy w systemach kompatybilnych z powy¿sz¹ technologi¹. Kontroler SmartRAID V zawiera mostek PCI, który musi byæ rozpoznawany przez system. Informacje o SmartRAID V: Najnowsze informacje mo¿na uzyskaæ wybieraj¹c opcjê HelpView README Information w programie Storage Manager lub przegl¹daj¹c plik READ.ME w katalogu instalacyjnym DPT. Systemy Operacyjne Sterowniki I2O dla SCO UnixWare i BSD/OS 4.1 mo¿na otrzymaæ bezporednio od producenta systemu operacyjnego. W celu uzyskania dodatkowych informacji o sterownikach I2O mo¿na siêgn¹æ do dokumentacji stosowanego systemu operacyjnego lub do Podrêcznika U¿ytkownika SmartRAID V. 49 Polski W celu korzystania z kontrolera, wymagany jest sterownik urz¹dzeñ I2O. DPT zapewnia sterowniki dla systemów Linux, SCO Unix, SCO OpenServer, Windows NT i Windows 95/98. Ponadto dostêpny jest te¿ OSM autorstwa firmy Novell dla systemu NetWare. Podrêcznik Instalacji Instalacja Modu³ów n W celu dodania kana³ów do kontrolera SCSI Millennium, nale¿y zainstalowaæ Modu³ Rozszerzenia SX4055U2 (Rysunek 1A). W celu dodania drugiego Fibre Channel do kontrolera PM3755F, nale¿y zainstalowaæ Modu³ Rozszerzenia SX4055F. 1A Polski n Wspornik mocuj¹cy na kontrolerze nale¿y wymieniæ na nowy dostarczony z modu³em SX4055U2 (Rysunek 1B). 1B n W celu wykorzystania funkcji podtrzymywania bateryjnego na kontrolerze PM3775U2B, nale¿y do³¹czyæ modu³ baterii BB4050 przy zastosowaniu trzech dostarczonych elementów mocuj¹cych. (Rysunek 1C). 1C 50 Podrêcznik Instalacji Instalacja Pamiêci n Kontrolery PM3754U2 i PM3755F obs³uguj¹ do 256 MB pamiêci cache z³o¿onej z 16MB lub 64MB jednostronnych modu³ów pamiêci 60ns EDO SIMMs. W gniazdach nale¿y zainstalowaæ modu³y SIMM jednego typu i takiej samej wydajnoci poczynaj¹c od gniazda 1 (Rysunek 2). Wszystkie modu³y pamiêci musz¹ byæ tego samego typu. Nie wolno mieszaæ modu³ów DPT SIMM i nie-DPT SIMM. 2 Polski n Kontrolery PM3755U2B obs³uguj¹ do 256MB pamiêci cache, z³o¿onej z modu³ów pamiêci DPT 16MB lub 64MB. Gniazda nale¿y wype³niæ modu³ami pamiêci DIMM tego samego typu i wydajnoci poczynaj¹c od gniazda 1 (Rysunek 3). Wszystkie modu³y pamiêci musz¹ byæ tej samej wydajnoci. Nie nale¿y instalowaæ lub usuwaæ modu³ów pamiêci DIMM z do³¹czonym Modu³em Baterii BB4050. Operacja ta mo¿e spowodowaæ uszkodzenia. 3 51 Podrêcznik Instalacji Terminator SCSI Nale¿y zakoñczyæ urz¹dzenia SCSI, jak pokazano na przyk³adach. Tylko urz¹dzenia na koñcach kabli powinny byæ terminowane. Terminator kontrolera SmartRAID V ustawiony jest domylnie na Auto. Zmiany mo¿na dokonaæ przy zastosowaniu Storage Manager on ROM (SMOR). W przypadku u¿ytkowania urz¹dzeñ Ultra2 SCSI, nale¿y zapoznaæ siê z informacjami w czêci Ultra2 SCSI. Dla urz¹dzeñ w standardzie Ultra, nale¿y stosowaæ siê do zaleceñ dokumentacji tych urz¹dzeñ. Poprzez zastosowanie adaptera kabla SCSI 68- na 50-pinowego, mo¿na pod³¹czyæ urz¹dzenia 8-bitowe SCSI do kabla Wide SCSI wraz urz¹dzeniami Wide SCSI. Jednak urz¹dzeniem na koñcu kabla musi byæ urz¹dzenie Wide SCSI w celu ograniczenia wszystkich sygna³ów SCSI. Przy korzystaniu z kabli zewnêtrznego i wewnêtrznego, gdzie jeden z nich jest kablem 8-bitowym, nale¿y przestawiæ terminacjê na kontrolerze na opcjê High Only. Wewnetrzny Narrow SCSI Wewnetrzny Wide SCSI T Polski T Zewnetrzny Wide SCSI Zewnetrzny Narrow SCSI T T SmartRAID V Ograniczenie = High Only SmartRAID V Ograniczenie = Auto lub Disabled (Wylaczony) Wewnetrzny Narrow SCSI T Wewnetrzny Wide SCSI T Zewnetrzny Wide SCSI T T Zewnetrzny Wide SCSI Wewnetrzny Wide SCSI T T T SmartRAID V Ograniczenie = Auto Zewnetrzny Narrow SCSI T SmartRAID V Ograniczenie = High Only T = Ograniczony 52 Podrêcznik Instalacji Ultra2 SCSI Nastêpuj¹ce uwagi dotycz¹ kontrolera i modu³u SX405xU2 (w przypadku jego zainstalowania): n Kontrolery SmartRAID V Ultra2 (LVD) SCSI obs³uguj¹ zarówno urz¹dzenia LVD jak i single-ended , które mo¿na mieszaæ na magistrali SCSI. Pod³¹czenie urz¹dzenia single-ended do magistrali Ultra2 spowoduje pracê ca³ej magistrali z maksymaln¹ szybkoci¹ 20MHz. ! Nie nale¿y pod³¹czaæ urz¹dzeñ Differential SCSI niezgodnych ze standardem Ultra2 do magistrali Ultra2 Low Voltage Differential (LVD). Taka operacja spowoduje zniszczenie urz¹dzenia Ultra2. n Urz¹dzenia Ultra2 zwykle nie maj¹ wbudowanego terminatora. DPT zapewnia terminator Ultra2 na koñcu kabla dostarczanego z kontrolerem. Fibre Channel Nastêpuj¹ce uwagi dotycz¹ korzystania z PM3755F lub instalacji modu³u rozszerzenia SX4055F: n Kontrolery i urz¹dzenia Fibre Channel automatycznie konfiguruj¹ ID urz¹dzeñ podczas uruchamiania systemu. n DPT korzysta ze z³¹cza High Speed Serial Data Connector (HSSDC). ID SCSI Nale¿y upewniæ siê, ¿e ka¿de urz¹dzenie SCSI ma w³asny unikalny numer ID SCSI. n Numery ID urz¹dzeñ SCSI ustawia siê zwykle za pomoc¹ zworek lub prze³¹czników na urz¹dzeniu. n Domylnie, ID 7 wykorzystywane jest dla kontrolera. Zmian ID mo¿na dokonaæ za porednictwem SMOR przy starcie. n Urz¹dzeniom Wide-SCSI mo¿na przyporz¹dkowaæ numery ID od 0 do 15. Urz¹dzenia Narrow SCSI korzystaj¹ z numerów ID od 0 do 7. n W przypadku zainstalowanego Modu³u Rozszerzenia SX405xU2, nale¿y skonfigurowaæ numery ID urz¹dzeñ SCSI niezale¿nie dla ka¿dego kana³u. 53 Polski n Urz¹dzenia i kontrolery Fibre Channel nie wymagaj¹ terminatora. Instalacja wtyczki pêtli zwrotnej opisana jest w dokumentacji obudowy Fibre Channel. Podrêcznik Instalacji Kable i Instalacja n Kabel pracy dysku LED nale¿y pod³¹czyæ do z³¹cza P6 na kontrolerze. n Kabel wewnêtrznego urz¹dzenia SCSI nale¿y pod³¹czyæ do kontrolera i do wewnêtrznych urz¹dzeñ SCSI. Opcjonalnie kabel wewnêtrznego urz¹dzenia SCSI nale¿y do³¹czyæ do SX405xU2 (jeli jest zainstalowany) i do dodatkowych wewnêtrznych urz¹dzeñ SCSI. Jeden kabel wewnêtrznego urz¹dzenia Ultra2 SCSI do³¹czony jest do zestawu z kontrolerem SmartRAID V. Jeli potrzebne s¹ dodatkowe kable, nale¿y skontaktowaæ siê z Dzia³em Sprzeda¿y DPT lub dokonaæ zakupów w naszym sklepie internetowym pod adresem: http://www.dpt.com. Polski n Kontroler nale¿y pod³¹czyæ do wolnego gniazda PCI. Korzystanie z 64bitowego kontrolera SmartRAID V w komputerze 32-bitowym spowoduje zmniejszenie wydajnoci. n PM3755F & SX4055F: Pod³¹cz kabel zewnêtrznego Fibre Channel miêdzy kontrolerem a zewnêtrznym urz¹dzeniem Fibre Channel. W przypadku posiadania zewnêtrznego urz¹dzenia Fibre Channel z zainstalowanym podwójnym portem i konfiguracji dla systemu z podwójn¹ pêtl¹ , nale¿y zdawaæ sobie sprawê, ¿e DPT obecnie nie obs³uguje systemów z podwójn¹ pêtl¹. W dokumentacji urz¹dzenia Fibre Channel mo¿na znaleæ wiêcej informacji na ten temat. n Kabel zewnêtrznego urz¹dzenia SCSI nale¿y pod³¹czyæ miêdzy kontrolerem a urz¹dzeniami zewnêtrznymi SCSI. Opcjonalnie, pod³¹cza siê kable zewnêtrznego urz¹dzenia SCSI pomiêdzy SX405xU2 (jeli jest zainstalowany) i dodatkowymi zewnêtrznymi urz¹dzeniami SCSI. Natomiast kabel Fibre Channel pod³¹czany jest pomiêdzy SX4055F (jeli jest zainstalowany) a zewnêtrzn¹ obudow¹ i Fibre Channel. Kable zewnêtrzne wielokana³owe wymagaj¹ 68-pinowego kabla offset VHDCI. Pozwala on na pod³¹czenie dwóch lub wiêcej zewnêtrznych kabli. W przypadku korzystania z urz¹dzeñ Ultra2 SCSI, kabel musi spe³niaæ wymagania tego standardu. Jeli potrzebne s¹ zewnêtrzne kable typu offset, nale¿y skontaktowaæ siê z Dzia³em Sprzeda¿y DPT lub dokonaæ zakupów w naszym sklepie internetowym pod adresem: http://www.dpt.com. W przypadku wykorzystywania kabli produkowanych nie przez DPT nale¿y sprawdziæ w Podrêczniku U¿ytkownika SmartRAID V dodatkowe wymagania dotycz¹ce kabli. 54 Podrêcznik Instalacji Konfiguracja n Nale¿y w³¹czyæ komputer i uruchomiæ Storage Manager on ROM (SMOR) poprzez naciniêcie Ctrl+D w czasie procesu startu systemu. n W razie potrzeby, mo¿na zmieniæ ustawienia domylne numeru ID kontrolera SCSI i terminacjê korzystaj¹c z opcji Configuration dostêpnej w oknie Information. n Nowe ustawienia nale¿y zapisaæ. n W SMOR Device Tree nale¿y sprawdziæ, czy wszystkie pod³¹czone urz¹dzenia SCSI s¹ widoczne. n W razie potrzeby mo¿na stworzyæ macierz dyskow¹. Informacje na ten temat znajduj¹ siê w rozdziale Storage Manager on ROM Podrêcznika U¿ytkownika SmartRAID V. Instalacja Oprogramowania W nowym systemie, zwyk³a procedura instalacji wygl¹da nastêpuj¹co: n Instalacja Systemu Operacyjnego Polski n Instalacja sterownika urz¹dzenia lub OSM DPT n Instalacja Storage Manager Pe³ne informacje mo¿na znaleæ w Podrêczniku U¿ytkownika SmartRAID V. 55 Polski Podrêcznik Instalacji 56 DO-0999-001 Distributed Processing Technology 140 Candace Drive Maitland, Florida USA Phone +1 407 830-5522 Fax +1 407 260-5366 www.dpt.com