1
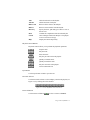
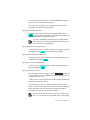
3D Blaster Banshee
User Guide
On-line Version
Installation Guide
Information in this document is subject to change without notice and does not represent a
commitment on the part of Creative Technology Ltd. No part of this manual may be reproduced
or transmitted in any form or by any means, electronic or mechanical, including photocopying and
recording, for any purpose without the written permission of Creative Technology Ltd.
The software described in this document is furnished under a license agreement and may be used
or copied only in accordance with the terms of the license agreement. It is against the law to copy
the software on any other medium except as specifically allowed in the license agreement. The
licensee may make one copy of the software for backup purposes.
Copyright © 1996-1998 by Creative Technology Ltd. All rights reserved.
Version 1.0 (CLI)
September 1998
Version 1.0
3D Blaster is a trademark of Creative Technology Ltd. Banshee is a trademark of 3Dfx Interactive,
Inc. Colorific and 3Deep are registered trademarks of Sonnetech, Ltd. All other products are
trademarks or registered trademarks of their respective owners
Cre a tiv e E nd-U s er S o ftw a re L ic e nse A g re e m en t
PLEASE READ THIS DOCUMENT CAREFULLY BEFORE OPENING THE SEALED DISK PACKAGE OR INSTALLING THE SOFTWARE. BY
OPENING THE SEALED DISK PACKAGE OR INSTALLING THE SOFTWARE, YOU ARE AGREEING TO BECOME BOUND BY THE TERMS
OF THIS AGREEMENT. IF YOU DO NOT AGREE TO THE TERMS OF THE AGREEMENT, PLEASE DO NOT OPEN THE SEALED DISK
PACKAGE OR INSTALL THE SOFTWARE. PROMPTLY RETURN, WITHIN 15 DAYS, THE SOFTWARE, ALL RELATED DOCUMENTATION
AND ACCOMPANYING ITEMS TO THE PLACE OF ACQUISITION FOR A FULL REFUND.
This is a legal agreement between you and Creative Technology Ltd. and its
subsidiaries (“Creative”). This Agreement states the terms and conditions
upon which Creative offers to license the software sealed in the disk package
together with all related documentation and accompanying items including,
but not limited to, the executable programs, drivers, libraries and data files
associated with such programs (collectively, the “Software”).
LICENSE
1. Grant of License
The Software is licensed, not sold, to you for use only under the terms of
this Agreement. You own the disk or other media on which the Software
is originally or subsequently recorded or fixed; but, as between you and
Creative (and, to the extent applicable, its licensors), Creative retains all
title to and ownership of the Software and reserves all rights not
expressly granted to you.
2. For Use on a Single Computer
The Software may be used by you only on a single computer with a single
CPU. You may transfer the machine-readable portion of the Software
from one computer to another computer, provided that (a) the Software
(including any portion or copy thereof) is erased from the first computer
and (b) there is no possibility that the Software will be used on more than
one computer at a time.
3. Stand-Alone Basis
You may use the Software only on a stand-alone basis, such that the
Software and the functions it provides are accessible only to persons who
are physically present at the location of the computer on which the
Software is loaded. You may not allow the Software or its functions to
be accessed remotely, or transmit all or any portion of the Software
through any network or communication line.
4. One Archival Copy
You may make one (1) archival copy of the machine-readable portion of
the Software for backup purposes only in support of your use of the
Software on a single computer, provided that you reproduce on the copy
all copyright and other proprietary rights notices included on the
originals of the Software.
5. No Merger or Integration
You may not merge any portion of the Software into, or integrate any
portion of the Software with, any other program, except to the extent
expressly permitted by the laws of the jurisdiction where you are located.
Any portion of the Software merged into or integrated with another
program, if any, will continue to be subject to the terms and conditions of
this Agreement, and you must reproduce on the merged or integrated
portion all copyright and other proprietary rights notices included on the
originals of the Software.
6. Network Version
If you have purchased a “network” version of the Software, this
Agreement applies to the installation of the Software on a single “file
server”. It may not be copied onto multiple systems. Each “node”
connected to the “file server” must also have its own license of a “node
copy” of the Software, which becomes a license only for that specific
“node”.
7. Transfer of License
You may transfer your license of the Software, provided that (a) you
transfer all portions of the Software or copies thereof, (b) you do not
retain any portion of the Software or any copy thereof, and (c) the
transferee reads and agrees to be bound by the terms and conditions of
this Agreement.
8. Limitations on Using, Copying, and Modifying the Software
Except to the extent expressly permitted by this Agreement or by the laws
of the jurisdiction where you acquired the Software, you may not use,
copy or modify the Software. Nor may you sub-license any of your rights
under this Agreement.
9. Decompiling, Disassembling, or Reverse Engineering
You acknowledge that the Software contains trade secrets and other
proprietary information of Creative and its licensors. Except to the extent
expressly permitted by this Agreement or by the laws of the jurisdiction
where you are located, you may not decompile, disassemble or otherwise
reverse engineer the Software, or engage in any other activities to obtain
underlying information that is not visible to the user in connection with
normal use of the Software. In any event, you will notify Creative of any
information derived from reverse engineering or such other activities,
and the results thereof will constitute the confidential information of
Creative that may be used only in connection with the Software.
TERMINATION
The license granted to you is effective until terminated. You may terminate
it at any time by returning the Software (including any portions or copies
thereof) to Creative. The license will also terminate automatically without
any notice from Creative if you fail to comply with any term or condition of
this Agreement. You agree upon such termination to return the Software
(including any portions or copies thereof) to Creative. Upon termination,
Creative may also enforce any rights provided by law. The provisions of this
Agreement that protect the proprietary rights of Creative will continue in
force after termination.
LIMITED WARRANTY
Creative warrants, as the sole warranty, that the disks on which the Software
is furnished will be free of defects, as set forth in the Warranty Card or printed
manual included with the Software. No distributor, dealer or any other entity
or person is authorized to expand or alter this warranty or any other provisions
of this Agreement. Any representation, other than the warranties set forth in
this Agreement, will not bind Creative.
Creative does not warrant that the functions contained in the Software will
meet your requirements or that the operation of the Software will be
uninterrupted or error-free. EXCEPT AS STATED ABOVE IN THIS
AGREEMENT, THE SOFTWARE IS PROVIDED AS-IS WITHOUT
WARRANTY OF ANY KIND, EITHER EXPRESS OR IMPLIED,
INCLUDING, BUT NOT LIMITED TO, ANY IMPLIED
WARRANTIES OF MERCHANTABILITY AND FITNESS FOR A
PARTICULAR PURPOSE.
You assume full responsibility for the selection of the Software to achieve
your intended results, and for the installation, use and results obtained from
the Software. You also assume the entire risk as it applies to the quality and
performance of the Software. Should the Software prove defective, you (and
not Creative, or its distributors or dealers) assume the entire cost of all
necessary servicing, repair or correction.
This warranty gives you specific legal rights, and you may also have other
rights which vary from country/state to country/state. Some countries/states
do not allow the exclusion of implied warranties, so the above exclusion may
not apply to you. Creative disclaims all warranties of any kind if the Software
was customized, repackaged or altered in any way by any third party other
than Creative.
LIMITATION OF REMEDIES AND DAMAGES
THE ONLY REMEDY FOR BREACH OF WARRANTY WILL BE
THAT SET FORTH IN THE WARRANTY CARD OR PRINTED
MANUAL INCLUDED WITH THE SOFTWARE. IN NO EVENT
WILL CREATIVE OR ITS LICENSORS BE LIABLE FOR ANY
INDIRECT, INCIDENTAL, SPECIAL OR CONSEQUENTIAL
DAMAGES OR FOR ANY LOST PROFITS, LOST SAVINGS, LOST
REVENUES OR LOST DATA ARISING FROM OR RELATING TO
THE SOFTWARE OR THIS AGREEMENT, EVEN IF CREATIVE OR
ITS LICENSORS HAVE BEEN ADVISED OF THE POSSIBILITY OF
SUCH DAMAGES. IN NO EVENT WILL CREATIVE’S LIABILITY
OR DAMAGES TO YOU OR ANY OTHER PERSON EVER EXCEED
THE AMOUNT PAID BY YOU TO USE THE SOFTWARE,
REGARDLESS OF THE FORM OF THE CLAIM. Some
countries/states do not allow the limitation or exclusion of liability for
incidental or consequential damages, so the above limitation or exclusion
may not apply to you.
PRODUCT RETURNS
If you must ship the software to creative or an authorized creative distributor
or dealer, you must prepay shipping and either insure the software or assume
all risk of loss or damage in transit.
U.S. GOVERNMENT RESTRICTED RIGHTS
All Software and related documentation are provided with restricted rights.
Use, duplication or disclosure by the U.S. Government is subject to
restrictions as set forth in subdivision (b)(3)(ii) of the Rights in Technical
Data and Computer Software Clause at 252.227-7013. If you are
sub-licensing or using the Software outside of the United States, you will
comply with the applicable local laws of your country, U.S. export control
law, and the English version of this Agreement.
CONTRACTOR/MANUFACTURER
The Contractor/Manufacturer for the Software is:
Creative Technology Ltd
67 Ayer Rajah Crescent #03-18
Singapore 139950
GENERAL
This Agreement is binding on you as well as your employees, employers,
contractors and agents, and on any successors and assignees. Neither the
Software nor any information derived therefrom may be exported except in
accordance with the laws of the U.S. or other applicable provisions. This
Agreement is governed by the laws of the State of California (except to the
extent federal law governs copyrights and federally registered trademarks).
This Agreement is the entire agreement between us and supersedes any other
understandings or agreements, including, but not limited to, advertising, with
respect to the Software. If any provision of this Agreement is deemed invalid
or unenforceable by any country or government agency having jurisdiction,
that particular provision will be deemed modified to the extent necessary to
make the provision valid and enforceable, and the remaining provisions will
remain in full force and effect. For questions concerning this Agreement,
please contact Creative at the address stated above. For questions on product
or technical matters, contact the Creative technical support centre nearest
you.
SPECIAL PROVISIONS APPLICABLE TO THE EUROPEAN UNION
IF YOU ACQUIRED THE SOFTWARE IN THE EUROPEAN UNION (EU), THE FOLLOWING PROVISIONS ALSO APPLY TO YOU. IF THERE IS ANY
INCONSISTENCY BETWEEN THE TERMS OF THE SOFTWARE LICENSE AGREEMENT SET OUT ABOVE AND THE FOLLOWING PROVISIONS,
THE FOLLOWING PROVISIONS SHALL TAKE PRECEDENCE.
DECOMPILATION
You agree not for any purpose to transmit the Software or display the
Software’s object code on any computer screen or to make any hard copy
memory dumps of the Software’s object code. If you believe you require
information related to the interoperability of the Software with other
programs, you shall not decompile or disassemble the Software to obtain such
information, and you agree to request such information from Creative at the
address listed below. Upon receiving such a request, Creative shall determine
whether you require such information for a legitimate purpose and, if so,
Creative will provide such information to you within a reasonable time and
on reasonable conditions.
LIMITED WARRANTY
EXCEPT AS STATED ABOVE IN THIS AGREEMENT, AND AS
PROVIDED BELOW UNDER THE HEADING "STATUTORY
RIGHTS", THE SOFTWARE IS PROVIDED AS-IS WITHOUT
WARRANTY OF ANY KIND, EITHER EXPRESS OR IMPLIED,
INCLUDING, BUT NOT LIMITED TO, ANY IMPLIED
WARRANTIES OR CONDITIONS OF MERCHANTABILITY,
QUALITY AND FITNESS FOR A PARTICULAR PURPOSE.
LIMITATION OF REMEDY AND DAMAGES
THE LIMITATIONS OF REMEDIES AND DAMAGES IN THE
SOFTWARE LICENSE AGREEMENT SHALL NOT APPLY TO
PERSONAL INJURY (INCLUDING DEATH) TO ANY PERSON
CAUSED BY CREATIVE’S NEGLIGENCE AND ARE SUBJECT TO
THE PROVISION SET OUT BELOW UNDER THE HEADING
"STATUTORY RIGHTS".
STATUTORY RIGHTS
Irish law provides that certain conditions and warranties may be implied in
contracts for the sale of goods and in contracts for the supply of services. Such
conditions and warranties are hereby excluded, to the extent such exclusion,
in the context of this transaction, is lawful under Irish law. Conversely, such
conditions and warranties, insofar as they may not be lawfully excluded, shall
apply. Accordingly nothing in this Agreement shall prejudice any rights that
you may enjoy by virtue of Sections 12, 13, 14 or 15 of the Irish Sale of Goods
Act 1893 (as amended).
GENERAL
This Agreement is governed by the laws of the Republic of Ireland. The local
language version of this agreement shall apply to Software acquired in the
EU. This Agreement is the entire agreement between us and you agree that
Creative will not have any liability for any untrue statement or representation
made by it, its agents or anyone else (whether innocently or negligently) upon
which you relied upon entering this Agreement, unless such untrue statement
or representation was made fraudulently.
Safety & Regulatory Information
The following sections contain notices for various countries:
Safety Information
CAUTION: This device is intended to be installed by the user in
a CSA/TUV/UL certified/listed IBM AT or compatible personal
computers in the manufacturer’s defined operator access area.
Check the equipment operating/installation manual and/or with
the equipment manufacturer to verify/confirm if your equipment
is suitable for user-installed application cards.
ATTENTION: Ce carte est destiné à être installé par
l’utilisateur, dans un ordinateur compatible certifié
CSA/TUV/UL ou listé IBM AT, à l’intérieur de la zone définie
par le fabricant. Consulter le mode d’emploi ou le fabricant de
l’appareil pour vérifier ou confirmer si l’utilisateur peut y
installer lui-même des cartes périphériques.
Notice for Canada
This apparatus complies with the Class “B” limits for radio
interference as specified in the Canadian Department of
Communications Radio Interference Regulations.
Cet appareil est conforme aux normes de CLASSE “B”
d’interference radio tel que spe’cifie’ par le Ministère Canadien
des Communications dans les règlements d’interfe’rence radio.
Compliance
This product conforms to the following Council Directive:
! Directive 89/336/EEC, 92/31/EEC (EMC)
Notice for the USA
FCC Part 15: This equipment has been tested and found to
comply with the limits for a Class B digital device, pursuant to
Part 15 of the FCC Rules. These limits are designed to provide
reasonable protection against harmful interference in a residential
installation. This equipment generates, uses, and can radiate
radio frequency energy and, if not installed and used in
accordance with the instructions, may cause harmful interference
to radio communications. However, this notice is not a guarantee
that interference will not occur in a particular installation. If this
equipment does cause harmful interference to radio or television
reception, which can be determined by turning the equipment off
and on, the user is encouraged to try one or more of the following
measures:
! Reorient or relocate the receiving antenna.
! Increase the distance between the equipment and receiver.
! Connect the equipment to an outlet on a circuit different
from that to which the receiver is connected.
! Consult the dealer or an experienced radio/TV technician.
CAUTION: To comply with the limits for the Class B digital
device, pursuant to Part 15 of the FCC Rules, this device must be
installed in computer equipment certified to comply with the
Class B limits.
All cables used to connect the computer and peripherals must be
shielded and grounded. Operation with non-certified computers
or non-shielded cables may result in interference to radio or
television reception.
Modifications
Any changes or modifications not expressly approved by the
grantee of this device could void the user’s authority to operate
the device.
Declaration of Conformity
According to the FCC96 208 and ET95-19 documents,
Name:
Creative Labs Inc.
Address:
1901 McCarthy Boulevard
Milpitas, CA. 95035
United States
Tel: (408) 428-6600
declares under its sole responsibility that the product
Trade Name:Creative Labs
Model Number:CT6760
has been tested according to the FCC / CISPR22/85 requirements
for Class B devices and found compliant with the following
standards:
EMI/EMC: ANSI C63.4 1992, FCC Part 15 Subpart B
This device complies with part 15 of the FCC Rules.
Operation is subject to the following two conditions:
1. This device may not cause harmful interference, and
2. This device must accept any interference received,
including interference that may cause undesirable
operation.
Ce matériel est conforme à la section 15 des régles FCC.
Son Fonctionnement est soumis aux deux conditions
suivantes:
1. Le matériel ne peut étre source D’interférences et
2. Doit accepter toutes les interférences reques, Y
compris celles pouvant provoquer un fonctionnement
indésirable.
Supplementary Information:
CT6760 is PCI interface
Compliance Manager
Creative Labs, Inc.
13 August 1998
Contents
Introduction
System Requirements............................................................................. vii
Driver Updates ...................................................................................... viii
Getting More Information..................................................................... viii
For 3D Blaster Banshee............................................................. viii
1
Setting Up Your 3D Blaster Banshee
3D Blaster Banshee Connectors............................................................ 1-1
Setting Up 3D Blaster Banshee Card.................................................... 1-1
2
Installing Software
Installing in Windows 95 (Retail version) ............................................ 2-1
Installing in Windows 95 (OSR version 2.1 and above)....................... 2-2
Installing in Windows 98 ...................................................................... 2-4
Installing Software in Windows NT 4.0 ............................................... 2-5
Changing Display Settings in Windows NT 4.0........................ 2-6
3
Troubleshooting
Determining your Windows 95 Version................................................ 3-1
System Hangs, Blank Screen or Corrupted Display ............................. 3-1
Windows 98 Multi-Monitor Display Problems .................................... 3-2
Other Display Problems........................................................................ 3-2
Beeping Sounds During System Startup............................................... 3-3
Problems Installing Software................................................................ 3-3
Creative SoftMPEG .............................................................................. 3-4
4
Using BlasterControl
Getting More Information..................................................................... 4-1
Opening Display Properties Dialog ...................................................... 4-2
Adjusting Display Settings ................................................................... 4-3
Changing Refresh Rate.............................................................. 4-4
Changing Display Position ........................................................ 4-5
Changing Display Size .............................................................. 4-5
Assigning and Clearing Hot Keys......................................................... 4-6
Assigning Hot Keys................................................................... 4-6
Clearing Hot Key Assignments ................................................. 4-7
Adjusting the Virtual Desktop ................................................... 4-8
Correcting Display Settings ................................................................ 4-10
Contents v
5
Using Creative SoftMPEG
Getting More Information .....................................................................5-1
Starting Creative SoftMPEG.................................................................5-2
Playing Tracks.......................................................................................5-6
Working with the MPEG File Playlist...................................................5-8
Using the Preferences Dialog.............................................................. 5-11
Using Command Line Switches..........................................................5-12
Using Keyboard Shortcuts ..................................................................5-12
6
Sonnetech’s Colorific® and 3Deep®
Colorific® True Color Matching ..........................................................6-1
Running Colorific ......................................................................6-1
After Running Colorific.............................................................6-2
Windows 95/98 only .............................................................6-2
Advanced Windows Users (all versions).............................6-2
3Deep ....................................................................................................6-2
Using 3Deep ..............................................................................6-3
About True Internet Color® ......................................................6-3
Colorific and 3Deep..............................................................6-3
Technical Support..................................................................................6-4
A
B
Technical Specifications
Technical Support
Before You Contact Us ........................................................................ B-1
Product Return ..................................................................................... B-2
Contents
vi
Introduction
3D Blaster Banshee is a state-of-the-art, fully integrated 128-bit
VGA/2D/3D/video accelerator with full VMI interface. Engineered to
meet the demands of value-conscious but discerning gamers, 3D
Blaster Banshee combines the best of VGA and 3D game accelerator
technologies to eliminate the need for a separate 3D accelerator card.
As a VGA card, it harnesses an outstanding graphics engine to enhance
your overall visual experience. Its powerful graphics engine and rich
3D features give you smoother, more realistic play for games and let
you do real-time 3D design work – far surpassing the average VGA
card.
Equally uncompromising in the 2D arena, 3D Blaster Banshee speeds
up your navigation within the Windows environment while you work
on your documents and spreadsheets or use other applications.
As a 3D game accelerator, its processor and impressive RAM deliver
neck-breaking speed and breathtaking performance. Advanced
features include anti-aliasing, bilinear and trilinear filtering. All these
translate into overall visual improvement with complex 3D gaming
environments.
The README file on the CD-ROM contains information not available
at the time of printing. Read the file before you continue.
In addition, read the following:
! System Requirements
! Driver Updates
System Requirements
The minimum system requirements for your 3D Blaster Banshee are:
! IBM PC-compatible Pentium-90 with a CD-ROM drive
installed
! 16 MB RAM
! 15 MB free hard disk space
! Vacant 32-bit PCI 2.1 expansion slot
! VGA monitor
! Windows 95, Windows 98 or Windows NT 4.0
Introduction vii
Driver Updates
To download the latest Banshee drivers, visit Creative’s website (refer
to the Technical Support leaflet for details).
Getting More Information
For 3D Blaster Banshee
The Help file for 3D Blaster Banshee gives a brief introduction to the
features supported by your graphics card.
To open the Help file 3DBB.HLP, click the Start button, point to
Programs, followed by Creative, followed by 3D Blaster Banshee, and
then click the 3D Blaster Banshee Help icon.
Introduction
viii
1
Setting Up Your 3D Blaster Banshee
This chapter familiarizes you with the 3D Blaster Banshee and shows
you how to set it up.
! 3D Blaster Banshee Connectors
! Setting Up 3D Blaster Banshee Card
3D Blaster Banshee Connectors
Connectors are multiple pins or multiple-pin receptacles that allow you
to attach other devices to your 3D Blaster Banshee.
PCI gold-striped bus connector
Monitor Output connector
Connects to your monitor via a monitor cable.
Setting Up 3D Blaster Banshee Card
To install your 3D Blaster Banshee in the computer:
1. Switch off the power to the computer system and all peripheral
devices. Unplug the power cord from the wall outlet.
2. Touch a metal part of your computer to discharge any static
electricity.
Setting Up Your 3D Blaster Banshee 1-1
3. Remove the cover from your computer.
If you are replacing an existing VGA card with 3D Blaster
Banshee, remove the existing VGA card.
4. Locate a free PCI expansion
slot for your 3D Blaster
Banshee. The relative
length and position of the
PCI expansion slots are
shown in the figure.
AGP slot
PCI slot
ISA slot
PCI systems usually give
slot 1 top priority. For best performance and compatibility,
place the 3D Blaster Banshee into slot 1 if possible. See your
computer’s manual for the location of slot 1.
5. Remove the metal plate from the expansion slot. Keep the
screw and the metal plate in case you need them later.
6. Align the 3D Blaster
Banshee’s PCI connector with
the free PCI expansion slot
and insert the card into the
slot. Ensure that the card’s
tabs fit firmly in the PCI
expansion slot.
2. Fasten the card to the
slot with a screw.
1. Insert the
card into
the slot.
Do not force the 3D Blaster Banshee into place. If it does not
fit properly, remove it and try again.
7. Secure the card to the expansion slot with a screw.
8. Replace your computer cover.
Setting Up Your 3D Blaster Banshee
1-2
9. Connect the monitor cable to the Monitor Output connector of
your 3D Blaster Banshee.
VGA monitor
3D Blaster Banshee
VGA monitor
cable
Monitor
output
connector
If you are using a multi-frequency monitor, you may need a 15
pin PS/2-compatible adapter cable. If your multi-frequency
monitor has a TTL or analog switch, set the switch to analog.
Refer to your monitor’s manual for additional information.
Setting Up Your 3D Blaster Banshee 1-3
2
Installing Software
After you have installed your 3D Blaster Banshee, you can install the
software. The 3D Blaster Banshee CD contains the following drivers
and applications:
! Drivers for Windows 95 and Windows 98 (common to both)
! Drivers for Windows NT 4.0
! Creative BlasterControl for Windows 95 and Windows 98
! Creative BlasterControl for Windows NT 4.0
! Creative SoftMPEG for Windows 95
! Glide drivers
! Colorific™ for Windows 95, Windows 98 and Windows NT 4.0
! 3Deep™ for Windows 95, Windows 98 and Windows NT 4.0
For information on how to install and use these drivers and
applications, refer to the labels or README files on the
diskettes or CD.
This chapter is organized as follows:
! Installing in Windows 95 (Retail version)
! Installing in Windows 95 (OSR version 2.1 and above)
! Installing in Windows 98
! Installing Software in Windows NT 4.0
To determine your Windows 95 version number, refer to the
Troubleshooting section on page 3-1.
Installing in Windows 95 (Retail version)
1. Switch on your system.
Windows 95 automatically detects the graphics card.
A New Hardware Found message box appears, informing you
that a display adapter has been detected.
Installing Software 2-1
2. When a dialog similar to Figure 2-1 appears, ensure that the
Driver From Disk Provided By Hardware Manufacturer option
is selected.
Figure 2-1: Select driver from disk provided by hardware manufacturer.
3. Click the OK button.
4. Insert the 3D Blaster Banshee CD into your CD-ROM drive.
5. In the Install From Disk dialog, type D:\WINDOWS (where D:
represents your CD-ROM drive) and click the OK button.
6. If prompted to select drivers, click the 3D Blaster Banshee
drivers.
The drivers are copied to your system.
7. When prompted to restart your system, click the Yes button.
8. After the system has restarted, proceed to install the
applications. Click the Start button on your taskbar, and then
click Run.
9. In the Run dialog, type D:\WINDOWS\SETUP and click the
OK button.
10. Follow the instructions on the screen to complete the setup.
If you do not install all the applications now, you can install
them later.
Installing in Windows 95 (OSR version 2.1 and above)
1. Switch on your system.
Windows 95 automatically detects the graphics card.
A New Hardware Found message box appears, informing you
that a display adapter has been detected.
Installing Software
2-2
2. When a dialog similar to Figure 2-2 appears, click the Next
button.
Figure 2-2: The Update Device Driver Wizard dialog.
3. When the Other Locations button appears in the Update Device
Driver Wizard dialog, click the Other Locations button.
4. Insert the 3D Blaster Banshee CD into your CD-ROM drive.
5. In the Select Other Location dialog, type D:\WINDOWS
(where D: represents your CD-ROM drive) and click the OK
button.
6. In the Update Device Driver Wizard dialog, click the Finish
button.
7. In the Insert Disk message box, click the OK button.
8. In the Copying Files dialog, type D:\WINDOWS and click the
OK button.
9. In the Update Device Driver Wizard dialog, click the OK
button.
10. When prompted to restart your system, click the Yes button.
11. After the system has restarted, proceed to install the
applications. Click the Start button on your taskbar followed by
Run.
12. In the Run dialog, type D:\WINDOWS\SETUP and click the
OK button.
13. Follow the instructions on the screen to complete the setup.
If you do not install all the applications now, you can install
them later.
Installing Software 2-3
Installing in Windows 98
1. Switch on your system.
Windows 98 automatically detects the graphics card.
An Add New Hardware Wizard message box appears,
informing you that a display adapter has been detected.
2. When a dialog similar to Figure 2-3 appears, ensure that the
Display A List Of All The Drivers In A Specific Location, So
You Can Select The Driver You Want option is selected.
Figure 2-3: Selecting the Display A List Of All The Drivers In A Specific Location, So
You Can Select The Driver You Want option.
3. Click the Next button.
4. Insert the 3D Blaster Banshee CD into your CD-ROM drive.
5. When a dialog similar to Figure 2-4 appears, click the Have
Disk button.
Figure 2-4: Clicking the Have Disk button.
6. In the Install From Disk dialog, type D:\WINDOWS (where D:
represents your CD-ROM drive) and click the OK button.
2-4 Installing Software
If you are installing Banshee as a second or subsequent card to
make use of Windows 98’s multi-monitor capability, you will
see an Update Driver Warning message telling you that the
driver you have selected may not work correctly. You must click
the No button to confirm that you want to use the selected driver.
Otherwise, the system will install the wrong driver and will not
recognize the card as a Banshee card (for details, See “Windows
98 Multi-Monitor Display Problems” on page 3-2.).
7. In the Select Device dialog, make sure the 3D BLASTER
BANSHEE entry in the Models list is selected and click the OK
button.
8. Click the Next button.
9. Click the Finish button.
The drivers are copied to your system.
10. When prompted to restart your system, click the Yes button.
11. After the system has restarted, proceed to install the
applications. Click the Start button on your taskbar, and then
click Run.
12. In the Run dialog, type D:\WINDOWS\SETUP and click the
OK button.
13. Follow the instructions on the screen to complete the setup.
If you do not install all the applications now, you can install
them later.
If you are installing two or more Banshee cards, verify that each
Banshee card is working properly with its corresponding
monitor after completing the hardware and driver installation.
Repeat this procedure for each subsequent card.
Installing Software in Windows NT 4.0
To install the 3D Blaster Banshee software for Windows NT 4.0:
1. Switch on your system. In Windows NT, right-click your
desktop, and then click Properties on the shortcut menu.
2. In the Display Properties dialog, click the Settings tab.
3. On the Settings tab page, click the Display Type button.
4. In the Display Type dialog, click the Change button.
5. In the Change Display dialog, click the Have Disk button.
Installing Software 2-5
6. Insert the 3D Blaster Banshee CD into your CD-ROM drive.
7. In the Install From Disk dialog, type D:\WINNT40 (where D:
represents your CD-ROM drive) and click the OK button.
8. In the Display list box, select the 3D Blaster Banshee drivers.
9. Click the OK or Close button until you are prompted to restart
your system, and then click the Yes button.
10. If the Invalid Display Settings message box appears after your
system has restarted, click the OK button and change the display
settings.
For details, see “Changing Display Settings in Windows NT
4.0” on page 2-6.
11. Proceed to install the applications.
Click the Start button on your taskbar, and then click Run.
12. In the Run dialog, type D:\WINNT40\SETUP and click the OK
button.
13. Follow the instructions on the screen to complete the setup.
If you do not install all the applications now, you can install
them later.
Changing Display Settings in Windows NT 4.0
1. Right-click your desktop, and then click Properties on the
shortcut menu.
2. In the Display Properties dialog, click the Settings tab.
3. In the Desktop Area group box, move the slider to set the
desired resolution.
4. In the Color Palette group box, select the desired color. Certain
colors may not be available for some display resolutions.
5. In the Refresh Frequency group box, select the desired refresh
rate.
6. To test the settings, click the Test button, and then click the OK
button. When the Testing Mode dialog re-appears:
!If the test bitmap is properly displayed, click the Yes button.
!If not, click the No button. A warning message will be
displayed. Click the OK button and repeat steps 3 through 6,
changing one or more of the settings.
7. Click the OK button to close the Display Properties dialog.
2-6 Installing Software
3
Troubleshooting
Determining your Windows 95 Version
To determine your Windows 95 version number:
1. Right-click the My Computer icon, and select Properties. The
System Properties dialog appears.
2. On the General tab, note your Windows 95 version number.
Possible version numbers are:
! 4.00.950
! 4.00.950A
! 4.00.950B
System Hangs, Blank Screen or Corrupted Display
After installing 3D Blaster Banshee and starting your system, the monitor
displays a blank screen.
! Switch off your system and wait a while before switching it on
again.
! Verify that any built-in VGA on your motherboard is disabled
and that you have removed any other video display card from
your system.
! Ensure that your 3D Blaster Banshee card is properly inserted
into the expansion slot. Ensure this by pressing it gently and
evenly into the slot.
! Verify that the pins of your monitor’s VGA Input connector are
not bent and that the connector is properly connected to the
VGA Out connector of 3D Blaster Banshee.
Troubleshooting 3-1
Windows 98 Multi-Monitor Display Problems
The monitor connected to the second or successive Banshee card remains
blank even though the card and its drivers have been installed.
If you do not specify Banshee’s drivers during the software installation
(see “Installing in Windows 98” on page 4), the system installs the
second or successive Banshee card as a VGA card which does not
support Windows 98’s multi-monitor feature.
Update the device drivers to Banshee’s drivers:
1. Right-click your desktop, and then click Properties on the
shortcut menu.
2. In the Display Properties dialog, click the Settings tab.
3. On the Settings tab page, click the Advanced Properties button.
4. In the Advanced Display Properties dialog, click the Change
button.
5. In the Select Device dialog, click the Have Disk button.
6. Insert the 3D Blaster Banshee CD into your CD-ROM drive.
7. Follow steps 6 through 13 of the procedure in “Installing in
Windows 98” on page 4 to complete the update.
Other Display Problems
Monitor display flickers after Windows 95 or Windows 98 starts.
Your monitor may not support the resolution or refresh rate that you
have set.
Use display settings supported by the monitor.
To change the display settings:
1. Restart your system in Windows 95/ Windows 98 Safe mode.
To do so:
a. Restart your system and when the message “Starting
Windows 95...” or “Starting Windows 98...” appears, press
F8.
A list of options such as Safe Mode and Command Prompt
Only Mode appears.
b. Select Safe Mode and press ENTER.
2. Lower your monitor’s resolution.
For the resolutions supported by your monitor, refer to its manual.
Monitor display exhibits pixel drop (that is, pixels, usually white in color,
appear on the screen) or other abnormal behavior.
The settings that you have selected for your graphics card may be
incompatible with one or more games or applications that you are
running.
Use the factory default settings.
1. Right-click your desktop, and then click Properties on the
shortcut menu.
2. In the Display Properties dialog, click the BlasterControl tab.
3. On the BlasterControl tab page, click the Advanced icon.
4. Click the Factory Default button.
Beeping Sounds During System Startup
When the system is starting up, there is a series of prolonged beeps.
Your 3D Blaster Banshee card may not be firmly inserted into the
expansion slot.
Ensure that the gold-striped bus connector of the graphics card is
properly inserted into the expansion slot. Ensure this by pressing the
card gently and evenly into the slot. Alternatively, remove the card and
re-insert it.
Problems Installing Software
In Windows 95 or Windows 98, the installation program for BlasterControl
and SoftMPEG does not run automatically after you have inserted the
installation CD into your drive.
The AutoPlay feature in your Windows 95 or Windows 98 system is not
enabled.
Install the software from the CD:
1. Double-click the My Computer icon on your Windows 95 or
Windows 98 desktop
2. In the My Computer window, double-click the Creative
Banshee icon.
If the installation program does not run, double-click the
Win95/Win98 folder icon followed by the Setup icon.
3. Follow the instructions on the screen to complete the
installation.
Creative SoftMPEG
Creative SoftMPEG launches and quits immediately without
giving any error messages
This is probably due to the application resource DLL file
MPGRS32S.DLL being missing from the application directory.
Try locating the file and copying it to the same directory as the
application. If you cannot find the file in your system, you will need to
reinstall the application.
Problems adjusting the volume
If there is no effect when you adjust the volume:
! Check that the sound card supports the device.
! Check that the audio cable is properly connected from the
CD-ROM drive to the sound card.
! Check that the speakers are properly connected to the sound
card.
! Increase the volume output to the speakers by turning the
volume knob on the sound card (if present).
! If you have more than one sound card, check that you are
controlling the correct one.
! Launch the Mixer and check that the Mixer mute control is not
enabled.
Error messages:
•
OLE 2.0 initialization failed. Make sure that the OLE libraries
are the correct version.
Cause Creative SoftMPEG supports OLE 2.0 Automation and
requires the OLE libraries to run.
Action Try running the application again. If it fails again, the OLE
libraries in your system are not the correct version or they
are missing. Try installing the application again.
•
Unable to display About box. Ensure that CTRES32.DLL is
present in your system.
Cause The file CTRES32.DLL is required to display Creative
SoftMPEG’s About box.
Action Check that the file is in your system. If it is not, you may
want to reinstall the application. Creative SoftMPEG can
still run without this file.
•
Unable to load mixer. Try running the Creative Mixer application
from its program group to verify if it is installed properly.
Cause The mixer application has probably been deleted or moved
to another directory.
Action Locate the mixer application and run it to check that it is
working.
•
This file cannot be played on the specified MCI device. The file
may be corrupted, or not in the correct format.
Cause SoftMPEG can only play MPEG files. If a MPEG file
cannot be played, then it is probably corrupted.
Action Remove the file from the playlist.
•
The device needed to play the file is already in use. Wait until it is
free, and then try again.
Cause Another application is playing an MPEG file.
Action Try quitting the other application, or wait until that
application has stopped playing the MPEG file.
•
Failed accessing file. Check that this file exists and is not in use
(locked).
Cause The file has probably been deleted or moved to another
directory.
Action If the file cannot be located, remove the file from the
playlist.
•
Failed accessing file. This file is already in use.
Action Check that the MPEG file is not opened by another
application like the Media Player.
•
The file cannot be opened. Try closing other open files and then
try again.
Cause There are too many files opened in Windows.
Action Try closing some of the files first and then try opening the
file again.
•
Failed to launch Multimedia Properties. Check if application is
installed.
Action Make sure that CONTROL.EXE exists in the Windows
directory and MMSYS.CPL exists in the Windows system
directory. If not, you may want to reinstall your Windows.
The player can still run without these files.
4
Using BlasterControl
After you install the Graphics Blaster, the BlasterControl property
pages indicated by the
logo are added to the Display Properties
dialog, and the Settings page is modified to include a virtual desktop
control. The other unmarked pages are standard Windows Display
property pages.
Only the new and modified BlasterControl property pages are
covered in the Installation Guide. For information on other
display property pages, refer to your Windows documentation.
You can use the BlasterControl property pages to customize screen
resolution, color depth, and refresh rate; you can also assign hot keys to
frequently used resolutions.
Your monitor may not support some of the display settings that
can be controlled by BlasterControl. In this case, the buttons or
options of unsupported display settings may be grayed out;
some display property pages may also be absent.
Getting More Information
BlasterControl help describes how to use the utility to customize your
screen resolution, color depth, and refresh rate.
To open the BlasterControl help file:
1. Click the BlasterControl icon
Taskbar.
on the right end of the
2. Click Help on the menu.
Using BlasterControl 4-1
Opening Display Properties Dialog
The Display Properties dialog provides you with controls to customize
screen elements.
There are three ways to open the Display Properties dialog:
! Right-click on the Windows
desktop to display a shortcut
menu. Click Properties.
! Click the BlasterControl graphic
in the right-hand corner of
the taskbar.
! Right-click the BlasterControl
graphic
in the right-hand
corner of the taskbar. The
shortcut menu (Figure 4-1)
appears. Click Display
Properties.
Figure 4-1: BlasterControl
shortcut menu.
The Display Properties dialog contains several new tabs. The tabs for
the BlasterControl property pages are indicated by the
logo.
Clicking the BlasterControl tabs lead you to:
! Monitor Property Page
! Hotkey Property Page
! Color Correction Page
Additionally, the Settings page has a new Desktop area for selecting a
virtual desktop.
Using BlasterControl
4-2
Adjusting Display Settings
Several of your display settings can be changed using the Monitor
property page in BlasterControl (Figure 4-2):
! Refresh Rate
! Display Position
! Display Size
A few test patterns are provided to help you adjust the size and position
of your display. Click the Test Pattern area to display different test
patterns on the screen. Whatever changes you make are immediately
reflected by the test pattern.
Figure 4-2: Monitor property page.
Using BlasterControl 4-3
Changing Refresh Rate
To select a particular refresh rate:
1. Click the down-arrow button at
the side of the Refresh Rate list
box (Figure 4-3).
Figure 4-3: Refresh Rate list.
A list of all the refresh rates that
are supported by your Graphics
Blaster card appears (Figure 4-4).
2. Click the desired frequency.
3. Click the OK or Apply button. A
confirmation dialog (Figure 4-5)
prompts you to confirm the
refresh rate selection:
Figure 4-4: Selecting the
refresh rate.
! If the display is not correct, click the No button.
! If the refresh rate setting is acceptable, click the Yes button.
! If the Yes button is not clicked within five seconds, the
refresh rate automatically reverts to the last saved refresh
rate setting. This feature is useful when you chose a setting
that causes a distorted display.
Figure 4-5: BlasterControl Monitor confirmation dialog.
Do not change the default refresh rate unnecessarily—other
settings may not be supported by your display. If the selection
causes distortion, correct the setting by using BlasterControl
Rescue. See “Correcting Display Settings” on page 4-10.
BlasterControl obtains the name and model of your monitor through the
information you enter on the Settings property page. To change the
name and model of your monitor, go to the Settings property page and
click the Change Display Type button.
Using BlasterControl
4-4
Changing Display Position
To adjust the position of the screen display, click the Up,
Down, Left, and Right positional buttons in the
Alignment group (Figure 4-6).
Figure 4-6: Positional buttons in the Alignment group.
Changing Display Size
To change the size of the display
area, click the plus (+) and minus (-)
Figure 4-7: Sizing
buttons (Figure 4-7) shows the
controls.
buttons for sizing the displayed area.
Clicking the plus (+) buttons increase
the height and width; clicking the minus (-) buttons decrease the height
and width of the displayed area.
The position and maximum size of the display depend on the
model of your monitor.
Using BlasterControl 4-5
Assigning and Clearing Hot Keys
The Hotkey property page (Figure 4-8) allows you to assign hot keys to
your screen resolutions, color depths, and virtual desktop controls.
This allows you to switch between display modes quickly. For
example, you may switch the color depth from 256 colors to 16.8
million colors by pressing a key.
Figure 4-8: Hotkey property page.
Assigning Hot Keys
To assign a hot key to a combination of resolution and color depth:
1. Click the desired combination of resolution and color depth.
The combination is highlighted (Figure 4-9).
Figure 4-9: Selecting an option.
2. Place your text cursor in the Key Assignment text box.
Using BlasterControl
4-6
3. Press the hot key you want to assign. For example, if you press
the F12 key, “F12” appears in the Key Assignment text box
(Figure 4-10) under the Operations list.
Figure 4-10: Assigning the F12 key.
4. Click the Assign button. The hot key assigned is displayed next
to the selected resolution and color depth (Figure 4-11) in the
Operations list.
Figure 4-11: Hot key is assigned.
5. To use the hot keys immediately, select the Enable Hotkey check
box. If you do not want to use them yet, clear the Enable Hotkey
check box.
The hot key combination that you assign must be unique. To
prevent a conflict with an existing hot key, BlasterControl adds
the CTRL (CONTROL) or ALT (ALTERNATE) key. For
example, if you press the R key, BlasterControl automatically
configures the hot key as CTRL+ALT+R.
Clearing Hot Key Assignments
If you no longer want the hot key assignment for a particular
combination of resolution and color depth, you can clear it by:
1. Select the combination and corresponding hot key assignment
in the Operations list on the Hotkey property page.
2. Click the Clear button. The hot key assignment for that
combination is removed and the Key Assignment text box
shows “Not Assigned.”
Using BlasterControl 4-7
Adjusting the Virtual Desktop
BlasterControl adds a Desktop area function to the familiar Settings tab
page. Now, in addition to selecting your display resolution, color
palette, and font size, you can select a virtual desktop that extends
beyond the physical screen resolution of your monitor. The virtual
desktop feature allows you to take advantage of the high resolutions
offered by Graphics Blaster RIVA TNT even if your monitor is not
large enough for you to use those modes effectively. For example, if
you have a 15” monitor that is capable of displaying 1280x1024 but
find the screen difficult to read at this resolution, you can select a
Desktop area of 1280x1024 and a screen area of 1024x768 or less.
Figure 4-12: Display Properites, Settings tab page.
You can configure the virtual desktop feature by clicking the
BlasterControl graphic
in the right-hand corner of the taskbar,
selecting Preferences..., and selecting the Virtual Desktop tab.
Using BlasterControl
4-8
The Hotkey property page allows you to activate two powerful virtual
desktop features by assigning hotkeys to them: Zoom In/Out and Pan
Lock.
Zoom In lets you get a close-up view of your work by reducing the
screen resolution. For example, if you are using a resolution of
1024x768, pressing the Zoom In key instantly switches your Graphics
Blaster to a screen area of 800x600 pixels and a desktop area of
1024x768 pixels. Pressing the Zoom In hotkey again reduces the
screen area to 640x480. Pressing the Zoom Out reverses the effect.
Pan Lock temporarily stops the mouse from scrolling the screen around
the virtual desktop. You can use the Virtual Desktop tab in
BlasterControl’s Preferences dialog to configure the Pan Lock feature
to lock the vertical axis, the horizontal axis, or both. Pressing the
assigned Pan Lock hotkey again resumes normal virtual desktop
operation.
Using BlasterControl 4-9
Correcting Display Settings
You may inadvertently select a display setting that causes distortion, for
example, a high refresh rate that is not supported by your monitor. The
monitor starts to flicker.
To correct the settings:
1. Restart the system in Windows Safe mode:
a. Restart your system. When the message “Starting
Windows...” appears, press the F8 key on your keyboard.
A list of options appears.
b. Select Safe Mode and press the ENTER key.
2. Click the Start button, select Programs, then the Graphics
Blaster program folder, and then click Creative Rescue Utility.
The BlasterControl Rescue dialog (Figure 4-13) appears.
Figure 4-13: BlasterControl Rescue dialog.
3. In the Product Name list, click the name of your Graphics
Blaster video card. A list of resolutions appears in the Display
Setting To Clean Up list. Each resolution represents a group of
display settings.
4. Select the resolution that caused the screen distortion and click
the Clean Up button. For example, if a refresh rate of 75 Hz and
a resolution of 1024 x 768 caused the display problem, select the
“1024 x 768” entry and click the Clean Up button.
5. Click the Close button.
6. Restart your system in Windows Normal mode.
Using BlasterControl
4-10
5
Using Creative SoftMPEG
Creative SoftMPEG is an MPEG player that plays Karaoke CDs, Video
CDs, and .MPG files.
This chapter includes the following sections:
! Getting More Information
! Starting Creative SoftMPEG
! Playing Tracks
! Working with the MPEG File Playlist
! Using the Preferences Dialog
! Using Command Line Switches
! Using Keyboard Shortcuts
Track and file are used interchangeably throughout this chapter
to refer to MPEG files, and Karaoke CD or Video CD tracks.
Getting More Information
Creative SoftMPEG help explains how to use the utility to play Video
CDs and MPEG files.
To open the SoftMPEG help file:
1. With SoftMPEG running, click the Menu button
.
2. Click Help On Creative SoftMPEG on the menu.
Using Creative SoftMPEG 5-1
Starting Creative SoftMPEG
To start Creative SoftMPEG:
1. Double-click the Creative SoftMPEG icon in your Graphics
Blaster’s program group to open the interface (Figure 5-1).
Touch-Sensitive Display
Playback Control
Power Off
Menu
Minimize
Fast Track Selector
Eject
Playlist
Figure 5-1: Creative SoftMPEG interface.
The Creative SoftMPEG interface consists of:
! Touch-Sensitive Display
! Menu Button
! Minimize Button
! Playlist Button
! Playback Control Buttons
! Eject Button
! Fast Track Selector
! Power Off Button
Touch-Sensitive Display
By clicking the touch-sensitive display, you can switch among:
! Track number and duration
! Track title and collection
! Track title and artist
! Track title and sequence
! MPEG Player graphics
Or, click the touch-sensitive display with your right mouse button and
choose a display from the shortcut menu that appears. For example, if
Using Creative SoftMPEG
5-2
you select the “Display Track Number and Duration” option in the
shortcut menu, the touch-sensitive display (Figure 5-2) appears.
Repeat Mode Selector
Track Info
Introduction Mode Selector
Shuffle Mode Selector
Player Selector
Graphic Slider
Graphic Volume Control
Figure 5-2: Creative SoftMPEG’s touch-sensitive display.
Graphic Slider
Portion of current track that has played. Also,
controls playback position of current track.
Graphic Volume Control
Shows the volume level of the player.
Player Selector
Plays Video CD from the selected CD-ROM
drive (1 to 4). Toggles between Video CD ver
1.1 and ver 2.0 formats. The last player
lets you play MPEG files instead of Video CDs.
Repeat Mode Selector
Repeats the current track or the whole playlist
when the final track is played.
Introduction Mode Selector Plays the first seconds of each track in playlist.
Shuffle Mode Selector
Randomly plays the tracks in the playlist.
Menu Button
The Menu button
displays the Control menu:
Minimizes Creative SoftMPEG to an icon
Quits Creative SoftMPEG
Displays the Playlist dialog
Displays the preferences dialog
Opens Creative Mixer
Displays on-line help
Displays copyright and credits
Figure 5-3: Creative SoftMPEG’s Control menu.
Using Creative SoftMPEG 5-3
Minimize Button
The Minimize button minimizes Creative SoftMPEG to a button on the
Windows 95 taskbar.
Playlist Button
The Playlist button
opens the MPEG File Playlist dialog. Use
the MPEG File Playlist dialog to create sets of tracks for playing.
Figure 5-4: MPEG File Playlist dialog.
Collection Title Give a title to your playlist.
Display files specified in List Files of Type.
Assign an artist name to a track.
Make notes relating to a track.
Create a new collection.
Save the playlist using the name in Collection box.
Save the playlist with a new name.
Delete a collection.
Play the selected tracks.
Stop a playing track.
Play the next file.
File List
List tracks that can be added to your playlist.
Playlist
Display the files you have included in the playlist.
Using Creative SoftMPEG
5-4
Add
Add All
Remove All
Remove
Directory
Add selected tracks to the Playlist.
Add all the tracks to Playlist.
Remove all the tracks in the Playlist.
Remove selected tracks from the Playlist.
Specify the drive, path and type of files to view in
the File List.
Confirm the compilation of tracks in the Playlist.
Cancel changes made in the Playlist. The playlist
reverts to its last saved copy.
Display the online help facility.
Done
Cancel
Help
Playback Control Buttons
Playback Control allows you to perform the playback operations.
Stop the track.
Play the track.
Pause the track.
Play the previous track in the playlist.
Quickly rewind the track.
Quickly forward the track.
Play the next track in the playlist.
Load or unload the CD.
Eject Button
Use the Eject button to load or eject the CD.
Fast Track Selector
Use the Fast Track selector to select and play a track in the playlist (see
Figure 5-5) by clicking the track’s number.
Figure 5-5: Creative SoftMPEG’s Fast Track Selector.
Power Off Button
Use the Power Off button
to close Creative SoftMPEG.
Using Creative SoftMPEG 5-5
Playing Tracks
To start playing a track, click the Play button
.
To stop playing a track, click the Stop button
.
Playing a Particular Track
To play a track using the Fast Track selector:
1. Click a number button on the Fast Track selector to select that
track. To select a two-digit track number, click both numbers
consecutively within two seconds. For example, to choose track
15, click button 1 and then button 5.
Playing the Track at a Different Position
To play a track from a certain position:
1. Click and hold down the left mouse button on the Graphic slider
and move it to the position you want to start playing the track.
2. When the highlighted portion of the Graphic slider reaches the
desired position, release the mouse button. If the player is
already playing, it immediately moves to the new position.
3. If your player is not playing, click Play to start playing the track
from the position you have chosen.
Pausing and Resuming Playback
Click the Pause button
Click the Play button
to pause.
or Pause button again to resume playing.
Changing to a Different Track
To change to the next track in the playlist, click the Skip Forward
button
.
To change to the previous track in the playlist, click the Skip Backward
button
.
Moving Forward and Backward Within a Track
You can also move forward and backward within a track:
! Click the Fast Forward
or Rewind button
.
! Move the Graphic slider to the track that you want.
Using Creative SoftMPEG
5-6
If you are already playing a track, Creative SoftMPEG immediately
goes to the new position and starts playing.
If your player is not playing a track, click the Play button to start
playing the track from the chosen position.
Playing Tracks in Random Order
To play tracks in random order, select the Shuffle Mode selector
in the touch-sensitive display. The Shuffle mode shuffles the
playlist and randomly rearranges the playlist.
If Creative SoftMPEG is already playing, selecting Shuffle
mode stops the current playback and starts playback from the
first track of the reordered playlist.
Playing the First Few Seconds of Tracks
To play only the first few seconds of all tracks in the playlist, select the
Intro Mode selector
in the touch-sensitive display.
Playing Tracks in the Playlist Repeatedly
To play tracks in the playlist repeatedly, set the Repeat Mode selector
to Repeat Playlist Mode
.
Playing the Current Track Repeatedly
To play the current track repeatedly, set the Repeat Mode selector to
Repeat Track Mode
.
Playing Video CD Version 2.0
You can simply click the CD Player selector
which is in
use to switch the Creative SoftMPEG between playing Video CD ver
1.1 and Video CD ver 2.0.
A Video CD ver 1.1 plays the first track on the CD and proceeds to play
the rest of the tracks in sequence.
A Video CD ver 2.0, however, displays a main menu with a list of
tracks. The selection of songs is based on the track numbers displayed
on the main menu. The Fast Track selector buttons are used for
selecting these songs once the main menu appears.
You can use hot keys to select the songs. For example, press
the 1 key to select the first song and the S key to stop playing.
Using Creative SoftMPEG 5-7
Adjusting the Volume
You can adjust the volume of Creative SoftMPEG using the Graphic
Volume slider on the touch-sensitive display. Click and drag the
Graphic Volume slider to the level you want.
Selecting Sound Card and Volume Device
SoftMPEG allows you to control multiple sound cards installed in your
system, and control multiple volume devices of a sound card.
To select the sound card to control:
1. Click the right mouse button on the Graphic Volume slider, or
press CTRL+SHIFT+V.
2. From the shortcut menu, select the sound card you want.
To select the volume device to control:
1. Click the right moust button on the Graphic Volume slider, or
press CTRL+SHIFT+V.
2. From the shortcut menu, select the volume device you want.
Working with the MPEG File Playlist
A playlist is a collection of tracks that are grouped for playing. You can
compile tracks in the playlist using the MPEG Playlist.
Compiling the Playlist
To compile the playlist:
1. Click the Playlist button
.
2. Perform the desired operations in the Playlist dialog:
! Add tracks to the playlist
! Preview tracks
! Set directory, path, and type of files to display in the File List
! Remove tracks from the playlist
! Rearrange tracks in the playlist
! Assign the names of artists to tracks in the playlist
! Enter notes for tracks in the playlist
! Name the playlist
3. Click Done after you have finished compiling the playlist.
To cancel all changes made to the playlist, click Cancel.
Using Creative SoftMPEG 5-8
Adding Tracks to the Playlist
To add tracks to the playlist:
1. Select tracks to add to the playlist from the File List (see Figure
5-4). The Playlist is on the left; the File List is on the right.
2. To add the selected tracks to the Playlist, click Add.
To add all the tracks in the File List to the Playlist, click Add All.
You can also add tracks to the playlist by:
! Double-clicking the tracks in the File List.
! Dragging tracks from the File List and dropping in the Playlist.
! Dragging selected tracks from Explorer or File Manager and
drop them in Creative SoftMPEG. The tracks are added to the
playlist. This operation is done outside the Playlist dialog.
Previewing Tracks
To preview tracks:
1. Select the tracks from the Playlist or File List.
2. Click Play. The track starts playing.
Removing Tracks from the Playlist
To remove tracks from the playlist:
1. Select the tracks from the Playlist.
2. To remove selected tracks, click Remove.
To remove all tracks in the Playlist, click Remove All.
You can also remove a track from the playlist by either:
! Double-clicking the track in the Playlist.
! Pressing the CTRL+SHIFT+R keys to remove current track.
Selecting Tracks in the Playlist
You can select multiple tracks for previewing, adding, or removing by
holding down CTRL or SHIFT while you select them.
! To select specific tracks, hold CTRL while you select tracks.
! To select a group of consecutive tracks, hold down SHIFT and
select the first and last tracks in the list.
Using Creative SoftMPEG 5-9
Rearranging Tracks in the Playlist
To rearrange a track in the playlist:
1. Click the track in the Playlist and drag it to the new position.
The track is inserted at that position in the Playlist.
Assigning Names of Artists to Tracks
To assign a name to a track:
1. Select the track.
2. For a new artist, type in the name in the Track artist box. For an
existing artist, select the name in the artist Name box.
You can also assign a single artist name to multiple tracks in the
playlist by selecting the tracks and assigning a name to them.
Entering Notes for Tracks in the Playlist
To enter notes for a track in the playlist:
1. Select the track you want to enter notes into.
2. Type in the notes for that track in the Track Notes text box.
You can enter the same notes for multiple tracks by selecting
the tracks and entering the notes in the Track Notes text box.
Naming the Playlist
Once you have compiled your playlist, you may want to give the
playlist a title.
To give your playlist a title:
1. Click Save As.
2. Type the title of the playlist in the text box of the Save As
Collection dialog.
3. Click OK.
If you click Cancel, you will return to the Playlist dialog
without saving the title.
Using Creative SoftMPEG
5-10
Using the Preferences Dialog
The Preferences dialog similar to that in Figure 5-6 allows you to set
preferences for Creative SoftMPEG.
Figure 5-6: Preferences dialog.
Balloon Help
Display information about a control or button
currently selected.
Enable/disable balloon help by selecting/clearing
the Balloon Help check box.
Show Track
Display the time remaining on a track in addition
Time Remaining to displaying the time played.
Enable/disable this feature by selecting/clearing
the Show Track Time Remaining check box.
Minimize On
Automatically minimize Creative SoftMPEG each
Play
time a track starts playing.
Enable/disable this feature by selecting/clearing
the Minimize On Play check box.
Play On Startup Automatically play Creative SoftMPEG when it is
launched.
Enable/disable this feature by selecting/clearing
the Play On Startup check box.
Play On New
Automatically plays Creative MPEG when
Playlist
Playlist dialog is closed and when there is a
change in the playlist.
Enable/disable this feature by selecting/clearing
the Play On New Playlist check box.
Play On Disc
Automatically start playing when a disc is
Insert
inserted.
Enable/disable this feature by selecting/clearing
the Play On Disc Insert check box
Using Creative SoftMPEG 5-11
Intro Length
Specify the amount of time in seconds between
tracks when Creative SoftMPEG is in Intro mode.
Step
Specify the number of frames for each step
command. The greater the value, the greater the
number of frames for each step.
Save Settings On Save changes made in the Preferences dialog
Exit
when you exit from Creative SoftMPEG.
Using Command Line Switches
The following command line switches are supported by the application:
Switch
Description
/play or /p
/play track-number
or /p track-number
/stop or /s
track-name
Starts playback of the current track.
Plays specified track.
Stops playback of the current track.
Add a specified track to the collection.
Using Keyboard Shortcuts
The following keyboard shortcuts are supported by this application:
CTRL+P
CTRL+A
CTRL+S
CTRL+R
CTRL+B
CTRL+O
CTRL+L
CTRL+F
CTRL+M
CTRL+D
CTRL+SHIFT+D
CTRL+SHIFT+R
CTRL+SHIFT+V
Plays the current track.
Pauses the playing track.
Stops the playing track.
Steps the current track.
Plays the previous track.
Plays the next track.
Shows the Playlist dialog.
Sets preferences.
Shows mixer settings.
Switches the display mode.
Shows select display mode menu.
Removes current track from the playlist.
Displays the Select Volume Device menu.
Using Creative SoftMPEG
5-12
6
Sonnetech’s Colorific® and 3Deep®
Colorific® True Color Matching
Colorific color management software is the industry-standard process
for monitor-to-monitor and monitor-to-printer color management. It
accurately matches colors between your screen and printer or over the
Internet by calibrating the monitor colors. The software leads you
through a series of choices about what you see on your screen. From
this information, Colorific builds a precise description of how your
monitor displays color, taking into account variable viewing
conditions, monitor control settings, and video card adjustments.
Running Colorific
Calibrate with Colorific before doing critical color work and whenever
you change monitor color settings.
! If your monitor has a color temperature control, adjust it to
5000 K or 6500 K to get the best results.
! When printing to an inkjet printer, it is best to use special
coated paper.
To run Colorific in Windows 95/98 and Windows NT 4.0:
1. Click the Colorific Control Panel icon in the taskbar. The
Display Properties dialog appears.
2. Click the Colorific tab.
3. Click the Recalibrate button.
The Colorific calibration utility is opened.
4. Click the Reset And Calibrate button to start the Colorific
calibration process.
5. Follow the instructions on the screen to complete the process.
Sonnetech’s Colorific® and 3Deep® 6-1
After Running Colorific
When you complete the Colorific calibration, Colorific creates a color
profile of your monitor and loads those settings each time you turn on
your computer. The way you use this profile depends on your operating
system and applications.
Windows 95/98 only
Colorific creates a custom profile for your monitor for use with the
ICM (Image Color Matching) module built into Windows 95/98. This
profile automatically replaces Windows’ default profile and is used at
print-time whenever ICM is enabled. (If you do not see an ICM option
for your color printer’s driver, contact your printer vendor to obtain the
latest Windows 95/98 printer driver.) For more information about
ICM, see Colorific’s online Help.
Advanced Windows Users (all versions)
In addition, all Windows version of Colorific create a Kodak
Precision-format monitor profile that can be used by any program that
incorporates Kodak’s Precision Color Management System, such as
CorelDraw 7, Photoshop 3, and PageMaker 6. Go to the Kodak CMS
module within your application and select the Colorific monitor profile.
3Deep
3Deep is an exciting new tool that allows gamers to experience 3D
games as the game developers intended. Only 3Deep can provide
accurate 3D lighting and shading for 3D games because it adjusts the
user’s monitor.
3Deep uses Colorific’s technology (the industry standard for monitor
calibration) to measure the unique characteristics of each gamer’s
display. Once 3Deep captures this information, it communicates it to
the game (via DirectX) and the game sets an accurate gamma value for
perfect imagery.
Sonnetech’s Colorific® and 3Deep®
6-2
Using 3Deep
To use 3Deep to calibrate monitor gamma value:
1. Click the Start button, point to Settings and then click Control
Panel.
2. In the Control Panel window, double-click the 3Deep icon.
3. On the 3Deep Control Panel, move the Tweak slider or click the
Calibrate Display button.
About True Internet Color®
Colorific works in conjunction with browsers, tools, and plug-ins to
provide accurate color when you view or create Web sites. Similar to
other Web plug-ins, True Internet Color has two parts—one part lets a
designer create color-correctable Web pages, the other part lets
consumers view those pages with True Internet Color. Visit Colorific’s
web page at www.colorific.com/products/true_internet_color.html to
learn more about True Internet Color.
Colorific and 3Deep
The Help file for Colorific contains the User’s Manual.
To open the Help file for Colorific
1. Click the Start button, point to Programs and then click
Colorific.
The Colorific calibration utility is opened.
2. On the right-hand corner of the menu bar, click Help.
The Help menu appears.
3. Click Help Contents.
You can also print a copy of the User’s Manual, MANUAL.RTF,
found in the Documents folder on the installation disk.
To open the Help file for 3Deep
1. Click the Start button, point to Settings and then click Control
Panel.
2. In the Control Panel window, double-click the 3Deep icon.
The 3Deep Control Panel appears.
3. On the 3Deep Control Panel, click the Help button.
Sonnetech’s Colorific® and 3Deep® 6-3
Technical Support
Updated information about using Colorific and 3Deep can be obtained
from Sonnetech’s web site at www.colorific.com. Alternatively, you
can call Sonnetech’s 24-hour fax-on-demand system at (415) 957-9941
with a fax phone. If you can’t find the information you need in these
sources or in the program’s Help screens, call Colorific Technical
Support at (415) 957-0152 or send e-mail to [email protected].
Sonnetech’s Colorific® and 3Deep®
6-4
A
Technical Specifications
General Features
! Fully integrated 128-bit VGA/2D/3D video accelerator
! Full VMI interface
! VESA DDC2B support
3Dfx® Banshee™ Chipset
! 2D acceleration
• Single-cycle 128-bit Windows GUI acceleration
• Full featured 128-bit BitBlt engine
! 3D acceleration
• Full triangle parameters hardware setup
• 16-bit integer and floating-point Z-buffering with
biasing
• Alpha blending on source and destination pixels
• Sub-pixel and sub-texel correction
• 24-bit color dithering applied to native 16-bit RGB
color
• Per-pixel atmospheric fog with programmable fog
zones
• Polygon-based full scene edge anti-aliasing
• Perspective-correct (true divide-per-pixel) 3D texture
mapping and Gouraud shading
• True per-pixel LOD MIP mapping
• Bilinear and trilinear texture filtering
! Video acceleration
• Bilinear horizontal and vertical filtering
• YUV 4:2:2 and YUV 4:2:0 planar support
• Bob-and-Weave de-interlacing
Memory Configuration
! 250 MHz integrated RAMDAC with 16 MB SDRAM onboard.
Technical Specifications A-1
PCI 2.1 Compliant (for Banshee PCI)
! Full support for PCI system bus, with the ease of Plug and Play
installation
Addressing and Interrupts
! Plug and Play configurable I/O addresses and interrupts
Utilities
! BlasterControl
! Creative SoftMPEG Player
! Sonnetech Colorific/3Deep
Applications Supported
! All Windows 95 applications, including DirectDraw and
Direct3D games and applications
! Glide applications under Windows 95, Windows 98 and
Windows NT 4.0
Table 2: 2D and 3D resolutions and refresh rates supported
Color Depth
Refresh Rates (Hz)
(Bits Per Pixel)
640x480
8, 16, 24, 32
60, 75, 85, 100, 120
800x600
8, 16, 24, 32
60, 75, 85, 100, 120
1024x768
8, 16, 24, 32
60, 70, 75, 85, 100, 120
1152x864
8, 16, 24, 32
60, 75, 85, 100
1280x1024
8, 16, 24, 32
60, 75, 85, 100
1600x1200
8, 16, 24, 32
60, 65, 70, 75, 85
1792x1344
8, 16, 24, 32
60, 72
1856x1392
8, 16, 24, 32
60
1920x1440
8, 16, 24, 32
60
Note: The refresh rates shown in the table are the highest obtainable and are
monitor-dependent. Resolutions, pixel depths, and refresh rates are also
driver-dependent and may not be available for some applications or operating systems.
Resolution
Technical Specifications
A-2
B
Technical Support
At Creative Labs, we are committed to giving our customers the best
product possible with excellent technical support. The information
below is correct as this manual goes to press; check the software disk
for a README file that will give any changes.
Updated information about using Colorific and 3Deep can be obtained
from Sonnetech’s web site at www.colorific.com. Alternatively, you
can call Sonnetech’s 24-hour fax-on-demand system at (415) 957-9941
with a fax phone. If you can’t find the information you need in these
sources or in the program’s Help screens, call Colorific Technical
Support at (415) 957-0152 or send e-mail to [email protected].
Before You Contact Us
Please be seated at your computer and have the following information:
! Model and serial numbers (usually found on the back of the
device) of the product, and date of purchase.
! Error message on the screen and how it came about.
! Information on the adapter card that conflicts with the product,
if applicable.
! Hardware configuration information such as the base I/O
address, IRQ line, or DMA channel, if applicable.
! Computer type and speed (for example, Pentium 166) and
memory available.
! Type and version of your operating system; for example, DOS
6.22, Windows 3.1x, or Windows 95/98/NT.
You can contact Technical Support through one of the following
addresses or numbers:
Creative Labs, Inc.
Technical Support
1523 Cimarron Plaza
Stillwater, OK 74075 U.S.A.
! Telephone:405 742 6622
! Facsimile:405 742 6633
Technical Support B-1
! TTD (hearing-impaired):405 372 7341
Monday—Friday:10:00 a.m.—6:00 p.m.
! Webphone:[email protected]
Monday—Friday:10:00 a.m.—6:00 p.m.
Operating hours (U.S.A. Central Time)
! Monday—Saturday:8:00 a.m.—10:00 p.m.
! Sunday:Noon—8:00 p.m.
! Public Holidays:Closed
You can get our latest program and driver updates, technical data, and
answers to frequently asked questions through these 24-hour services:
! BBS:405 742 6660
! CompuServe:Go Blaster
! Fax Back:405 372 5227
! Internet:http://www.soundblaster.com or
www.creaf.com/wwwnew/tech/support/c-usa.html
You need a modem to access a bulletin board service (BBS).
Product Return
To return a Creative product for factory service, contact the Creative
Technical Support office. Once the staff has verified the product is
defective, you will be given a Return Merchandise Authorization
(RMA) number.
NOTE: Retain your purchase receipt, as well as all packaging and
contents, until all product components are functioning to your
satisfaction. They are required in the unlikely event you need to return
the product to Creative.
When returning a product for factory service:
! Shipment to Creative is at your expense and you assume all risk.
Ship the package through a carrier that provides proof of
delivery; insure the shipment at full product value.
! Place the RMA number on the outside of the package.
! Use proper materials for packing the product for shipment.
! For free repair or replacement, you must include a copy of a
dated proof of purchase (store receipt), proving the product is
still under Warranty
Creative may replace or repair the product with new or reconditioned
parts, and the faulty parts or product will become the property of
Creative.
Technical Support
B-2