1
SoundBlaster Live!
User Guide
On-line Version
SBLMPC.book Page 2 Sunday, September 17, 2000 2:35 PM
Information in this document is subject to change without notice and does not represent a commitment on the part of Creative Technology Ltd.
No part of this manual may be reproduced or transmitted in any form or by any means, electronic or mechanical, including photocopying and
recording, for any purpose without the written permission of Creative Technology Ltd. The software described in this document is furnished under
a license agreement and may be used or copied only in accordance with the terms of the license agreement. It is against the law to copy the software
on any other medium except as specifically allowed in the license agreement. The licensee may make one copy of the software for backup
purposes.
Copyright © 1998-2000 by Creative Technology Ltd. All rights reserved.
Version 1.00 (CLI)
September 2000
Sound Blaster and Blaster are registered trademarks, and the Sound Blaster Live! logo, the Sound Blaster PCI logo, EMU10K1, Environmental
Audio, Creative Multi Speaker Surround, and LAVA! are trademarks of Creative Technology Ltd. in the United States and/or other countries. EMu and SoundFont are registered trademarks of E-mu Systems, Inc.. SoundWorks is a registered trademark, and MicroWorks, PCWorks and
FourPointSurround are trademarks of Cambridge SoundWorks, Inc.. Microsoft, MS-DOS, and Windows are registered trademarks of Microsoft
Corporation. Manufactured under license from Dolby Laboratories. Dolby, AC-3, Pro Logic and the double-D symbol are trademarks of Dolby
Laboratories. © 2000 Dolby Laboratories. All rights reserved. All other products are trademarks or registered trademarks of their respective
owners.
This product is covered by one or more of the following U.S. patents:
4,506,579; 4,699,038; 4,987,600; 5,013,105; 5,072,645; 5,111,727; 5,144,676; 5,170,369; 5,248,845; 5,298,671; 5,303,309; 5,317,104;
5,342,990; 5,430,244; 5,524,074; 5,698,803; 5,698,807; 5,748,747; 5,763,800; 5,790,837.
/,0,7(':$55$17<
Creative Technology Ltd. (“Creative”) warrants to the original end-user purchaser only that the hardware product will be free of defects in
materials and workmanship for a period of ONE year from the date of purchase. The physical media (whether CD-ROM or diskettes) enclosed
herein are also warranted to be free of defects in materials and workmanship for a period of 60 days from the date of purchase, or such other period
as may be expressly required by applicable law (“Warranty Period”).
Should there be a material or workmanship defect in the hardware product or accompanying item(s) during the Warranty Period, the end-user
purchaser shall obtain a Return Merchandise Authorization (RMA) number from the nearest support center and be responsible for all efforts and
costs incurred in transporting/mailing/shipping/insuring the defective hardware or item(s) to and from the support center. A copy of a dated proof
of purchase (e.g., a store receipt) should be enclosed in the returned package, with the RMA number clearly indicated on the outside.
Creative’s entire liability and sole remedy will be, at Creative’s sole discretion, the repair or replacement (with the same or similar model) of any
hardware or accompanying item(s) not meeting the “Limited Warranty” explained above that is returned to Creative or an authorized distributor
or dealer during the Warranty Period with a copy of your receipt.
:KDWWKLVZDUUDQW\GRHVQRW
FRYHU
To the maximum extent permitted by applicable law, Creative disclaims all other warranties, expressed or implied, including the warranties of
merchantability or fitness for a particular purpose with respect to the use of this product and the program license granted herein. Creative also
disclaims any warranty or obligation to support products for all operating environments — for example, by ensuring interoperability with future
versions of operating systems or other future software or hardware. In no event shall Creative or its licensors be liable for any indirect, incidental,
special or consequential damages or for any lost profits, lost savings, lost data, personal injury, and so on, arising from or relating to the use of
this software or hardware product, even if Creative or its licensors have been advised of the possibility of such damages.
Specifically, this warranty does not cover failures of the product which result from accident, abuse, misuse (including but not limited to improper
installation, or connection to incorrect voltages or power points), alterations (by persons other than Creative or its authorized repair agents),
moisture, corrosive environments, shipping, high voltage surges, or abnormal working conditions (including but not limited to lightning and water
damage) after purchase. In no event will Creative’s liability or damages to you, or any other person, ever exceed the purchase price you paid for
the product, regardless of the form of the claim.
This warranty does not cover normal wear and tear, or in the case of communications products, the use of the product outside the borders of the
country intended for use (as indicated by local telecommunication approval stickers).
Note:This warranty gives you specific legal rights. You may have other rights which vary from country/state to country/state. Certain
limitations in this warranty are not permitted by the jurisdiction of some countries/states, so some limitations here may not apply to you.
SBLMPC.book Page 3 Sunday, September 17, 2000 2:35 PM
Creative End-User Software License Agreement
PLEASE READ THIS DOCUMENT CAREFULLY BEFORE USING THE SOFTWARE. BY USING THE SOFTWARE, YOU AGREE TO BE BOUND BY THE TERMS OF THIS AGREEMENT. IF YOU DO NOT
AGREE TO THE TERMS OF THE AGREEMENT, DO NOT OPEN THE SEALED DISK PACKAGE, INSTALL OR USE THE SOFTWARE. PROMPTLY RETURN, WITHIN 15 DAYS, THE SOFTWARE, ALL
RELATED DOCUMENTATION AND ACCOMPANYING ITEMS TO THE PLACE OF ACQUISITION FOR A FULL REFUND.
This is a legal agreement between you and Creative Technology Ltd. and
its subsidiaries (“Creative”). This Agreement states the terms and
conditions upon which Creative offers to license the software sealed in the
disk package together with all related documentation and accompanying
items including, but not limited to, the executable programs, drivers,
libraries and data files associated with such programs (collectively, the
“Software”).
LICENSE
1. Grant of License: The Software is licensed, not sold, to you for use
only under the terms of this Agreement. You own the disk or other
media on which the Software is originally or subsequently recorded or
fixed; but, as between you and Creative (and, to the extent applicable,
its licensors), Creative retains all title to and ownership of the Software
and reserves all rights not expressly granted to you.
2. For Use on a Single Computer: The Software may be used only on a
single computer by a single user at any time. You may transfer the
machine-readable portion of the Software from one computer to another
computer, provided that (a) the Software (including any portion or copy
thereof) is erased from the first computer and (b) there is no possibility
that the Software will be used on more than one computer at a time.
3. Stand-Alone Basis: You may use the Software only on a stand-alone
basis, such that the Software and the functions it provides are accessible
only to persons who are physically present at the location of the
computer on which the Software is loaded. You may not allow the
Software or its functions to be accessed remotely, or transmit all or any
portion of the Software through any network or communication line.
4. Copyright: The Software is owned by Creative and/or its licensees and
is protected by United States copyright laws and international treaty
provisions. You may not remove the copyright notice from any copy of
the Software or any copy of the written materials, if any, accompanying
the Software.
5. One Archival Copy: You may make one (1) archival copy of the
machine-readable portion of the Software for backup purposes only in
support of your use of the Software on a single computer, provided that
you reproduce on the copy all copyright and other proprietary rights
notices included on the originals of the Software.
6. No Merger or Integration: You may not merge any portion of the
Software into, or integrate any portion of the Software with, any other
program, except to the extent expressly permitted by the laws of the
jurisdiction where you are located. Any portion of the Software merged
into or integrated with another program, if any, will continue to be
subject to the terms and conditions of this Agreement, and you must
reproduce on the merged or integrated portion all copyright and other
proprietary rights notices included in the originals of the Software.
7. Network Version: If you have purchased a “network” version of the
Software, this Agreement applies to the installation of the Software on
a single “file server”. It may not be copied onto multiple systems. Each
“node” connected to the “file server” must also have its own license of
a “node copy” of the Software, which becomes a license only for that
specific “node”.
8. Transfer of License: You may transfer your license of the Software,
provided that (a) you transfer all portions of the Software or copies
thereof, (b) you do not retain any portion of the Software or any copy
thereof, and (c) the transferee reads and agrees to be bound by the terms
and conditions of this Agreement.
9. Limitations on Using, Copying, and Modifying the Software:
Except to the extent expressly permitted by this Agreement or by the
laws of the jurisdiction where you acquired the Software, you may not
use, copy or modify the Software. Nor may you sub-license any of your
rights under this Agreement.
10.Decompiling, Disassembling, or Reverse Engineering: You
acknowledge that the Software contains trade secrets and other
proprietary information of Creative and its licensors. Except to the
extent expressly permitted by this Agreement or by the laws of the
jurisdiction where you are located, you may not decompile, disassemble
or otherwise reverse engineer the Software, or engage in any other
activities to obtain underlying information that is not visible to the user
in connection with normal use of the Software.
In particular, you agree not for any purpose to transmit the Software or
display the Software's object code on any computer screen or to make
any hardcopy memory dumps of the Software's object code. If you
believe you require information related to the interoperability of the
Software with other programs, you shall not decompile or disassemble
the Software to obtain such information, and you agree to request such
information from Creative at the address listed below. Upon receiving
such a request, Creative shall determine whether you require such
information for a legitimate purpose and, if so, Creative will provide
such information to you within a reasonable time and on reasonable
conditions.
In any event, you will notify Creative of any information derived from
reverse engineering or such other activities, and the results thereof will
constitute the confidential information of Creative that may be used
only in connection with the Software.
TERMINATION
The license granted to you is effective until terminated. You may terminate
it at any time by returning the Software (including any portions or copies
thereof) to Creative. The license will also terminate automatically without
any notice from Creative if you fail to comply with any term or condition
of this Agreement. You agree upon such termination to return the Software
(including any portions or copies thereof) to Creative. Upon termination,
Creative may also enforce any rights provided by law. The provisions of
this Agreement that protect the proprietary rights of Creative will continue
in force after termination.
LIMITED WARRANTY
Creative warrants, as the sole warranty, that the disks on which the
Software is furnished will be free of defects, as set forth in the Warranty
Card or printed manual included with the Software. No distributor, dealer
or any other entity or person is authorized to expand or alter this warranty
or any other provisions of this Agreement. Any representation, other than
the warranties set forth in this Agreement, will not bind Creative.
Creative does not warrant that the functions contained in the Software will
meet your requirements or that the operation of the Software will be
uninterrupted, error-free or free from malicious code. For purposes of this
paragraph, “malicious code” means any program code designed to
contaminate other computer programs or computer data, consume
computer resources, modify, destroy, record, or transmit data, or in some
other fashion usurp the normal operation of the computer, computer
system, or computer network, including viruses, Trojan horses, droppers,
worms, logic bombs, and the like. EXCEPT AS STATED ABOVE IN
THIS AGREEMENT, THE SOFTWARE IS PROVIDED AS-IS
WITHOUT WARRANTY OF ANY KIND, EITHER EXPRESS OR
IMPLIED, INCLUDING, BUT NOT LIMITED TO, ANY IMPLIED
WARRANTIES OF MERCHANTABILITY AND FITNESS FOR A
PARTICULAR PURPOSE. CREATIVE IS NOT OBLIGATED TO
PROVIDE ANY UPDATES, UPGRADES OR TECHNICAL
SUPPORT FOR THE SOFTWARE.
Further, Creative shall not be liable for the accuracy of any information
provided by Creative or third party technical support personnel, or any
damages caused, either directly or indirectly, by acts taken or omissions
made by you as a result of such technical support.
You assume full responsibility for the selection of the Software to achieve
your intended results, and for the installation, use and results obtained from
the Software. You also assume the entire risk as it applies to the quality and
performance of the Software. Should the Software prove defective, you
(and not Creative, or its distributors or dealers) assume the entire cost of all
necessary servicing, repair or correction.
This warranty gives you specific legal rights, and you may also have other
rights which vary from country/state to country/state. Some countries/
states do not allow the exclusion of implied warranties, so the above
exclusion may not apply to you. Creative disclaims all warranties of any
kind if the Software was customized, repackaged or altered in any way by
any third party other than Creative.
LIMITATION OF REMEDIES AND DAMAGES
THE ONLY REMEDY FOR BREACH OF WARRANTY WILL BE
THAT SET FORTH IN THE WARRANTY CARD OR PRINTED
MANUAL INCLUDED WITH THE SOFTWARE. IN NO EVENT
WILL CREATIVE OR ITS LICENSORS BE LIABLE FOR ANY
INDIRECT, INCIDENTAL, SPECIAL OR CONSEQUENTIAL
DAMAGES OR FOR ANY LOST PROFITS, LOST SAVINGS,
LOST REVENUES OR LOST DATA ARISING FROM OR
RELATING TO THE SOFTWARE OR THIS AGREEMENT, EVEN
IF CREATIVE OR ITS LICENSORS HAVE BEEN ADVISED OF
THE POSSIBILITY OF SUCH DAMAGES. IN NO EVENT WILL
CREATIVE’S LIABILITY OR DAMAGES TO YOU OR ANY
OTHER PERSON EVER EXCEED THE AMOUNT PAID BY YOU
TO USE THE SOFTWARE, REGARDLESS OF THE FORM OF
THE CLAIM.
Some countries/states do not allow the limitation or exclusion of liability
for incidental or consequential damages, so the above limitation or
exclusion may not apply to you.
PRODUCT RETURNS
If you must ship the software to Creative or an authorized Creative
distributor or dealer, you must prepay shipping and either insure the
software or assume all risk of loss or damage in transit.
U.S. GOVERNMENT RESTRICTED RIGHTS
All Software and related documentation are provided with restricted rights.
Use, duplication or disclosure by the U.S. Government is subject to
restrictions as set forth in subdivision (b)(3)(ii) of the Rights in Technical
SBLMPC.book Page 4 Sunday, September 17, 2000 2:35 PM
Data and Computer Software Clause at 252.227-7013. If you are sublicensing or using the Software outside of the United States, you will
comply with the applicable local laws of your country, U.S. export control
law, and the English version of this Agreement.
CONTRACTOR/MANUFACTURER
The Contractor/Manufacturer for the Software is:
Creative Technology Ltd
31, International Business Park
Creative Resource
Singapore 609921
GENERAL
This Agreement is binding on you as well as your employees, employers,
contractors and agents, and on any successors and assignees. Neither the
Software nor any information derived therefrom may be exported except in
accordance with the laws of the U.S. or other applicable provisions. This
Agreement is governed by the laws of the State of California (except to the
extent federal law governs copyrights and federally registered trademarks).
This Agreement is the entire agreement between us and supersedes any
other understandings or agreements, including, but not limited to,
advertising, with respect to the Software. If any provision of this
Agreement is deemed invalid or unenforceable by any country or
government agency having jurisdiction, that particular provision will be
deemed modified to the extent necessary to make the provision valid and
enforceable, and the remaining provisions will remain in full force and
effect.
For questions concerning this Agreement, please contact Creative at the
address stated above. For questions on product or technical matters, contact
the Creative technical support center nearest you.
ADDENDUM TO THE MICROSOFT SOFTWARE LICENSE
AGREEMENT (WINDOWS 95)
IMPORTANT: By using the Microsoft software files (the “Microsoft
Software”) provided with this Addendum, you are agreeing to be bound by
the following terms. If you do not agree to be bound by these terms, you
may not use the Microsoft Software.
The Microsoft Software is provided for the sole purpose of replacing the
corresponding files provided with a previously licensed copy of the
Microsoft software product identified above (“ORIGINAL PRODUCT”).
Upon installation, the Microsoft Software files become part of the
ORIGINAL PRODUCT and are subject to the same warranty and license
terms and conditions as the ORIGINAL PRODUCT. If you do not have a
valid license to use the ORIGINAL PRODUCT, you may not use the
Microsoft Software. Any other use of the Microsoft Software is prohibited.
6DIHW\,QIRUPDWLRQ
CAUTION: This device is intended to be installed by the user in a CSA/
TUV/UL certified/listed IBM AT or compatible personal computers in the
manufacturer’s defined operator access area. Check the equipment
operating/installation manual and/or with the equipment manufacturer to
verify/confirm if your equipment is suitable for user-installed application
cards.
ATTENTION: Ce carte est destiné à être installé par l’utilisateur, dans un
ordinateur compatible certifié CSA/TUV/UL ou listé IBM AT, à l’intérieur
de la zone définie par le fabricant. Consulter le mode d’emploi ou le
fabricant de l’appareil pour vérifier ou confirmer si l’utilisateur peut y
installer lui-même des cartes périphériques.
1RWLFHIRUWKH86$
1RWLFHIRU&DQDGD
This apparatus complies with the Class “B” limits for radio interference as
specified in the Canadian Department of Communications Radio
Interference Regulations.
Cet appareil est conforme aux normes de CLASSE “B” d’interference
radio tel que spécifié par le Ministère Canadien des Communications dans
les règlements d’interférence radio.
&RPSOLDQFH
This product conforms to the following Council Directive:
T Directive 89/336/EEC, 92/31/EEC (EMC)
'HFODUDWLRQRI&RQIRUPLW\
According to the FCC96 208 and ET95-19
Name:
Creative Labs Inc.
Address:
1901 McCarthy Boulevard
Milpitas, CA. 95035
United States
Tel: (408) 428-6600
declares under its sole responsibility that the product
Trade Name:
Creative Labs
Model Number: SB0060
FCC Part 15: This equipment has been tested and found to comply with
the limits for a Class B digital device, pursuant to Part 15 of the FCC Rules.
These limits are designed to provide reasonable protection against harmful
interference in a residential installation. This equipment generates, uses,
and can radiate radio frequency energy and, if not installed and used in
accordance with the instructions, may cause harmful interference to radio
communications. However, this notice is not a guarantee that interference
will not occur in a particular installation. If this equipment does cause
harmful interference to radio or television reception, which can be
determined by turning the equipment off and on, the user is encouraged to
try one or more of the following measures:
has been tested according to the FCC / CISPR22/85
requirement for Class B devices and found compliant with the
following standards:
T Reorient or relocate the receiving antenna.
T Increase the distance between the equipment and receiver.
T Connect the equipment to an outlet on a circuit different from that to
which the receiver is connected.
T Consult the dealer or an experienced radio/TV technician.
Ce matériel est conforme à la section 15 des régles FCC.
Son Fonctionnement est soumis aux deux conditions suivantes:
1. Le matériel ne peut étre source D’interférences et
2. Doit accepter toutes les interférences reques, Y compris celles
pouvant provoquer un fonctionnement indésirable.
CAUTION: To comply with the limits for the Class B digital device,
pursuant to Part 15 of the FCC Rules, this device must be installed in
computer equipment certified to comply with the Class B limits.
All cables used to connect the computer and peripherals must be shielded
and grounded. Operation with non-certified computers or non-shielded
cables may result in interference to radio or television reception.
0RGLILFDWLRQV
Any changes or modifications not expressly approved by the grantee of this
device could void the user’s authority to operate the device.
EMI/EMC: ANSI C63.4 1992, FCC Part 15 Subpart B
This device complies with part 15 of the FCC Rules.
Operation is subject to the following two conditions:
1. This device may not cause harmful interference, and
2. This device must accept any interference received, including
interference that may cause undesirable operation.
Compliance Manager
Creative Labs, Inc.
March 16, 1999
SBLMPC.book Page v Sunday, September 17, 2000 2:35 PM
&RQWHQWV
,QWURGXFWLRQ L[
System Requirements......................................................................................................................x
Live!Ware Benefits..........................................................................................................................x
Getting More Information...............................................................................................................x
,QVWDOOLQJ6RXQG%ODVWHU/LYH
What You Need............................................................................................................................................1
Installing the Audio Card.............................................................................................................................2
Installing the Creative Software..................................................................................................................5
8VLQJ6RXQG%ODVWHU/LYH Creative Software.........................................................................................................................................7
Sound Blaster Live! Experience..................................................................................................................8
Creative Diagnostics....................................................................................................................................8
Creative Launcher........................................................................................................................................8
Options .............................................................................................................................................8
Groups..............................................................................................................................................9
Surround Mixer..........................................................................................................................................10
AudioHQ ....................................................................................................................................................12
SoundFont Control ........................................................................................................................13
Device Controls .............................................................................................................................15
Creative Keyboard.........................................................................................................................16
EAX Control..................................................................................................................................17
AutoEAX .......................................................................................................................................18
Wave Studio ...............................................................................................................................................18
Creative PlayCenter ...................................................................................................................................19
Creative Recorder ......................................................................................................................................19
Creative LAVA!..........................................................................................................................................20
Contents
v
SBLMPC.book Page vi Sunday, September 17, 2000 2:35 PM
Creative MediaRing Talk ..........................................................................................................................21
Creative Keytar ..........................................................................................................................................22
Creative Rhythmania.................................................................................................................................23
$GGLWLRQDO6RXQG%ODVWHU/LYH$SSOLFDWLRQV Mixman Studio ..........................................................................................................................................26
Kool Karaoke.............................................................................................................................................27
Prody Parrot ...............................................................................................................................................27
Sound Forge XP.........................................................................................................................................30
PixAround PixMaker Creative Edition.....................................................................................................30
Cakewalk Express Gold ............................................................................................................................31
Game Commander.....................................................................................................................................31
TextAssist...................................................................................................................................................32
VoiceAssist.................................................................................................................................................32
$GYDQFHG&RQILJXUDWLRQV Positioning Your Speakers.........................................................................................................................33
Connecting Optional Devices.......................................................................................................34
Recording and Content Authoring................................................................................................35
7URXEOHVKRRWLQJ MS-DOS Mode..........................................................................................................................................37
Audio Options................................................................................................................................38
Music Options................................................................................................................................38
Digital Audio Options ...................................................................................................................38
MS-DOS Mode Utilities ...............................................................................................................39
Software......................................................................................................................................................40
Sound..........................................................................................................................................................41
Surround Mixer..........................................................................................................................................43
Insufficient SoundFont Cache...................................................................................................................44
Joystick.......................................................................................................................................................44
I/O Conflicts...............................................................................................................................................45
Windows NT 4.0........................................................................................................................................45
Encore DVD Player...................................................................................................................................46
Contents
vi
SBLMPC.book Page vii Sunday, September 17, 2000 2:35 PM
'HWDLOV 'HWDLOV
Creative Sound Blaster Live! MP3+ 5.1........................................................................................Details-1
General Specifications: Sound Blaster Live! MP3+ 5.1..................................................Details-3
Contacting Creative Labs ...............................................................................................................Details-6
Product Return ....................................................................................................................Details-7
Contents
vii
SBLMPC.book Page ix Sunday, September 17, 2000 2:35 PM
,QWURGXFWLRQ
Sound Blaster Live! is the top audio solution for games, movies, CDs, MP3 music, and Internet
entertainment. With its support for today’s leading audio standard—EAX—Sound Blaster Live! creates
real-life, multidimensional sound and multi-textured acoustical environments for the most realistic 3D
audio experience. Its powerful EMU10K1 audio processor delivers audio at optimum CPU performance
with the highest fidelity and absolute clarity. Combine it with a four- or five-speaker setup and you’ll
experience realistic 3D audio, EAX in supported games, and enjoy your movies with true surround sound.
The Live!Ware upgrade program keeps your Sound Blaster Live! card up to date, supporting future
technologies, functionality, and features.
To create your own music or audio content in the future, Sound Blaster Live! offers upgrade options that
allow you to connect multiple digital and analog devices simultaneously, including keyboards and other
music devices, as well as optical connection to MiniDisc and DAT recorders.
Introduction
ix
SBLMPC.book Page x Sunday, September 17, 2000 2:35 PM
6\VWHP5HTXLUHPHQWV
For Creative software, your card requires at least:
T Genuine Intel® Pentium® class processor:
166 MHz for Windows 95/98/Me
200 MHz for Windows NT 4.0 or Windows 2000
T Intel or 100% compatible motherboard chipset
T Windows 95, 98, or Me; Windows NT 4.0 or Windows 2000
T 16 MB RAM for Windows 95/98 (32 MB RAM recommended),
32 MB RAM for Windows NT 4.0
64 MB RAM for Windows 2000
T 160 MB of free hard disk space
T Open half-length PCI 2.1 compliant slot
T Headphones or amplified speakers (available separately)
T CD-ROM drive required for software installation
Sound Blaster Live! estimates the hard disk space required when you select it during installation. Included
applications may need higher system requirements or microphone for basic functionalities. Refer to the
documentation for individual applications for details.
/LYH:DUH%HQHILWV
Through Live!Ware, new features and applications are always available so you may experience the latest
technology and extend the life of your card. Each upgrade rejuvenates your audio card, allowing you to
experience new functionality. The latest Live!Ware upgrades are only a download away. When new
standards and capabilities emerge, your hardware is ready for it—just download the functions and the card
becomes up-to-date!
Visit the www.sblive.com site for more information, content, and Live!Ware updates.
*HWWLQJ0RUH
,QIRUPDWLRQ
See the online User’s Guide for MIDI specifications and connector pin assignments, as well as
instructions on using the various applications in your audio package.
Introduction
x
SBLMPC.book Page 1 Sunday, September 17, 2000 2:35 PM
1
,QVWDOOLQJ6RXQG%ODVWHU/LYH
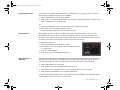
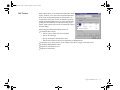
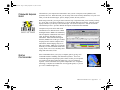
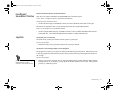
:KDW<RX1HHG
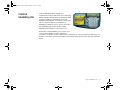
Most of the items you need for installation are included. The following illustration shows the basic
components necessary for a complete installation.
Creative Audio
Software and
Applications
Refer to the colored insert for
specific information about your
audio card.
CD Digital Cable
CD Audio Cable
Audio Card
Phillips Screwdriver
(not included)
Your Sound Blaster Llive!
may also include a
microphone not shown
here.
Installing Sound Blaster Live!
1
SBLMPC.book Page 2 Sunday, September 17, 2000 2:35 PM
,QVWDOOLQJWKH
$XGLR&DUG
Before you remove the computer
cover, touch a grounded metal
surface to discharge static
electricity.
To install the audio card:
1. Turn off your computer, and
disconnect the power cable.
2. Disconnect the monitor and other
devices that are connected to the
computer.
3. Remove the computer cover.
3
2
1
Remove or disable any existing
audio card and its driver from your
computer. Refer to the
manufacturer’s documentation for
details.
4. Locate a PCI slot to
accommodate the audio card.
Remove the slot cover from your
computer—save the screws to
secure the audio and extension
cards.
4
PCI slot for
audio card
Installing Sound Blaster Live!
2
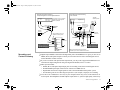
SBLMPC.book Page 3 Sunday, September 17, 2000 2:35 PM
5. Align the gold-striped tabs on the
bottom of the audio card with the
PCI slot, and firmly press the
card into place until it fits snugly.
6. Use the screw from the slot cover
to secure the audio card to the
frame of the computer—securing
the card assures proper
grounding.
5
6
CD audio
connector
7. Connect the CD audio cable from
your CD-ROM drive to the audio
card’s CD audio connector.
Optionally, connect the CD SPDIF
cable from your CD-ROM or PCDVD to the audio card’s CD
SPDIF connector.
7
CD audio
connector
CD or PC-DVD
audio connector
Installing Sound Blaster Live!
3
SBLMPC.book Page 4 Sunday, September 17, 2000 2:35 PM
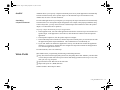
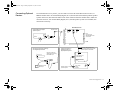
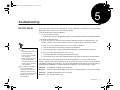
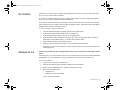
8. Connect your speakers, headphones, microphone, joystick, MIDI devices, or other devices to the
back panel of the audio card.
Use the MIDI In jack of the audio
extension card to connect a MIDI
input device; connect a gamepad
to the audio card. You can
connect only one MIDI device to
Sound Blaster Live! at a time.
CD-ROM drive
Connects to digital speakers*, minidisc, or
DAT via minijack-to-DIN cable or Digital
Output Module.
See “Connecting Optional Devices” on
page 34 for more details.
MPC-to-MPC (2-pin)
audio cable
MPC-to-MPC (4pin) audio cable
Line-out
PC-DVD drive
Cassette, CD player,
Synthesizer, etc.
Line In
Mic In
Line Out
Microphone
Rear Out
If you connect the digital audio to
the analog audio connectors of the
same CD-ROM or PC-DVD
drive, do not unmute CD Audio
and CD Digital at the same time
in Surround Mixer.
Joystick/MIDI
To analog input of
FourPointSurround
speakers
Sound Blaster Live!
GamePad
Connects to Optical Digital I/O card or Drive.
See “Connecting Optional Devices” on page
34 for more details.
* For example, FPS2000
Digital speakers from
Cambridge SoundWorks
9. Replace the computer cover.
10. Reconnect the power cable, monitor, and other devices.
The joystick connector is a standard PC game control adapter. You can connect any analog joystick with
a 15-pin D-shell connector or any device compatible with the standard PC joystick. To use two
joysticks, you need a Y-cable splitter.
To play games in MS-DOS mode:
• Connect the CD In connector ot the analog audio connector of the CD-ROM or PC-DVD drive.
• If the audio is distorted, do not connect the CD SPDIF connector to the digital audio connector of
the CD-ROM or PC-DVD drive.
Installing Sound Blaster Live!
4
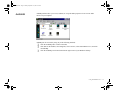
SBLMPC.book Page 5 Sunday, September 17, 2000 2:35 PM
,QVWDOOLQJWKH
&UHDWLYH6RIWZDUH
The Sound Blaster Live! software CD contains drivers necessary for operation and utilities to make the
most of the audio card.
When you turn on your computer, Windows automatically detects the new hardware, and prompts for the
installation disk.
To install in Windows:
This manual reflects a software
installation in an unmodified
version of the operating system.
Your installation screens and
procedure may vary slightly from
what is shown and described. The
variations may be caused by other
software/hardware installed on
your computer, or the version of
the Windows operating system.
1. Turn on your computer—Windows automatically detects your new hardware.
T If the New Hardware Found dialog appears (Windows 95/98), click the Cancel button.
T If the dialog does not appear, continue below.
2. Insert the installation CD into your CD-ROM drive.
3. When the Sound Blaster Live! installation screen appears, follow the instructions on the screen to
complete the installation.
If the installation program does not run, follow the instructions below to set up AutoPlay:
1.
2.
3.
4.
5.
6.
7.
8.
Click Start on the Windows Taskbar, choose Settings, and click on Control Panel.
In the Control Panel window, double-click the System icon.
In the System Properties dialog, click the Device Manager tab and select your CD-ROM drive.
Click the Properties button.
In the Properties dialog, click the Settings tab and select Auto Insert Notification.
Click the OK button to close the dialog.
Eject and re-insert the installation CD.
Follow the instructions on the screen to complete the installation.
Or:
1. With the installation CD in the CD-ROM drive, double-click the My Computer icon on the
Windows desktop.
2. Double-click the Sound Blaster Live! CD-ROM icon.
Or, right-click the Sound Blaster Live! CD-ROM icon and click on AutoPlay on the menu.
3. Follow the instructions on the screen to complete the installation.
Installing Sound Blaster Live!
5
SBLMPC.book Page 6 Sunday, September 17, 2000 2:35 PM
6HWWLQJ8S-R\VWLFN'ULYHUVLQ
:LQGRZV17
1.
2.
3.
4.
5.
6.
7.
8.
9.
Log on to your computer as Administrator.
Click Start on the Windows Taskbar, select Settings, and click on Control Panel.
Double-click the Multimedia icon, click the Devices tab, and then click the Add button.
On the Add dialog, select Unlisted Or Updated Driver from the List of Drivers, and then click the
OK button.
Insert the Windows NT 4.0 CD-ROM into the CD-ROM drive.
In the Install Driver dialog, type E:\DRVLIB\MULTIMED\JOYSTICK\X86 (E:\ is the
CD-ROM drive letter), and then click the OK button.
On the Add Unlisted Or Updated Driver dialog, select Analog Joystick Driver, and then click the
OK button.
On the Microsoft Joystick Configuration dialog, click the OK button.
Restart your computer when prompted.
Installing Sound Blaster Live!
6
SBLMPC.book Page 7 Sunday, September 17, 2000 2:35 PM
8VLQJ6RXQG%ODVWHU/LYH
&UHDWLYH6RIWZDUH
2
Sound Blaster Live! is supported by a full range of applications to help you get the absolute most from
the audio card:
T Sound Blaster Live! Experience
T Creative Diagnostics
T Creative Launcher
T Surround Mixer
T AudioHQ
T Wave Studio
T Creative PlayCenter 2
T Creative Recorder
T Creative LAVA!
T Creative MediaRing Talk
T Creative Keytar
T Creative Rhythmania
Each of the applications included with Sound Blaster Live! provides online help to guide you during the
use of that software.
To run a Creative Software application:
1. Click Start on the Windows Taskbar, select Programs, select Creative, select Sound Blaster Live!,
and click on the application you want to open.
Using Sound Blaster Live!
7
SBLMPC.book Page 8 Sunday, September 17, 2000 2:35 PM
6RXQG%ODVWHU/LYH
([SHULHQFH
Sound Blaster Live! Experience presents an interactive introduction to Sound Blaster Live!
To run SB Live! Experience, bring your pointer to the top of the screen to display Creative Launcher,
click the Sound Blaster Live! tab, and then click the SB Live! Experience icon. On the opening screen,
click to select the topic that interests you.
&UHDWLYH
'LDJQRVWLFV
Use Creative Diagnostics to test your audio card’s Wave, MIDI, or CD Audio playback, as well as the
recording function and speaker output.
&UHDWLYH/DXQFKHU
Creative Launcher presents immediate access to Creative applications.
The Creative Launcher is installed at the top of your screen. If it does not appear, move your mouse
pointer to the top of the screen. As the pointer reaches the top of the screen, it changes to a pointing hand
and the Creative Launcher displays as a bar window. The Launcher consists of the System Menu icon
(the Creative logo at the top left corner), the web site icon, the group tab pages, and the group items. The
EAX icon also appears in the right corner.
2SWLRQV
To set the options for the Launcher:
1.
2.
3.
4.
Click the System Menu icon
on the Launcher.
On the System menu, click Properties. The Properties dialog appears.
Select or clear the desired options.
Click the OK button to apply the changes to the Launcher.
Using Sound Blaster Live!
8
SBLMPC.book Page 9 Sunday, September 17, 2000 2:35 PM
*URXSV
You can place three kinds of items on the Launcher:
• Subgroups
• Shortcuts
• Plugins
A subgroup is an item within a group that may contain more items.
The installation creates a number of group tab pages in the Launcher that may contain shortcuts to
Creative applications such as PlayCenter and Control Panel. It may also contain shortcuts to other
applications for your hardware settings, volume control, Help files or demo programs by Creative.
A plugin is a Creative software module that is integrated into the Launcher. Examples are the Volume
Control plugin and the Command Line plugin.
Use the System menu on the Launcher to add, delete, and rearrange groups and items within each group
on the Launcher.
The Live!Task tab on the Launcher offers a task-oriented form to help you select the correct application
for a task. The application can be launched with its associated Super-Environment Presets using the
Launcher. The controls are arranged intuitively: “I want to” [perform a task] “With” [SuperEnvironment preset] You can create and save new Super-Environment presets in Creative Surround
Mixer and configure them in Launcher.
The README file on the Live! Task tab offers a comprehensive description on how to configure the
Live! Task bar. Click the right scroll-arrow until you see the README icon; then click it.
For the latest updates and drivers, further information, value-added tips, tricks and plug-ins, check the
SB Live! website frequently at http://www.sblive.com You can access the website quickly by clicking
the right-most icon (the EAX icon) on Creative Launcher.
Using Sound Blaster Live!
9
SBLMPC.book Page 10 Sunday, September 17, 2000 2:35 PM
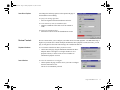
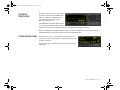
6XUURXQG0L[HU
Creative Surround Mixer is an application for setting and controlling the various aspects of your audio
card. It consists of two sections: Main and Mixer
Set Super-Environment presets
Speaker view
Main
Spectrum view
Mixer
0DLQ6HFWLRQ
The top area of the Main section allows you to:
T Select tasks or save, delete, import, and export Super-Environment presets. You can save the
settings as Super-Environment presets for the selected speaker output. A selected preset is an
automatic configuration of speakers, mixer, and effects.
The three buttons on the left side of the Main section allow you to switch between three different views:
T EAX: Select and create environments; position audio sources within the configuration space.
T Speaker: Set up speakers and perform a speaker output test.
T Spectrum: Select and display the spectrum analyzer during playback or recording.
0L[HU6HFWLRQ
The Mixer section allows you to:
T Mix sounds from various audio input sources when playing or recording.
T Adjust the volume level for the audio input sources.
T Adjust the treble and bass level, front/rear or left/right balance.
To identify the icons on the Surround Mixer, place the pointer over any icon or area to display a label.
For details on what you can do in Surround Mixer, explore its online help.
Using Sound Blaster Live!
10
SBLMPC.book Page 11 Sunday, September 17, 2000 2:35 PM
$QDORJ'LJLWDO2XWSXW
The default for the Analog/Digital Output jack on Sound Blaster Live! is analog output. To switch to
digital output (6-channel or compressed AC-3 SPDIF):
1. On the Surround Mixer, click the Speaker button.
2. In the Speaker view, click the Digital Output Only check box. Digital Output mode is available for all
speaker configurations except headphones.
Or:
1. On the Surround Mixer, click the red plus sign above the volume (VOL) control.
2. In the dialog, select the Digital Output Only option.
To return to analog output mode, clear the option check box.
%DVV5HGLUHFWLRQ
Dolby Digital delivers five full range channels and one bass-only effects channel. However, most
multimedia speaker systems do not reproduce low-frequency content. Bass redirection allows lowfrequency source content from the front, rear, and center channels to be redirected and added to the lowfrequency source effects (LFE) channel to produce deeper subwoofer output.
To enable bass redirection:
1. On the Surround Mixer, click the Speaker button.
2. In the Speaker view, click the Speaker Selection button and select
5.1 speaker mode.
3. Click the Advanced button.
4. In the dialog, click the Bass Redirection button.
'ROE\'LJLWDO$&
'HFRGLQJ
Dolby Digital decoding allows Sound Blaster Live! to decode Dolby Digital output to six discrete analog
channels, such as the Cambridge SoundWorks DeskTop Theater DTT2200 speaker system. Thus, an
external Dolby Digital decoder is not required for you to enjoy multi-speaker surround sound.
To enable Dolby Digital (AC-3) decoding:
1. In the Speaker view, clear the Digital Output only check box.
2. Follow the steps 1 to 3 described in the previous section and then select AC-3 Decode.
3. Remember to set Sound Blaster Live! to Digital Output mode.
To use an external Dolby Digital decoder, do not enable this feature. In addition, you will need a separate
3.5mm-to-RCA jack cable to connect to your decoder.
Using Sound Blaster Live!
11
SBLMPC.book Page 12 Sunday, September 17, 2000 2:35 PM
$XGLR+4
AudioHQ utilities allow you to view, audition, or set up the audio properties of one or more audio
devices on your computer.
AudioHQ can be accessed by using any of the following methods:
T Click the AudioHQ tab in Creative Launcher;
T Click Start on the Taskbar, select Programs, select Creative, select Sound Blaster Live!, and click
on AudioHQ.
T Click the AudioHQ icon located at the bottom right corner of your Windows desktop.
Using Sound Blaster Live!
12
SBLMPC.book Page 13 Sunday, September 17, 2000 2:35 PM
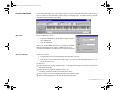
6RXQG)RQW&RQWURO
Creative SoundFont Control allows you to configure MIDI banks with SoundFont files and instruments,
as well as set the caching algorithm and space.
&RQILJXUHD0,',%DQN
To configure a MIDI bank:
1. In SoundFont Control, click the Configure Bank tab.
2. In the Select Bank list, select the MIDI bank to
configure.
3. Click the Load button and load the SoundFont file you
want to the MIDI bank.
The latest file loaded always appears at the top of the
Bank Stack box.
The top of the stack is indicated by an arrow.
4. To replace a SoundFont file, click the file, and then click
the Replace button.
5. To clear a bank from the stack, select the bank and then
click the Clear button.
A variation bank can only be cleared by clearing its
main bank.
6. Repeat Steps 3, 4, or 5 as required.
By stacking a SoundFont file instead of replacing one with the other, you may return to the original
sounds or use the new selection.
You can “spot” hide particular instruments by loading one or more SoundFont files on top of the original.
When you clear a SoundFont file, you remove the latest configuration of the main bank and any variation
banks, including the latest configuration of instruments on the Configure Instrument tab page.
Using Sound Blaster Live!
13
SBLMPC.book Page 14 Sunday, September 17, 2000 2:35 PM
&RQILJXUHDQ,QVWUXPHQW
Setting the maximum amount of
cache memory for SoundFont files
does not mean setting aside or
reserving the space. The space can
still be used by your computer or
other files, if needed.
To configure an instrument:
1. In the SoundFont dialog, click the Configure
Instrument tab.
2. In the Select Bank list, select the bank whose
instruments you want to configure.
3. In the Select Instrument list, select the instrument to
configure.
In the Instrument Stack, you may see an instrument
entry although you did not load an instrument on this
page. The instrument can be found in a bank loaded on
the Configure Bank tab page.
4. Click the Load button and load a SoundFont or singleinstrument (for example, .WAV) file.
The last file loaded always appears at the top of the
Instrument Stack with an arrow pointing to it.
5. To clear an instrument from the stack, select the instrument and then click the Clear button.
6. For faster processing of SoundFont files, the files are loaded into memory. You need to set the
maximum amount of cache memory your SoundFont files can occupy, so that your system
performance does not suffer from insufficient memory. You can also set the caching algorithm for
a balanced system performance.
Using Sound Blaster Live!
14
SBLMPC.book Page 15 Sunday, September 17, 2000 2:35 PM
6RXQG)RQW2SWLRQV
You change the following options on the Options tab page of
the SoundFont Control dialog:
To specify the caching algorithm:
• Select an algorithm from the SoundFont Cache list.
To set the amount of cache for SoundFont files:
• Drag the SoundFont Cache slider to set the amount of
cache.
To change the SoundFont device
• Select the new device from the SoundFont Device list.
'HYLFH&RQWUROV
Device Controls allow you to configure your audio devices for audio playback. The EMU8008 chip or
higher on your audio device allows multiple simultaneous Wave playback sessions; therefore, you can
play several games at the same time and enjoy the sounds from them all.
3OD\EDFN6HVVLRQV
To set maximum simultaneous Wave playback sessions:
• On the Wave tab page, drag the Maximum Simultaneous Wave
Playback slider to the right to set a higher number of wave
playback sessions, or to the left to set a lower number of
simultaneous playback sessions.
6RXQG'HYLFH
To select the sound device to configure:
• On the Options tab page, click the device you want to configure
from the Sound Device list.
The device is immediately selected.
Using Sound Blaster Live!
15
SBLMPC.book Page 16 Sunday, September 17, 2000 2:35 PM
&UHDWLYH.H\ERDUG
Creative Keyboard allows you to play musical notes on various instruments much like a composer plays
notes on a piano (or other instrument) while creating or arranging music. To edit the sound, use Vienna
SoundFont Studio or another sound editor.
0,',,QSXW
To select a MIDI input device:
1. In the Select MIDI In box in the Options dialog, click the
correct MIDI port.
2. Click the OK button.
You can use external MIDI input devices to audition your MIDI
banks and instruments. First, connect a MIDI input device to
your audio card and then select that device in Creative Keyboard.
7HVWDQ,QVWUXPHQW
To test an instrument:
1. In Creative Keyboard, click the bank and the instrument you want.
2. Click the keys on the keyboard to test the sound. If you have an external MIDI input device, you
may find it easier to use.
Use mouse to:
T Select multiple notes to play simultaneously. Use the right mouse button to click the keys, which are
indicated by black dots.
T Release the keys by right-clicking them one by one,
or click the All Notes Off button for simultaneous release.
T Play a sequence of notes by dragging the mouse across the keyboard.
T Shorten sustained playback by clicking the All Notes Off button.
Using Sound Blaster Live!
16
SBLMPC.book Page 17 Sunday, September 17, 2000 2:35 PM
($;&RQWURO
EAX Control allows you to configure the EMU10K1 effects
engine. It allows you to specify the components that make
up the audio elements that generate an environment. An
environment is the model of a real-world audio experience.
Included with Sound Blaster Live! are some entertainment,
gaming, and miscellaneous environments to help you get
started. EAX Control can be also be accessed from Creative
Surround Mixer.
Online help gives detailed instructions on how to:
T Configure master effects
• Add or remove effects from an environment
• Specify the effect type
• Specify the degree or amount of the effect
• Edit an effect all the way down to its parameters or building blocks
T Configure source effects, that is, set the amount of the effects to apply on an audio source
T Configure MIDI playback effects
T Export an environment to a file
T Import an environment
Using Sound Blaster Live!
17
SBLMPC.book Page 18 Sunday, September 17, 2000 2:35 PM
$XWR($;
AutoEAX allows you to specify a Super-Environment preset for any audio application to automatically
associate with the currently active speaker output. For the automatic super-environment to work,
AutoEA must be active or at least minimized.
$VVRFLDWLQJ
D6XSHU(QYLURQPHQW
For each audio application on your computer, you can specify the super-environment to be automatically
associated with it, for each speaker output configuration. For example, when playing a MiniDisc using
Creative PlayCenter, you may want to associate a different Super-Environment for each of the speaker
outputs “Live!Surround” and “4 Speakers.”
To specify a Super-Environment preset for an application:
1. In the Application list, select the audio application with which to associate a super-environment for a
speaker output. If the application is not in the list, click the Browse button to locate and open the
application.
2. In the Speaker Output box, click the speaker output to configure.
3. In the Linked Super-Environment box, click the Super-Environment preset you want to associate with
the application/speaker-output combination. This combination trio is automatically set.
4. If you want AutoEA to monitor this application's activity, clear the Do not monitor this application
check box. If you select it, AutoEA does not configure the Super-Environment for that application
even when the application is started.
For other functions, refer to its online help.
:DYH6WXGLR
Wave Studio assists you performing the following sound editing functions:
T Play, edit, and record 8-bit (tape quality) and 16-bit (CD quality) Wave data. Enhance your Wave data
or create unique sounds with various special effects and editing operations such as rap, reverse, echo,
mute, pan, cut, copy, and paste.
T Open and edit several Wave files at the same time.
T Import and export raw (.RAW) data files.
SeeWave Studio’s online help for details.
Using Sound Blaster Live!
18
SBLMPC.book Page 19 Sunday, September 17, 2000 2:35 PM
&UHDWLYH
3OD\&HQWHU
PlayCenter allows you to play most types
of media—multimedia files (MIDI, Wave,
MP3, etc.), audio CDs, and Video CDs.
Just insert or select your media and
PlayCenter does the rest.
The SoundFont Association feature allows
you to autoload SoundFont banks used by
MIDI files so that you can experience the power of SoundFont technology seamlessly.
PlayCenter launches LAVA! automatically whenever you play an MP3 file. You can also set LAVA! to
launch automatically when playing audio CDs or other multimedia files.
&UHDWLYH5HFRUGHU
Recorder allows you to record sounds or music from various
input sources such as a microphone or audio CD, and save them
as Wave (.wav) files.
For details on how to use Recorder, see the Creatie PlayCenter
online help.
Using Sound Blaster Live!
19
SBLMPC.book Page 20 Sunday, September 17, 2000 2:35 PM
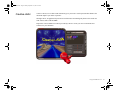
&UHDWLYH/$9$
Creative LAVA! (Live! Audio-Visual Animation) gives your music visual expression that enhances the
emotional depth of your music experience.
Through LAVA!, 3D graphical objects interact with the music and intelligently dance to the sound cues
from sources such as CD and MIDI.
Explore the various animation scenarios provided by LAVA! or create your own environments and
scenarios for your animation.
Using Sound Blaster Live!
20
SBLMPC.book Page 21 Sunday, September 17, 2000 2:35 PM
&UHDWLYH
0HGLD5LQJ7DON
Creative MediaRing Talk is Internet voice
communication software that allows you to make long
distance and international calls over the Internet, from
your PC to another PC with Internet access and
MediaRing Talk installed. It also allows you to make
calls to a regular telephone if you subscribe to
MediaRing’s ValueFone service. All you need to do is
start MediaRing Talk; dial the number; and let
MediaRing Talk establish a connection for you.
Furthermore, with Sound Blaster Live!’s EAX, your
voice can be modified as you take on different
“personas” (for example, a male or female person, chipmunk, etc.) when you talk to the other party. To
use these voice effects, click the Voice Effects button (EAX button) and select the desired persona from
the list.
Using Sound Blaster Live!
21
SBLMPC.book Page 22 Sunday, September 17, 2000 2:35 PM
&UHDWLYH.H\WDU
With Creative Keytar, an easy-to-use and highly interactive edutainment software for beginners, you can
turn your multimedia computer into a virtual rhythm guitar system immediately. Click a picture at the
top of the screen to choose your favorite guitar. Press a function key (F1, ..., F12) to activate a chord, and
you can start strumming or plucking your favorite tune.
Capo
(transposition)
Properties
Musician
Strumming
area
Reverb
and chorus
Custom
chord palette
Basic/
advanced
Exit
Volume
and tone
C
Standard
chord palette
Chord
palette
About
Keytar
D
E
G
A
Hold the chord with one hand, use the other hand to strum or pluck the strings. You don’t need to worry
about notes, all you need is a sense of rhythm and remember your chord keys, no need to worry about
notes. You only need to know and memorize chord fingerings.
Learn how to play Keytar from its online help.
Using Sound Blaster Live!
22
SBLMPC.book Page 23 Sunday, September 17, 2000 2:35 PM
&UHDWLYH
5K\WKPDQLD
Creative Rhythmania lets you create a MIDI file, choosing from a professional set of backup rhythms
and instruments.
Creative Rhythmania allows you to:
T Perform with auto-accompaniment in
Rhythm mode:
• Four-part rhythm section
• Preset backing styles
• Interactive backing arrangement
• Chord palette system
• SoundFont support
T Choose between two Keyboard types: PC
(QWERTY) keyboard or MIDI keyboard
connected to your PC.
Rhythmania is essentially pattern-based
software:
T You play a pattern to provide auto-accompaniment for your melody playing.
T You create or modify a pattern by building or changing it section by section in Rhythm mode.
T Then, you combine a pattern and a melody to create a sequence in Sequencer mode.
For details on how to use Rhythmania, see its online help.
Using Sound Blaster Live!
23
SBLMPC.book Page 25 Sunday, September 17, 2000 2:35 PM
$GGLWLRQDO6RXQG%ODVWHU/LYH$SSOLFDWLRQV
Applications included with Sound
Blaster Live! are occasionally
upgraded; your set of applications
may be slightly different from the
ones described here.
3
Sound Blaster Live! can best be appreciated through some of the advanced software that makes
maximum use of the audio card’s features. To assist you in exploring these features, Creative has
assembled an assortment of applications that demonstrate and allow you to explore the limitless potential
of Sound Blaster Live!
T Mixman Studio
T Kool Karaoke
T Prody Parrot
T Sound Forge XP
T PixAround PixMaker Creative Edition
T Cakewalk Express Gold
T Game Commander
T TextAssist
T VoiceAssist
Additional Sound Blaster Live! Applications
25
SBLMPC.book Page 26 Sunday, September 17, 2000 2:35 PM
0L[PDQ6WXGLR
Mixman Studio is a powerful tool that enables you to create original, CD-quality music. At your option,
you may choose tracks from a variety of music—combine, layer, and perform the tracks to create music.
Use Mixman Studio to control up to 16 tracks of digital audio at the same time. You can add music to
multimedia presentations, video projects, websites, even make custom tapes and CDs!
Mixman Studio is designed for you to start making music immediately. To help you learn Mixman
Studio, a series of step-by-step tutorials is included online. Once you master the basics, challenge
yourself with Mixman Studio’s advanced features.
Additional Sound Blaster Live! Applications
26
SBLMPC.book Page 27 Sunday, September 17, 2000 2:35 PM
.RRO.DUDRNH
Kool Karaoke is a straightforward and easy-touse application for karaoke. Just install the
application, plug in your microphone to the
computer, and you are ready to sing. It offers
many popular tunes to sing along, both for
children and adults.
The range of songs offered covers all types of
music available; jazz, pop, hip-hop, rock-and
roll, and others, featuring songs from many
famous and popular artists from the ‘70s to the
‘90s. There are also songs available for all
occasions: Holidays, birthdays, and other
occasions. If you want even more selection, go
to Kool Karaoke’s website at www.eatsleepmusic.com to download new songs.
Kool Karaoke also lets you change the tempo as well as the key of any song to suit your voice range, just
like a karaoke machine. It will bring your family and friends hours of entertainment.
3URG\3DUURW
Prody Parrot is an intelligent assistant who both
serves and entertains you. Prody Parrot inhabits
your desktop, swooping from here to there, resting
on dialogs and windows. He performs commands
and launches applications, and also displays his
personality by cracking jokes and singing songs.
You can give Prody Parrot commands in five ways:
T Voice commands: For example, after you train
Prody Parrot, just say “e-mail” to launch your
e-mail software.
T Keyboard commands: For example, after you
train Prody Parrot, you can press the L key to
insert a letterhead into a Microsoft Word document.
T Mouse movements: For example, after you train Prody Parrot, write an “I” on the screen with your
mouse pointer to start your Internet browser.
Additional Sound Blaster Live! Applications
27
SBLMPC.book Page 28 Sunday, September 17, 2000 2:35 PM
T Icon drag-and-drop: For example, after you train Prody Parrot, drag an icon of a guitar onto Prody
Parrot to open the CD Player program.
T Commands List: For example, double-click “hello” in the Commands window to greet Prody Parrot.
Prody Parrot can perform four types of actions:
T Run applications in Windows.
T Execute macros consisting of any combination of keyboard and mouse actions.
T Speak with informative messages or entertaining remarks.
T Exhibit behavior in animated action sequences.
Prody Parrot communicates in three ways:
T By speaking, using state-of-the-art speech synthesis.
T By displaying a text balloon.
T Through body language, such as closing his eyes to show that he is sleepy, or scratching his head to
indicate he did not understand your command.
The Prody Parrot software has the following key features:
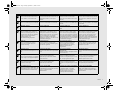
Feature
Description
Intelligent Assistant
Functionality
Entertaining Animated
Character
Multiple Input and Output
Options
Tells you the time, navigates the Web for you, starts a letter, and opens your
favorite programs.
Tells jokes, makes comments, asks to be fed, and flies around your desktop.
Customizable Program
Options
User-specific Settings
Pretrained Commands and
Actions
Issues commands in five ways—through speech input, keystroke combinations,
mouse gestures, double-clicking commands, and dragging icons. Also, responds
to your command through text, speech, and animation.
Chooses when the parrot works and when he plays. Teach Prody Parrot what to
say and adjust the quality of his voice.
Stores commands and actions that you configure or train. Users sharing the same
computer can configure Prody Parrot for individual use.
Allows Prody Parrot to be used for a new application instantly—extracts and
loads menu items from any Windows program and immediately knows how to
perform the associated actions.
Additional Sound Blaster Live! Applications
28
SBLMPC.book Page 29 Sunday, September 17, 2000 2:35 PM
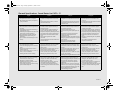
Feature
Description
Trainable Behavior
Teaches responses to your commands in custom ways, such as running
applications, executing macros, speaking or displaying messages, and performing
animated action sequences.
Speech Recognition and
Speech Synthesis
Uses natural, continuous speech to issue commands, without training. Prody
Parrot responds in high-quality synthetic speech with a voice that you can
customize.
Mouse Gesture Recognition
Communicate with Prody Parrot using mouse movements. For example, draw a
check mark to start your Internet browser.
Watch your stock portfolio and receive notification if a stock price changes
dramatically. You specify the response you want.
Keeps track of your appointments, meetings, tasks, and gives daily or annual
reminders. Use in connection with the Microsoft® Outlook™ personal
information manager, or use Prody Parrot's scheduler to resolve schedule
conflicts and confirm meeting requests.
Checks for new e-mail messages—you define the information you want.
Stock Monitoring
Scheduling Assistance
E-mail Notification
News, Sports and Weather
Updates
Web Navigation
Prodyphone
Dr. Sbaitso
Retrieves the latest news or weather information from the Internet. Reads the
information to you while you perform other tasks, or displays on your Internet
browser.
Navigates the Internet by voice. Simply say the name of any hyperlink, and Prody
Parrot takes you to the Web page—no training required.
Contacts other users with Assistant 2.0 (Prody Parrot™ 2.0 or Zymo the Alien™
2.0) with Prodyphone, for real-time voice conversation. And, if the person you
are trying to reach is not available, your Assistant allows you to send voice or text
messages.
Plays seven Java games in Prody’s playground with Prody Parrot’s comments and
sound effects.
To open Prody Parrot Help or User’s Guide:
1. Click the Start button on the Windows taskbar, point to Programs, and then point to Prody Parrot.
2. Click either of the following:
• Prody Parrot Help
• Prody Parrot User’s Guide, a PDF file
Additional Sound Blaster Live! Applications
29
SBLMPC.book Page 30 Sunday, September 17, 2000 2:35 PM
6RXQG)RUJH;3
With Sound Blaster Live!, Sound Forge XP gives
you the ability to record, edit, and process
professional-quality digital audio files. Sound
Forge XP supports an extensive set of file
formats—Microsoft Video for Windows (AVI),
RealMedia (RA, RM), and Active Streaming
Format (ASF) files using Microsoft NetShow—
allowing you to develop audio for training and
business presentations, Web content, musical
recordings, computer games, and digital video
productions.
You can obtain Sound Forge help by using any of
three methods:
T Select Contents on the Help menu or press the F1 key. Either action opens the help table of contents
from which you can search by topic or get information about using online help.
T In a dialog, press the Help button or the F1 key to obtain information about the current dialog.
T Press the F1 key while selecting a menu item to obtain information about the selected command.
3L[$URXQG
3L[0DNHU&UHDWLYH
(GLWLRQ
PixMaker CE lets you create your own 360° interactive PixAround scenes, web pages, and postcards in
three steps—snap, stitch, and publish! You can also insert audio spots in your scenes that play audio files
when clicked.
Also included with PixMaker CE is PixScreen, which lets you view PixAround scenes. Navigate around
a 360° PixAround scene with the help of buttons built into PixScreen’s friendly user interface, or print out
your PixAround scenes in normal or panoramic view.
Additional Sound Blaster Live! Applications
30
SBLMPC.book Page 31 Sunday, September 17, 2000 2:35 PM
&DNHZDON([SUHVV
*ROG
Cakewalk uses your computer and sound card to turn you into a composer, music publisher, and
performer, all in one. With Cakewalk, you can easily create music with any instrument, even your voice.
Then you can edit and rearrange it, print it, and play it back, all from your PC!
While using Cakewalk, you can get context-sensitive help—help about what you’re currently working
on—at any time. Press the F1 function key, or, press the Help button on any dialog. The help system
displays and takes you directly to the relevant topic. The Technical Reference—the last item on the
Cakewalk help screens—provides detailed descriptions of functions and commands.
Computers can process music and sound
information in two different forms: MIDI
and Digital Audio. MIDI is the standard by
which computers communicate with sound
cards, keyboards, and other electronic
instruments. Musical Instrument Digital
Interface (MIDI) refers to the type of cables
and plugs used to connect computers and
instruments, and the language they use to
talk to one another. MIDI gives a computer
the ability to tell an instrument which notes
to play, which voice to use, and many other
things that make music, music
*DPH
&RPPDQGHU
Game Commander allows you to play a computer game by giving voice
commands instead of fumbling with awkward keystrokes. Your voice
commands supplement keyboard/joystick controls so that you can respond
to a situation in the fastest and most natural way. No voice training is
required—Game Commander uses speaker-independent voice recognition
technology. Templates are included for several popular games, so you can
give voice commands right away.
Additional Sound Blaster Live! Applications
31
SBLMPC.book Page 32 Sunday, September 17, 2000 2:35 PM
7H[W$VVLVW
TextAssist gives your computer the ability to synthesize human voices and read text aloud.
TextAssist has the following key features:
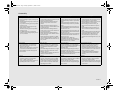
Feature
Allows You To
Synthesized speech output
Have your computer read text aloud.
Multiple languages
Use different languages.
Predefined/user-defined voices
Choose between the predefined voices, change the voices, or create voices.
Special text filters
Define the reading manner of the program, whether it should read signs,
embedded or quoted texts, or the header of e-mail messages.
Adjustable reading styles
Define the reading style of the program—pause after every word, read
punctuation marks and math symbols, etc.
Exception dictionaries
Define special pronunciation for exceptional words, such as abbreviations
Application-specific settings
Set different parameters for each application.
To open TextAssist Help or User’s Guide:
1. Click the Start button on the Windows taskbar, select Programs, followed by TextAssist.
2. Click on either of the following:
• TextAssist Help
• TextAssist User’s Guide, a PDF file that opens automatically in Acrobat Reader.
9RLFH$VVLVW
VoiceAssist uses voice and keyboard commands to navigate the Windows environment and run
applications. For example, you can say “e-mail” to launch your e-mail software, or press the L key to
insert a letterhead into a document. VoiceAssist automatically learns to recognize your commands—you
can perform an almost limitless number of tasks with voice/keyboard commands.
VoiceAssist runs in the background, monitoring your input. Whenever you open a program or window,
VoiceAssist automatically extracts the available menu commands. When you open your Web browser,
for example, VoiceAssist loads all commands available for that program. You can then execute a
command by saying its name into the microphone, typing its name into the keyboard input box, or
double-clicking the command in the Commands window.
You do not have to train VoiceAssist to recognize your commands. However, you may retrain the
program to recognize a different input and to execute a series of actions executed by a single command.
Additional Sound Blaster Live! Applications
32
SBLMPC.book Page 33 Sunday, September 17, 2000 2:35 PM
4
$GYDQFHG&RQILJXUDWLRQV
Sound Blaster Live! will give you endless hours of listening pleasure. You can further enhance your SB
Live! experience by adding one or more of the several upgrade options (available separately).
3RVLWLRQLQJ<RXU
6SHDNHUV
If you are using four speakers, place them to form the corners of
a square with you in the center. Angle the speakers toward you
with the computer monitor positioned to not block the sound
path of your front speakers. Adjust the positions of the speakers
until you get the best audio experience. If you have a subwoofer,
place the unit in a corner of the room.
With FourPointSurround Digital speakers from Cambridge
SoundWorks (for example, DTT3500 5.1 digital), you can
experience crystal clear gaming sequences or music from the
Digital DIN connection. A minijack-to-DIN cable is bundled
with the speaker set for this connection.
Subwoofer
Computer
monitor
Front right
speaker
Front left
speaker
You
Rear left
speaker
Rear right
speaker
Or, connect an analog 5.1 channel speaker system (such as the Cambridge Soundworks’ DeskTop Theater
5.1 DTT2200) or your 6-channel home theater speaker system. Sound Blaster Live! includes an Analog/
Digital Out jact that allows you to connect center and subwoofer speakers. (For instructions on switching
between analog and digital modes, see “Analog/Digital Output” on page 11.
Advanced Configurations
33
SBLMPC.book Page 34 Sunday, September 17, 2000 2:35 PM
&RQQHFWLQJ2SWLRQDO
'HYLFHV
To watch DVD movies on your PC, you can connect a Creative PC-DVD Encore Dxr2 or Dxr3, or
MPEG2 decoder card to an external Dolby Digital (AC-3) decoder such as the DeskTop Theater speaker
systems. In this case, disconnect the audio card’s Aux In connector from the decoder card’s Audio Out
connector. However, if an external Dolby Digital (AC-3) decoder speaker system is not available, this
connection is necessary.
Digital Out
jack
FourPointSurround Digital
Speaker System
FourPointSurround
Digital Speaker
System
Sound Blaster Live!
Minijack-to-DIN
Digital
DIN
Connects to the
Optical Digital I/O card
or Live! Drive
(see next page).
Analog Line and Rear Inputs
Recording and Content Authoring
with Digital Output Module
Digital device
SPDIF In (RCA)
Connect for downmix audio only
when a Dolby Digital (AC-3) decoder
speaker system is not available.
Creative PC-DVD and
DeskTop Theater 5.1
Digital Speaker System
Recording to external
digital devices supporting
RCA SPDIF input
Dolby Digital (AC-3)
SPDIF Out jack
MPEG2 decoder
Digital
Output
Digital device with
optical input
DeskTop Theater 5.1 Digital
Speaker System
Dolby Digital
(AC-3)
SPDIF In
Digital
DIN
Advanced Configurations
34
SBLMPC.book Page 35 Sunday, September 17, 2000 2:35 PM
Recording and Content Authoring
with Optical Digital I/O card and Digital I/O Module
SPDIF (RCA)
In
Out
Digital device
( e.g., DAT)
SPDIF In (RCA)
MiniDisc
Recorder
Optical
Input
Recording and Content Authoring
with Live! Drive
Recording to or from an external
digital device supporting RCA
SPDIF input/output
MiniDisc
Digital I/O
Module
To Digital
Speaker System*
Digital Device
SPDIF (RCA)
In
Out
AUX input from
an analog source
(e.g., CD player,
tape deck)
Digital
DIN
Metal
bracket
Optical
Output
Connects
to SB Live!
Second analog Line In for an
additional recording device
Live! Drive
Line In 2
To Digital Speaker
System*
Digital In/Out
Digital DIN
Connects
to SB Live!
MIDI devices
MIDI In
MIDI Out
Headphones
Microphone /
Line In
MIDI devices
Optical Digital
I/O card
5HFRUGLQJDQG
&RQWHQW$XWKRULQJ
Note: The Optical and AUX input jacks are
available only on certain models of the Live! Drive.
T Digital Output Module connected to the Digital Out jack of Sound Blaster Live! gives you two sets of
SPDIF (RCA) and Optical outputs to which you can connect and record to external digital devices
such as MiniDisc or DAT recorders.
T If you are a musician with professional requirements, you may want to upgrade Sound Blaster Live!
with either the Optical Digital I/O card (plus Digital I/O Module) or the Live! Drive.
T Either option includes:
• SPDIF (RCA) and Optical input/output jacks for recording to and from external digital devices.
• Standard MIDI input/output connectors for connection to MIDI devices.
• Digital DIN connection to digital speakers such as the FourPointSurround speaker system.
• Second analog Line In for connecting an input device (for example, CD player) for recording.
T Live! Drive fits a standard 5¼” drive bay of your computer and for easy access to the connectors on
its front panel. The Headphones and Microphone inputs utilize ¼” jacks for high-quality connectivity.
Advanced Configurations
35
SBLMPC.book Page 37 Sunday, September 17, 2000 2:35 PM
5
7URXEOHVKRRWLQJ
06'260RGH
Some legacy games may have been designed for use only in MS-DOS. Sound Blaster Live! supports MSDOS games. There are two ways to play MS-DOS games:
T From the MS-DOS window in Windows
To open the MS-DOS window:
1. Click the Start button on the Windows Taskbar, select Programs, and then click MS-DOS Prompt.
T In Windows MS-DOS mode
If you do not want to or cannot run a game from the MS-DOS window, use MS-DOS mode. For
example, when there are insufficient system resources to play the game with Windows loaded.
T To play games in MS-DOS
mode:
• Connect the CD In connector
to the Analog Audio
connector of the CD-ROM
or PC-DVD drive.
• If audio is distorted, do not
connect the CD SPDIF
connector to the digital audio
connector of the CD-ROM
or PC-DVD drive.
T If you connect to the digital
audio and analog audio
connectors of the same CDROM or PC-DVD drive, do
not unmute CD Audio and CD
Digital at the same time in
Surround Mixer.
To restart the system in MS-DOS mode when you are already in Windows:
1. Click the Start button on the taskbar, and then click Shutdown.
2. Select the Restart The Computer In MS-DOS Mode option, and then click the OK button.
To start the system in MS-DOS mode at system startup:
1. At startup as Windows is loading, press and hold the F8 key.
2. At the startup menu, choose the Command Prompt Only option, and then press the ENTER key.
Some older games may have difficulty detecting the Sound Blaster Live! card at certain resource
settings. Typically, these games would expect the card to be at a fixed set of resources and would fail to
load if those resources are not detected. If you have older MS-DOS games that do not work properly, try
changing the Sound Blaster Live! SB16 Emulation configuration. Use the following as a guide:
PROBLEM: Sound Blaster emulation is not recognized.
Resource:
Switch the SB emulation IRQ between 5 and 7, use DMA channel 1, use interface port 220.
PROBLEM: The MPU-401emulation is not recognized.
Resource:
Try using Port address 330.
Troubleshooting
37
SBLMPC.book Page 38 Sunday, September 17, 2000 2:35 PM
$XGLR2SWLRQV
Most MS-DOS–based games have a procedure for audio setup. Generally, you are presented with a list of
audio cards or audio devices from which to choose.
The methods used by games to present audio options can vary greatly. Some may present a single choice
that corresponds to a particular audio device, that is, Sound Blaster, Sound Blaster 16, Roland Sound
Canvas, and so on. Others provide an option for music and digital audio separately; for example, General
MIDI music with Sound Blaster digital audio. In such a case, there are often two separate menus to
configure.
Some games allow you to set the MIDI port address and IRQ for music and sound. These settings should
correspond to the values displayed by SBECFG.EXE or the Resources tab page of the Creative Sound
Blaster Live! SB16 Emulation Properties dialog.
Other games offer MPU-401/Roland (General MIDI or MT-32/LAPC-1) as an option. Often these games
allow you to set the MIDI port address. They must match the MIDI address in the Resources list on the
Resources tab page of the Creative Sound Blaster Live! SB16 Emulation Properties dialog. The same
values can be found under “MPU-401 (General MIDI, Roland MT-32/LAPC-1) Emulation,” displayed by
SBECFG.EXE in MS-DOS mode. Remember to enable the MT-32 MIDI patch with the SBEMIXER
program if you select Roland MT-32 or LAPC-1 for music.
0XVLF2SWLRQV
Most MS-DOS games offer a menu choice for sound when they start up. If you have a choice between
General MIDI and MT-32, always choose General MIDI, since it provides the best sound quality. If you
need to use MT-32, you must first switch from the General MIDI instrument set (the default) to the MT-32
instrument set using SBEMIXER. Switch back to the General MIDI set when you are finished using the
MT-32 instrument set.
'LJLWDO$XGLR2SWLRQV
Sound Blaster Live! supports Sound Blaster, Sound Blaster Pro, Sound Blaster 16, and Adlib digital audio
emulation. If an application provides all these as options, specify the choices in this order:
1. Sound Blaster 16
2. Sound Blaster Pro
3. Sound Blaster
4. Adlib
Troubleshooting
38
SBLMPC.book Page 39 Sunday, September 17, 2000 2:35 PM
06'260RGH8WLOLWLHV
The Sound Blaster Live! card includes a few MS-DOS utilities. These utilities require the Sound Blaster
Live! DOS driver SBEINIT.COM to be loaded.
6%(&)*(;(
Use the SBECFG.EXE utility to obtain the hardware settings and the status of the Sound Blaster Live!
card. Typing SBECFG.EXE at the command prompt displays the following hardware settings:
T PCI Hardware Settings: Port, IRQ
T Sound Blaster Emulation: Port, IRQ, DMA
T MPU-401 Emulation (GM, Roland MT-32/LAPC-1): Port
T Adlib Emulation: Port
6%(0,;(5(;(
Use SBEMIXER.EXE to change the volume levels of the MPU-401 instrument set used on the Sound
Blaster Live! card. You can use SBEMIXER.EXE from the command line—useful for advanced users
who want to set up batch files with particular volume levels—or within the SBEMIXER screen. The
settings for SBEMIXER.EXE are independent of the Creative Mixer settings in Windows 95/98.
To set SBEMIXER values in the command line:
At the DOS prompt, type the SBEMIXER command in a single line:
SBEMIXER [/S:x] [/W:x] [/C:x] [/M:x] [/?]
Square brackets [ ] denote optional parameters.
Parameter
/S:x
/W:x
/C:x
/M:x
/?
Specifies
Synth volume. x can be a value from the range 0 to 127.
Wave volume. x can be a value from the range 0 to 127.
CD audio volume. x can be a value from the range 0 to 127.
Synth MT-32/LAPC-1 mode. For x, 0 is Off, 1 is On.
View a short description of the parameters.
For example:
SBEMIXER /S:64 /W:120 /C:50 /M:0
To set SBEMIXER values within the Mixer screen:
•
At the DOS prompt, type SBEMIXER
In interactive editor mode, you can change mixer settings with the mouse, TAB, PGUP, PGDN, or arrow
keys.
Use the Save button to save the settings for the next session.
Troubleshooting
39
SBLMPC.book Page 40 Sunday, September 17, 2000 2:35 PM
6%(6(7(;(
Use SBESET.EXE to manually configure SB resources or disable SB Emulation. By default, SB
Emulation in DOS follows the Windows settings. For example, if you disable SB Emulation in
Windows, in the next boot to DOS, SB Emulation is disabled. Under rare circumstances you may need
to manually reconfigure DOS SB Emulation, for example, if there is conflict in DOS before it can boot to
Windows. SBESET.EXE is run from the command line.
To set SBESET values in the command line:
At the DOS prompt, type the SBESET command in a single line. Its syntax is:
SBESET [-Axxx] [-Ix] [-Dx] [-Hx] [-Pxxx] [-dx] [-wx]
Square brackets [ ] denote optional parameters:
Parameter
-Axxx
-Ix
-Dx
-Hx
-Pxxx
-dx
-wx
Specifies
SB interface’s base I/O address.
IRQ line used by the audio interface.
First DMA channel used by the audio interface.
Second DMA channel used by the audio interface.
MPU-401 UART interface’s base I/O address.
SB Emulation mode. For x, 1 is Off, 0 is On.
Set x to 1 to use the Windows-assigned resource configuration.
Set x to 0 to use (your) user-assigned resource configuration.
For example:
SBESET -A240 -I5 -D3 -w0
6%(*2(;(
Run this utility to confirm that SB16 Emulation is properly installed and working.
6RIWZDUH
,Q:LQGRZVWKHLQVWDOODWLRQGRHVQRWVWDUWDXWRPDWLFDOO\DIWHUWKH&'520LVLQVHUWHG
The AutoPlay feature in Windows may not be enabled.
To start the installation program through the My Computer shortcut menu:
1. Double-click the My Computer icon on your Windows desktop.
2. In the My Computer window, right-click the CD-ROM drive icon.
3. On the shortcut menu, click AutoPlay and follow the instructions on the screen.
Troubleshooting
40
SBLMPC.book Page 41 Sunday, September 17, 2000 2:35 PM
To enable AutoPlay through Auto Insert Notification:
1. Click the Start button, select Settings, and then click Control Panel.
2. In the Control Panel window, double-click the System icon.
3. In the System Properties dialog, click the Device Manager tab and select your CD-ROM drive.
4. Click the Properties button.
5. In the Properties dialog, click the Settings tab and select Auto Insert Notification.
6. Click the OK button to exit from the dialog.
6RXQG
7KHUHLVXQH[SHFWHGH[FHVVLYHHQYLURQPHQWDOVRXQGRUHIIHFWVZKHQDQDXGLRILOHLVEHLQJSOD\HG
The last selected preset is an inappropriate environment for the current audio file.
To switch to an appropriate environment:
1. Open the Environmental Audio control utility.
OR
Display Creative Launcher. It is found at the top or bottom of your screen (you may have to bring your
pointer to the edge of the screen to display Launcher). And then click the Environments tab.
2. In the Environment list, select “No effects” or an appropriate environment.
1RVRXQGIURPWKHKHDGSKRQHV
Check the following:
T The headphones are connected to the Line Out jack.
T In the Environment deck of Surround Mixer, make sure that the Speaker entry is Headphones.
,QDVSHDNHUFRQILJXUDWLRQWKHUHLVQRVRXQGIURPWKHUHDUVSHDNHUV
Check the following:
T The rear speakers are connected to the audio card’s Rear Out jack.
T If you are playing sound from one of these sources:
• CD Audio
• Line In
• TAD
• Auxiliary (AUX)
• Microphone
Troubleshooting
41
SBLMPC.book Page 42 Sunday, September 17, 2000 2:35 PM
To solve the problem:
1. In Surround Mixer’s Mixer deck, make sure the source being played is unmuted, that is, enabled.
2. Select the same source as the record source.
For example, if you are playing DVD games or movies, in Surround Mixer, unmute the Auxiliary device
and select the Auxiliary device as your record source.
T If you change environments, go to Surround Mixer and unmute your active sources.
1RVRXQGIURPWKHVSHDNHUV
Check the following:
•
Speakers are correctly connecte to your audio card's output.
•
You have unmuted the correct source in Surround Mixer.
If both these conditions have been met and you still do not have sound, click the red plus sign above the
VOL control. If Digital Output Only is selected, you are in Digital Output Only mode and must connect
to digital speakers to hear the sound from your audio card.
1RDXGLRRXWSXWZKHQSOD\LQJGLJLWDOILOHVVXFKDV:$90,',ILOHVRU$9,FOLSV
Possible causes:
T Speaker volume (if any) is not set properly.
T External amplifier or speakers are connected to the wrong jack.
T Hardware conflict.
T Speakers selection in the Environment deck of Surround Mixer is incorrectly selected.
T Original Sound in either the Master or Source tab pages of Environmental Audio is set at or near 0%.
Check the following:
T Speakers’ volume control, if any, is set at mid-range. Use Creative Mixer to adjust the volume, if
necessary.
T Powered speakers or external amplifier are connected to the card’s Line Out or Rear Out jack.
T No hardware conflict between the card and a peripheral device. See “I/O Conflicts” on page 45.
T Speakers selection in the Environment deck of Surround Mixer corresponds to your speaker or
headphone configuration.
T Original Sound in either/both the Master and Source tab pages of Environmental Audio is set to 100%.
Troubleshooting
42
SBLMPC.book Page 43 Sunday, September 17, 2000 2:35 PM
1RDXGLRRXWSXWZKHQSOD\LQJ&'$XGLR
25
1RDXGLRRXWSXWZKHQSOD\LQJ'26JDPHVWKDWUHTXLUHD&'520
To solve this problem:
•
Make sure the Analog Audio connector on the CD-ROM drive and the CD In connector on the audio
card are connected.
3DQQLQJDVRXUFHVRPHWLPHVWXUQVRIILWVVRXQG
Sometimes when panning an analog audio input source to the left or to the right, the sound from that
source turns off.
Cause: Digital Output Only mode and conflicting left-right balances in two mixers
For example, in the Digital Output Only mode, the source’s left-right balance in Windows Volume Control
is at the opposite end compared to the position to which you panned the source in the Environment deck
of Surround Mixer.
To solve this problem:
1. Open the other mixer (Windows Volume Control), and center the balances for all the audio input
sources. This ensures that analog sources do not turn mute when you pan them in Surround Mixer.
6XUURXQG0L[HU
8QZDQWHGFKDQJHRIPL[HUVHWWLQJVZLWKHYHU\FKDQJHRIVXSHUHQYLURQPHQWSUHVHWV
To solve this problem:
•
Dissociate the mixer settings.
1. In the Preset deck, click the Surround Mixer title in the upper-left corner.
The system menu appears, with a command Dissociate Mixer Settings.
2. To dissociate mixer settings, make sure the command is checked.
Troubleshooting
43
SBLMPC.book Page 44 Sunday, September 17, 2000 2:35 PM
,QVXIILFLHQW
6RXQG)RQW&DFKH
7KHUHLVLQVXIILFLHQWPHPRU\WRORDG6RXQG)RQWV
This may occur when a SoundFont-compatible MIDI file is loaded or played.
Cause: There is insufficient memory allocated to SoundFonts.
To allocate more SoundFont cache:
•
On the Options tab page of SoundFont Control, move the SoundFont Cache slider to the right.
The amount of SoundFont cache you can allocate depends on the system RAM available.
If there is still insufficient system RAM available:
•
-R\VWLFN
On the Configure Banks tab page of SoundFont Control, select a smaller SoundFont bank from the
Select Bank box. The smallest SoundFont bank available is 2 MB (2GMGSMT.SF2).
7KHMR\VWLFNSRUWLVQRWZRUNLQJ
The audio card’s joystick port conflicts with the system’s joystick port.
To solve this problem:
•
Disable the audio card’s joystick port and use the system port instead.
7KHMR\VWLFNLVQRWZRUNLQJSURSHUO\LQVRPHSURJUDPV
The program may use the system processor timing to calculate the joystick position. When the processor
is fast, the program may determine the position of the joystick incorrectly, assuming that the position is
out of range.
To solve this problem:
Do not attempt to make changes to
the BIOS unless you have
experience with system software.
•
Increase your system’s 8 bit I/O recovery time of the BIOS setting, usually under the Chipset Feature
Settings section. Or, if available, you may adjust the AT Bus speed to a slower clock. If the problem
persists, try a different joystick.
Troubleshooting
44
SBLMPC.book Page 45 Sunday, September 17, 2000 2:35 PM
,2&RQIOLFWV
Conflicts between your audio card and another peripheral device may occur if your card and the other
device are set to use the same I/O address.
To resolve I/O conflicts, change the resource settings of your audio card or the conflicting peripheral
device in your system using Device Manager in Windows.
If you still do not know which card is causing the conflict, remove all cards except the audio card and
other essential cards (for example, disk controller and graphics cards). Add each card back until Device
Manager indicates that a conflict has occurred.
To resolve hardware conflicts in Windows:
1.
2.
3.
4.
Click the Start button, point to Settings, and then click Control Panel.
In the Control Panel window, double-click the System icon.
In the System Properties dialog, click the Device Manager tab.
Under the Sound, Video And Game Controllers entry, select the conflicting audio card driver—
indicated by an exclamation mark (!)—and click the Properties button.
5. In the Properties dialog, click the Resources tab.
6. Make sure that Use Automatic Settings is selected, and click the OK button.
7. Restart your system to allow Windows 95/98 to reassign resources to your audio card and/or the
conflicting device.
:LQGRZV17
$6HUYLFH&RQWURO0DQDJHUHUURUPHVVDJHDSSHDUVZLWKRQHRUPRUHRWKHUHUURUPHVVDJHVDWV\VWHP
UHVWDUW
This occurs after you remove an audio card from your computer after you have successfully installed the
Sound Blaster Live! card. Windows is trying to match the drivers to the removed audio card.
To solve this problem:
1.
2.
3.
4.
Log on to your computer as Administrator.
Click the Start button, point to Settings, and then click Control Panel.
Double-click the Multimedia icon, and then click the Devices tab.
In the list, under these entries:
• Audio Devices
• MIDI Devices and Instruments
remove all items other than:
Troubleshooting
45
SBLMPC.book Page 46 Sunday, September 17, 2000 2:35 PM
• Audio for Creative SB Live!
• MIDI for Creative SB Live!
• MIDI for Creative S/W Synth
5. Click the OK button to close the dialog. The drivers are removed.
(QFRUH'9'3OD\HU
(QFRUH'9'3OD\HULVQRWODXQFKHGZKHQD'9'GLVFLVLQVHUWHGLQWRWKHGULYH
To solve this problem:
1.
2.
3.
4.
5.
6.
In the Windows system tray, right-click the Disc Detector icon, and then click Properties.
On the General tab page of the Creative Disc Detector dialog, select Enable Disc Detector.
Click the Players tab.
Select the DVD Disc entry and then click the Select Player button.
In the Players Properties dialog, click the Browse button.
Browse to C:\Program Files\Creative\PC-DVD Encore and double-click the entry ctdvdply
The Name box now displays the entry ctdvdply.
7. Click the OK button twice to close.
Now when you double-click the Disc Detector icon, the Encore DVD Player is launched.
Troubleshooting
46
SBLMPC.book Page 1 Sunday, September 17, 2000 2:35 PM
'HWDLOV
&UHDWLYH
6RXQG%ODVWHU/LYH
03
TAD/Modem
Audio I/O
6
Analog/Digital
Out jack
7
Line In jack
8
Microphone In jack
9
Line Out jack
10
Rear Out jack
11
Joystick/MIDI
connector
(QJOLVK
1
2
1
2
CD Audio
Input
3
AUX
connector
4
CD SPDIF
connector
5
(VSDxRO
)UDQoDLV
SPDIF
Extension
(digital I/O)
connector
3RUWXJXrV
Telephone Answering connector
Provides a mono connection from a standard
voice modem, and transmits microphone
signals to the modem.
Conector Dispositivo Contestador
Automático
Provee una conexión mono de un módem
vocal estándar, y transmite señales del
micrófono al módem.
Connecteur de répondeur téléphonique
(TAD)
Assure une connexion mono en provenance
d’un modem voix standard et transmet les
signaux du microphone au modem.
Conector para dispositivo de resposta
telefônica (TAD)
Fornece uma conexão mono de um modem
de voz padrão e transmite sinais do
microfone para o modem.
CD Audio connector
Connects to a CD-ROM drive using a CD
audio cable.
Conector Audio CD
Conecta a un lector CD-ROM utilizando un
cable de audio CD.
Connecteur CD Audio
Raccorder un lecteur de CD-ROM via un
câble CD audio.
Conector para áudio de CD
Conecta a uma unidade de CD-ROM usando
um cabo de áudio para CD.
Details 1
SBLMPC.book Page 2 Sunday, September 17, 2000 2:35 PM
(QJOLVK
(VSDxRO
)UDQoDLV
3RUWXJXrV
3
AUX connector
Connects to internal audio sources such as
TV tuner, MPEG, or other similar cards.
Conector AUX
Conecta a fuentes de audio internas como el
sintetizador TV, MPEG, u otras tarjetas
similares.
Connecteur AUX
Permet de raccorder les sources audio
internes (TV Tuner, MPEG ou autres cartes
similaires).
Conector AUX
Conecta a fontes de áudio internas, como um
sintonizador de TV, MPEG ou outras placas
similares.
4
CD SPDIF connector
Connects to a SPDIF output on a CD-ROM.
Conector CD SPDIF
Conecta a la salida SPDIF en un CD-ROM.
Connecteur CD SPDIF
Permet de raccorder une sortie SPDIF sur un
CD-ROM.
Conector CD SPDIF
Conecta a uma saída SPDIF em uma unidade
de CD-ROM.
5
SPDIF EXT connector
Connects to an external SPDIF device.
Conector SPDIF EXT
Conecta a dispositivo externo SPDIF.
Connecteur SPDIF EXT
Permet de raccorder de périphérique externe
SPDIF.
Conector SPDIF EXT
Conecta a dispositivo externo SPDIF.
Digital Out jack
Front and rear SPDIF output channels for
connection to external digital devices, such
as a Digital Audio Tape (DAT) or MiniDisc
recorder via a Digital Output module
(available separately) or to
FourPointSurround Digital speakers.
Jack Salida de Línea Digital
SPDIF delantero y posterior hizo salir los
canales para la conexión a los dispositivos
digitales externos, tales como un registrador
de la cinta audio (DAT) o de MiniDisc
Digital vía un módulo de salida digital
(disponible por separado) o a los altavoces de
FourPointSurround Digital.
Jack de sortie ligne numérique
SPDIF avant et arrière a sorti des canaux
pour la connexion aux dispositifs digitaux
externes, tels qu'un enregistreur de la bande
sonore (DAT) ou du MiniDisc de Digital par
l'intermédiaire d'un module de sortie digitale
(disponible séparément) ou aux haut-parleurs
de FourPointSurround Digital.
Tomada Line Out Digital
SPDIF dianteiro e traseiro output as canaletas
para a conexão aos dispositivos digitais
externos, tais como um registrador da fita
adesiva audio (DAT) ou do MiniDisc de
Digital através de um módulo de saída digital
(disponível separada) ou aos altofalantes de
FourPointSurround Digital.
Line In jack
Connects to external devices (such as
cassette, DAT, or minidisc player) for
playback or recording.
Jack Entrada Línea
Conecta a dispositivos externos (como
cassette, DAT, o tocador de Minidisco) para
reproducción o grabación.
Jack d’entrée ligne (Line In)
Permet de raccorder des périphériques
externes (magnétophone à cassettes,
répondeur téléphonique ou lecteur de
minidisques) pour la lecture ou
l’enregistrement.
Tomada Line In
Conecta a dispositivos externos (como um
tape deck, DAT ou Minidisc player) para
reprodução ou gravação.
Microphone In jack
Connects to an external microphone for voice
input.
Jack Entrada Micrófono
Conecta a un micrófono externo para entrada
vocal.
Jack d’entrée microphone
(Microphone In)
Permet de raccorder un microphone externe
pour les entrées voix.
Tomada Microfone In
Conecta a um microfone externo para entrada
de voz.
Line Out jack
Connects to powered speakers or an amplifier
for audio output. Also supports headphones.
Jack Salida de Línea
Conecta a parlantes amplificados o
amplificador para salida audio. También
soporta auriculares.
Jack de sortie ligne (Line Out)
Permet de raccorder des haut-parleurs
alimentés ou un amplificateur pour la sortie
audio. Accepte également un casque.
Tomada Line Out
Conecta a caixas acústicas amplificadas ou a
um amplificador para saída de áudio..
Também suporta fones de ouvido.
Rear Out jack
Connects to powered speakers or an
amplilfier for audio output.
Jack Salida Atrás
Conecta a parlantes amplificados o
amplificador para salida audio.
Jack de sortie arrière (Rear Out)
Permet de raccorder des haut-parleurs
alimentés ou un amplificateur pour la sortie
audio.
Tomada Rear Out
Conecta a caixas acústicas amplificadas ou a
um amplificador para saída de áudio.
Joystick/MIDI connector
Connects to a joystick or a MIDI device. An
optional MIDI kit allows you to connect the
joystick and MIDI device simultaneously.
Conector Joystick/MIDI
Conecta a un joystick o un dispositivo MIDI.
Un kit MIDI opcional le permitirá conectar el
joystick y el dispositivo MIDI
simultáneamente.
Connecteur pour manette de jeux/MIDI
Permet de raccorder une manette de jeux ou
un périphérique MIDI. Un kit MIDI
disponible en option vous permettra de
raccorder la manette de jeux et le
périphérique MIDI simultanément.
Conector para Joystick/MIDI
Conecta a um joystick ou a um dispositivo
MIDI. Um kit MIDI opcional permitirá a
conexão do joystick e do dispositivo MIDI
simultaneamente.
6
7
8
9
10
11
Details
2
SBLMPC.book Page 3 Sunday, September 17, 2000 2:35 PM
*HQHUDO6SHFLILFDWLRQV6RXQG%ODVWHU/LYH03
(QJOLVK
(VSDxRO
)UDQoDLV
3RUWXJXrV
PCI Bus Mastering
• PCI Specification Version 2.1 compliant
• Bus mastering reduces latency and speeds up
system performance
PCI Bus Mastering
• Conforme con la Especificación PCI Versión
2.1
• Bus mastering reduce la latencia y acelera la
performance del sistema
Matriçage du bus PCI
• Compatible avec la Spécification PCI Version
2.1
• Le matriçage du bus réduit les temps d’attente
et augmente les performances du système en
termes de vitesse
Barramento-mestre PCI
• Especificação PCI em concordância com a
versão 2.1
• O barramento-mestre reduz a latência e melhora
o desempenho do sistema.
EMU10K1
• Advanced hardware accelerated digital effects
processing
• 32-bit digital processing while maintaining a
192 dB dynamic range
• Patented 8-point interpolation that achieves the
highest quality of audio reproduction
• 64-voice hardware wavetable synthesizer
• Professional-quality digital mixing and
equalization
• Up to 32 MB of sound RAM mapped to host
memory
EMU10K1
• Procesado de efectos digitales acelerado por
hardware avanzado
• Procesado digital de 32-bit manteniendo a la
misma vez una gama dinámica de 192 dB
• Interpolación de 8-puntos patentada que obtiene
una reproducción de audio de calidad superior
• Sintetizador de wavetable de hardware de 64voces
• Mezcla digital e igualación de calidad
profesional
• Hasta 32 MB de RAM de sonido trazados en la
memoria anfitriona
EMU10K1
• Traitement d’effets numériques accéléré avec
un matériel d’avant-garde
• Traitement numérique 32 bits, avec
conservation de la gamme dynamique de 192
dB
• Interpolation 8 points brevetée permettant
d’obtenir une qualité optimale dans la
reproduction du son
• Synthétiseur de table d’ondes matériel 64 voies
• Mixage et égalisation numériques d’une qualité
professionnelle
• Projection de 32 Mo de RAM audio
(maximum) sur la mémoire centrale
EMU10K1
• Processamento avançado de efeitos digitais
acelerado por hardware
• Processamento digital de 32 bits, mantendo ao
mesmo tempo uma faixa dinâmica de 192 dB
• Interpolação de 8 pontos patenteada que atinge
a mais alta qualidade de reprodução sonora.
• Sintetizador de hardware wavetable de 64
vozes
• Mixagem e equalização digitais com qualidade
profissional
• Até 32 MB de memória RAM sonora
mapeados à memória host
Stereo Digitized Voice Channel
• True 16-bit Full Duplex operation
• 16-bit and 8-bit digitizing in stereo and mono
modes
• Playback of 64 audio channels, each at an
arbitrary sample rate
• ADC recording sampling rates: 8, 11.025, 16,
22.05, 24, 32, 44.1 and 48 kHz
• Dithering for 8-bit and 16-bit recording
Canal Vocal Digitalizado Estéreo
• Operación en Full Duplex de 16-bit verdadera
• Digitalización de16-bit y 8-bit en modos
estéreo y mono
• Reproducción de 64 canales audio, cada uno a
una frecuencia de muestreo arbitraria
• Frecuencia de muestreo de grabación ADC: 8,
11.025, 16, 22.05, 24, 32, 44.1 y 48 kHz
• Dithering para grabación de 8-bit y 16-bit
Canal voix numérisé stéréo
• Véritable fonctionnement Full Duplex 16 bits
• Numérisation 16 bits et 8 bits en modes stéréo
et mono
• Lecture de 64 canaux audio, chacun avec une
fréquence d’échantillonnage arbitraire
• Fréquences d’échantillonnage pour
l’enregistrement ADC: 8 / 11,025 / 16 / 22,05 /
24 / 32 / 44,1 et 48 kHz
• Dithering pour l’enregistrement 8 bits et 16 bits
Canal de voz digitalizada estéreo
• Operação real full duplex de 16 bits
• Digitalização de 16 bits e 8 bits nos modos
estéreo e mono
• Reprodução de 64 canais de áudio, cada um a
uma taxa de amostragem arbitrária
• Taxas de amostragem de gravação ADC: 8,
11.025, 16, 22.05, 24, 32, 44.1 e 48 kHz
• Simulação para gravação de 8 bits e 16 bits
AC ’97 Codec Mixer
• Mixes EMU10K1 audio sources and analog
sources such as CD Audio, Line In,
Microphone, Auxiliary, and TAD
• Selectable input source or mixing of various
audio sources for recording
• 16-bit Analog-to-Digital conversion of analog
inputs at 48 kHz sample rate
AC ’97 Codec Mixer
• Mezcla fuentes de audio EMU10K1 y fuentes
análogas como Audio CD, Entrada Línea,
Micrófono, Auxiliar, y TAD
• Fuente de entrada seleccionable o mezcla de
varias fuentes de audio para grabación
• Conversión Analogo-a-Digital de 16-bit de
entradas análogas a una frecuencia de muestreo
de 48 kHz
Table de mixage codec AC ’97
• Mélange de sources audio EMU10K1 et de
sources analogiques telles que CD Audio, Line
In (Entrée ligne), Microphone, Auxiliary
(Auxiliaire), et TAD In (Entrée répondeur
téléphonique
• Sélection de la source en entrée ou mixage de
différentes sources audio pour l’enregistrement
• Conversion analogique-numérique 16 bits des
entrées analogiques avec une fréquence
d’échantillonnage de 48 kHz
AC ’97 Codec Mixer
• Mixa fontes de áudio EMU10K1 e fontes
analógicas, como áudio de CD, Line In,
microfone, auxiliar, e TAD
• Fonte de entrada selecionável ou mixagem de
várias fontes de áudio para a gravação
• Conversão analógica-digital de 16 bits de sinais
analógicos a uma taxa de amostragem de 48
kHz
Details 3
SBLMPC.book Page 4 Sunday, September 17, 2000 2:35 PM
)UDQoDLV
3RUWXJXrV
Volume Control
• Software record and playback control of
Master, Digitized Voice, and inputs from MIDI
device, CD Audio, Line, Microphone,
Auxiliary, TAD, SPDIF, Wave/DirectSound
device, and CD Digital (CD SPDIF)
• Separate bass and treble control
• Front and rear balance control
• Muting and balance control for individual
playback sources
(QJOLVK
Control de Volumen
• Control de grabación y reproducción por
software de Master, Voz Digitalizada, y
entradas de dispositivos MIDI, Audio CD,
Línea, Micrófono, Auxiliar, TAD, SPDIF,
dispositivo Wave/DirectSound, y Digital CD
(CD SPDIF)
• Control de graves y agudos separado
• Control delantero y posterior del balance
• Control de mute y balance para fuentes de
reproducción individuales
(VSDxRO
Réglage du volume
• Réglage logiciel, pour l’enregistrement et la
lecture, du Master, de Voix numérisée et des
entrées suivantes : périphérique MIDI, CD
Audio, Ligne, Microphone, Auxiliaire, TAD
(Répondeur téléphonique), SPDIF, périphérique
Wave/DirectSound et CD Digital (CD SPDIF)
• Réglages séparés des basses et des aiguës
• Commande avant et arrière d'équilibre
• Réglage de la coupure du son et de l’équilibrage
pour les sources de lecture individuelles
Controle de volume
• Controle de gravação e reprodução do software
de Master, voz digitalizada e sinais de entrada
de dispositivo MIDI, áudio de CD, linha,
microfone, auxiliar, TAD, SPDIF, dispositivo
Wave/DirectSound e CD Digital (CD SPDIF)
• Controles individuais para graves e agudos
• Controle dianteiro e traseiro do contrapeso
• Controle de silenciamento e balanço para fontes
individuais de reprodução
Dolby Digital (AC-3) Decoding
• Decodes Doby Digital (AC-3) to 5.1 channels
or pass-through compressed Dolby Digital
(AC-3) PCM SPDIF stream to external decoder
• Bass Redirection: Enhances bass ouput to
subwoofer
El Decodificar Dolby Digital (AC-3)
Decodifica
• Doby Digital (AC-3) a 5,1 canales o a la
secuencia Dolby comprimida paso del PCM
SPDIF Digital (AC-3) al decodificador externo
• Cambio de dirección Bajo: Realza el ouput bajo
al subwoofer
Décodage Dolby de Digital (AC-3)
• Décode Doby Digital (AC-3) à 5,1 canaux ou à
jet dolby du PCM SPDIF de Digital comprimé
par pass-through (AC-3) au décodeur externe
• Redirection Basse: Met en valeur l'ouput bas au
subwoofer
Descodificação Dolby de Digital (AC-3)
• Descodifica Doby Digital (AC-3) a 5,1
canaletas ou ao córrego dolby comprimido
pass-through do PCM SPDIF de Digital (AC-3)
ao decodificador externo
• Redirection Baixo: Realça o ouput baixo ao
subwoofer
Creative Multi Speaker SurroundTM
(CMSSTM)
• Multi-speaker technology
• Professional-quality panning and mixing
algorithm
• Independent multiple sounds can be moved and
placed around a listener
Creative Multi Speaker SurroundTM
(CMSSTM)
• Tecnología multi-parlante
• Algoritmo de panning y mezcla de calidad
profesional
• Sonidos múltiples independientes pueden ser
movidos y colocados alrededor de un oyente
Creative Multi Speaker SurroundTM
(CMSSTM)
• Technologie multi-haut-parleurs
• Algorithme de panoramique et de mixage de
qualité professionnelle
• Plusieurs sons indépendants peuvent être
déplacés et disposés autour d’un auditeur
Creative Multi Speaker SurroundTM
(CMSSTM)
• Tecnologia de múltiplas caixas acústicas
• Algoritmo de distribuição panorâmica e
mixagem de qualidade profissional
• Vários sons independentes podem ser movidos
e posicionados ao redor de um ouvinte
Details
4
SBLMPC.book Page 5 Sunday, September 17, 2000 2:35 PM
&RQQHFWLYLW\
(QJOLVK
(VSDxRO
)UDQoDLV
3RUWXJXrV
Audio Inputs
• Line-level analog Line input via stereo jack on
rear bracket
• Mono Microphone analog input via stereo jack
on rear bracket
• CD_IN line-level analog input via 4-pin Molex
connector on card
• AUX_IN line-level analog input via 4-pin
Molex connector on card
• TAD line-level analog input via 4-pin Molex
connector on card
• CD_SPDIF digital input via 2-pin Molex
connector on card, accepting sampling rates of
32, 44.1, and 48 kHz
Entradas de información Audio
• La línea analogica del Línea-nivel entró vía jack
estéreo en el corchete posterior
• Entrada de información analogica del mono
micrófono vía jack estéreo en el corchete
posterior
• Entrada de información analogica del líneanivel de CD_IN vía el conector de Molex de los
4-contactos en tarjeta
• Entrada de información analogica del líneanivel de AUX_IN vía el conector de Molex de
los 4-contactos en tarjeta
• Entrada de información analogica del líneanivel de TAD vía el conector de Molex de los 4contactos en tarjeta
• Entrada de información digital de CD_SPDIF
vía el conector de Molex de los 2-contactos en
la tarjeta, validando índices del muestreo de 32,
44,1, y 48 kHz
Entrées Sonores
• La ligne analogique de Ligne-niveau a entré par
l'intermédiaire du plot stéréo sur la parenthèse
arrière
• Entrée analogique de microphone mono par
l'intermédiaire de plot stéréo sur la parenthèse
arrière
• Entrée analogique de ligne-niveau de CD_IN
par l'intermédiaire de connecteur de Molex de
4-broches sur la carte
• Entrée analogique de ligne-niveau d'AUX_IN
par l'intermédiaire de connecteur de Molex de
4-broches sur la carte
• Entrée analogique de ligne-niveau de TAD par
l'intermédiaire de connecteur de Molex de 4broches sur la carte
• Entrée digitale de CD_SPDIF par
l'intermédiaire de connecteur de Molex de 2broches sur la carte, recevant des cadences de
prélèvement de 32, 44,1, et 48 kHz
Entradas Audio
• A linha análoga do Linha-nível input através do
jaque estereofónico no suporte traseiro
• Entrada análoga do microfone mono através do
jaque estereofónico no suporte traseiro
• Entrada análoga do linha-nível de CD_IN
através do conector de Molex dos 4-pinos no
cartão
• Entrada análoga do linha-nível de AUX_IN
através do conector de Molex dos 4-pinos no
cartão
• Entrada análoga do linha-nível de TAD através
do conector de Molex dos 4-pinos no cartão
• Entrada digital de CD_SPDIF através do
conector de Molex dos 2-pinos nocartão,
aceitando taxas da amostragem de 32, 44,1, e 48
kHz
Audio Outputs
• ANALOG/DIGITAL OUT (front and rear
SPDIF digital outputs) via 4-pole 3.5 mm
minijack on rear bracket
• Three line-level analog outputs via stereo jacks
on rear bracket, Front and Rear Line-Outs
• Stereo headphone (32-ohm load) support on
Front Line-Out
Salidas del Audio
• ANALOG/DIGITAL OUT (salidas digitales
delanteras y posteriores de SPDIF) vía 4-pole
3,5 milímetros de minijack en el corchete
posterior
• Tres salidas analogicas del línea-nivel vía gatos
estéreos en Line-Outs posterior del corchete,
delantero y posterior
• La ayuda estérea del auricular (carga de los 32ohmios) en Line-Out delantero
Sorties d'acoustique
• ANALOG/DIGITAL OUT (sorties digitales
avant et arrière de SPDIF) par l'intermédiaire de
4-pole 3,5 millimètres de minijack sur la
parenthèse arrière
• Trois sorties analogiques de ligne-niveau par
l'intermédiaire des plots stéréo sur Line-Outs de
parenthèse, avant et arrière arrière
• Le support stéréo de écouteur (chargement d'32ohms) sur Line-Out avantconnecte
ANALOG/Saídas do áudio
• DIGITAL OUT (saídas digitais dianteiras e
traseiras de SPDIF) através de 4-pole 3,5
milímetros de minijack no suporte traseiro
• Duas saídas análogas do linha-nível através dos
jaques estereofónicos em Line-Outs traseiro do
suporte, o dianteiro e o traseiro
• A sustentação estereofónica do headphone
(carga de 32-ohms) em Line-Out dianteiro
conectara
Interfaces
• D-Sub MIDI interface for connection to
external for connection to external MIDI
devices. Doubles as Joystick port.
• AUD_EXT 2x20 pin header for connection to
Optical Digital I/O card or Live! Drive
Interfaces
• D-Sub MIDI para la conexión a externo para la
conexión a los dispositivos externos de MIDI.
Dobles como acceso de la palanca de mando.
• La cabecera del contacto de AUD_EXT 2x20
para la conexión a la tarjeta de entrada-salida
óptica Digital o Live! Drive
Interfaces
• D-Sub MIDI pour la connexion à externe pour
la connexion aux dispositifs externes du MIDI.
Doubles comme port de manche.
• L'en-tête de broche d'cAud_ext 2x20 pour la
connexion à la carte de E/S optique de Digital
ou Live! Drive
Relações
• D-Sub MIDI para a conexão a externo para a
conexão aos dispositivos externos de MIDI.
Dobros como a porta do manche.
• O encabeçamento do pino de AUD_EXT 2x20
para a conexão ao cartão de I/O ótico de Digital
ou Live! Drive
Details 5
SBLMPC.book Page 6 Sunday, September 17, 2000 2:35 PM
&RQWDFWLQJ&UHDWLYH/DEV
(QJOLVK
(VSDxRO
)UDQoDLV
3RUWXJXrV
At Creative, we are committed to giving you the
best product as well as the best technical support.
Before You Contact Us
Please be seated at your computer and have the
following information:
• Model and serial numbers (usually found on the
back of the device) of the product, and date of
purchase.
• Error message on the screen and how it came
about.
• Information on the adapter card that conflicts with
the product, if applicable.
• Hardware configuration information such as the
base I/O address, IRQ line, or DMA channel used,
if applicable.
• Computer type and speed (for example, Pentium
166) and memory available.
• Type and version of your operating system; for
example, DOS 6.22, Windows 3.1x, or
Windows 95.
You can contact Technical Support through one of
the following addresses or numbers:
Creative Labs, Inc.
Technical Support
1523 Cimarron Plaza
Stillwater, OK 74075 U.S.A.
• Telephone:
405 742 6622
• Facsimile:
405 742 6633
• TTD:
405 372 7341
Monday—Friday: 10:00 a.m.—6:00 p.m.
• Webphone:
[email protected]
Monday—Friday: 10:00 a.m.—6:00 p.m.
Operating hours (U.S.A. Central Time)
• Monday—Saturday:
10:00 a.m.—10:00 p.m.
• Sunday
Noon—8:00 p.m.
• Public Holidays:
Closed
You can get our latest program and driver updates,
technical data, and answers to frequently asked
questions through these 24-hour services:
• BBS:
405 742 6660
• CompuServe: Go Blaster
• Fax Back:
405 372 5227
• Internet:
http://www.soundblaster.com
You need a modem to access a bulletin board
service (BBS).
El compromiso de Creative Labs es el de
proporcionar a sus clientes el mejor producto
posible que cuente con excelente soporte
técnico.
Si requiere soporte técnico en su propio
idioma (español), puede ponerse en contacto
con nosotros por facsímil o por correo
electrónico las 24 horas del día. Las
respuestas se enviarán de Lunes a Sábado de
10:00 a las 22:00 horas y los Domingos de las
12:00 a las 22:00 horas - horario central de
EE.UU.
Bajo condiciones normales, el grupo de
soporte técnico enviará las respuestas a las
consultas dentro de un tiempo oportuno, sin
embargo, éste puede variar dependiendo de la
cantidad de solicitudes de soporte recibida.
Al enviar su consulta, por favor cerciórese de
incluir la información siguiente lo más
detalladamente posible. De tal manera, nuestros
representantes de soporte podrán diagnosticar y
resolver su problema más fácilmente.
• Nombre, número de facsímil o dirección de
correo electrónico
• Nombre y número de modelo del producto de
Creative Labs utilizado
• Descripción detallada del problema y texto de
cualquier mensaje de error que haya aparecido
en la pantalla
• Sistema operativo y versión del mismo
• Tipo y velocidad del equipo utilizado (por
ejemplo, PC 486/33), además de la memoria
disponible
• Tipo de tarjeta gráfica y otras tarjetas para
periféricos que haya instaladas en su sistema
(por ejemplo, fax/módem, tarjeta controladora
SCSI, etc.)
Creative Labs, Inc. - Soporte Tecnico
1523 Cimmaron Plaza
Stillwater, OK 74075 EE.UU
Soporte Tecnico en español por facsímil y
correo electrónico
• Facsímil:
1 405 742 6613
• Correo electrónico:
[email protected]
À Creative Labs, nous voulons offrir à nos
clients les meilleurs produits multimédia et un
support technique de haute qualité.
Si vous avez besoin de support technique dans
votre langue, vous pouvez nous contacter par
télephone au numéro suivant: 405 742 2385.
Le support technique est offert du lundi au
vendredi de 10:00 à 22:00 heure.
Avant de nous contacter, assurez-vous d’avoir
à votre portée, toute l’information se
rapportant aux points suivants:
• Modèle et numéro de série du produit (se
trouve habituellement à l’arrière des
composantes principales)
• Une description détaillée du problème et texte
complet du message d’erreur qui est apparu à
l’écran.
• Système opérationnel et version spécifique
• Genre d’ordinateur et de processeur utilisé
• Genre de carte graphique et autres cartes
périphériques installées dans votre system
(exemple: modem, carte de contrôle SCSI etc.)
Creative Labs, Inc. - Support Technique
1523 Cimarron Plaza
Stillwater, OK 74075 Etats-Unís
Nouveaux gestionnaires de programmes,
solutions de problèmes communs et réponses
aux questions demmandées fréquemment sont
disponible aux numéraux ou sites internet
suivants:
• BBS:
405 742 6660
• CompuServe: Go Blaster
• Fax Back:
405 372 5227
• Internet:
http://www.soundblaster.com
• e-mail:
[email protected]
Vous devez avoir un modem pour accéder le
BBS, CompuServe et le site internet.
A Creative Labs tem por objetivo oferecer a
seus clientes o melhor produto possível com
suporte técnico do mais alto nível.
Se você precisar de suporte em seu idioma,
entre em contato com a Creative Labs por fax
ou correio eletrônico, disponível 24-horas por
dia. As respostas serão enviadas de segunda a
sábado, das 8h00 às 22h00 e domingos das
12h00h às 22h00, horário central nos EUA.
Em condições normais, o grupo de suporte
técnico enviará as respostas dentro de um
prazo adequado. O tempo de resposta poderá
variar de acordo com a quantidade de
perguntas enviadas.
Ao enviar sua pergunta, certifique-se de estar
fornecendo as informações relacionadas
abaixo, incluindo tantos detalhes quanto for
possível. Isto facilitará o diagnóstico de seu
problema e, consequentemente, a identificação
de uma solução por parte de nossos
representantes de suporte técnico.
• Seu nome e número de fax ou endereço de
correio eletrônico
• O nome e número de modelo de seu produto
Creative Labs
• Uma descrição detalhada do problema e o
conteúdo de qualquer mensagem de erro que
você tenha recebido
• O sistema operacional e a versão
• O tipo e a velocidade de seu processador (por
ex., 486/33), bem como a memória RAM
disponível
• O tipo de placa gráfica e quaisquer outras
placas periféricas instaladas em seu sistema
(por exemplo, fax/modem, placa controladora
SCSI)
Creative Labs, Inc. - Assistência Técnica
1523 Cimaron Plaza
Stillwater, OK 74075 EUA.
Você pode enviar sua pergunta por fax ou
correio eletrônico a:
• Fax:
+1 405 742-6613
• Correio Eletrônico:
[email protected]
Details
6
SBLMPC.book Page 7 Sunday, September 17, 2000 2:35 PM
3URGXFW5HWXUQ
(QJOLVK
(VSDxRO
)UDQoDLV
3RUWXJXrV
Product Return
To return a Creative product for a factory
service, contact the Creative Technical Support
office. Once the staff has verified the product is
defective, you will be given a Return
Merchandise Authorization (RMA) number.
NOTE: Retain your purchase receipt, as well as
all packaging and contents, until all product
components are functioning to your satisfaction.
They are required in the unlikely event you
need to return the product to Creative.
When returning a product for factory service:
• Shipment to Creative is at your expense and you
assume all risk. Ship the package through a
carrier that provides proof of delivery; insure the
shipment at full product value.
• Place the RMA number on the outside of the
package.
• Use proper materials for packing the product for
shipment.
• For free repair or replacement, you must include
a copy of a dated proof of purchase (store
receipt), proving the product is still under
Warranty
Creative may replace or repair the product with
new or reconditioned parts, and the faulty parts
or product will become the property of Creative.
Devolución del producto
Con el fin de devolver un producto de Creative
Labs para que reciba servicio de fábrica,
ponerse en contacto con la oficina de soporte
técnico de la compañía. Después que el
personal de servicio haya verificado que el
producto se encuentra defectuoso, se emitirá un
número de autorización para la devolución de
mercadería (RMA).
NOTA: Guardar el recibo de compra y los
materiales de empaque del producto hasta que
todos los componentes estén funcionando
satisfactoriamente, puesto que se deberá
incluirlos con el mismo en caso de necesitar
devolverlo a Creative Labs.
Cuando se devuelva un producto para que
reciba servicio de fábrica:
• El envío a Creative Labs corre por cuenta del
cliente y éste asume todos los riesgos. Se
recomienda enviar el paquete a través de una
compañía que proporcione un comprobante de
entrega y asegurar el producto por su valor total.
• Colocar el número de autorización para la
devolución de mercadería (RMA) en el exterior
del paquete.
• Embalar el producto adecuadamente para el
transporte.
• Para obtener la reparación o reemplazo gratuitos
se debe incluir una copia del comprobante de
compra fechado (recibo de tienda), siempre y
cuando el producto se encuentre dentro de la
fecha cubierta por la garantía.
Creative Labs puede reemplazar o reparar el
producto con componentes nuevos o
reacondicionados y las partes o componentes
defectuosos quedarán como propiedad de la
compañía.
Renvoi de produits
Pour renvoyer un produit Creative nécessitant
des réparations, veuillez contacter le service du
support technique de Creative. Une fois que nos
techniciens auront pu déterminer que le produit
est défectueux, vous recevrez un numéro
d’autorisation pour retour de marchandise
(ARM).
REMARQUE : Outre tous les matériaux et le
contenu de l’emballage, veuillez conserver le
récépissé de caisse jusqu’à ce que tous les
composants du produit fonctionnent selon vos
désirs. Ces éléments sont indispensables au cas
peu probable où vous auriez besoin de renvoyer
le produit à Creative.
Quand vous renvoyez un produit nécessitant des
réparation :
• L’expédition à destination de Creative se fait à
vos frais et vous en assumez tous les risques.
Envoyez le paquet par l’intermédiaire d’une
entreprise délivrant un certificat de livraison ;
assurez l’expédition pour la valeur totale du
produit.
• Indiquez le numéro ARM à l’extérieur de
l’emballage.
• Utilisez des matériaux d’emballage convenables
pour ce produit.
• Pour obtenir des réparations gratuites ou un
échange du produit, vous devez y inclure une
copie datée du récépissé d’achat (reçu du
magasin), prouvant que le produit est encore
sous garantie.
Creative peut échanger ou réparer le produit
avec des pièces neuves ou remises à neuf, et les
pièces ou le produit défectueux deviennent alors
la propriété de Creative.
Devolução de Produto
Para devolver um produto da Creative para
conserto na fábrica, entre em contato com o
departamento de Suporte Técnico da Creative.
Depois que a equipe confirmar que o produto
apresenta defeitos, você receberá um número de
Autorização para Devolução de Mercadoria
(RMA - Return Merchandise Authorization).
NOTA: Guarde o seu recibo de compra, junto
com toda a embalagem e o conteúdo do pacote,
até ter certeza de que todos os componentes do
produto estão funcionando satisfatoriamente.
Todos esses itens serão necessários caso você
precise devolver o produto para a Creative.
Para retornar o produto para conserto na
fábrica:
• Você deverá arcar com os custos de transporte
para a Creative e assumir todos os riscos. Envie
o pacote através de uma transportadora que
forneça um comprovante de entrega e faça um
seguro que cubra o valor total do produto.
• Coloque o número da RMA do lado de fora do
pacote.
• Utilize material adequado para embalar o
produto para transporte.
• Para solicitar conserto ou substituição gratuitos,
você deverá incluir uma cópia de um
comprovante de compra datado (recibo da loja),
confirmando que o produto ainda está na
garantia.
A Creative pode substituir ou consertar o
produto com peças novas ou recondicionadas, e
as peças ou produtos com defeitos passarão a
ser propriedade da Creative.
Outside the United States
To avoid tariffs when shipping a product to
Creative Labs from outside the U.S., you must
complete an official customs form before
shipping the product. To ensure delivery,
Creative may include charges for return
shipment.
Fuera de los Estados Unidos
Con el fin de evitar el pago de tarifas al enviar
un producto a Creative Labs desde fuera de los
EE.UU., se debe llenar un formulario de aduana
oficial antes de enviar el paquete. Para
garantizar la entrega, Creative Labs puede
incluir cargos de embarque con la devolución.
En dehors des États-Unis
Pour éviter de payer des taxes quand vous
envoyez un produit à Creative Labs depuis
l’étranger, vous devez remplir un formulaire de
douane officiel avant d’envoyer le produit. Pour
en assurer la livraison, Creative peut ajouter
des frais de retour à l’envoyeur.
Fora dos Estados Unidos
Para evitar o pagamento de impostos quando
estiver enviando um produto para Creative Labs
de outro país que não os EUA, você deverá
completar o formulário oficial da alfândega
antes de enviar o produto. Para garantir a
entrega do produto, a Creative pode incluir
taxas para transporte de volta.
Details 7