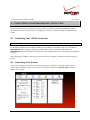
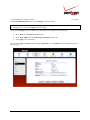
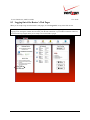
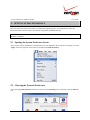
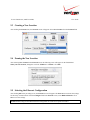
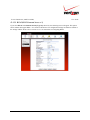
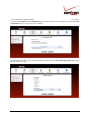
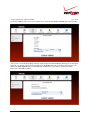
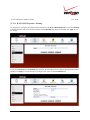
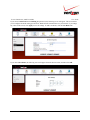
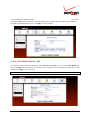
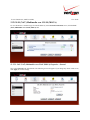
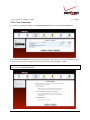
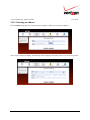
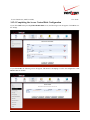
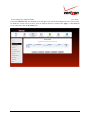
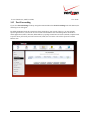
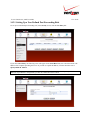
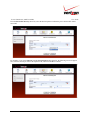
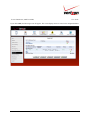
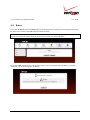
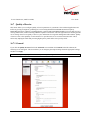
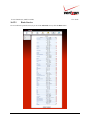
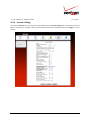
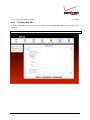
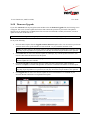
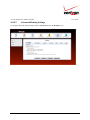
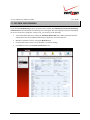
1
Verizon FiOS® Router
Model 9100VM
User Guide
www.verizon.com/fios
User Guide
Verizon FiOS Router (Model 9100VM)
CONTENTS
1.
PRODUCT DESCRIPTION ..................................................................................................................................5
2.
SAFETY INSTRUCTIONS ...................................................................................................................................5
3.
REGULATORY INFORMATION ........................................................................................................................6
3.1
FCC Compliance Note ...............................................................................................................................6
3.2
Canada Certification Notice.......................................................................................................................7
4.
NETWORKING REQUIREMENTS .....................................................................................................................8
5.
HARDWARE FEATURES....................................................................................................................................9
6.
7.
5.1
LED Indicators...........................................................................................................................................9
5.2
Cable Connectors and Switch Locations..................................................................................................10
5.3
Connector Descriptions............................................................................................................................11
INSTALLING THE HARDWARE......................................................................................................................12
6.1
Installation Requirements ........................................................................................................................12
6.2
Before you begin......................................................................................................................................12
6.3
Microfilters ..............................................................................................................................................12
6.4
Hardware Installations .............................................................................................................................13
ACCESSING THE ROUTER ..............................................................................................................................18
7.1
8.
9.
Logging on to the Router .........................................................................................................................18
CONFIGURING YOUR BROADBAND CONNECTION .................................................................................21
8.1
Confirming Your VDSL2 Connection .....................................................................................................21
8.2
Connecting to the Internet........................................................................................................................21
8.3
Logging Out of the Router’s Web Pages .................................................................................................25
SETTING UP MACINTOSH OS X.....................................................................................................................26
9.1
Opening the System Preference Screen ...................................................................................................26
9.2
Choosing the Network Preferences..........................................................................................................26
9.3
Creating a New Location .........................................................................................................................27
9.4
Naming the New Location .......................................................................................................................27
9.5
Selecting the Ethernet Configuration .......................................................................................................27
9.6
Checking the IP Connection ....................................................................................................................28
9.7
Accessing Your Router ............................................................................................................................29
10. BASIC CONFIGURATION ................................................................................................................................30
11. MAIN (HOME PAGE).........................................................................................................................................31
11.1
Gateway Status ........................................................................................................................................32
030-300239 Rev. A
2
March 2008
User Guide
Verizon FiOS Router (Model 9100VM)
11.2
Quick Links..............................................................................................................................................32
11.3
Network Connections...............................................................................................................................32
11.4
Start Surfing.............................................................................................................................................32
12. WIRELESS ..........................................................................................................................................................33
12.1
Wireless Status.........................................................................................................................................33
12.2
Basic Security Settings ............................................................................................................................34
12.3
Advanced Security Settings .....................................................................................................................37
13. MY NETWORK...................................................................................................................................................57
13.1
Network Status.........................................................................................................................................57
13.2
Network Connections...............................................................................................................................74
14. FIREWALL SETTINGS ....................................................................................................................................110
14.1
General Firewall Security Settings.........................................................................................................110
14.2
Access Control.......................................................................................................................................111
14.3
Port Forwarding .....................................................................................................................................120
14.4
DMZ Host ..............................................................................................................................................137
14.5
Port Triggering.......................................................................................................................................138
14.6
Remote Admin .......................................................................................................................................147
14.7
Static NAT .............................................................................................................................................148
14.8
Advanced Filtering.................................................................................................................................153
14.9
Security Log...........................................................................................................................................156
14.10 Connections ...........................................................................................................................................158
15. PARENTAL CONTROLS .................................................................................................................................160
16. ADVANCED......................................................................................................................................................165
16.1
Diagnostics.............................................................................................................................................166
16.2
Restore Defaults.....................................................................................................................................168
16.3
Reboot....................................................................................................................................................169
16.4
MAC Cloning ........................................................................................................................................170
16.5
ARP Table..............................................................................................................................................171
16.6
Users ......................................................................................................................................................173
16.7
Quality of Service ..................................................................................................................................179
16.8
Remote Administration ..........................................................................................................................190
16.9
DNS .......................................................................................................................................................191
16.10 Personal Domain (Dynamic DNS).........................................................................................................192
16.11 Network Objects ....................................................................................................................................194
030-300239 Rev. A
3
March 2008
User Guide
Verizon FiOS Router (Model 9100VM)
16.12 Protocol..................................................................................................................................................197
16.13 UPnP ......................................................................................................................................................210
16.14 System Settings......................................................................................................................................211
16.15 Configuration File..................................................................................................................................212
16.16 Date and Time Rules..............................................................................................................................213
16.17 Scheduler Rules .....................................................................................................................................213
16.18 Firmware Upgrade .................................................................................................................................214
16.19 Routing...................................................................................................................................................215
16.20 IGMP Configuration ..............................................................................................................................218
16.21 PPPoE Relay ..........................................................................................................................................221
16.22 IP Address Distribution..........................................................................................................................222
17. SYSTEM MONITORING..................................................................................................................................223
18. TECHNICAL SUPPORT INFORMATION ......................................................................................................225
19. PRODUCT SPECIFICATIONS.........................................................................................................................225
20. SOFTWARE LICENSE AGREEMENT............................................................................................................226
21. PUBLICATION INFORMATION.....................................................................................................................228
030-300239 Rev. A
4
March 2008
User Guide
Verizon FiOS Router (Model 9100VM)
1. PRODUCT DESCRIPTION
The Verizon® FiOS® Router provides reliable, high-speed, Internet access to your existing small office phone line
and is capable of data rates hundreds of times faster than a traditional analog modem. But unlike analog modems,
the Verizon FiOS Router allows you to use the same phone line for simultaneous voice/fax communications and
high-speed Internet access, eliminating the need for dedicated phone lines for voice and data needs. In addition, your
Verizon FiOS Router supports a variety of networking interfaces such as Wireless 802.11b/g, VDSL2, COAX, and
WAN Ethernet.
Hereafter, the Verizon® FiOS® Router will be referred to as the “Router,” or “Modem.”
Key Features:
•
•
•
•
•
•
Multimedia over Coax interface (MoCA)
4-Port 10/100 BaseT Ethernet LAN switch
Integrated 802.11g Access Point
Embedded Firewall
IP Quality of Service
IGMP Proxy Function
2. SAFETY INSTRUCTIONS
•
Never install any telephone wiring during a lightning storm.
•
Never install telephone jacks in wet locations unless the jack is specifically designed for wet locations.
•
Never touch non-insulated telephone wires or terminals unless the telephone line has been disconnected at
the network interface.
•
Use caution when installing or modifying telephone lines.
WARNING
Risk of electric shock. Voltages up to 140 Vdc (with reference to
ground) may be present on telecommunications circuits.
030-300239 Rev. A
5
March 2008
User Guide
Verizon FiOS Router (Model 9100VM)
3. REGULATORY INFORMATION
3.1 FCC Compliance Note
(FCC ID: CH89100VMXX-10)
This equipment has been tested and found to comply with the limits for a Class B digital device, pursuant to Part 15
of the Federal Communication Commission (FCC) Rules. These limits are designed to provide reasonable protection
against harmful interference in a residential installation. This equipment generates, uses, and can radiate radio
frequency energy, and if not installed and used in accordance with the instructions, may cause harmful interference
to radio communications. However, there is no guarantee that interference will not occur in a particular installation.
If this equipment does cause harmful interference to radio or television reception, which can be determined by
turning the equipment OFF and ON, the user is encouraged to try to correct the interference by one or more of the
following measures:
•
•
•
•
•
Reorient or relocate the receiving antenna.
Increase the separation between the equipment and the receiver.
Connect the equipment to a different circuit from that to which the receiver is connected.
Consult the dealer or an experienced radio/TV technician for help.
This device complies with part 15 of the FCC Rules. Operation is subject to the following two conditions:
(1) this device may not cause harmful interference, and (2) this device must accept any interference
received, including interference that may cause undesired operation.
WARNING: While this device is in operation, a separation distance of at least 20 cm (8 inches) must be maintained
between the radiating antenna and users exposed to the transmitter in order to meet the FCC RF exposure guidelines.
Making changes to the antenna or the device is not permitted. Doing so may result in the installed system exceeding
RF exposure requirements. This device must not be co-located or operated in conjunction with any other antenna or
radio transmitter. Installers and end users must follow the installation instructions provided in this guide.
Modifications made to the device, unless expressly approved, could void the users’ rights to operate the device.
PART 68 – COMPLIANCE REGISTRATION
This equipment is designated to connect to the telephone network or premises wiring using a compatible modular
jack that is Part 68 compliant. An FCC compliant telephone cord and modular plug is provided with the equipment.
See the Installation Information section of this User Guide for details.
A plug and jack used to connect this equipment to the premises wiring and telephone network must comply with the
applicable FCC Part 68 rules and requirements adopted by the ACTA. A compliant telephone cord and modular plug
is provided with this product. It is designed to be connected to a compatible modular jack that is also compliant. See
installation instruction for details.
If this terminal equipment (Model 9100VM) causes harm to the telephone network, the telephone company may
request you to disconnect the equipment until the problem is resolved. The telephone company will notify you in
advance if temporary discontinuance of service is required. If advance notification is not practical, the telephone
company will notify you as soon as possible. You will be advised of your right to file a complaint with the FCC if
you believe such action is necessary. If you experience trouble with this equipment (Model 9100VM), do not try to
repair the equipment yourself. The equipment cannot be repaired in the field. Contact Verizon for instructions.
030-300239 Rev. A
6
March 2008
User Guide
Verizon FiOS Router (Model 9100VM)
The telephone company may make changes to their facilities, equipment, operations, or procedures that could affect
the operation of this equipment. If this happens, the telephone company will provide advance notice in order for you
to make the modifications necessary to maintain uninterrupted service.
If your home has specially wired alarm equipment connected to the telephone line, ensure that the installation of this
equipment (Model 9100VM) does not disable your alarm equipment. If you have questions about what will disable
alarm equipment, consult your telephone company or a qualified installer. This equipment cannot be used on public
coin phone service provided by the telephone company. Connection of this equipment to party line service is subject
to state tariffs.
3.2 Canada Certification Notice
The Industry Canada label identifies certified equipment. This certification means that the equipment meets certain
telecommunications network protective, operations and safety requirements as prescribed in the appropriate
Terminal Equipment Technical Requirements document(s). The department does not guarantee the equipment will
operate to the user’s satisfaction.
This equipment meets the applicable Industry Canada Terminal Equipment Technical Specification. This is
confirmed by the registration number. The abbreviation, IC, before the registration number signifies that registration
was performed based on a Declaration of Conformity indicating that Industry Canada technical specifications were
met. It does not imply that Industry Canada approved the equipment. The Ringer Equivalence Number (REN) is 0.0.
The Ringer Equivalence Number that is assigned to each piece of terminal equipment provides an indication of the
maximum number of terminals allowed to be connected to a telephone interface. The termination on an interface
may consist of any combination of devices subject only to the requirement that the sum of the Ringer Equivalence
Numbers of all the devices does not exceed five.
Before installing this equipment, users should ensure that it is permissible to be connected to the facilities of the
local Telecommunication Company. The equipment must also be installed using an acceptable method of
connection. The customer should be aware that compliance with the above conditions may not prevent degradation
of service in some situations. Connection to a party line service is subject to state tariffs. Contact the state public
utility commission, public service commission, or corporation commission for information.
If your home has specially wired alarm equipment connected to the telephone line, ensure that the installation of this
equipment (Model 9100VM) does not disable your alarm equipment. If you have questions about what will disable
alarm equipment, consult your telephone company or a qualified installer.
If you experience trouble with this equipment (Model 9100VM), do not try to repair the equipment yourself. The
equipment cannot be repaired in the field and must be returned to the manufacturer. Repairs to certified equipment
should be coordinated by a representative, and designated by the supplier. Contact Verizon for instructions.
The termination on an interface may consist of any combination of devices subject only to the requirement that the
sum of the Ringer Equivalence Numbers of all the devices does not exceed five. Users should ensure, for their own
protection, that the electrical ground connections of the power utility, telephone lines, and internal, metallic water
pipe system, if present, are connected together. This precaution may be particularly important in rural areas.
CAUTION
Users should not attempt to make such connections themselves, but should contact the
appropriate electrical inspection authority, or electrician, as appropriate.
030-300239 Rev. A
7
March 2008
User Guide
Verizon FiOS Router (Model 9100VM)
4. NETWORKING REQUIREMENTS
The following system specifications are required for optimum performance of the Router.
Connection Type
•
•
COAX
ETHERNET
(1,2,3,4, WAN)
WIRELESS
IEEE 802.11b/g
030-300239 Rev. A
•
•
•
•
•
•
•
•
•
•
•
•
•
•
•
•
•
•
•
•
•
•
Minimum System Requirements
Pentium® or equivalent class machines or higher
Microsoft® Windows® (XP, 2000, ME, NT 4.0, 98 SE) Macintosh® OS X,
or Linux installed
64 MB RAM (128 MB recommended)
10 MB of free hard drive space
10/100 Base-T Network Interface Card (NIC)
Internet Explorer 5.5 or later or Netscape Navigator 7.x or later or
Firefox 1.0.7 or later
Computer Operating System CD-ROM on hand
Pentium® or equivalent class or higher machines
Microsoft® Windows® (XP, 2000, ME, NT 4.0, 98 SE) or
Macintosh® OS X installed
64 MB RAM (128 MB recommended)
10 MB of free hard drive space
Internet Explorer 5.5 or Netscape Navigator 7.x or later or
Firefox 1.0.7 or later
An available IEEE 802.11b/g PC adapter
Computer Operating System CD-ROM on hand
8
March 2008
User Guide
Verizon FiOS Router (Model 9100VM)
5. HARDWARE FEATURES
5.1 LED Indicators
This section explains the front-panel and rear-panel LED states and descriptions. LEDs are used to verify the unit’s
operation and status.
LED States and Descriptions
LED
POWER
BROADBAND
INTERNET
WIRELESS
SETUP
1,2,3,4
(Ethernet LAN)
030-300239 Rev. A
Verizon FiOS Router Front Panel LEDs
State
Description
Solid Green
Power is ON.
Flashing Green
Router is performing POST.
Router failed POST (Power On Self Test) or Device Malfunction.
Solid Red
Note: The Power LED should be red no longer than two seconds
after the power on self test passes.
OFF
Power is OFF.
Solid Green
VDSL2 link established.
Flashing Green
VDSL2 attempting to sync.
Solid Red
Router failed to sync.
OFF
Router power is OFF or no VDSL2 signal detected.
Internet link established. VDSL2 link is Up, and the Router has a
WAN IP address from IPCP or DHCP; or a static IP is configured;
Solid Green
or PPP negotiation has successfully completed (if used) and no
traffic is detected.
IP connection established and IP Traffic is passing through device
(in either direction). Note: If the IP or PPP session is dropped due
to an idle timeout, the light will remain solid green, if a VDSL2
Flashing Green
connection is still present. If the session is dropped for any other
reason, the light is turned OFF. The light will turn red when it
attempts to reconnect and DHCP or PPP fails).
Router has attempted and failed to establish IP connectivity (no
Solid Amber
DHCP response, no PPP response, PPP authentication failed, no
IP address from IPCP, etc.).
Router power is OFF; or Router is performing POST; or Router is
OFF
in Bridge Mode; or Router has not attempted Internet connectivity.
Solid Green
Wireless link established.
Wireless LAN activity is present (traffic in either direction).
IP connection established and IP traffic is passing through device
(in either direction). Note: If the IP or PPP session is dropped due
Flashing Green
to an idle timeout, the light will remain solid green, if a VDSL2
connection is still present. If the session is dropped for any other
reason, the light is turned OFF. The light will turn red when it
attempts to reconnect and DHCP or PPP fails).
Router power is OFF; no wireless link; or wireless Easy Config
OFF
not active.
Solid Green
Powered device is connected to the associated port.
Flashing Green
10/100 Base-T LAN activity is present (traffic in either direction).
9
March 2008
User Guide
Verizon FiOS Router (Model 9100VM)
OFF
COAX
Solid Green
Flashing Green
OFF
Solid Green
Flashing Green
WIRELESS
Solid Red
OFF
Solid Green
OFF
POWER
Solid Red
Solid Green
Left Ethernet LED
Right Ethernet LED
Flashing Green
OFF
Solid Green
Flashing Green
OFF
Router power is OFF, or no cable or no powered device is
connected to the associated port.
A physical connection has been established.
Activity is present on the Coax link.
Router power is OFF.
Wireless link established.
Wireless LAN activity is present (traffic in either direction).
IP connection established and IP traffic is passing through device
(in either direction). Note: If the IP or PPP session is dropped due
to an idle timeout, the light will remain solid green, if a VDSL2
connection is still present. If the session is dropped for any other
reason, the light is turned OFF. The light will turn red when it
attempts to reconnect and DHCP or PPP fails).
Device attempted to become IP connected and failed (no DHCP
response, no PPP response, PPP authentication failed, no IP
address from IPCP, etc.).
Router power is OFF or No wireless link.
Rear Panel LEDs
Router power is ON.
Router power is OFF.
POST (Power On Self Test), Failure (not bootable) or Device
Malfunction. Note: The Power LED should be red no longer than
two seconds after the power on self test passes.
100 Mbps link established.
LAN activity at 100 Mbps (traffic in either direction).
No 100 Mbps link.
10 Mbps link established.
LAN activity at 10 Mbps (traffic in either direction).
No 10 Mbps link.
5.2 Cable Connectors and Switch Locations
•
Reset push button
•
Four LAN Ethernet connectors (RJ-45)
•
WAN Ethernet connector (RJ-45)
•
Power connector (12 VDC) barrel
•
OFF/ON power switch
•
VDSL2 connector (RJ-11)
•
Wireless 802.11b/g SMA connector and antenna
030-300239 Rev. A
10
March 2008
User Guide
Verizon FiOS Router (Model 9100VM)
Verizon FiOS Router - Rear View
Wireless Antenna
and Connector
COAX
Connector
Reset
Button
Ethernet WAN Power Off/On VDSL2
Connector Connector Switch Line
Ethernet LAN
Connectors
(1,2,3,4)
5.3 Connector Descriptions
The following chart displays the Router’s rear panel connector and switches.
SYMBOL
NAME
COAX
TYPE
FUNCTION
Connects the Router to the in-home coaxial cabling.
Compatible with the Multimedia over Coax Alliance
(MoCA) 1.1 standard.
F-type COAX connector
LAN
8-pin (RJ-45) modular jack
<none>
WAN
8-pin (RJ-45) modular jack
12 VDC
POWER
Wireless
Wireless
Antenna
and
Connector
<none>
Barrel connector
Connects the Router’s 10/100 Base-T Ethernet switch to
a local computer, Hub, or other Ethernet-enabled device.
Connects the Router to a broadband modem or router
via 10/100 Base-T Ethernet, enabling access to the
Internet or Wide Area Network (WAN).
Connects the Router’s DC 12V power connector to an
AC wall jack. Use only the power supply provided with
the Router kit.
SMA connector and antenna
Antenna for transmitting and receiving wireless signals
for Wi-Fi (802.11b/g) connected devices.
POWER
OFF/ON power switch
Allows you to turn on or turn off the Router.
VDSL2
6-pin RJ-11 modular jack
Connects to a wall jack provisioned with VDSL2
service or to the VDSL2 jack of a POTS splitter.
030-300239 Rev. A
11
March 2008
User Guide
Verizon FiOS Router (Model 9100VM)
6. INSTALLING THE HARDWARE
This section explains the hardware installation procedures for connecting to your Router.
6.1 Before you begin
Make sure that your kit contains the following items:
•
•
•
•
•
•
•
Verizon® FiOS Router
Power Supply
RJ-45 Ethernet cable (straight-through) (yellow)
RJ-45 Ethernet cable (straight-through) (white)
Verizon CD-ROM containing User Guide in PDF format
Wireless antenna
Router Stand
6.2 Installation Requirements
To install your Verizon FiOS Router, you will need the following:
•
•
•
•
Active VDSL2 line
Network Interface Card (NIC) installed in your PC
802.11 b/g wireless adapter (for wireless installation)
COAX (for coax installation)
IMPORTANT: Please wait until you have received notification from Verizon that your VDSL2 line has been
activated before installing your Router.
6.3 Microfilters
VDSL2 signals must be blocked from reaching each telephone, answering machine, fax machine, computer modem
or any similar conventional device. Failure to do so may degrade telephone voice quality and VDSL2 performance.
Install a microfilter if you desire to use the VDSL2-equipped line jack for telephone, answering machine, fax
machine or other telephone device connections. Microfilter installation requires no tools or telephone rewiring. Just
unplug the telephone device from the baseboard or wall mount and snap in a microfilter, next snap in the telephone
device. You can purchase microfilters from your local electronics retailer, or contact the original provider of your
VDSL2 equipment.
030-300239 Rev. A
12
March 2008
User Guide
Verizon FiOS Router (Model 9100VM)
6.4 Hardware Installations
The following instructions explain how to install your Router using 10/100 Base-T Ethernet, Wireless or WAN
Ethernet connections. Before you begin, please read the following notes:
NOTE:
1. If your Ethernet card does not auto-negotiate, set it to half duplex. Refer to the Ethernet card manufacturer’s
instructions for installing and configuring your Ethernet card.
2. If you are using Router in conjunction with an Ethernet Hub, Switch, or other VDSL2 device, refer to the
manufacturer’s instructions for proper installation and configuration.
3. When using a Microfilter, confirm that the VDSL2 RJ-11 phone cable is connected to the VDSL2 port of the
DSL/HPN non-filtered jack.
4. It is recommended that you use a surge suppressor to protect equipment attached to the power supply. Use only
the power supply provided with your kit.
5. Additional Ethernet cables may be required depending on the installation method you are using. Ethernet cables
and filters can be purchased at your local computer hardware retailer.
6. The Router supports simultaneous use of 10/100 Base-T Ethernet, Wireless, and MoCA configurations. To use
this installation method, follow the instructions provided in sections 6.4.1 and 6.4.2, and 6.4.4.
The Router supports the following modes for WAN access, which are configurable through the Router’s Web pages:
VDSL2, WAN Ethernet, and MoCA.
•
VDSL2 allows you to use the Router’s VDSL2 port for WAN access. In this mode you should install the
Router according to the instructions in the following sections:
•
Section 6.4.1, Connecting the Router via 10/100 Base-T Ethernet
•
Section 6.4.2, Connecting the Router via Wireless
•
WAN Ethernet allows you to use the Router as an Ethernet Gateway (for example, to connect to another
VDSL2 device that provides WAN access). In this mode you should install the Router according to the
instructions in section 6.4.3, “Connecting the Router via WAN Ethernet.”
•
MoCA allows you to connect the Router via a COAX interface such a set-top box. In this mode you should
install the Router according to the instructions in section 6.4.4, “Connecting the Router via COAX/Set-top
Box.”
030-300239 Rev. A
13
March 2008
User Guide
Verizon FiOS Router (Model 9100VM)
6.4.1 Connecting the Router via 10/100 Base-T Ethernet
To connect your Router using the 10/100-BaseT Ethernet connection, please follow the steps below:
1.
Connect the power supply cord to the power connector marked 12 VDC on the rear panel of the Router. Plug
the other end of the power supply into an AC wall socket, and then power up the Router.
2.
Connect the Ethernet cable (provided with your kit) from any one of the four Ethernet jacks marked Ethernet 1,
E2, E3, E4 on the rear panel of the Router to the Ethernet port on your computer. Repeat this step to connect up
to three additional PCs to the Router.
NOTE: Use any of the four LAN Ethernet jacks on the Router’s rear panel; each jack serves as an Ethernet
switch.
3.
Connect the RJ-11 phone cable from the connector marked VDSL2 on the rear panel of the Router to the jack
provisioned with VDSL2 service on the wall.
IMPORTANT: If you use a microfilter, you must plug the RJ-11 phone cable from the Router into the VDSL2
port of the microfilter.
4.
Check to see if the Router’s POWER LED is solid green. This indicates that the Router is powered on.
5.
Check to see if the Router’s ETHERNET LED is solid green. Solid green indicates that the Ethernet
connection is functioning properly. Check the ETHERNET LED for each Ethernet jack to which you are
connected at the rear of the Router.
6.
Check to see if the Router’s BROADBAND LED is solid green. This means the VDSL2 connection is
functioning properly.
7.
After you have logged in to you account and established an Internet connection, as explained later in section 9,
check to see if the Router’s INTERNET LED is solid green. Solid green indicates that the Internet link has
been established. (Flashing green indicates the presence of IP traffic.)
Congratulations! You have completed the Ethernet hardware installation. Now proceed to section 7 to access the
Router’s Web pages.
030-300239 Rev. A
14
March 2008
User Guide
Verizon FiOS Router (Model 9100VM)
6.4.2 Connecting the Router via Wireless
IMPORTANT: If you are connecting to the Router via a wireless network adapter, the SSID must be the same for
both the Router and your PC’s wireless network adapter. The default SSID for the Router is the serial number of the
unit (located below the bar code on the bottom of the modem and also on the shipping carton). The SSID is also
provided in the Router’s Web pages, in the Wireless section. On your PC, locate and run the utility software
provided with your PC’s wireless network adapter. Then, enter the Router’s SSID value (in order to communicate
with the Router, the PC’s wireless network adapter must be configured with the SSID). Later, for privacy, you can
change the SSID by following the procedures outlined in section 12.2, “Basic Security Settings.”
NOTE: Client PCs can use any Wireless 802.11b/g card to communicate with the Router. By default your Router is
enabled for Wired Equivalent Privacy (WEP) security. Whenever, WEP is configured in the Router, the PC’s
wireless card must use the same WEP security code type as the one provided in Router. The WEP security code is
also located on a label on the bottom of the Router. Always check that your PC’s wireless adapter is configured
properly for whichever network setting you use: WEP or WPA. You can configure the settings in the advanced
properties of the PC’s wireless network adapter.
To network your Router to computers in your home or office using a wireless installation, follow the steps below:
1.
2.
3.
4.
Ensure that each PC on your wireless network has an 802.11b/g wireless network adapter installed.
Ensure that appropriate drivers for your wireless adapter have been installed on each PC.
Make sure the wireless antenna is screwed on to the connector on the rear of the modem and firmly locked into
place. Then, orient the antenna to appropriate position.
Connect the RJ-11 phone cable from the connector marked VDSL2 on the rear panel of Router to the telephone jack
provisioned with VDSL2 service on the wall.
IMPORTANT: If you use a microfilter, you must plug the RJ-11 phone cable from the Router into the VDSL2
port of the microfilter.
5.
Connect the yellow Ethernet cable (provided with your kit) from any one of the four Ethernet jacks marked E1,
E2, E3, or E4 on the rear panel of the Router to the Ethernet port on your computer. Repeat this step to connect
up to three additional PCs to the Router.
NOTE: Use any of the four LAN Ethernet jacks on the Router’s rear panel; each serves as an Ethernet switch.
6.
Connect the power supply cord to the power connector marked 12 VDC on the rear panel of the Router. Plug the
other end of the power supply into an AC wall socket, and then power up the Router.
7. Check to see if the Router’s POWER LED is solid green. This indicates that Router is powered on.
8. Check to see if the Router’s BROADBAND LED is solid Green. This means the VDSL2 connection is
functioning properly.
9. Check to see if the ETHERNET LED is solid green. Solid green indicates that the Ethernet connection is
functioning properly. Check the ETHERNET LED for the Ethernet jack you are using on the Router.
10. Check to see if the Router’s WIRELESS LED is solid Green. This means that the Wireless interface is
functioning properly.
11. After you have logged on to your account and established an Internet connection, as explained later in section 8,
check to see if the Router’s INTERNET LED is solid green. Solid green indicates that an Internet link has been
established. (Flashing green indicates the presence of IP traffic.)
Congratulations! You have completed the Wireless installation for the Router. Now proceed to section 7 to access
Router’s Web pages.
030-300239 Rev. A
15
March 2008
User Guide
Verizon FiOS Router (Model 9100VM)
6.4.3 Connecting the Router via WAN Ethernet
This section provides the installation instructions for connecting the Router via WAN Ethernet. The advantage to
using the WAN Ethernet feature is that it allows you to connect multiple devices to your LAN beyond the number of
physical ports provided by your Router. In this configuration, an Ethernet cable is used to connect the Router to a
switch, gateway, or other VDSL2 device. Then, the other VDSL2 device makes the WAN connection to the Internet
while still allowing you to use many of the networking features provided in the Router.
If you want to install your Router so that it connects to another VDSL2 device, follow the steps below:
1.
Connect the attached VDSL2 device to the jack provisioned with VDSL2 on the wall, using the RJ-11 phone
cord that was provided with the kit. If you are using a microfilter at the wall jack, you must connect the RJ-11
VDSL2 phone cable from the VDSL2 port of the VDSL2 device to the VDSL2 port of the microfilter.
NOTE: The VDSL2 device to which you are connecting will function as your WAN interface to the Internet.
Be sure you have connected the VDSL2 device appropriately. If needed, refer to the manufacturer’s
instructions.
2.
Connect the yellow Ethernet cable (provided with your kit) from the Ethernet jack marked WAN on the rear
panel of the Router to the Ethernet port on the attached VDSL2 device, and then turn on the power switch of the
attached VDSL2 device (if it is not already on).
NOTE: Later, in Router’s Web pages, be sure to configure the Router’s WAN interface for “Ethernet” via the
WAN VDSL2 Properties screen. When the Router’s WAN interface is configured for “Ethernet,” the Router’s
VDSL2 transceiver is not used to make the WAN connection. Instead the VDSL2 device to which the Router is
connected will be your WAN interface to the Internet.
3.
4.
Connect an Ethernet cable from any one of the three Ethernet jacks marked E2, E3, or E4 on the rear panel of
the Router to the Ethernet port on your computer. Repeat this step to connect up to three additional PCs to the
Router; each jack serves an Ethernet switch.
Connect the power supply cord to the power connector marked 12 VDC on the rear panel of the Router. Plug
the other end of the power supply into an AC wall socket, and then power up the Router.
5.
Check to see if the Router’s POWER LED is solid green. This indicates that the Router is powered on.
6.
Check to see if the ETHERNET LED is solid green. Solid green indicates that the Ethernet connection is
functioning properly. Check the ETHERNET LED for the Ethernet jack you are using on the Router.
7.
After you have logged on to your account and established an Internet connection, as explained later in section 7,
check to see if the Router’s INTERNET LED is solid green. Solid green indicates that an Internet link has been
established. (Flashing green indicates the presence of IP traffic.)
Congratulations! You have completed the WAN Ethernet installation for your Router. Now proceed to section 7 to
access the Router’s Web pages.
030-300239 Rev. A
16
March 2008
User Guide
Verizon FiOS Router (Model 9100VM)
6.4.4 Connecting the Router via COAX/Set-top Box
To connect your Router using the COAX connection, please follow the steps below:
1.
Make sure all your set-top box(es) are turned off.
2.
Obtain a coax cable and connect one end into your high-speed wall outlet port. Connect the other end into your
set-top box.
3.
Power up your set-top box.
4.
Connect the power supply cord to the power connector marked 12 VDC on the rear panel of the Router. Plug
the other end of the power supply into an AC wall socket, and then power up the Router.
5.
Connect the Ethernet cable (provided with your kit) from any one of the four Ethernet jacks marked Ethernet 1,
E2, E3, E4 on the rear panel of the Router to the Ethernet port on your computer. Repeat this step to connect up
to three additional PCs to the Router.
NOTE: Use any of the four LAN Ethernet jacks on the Router’s rear panel; each jack serves as an Ethernet
switch.
6.
Connect a COAX cable from the connector marked COAX on the rear panel of the Router to a COAX
connector on the wall.
7.
Check to see if the Router’s POWER LED is solid green. This indicates that the Router is powered on.
8.
Check to see if the Router’s ETHERNET LED is solid green. Solid green indicates that the Ethernet
connection is functioning properly. Check the ETHERNET LED for each Ethernet jack to which you are
connected at the rear of the Router.
9.
Check to see if the Router’s MoCA LED is solid green. This means the MoCA connection is functioning
properly.
10. After you have logged in to you account and established an Internet connection, as explained later in section 9,
check to see if the Router’s INTERNET LED is solid green. Solid green indicates that the Internet link has
been established. (Flashing green indicates the presence of IP traffic.)
Congratulations! You have completed the MoCA hardware installation. Now proceed to section 7 to access the Router’s
Web pages.
030-300239 Rev. A
17
March 2008
User Guide
Verizon FiOS Router (Model 9100VM)
7. ACCESSING THE ROUTER
7.1 Logging on to the Router
This section explains the logon procedures for your Verizon FiOS Router. This procedure should be used any time
you want to access or make changes to the Router’s configurable settings.
IMPORTANT: Your Router is capable of automatically sensing protocol type (DHCP or PPPoE). This process is
designed to start after you have connected the Router. To access the Router, your PC must be configured for DHCP.
Refer to your Windows help screen for information on configuring your computer for DHCP. At your PC, click
Start, then click Help to access the Windows help screen.
To log on to the Router, start your Web browser, and then type the following IP address in the browser’s address
bar:
http://192.168.1.1
After you type the IP address, press Enter on your keyboard. The following screen will display the message:
This is your first login to the Management Console. Use http://192.168.1.1 in order to access the Router’s
Management Console. To conveniently access the Management Console, you can click Add to Favorites. You
should make sure that cookies are enabled in the browser. To enable cookies, go to Tools->Internet Options>Privacy->Advanced.
Click OK in the Welcome screen.
030-300239 Rev. A
18
March 2008
User Guide
Verizon FiOS Router (Model 9100VM)
Next, type the default user name (which is admin) and the default password (which is password) in the fields
provided. Click OK to continue.
admin
password
After you have entered “admin” and “password” in the preceding screen, the following screen will prompt you to
enter a new password. Enter the new password in the fields provided. (If desired, you can use “admin” as the user
name or change this value to the name of your choice.) Then click OK to continue.
030-300239 Rev. A
19
March 2008
User Guide
Verizon FiOS Router (Model 9100VM)
After you have logged on to your Router, the following screen will appear. This is the main page of your Router’s
Web pages, also referred to in this document as the home page. You can access this page by clicking Main in the
navigation menu located across the top of the Router’s Web pages. Details on this page will be explained in the
following sections.
030-300239 Rev. A
20
March 2008
User Guide
Verizon FiOS Router (Model 9100VM)
8. CONFIGURING YOUR BROADBAND CONNECTION
To browse the Internet using your Router, you must confirm your VDSL2 connection and establish an Internet
connection with Verizon. The procedures for configuring your Router’s connection settings are explained in this
section.
8.1 Confirming Your VDSL2 Connection
IMPORTANT: You must have active VDSL2 service before the Router can synchronize with Verizon’s equipment.
To determine if the Router has established a VDSL2 link, at the Router’s front panel, check to see if the Router’s
BROADBAND LED is solid green. Solid green indicates that a VDSL2 connection is established. (The
BROADBAND LED may flash while the connection is being established. Please wait a brief moment for the Router
to connect.
After confirming your VDSL2 connection, proceed to section 8.2 to configure your Router’s Internet connection
settings.
8.2 Connecting to the Internet
After you have logged on to the Router, the following home page will appear. Use this page to determine the
Router’s Internet connection status. If you do not have an Internet connection, the Internet Address field will
display “Not Available.”
030-300239 Rev. A
21
March 2008
User Guide
Verizon FiOS Router (Model 9100VM)
To begin your connection setup, at the home page, go to the Quick Links section, and then click the Configure My
Broadband Connection link.
The following Quick Setup screen will be displayed. At this screen, do the following:
1.
From the Broadband Detect Default drop-down list, select Point-to-Point Protocol over Ethernet
(PPPoE).
2.
Enter the login user name and login password in the fields provided. (These values are provided by Verizon)
3.
Click Apply to save the settings.
Next, click the Click Here for Advanced Settings link to go to the WAN VDSL2 Properties screen.
030-300239 Rev. A
22
March 2008
User Guide
Verizon FiOS Router (Model 9100VM)
In the WAN PPPoE Properties screen, select Settings in the left submenu.
NOTE: To configure additonal WAN PPPoE properties, select Routing and PPP in the left submenu. If you change
any settings in these screens, click Apply to save the settings.
If you selected Settings in the left submenu, the following screen will appear. Do the following:
1.
Select WAN from the Network drop-down list.
2.
Select WAN VDSL2 from the Underlying Connection drop-down list
3.
Click Apply to save the settings.
After you click Apply, the Status field will display Connected. Next, click Main in the left submenu to return to
the home page.
030-300239 Rev. A
23
March 2008
User Guide
Verizon FiOS Router (Model 9100VM)
At the home page, view the Gateway Status panel. The message Go! Your gateway is ready for Internet access
should now be displayed. In addition, the Internet Address field will display the WAN IP address of your Router.
Congratulations! You are ready to browse the Internet. To quickly access your default Web page, click GO TO THE
INTERNET NOW.
030-300239 Rev. A
24
March 2008
User Guide
Verizon FiOS Router (Model 9100VM)
8.3 Logging Out of the Router’s Web Pages
When you are ready to log out of the Router’s web pages, click the Logout link in any of the Web screens.
NOTE: If you want to close the Router’s Web page, simple click the “X” in the upper-right corner of the window.
Logging out or closing the window does not affect your Internet connection or your VDSL2 connection. However,
you will need to log in again when you are ready to access the Router’s pages.
030-300239 Rev. A
25
March 2008
User Guide
Verizon FiOS Router (Model 9100VM)
9. SETTING UP MACINTOSH OS X
This section provides instructions on how to use Macintosh Operating System 10 with the Router. Follow the
instructions in this section to create a new network configuration for Macintosh OS X.
NOTE: Macintosh computers must use the Router’s Ethernet installation. Refer to section 6, “Installing the
Hardware,” for details.
9.1 Opening the System Preference Screen
After you have connected the Router to the Ethernet port of your Macintosh, the screen below will appear. Click the
“Apple” icon in the upper-left corner of the screen and select System Preferences.
9.2 Choosing the Network Preferences
After selecting System Preferences from the previous screen, the following screen will appear. Click the Network
icon.
030-300239 Rev. A
26
March 2008
User Guide
Verizon FiOS Router (Model 9100VM)
9.3 Creating a New Location
After clicking the Network icon, the Network screen will appear. Select New Location from the Location field.
9.4 Naming the New Location
After selecting New Location in the Network screen, the following screen will appear. In the field labeled
Name your new location:, change the text from “Untitled” to “Westell.” Click OK.
9.5 Selecting the Ethernet Configuration
After clicking OK in the preceding screen, the Network screen will appear. The Network screen shows the settings
for the newly created location. From the Configure field in the Network screen, select Built-in Ethernet. Click
Save to save the settings.
NOTE: Default settings for the Built-in Ethernet configuration are sufficient to operate the Router.
030-300239 Rev. A
27
March 2008
User Guide
Verizon FiOS Router (Model 9100VM)
9.6 Checking the IP Connection
To verify that the computer is communicating with the Router, follow the instructions below.
1.
Go to the “Apple” icon in the upper-left corner of the screen and select System Preferences.
2.
In the System Preferences screen, click the Network icon. The Network screen will appear.
3.
In the Configure field in the Network screen, select Built-in Ethernet.
4.
View the IP address field. An IP address that begins with 192.168.1 should appear.
NOTE: The Router’s DHCP server provides this IP address. If this IP address is not displayed, check the Router’s
wiring connection to the PC. If necessary, refer to section 6, “Installing the Hardware,” for installation instructions.
030-300239 Rev. A
28
March 2008
User Guide
Verizon FiOS Router (Model 9100VM)
9.7 Accessing Your Router
In your Internet Explorer Web browser’s address bar, type http://192.168.1.1, and then press Enter on your
keyboard.
http://192.168.1.1
The Login screen will appear. Please refer to the Login screen in section 7.1 of this User Guide for logon
instructions.
030-300239 Rev. A
29
March 2008
User Guide
Verizon FiOS Router (Model 9100VM)
10. BASIC CONFIGURATION
IMPORTANT: The following sections assume that you have active VDSL2 and Internet service.
The Router allows you to make changes to the configurable features such as connection settings, routing
configurations, and firewall settings. The following sections explain each feature and show you how to make
changes to the Router’s settings. The navigation menu displayed at the top of each page allows you to navigate to
the various configuration screens of your Router. Whenever you change settings in your Router, you must click
Apply to allow the changes to take effect in the Router.
NOTE:
1. If you need help, go to the Quick Links section in the home page and then click the Verizon Help link. Clicking
this link takes you to Verizon’s Online Help site where you can find additional information about your VDSL2
Router.
2. If you click OK or Apply in a screen and then experience a delay, you may need to refresh the screen; press the
Refresh button (where applicable) or press F5 on your keyboard.
3. If you want to logout of the Router’s Web page, click the logout link in the home page. Clicking this link does not
affect your Internet connection; it only closes the Router’s Web page. To log in, you will need to enter your
username and password in the Login screen.
To configure the basic settings in your Router, follow the instructions provided in sections 11 through 15.
030-300239 Rev. A
30
March 2008
User Guide
Verizon FiOS Router (Model 9100VM)
11. MAIN (HOME PAGE)
After you have logged on to your Router and established a PPP session with Verizon, click Main in the top navigation
menu. The following home page will appear. The home page allows you to view connection information reported by
your Router and to quickly access Internet services provided by Verizon. The following sections discuss each panel in
the Main page. The Main page will be referred to as the home page throughout this User Guide.
030-300239 Rev. A
31
March 2008
User Guide
Verizon FiOS Router (Model 9100VM)
11.1 Gateway Status
In the home page, the Gateway Status panel allows you to view the status of your Router’s Internet connection.
Whenever you have an Internet connection, a green check mark is displayed. This signals you to Go! You can now
browse the Internet. In addition, the Router’s connection type and WAN IP address will also be displayed.
11.2 Quick Links
The Quick Links panel allows access to your broadband connection settings, and provides a link to Help
information related to your Router. The following links are displayed in the Quick Links panel.
Configure My Broadband Connection
Change the Password Needed to
Manage Network Connections
Enable Applications (Games, Web
Cams, Instant Messaging, other)
Verizon Help
Logout
Quick Links
Click this link to access the Router’s connection settings.
Click this link to change Administrator permissions, or to set up privileges
for new users and groups on your network.
Click this link to open a tunnel between remote (Internet) computers and a
specific device port inside your local area network (LAN).
Click this link to access Verizon’s Online Help site.
Click this link to log out of the Router’s Web pages.
11.3 Network Connections
In the home page, the Network Connections panel allows you to view information about devices that are connected
to your network. If your network provides access to shared files, you can access the files by clicking the Access
Shared Files link. The following details are displayed in the Network Connections panel.
Computer Name
Connection Type
Status
IP Address
Network Connections
The ASCII (text) name or MAC address of the device connected to the network.
The physical or wireless connection used to interface with your Router.
The Internet status of the connected device: Offline or Online.
The IP address assigned to a device on your network.
11.4 Start Surfing
In the home page, the Start Surfing panel allows quick access to Internet services provided by Verizon. The
following details are displayed in the Start Surfing panel.
NOTE: The links displayed in the Start Surfing panel are specific to the services offered by Verizon and will be
available only after you have established an Internet connection with Verizon.
Go to the Internet Now
Verizon
Shop Westell
Music
Video
030-300239 Rev. A
Start Surfing
Click this button to go to the default page of your Web browser.
Click the links in this section to access networking services provides by Verizon.
Click this button to go to Westell’s home page.
Click this button to go to the Verizon Surround - Music page.
Click this button to go to the Verizon Surround - Movies page.
32
March 2008
User Guide
Verizon FiOS Router (Model 9100VM)
12. WIRELESS
12.1 Wireless Status
If you click Wireless in the top navigation menu and then select Wireless Status in the left submenu, the following
screen will appear. This screen allows you to view details about your wireless connection.
NOTE: If you change the Router’s wireless settings, wireless access to the Router may be interrupted and wireless
stations may require reconfiguration.
030-300239 Rev. A
33
March 2008
User Guide
Verizon FiOS Router (Model 9100VM)
12.2 Basic Security Settings
If you select Wireless from the top navigation menu and then select Basic Security Settings in the left submenu, the
following screen will appear. Your Router also functions as a wireless access point for wireless devices. To configure
your wireless settings, enter the appropriate values in the fields provided. Then, click Apply to allow the settings to
take effect. The following table explains the details of this screen.
IMPORTANT:
1. If you are connecting to the Router via a wireless network adapter, the computer’s wireless network adapter must
be configured with the Router’s Service Set ID (SSID); that is, the SSID used in the wireless network adapter
must be identical to the Router’s SSID. The default SSID for the Router is the serial number of the unit (located
below the bar code on the bottom of the unit and also on the shipping carton). Locate and run the utility software
provided with the wireless network adapter, and then enter the identical SSID and WEP encryption security
settings displayed in the Router into the wireless adapter. For privacy, you can change the SSID and security
settings to your desired values. SSIDs are case sensitive and can contain up to 32 alphanumeric characters,
including spaces.
2. In order for every computer on your network to connect to your Router wirelessly, confirm that each computer’s
wireless adapater is using the same security settings that you have configured in the Router’s Basic Security
Settings screen. After you have configured all the settings in this screen, please record the settings for future
reference.
030-300239 Rev. A
34
March 2008
Verizon FiOS Router (Model 9100VM)
Wireless (ON/OFF)
Change SSID
Channel
WEP Security
030-300239 Rev. A
User Guide
Wireless Settings
By default, the wireless feature is enabled. To completely turn off the wireless networking
feature and the Router’s internal wireless radio, select OFF.
Factory Default = 07B406037157
The SSID is the name of your wireless network. This string is case-sensitive and must be
30 characters or less. To connect to the Router, the SSID on a computer’s wireless card
must be identical the SSID on the Router. The Router comes pre-configured with the SSID;
however, you can change the SSID to any name or code you want.
This is the channel of the frequency band at which the Router communicates.
The Router transmits and receives data on this channel. The number of channels to choose
from is pre-programmed into the Router. A computer’s wireless card does not have to be
set to the same channel as the Router; the wireless card can scan all channels and look for a
Router to connect to. (In the United States, use channels 1 through 11).
For better performance, select a channel that is not being used or being used the least by
other wireless devices such as cordless phones or other Routers in the area . If "Automatic"
is selected, the Router will determine the optimal channel to use.
Factory Default = OTHER SECURITY
WEP security encrypts the Router's wireless traffic and prevents unauthorized access to the
Router's network. If "OTHER SECURITY" is selected by default, it means that current
35
March 2008
User Guide
Verizon FiOS Router (Model 9100VM)
WEP Key Length
WEP Key
Number of Required
Digits
Configure Wireless Client
Settings to match Router’s
settings
030-300239 Rev. A
wireless security setting is configured using advanced options. If "OTHER SECURITY" is
manually selected on this page, it will be ignored. (See 'Advanced Security Settings' for
additional security options.) Selecting "NO SECURITY" will disable wireless security and
is not recommended.
A WEP encryption key is used to protect your wireless transmissions. These keys are of
varying lengths. The key can include the numbers 0-9 and letters a,b,c,d,e, and f. The
number of characters must be either 10 (for 64/40 bit encryption) or 26 (for 104 bit
encryption). If this page is used to configure WEP, key 1 will be used as the active key.
You should note this value as you will have to enter it into each device which is connecting
wirelessly
This is the actual security key value. You should note this value as you will have to enter it
into each device which is connecting wirelessly.
This field indicates how many more characters are needed to complete the security key.
The security key is not complete unless this counter indicates 0.
For wireless clients, such as computers and other devices with wireless cards to establish a
wireless connection to this Router, the clients' settings, especially the SSID, channel,
wireless mode, and security (i.e., WEP) settings must match the Router's settings as
summarized in the table. If channel is set to Automatic, the Router will determine the
optimal channel to use. (If settings, particularly if using advance security options, are
changed in other or "Advanced" sections, the sections where the changes were made must
be consulted for reference.)
36
March 2008
User Guide
Verizon FiOS Router (Model 9100VM)
12.3 Advanced Security Settings
If you select Wireless from the top navigation menu and then select Advanced Security Settings in the left
submenu, the following screen will appear. Generally, most owners of the Router will not need to modify these
wireless options.
From this menu, you can change your wireless security level by selecting the desired choice: WEP, WEP + 802.11x,
or Wireless Protected Access (WPA). You can also enable/disable the SSID broadcast feature fo the product.
If you want to limit connected wireles dievces only to the 802.11g (54Mbps) standard, chose the 802.11 b/g mode
link and select the desired mode.
For full access to all wireless and secuity settings one on page, click on the Other Advanced Wireless Options
link.
030-300239 Rev. A
37
March 2008
User Guide
Verizon FiOS Router (Model 9100VM)
12.3.1 SSID Broadcast
If you clicked the SSID Broadcast link, the following screen will appear. By disabling the SSID broadcast, your
Router will no longer send out messages indicating that it is in place. Disabling the SSID broadcast does not disable
the wireless interface and clients configured with the correct SSID and wireless security key (when enabled) will
still be able to connect.
030-300239 Rev. A
38
March 2008
User Guide
Verizon FiOS Router (Model 9100VM)
12.3.2 Wireless MAC Authentication
If you clicked the Wireless MAC Authenticaton link, the following screen will appear. Set up your MAC Filtering
settings, and then click Apply to save the settings.
For example, if you select “Allow” from the MAC filtering Mode drop-down list, this option will allow only the
devices whose MAC Addresses are active in the list to connect to the Router. Next, click the New MAC Address
link to add the desired MAC address.
030-300239 Rev. A
39
March 2008
User Guide
Verizon FiOS Router (Model 9100VM)
If you clicked New MAC Address, the following screen will appear. Enter the MAC address of the device that you
want to allow access to the Router. Then, click OK to continue.
NOTE: If you enter a duplicate MAC address, the following screen will appear. Enter a valid MAC address and
click OK to continue.
030-300239 Rev. A
40
March 2008
User Guide
Verizon FiOS Router (Model 9100VM)
After you have entered a valid MAC address and clicked OK, the following screen will appear. Click Apply to save
the settings. From this screen, you may add additional MAC address to the list or edit/delete existing MAC address.
If you make any changes, be sure to click Apply to save the changes.
After you have entered a valid MAC address, the following Advanced Security Settings screen will display all the
MAC addresses that have been added to the MAC filtering table. Be sure to select the desired option from the MAC
Filtering Mode drop-down list. Then, click Apply to allow the settings to take effect in the Router.
To edit a MAC address, click the pencil icon next to the address you want to edit. To delete a MAC address, click the
“X” icon next to the address you want to delete. To add a new MAC address, click the plus icon, or click the New
MAC Address link.
030-300239 Rev. A
41
March 2008
User Guide
Verizon FiOS Router (Model 9100VM)
12.3.3 802.11b/g Mode
If you clicked the 802.11b/g Mode link, the following screen will appear. Access to the Router’s wireless network
can be controlled by designating a wireless LAN technology specification 802.11b (11 Mbps) or 802.11g (54 Mbps).
Use an option that is most compatible with your wireless clients.
Select the desired mode from the drop-down list, and then click Apply to save the settings.
030-300239 Rev. A
42
March 2008
User Guide
Verizon FiOS Router (Model 9100VM)
12.3.4 Other Advanced Wireless Options
If you clicked the Other Advanced Wireless Options link, the following screen will appear. Click Yes to proceed.
The following screen will appear. Enter the desired values, and then click Apply to save the settings. The following
table explains the details of this screen.
030-300239 Rev. A
43
March 2008
User Guide
Verizon FiOS Router (Model 9100VM)
Wireless Access Point
Enable Wireless
SSID
SSID Broadcast
802.11 Mode
Channel
Network Authentication
MAC Filter Mode
MAC Filtering Settings
Transmission Rate
CTS Protection Mode
CTS Protection Type
030-300239 Rev. A
Advanced Security Settings
The Router also functions as a wireless access point for wireless devices.
By default, the wireless feature is enabled. To disable this feature, clear the check box.
Factory Default = 07B406037157
The SSID is the name of your wireless network. This string is case-sensitive and must be
30 characters or less. To connect to the Router, the SSID on a computer’s wireless card
must be identical the SSID on the Router. The Router comes pre-configured with the SSID;
however, you can change the SSID to any name or code you want.
Select this check box to enable SSID (a check mark will appear in the box).
When this box is cleared, the Router will not broadcast its SSID.
When SSID Broadcast is enabled, any computer or wireless device using the SSID of
“ANY” can see the Router. To prevent this from happening, click the Disable option
button. This will disable SSID Broadcast so that only the wireless devices that are
configured with your SSID can access your Router.
Allows you to limit access to your Router based on technology type.
11b only: Communication with the Router is limited to 802.11b
11g only: Communication with the Router is limited to 802.11g
802.11 b/g Mixed: Computers using 802.11b or 802.11g rates can communicate with the
Router.
This is the channel of the frequency band at which the Router communicates.
The Router transmits and receives data on this channel. The number of channels to choose
from is pre-programmed into the Router. A computer’s wireless card does not have to be
set to the same channel as the Router; the wireless card can scan all channels and look for a
Router to connect to. (In the United States, use channels 1 through 11).
Open System Authentication: If Open System authentication is selected, this will allow any
station to associate with the wireless network, but only stations with a valid WEP key can
send or receive data from the Router.
Shared Key Authentication: If Shared Key Authentication is selected, a station must
authenticate with the Router (using the WEP key) before it can connect to the Router’s
wireless network.
Both: If “Both” is selected, the Router will allow both Open System and Shared Key
Authentication to be used.
Disable: If Disable is selected, MAC Filtering Mode will be deactivated.
Allow: If Allow is selected, the Router will allow only the devices that are configured in
the MAC filter table.
Deny: If Deny is selected, the Router will deny all devices that are configured in the MAC
filter table.
Click this link to add a MAC address to the MAC filtering list. Details on this feature are
discussed later in this section.
Selecting a transmission rate allows you to adjust the bit rate of the Router’s wireless
transmissions. Select a transmission rate from the drop-down list, or select Auto to allow
the Router to automatically select the best transmission rate.
Clear to Send (CTS) allows the 802.11 b/g networks to operate a maximum efficiency.
Auto: Select Auto to activate CTS.
None: Select None to deactivate CTS.
Always: Select Always to allow CTS to always be activated.
CTS (Clear to Send) protection mode allows mixed 802.11b/g networks to operate at
maximum efficiency.
RTS (Request to Send) controls what size data packet the low level RF protocol issues to
an RTS packet.
44
March 2008
User Guide
Verizon FiOS Router (Model 9100VM)
Beacon Interval
(in milliseconds)
DTIM Interval
(in milliseconds)
Fragmentation Threshold
RTS Threshold
Wireless Security
Stations Security Type
Authentication Method
030-300239 Rev. A
Select cts_only to activate this feature.
Select cts_rts to activate this feature.
Enter the beacon interval value.
The beacon interval is the time between beacon frame transmissions. Beacons are
transmitted by the Router to help identify wireless networks. Beacons contain rate and
capability information. Beacons received by stations can be used to identify the wireless
access points in the area.
Enter the DTIM (Delivery Traffic Indication Message) interval value. A DTIM is a
countdown mechanism for the Router. It informs wireless network clients of the next
window for listening to broadcast and multicast messages.
Setting the fragmentation threshold can increase the reliability of frame transmissions on
the wireless network. Any MAC Service Data Unit (MSDU) or MAC Protocol Data Unit
(MPDU) larger than this value will be fragmented into an MPDU of the specified size.
Enter the RTS (Request to Send) threshold. This setting controls what size data packet the
low level RF protocol issues to an RTS packet.
RTS/CTS handshaking will be performed for any data or management MPDU containing a
number of bytes greater than the threshold. If this value is larger than the MSDU size
(typically set by the fragmentation threshold), no handshaking will be performed. A value
of zero will enable handshaking for all MPDUs.
When this feature is enabled (the box contains a check mark), wireless security is activated,
and the security type can be configured.
When the box is clear, wireless security is deactivated. By factory default, Wireless
Security is disabled.
Set the type of security for the Router’s wireless network. Choose from the following
options: WPA, WPA2, WPA and WPA2, 802.1x WEP, Non-802.1x WEP, Authentication
Only. Details on these options are discussed later in this section.
This is the authentication method used with the security type.
45
March 2008
User Guide
Verizon FiOS Router (Model 9100VM)
12.3.5 Configuring the Stations Security Type
To configure the Router’s wireless security type for the wireless network, in the Advanced Security Settings
screen, select an option from the Stations Security Type drop-down list. The following sections describe each
security type.
030-300239 Rev. A
46
March 2008
User Guide
Verizon FiOS Router (Model 9100VM)
12.3.5.1 WPA (Wi-Fi Protected Access v.1)
If you select WPA in the Stations Security Type drop-down list, the following screen will appear. WPA allows you
to enable a pre-shared key for your home network or for advanced security for an enterprise network. This option
allows stations that support WPA v.1 to connect to the Router.
Wireless Security
Stations Security Type
Authentication Method
Pre-Authentication
030-300239 Rev. A
WPA Wireless Security
Factory Default = Enabled
When this feature is enabled (the box contains a check mark), wireless security in activated.
If the box is cleared, wireless security will be deactivated.
Factory Default = WPA
Set the type of security for the Router’s wireless network. Choose from the following options:
Details on these options are discussed later in this section.
WPA – Allows stations that support WPA v.1 to connect to the Router.
WPA2 – Allows stations that support WPA v.2 to connect to the Router.
WPA and WPA2 – Allows stations that support WPA and WPA2 to connect to the Router.
802.1x WEP – Allows stations that support 802.1x WEP to connect to the Router.
Non-802.1x WEP – Allows stations that support Non-802.1x WEP to connect to the Router.
Authentication Only – Allows stations that support Authentication Only to connect to the Router.
Factory Default = Personal (Pre-Shared Key)
Pre-Shared Key – WPA stations share a pre-shared key (string format) with the Router and do
not authenticate with the RADIUS server.
802.1x – WPA stations authenticate with the RADIUS server using EAP-TLS over 802.1x, a
standard for passing extensible authentication protocol (EAP) for authentication purposes. EAP
is used to communicate authentication information between the supplicant and the authentication
server. With 802.1x, EAP messages are packaged in Ethernet frames, rather than using and PPP.
Factory Default = Disabled
To Enable this feature, click the box (a check mark will appear in the box).
47
March 2008
User Guide
Verizon FiOS Router (Model 9100VM)
WPA Pre-Shared Key
Group Key Update
Interval (in seconds)
The WPA key can be either 8 to 63 text (ASCII) characters or 64 hexadecimal (Hex) characters.
The only allowable hexadecimal characters are: A-F and 0-9.
The number of seconds between rekeying the WPA group key. A value of zero means that
rekeying is disabled.
After you have selected the security type, select the desired authentication method from the Authentication Method
drop-down list.
12.3.5.1.1
Authentication Method—Pre-Shared Key
If you select Pre-Shared key as the authentication method for WPA, the following screen will appear. Configuring
Pre-Shared Key in the Router allows devices that know the pre-shared key to connect to the Router.
NOTE: A WPA pre-shared key is treated as either a string of text (ASCII) characters or a set of
hexadecimal (Hex) characters. The key can be either 8 to 63 text (ASCII) characters or 64 hexadecimal
(Hex) characters. The only allowable hexadecimal characters are: 0-9 and A-F.
To configure the WPA Pre-Shared Key, do the following:
1.
Select the string type (ASCII or HEX) in the Pre-Shared Key drop-down list.
2.
Enter the desired pre-shared key values in the field provided.
3.
Select the desired option from the Encryptoin Algorithm drop-down list.
•
TKIP: Select this option to enable the Temporal Key Integrity Protocol for data encryption.
030-300239 Rev. A
48
March 2008
User Guide
Verizon FiOS Router (Model 9100VM)
•
AES: Select this option to enable the Advanced Encryption Standard for data encryption.
•
TKIP and AES: Select this option to enable the Router to accept TKIP and AES encryption.
4.
Enter the desired Group Key Update Interval, and confirm that the adjacent box contains a check mark. (By
factory default, Group Key Interval is enabled for 900 seconds.)
5.
Click OK to save the wireless settings in the Router.
12.3.5.1.2
Authentication Method—802.1x
If you select 802.1x as the authentication method for WPA, the following screen will appear. Configuring 802.1x
allows devices that support 802.1x to connect to the Router.
To configure WPA authentication for 802.1x, do the following:
1.
Select the desired option from the Encryptoin Algorithm drop-down list.
•
TKIP: Select this option to enable the Temporal Key Integrity Protocol for data encryption.
•
AES: Select this option to enable the Advanced Encryption Standard for data encryption.
•
TKIP and AES: Select this option to enable the Router to accept either TKIP or AES encryption.
2.
Enter the desired Group Key Update Interval, and confirm that the box contains a check mark. (By factory
default, Group Key Interval is enabled for 900 seconds.)
3.
Configure the Radius Server:
a. Enter the Radius Server IP address in the fields provided.
030-300239 Rev. A
49
March 2008
User Guide
Verizon FiOS Router (Model 9100VM)
b. Enter the desired Server Port value.
c. Enter the Shared Secret.
4.
Click OK to save the wireless settings in the Router.
030-300239 Rev. A
50
March 2008
User Guide
Verizon FiOS Router (Model 9100VM)
12.3.5.2 WPA2 (Wi-Fi Protected Access v. 2)
If you select WPA2 in the Stations Security Type drop-down list, the following screen will appear. This option
allows stations that support WPA v.2 to connect to the Router. The configuration settings for WPA2 are similar to
the settings in WPA. Please refer to section 12.3.5.1 for instructions on configuring WPA2.
030-300239 Rev. A
51
March 2008
User Guide
Verizon FiOS Router (Model 9100VM)
12.3.5.3 WPA and WPA2
If you select WPA2 and WPA2 in the Stations Security Type drop-down list, the following screen will appear.
This option allows stations that support both WPA v.1 and WPA v.2 to connect to the Router. The configuration
settings for this feature are similar to the settings in WPA. Please refer to section 12.3.5.1 for instructions on
configuring WPA and WPA2.
030-300239 Rev. A
52
March 2008
User Guide
Verizon FiOS Router (Model 9100VM)
12.3.5.4 802.1x WEP
If you select 802.1x WEP in the Stations Security Type drop-down list, the following screen will appear. The
802.1x WEP feature allows you to enable WEP keys for wireless security. In addition, 802.1x WEP security uses a
Remove Authentication Dial-in Service (RADIUS) server for authentication purposes. The server must be physically
connected to the Router. The Router’s card supports 40-bit or 104-bit WEP encryption. If 802.1x WEP is used, any
station can connect to the Router as long as its SSID and WEP key values match the Router’s values.
NOTE: Client PCs can use any Wireless 802.11b/g card to communicate with the Router. By default your Router is
configured (enabled) for 802.1X WEP (Wired Equivalent Privacy) security. Whenever, WEP is configured, the PC’s
wireless card must use the same WEP security code type as the one provided in Router. The WEP security code is
located on a label on the bottom of the Router. Always check that your PC’s wireless adapter is configured properly
for whichever network setting you use: WEP or WPA. You can configure the settings in the advanced properties of
the PC’s wireless network adapter.
030-300239 Rev. A
53
March 2008
User Guide
Verizon FiOS Router (Model 9100VM)
12.3.5.4.1
Configuring Automatic WEP Encryption Keys
The 802.1x WEP security protocol uses port control with dynamically changing encryption keys automatically
updated over the network. To configure 802.1x WEP to generate keys automatically, do the following:
1.
Select the Generate Keys Automatically check box if you want the Router to automataically create the WEP
security keys. A check mark will appear in the box, and the Encryption Key table will be removed from the screen.
NOTE: Disable (clear) the Generation Keys Automatically check box to allow 802.1x-MD5 stations to
connect to the Router
2.
Enter the desired Group Key Update Interval, and confirm that the box contains a check mark. (By factory
default, Group Key Interval is enabled for 900 seconds.)
3.
Configure the Radius Server:
a. Enter the Radius Server IP address in the fields provided.
b. Enter the desired Server Port value.
c. Enter the Shared Secret.
4.
Click OK to save the wireless settings in the Router.
12.3.5.4.2
Configuring Manual WEP Encryption Keys
To configure 802.1x WEP with manual encryption keys, do the following:
1.
Clear the Generate Keys Automatically check box. The Key Encryption table will appear in the screen.
NOTE: Disable (clear) the Generation Keys Automatically check box to allow 802.1x-MD5 stations to
connect to the Router.
2.
At the Key Encryption table, select a key (1 through 4) that you want to activate.
3.
Enter the desired encryption key.
NOTE: A WEP encryption key is treated as either a string of text (ASCII) characters or a set of
hexadecimal (Hex) characters. The number of text characters must be either 5 (for 40 bit encryption) or 13
(for 104 bit encryption). The number of Hex characters must be either 10 (for 40 bit encryption) or 26 (for
104 bit encryption). The only allowable hexadecimal characters are: A-F and 0-9.
4.
Select the Entry Method (ASCII or Hex) from the drop-down list.
5.
Select the Key Length (40 bit or 104 bit) from the drop-down list.
6.
Enter the desired Group Key Update Interval, and confirm that the box contains a check mark. (By factory
default, Group Key Interval is enabled for 900 seconds.)
7.
Configure the Radius Server by doing the following:
8.
a.
Enter the Radius Server IP address in the fields provided.
b.
Enter the desired Server Port value.
c.
Enter the Shared Secret.
Click OK to save the wireless settings in the Router.
030-300239 Rev. A
54
March 2008
User Guide
Verizon FiOS Router (Model 9100VM)
12.3.5.5 Non-802.1x WEP
If you select Non-802.1x WEP in the Stations Security Type drop-down list, the following screen will appear. The
Non-802.1x WEP feature allows you to enable a WEP key for wireless security without using a RADIUS server.
The Router’s card supports 40-bit or 104-bit WEP encryption. Whenever Non-802.1x WEP is used, any station can
connect to the Router as long as its SSID and WEP key values match the Router’s values.
To configure the Router for Non-802.1x WEP, do the following:
1.
At the Key Encryption table, select a key (1 through 4) that you want to activate.
2.
Enter the desired encryption key.
NOTE: A WEP encryption key is treated as either a string of text (ASCII) characters or a set of hexadecimal
(Hex) characters. The number of text characters must be either 5 (for 40-bit encryption) or 13 (for 104-bit
encryption). The number of Hex characters must be either 10 (for 40-bit encryption) or 26 (for 104-bit
encryption). The only allowable hexadecimal characters are: A-F and 0-9.
3.
Select the Entry Method (ASCII or Hex) from the drop-down list.
4.
Select the Key Length (40 bit or 104 bit) from the drop-down list.
5.
Click OK to save the wireless settings in the Router.
030-300239 Rev. A
55
March 2008
User Guide
Verizon FiOS Router (Model 9100VM)
12.3.5.6 Authentication Only
If you select Authentication Only in the Stations Security Type drop-down list, the following screen will appear.
This feature allows you to enable wireless security in your Router without using encryption keys or a RADIUS
server. However, a station’s SSID must match the Router’s SSID in order to connect to the Router.
030-300239 Rev. A
56
March 2008
User Guide
Verizon FiOS Router (Model 9100VM)
13. MY NETWORK
This section discusses details about your Router’s network connections.
13.1 Network Status
To view your Router’s network settings, from the top navigation menu, select Network Connections. Next, click
Network Status in the submenu at the left of the screen. The following screen will appear. This screen displays
information about the devices connected to your local area network (LAN).
Name
Type
Connection
Status
IP Address
IP Address Source
MAC Address
Connected Devices
Delete All Devices
Scan for New Devices
030-300239 Rev. A
Network Connections
The name of the device.
The type of device connected to the network.
The interface used to connect to the Router.
Ethernet: Displays the number of devices that are connected to the Router via Ethernet
10/100 BaseT connection.
Wireless: Displays the number of devices that are connected to the Router wirelessly.
Note: If you have computers on your network that are not being displayed, check the
firewall setting on the PCs to ensure that the firewall is disabled.
The status of the Inernet connection.
The IP address assigned to the computer.
The method by which the computer receives its IP address.
The Media Access Controller; the hardware address assigned to the deviced by the
manufacturer.
The interface used to connect the device to the Router, and the devices connected.
Ethernet: Displays the number of devices that are connected to the Router via Ethernet
10/100 BaseT connection.
Wireless: Displays the number of devices that are connected to the Router wirelessly.
Note: If you have computers on your network that are not being displayed, check the
firewall setting on the PCs to ensure that the firewall is disabled.
Click this link to delete all devices from your network.
Click this link to allow the Router to scan the network for new devices that may have
recently connected to the network.
57
March 2008
User Guide
Verizon FiOS Router (Model 9100VM)
13.1.1 Website Blocking
In the Network Status page, click the Website Blocking link. You can configure your Router to restrict access to
certain websites. Click the New Entry link.
The following screen will appear. Enter the URL of the desired site in the Restricted Website field. Then select the
local host device to which you want to apply this restriction, and then a schedule for the restriction. Click OK to
save the settings.
030-300239 Rev. A
58
March 2008
User Guide
Verizon FiOS Router (Model 9100VM)
If you select User Defined from the Schedule drop-down list, the following screen will appear. Click the New Time
Segment Entry link to set up a time for the restriction.
The following screen allows you to enter the desired time segment. Click the New Hours Range Entry link to add
the time values to the entry.
030-300239 Rev. A
59
March 2008
User Guide
Verizon FiOS Router (Model 9100VM)
After you have entered the desired time values, click OK to save the settings.
If you have set up time values and clicked OK, the following screen will appear. Next, select the desired Days of
Week values and click OK.
030-300239 Rev. A
60
March 2008
User Guide
Verizon FiOS Router (Model 9100VM)
After you have set up the Hours Range and Days of Week values and clicked OK, the following screen will appear.
If desired, you can enter a name for this schedule rule in the Name field. This screen shows that rules have been
added to the Time Segments table. To add additional schedule rules to your Router, repeat the preceding
instructions. Click OK to continue.
If you clicked OK, the following screen will appear. Enter the website to which you want to restrict access, and then
click OK.
If you clicked OK in the preceding screen, the following screen will appear. To edit an entry, click the pencil icon.
030-300239 Rev. A
61
March 2008
User Guide
Verizon FiOS Router (Model 9100VM)
13.1.2 Block Internet Services
In the Network Status page, click the Block Internet Services link. The following Access Control screen will
appear. This feature allows you to block specific computers within the local network (or even the entire network)
from accessing certain services on the Internet. For example, one computer can be prohibited from surfing the
Internet, another computer from transferring files using FTP, and the whole network from receiving incoming email.
To configure Access Control, click the New Entry link.
If you clicked New Entry, the following screen will appear. Enter the desired values in this screen, and then click
OK to save the settings.
030-300239 Rev. A
62
March 2008
User Guide
Verizon FiOS Router (Model 9100VM)
13.1.2.1 Selecting an Address
From the Address drop-down list, select the desired computer for which you want to apply access.
After you have selected a computer, the following screen will appear. Proceed to section 13.1.2.2 to select a
protocol.
030-300239 Rev. A
63
March 2008
User Guide
Verizon FiOS Router (Model 9100VM)
13.1.2.2 Selecting a Protocol
From the Protocols drop-down list, select the desired option that you want to prohibit the computer from using. To
reply an html page to the blocked client, click the check box (a check mark will appear in the box). To disable this
feature click to clear the check box.
After you have selected the protocol, the following screen will appear. Proceed to section 13.1.2.3 to configure a
schedule rule.
030-300239 Rev. A
64
March 2008
User Guide
Verizon FiOS Router (Model 9100VM)
13.1.2.3 Configuring a Schedule Rule
Select the desired schedule from the Schedule drop-down list.
For example, if you selected User Defined from the Schedule drop-down list, the following screen will appear.
Click the desired Rule Activity Settings option button, and then select the New Time Segment Entry link.
030-300239 Rev. A
65
March 2008
User Guide
Verizon FiOS Router (Model 9100VM)
If you clicked New Time Segment Entry, the following screen will appear. Click the New Hours Range Entry
link.
If you clicked New Hours Range Entry, the following screen will appear. Enter the desired start time and end time
values in the fields provided, and then click OK to continue.
030-300239 Rev. A
66
March 2008
User Guide
Verizon FiOS Router (Model 9100VM)
If you clicked OK the following screen will appear. Next, select the desired Days of Week values and click OK.
After you have set up the Hours Range and Days of Week values and clicked OK, the following screen will appear.
If desired, you can enter a name for this schedule rule in the Name field. This screen shows that rules have been
added to the Time Segments table. To add additional schedule rules to your Router, repeat the preceding
instructions. Click OK to continue.
030-300239 Rev. A
67
March 2008
User Guide
Verizon FiOS Router (Model 9100VM)
13.1.2.4 Completing the Access Control Rule Configuration
If you clicked OK in the preceding Edit Scheduler Rule screen, the following screen will appear. Click OK to save
the settings.
If you clicked OK, the following screen will appear. The Router is attempting to resolve the configuration. Click
Resolve Now to continue.
030-300239 Rev. A
68
March 2008
User Guide
Verizon FiOS Router (Model 9100VM)
If you clicked Resolve Now, the following screen will appear. The rule has been added to the list of security rules.
To disable the security rule for an entry, click the adjacent check box, and then click Apply. To add additional
access control rules, click the New Entry link.
030-300239 Rev. A
69
March 2008
User Guide
Verizon FiOS Router (Model 9100VM)
13.1.3 Access Shared Files
In the Network Status page, click the Access Shared Files link to access files from a device on your local network.
(The device from which you will access files must have file sharing enabled.) If the device has a firewall turned on,
you will not be able to access shared files from the device.
030-300239 Rev. A
70
March 2008
User Guide
Verizon FiOS Router (Model 9100VM)
13.1.4 View Device Details
In the Network Status page, click the View Device Details link. The following screen will appear. Click Refresh to
refresh the details on this screen. After you have finished viewing this screen, click OK to return to the Network
Status page.
030-300239 Rev. A
71
March 2008
User Guide
Verizon FiOS Router (Model 9100VM)
13.1.5 Enable Application
In the Network Status page, click the Enable Application link to set up applications for your service profile, such
as port forwarding services. This feature enables applications (Games, Webcams, IM & Others) by opening a tunnel
between remote (Internet) computers and a specific device port inside your local area network (LAN). Details on
this screen are discussed later in section 14.3, “Port Forwarding.”
030-300239 Rev. A
72
March 2008
User Guide
Verizon FiOS Router (Model 9100VM)
13.1.6 Rename Device
In the Network Status page, click the Rename Device link to rename a device on your network. In the following
screen, type the desired name in the Name field. Next, click OK to allow the changes to take effect. Click Cancel to
return to the Network Status page.
030-300239 Rev. A
73
March 2008
User Guide
Verizon FiOS Router (Model 9100VM)
13.1.7 Delete Device
In the Network Status page, click the Delete Device link to remove a device from your network.
13.2 Network Connections
To edit your connection settings, from the top navigation menu, select My Network. Next, select Network
Connections in the left submenu. The following screen will be displayed. This screen allows you to access your
Router’s connection settings and your local area network (LAN) settings. The following sections discuss the details
of this screen.
030-300239 Rev. A
74
March 2008
User Guide
Verizon FiOS Router (Model 9100VM)
13.2.1 LAN (NAT) Bridge Properties
To view the LAN (NAT) Bridge properties, in the Network Connections screen, click the LAN (NAT) Bridge
link. Then select General in the left submenu. The following screen will appear. This screen displays information
about your LAN connections and allows you to access the hardware Ethernet and Wireless properties. You can also
access the IP Address Distribution settings from this screen by clicking the IP Address Distribution link.
13.2.1.1 LAN (NAT) Hardware Ethernet Switch—General
To view the Hardware Ethernet Switch properties, in the LAN (NAT) Bridge Properties screen, click the LAN
(NAT) Hardware Ethernet Switch link.
030-300239 Rev. A
75
March 2008
User Guide
Verizon FiOS Router (Model 9100VM)
If you clicked LAN (NAT) Hardware Ethernet Switch, the following screen will appear. If you change the
connection name, click Apply. Then, click OK to return to the Network Connections screen.
13.2.1.2 LAN (NAT) Hardware Ethernet Switch Properties—Settings
If you select Settings in the left submenu, the following screen will appear. Enter the desired properties for the
Ethernet switch, and then click Apply to save the settings.
030-300239 Rev. A
76
March 2008
User Guide
Verizon FiOS Router (Model 9100VM)
13.2.1.3 LAN (NAT) Hardware Ethernet Switch Properties—HW Switch
If you select HW Switch in the left submenu. The following screen will appear. Enter the desired settings, and then
click Apply to save the settings.
13.2.1.4 LAN (NAT) Hardware Ethernet Switch Properties—Advanced
If you select Advanced in the left submenu, the following screen will appear. Click the New IP Address link to add
additional IP Address settings.
030-300239 Rev. A
77
March 2008
User Guide
Verizon FiOS Router (Model 9100VM)
If you clicked New IP Address, the following screen will appear. Enter the IP Address and Subnet Mask, and then
click Apply to save the settings.
030-300239 Rev. A
78
March 2008
User Guide
Verizon FiOS Router (Model 9100VM)
13.2.2 LAN (NAT) Wireless 802.11g Access Point
To view the LAN wireless properties, in the LAN (NAT) Bridge Properties screen, click LAN (NAT) Wireless
802.11g Access Point.
13.2.2.1 LAN (NAT) Wireless 802.11g Access Point Properties—General
If you click LAN (NAT) Wireless 802.11g Access Point and then click General in the left submenu, the following
screen will appear. If you change the LAN connection name in this screen, click Apply. Then, click OK to return to
the Network Connections screen.
030-300239 Rev. A
79
March 2008
User Guide
Verizon FiOS Router (Model 9100VM)
13.2.2.2 LAN (NAT) Wireless 802.11g Access Point Properties—Settings
If you click Settings in the left submenu, the following screen will appear. If you change any settings in this screen,
click Apply.
13.2.2.3 LAN (NAT) Wireless 802.11g Access Point Properties—Wireless Status
If you click Wireless Status in the left submenu, the following screen will appear. After viewing this screen, click
Cancel to return to the preceding screen.
030-300239 Rev. A
80
March 2008
User Guide
Verizon FiOS Router (Model 9100VM)
13.2.2.4 LAN (NAT) Wireless 802.11g Access Point Properties—Basic Security Settings
If you click Basic Security Settings in the left submenu, the following screen will appear. Please refer to section
12.2, “Basic Security Settings,” for details on this screen.
030-300239 Rev. A
81
March 2008
User Guide
Verizon FiOS Router (Model 9100VM)
13.2.2.5 LAN (NAT) Wireless 802.11g Access Point Properties—Advanced Security Settings
If you click Advanced Security Settings in the left submenu, the following screen will appear. Please refer to
section 12.3, “Advanced Security Settings,” for details on this screen.
030-300239 Rev. A
82
March 2008
User Guide
Verizon FiOS Router (Model 9100VM)
13.2.2.6 LAN (NAT) Wireless 802.11g Access Point Properties—Advanced
If you click Advanced in the left submenu, the following screen will appear. Click the New IP Address link to
configure additions IP address settings. Then click Apply to save the settings.
030-300239 Rev. A
83
March 2008
User Guide
Verizon FiOS Router (Model 9100VM)
13.2.2.7 LAN (NAT) Bridge Properties—Settings
To configure the settings for the Router’s LAN (NAT) Bridge connections, in the Network Connections screen,
click the LAN (NAT) Bridge link. The following screen will appear. Enter the desired values, and then click Apply
to save the settings.
030-300239 Rev. A
84
March 2008
User Guide
Verizon FiOS Router (Model 9100VM)
13.2.2.8 LAN (NAT) Bridge Properties—Routing
To configure the routing values for the Router’s LAN (NAT) Bridge connections, in the Network Connections
screen, click the LAN (NAT) Bridge link. Then, select Routing in the left submenu. The following screen will
appear. Select the desired setting from the Routing drop-down list.
If you selected Basic from the Routing drop-down list, the following screen will appear. The Router will use basic
routing operations for your LAN IP traffic. Click Apply to save the settings.
If you selected Advanced from the Routing drop-down list, the following screen will appear. Use this screen to
configure advanced routing instructions for IP traffic transmitted across your network. If you change any values in
this screen, click Apply to save the settings. To add a new Route, click the New Route link.
030-300239 Rev. A
85
March 2008
User Guide
Verizon FiOS Router (Model 9100VM)
If you clicked New Route, the following screen will appear. Enter the appropriate values, and then click OK.
If you clicked OK in the preceding screen, the following screen will appear. This screen shows that a Route has
been added. Next, click Apply to save the settings.
030-300239 Rev. A
86
March 2008
User Guide
Verizon FiOS Router (Model 9100VM)
13.2.2.9 LAN (NAT) Bridge Properties—Bridging
To configure the bridging values for the Router’s LAN (NAT) Bridge connections, in the Network Connections
screen, click the LAN (NAT) Bridge link. Then, select Bridging in the left submenu. The following screen will
appear. Enter the desired settings, and then click Apply to save the settings.
030-300239 Rev. A
87
March 2008
User Guide
Verizon FiOS Router (Model 9100VM)
13.2.2.10
LAN (NAT) Bridge Properties – Advanced
To configure advanced settings for the Router’s LAN (NAT) Bridge connections, in the Network Connections
screen, click the LAN (NAT) Bridge link. Then, select Advanced in the left submenu. The following screen will
appear. To add a new IP Address, click the New IP Address link.
If you clicked New IP Addresses, the following screen will appear. Enter the desired values and click Apply.
030-300239 Rev. A
88
March 2008
User Guide
Verizon FiOS Router (Model 9100VM)
13.2.3 WAN VDSL2 Properties
To view the WAN VDSL2 properties, in the following Network Connections screen, click the WAN VDSL2 link.
13.2.3.1 WAN VDSL2 Properties—General
Select General in the left submenu. The following screen will appear. This screen displays information about your
WAN VDSL2 connection. If you make changes to this screen, click Apply to save the settings.
030-300239 Rev. A
89
March 2008
User Guide
Verizon FiOS Router (Model 9100VM)
13.2.3.2 WAN VDSL2 Properties—Settings
To configure the settings for your Router’s WAN VDSL2 connection, in the WAN VDSL2 Properties screen,
select Settings in the left submenu. The following screen will appear. Enter the appropriate values, and then click
Apply to save the settings.
030-300239 Rev. A
90
March 2008
User Guide
Verizon FiOS Router (Model 9100VM)
13.2.3.3 WAN VDSL2 Properties—Routing
To configure the routing for your WAN VDSL2 connection, in the WAN VDSL2 Properties screen, select Routing
in the left submenu. Then, select the desired option from the Routing drop-down list, and then click Apply to save
the settings.
If you select Advanced from the Routing drop-down list, the following screen will appear. Enter the desired values,
and then click Apply to save the settings. To configure a new route, click the New Route link.
030-300239 Rev. A
91
March 2008
User Guide
Verizon FiOS Router (Model 9100VM)
If you clicked New Route, the following screen will appear. Enter the appropriate values in the fields provided, and
then click OK to save the settings.
13.2.3.4 WAN VDSL2 Properties—QOS
To configure the QoS settings for your Router, in the WAN VDSL2 Properties screen, select QoS in the left
submenu. The following screen will appear. Enter the desired values, and then click Apply to save the settings.
030-300239 Rev. A
92
March 2008
User Guide
Verizon FiOS Router (Model 9100VM)
13.2.3.5 WAN VDSL2 Properties—VDSL2
If you select VDSL2 in the left submenu of the WAN VDSL2 Properties screen, the following screen will appear.
View the transceiver information. To refresh this screen so that it displays the most current values, click Refresh.
13.2.3.6 WAN VDSL2 Properties—Advanced
To configure an additional IP address for your Router, in the WAN VDSL2 Properties screen, select Advanced in
the left submenu. The following screen will appear. Click the New IP Address link.
030-300239 Rev. A
93
March 2008
User Guide
Verizon FiOS Router (Model 9100VM)
If you clicked New IP Address, the following screen will appear. Enter the desired values in the fields, and then
click Apply to save the settings.
030-300239 Rev. A
94
March 2008
User Guide
Verizon FiOS Router (Model 9100VM)
13.2.4 WAN PPPoE Properties—Configuring WAN Ethernet
To configure the Router so that it connects to another DSL device via Ethernet, for example connecting to another
VDSL2 device that provides WAN access, you will need to change the WAN interface settings in your Router. To
do this, in the following Network Connections screen, click the WAN PPPoE link.
NOTE: When the Router is configured for this setting, the Router’s transceiver will be disabled. And the WAN
Ethernet port on the rear of the Router will be used to connect to another VDSL2 device.
13.2.4.1 WAN PPPoE Properties—General
If you clicked WAN PPPoE, the following screen will appear. Next, select Settings in the left submenu.
030-300239 Rev. A
95
March 2008
User Guide
Verizon FiOS Router (Model 9100VM)
13.2.4.2 WAN PPPoE Properties—Settings
If you selected Settings in the left submenu, the following screen will appear. This screen allows you to select the
Router’s WAN Ethernet port on the rear of the Router for connection to another VDSL2 device, through which you
will connect to the Internet. Click the link labeled Underlying Connection.
If you clicked Underlying Connections, the following screen will appear. Select Ethernet from the WAN Interface
drop-down list.
IMPORTANT: When Ethernet is selected as the WAN interface port, the VDSL2 port on the rear of the Router
will not be used. (By factory default, the VDSL2 is the active WAN interface port.)
030-300239 Rev. A
96
March 2008
User Guide
Verizon FiOS Router (Model 9100VM)
If you selected Ethernet, the following screen will be displayed. Enter the appropriate values, and then click Apply
to save the settings.
NOTE: If you are using Ethernet as the WAN interface, be sure to install the Router according to the instructions
provided in section 6.4.3, “Connecting the Router via WAN Ethernet.”
13.2.4.3 WAN PPPoE Properties—Routing
To configure routing for the Router’s WAN VDSL2 connection, in the Network Connections screen, click the
WAN PPPoE link. Then, select Routing in the left submenu. The following screen will appear. Select the desired
setting from the Routing drop-down list. Click Apply to save the settings.
For example, if you selected Basic from the Routing drop-down list, the Router will use basic routing operations for
WAN IP traffic transmitted across your network. Click Apply to save the settings.
030-300239 Rev. A
97
March 2008
User Guide
Verizon FiOS Router (Model 9100VM)
If you selected Advanced from the Routing drop-down list, the following screen will appear. This screen allows
you to configure advanced routing operations for WAN IP traffic transmitted across your network. If you change
any values in this screen, click Apply to save the settings. To add a new Route, click the New Route link.
If you clicked New Route, the following screen will appear. Enter the desired values, and then click OK.
030-300239 Rev. A
98
March 2008
User Guide
Verizon FiOS Router (Model 9100VM)
If you clicked OK in the preceding screen, the following screen will appear. This screen shows that a Route has
been added to the Routing Table. Next, click Apply to save the settings.
13.2.4.4 WAN PPPoE Properties—PPP
To configure the PPP settings for the Router, in the Network Connections screen, click the WAN PPPoE link.
Then, select PPP in the left submenu. The following screen will appear. Enter the appropriate values in the fields,
and then click Apply to save the settings.
NOTE: The Login User name and Password are provided by Verizon.
030-300239 Rev. A
99
March 2008
User Guide
Verizon FiOS Router (Model 9100VM)
13.2.5 LAN (NAT) Multimedia over COAX (MOCA)
To view the Router’s connection type for COAX (MOCA), in the Network Connections screen, click the LAN
(NAT) Multimedia over COAX (MOCA) link.
13.2.5.1 LAN (NAT) Multimedia over COAX (MOCA) Properties—General
Next, select General in the left submenu. The following screen will appear. If you change any values in this screen,
click Apply to save the settings.
030-300239 Rev. A
100
March 2008
User Guide
Verizon FiOS Router (Model 9100VM)
13.2.5.2 LAN (NAT) Multimedia over COAX (MOCA) Properties—Settings
To configure the Router’s MOCA connection settings, in the LAN (NAT) Multimedia over COAX (MOCA)
Properties screen, select Settings in the left submenu. Enter the desired values in this screen, and then click Apply
to save the settings.
13.2.5.3 LAN (NAT) Multimedia over COAX (MOCA) Properties—MOCA
To configure MOCA settings for the Router, in the LAN (NAT) Multimedia over COAX (MOCA) Properties
screen, select MOCA in the left submenu. Next, enter the desired values in this screen, and then click Apply to save
the settings.
030-300239 Rev. A
101
March 2008
User Guide
Verizon FiOS Router (Model 9100VM)
If you clicked the View LAN MoCA Node Detailed Stats, the following screen will appear. After viewing this
screen, click Close to return to the preceding screen. To refresh this screen, click the Refresh button.
030-300239 Rev. A
102
March 2008
User Guide
Verizon FiOS Router (Model 9100VM)
13.2.6 New Connection
To create a new network connection, in the Network Connections screen, click the New Connection link.
If you clicked New Connection, the following screen will appear. Choose the type of network connection you want
to use based on your network configuration and networking needs. Then click Next to continue.
NOTE: The network connection types available to you are determined by Verizon. The Router’s default network
connection type is Internet Connection.
030-300239 Rev. A
103
March 2008
User Guide
Verizon FiOS Router (Model 9100VM)
For example, if you click Advanced Connection in the Connection Wizard screen and then click Next, the
following screen will appear. Click the desired connection type, and then click Next to continue.
030-300239 Rev. A
104
March 2008
User Guide
Verizon FiOS Router (Model 9100VM)
If you clicked Next, the following screen will appear. Choose an underlying device for your connection. Then, click
Next to continue.
For example, if you selected WAN VDSL2, the following screen will appear. Enter your Login User Name and
Login Password in the fields provided.
NOTE: The Login User Name and Login Password values are provided by Verizon.
030-300239 Rev. A
105
March 2008
User Guide
Verizon FiOS Router (Model 9100VM)
After you have entered your user name and password, click Next to continue.
If you clicked Next, the following screen will appear. You have successfully completed the steps needed to create
the following connection. Press Finish, and then wait a brief moment for the connection to be established.
030-300239 Rev. A
106
March 2008
User Guide
Verizon FiOS Router (Model 9100VM)
13.2.7 Quick Setup
To quickly set up your network connection and wireless settings, in the Network Connections screen, click the
Quick Setup button.
If you clicked Quick Setup, the following screen will appear. After you have finished configuring the settings in
this screen, click Apply to save the settings.
030-300239 Rev. A
107
March 2008
User Guide
Verizon FiOS Router (Model 9100VM)
13.2.8 Status
To view the status of the Router’s connections, in the Network Connections screen, click the Status button. The
following screen will appear. This screen displays connection information for devices connected to your Router. At
this screen, do any the following:
•
Turn off Automatic Refresh by clicking the Automatic Refresh Off button. When Automatic Refresh is
enabled, the screen will be updated automatically to display the most current statistics.
•
Manually refresh this screen by clicking the Refresh button.
•
Click the links in this screen to access the Router’s connection settings.
•
Click Close to return to the Network Connections screen.
verizonfios
030-300239 Rev. A
108
March 2008
User Guide
Verizon FiOS Router (Model 9100VM)
13.2.9 Advanced
To view additional connection settings, in the Network Connections screen, click the Advanced button.
If you clicked Advanced in the preceding screen, the following screen will appear. Use the links in this screen to
access the Router’s connection settings.
030-300239 Rev. A
109
March 2008
User Guide
Verizon FiOS Router (Model 9100VM)
14. FIREWALL SETTINGS
If you click Wireless in the top navigation menu, the following screen will appear. Click Yes to proceed.
14.1 General Firewall Security Settings
This section explains how to configure your Router’s firewall security features. The Router’s firewall security
settings allow you to reduce the risk of unauthorized access to your network by prohibiting certain types of inbound
and outbound network traffic and by allowing you to configure specific firewall rules.
IMPORTANT: If you need help, click Main in the top navigation menu to go to the home page. In the Quick
Links section of the home page, click Verizon Help. Clicking this link takes you to Verizon’s Online Help site,
where you can access additional information about your VDSL2 Router.
To change your firewall security level, click the option button next to the desired security setting. Next, click Apply
to allow the changes to take effect.
030-300239 Rev. A
110
March 2008
User Guide
Verizon FiOS Router (Model 9100VM)
Maximum Security
(High)
Typical Security
(Medium)
Minimum Security
(Low)
Block IP Fragments
General Firewall Settings
High security level only allows basic Internet functionality. Only Mail, News, Web,
FTP, and IPSEC are allowed. All other traffic is prohibited.
Like High security, Medium security only allows basic Internet functionality by
default. However, Medium security allows customization through NAT configuration
so that you can enable the traffic that you want to pass. This is the factory default
security level.
Low security setting will allow all traffic except for known attacks. With Low
security, your Router is visible to other computers on the Internet.
Select this check box to allow the Router to block IP fragments. Blocking fragments
can prevent hackers from using fragmented data packets to sabotage your network.
Note. Some VPN and UDP services use IP fragments, and this feature may need to be
disabled. If you have questions about this feature, check with Verizon.
14.2 Access Control
If you select Firewall Settings in the top navigation menu and then select Access Control in the left submenu, the
following screen will appear. This feature allows you to block specific computers within the local network (or even
the entire network) from accessing certain services on the Internet. For example, one computer can be prohibited
from surfing the Internet, another computer from transferring files using FTP, and the whole network from receiving
incoming email. To configure Access Control, click the New Entry link.
030-300239 Rev. A
111
March 2008
User Guide
Verizon FiOS Router (Model 9100VM)
If you clicked New Entry, the following screen will appear. Enter the desired values in this screen, and then click
OK to save the settings.
030-300239 Rev. A
112
March 2008
User Guide
Verizon FiOS Router (Model 9100VM)
14.2.1 Selecting an Address
From the Address drop-down list, select the desired computer to which you want this rule applied.
After you have selected a computer, the following screen will appear. Proceed to section 14.2.2 to select a protocol.
030-300239 Rev. A
113
March 2008
User Guide
Verizon FiOS Router (Model 9100VM)
14.2.2 Selecting a Protocol
From the Protocols drop-down list, select the desired option that you want to prohibit the computer from using. To
reply an html page to the blocked client, click the check box (a check mark will appear in the box). To disable this
feature, click to clear the check box.
After you have selected the protocol, the following screen will appear. Proceed to section 14.2.3 to configure a
schedule rule.
030-300239 Rev. A
114
March 2008
User Guide
Verizon FiOS Router (Model 9100VM)
14.2.3 Configuring a Schedule Rule
Select the desired schedule from the Schedule drop-down list.
For example, if you select User Defined from the Schedule drop-down list, the following screen will appear. Click
the desired Rule Activity Settings option button, and then select the New Time Segment Entry link.
030-300239 Rev. A
115
March 2008
User Guide
Verizon FiOS Router (Model 9100VM)
If you clicked New Time Segment Entry, the following screen will appear. Click the New Hours Range Entry
link.
The following screen will appear. Enter the desired start time and end time values in the fields provided, and then
click OK to continue.
030-300239 Rev. A
116
March 2008
User Guide
Verizon FiOS Router (Model 9100VM)
If you clicked OK the following screen will appear. Next, select the desired Days of Week values and click OK.
After you have entered the desired values and clicked OK, the following screen will appear. If desired, you can
enter a name for this schedule rule in the Name field. For example, this screen shows that rules have been added to
the Time Segments table. To add additional schedule rules to your Router, repeat the preceding instructions. Click
OK to continue.
030-300239 Rev. A
117
March 2008
User Guide
Verizon FiOS Router (Model 9100VM)
14.2.4 Completing the Access Control Rule Configuration
If you clicked OK in the preceding Edit Scheduler Rule screen, the following screen will appear. Click OK to save
the settings.
If you clicked OK, the following screen will appear. The Router is attempting to resolve the configuration. Click
Resolve Now to continue.
030-300239 Rev. A
118
March 2008
User Guide
Verizon FiOS Router (Model 9100VM)
If you clicked Resolve Now, the following screen will appear. The rule has been added to the list of security rules.
To disable the security rule for an entry, click the adjacent check box, and then click Apply. To add additional
access control rules, click the New Entry link.
030-300239 Rev. A
119
March 2008
User Guide
Verizon FiOS Router (Model 9100VM)
14.3 Port Forwarding
If you select Firewall Settings in the top navigation menu and then select Port Forwarding in the left submenu, the
following screen will appear.
By default the Router blocks all external users from connecting to your network. However, you can configure
specific applications on your network to be accessible from the Internet. Port Forwarding allows the Router to
enable applications (Games, Webcams, IM & Others) by opening a tunnel between remote (Internet) computers and
a specific device port inside your local area network (LAN). Services on the LAN will be exposed to external
Internet users.
030-300239 Rev. A
120
March 2008
User Guide
Verizon FiOS Router (Model 9100VM)
14.3.1 Setting Up a User Defined Port Forwarding Rule
To set up a user-defined port forwarding rule, in the Security screen, click the New Entry link.
If you clicked New Entry, the following screen will appear. In the Local Host field, enter a local host name or IP
address of the computer providing the service. If you will use a public IP address, click the check box next to
Specify Public IP Address.
NOTE: Only one computer can be assigned to provide a specific service or application. If you use public IP
addresses in your Router’s configuration, you must first obtain them from Verizon.
030-300239 Rev. A
121
March 2008
User Guide
Verizon FiOS Router (Model 9100VM)
Next, from the Protocol drop-down list, select User Defined.
If you selected User Defined, the following screen will appear. Click the New Server Ports link.
NOTE: At least one server port entry must be defined before you can enter a service name.
030-300239 Rev. A
122
March 2008
User Guide
Verizon FiOS Router (Model 9100VM)
If you clicked the New Server Ports link, the following screen will appear.
Next, select the desired protocol from the Protocol drop-down list.
030-300239 Rev. A
123
March 2008
User Guide
Verizon FiOS Router (Model 9100VM)
For example, if you selected TCP, from the drop-down list, the following screen will appear. Select the desired
source and destination port settings from the drop-down lists.
To set up a range of ports, select “Range” from the Source Ports and Destination Ports drop-down lists.
Next, enter the desired port range values in the fields provided, and then click OK to continue.
030-300239 Rev. A
124
March 2008
User Guide
Verizon FiOS Router (Model 9100VM)
If clicked OK in the preceding screen, the following screen will appear. Next, enter the desired service name in the
Service Name field, and then click OK to save the settings.
If you clicked OK, the following screen will appear. Next, specify a local host for which you to assign this userdefined port forwarding rule. To assign the rule to a public IP address, click the Specify Public IP Address check
box.
NOTE: Only one computer can be assigned to provide a specific service or application. If you use public IP
addresses in your Router’s configuration, you must first obtain them from Verizon.
030-300239 Rev. A
125
March 2008
User Guide
Verizon FiOS Router (Model 9100VM)
At the Add Port Forwarding Rule screen you can enter the name of a local host or click the Specify Public IP
Address check box to indicate the host or IP Address to which the port forwarding rule will be assigned.
If you clicked the Specify Public IP Address check box, the following screen will appear. Enter the appropriate IP
address in the fields provided.
030-300239 Rev. A
126
March 2008
User Guide
Verizon FiOS Router (Model 9100VM)
From the Forward to Port drop-down list, select the desired option to indicate the port to which traffic will be
forwarded.
For example, if you selected Specify from the Forward to Port drop-down list, the following screen will appear.
Next, enter the desired port value in the adjacent field, and then click OK to continue.
030-300239 Rev. A
127
March 2008
User Guide
Verizon FiOS Router (Model 9100VM)
After you have entered a local host, specified a port, and clicked OK in the preceding screen, the following screen
will appear. The user-defined rule has been added to the port forwarding table, and the status is Active. You may
need to click Resolve Now while the Router is attempting to save the rule to the local host.
If you want to disable a rule, clear the check box next to the host name or IP address. Then click Apply to save the
setting.
030-300239 Rev. A
128
March 2008
User Guide
Verizon FiOS Router (Model 9100VM)
14.3.2 Configuring a Schedule Rule
To set up a schedule rule, in the Add Port Forwarding Rule screen, select User Defined from the Schedule dropdown list.
The following screen will appear. Select the desired rule activity option:
•
Rule will be active at the scheduled time.
•
Rule will be inactive at the scheduled time.
Next, click the New Time Segment Entry link to schedule a time parameter.
030-300239 Rev. A
129
March 2008
User Guide
Verizon FiOS Router (Model 9100VM)
If you clicked New Time Segment Entry, the following screen will appear. Click the New Hours Range Entry
link.
If you clicked New Hours Range Entry, the following screen will appear. Enter the desired start and end time
values in the fields provided, and then click OK to continue.
030-300239 Rev. A
130
March 2008
User Guide
Verizon FiOS Router (Model 9100VM)
If you clicked OK the following screen will appear. Next, select the desired Days of Week, and then click OK.
If you have set up the Hours Range and Days of Week values and clicked OK, the following screen will appear.
This screen shows that a rule has been added to the Time Segments table. Repeat this process to add additional
schedule rules to your Router. Next, click OK to continue.
030-300239 Rev. A
131
March 2008
User Guide
Verizon FiOS Router (Model 9100VM)
If you clicked OK, the following screen will appear. Enter the domain name in the local Host field or click the check
box to specify a public IP address. Then, click OK to continue.
If you clicked OK, the following screen will appear. Click Apply to save the settings.
030-300239 Rev. A
132
March 2008
User Guide
Verizon FiOS Router (Model 9100VM)
14.3.3 Setting Up a Predefined Port Forwarding Rule
To set up a predefined port forwarding rule, at the Security screen, click the New Entry link.
If you clicked New Entry, the following screen will appear. In the Local Host field, enter a local host name or IP
address of the computer providing the service. If you will use a public IP address, click the check box next to
Specify Public IP Address.
NOTE: Only one computer can be assigned to provide a specific service or application. If you use public IP
addresses in your Router’s configuration, you must first obtain them from Verizon.
030-300239 Rev. A
133
March 2008
User Guide
Verizon FiOS Router (Model 9100VM)
Next, select a predefined service from the Protocol drop-down list.
NOTE: For your convenience, Router provides predefined protocols for applications, games, and VPN-specific
programs.
The screen below displays the protocols of basic services provided in the Router. If you select Show All Services
from the Protocol drop-down list, all available services will be displayed in the drop-down list.
030-300239 Rev. A
134
March 2008
User Guide
Verizon FiOS Router (Model 9100VM)
Select a predefined service from the protocol drop-down list.
After you have selected a predefined service, the following screen will appear. Next select an option from the
Forward to Port drop-down list to indicate the port to which traffic will be forwarded.
030-300239 Rev. A
135
March 2008
User Guide
Verizon FiOS Router (Model 9100VM)
If you selected Same as Incoming Port from the Forward to Port drop-down list, the following screen will appear.
Click OK to continue.
Next, set up a schedule using the instructions explained in section 14.3.2, “Configuring a Schedule.” After you have
set up a schedule, enter the address of the local Host, and then click OK to save the settings.
030-300239 Rev. A
136
March 2008
User Guide
Verizon FiOS Router (Model 9100VM)
If you clicked OK the following screen will appear. The predefined port forwarding rule has been assigned.
14.4 DMZ Host
If you select Firewall Settings in the top navigation menu and then select DMZ Host in the left submenu, the
following screen will appear. The DMZ (Demilitarized) Host feature allows the user to forward unsolicited inbound
WAN traffic to any single IP on the LAN. One computer on your LAN will be fully exposed to the Internet. The
designated computer will be connected to your network without regard to firewall security or restrictions. Use this
feature in cases where you want to use Internet services that are not available in the Port Forwarding list, such as
Web games or video-conferencing.
WARNING: The computer that is configured as a DMZ Host will not have security or firewall protection.
To configure a computer for DMZ Host, click the DMZ Host IP Address check box, and then enter the IP Address
of the computer that you want to be accessible from the Internet. Click Apply to save the settings.
To disable DMZ Host (if previously enabled), click to clear the check box. Then click Apply to save the settings.
030-300239 Rev. A
137
March 2008
User Guide
Verizon FiOS Router (Model 9100VM)
14.5 Port Triggering
If you select Firewall Settings in the top navigation menu and then select Port Triggering in the left submenu, the
following screen will appear. You can define port triggering rules to dynamically open the firewall for specific
protocols or ports. The specified ports will be opened for incoming traffic. Port triggering can be used for dynamic
port forwarding configuration. By setting port triggering rules, you can allow inbound traffic to arrive at a specific
LAN host, using ports different than those used for the outbound traffic. This is called port triggering because the
outbound traffic triggers the ports to which inbound traffic is directed.
030-300239 Rev. A
138
March 2008
User Guide
Verizon FiOS Router (Model 9100VM)
14.5.1 Setting Up a User Defined Port Triggering Rule
To set up a user-defined port triggering rule, in the Add drop-down list, select User Defined.
14.5.1.1 Configuring Outgoing Trigger Ports
If you selected User Defined in the preceding screen, the following screen will appear. Enter the desired name in the
Service Name field. Next, click the New Trigger Ports link to configure outgoing trigger ports.
030-300239 Rev. A
139
March 2008
User Guide
Verizon FiOS Router (Model 9100VM)
If you clicked New Trigger Ports, the following screen will appear. Select the desired protocol from the Protocol
drop-down list.
For example, if you selected TCP from the Protocol drop-down list, the following screen will appear. Select the
desired source and destination settings from the drop-down lists.
030-300239 Rev. A
140
March 2008
User Guide
Verizon FiOS Router (Model 9100VM)
For example, if you selected Single, the following screen will appear. Enter the desired source port and destination
port values, and then click OK to save the settings.
If you entered source and destination port values clicked OK in the preceding screen, the following screen will
appear. If you desire to configure incoming trigger port, proceed to section 14.5.1.2. Otherwise, click OK to
continue.
030-300239 Rev. A
141
March 2008
User Guide
Verizon FiOS Router (Model 9100VM)
If you clicked OK, the following screen will appear. Click Apply to save the settings. If you want to edit a rule,
click the pencil icon next to the rule that you want to edit. To delete a rule, click the “X” icon next to the rule that
you want to delete.
14.5.1.2 Configuring Incoming Trigger Ports
To configure incoming trigger ports, in the Edit Port Triggering Rule screen, click the New Opened Ports link.
030-300239 Rev. A
142
March 2008
User Guide
Verizon FiOS Router (Model 9100VM)
If you clicked New Opened Ports, the following screen will appear. Select a protocol from the Protocol drop-down
list.
For example, if you select UDP, the following screen will appear. Select the desired source port and destination port
settings from the drop-down lists.
030-300239 Rev. A
143
March 2008
User Guide
Verizon FiOS Router (Model 9100VM)
Next, enter the desired source and destination port values in the fields provided, and click OK to continue.
If you clicked OK, the following screen will appear. Click OK to continue.
030-300239 Rev. A
144
March 2008
User Guide
Verizon FiOS Router (Model 9100VM)
If you clicked OK, the following screen will appear. This screen shows that the triggering rule has been added to the
list of triggering services. Click Apply to save the settings. If you want to edit a rule, click the pencil icon next to the
rule that you want to edit. To delete a rule, click the “X” icon next to the rule that you want to delete.
030-300239 Rev. A
145
March 2008
User Guide
Verizon FiOS Router (Model 9100VM)
14.5.2 Setting Up a Predefined Port Triggering Rule
To set up a predefined port triggering rule, in the Add drop-down list, select a predefined service.
After you have selected a service, the following screen will appear. The service that you selected will be displayed.
Click Apply to save the settings.
030-300239 Rev. A
146
March 2008
User Guide
Verizon FiOS Router (Model 9100VM)
14.6 Remote Admin
If you select Firewall Settings in the top navigation menu and then select Remote Administration in the left
submenu, the following screen will appear.
It is possible to access and control your Router not only from within the home network, but also from the Internet.
This allows you to view or change settings while traveling. It also enables you to allow your service provider to
change settings or help you troubleshoot functionality or communication issues from a remote location. Remote
access to your Router is blocked by default to ensure the security of your network. However, your Router supports
the following services, and you can use the Remote Administration screen to selectively enable these services if they
are needed.
WARNING: With Remote Administration enabled, your network will be at risk from outside attacks.
To configure Remote Administration, enter the appropriate settings, and then click Apply to save the settings.
030-300239 Rev. A
147
March 2008
User Guide
Verizon FiOS Router (Model 9100VM)
14.7 Static NAT
If you select Firewall Settings in the top navigation menu and then select Static NAT in the left submenu, the
following screen will appear.
NOTE: A block of static IP addresses must be purchased from Verizon to configure this feature.
Static NAT allows LAN devices to use public IP addresses (different from the Router’s public IP address). The LAN
devices are still configured with private IP addresses (either statically or dynamically through DHCP). Traffic
between the LAN devices and the Internet is still NAT’ed, but the Static NAT mappings allow packets from specific
devices to use a distinct public IP address; and packets sent to different public IP addresses to be forwarded to
specific devices.
With Static NAT, devices that are behind the firewall and that are configured with private IP addresses appear to
have public IP addresses on the Internet. This allows an internal host, such as a Web server, to have an unregistered
(private) IP address and still be reachable over the Internet.
To configure Static NAT, click the New IP Address link.
030-300239 Rev. A
148
March 2008
User Guide
Verizon FiOS Router (Model 9100VM)
If you clicked New IP Address, the following screen will appear. Next, from the Network Object Type drop-down
list, select the desired object type.
For example, if you select IP Address, the following screen will appear. Enter the appropriate IP address, and then
click OK to continue.
030-300239 Rev. A
149
March 2008
User Guide
Verizon FiOS Router (Model 9100VM)
If you clicked OK, the following screen will appear. To add a rule to this IP address, click the New Entry link.
If you clicked New Entry, the following screen will appear. Select the desired values for your NAT/NAPT rule, and
then click OK to continue.
030-300239 Rev. A
150
March 2008
User Guide
Verizon FiOS Router (Model 9100VM)
After you select the desired NAT/NAPT rules, click OK to continue.
030-300239 Rev. A
151
March 2008
User Guide
Verizon FiOS Router (Model 9100VM)
If you clicked OK, the following screen will appear. This screen displays the active rules for the designated address.
030-300239 Rev. A
152
March 2008
User Guide
Verizon FiOS Router (Model 9100VM)
14.8 Advanced Filtering
If you select Firewall Settings in the top navigation menu and then select Advanced Filtering in the left submenu,
the following screen will appear.
Advanced filtering is designed to allow comprehensive control over the firewall's behavior. You can define specific
input and output rules, control the order of logically similar sets of rules and make a distinction between rules that
apply to WAN and LAN devices.
This screen is divided into two sections, one for Input Rule Sets and the other for Output Rule Sets, which are for
configuring inbound and outbound traffic, respectively. Each section comprises subsets, which can be grouped into
three main subjects:
•
Initial rules - rules defined here will be applied first, on all gateway devices.
•
LAN/WAN rules - rules can be defined per each device.
•
Final rules - rules defined here will be applied last, on all gateway devices.
To add rules to Input or Output rules sets, click the adjacent New Entry link.
030-300239 Rev. A
153
March 2008
User Guide
Verizon FiOS Router (Model 9100VM)
For example, if you clicked the New Entry link for input LAN (NAT) Bridge Rules, the following screen will
appear.
Select one of the following operation settings:
•
Select Drop to drop packets.
•
Select Reject to drop packets, and to send TCP Reset or ICMP Host Unreachable packets to the sender.
•
Select Accept Connection to accept all packets related to this session.
•
Select Accept Packet to accept packets matching this rule only. Do not use Stateful Packet Inspection
(SPI) to automatically accept packets related to this session.
After you have entered the desired values, click OK to continue.
030-300239 Rev. A
154
March 2008
User Guide
Verizon FiOS Router (Model 9100VM)
If you clicked OK, the following screen will appear. The rule is now active.
030-300239 Rev. A
155
March 2008
User Guide
Verizon FiOS Router (Model 9100VM)
14.9 Security Log
If you select Firewall Settings in the top navigation menu and then select Security Log in the left submenu, the
following screen will appear.
This screen alerts you of noteworthy information sent to Router from the Internet. The screen can contain 1000
entries, but a maximum of 50 entries are displayed at a time. Once 1000 entries have been logged, the oldest entry is
removed to make space for the new entries as they occur. In this screen, do any of the following:
•
Click Close to close the security log screen.
•
Click Clear Log to remove all entries from the log.
•
Click Save to save the settings to a syslog server.
•
Click Settings to configure the security settings. Clicking this button opens a new window that contains
configuration options for selecting the information that you want logged.
•
Click Refresh to refresh the security log screen.
To configure the security log settings, click the Settings button.
030-300239 Rev. A
156
March 2008
User Guide
Verizon FiOS Router (Model 9100VM)
If you clicked Settings, the following screen will appear. Select the desired settings by clicking the check boxes.
Then, click Apply to save the settings.
030-300239 Rev. A
157
March 2008
User Guide
Verizon FiOS Router (Model 9100VM)
14.10 Connections
If you select Firewall Settings in the top navigation menu and then select Connections in the left submenu, the
following screen will appear.
The connections list displays all the connections that are currently open on the firewall, as well as various details
and statistics. You can use this list to close undesired connections by clicking the “X” icon. The basic display
includes the protocol type, the different ports it uses, and the direction of the secured traffic. To display a detailed
list, click the Advanced button.
030-300239 Rev. A
158
March 2008
User Guide
Verizon FiOS Router (Model 9100VM)
If you clicked Advanced, the following screen will appear. To close a connection, click the adjacent “X” icon.
030-300239 Rev. A
159
March 2008
User Guide
Verizon FiOS Router (Model 9100VM)
15. PARENTAL CONTROLS
If you select Parental Controls in the top navigation menu and then select Website Restrictions in the left
submenu, the following screen will appear. This feature allows you to block LAN access to certain hosts on the
Internet or to certain Web sites. To configure a website restriction, click the New Entry link.
If you clicked New Entry, the following screen will appear. In the Restricted Website field, enter the desired
website to which you want to restrict access. You can enter a valid IP address or domain name. Next, select a host
from the Local Host drop-down list.
030-300239 Rev. A
160
March 2008
User Guide
Verizon FiOS Router (Model 9100VM)
After you have selected a local host, the following screen will appear. Click OK to continue. To add a user-defined
host to your list of restricted access, click User Defined in the Add drop-down list.
If you selected User Defined, the following screen will appear. Click the New Entry link.
030-300239 Rev. A
161
March 2008
User Guide
Verizon FiOS Router (Model 9100VM)
If you clicked New Entry, the following screen will appear. Select the desired object type from the Network
Object Type drop-down list.
NOTE: You can select any option from the Network Object Type drop-down list, and then configure the screen
accordingly.
For example, if you selected IP Address, the following screen will appear. Enter the desired IP address in the field
provided, and then click OK to continue.
030-300239 Rev. A
162
March 2008
User Guide
Verizon FiOS Router (Model 9100VM)
If you clicked OK, the following screen will appear. Enter the desired description in the Network Object
Description field, and then click OK to continue.
Next, select the desired schedule from the Schedule drop-down list, and then click OK to continue.
030-300239 Rev. A
163
March 2008
User Guide
Verizon FiOS Router (Model 9100VM)
For example, if you selected Always, and then clicked OK in the preceding screen, the following screen will appear.
This screen shows the IP address with an active website restriction. In this example, the PC that has IP address
“192.168.1.4” will be prohibited from accessing the specified Web site.
NOTE: If the Status field displays Resolving, this means that the Router is attempting to locate the restricted Web
site. Click Resolve Now; the restricted Web site will be resolved into the IP address that you have specified, and the
Status field will display Active.
To disable the website restriction, click to clear the check box adjacent to the IP address. Then, click Apply to allow
the settings to take effect. When the restriction status displays Disabled, the computer will have permission to
access the Web site.
030-300239 Rev. A
164
March 2008
User Guide
Verizon FiOS Router (Model 9100VM)
16. ADVANCED
If you select Advanced in the top navigation menu, the following screen will appear. Click Yes, to proceed.
Clicking the links in the Advanced screen allows you to access various configurable settings in your Router.
030-300239 Rev. A
165
March 2008
User Guide
Verizon FiOS Router (Model 9100VM)
16.1 Diagnostics
If you click the Diagnostics link in the Advanced screen, the following screen will appear. Using this screen, you
can run the following diagnostics tests:
•
To run a PING test, type the appropriate IP address or host name in the field provided, and then click Go.
•
To run a Traceroute test, type the appropriate IP address or host name in the field provided, and then click Go.
030-300239 Rev. A
166
March 2008
User Guide
Verizon FiOS Router (Model 9100VM)
For example, if you enter a host name in the Destination field and then click Go, the following screen will appear.
This screen shows that the Ping test succeeded. Click Close to return to the Advanced screen.
030-300239 Rev. A
167
March 2008
User Guide
Verizon FiOS Router (Model 9100VM)
16.2 Restore Defaults
If you click the Restore Defaults link in the Advanced screen, the following screen will appear. Click OK to allow
the Router to be reset to factory default settings. After the Router has rebooted, you will need to log in to the Router.
IMPORTANT: If you click OK, any settings that you have configured in the Router will be erased, and any data
that the Router has reported will be lost.
030-300239 Rev. A
168
March 2008
User Guide
Verizon FiOS Router (Model 9100VM)
16.3 Reboot
If you click the Reboot link in the Advanced screen, the following screen will appear. Rebooting the Router allows
the Router to be restarted. Click OK to allow the Router to reboot.
IMPORTANT: The Reboot feature does not reset the Router to factory default settings. If you want to reset the
Router to factory default settings, follow the instructions in section 16.2, “Restore Defaults.”
If you clicked OK, the following screen will appear. Please wait a brief moment while the Router is rebooting.
Afterwards, you will need to log in to the Router.
030-300239 Rev. A
169
March 2008
User Guide
Verizon FiOS Router (Model 9100VM)
16.4 MAC Cloning
If you click the MAC Cloning link in the Advanced screen, the following screen will appear. A Media Access
Control (MAC) address is a hexadecimal code that identifies a device on a network, such as a modem. All networking
devices have a MAC address, and in some cases, your service provider may need you to provide the MAC address of
your network device. If you use MAC Cloning, you can simply enter the MAC address of the “old” Router into your
Verizon FiOS Router, bypassing the need to contact the service provider with “new” MAC Address values (from the
Verizon FiOS Router).
To configure MAC Cloning, enter the MAC Address of the Router you are replacing. Then, click Apply to save the
settings.
NOTE: By default, this screen displays the MAC address of the Verizon FiOS Router. Replace these values with
the MAC address of your “old” Router and click Apply.
030-300239 Rev. A
170
March 2008
User Guide
Verizon FiOS Router (Model 9100VM)
16.5 ARP Table
If you click the ARP Table link in the Advanced screen, the following screen will appear. This screen allows you to
set up static DHCP connections using Host Names, IP Addresses, or MAC addresses. To configure a static DHCP
connection, click the New Static Connection link.
If you clicked New Static Connection, the following screen will appear. Enter the appropriate values in the fields
provided, and then click OK to continue.
NOTE: You can have a total of 253 static LAN devices connected to your Verizon FiOS Router.
030-300239 Rev. A
171
March 2008
User Guide
Verizon FiOS Router (Model 9100VM)
For example, if you enter an IP Address and a MAC address and then click OK, the following screen will appear.
The screen shows that the entry has been added to the list of static DHCP connections. To run a diagnostics test on a
adjacent to the connection you want to test.
DHCP connection, click the diagnostics icon
If you clicked the diagnostics icon, the following screen will appear. Review the status of the diagnostics test, and
then click Close to return to the DHCP Connections screen.
030-300239 Rev. A
172
March 2008
User Guide
Verizon FiOS Router (Model 9100VM)
16.6 Users
If you click the Users link in the Advanced screen, the following screen will appear. This feature allows you to
configure user settings in the Router.
16.6.1 Users—Adding a New Administrator
If you click the Administrator link in the Users screen, the following screen will appear. This screen allows you to
set up the desired Administrative values. Enter the appropriate values, and then click OK to save the changes.
NOTE: If the Router is password protected and you are not an authorized user, you will not be allowed to change
and save the values in this screen. (The Router cannot be configured unless the user is logged in.) Contact your
network administrator for further instructions.
030-300239 Rev. A
173
March 2008
User Guide
Verizon FiOS Router (Model 9100VM)
16.6.2 Users—Adding a New User
If you click the New User link, the following screen will appear. This screen allows specific users to have
administrative permissions in the Router.
To configure User Settings, enter the appropriate values, and then click OK to save the changes.
NOTE: The User Name and Password values must be at least 6 characters, and should consist of standard characters
only (ASCII 32-126), excluding the special character space and any of these characters :@"|\/=+<>[]*?,;. Also, user
names containing capital letters are not recommended. It might cause connectivity problems on Windows 98 hosts.
030-300239 Rev. A
174
March 2008
User Guide
Verizon FiOS Router (Model 9100VM)
After you have entered the appropriate values and click OK, the following screen will appear. The user information
has been added to the Router. If desired, repeat the preceding instructions to add additional users to the administrator
permissions list.
030-300239 Rev. A
175
March 2008
User Guide
Verizon FiOS Router (Model 9100VM)
16.6.3 Users—Removing a User
To remove a user from the list, click the “X” icon. The following screen will appear. Click OK to continue.
16.6.4 Groups—Adding a New Group
To add a new group, click the New Group link.
030-300239 Rev. A
176
March 2008
User Guide
Verizon FiOS Router (Model 9100VM)
If you click the New Group, the following screen will appear. Using this screen, you can configure additional groups
in the Router. At this screen, do the following:
1.
Enter a Group Name of your choice.
2.
3.
Enter a description of your choice.
If you want to assign administrative permissions to the group, click the Group Members Administrator
check box; otherwise, leave this box empty.
Click OK to save the settings.
4.
After you have entered the desired values and clicked OK, the following screen will display the group attributes.
Click Close to return to the Advanced screen.
030-300239 Rev. A
177
March 2008
User Guide
Verizon FiOS Router (Model 9100VM)
16.6.5 Groups—Add a User to a Group
To set up new users for a group, click the User link in the Groups section of the screen. The following screen will
appear. Using this screen, you can assign users to a designated group.
At this screen, do the following:
1.
2.
3.
4.
Enter a User name of your choice.
Enter a description of your choice.
If you want to assign administrative permissions to the user, click the Group Members Administrator
check box; otherwise, leave this box empty.
Click OK to save the settings.
After you have entered the desired values and clicked OK, the following screen will display the group attributes.
Click Close to return to the Advanced screen.
030-300239 Rev. A
178
March 2008
User Guide
Verizon FiOS Router (Model 9100VM)
16.7 Quality of Service
This feature allows you to configure Quality of Service parameters in your Router. Network-based applications and
traffic are growing at a high rate, producing an ever-increasing demand for bandwidth and network capacity.
Bandwidth and capacity cannot be expanded infinitely, requiring that bandwidth-demanding services be delivered over
existing infrastructure, without incurring additional expensive investments. The next logical means of ensuring optimal
use of existing resources are Quality of Service (QoS) mechanisms for congestion management and avoidance. Quality
of Service refers to the capability of a network device to provide better service to selected network traffic. This is
achieved by shaping the traffic and processing higher priority traffic before lower priority traffic.
16.7.1 General
If you click the Quality of Service link in the Advanced screen and then click General in the left submenu, the
following screen will appear. This screen allows you to configure general QoS settings. Enter the appropriate settings,
and then click Apply.
NOTE: Choosing a new QoS profile will cause all previous QoS settings to be lost.
030-300239 Rev. A
179
March 2008
User Guide
Verizon FiOS Router (Model 9100VM)
16.7.2 Traffic Priority
If you click the Quality of Service link in the Advanced screen and then click Traffic Priority in the left submenu,
the following screen will appear. This screen allows you to configure QoS to prioritize input and output traffic.
Traffic Priority manages and avoids traffic congestion by defining inbound and outbound priority rules for each
device on the Router. These rules determine the priority that packets, traveling through the device, will receive. QoS
parameters (DSCP marking and packet priority) are set per packet, on an application basis.
QoS can be configured using flexible rules, according to the following parameters:
• Source/destination IP address, MAC address, or host name
• Device
• Source/destination ports
• Limit the rule for specific days and hours
The Router supports two priority marking methods for packet prioritization:
• DSCP
•
802.1p Priority
The matching of packets by rules, also known as Stateful Packet Inspection is connection-based and uses the
Router’s firewall mechanism. Once a packet matches a rule, all subsequent packets with the same attributes receive
the same QoS parameters, both inbound and outbound.
To set up a traffic priority rule, click the adjacent New Entry link for the input/output device you want to configure.
030-300239 Rev. A
180
March 2008
User Guide
Verizon FiOS Router (Model 9100VM)
If you clicked New Entry, the following screen will appear. At this screen, do the following:
1.
Select the desired Source Address, Destination Address, and Protocol options from the drop-down lists.
2.
Click the Device check box if you will apply the settings to a device. By default this box is cleared.
3.
Select the desired option from the Set Priority drop-down list. (Zero is the lowest priority level.)
4.
Click OK to save the settings.
030-300239 Rev. A
181
March 2008
User Guide
Verizon FiOS Router (Model 9100VM)
16.7.3 Traffic Shaping
If you click the Quality of Service link in the Advanced screen and then click Traffic Shaping in the left submenu,
the following screen will appear.
Traffic Shaping is the solution for managing and avoiding congestion where the network meets limited broadband
bandwidth. Typical networks use a 100 Mbps Ethernet LAN with a 100 Mbps WAN interface router. This is where
most bottlenecks occur. A traffic shaper is essentially a regulated queue that accepts uneven and/or bursty flows of
packets and transmits them in a steady, predictable stream so that the network is not overwhelmed with traffic.
While traffic priority allows basic prioritization of packets, traffic shaping provides more sophisticated definitions,
such as:
•
Bandwidth limit for each device
•
Bandwidth limit for classes of rules
•
Prioritization policy
•
TCP serialization on a device
Additionally, QoS traffic shaping rules can be defined for a default device. These rules will be used on a device that
has no definitions of its own. This enables the definition of QoS rules on the default WAN, for example, and their
maintenance even if the PPP or bridge device over the WAN is removed.
The matching of packets by rules is connection-based, known as Stateful Packet Inspection (SPI ), using the
Router’s firewall mechanism. Once a packet matches a rule, all subsequent packets with the same attributes receive
the same QoS parameters, both inbound and outbound. Connection-based QoS also allows inheriting QoS
parameters by some of the applications that open subsequent connections. For instance, QoS rules can be defined on
SIP, and the rules will apply to both control and data ports (even if the data ports are unknown). Applications that
support such inheritance have an ALG in the firewall.
To add a traffic shaping rule, click the New Entry link.
030-300239 Rev. A
182
March 2008
User Guide
Verizon FiOS Router (Model 9100VM)
If you clicked New Entry, the following screen will appear. Select a device from the Device drop-down list. Then,
click OK to continue.
After you have selected a device and clicked OK in the preceding screen, the following screen will appear. Enter the
bandwidth values for transmit (Tx) and receive (Rx), and then select the desired option from the TCP Serialization
drop-down list. Next, click the desired New Entry link to add a class.
030-300239 Rev. A
183
March 2008
User Guide
Verizon FiOS Router (Model 9100VM)
For example, if you clicked New Entry in the receive (Rx) section, the following screen will appear. Enter the
desired name and then click OK to continue.
If you entered a name, and then clicked OK, the following screen will appear. At this screen, you can do the
following:
•
To edit a rule, click the name of the rule you want to edit.
•
If you do not want to edit a rule, click Apply to save the settings.
030-300239 Rev. A
184
March 2008
User Guide
Verizon FiOS Router (Model 9100VM)
In this example, the Class 2 link that was created in the preceding screen has been selected for editing. Enter the
desired values, and then click Resolve Now. Click OK to continue.
If you clicked OK in the preceding screen, the following screen will appear. This screen shows that the class priority
has been changed. If you change any additional settings in this screen, click Apply. Otherwise, click OK to continue.
030-300239 Rev. A
185
March 2008
User Guide
Verizon FiOS Router (Model 9100VM)
If you clicked OK, the following screen will appear. The values that you have configured will be displayed in this
screen. To repeat this process, click the New Entry link.
030-300239 Rev. A
186
March 2008
User Guide
Verizon FiOS Router (Model 9100VM)
16.7.4 DSCP Settings
If you click the Quality of Service link in the Advanced screen and then click DSCP Settings in the left submenu,
the following screen will appear.
Familiarity with the Differentiated Services model is essential to understanding DSCP. Differentiated Services
(Diffserv) is a Class of Service (CoS) model that enhances best-effort Internet services by differentiating traffic by
users, service requirements, and other criteria. Packets are specifically marked, allowing network nodes to provide
different levels of service, as appropriate for voice calls, video playback, or other delay-sensitive applications, via
priority queuing or bandwidth allocation, or by choosing dedicated routes for specific traffic flows.
Diffserv defines a field in IP packet headers referred to as the Differentiated Services Codepoint (DSCP). Hosts or
routers passing traffic to a Diffserv-enabled network will typically mark each transmitted packet with an appropriate
DSCP. The DSCP markings are used by Diffserv network routers to appropriately classify packets and to apply a
particular queue handling or scheduling behavior to packets.
The Router provides a table of predefined DSCP values, which are mapped to 802.1p priority marking method. Any
of the existing DSCP setting can be edited or deleted, and new entries can be added.
030-300239 Rev. A
187
March 2008
User Guide
Verizon FiOS Router (Model 9100VM)
16.7.5 802.1P Settings
If you click the Quality of Service link in the Advanced screen and then click 802.1P Settings in the left submenu,
the following screen will appear.
The IEEE 802.1p priority marking method is a standard for prioritizing network traffic at the data link/Mac sublayer. 802.1p traffic is simply classified and sent to the destination, with no bandwidth reservations established.
The 802.1p header includes a 3-bit prioritization field, which allows packets to be grouped into eight levels of
priority. By default, the highest priority is seven, which might be assigned to network-critical traffic. Values five and
six may be applied to delay-sensitive applications such as interactive video and voice. Data classes four through one
range from controlled-load applications down to “loss eligible” traffic. Zero is the value for unassigned traffic and is
used as a best effort default, invoked automatically when no other value has been set.
A packet can match more than one rule. This means the following:
•
The first class rule has precedence over all other class rules (scanning is stopped once the first rule is
reached).
•
The first traffic-priority (classless) rule has precedence over all other traffic priority rules.
•
There is no prevention of a traffic-priority rule conflicting with a class rule. In this case, the priority and
DSCP setting of the class rule (if given) will take precedence.
Select the desired values from the drop-down lists, and then click Apply to save the settings.
030-300239 Rev. A
188
March 2008
User Guide
Verizon FiOS Router (Model 9100VM)
16.7.6 Class Statistics
If you click the Quality of Service link in the Advanced screen and then click Class Statistics in the left submenu,
the following screen will appear.
The Router provides accurate, real-time information on the traffic moving through the defined device classes. For
example, the amount of packets sent, dropped, or delayed are just a few of the parameters monitored per each
shaping class.
NOTE: Class statistics will be available only after defining at least one class (otherwise the screen will not display
any values).
If you do not want the screen to refresh automatically, click Automatic Refresh Off.
030-300239 Rev. A
189
March 2008
User Guide
Verizon FiOS Router (Model 9100VM)
16.8 Remote Administration
If you click Advanced in the top navigation menu and then select the Remote Administration link, the
following screen will appear.
It is possible to access and control your Router not only from within the home network, but also from the
Internet. This allows you to view or change settings while traveling. It also enables you to allow Verizon to
change settings or help you troubleshoot functionality or communication issues from a remote location.
Remote access to your Router is blocked by default to ensure the security of your network. However, your
Router supports the following services, and you may use the Remote Administration Security screen to
selectively enable these services if they are needed.
WARNING: With Remote Administration enabled, your network will be at risk from outside attacks.
To configure Remote Administration, enter the appropriate settings, and then click Apply to save the settings.
030-300239 Rev. A
190
March 2008
User Guide
Verizon FiOS Router (Model 9100VM)
16.9 DNS
If you click Advanced in the top navigation menu and then select the DNS link, the following screen will
appear.
The Router contains a built-in DNS server. When an IP address is assigned, the Router will interrogate the
new device for a machine name using several well-known networking protocols. Any names learned will
dynamically be added to the DNS server’s table of local hosts.
Do any of the following:
•
To rename the domain name, click a host name link.
•
To add a host name, click the New DNS Entry link.
To add a new entry, click the New DNS Entry link. The following screen will appear. Enter the desired
host name, and then enter the appropriate IP address. Next, click OK to continue.
NOTE: Names may not contain spaces. Only letters, digits and the special characters dash (-), underscore
(_) and dot (.) may be used. These special characters may not appear at the beginning or at the end of a
name. The maximum length of a name can be is 63 characters.
030-300239 Rev. A
191
March 2008
User Guide
Verizon FiOS Router (Model 9100VM)
If you have entered values in the preceding screen and clicked OK, the following screen will appear. The
changes have been saved to the Router.
16.10 Personal Domain (Dynamic DNS)
If you click Advanced in the top navigation menu and then select the Personal Domain Name link, the
following screen will appear.
Dynamic DNS (Domain Name Server) a dynamic IP address to be aliased to a static hostname, allowing a
computer on the network to be more easily accessible from the Internet. Typically, when connecting to the
Internet, the service provider assigns an unused IP address from a pool of IP addresses, and this address is
used only for the duration of a specific connection. Dynamically assigning addresses extends the usable
pool of available IP addresses, while maintaining a constant domain name. This allows to user to access a
device from a remote location, since the device will always have the same IP address.
When using Dynamic DNS, each time the IP address provided by the service provider changes, the DNS
database changes accordingly to reflect the change. If the IP address of the computer changes often, its
domain name remains constant and accessible.
NOTE: To use Dynamic DNS, you must subscribe to this service via your service provider.
To configure a new dynamic DNS entry, click the New Dynamic DNS Entry link.
030-300239 Rev. A
192
March 2008
User Guide
Verizon FiOS Router (Model 9100VM)
The following screen will appear. Enter the appropriate values in the fields provided, and then click OK to continue.
NOTE: Your service provider will provide you with the appropriate values to use in this screen.
If you click the Click Here to Initiate and Manage your Subscription link, the following screen will appear. Enter
the user name and password (provided by your service) in the fields provided to access your account.
NOTE: The screen displayed in this document may differ from the actual screen.
030-300239 Rev. A
193
March 2008
User Guide
Verizon FiOS Router (Model 9100VM)
16.11 Network Objects
If you click Advanced in the top navigation menu and then select the Network Objects link, the following screen
will appear. A network object is a set of host names, IP address or MAC addresses. Security rules can be applied to a
distinct LAN subset using the Network Objects feature.
To configure a new network object, click the New Entry link.
If you clicked New Entry in the preceding screen, the following screen will appear. Enter the desired object
description in the field provided, and then click the New Entry link in this screen.
030-300239 Rev. A
194
March 2008
User Guide
Verizon FiOS Router (Model 9100VM)
If you clicked New Entry, the following screen will appear. Select an option from the Network Object Type dropdown list, and then enter the appropriate values in the fields provided. Click OK to continue.
If you have entered the desired values in the preceding screen and clicked OK, the following screen will appear. The
network object has been configured. Click OK to save the configuration.
030-300239 Rev. A
195
March 2008
User Guide
Verizon FiOS Router (Model 9100VM)
If you clicked OK, the following screen will appear. The network object has been saved to the Router. Click Close
to return to the Advanced screen.
030-300239 Rev. A
196
March 2008
User Guide
Verizon FiOS Router (Model 9100VM)
16.12 Protocol
If you click Advanced in the top navigation menu and then select the Protocol link, the following screen will
appear. For your convenience, the Router supports protocols for Applications, Games, and VPN-specific programs.
The following chart provides port/protocol information for the supported services. The Protocol screen is divided
into two main sections: Basic Service and Advanced Service. The following sections explain the features of each
service.
030-300239 Rev. A
197
March 2008
User Guide
Verizon FiOS Router (Model 9100VM)
16.12.1
Basic Service
To access the basic protocol screen (if you are in the Advanced screen), click the Basic button.
030-300239 Rev. A
198
March 2008
User Guide
Verizon FiOS Router (Model 9100VM)
If you clicked the Basic button in the preceding screen, the following screen will appear.
At this screen, you can do the following:
•
•
Configure ports for predefined protocols by clicking the desired link.
Configure a new user-defined port for a protocol by clicking the New Entry link.
16.12.1.1
Configuring a Predefined Protocol Service
To configure the Router for a predefined protocol service, click the desired link.
030-300239 Rev. A
199
March 2008
User Guide
Verizon FiOS Router (Model 9100VM)
For example, if you clicked FTP in the preceding screen, the following screen will appear. Next, click the TCP link
to configure the service protocol values.
If you clicked TCP in the Edit Service screen, the following screen will appear. Enter the desired values, and then
click OK to continue.
030-300239 Rev. A
200
March 2008
User Guide
Verizon FiOS Router (Model 9100VM)
If you have entered values and clicked OK in the preceding screen, the following screen will appear. A protocol
service has been configured. Click OK to save the settings.
If you clicked OK in the preceding screen, the following screen will appear. The protocol service has been saved to
the Router.
030-300239 Rev. A
201
March 2008
User Guide
Verizon FiOS Router (Model 9100VM)
16.12.1.2
Configuring a User-defined Protocol Service
To configure the Router for a user-defined protocol service, click the New Entry link.
If you clicked New Entry, the following screen will appear. Enter a service name and service description in the
fields provided. Next, click the New Server Ports link.
030-300239 Rev. A
202
March 2008
User Guide
Verizon FiOS Router (Model 9100VM)
If you clicked New Server Ports, the following screen will appear. Select a protocol from the drop-down list, and
then enter a protocol number. Click OK to continue.
If you clicked OK, the following screen will appear. Click OK to save the settings.
030-300239 Rev. A
203
March 2008
User Guide
Verizon FiOS Router (Model 9100VM)
If you clicked OK, the following screen will appear. The protocol settings have been saved to the Router.
030-300239 Rev. A
204
March 2008
User Guide
Verizon FiOS Router (Model 9100VM)
16.12.2
Advanced Protocol Service
To access the Advanced screen (if you are in the Basic screen), click the Advanced button. The following advanced
Protocols screen will appear.
At the Advanced screen, you can do the following:
•
•
Configure predefined application by clicking the desired link.
Configure a new user-defined application by clicking the New Entry link.
16.12.2.1
Configuring a Predefined Application
To configure the Router for a predefined application, click the desired link.
030-300239 Rev. A
205
March 2008
User Guide
Verizon FiOS Router (Model 9100VM)
For example, if you clicked the link of a predefined service in the preceding screen, the following screen will
appear. If desired, enter a description in the Service Description field. Next, click the desired TCP or UDP link.
If you selected TCP (Any -> 2300-4000) the following screen will appear. Select the desired source port and
destination port values from the drop-down lists, and then click OK.
NOTE: For the Source and Destination ports, you can select a single port or a range of ports. In this example, the
range for the Source port can be any value from 0 through 65535. And the range for the Destination port can be any
value from 2300-4000.
030-300239 Rev. A
206
March 2008
User Guide
Verizon FiOS Router (Model 9100VM)
After you have entered the desired values and click OK in the preceding screen, the following screen will appear.
The TCP protocol values have been configured. Next, click OK to save the settings.
If you clicked OK, the protocol values will be saved to the Router, and the following screen will display the entry.
030-300239 Rev. A
207
March 2008
User Guide
Verizon FiOS Router (Model 9100VM)
16.12.2.2
Configuring a New User-Defined Application
To configure new user-defined application, click the New Server Ports link in the Edit Service screen.
If you clicked New Server Ports, the following screen will appear. Select the desired protocol from the Protocol
drop-down list, and then enter the protocol number.
030-300239 Rev. A
208
March 2008
User Guide
Verizon FiOS Router (Model 9100VM)
For example, this screen shows appropriate values, click OK to continue.
If you clicked OK, the following screen will appear. The UDP port values have been configured. Next, click OK to
save the settings.
030-300239 Rev. A
209
March 2008
User Guide
Verizon FiOS Router (Model 9100VM)
If you clicked OK, the following screen will appear. The user-defined UDP port settings have been saved to the
Router.
16.13 UPnP
If you click Advanced in the top navigation menu and then select the UPnP link, the following screen will appear.
This feature advertises the presence of your Router on the LAN. Universal Plug-and-Play is a networking
architecture that provides compatibility among networking equipment, software and peripherals. Products that have
UPnP can seamlessly connect and communicate with other Universal Plug-and-Play enabled devices, without the
need for user configuration, centralized servers, or product-specific device drivers.
To configure UPnP enter the desired values and then click Apply to save the settings.
030-300239 Rev. A
210
March 2008
User Guide
Verizon FiOS Router (Model 9100VM)
16.14 System Settings
If you click Advanced in the top navigation menu and then select the System Settings link, the following screen will
appear. Use this page to configure various system settings. Enter the desired settings and then click Apply to save the
settings.
030-300239 Rev. A
211
March 2008
User Guide
Verizon FiOS Router (Model 9100VM)
16.15 Configuration File
If you click Advanced in the top navigation menu and then select the Configuration File link, the following screen
will appear.
IMPORTANT: Do not change the settings in this page unless instructed by Verizon.
030-300239 Rev. A
212
March 2008
User Guide
Verizon FiOS Router (Model 9100VM)
16.16 Date and Time Rules
If you click Advanced in the top navigation menu and then select the Date and Time link, the following screen will
appear. Enter the desired values in this screen, and then click Apply to save the settings.
16.17 Scheduler Rules
If you click Advanced in the top navigation menu and then select the Scheduler Rules link, the following screen will
appear. Please refer to instructions discussed in section 13.1.2.3 “Configuring a Schedule Rule,” to configure this
feature.
030-300239 Rev. A
213
March 2008
User Guide
Verizon FiOS Router (Model 9100VM)
16.18 Firmware Upgrade
If you click Advanced in the top navigation menu and then select the Firmware Upgrade link, the following screen
will appear. This screen is used to update the firmware that controls the operation of your Router. The updated
firmware may be loaded from a CD-ROM, from a file stored on a local hard drive within your network, or from an
update file stored on an Internet server.
IMPORTANT: The configurable settings of your Router may be erased during the upgrade process.
Do any of the following:
•
Select the desired option from the Upgrade from the Internet drop-down list. You can choose to perform an
automatic check at the specified number of hours and URL. Or you can disable automatic check.
NOTE: The URL must be in the format: protocol://user:password@host:port/path where protocol is one of
http, https, ftp or tftp. Either user or password, or both, may be left out. The port number is also optional.
•
Click Check Now to retrieve the firmware update file and display any available update information. You
must be connected to the Internet to use this option.
NOTE: If you click Check Now and the page returns “No new version available,” this indicates that the
firmware update file is not available.
•
Click Force Upgrade to download the firmware update file and to automatically update the Router
firmware if an update is available and applicable. You must be connected to the Internet to use this option.
NOTE: The URL must be in the format: protocol://user:password@host:port/path where protocol is one of
http, https, ftp or tftp. Either user or password, or both, may be left out. The port number is also optional.
•
Click upgrade now to retrieve the firmware update file from a local hard drive or CD-ROM on your
Network. Internet connection is not required for this option.
030-300239 Rev. A
214
March 2008
User Guide
Verizon FiOS Router (Model 9100VM)
16.19 Routing
If you click Advanced in the top navigation menu and then select the Routing link, the following screen will
appear. You can choose to setup your Router to use static or dynamic routing. Dynamic routing automatically
adjusts how packets travel on the network, whereas static routing specifies a fixed routing path to neighboring
destinations.
16.19.1
Basic Routing Settings
To create a new route, click the New Route link. If you change any settings in this screen, click Apply to save the
settings.
If you clicked New Route, the following screen will appear. Configure the settings in this screen, and then click OK
to continue.
030-300239 Rev. A
215
March 2008
User Guide
Verizon FiOS Router (Model 9100VM)
16.19.2
Advanced Routing Settings
To configure advanced routing settings, click the Advanced button in the Routing screen.
030-300239 Rev. A
216
March 2008
User Guide
Verizon FiOS Router (Model 9100VM)
If you clicked the Advanced button, the following screen will appear. If you change any settings in this screen, click
Apply to save the settings.
030-300239 Rev. A
217
March 2008
User Guide
Verizon FiOS Router (Model 9100VM)
16.20 IGMP Configuration
If you click Advanced in the top navigation menu and then select the IGMP Configuration link, the following
screen will appear. This screen allows you to configure IGMP LAN Proxy configuration settings in your Router.
The Router supports IGMP multicasting, which allows hosts connected to a network to be updated whenever an
important change occurs in the network. A multicast is simply a message that is sent simultaneously to a predefined
group of recipients. Each member of the multicast group will receive all messages addressed to the group.
IGMP proxy enables multicast packets to be routed according to the IGMP requests of local network devices
requesting to join multicast groups. To enable IGMP Proxy, click the adjacent check box, a check mark will appear
in the box. Next, enter the appropriate values in the fields provided and click Apply to save the settings.
030-300239 Rev. A
218
March 2008
User Guide
Verizon FiOS Router (Model 9100VM)
16.20.1
New Membership Filter
If you clicked the New Membership Filter link in the preceding screen, the following screen will appear.
Select the desired settings for the membership filter you want to create. Then click Apply to save the settings.
030-300239 Rev. A
219
March 2008
User Guide
Verizon FiOS Router (Model 9100VM)
16.20.2
New Multicast Address
If you clicked the New Multicast Address link in the preceding screen, the following screen will appear. Enter
multicast address and then click Apply.
If you clicked Apply, the address will be displayed in the list of Multicast Addresses.
030-300239 Rev. A
220
March 2008
User Guide
Verizon FiOS Router (Model 9100VM)
16.20.3
IGMP Status
If you click Advanced in the top navigation menu and then select the IGMP Status link, the following screen will
appear.
NOTE: If IGMP proxy is not enabled, the IGMP Proxy Status panel will be empty.
16.21 PPPoE Relay
If you click Advanced in the top navigation menu and then select the PPPoE Relay link, the following screen will
appear. PPPoE Relay enables the Router to relay packets on PPPoE connections, while keeping its designated
functionality for any additional connections.
To activate PPPoE Relay, click the check box (check mark will appear in the box). Click Apply to save the settings.
030-300239 Rev. A
221
March 2008
User Guide
Verizon FiOS Router (Model 9100VM)
16.22 IP Address Distribution
If you click Advanced in the top navigation menu and then select the IP Address Distribution link, the following
screen will appear.
Your Router's Dynamic Host Configuration Protocol (DHCP) server makes it possible to easily add computers that
are configured as DHCP clients to the home network. It provides a mechanism for allocating IP addresses and
delivering network configuration parameters to such hosts. The Router’s default DHCP server is the LAN bridge.
A client (host) sends out a broadcast message on the LAN requesting an IP address for itself. The DHCP server then
checks its list of available addresses and leases a local IP address to the host for a specific period of time and
simultaneously designates this IP address as “taken.” At this point the host is configured with an IP address for the
duration of the lease.
To configure the DHCP Sever settings, click the LAN (NAT) Bridge link, the following screen will appear. Enter
the desired DHCP settings in the fields provided, and then click Apply to save the settings.
030-300239 Rev. A
222
March 2008
User Guide
Verizon FiOS Router (Model 9100VM)
17. SYSTEM MONITORING
If you click System Monitoring in the top navigation menu, and then click Full Status/System wide Monitoring
of Connections in the left submenu, the following screen will appear. This screen displays connection information
for devices connected to your Router. At this screen, you can do any of the following:
•
Turn off Automatic Refresh by clicking the Automatic Refresh Off button. When Automatic Refresh is
enabled, the screen will be updated automatically to display the most current statistics.
•
Manually refresh this screen by clicking the Refresh button.
•
Click the links in this screen to access the Router’s connection settings.
•
Click Close to return to the Network Connections screen.
verizonfios
030-300239 Rev. A
223
March 2008
User Guide
Verizon FiOS Router (Model 9100VM)
If you click System Monitoring in the top navigation menu and then click System Log in the left submenu, the
following screen will appear. This screen display the details of your system’s logged events. To save the system log,
click Save Log, and then follow the instructions to save the log to the desired location.
030-300239 Rev. A
224
March 2008
User Guide
Verizon FiOS Router (Model 9100VM)
18. TECHNICAL SUPPORT INFORMATION
Contact your Internet service provider for technical support.
19. PRODUCT SPECIFICATIONS
System Requirements for 10/100 Base-T/Ethernet
• Pentium® or equivalent class machines or
higher
• Microsoft® Windows® (XP, 2000, ME, NT
4.0, 98 SE) Macintosh® OS X, or Linux
installed
• 64 MB RAM (128 MB recommended)
• 10 MB of free hard drive space
• 10/100 Base-T Network Interface Card
(NIC)
• Internet Explorer 5.5 or higher or Netscape
Navigator 7.x or higher
• Computer Operating System CD-ROM
LEDs
•
•
•
•
•
•
•
Connectors
• COAX
• VDSL2: RJ-11, 6-pin modular jack-VDSL2
• Ethernet: Four 8-pin RJ-45 modular jacks
• WAN: 8-pin RJ-45 modular jack
• Power: Barrel connector
System Requirements for Wireless
• Pentium® or equivalent class machines or
higher
• Microsoft® Windows® (XP, 2000, ME,
98 SE) installed
• 64 MB RAM (128 MB recommended)
• 10 MB of free hard drive space
• Internet Explorer 5.5 or higher or
Netscape Navigator 7.x or higher
• Computer operating system CD-ROM
• IEEE 802.11b/g PC adapter
Power
• Power Supply: 120 VAC to 12 VDC wallmount power supply
Dimensions
• Height: 1.9 in. (4.8 cm)
•
Width: 10.8 in. (27.4 cm)
•
Depth: 5.75 in. (14.6 cm)
System Requirements for MoCA
• Pentium® or equivalent class machines or
higher
• Microsoft® Windows® (XP, 2000, ME,
98 SE) installed
• 64 MB RAM (128 MB recommended)
• 10 MB of free hard drive space
• Internet Explorer 5.5 or later or
• Netscape Navigator 7.x or higher or
• Firefox 1.0.7 or later
• Computer operating system CD-ROM
030-300239 Rev. A
Power
Broadband
Internet
Wireless Setup
Ethernet 1, Ethernet 2, Ethernet 3, Ethernet 4
MoCA
Wireless
Weight
• Approx. 1.32 lb (0.60 kg)
Environmental
•
Relative Humidity: 5 to 95%, non-condensing
Storage Temperature: -20 °C to 85 °C
•
(-4 °F to 185 °F)
•
Ambient Temperature: 23 °C (73 °F)
EMC/Safety/Regulatory Certifications
• FCC Part 15, Class B
• FCC Part 68
• ANSI/UL Standard 60950-1
• CAN/CSA C22.2 No. 6090-1
225
March 2008
Verizon FiOS Router (Model 9100VM)
User Guide
20. SOFTWARE LICENSE AGREEMENT
READ THE TERMS AND CONDITIONS OF THIS LICENSE AGREEMENT CAREFULLY. THIS
SOFTWARE IS COPYRIGHTED AND LICENSED (NOT SOLD). BY INSTALLING AND OPERATING
THIS PRODUCT, YOU ARE ACCEPTING AND AGREEING TO THE TERMS OF THIS LICENSE
AGREEMENT. IF YOU ARE NOT WILLING TO BE BOUND BY THE TERMS OF THIS LICENSE
AGREEMENT, YOU SHOULD PROMPTLY RETURN THE SOFTWARE AND HARDWARE TO
WESTELL TECHNOLOGIES, INC. THIS LICENSE AGREEMENT REPRESENTS THE ENTIRE
AGREEMENT CONCERNING THE SOFTWARE BETWEEN YOU AND WESTELL TECHNOLOGIES,
INC. (REFERRED TO AS "LICENSOR"), AND IT SUPERSEDES ANY PRIOR PROPOSAL,
REPRESENTATION, OR UNDERSTANDING BETWEEN THE PARTIES.
1. License Grant. Licensor hereby grants to you, and you accept, a nonexclusive license to use the Compact
Disk (CD) and the computer programs contained therein in machine-readable, object code form only
(collectively referred to as the "SOFTWARE"), and the accompanying User Documentation, only as
authorized in this License Agreement. The SOFTWARE may be used only in connection with the number of
systems for which you have paid license fees as dictated in your support agreement. You agree that you will
not assign, sublicense, transfer, pledge, lease, rent, or share your rights under this License Agreement. You
agree that you may not nor allow others to reverse assemble, reverse compile, or otherwise translate the
SOFTWARE.
You may retain the SOFTWARE CD for backup purposes only. In addition, you may make one copy of the
SOFTWARE in any storage medium for backup purposes only. You may make one copy of the User's
Manual for backup purposes only. Any such copies of the SOFTWARE or the User's Manual shall include
Licensor's copyright and other proprietary notices. Except as authorized under this paragraph, no copies of
the SOFTWARE or any portions thereof may be made by you or any person under your authority or control.
2. Licensor's Rights. You acknowledge and agree that the SOFTWARE and the User's Manual are
proprietary products of Licensor protected under U.S. copyright law. You further acknowledge and agree
that all right, title, and interest in and to the SOFTWARE, including associated intellectual property rights,
are and shall remain with Licensor. This License Agreement does not convey to you an interest in or to the
SOFTWARE, but only a limited right of use revocable in accordance with the terms of this License
Agreement.
3. License Fees. The fees paid by you under the support agreement are paid in consideration of the licenses
granted under this License Agreement.
4. Term. This License Agreement is effective upon your opening of this package and shall continue until
terminated. You may terminate this License Agreement at any time by returning the SOFTWARE and all
copies thereof and extracts there from to Licensor. Licensor may terminate this License Agreement upon the
breach by you of any term hereof. Upon such termination by Licensor, you agree to return to Licensor the
SOFTWARE and all copies and portions thereof.
5. Limitation of Liability. Licensor's cumulative liability to you or any other party for any loss or damages
resulting from any claims, demands, or actions arising out of or relating to this Agreement shall not exceed
the license fee paid to Licensor for the use of the SOFTWARE. In no event shall Licensor be liable for any
indirect, incidental, consequential, special, or exemplary damages or lost profits, even if Licensor has been
advised of the possibility of such damages. SOME STATES DO NOT ALLOW THE LIMITATION OR
EXCLUSION OF LIABILITY FOR INCIDENTAL OR CONSEQUENTIAL DAMAGES, SO THE ABOVE
LIMITATION OR EXCLUSION MAY NOT APPLY TO YOU.
030-300239 Rev. A
226
March 2008
User Guide
Verizon FiOS Router (Model 9100VM)
6. Governing Law. This License Agreement shall be construed and governed in accordance with the laws of
the State of Illinois. You submit to the jurisdiction of the state and federal courts of the state of Illinois and
agree that venue is proper in those courts with regard to any litigation arising under this Agreement.
7. Costs of Litigation. If any action is brought by either party to this License Agreement against the other
party regarding the subject matter hereof, the prevailing party shall be entitled to recover, in addition to any
other relief granted, reasonable attorney fees and expenses of litigation.
8. Severability. Should any term of this License Agreement be declared void or unenforceable by any court of
competent jurisdiction, such declaration shall have no effect on the remaining terms hereof.
9. No Waiver. The failure of either party to enforce any rights granted hereunder or to take action against
the other party in the event of any breach hereunder shall not be deemed a waiver by that party as to
subsequent enforcement of rights or subsequent actions in the event of future breaches.
030-300239 Rev. A
227
March 2008
User Guide
Verizon FiOS Router (Model 9100VM)
21. PUBLICATION INFORMATION
Verizon® FiOS Router Model 9100VM
Document Part Number 030-300239 Rev. A
© 2008 Verizon.
All rights reserved.
All trademarks and registered trademarks are the property of their respective owners.
030-300239 Rev. A
228
March 2008