1
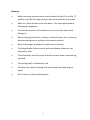
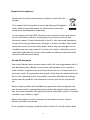
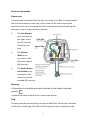
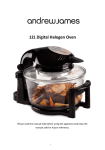
5.2 L Food Mixer Please read the manual fully before using the appliance and keep the manual safe for future reference. 1 Contents page Safety guide Page 3 Appliance components parts Page 6 Standard accessories Page 7 Before first time use Page 8 Removing the splash guard Page 8 Using the appliance Page 8 Application Page 10 Ice cream maker attachment Page 14 Tips for baking Page 19 Cleaning Page 20 Disposal of the appliance Page 21 UK and EU Guarantee Page 21 Electrical information Page 23 Contact details Page 25 2 General safety instructions When using any electrical appliance, basic safety precautions should always be followed, including: This appliance can be used by children aged from 8 years and above and persons with reduced physical, sensory or mental capabilities or lack of experience and knowledge if they have been given supervision or instruction concerning use of the appliance in a safe way and understand the hazards involved. Children shall not play with the appliance. Cleaning and user maintenance shall not be made by children unless they are older than 8 and supervised. Keep the appliance and its cord out of reach of children less than 8 years old. Always ensure the voltage on the rating label corresponds to the voltage in your home. Check the power cord and plug regularly for any damage. If the cord or the plug is damaged, it must be replaced by a qualified electrician or a service repair centre. If in doubt please contact our customer service team. The appliance is intended for domestic use only. Industrial or commercial use will void the warranty. The supplier cannot be held responsible for injury or damage if the appliance has been used for anything other than its intended use. Incorrect operation and use can damage the appliance and cause injury to the user. Do not use the appliance if it has been dropped or damaged in anyway. If the unit has been damaged take the unit for examination and or repair by an authorised service agent. Do not immerse or expose the motor assembly, plug or the power cord in water or any other liquid for any reason. If the supply cord is damaged, it must be replaced by the manufacturer or by someone who is suitably qualified to avoid a potential hazard. Do not kink or clamp the mains lead. Do not let the cord hang over the edge of a table or counter. Ensure that the cord is not in a position where it can be pulled or tripped over accidentally. Do not allow the cord to touch hot surfaces and do not place the cord near hot gas, electric burners or in a heated oven. Use of an extension cord with this appliance is not recommended. However if it is necessary to use an extension cord, ensure that the 3 extension cord is equal to or greater than the power consumption of the appliance to avoid overheating of the appliance and extension cord. Do not use any other appliance on the extension cord. Do not place the extension cord in a position where it can be pulled on by children or animals or be tripped over. Always operate the appliance on a smooth, even and stable surface. Do not place the unit on a hot surface. Always remove the plug of the appliance safely. Do not pull on the appliances cord to remove the appliances plug from the electrical socket. Never handle or operate the appliance with wet hands. Appliance specific safety instructions Do not use the device when the head is lifted up. Avoid using the product near water. When cleaning the product do not immerse the product in water or any other liquid. Please read the information and safety advice contained in the operating instructions carefully and thoroughly before using the stand mixer for the first time. Make sure that the voltage shown on the rating plate corresponds with that of the mains supply. The rating plate can be found on the bottom of the motor block. The stand mixer is only to be connected to an AC supply (~). The motor must always be switched off before the stand mixer is connected with the mains supply (switch 5 to the “0” setting). Do not use the product outdoors, it is for indoor use only. The device should not be set up in the close proximity of a heat source i.e. naked flame, inflammable materials (curtains, textiles, etc.). Place the device as close as possible to the power source so that you can disconnect the plug quickly and easily. The device must be operated with the type of power specified on the rating label. If you are unsure about the details of the available power supply, ask your dealer or the local power supply company. Do not attempt to repair the device yourself, since you will be 4 exposed to hazardous live components or other hazards by opening and removing the covers. Switch off the appliance before changing accessories or approaching moving parts. Never operate the appliance if it is empty and without supervision. During use, do not touch moving parts with your fingers. Please note that when passing the device on to a third party, the operating instructions must be included. No liability is accepted for damage due to improper use or the failure to observe our operating instructions/ safety notes. Unplug the appliance when it is not in use or before cleaning. The guarantee covers the entire appliance. See the guarantee section for details. Please note the recommended running time (RRT) applies when the motor is running at maximum speed. When making ice cream please turn the machine to its lowest speed and follow the instructions found in the ice cream maker attachment section. 5 Appliance components parts 1. Metal beater blade 2. Large cover 3. Upper housing cover 4. Small knob 5. Switch 6. Lower housing cover 7. Foot 8. Mixing bowl 9. Balloon whisk 10. Dough blade 11. Flexible beater blade 6 Standard accessories Main device (1 pc) Mixing bowl (1pc) Dough blade (1pc) Metal beater blade (1pc) Balloon whisk (1pc) Bowl cover (1pc) Manual (1pc) Flexible beater blade (1pc) Ice cream maker attachment (1 pc sold separately) Before first time use All parts of the stand mixer are to be thoroughly cleaned before being used for the first time (see the cleaning section.) Take out the required length of cable from the cable tidy on the base of the device and connect the device to the mains supply. 7 Assembly and use of the mixer 1. Make sure the mixer is unplugged from the mains outlet. Open the upper housing cover (3) using the small knob (4) (this should be in the down position) and place the ingredients in the mixing bowl (8). (fig. 1.1) 2. Place the mixing bowl (8) on the mixer plate, and turn the mixing bowl in an anti-clockwise direction until the bowl is in a fixed position. (fig. 1.2) 3. Fix the bowl cover into the locking plate on the underside of the housing cover. Then fix the beater blade (1), dough blade (10), balloon whisk (9) or the flexible beater (11) into the blade connector and rotate the blade connector clockwise until it locks firmly. (fig. 1.3) 4. Turn the small knob (4) in the direction of the arrow (on the machine) and press the housing cover (3) downwards with one hand. (fig. 1.4) 5. Insert the power plug into the power socket. Turn the switch (5) to desired speed position 1-6. 6. When the mixture is finished turn the switch (5) to the “0” setting and unplug the mixer from the mains socket. 7. Once all the moving parts have come to a complete stop, lift up the upper housing cover (3) by turning the small lever (4) clockwise. You can now remove the mixing bowl (8) from the mixer plate and remove the ingredients. Fig. 1.1 Fig. 1.2 Fig. 1.3 Fig. 1.4 8 Fig. 1.5 Application Balloon whisk attachment Easy delicious Meringue 6 egg whites ½ tsp vanilla extract 170g caster sugar 170g icing sugar Small amount of margarine to base the baking tray or baking paper To Serve: 300ml double cream Mixed summer fruits and berries 1. 2. 3. 4. 5. 6. 7. Pre-heat the oven to 110˚c/Gas mark ¼. Line the baking tray with greaseproof paper so that the meringue comes off easily once it is cooked. Separate the egg whites and yolks. For the best results use the balloon whisk for beating the egg whites. Place the egg whites into the bowl and select setting 2 for 20 seconds, then select setting 3 for 30 seconds adding the vanilla extract and a small amount of the caster sugar, then select setting 4 for 30 seconds adding another small amount of sugar. Select setting 6 for a couple of minutes adding the caster sugar, then the icing sugar, gradually, a tablespoon at a time, until all the sugar is used and until you have a nice glossy and stiff meringue mixture. Using the Andrew James spatula, place the mixture into the baking tray either in one big round portion or into small individual meringues. Bake for about 1hr 30 minutes until the meringues are golden and crisp. The time of cooking may vary depending on your oven. After cooking, take the meringues out of the oven and off the baking tray, allowing them to cool on a cooling rack until they are at room temperature. 9 Simple and Tasty Cakes Flexible beater blade 100g margarine 100g caster sugar 2 medium eggs 100g self-raising flour 100g icing sugar Few table spoons of cold water 1. 2. 3. 4. 5. 6. Pre-heat the oven at 180˚c/Gas mark 4. Grease a cake tin with margarine and sugar so the cake can easily come out once it is cooked. For the best results use the flexible beater blade for mixing cakes. Tip the margarine and the sugar into the mixing bowl and select setting 1 for 20 seconds then select setting 2 for 30 seconds then select setting 3 for 20 seconds. The mix should be light and fluffy, if not select 3 for a further 30 seconds if required. After the margarine and sugar is creamed together, select setting 2 for 30 seconds adding one egg and a small quantity of flour, then add the second egg, select setting 3 for 30 seconds, then add the remaining flour to the mix, then select setting 3 for 20 seconds. Select setting 6 for 10 seconds to make the mixture airy and smooth. Scrape the cake mix out of the mixing bowl, using the Andrew James spatula, into a cake tin and place it into the oven for 20-22 minutes on 180˚c. Once baked, take the cake out of the oven and place it on a cooling rack. Remember to allow plenty of time to cool. When the cake has completely cooled, add the icing sugar with a table spoon of cold water to a bowl and mix it quickly to prevent any lumps. Slowly add water and stir quickly until it reaches a soft and runny consistency. 10 White bread loaf Dough blade attachment 500g strong white bread flour 1 teaspoon of salt 1 teaspoon of sugar Sachet of yeast 225ml of tepid water 1 teaspoon of olive oil 1. 2. 3. 4. 5. 6. 7. For the best results use the dough blade for making bread and any type of mixture that requires kneading. Tip all the ingredients into the mixing bowl and select setting 1 for 2 seconds, then select setting 2 for 20 seconds, then select setting 3 for 3 minutes. Make sure it is kneading (punching the dough) at this stage. Please note, if the mix is too wet just add more flour and mix until it is smooth and does not stick on your hands. If the mix is too dry and not sticking together then add more water. Place in a bowl and leave to rest in a warm place for about 1 hour ( the bowl mixing set can be purchased separately on www.andrewjamesworldwide.com) with a clean kitchen towel covering it. After 1 hour, the bread should have doubled in size. Knock back the dough by tipping it back onto a floured surface and push the air out for a couple of minutes with your hands. Make it into a loaf shape and place in a loaf tin. Leave to rest for a further 30 minutes. Put the loaf tin into a pre-heated oven for 15 minutes. Reduce the heat to 190˚C/ Gas mark 5 for a further 30 minutes, until the bread is golden and sounds hollow when removed from the loaf tin. Always use oven gloves when removing anything hot from the oven. Leave the bread on a cooling rack to cool completely. Please use the metal mixer blade for larger quantities and heavy mixtures. Please note: The cooling rack can be purchased separately by visiting our website : www.andrewjamesworldwide.com 11 Dough blade attachment To mix or knead dough Use the Dough Blade Whisk 1. Use a flour to water ratio of 5: 3 2. Mix on speed 1 for 20 seconds and speed 2 for 20 seconds before continuing on speed 3 for 3 minutes. 3. When filling the mixing bowl, please ensure that the maximum quantity is not exceeded. 4. Maximum quantity of mixture is 2kg. Balloon whisk attachment Whipping egg whites or cream 1. Switch on the machine to speed 4-6, whip the egg white for 4 minutes without stopping (according to the amount of eggs used) whisk until the mixture is stiff. 2. For whipping cream, whip 250ml of fresh cream at speed 4 to 6 for about 4 minutes. When filling the mixing bowl with fresh milk, cream or other ingredients, please ensure that the maximum quantity is not exceeded. Making cakes or pastries Please use the metal beater blade or the flexible beater blade Note: For all sticky mixes such as cake mix that has a tendency to stick to the side of the mixing bowl, please use the flexible beater which has been included with our mixer to counteract this. 12 Ice cream maker attachment This can be purchased separately at www.andrewjamesworldwide.com Ice cream maker Accessories: 1. Cover& chute 2. Paddle 3. Freezing bowl 4. Mixing bowl Before first time use Wash all parts of the attachment that come into contact with food before using the ice cream maker attachment. 24 hours in advance, place the freezing bowl into a plastic bag and then place it into the freezer. Place the paddle and cover into the refrigerator. Prepare the ice cream or sorbet mix (refer to recipes). If necessary, allow the mix to cool in a refrigerator. Safety Unplug the machine before fitting or removing parts or cleaning. Never put your fingers or utensils down the chute. Do not touch moving parts. Never freeze ice cream that has fully or partially defrosted. Any ice cream or sorbet containing raw ingredients should be consumed within one week. Ice cream tastes best when fresh, so do 13 not make the ice cream too far in advance. Ice cream or sorbet that contains raw eggs should not be given to young children, pregnant women or the elderly. To prevent freezer burn, always ensure that hands are well protected when handling the Ice Cream Maker, especially when it is removed from the freezer. If the freezing solution appears to be leaking from the Ice Cream Maker discontinue use. The freezing solution is non-toxic. Using your ice-cream maker 1 Lock the plastic mixing bowl onto the machine. 2 Add the freezing bowl direct from the freezer, then position the paddle. 3 Fit the cover on the top. 4 Lower the mixer head, inserting the metal pin into the plastic hole. If the mixer head won’t shut, raise it, then switch on and off to reposition the metal pin. 5 Switch the machine onto its minimum speed (setting 1). The machine will operate for 15 minutes then turn off automatically, let the mixer rest for 3-5 minutes before switching it back on and continuing the process for another 15 minutes. 6 Using the chute, pour the ice cream or sorbet mix into the Ice Cream Maker. Fig. 2.1 Fig. 2.2 Fig. 2.3 14 Fig. 2.4 7. The machine must be switched on before adding the Ice Cream or Sorbet Mix, to prevent the mix from immediately freezing on the inside of the bowl. 8. After approximately 30 minutes, the ice cream should be ready to serve. Turn off the mixer. If the ice cream or sorbet is not to be used immediately, spoon the mix into a suitable container and store it in a freezer until it is required. Notes In order for the Ice Cream Maker to be operated safely and successfully, the following guidelines should be followed: The freezing bowl should be placed in a freezer that is operating at a temperature of -18˚C or below from twenty four hours before use. Do not switch off the mixer until the Ice cream or sorbet is ready. If, after forty-five minutes, the mix has not reached the desired consistency, switch the mixer off and spoon the ice cream or sorbet into a suitable container and place it in a freezer until it is frozen to the required consistency. Do not use metal utensils to remove the mix from the freezing bowl. Up to 1 litre (2 pints) of Ice cream can be successfully produced per session Cleaning Always switch off and unplug the appliance before removing the attachment from the food mixer. Allow the freezing bowl to reach room temperature before attempting to clean. All parts of the ice cream maker can be cleaned in hot soapy water. 15 Ensure that all parts of the appliance and attachments are dried properly, failure to clean the appliance properly could result in a film of ice forming in the mixing bowl Do not wash your ice cream maker in the dishwasher. It is recommended to store the freezing bowl in a plastic bag in your freezer so that it is always ready for use. Recipe suggestions Vanilla Ice cream Ingredients: 500ml/1 pt full fat milk 125ml/1/4 pt single cream 5ml/1 tsp vanilla essence 150g/6 oz caster sugar 2 egg yolks Instructions 1 Combine the cream, milk and vanilla essence in a pan and bring it almost to the boil. Set it aside to cool slightly. 2 Meanwhile, in a large bowl, whisk the egg yolks and the sugar together until thick and pale in colour. 3 Stirring continuously, pour the milk/cream mix onto the whisked egg and sugar. Ensure that the sugar is completely dissolved. 4 Return the mix to the pan and over a very low heat—continue to stir it until the mix coats the back of the spoon. 5 Allow the mix to cool thoroughly. Pour the mix into the Ice Cream Maker and mix until firm (about 30 minutes) 16 Variations: Chocolate - Omit the cream and replace it with 100g/ 4 oz of plain chocolate that has been melted in a basin over a pan of boiling water. Nut - add 100g/4 oz of chopped nuts to the ice cream mix just before serving. Strawberry Ice cream Ingredients 400g/1 lb. ripe strawberries 200ml/ 8fl oz double cream 75g/3 oz caster sugar Juice of ½ lemon Instructions: 1. Puree the strawberries. 2. Mix the sugar, cream and lemon juice into the puree. 3. Place the mix in a refrigerator to cool. 4. When the mix is cool, pour it into the Ice cream maker and mix until it is firm. Variations: Strawberries can be substituted for any soft fruit. The sweetness of the mix will depend on the fruit used, so remember to test it for sweetness before freezing. Please note that the length of time that the mix takes to freeze depends on: The quantity and composition of the mix. The addition of alcohol to the mix will inhibit freezing. 17 The original temperature of the mix. The room temperature will also affect the mix. Tips for baking To reduce the risk of curdling when making sponges ensure that the eggs are at room temperature, so it will not harden the butter. Dried fruit often soaks up the moisture of the dough or cakes, to ensure a better texture with your bake soak the dried fruit first. A good tip to get a glossy finish to your bread is to turn the temperature of your oven up to a high setting then drop it to your required baking temperature. Place your bread dough into the oven with three ice cubes in a separate tray on the bottom of the oven and shut the oven door. Use quality ingredients, the more you invest in your ingredients the better the final taste will be. Keep things measured and simple, baking is a science so it is important to measure your ingredients with accuracy. Always use the correct size tin when baking. Overloading the cake tin will increase the baking time and reduce the quality of the bake, using insufficient amounts of mix will result in burning. 18 Cleaning Before cleaning, please ensure that the switch knob (5) is at the “0” position and that the plug has been disconnected from the socket. After use, allow the device to cool down. This also applies before cleaning the appliance. To clean the exterior of the device, use a moist cloth and a mild detergent. When cleaning the interior, exterior and bowl cover, do not use any abrasive detergents or products that contain alcohol. Never submerge the product in water when cleaning. The dough blade, balloon whisk and metal beater blade are not dishwasher safe. The accessories should only be cleaned in warm water and washing up liquid. The mixing bowl is dishwasher safe. The bowl can also be cleaned with warm water and washing-up liquid. Do not use any abrasive detergents. 19 Disposal of the appliance Please note that this Andrew James product is mark with this Symbol: This means that this product must not be disposed of together with ordinary household waste, as electrical and electronic waste must be disposed of separately. In accordance with the WEEE directive, every member state must ensure correct collection, recovery, handling and recycling of electrical and electronic waste. Private households in the E.U. can take used equipment to special recycling stations free of charge. In certain member states used apparatus can be returned to the dealer where they were bought on the condition you buy new products. Contact your retailer, distributor or the municipal authorities for further information on what you should do with electrical and electronic waste. UK and EU Guarantee Your new Andrew James product comes with a 24 month guarantee and a 2 year fixed warranty, effective from receipt confirmation. Your receipt or order number is required as proof of purchase date so it is imperative that you keep it safe. This guarantee only applies if the item has been used solely for the use intended, and all instructions have been followed accordingly. Please note this product is for domestic use only and not for commercial use. Abuse of your product will invalidate the guarantee. Returned goods can only be accepted if repackaged properly within the original colour product box, and presented with the original receipt of sale/order number. This does not affect your statutory rights. Returned products must be cleaned and returned to us in as close to delivery condition as possible. If your product develops a problem within the first 12 months of the fixed 20 warranty, we will pay all shipping costs to have it returned to us. After 12 months the customer will be liable for the cost of returning the product to us. We will then pay to have the repaired/replaced item shipped back to the customer. If you wish to return your item for a full refund, you have the right to do so within the first 7 days. For our returns policy please go to www.andrewjamesworldwide.com Customers are responsible for any taxes applied to our products when they are shipped outside of the EU. All of our prices are inclusive of VAT. Once a product has been returned to us, we will aim to repair or replace it within 30 days of receipt. The guarantee does not cover any defect arising from improper use, damage, build-up of lime scale or repair attempts made by third-parties. Also, the guarantee does not cover normal wear and tear of individual parts. 21 Electrical information Please note: It is extremely important that the wires or cores in the flex are connected to the correct terminals in the plug. If the colour of the mains lead of the appliance does not correspond with the coloured markings identifying the terminals in your plug proceed as follows: The Live (Brown) wire connects to the right- most live (L) terminal nearest to the fuse. The Neutral (Blue) wire connects to the left-most neutral (N) terminal. The Earth (Green and Yellow) wire connects to the central, top most earthed (E) terminal. Warning: If the appliance is double insulated indicated by the double insulated symbol: it should not have an earth wire or earth connection. Plug The plug must be protected by the correct AMP fuse; this will be indicated on the case of the plug. Only BSI or ASTA approved fuses should be used. 22 When changing the fuse always replace it with a fuse that is of the same identical rating as the original. If you are unsure about which plug or fuse to use, always refer to a qualified electrician. Please note after replacing the fuse, ensure that the cover is correctly fitted back onto the plug. Never attempt to run the appliance if the plug does not have a cover. If a moulded plug is fitted and has to be removed take great care in disposing of the plug and severed cable, it must be destroyed to prevent it from engaging into a socket. If the supply cord is damaged it must be replaced by a service agent or a similarly qualified person in order to avoid a hazard. All of our electrical appliances conform to pre-existing EC Directives 2006/95/EC (Low Voltage Directive) and 2004/108/EC (EMC Directives). For further information please visit http://www.esc.org.uk/industry/ product-safety/product-testing-screening/kitchen-appliances/ 23 Contact Details Andrew James UK LTD Unit 1 P C Henderson Premises Bowburn North Industrial Estate Bowburn Co Durham DH6 5NG Customer Service / Technical Support- Telephone 0844 335 8464 Customer Service/ Technical Support Email: [email protected] Website: www.andrewjamesworldwide.com Copyright Andrew James 24