1
406 785%2
3ULQW6\VWHP
2SHUDWLRQ
®
'
7UDGHPDUNV
The following are tradem ar ks or registered trademarks of their respective owners. Other
pr oduct names mentioned in this manual may also be trademarks or registered
trademarks of their respective owner s. Register ed tradem ar ks are registered in the
United States Patent and Trademark Office; some tradem ar ks may also be registered in
other countries. QMS, Crown, the QMS logo, and the Crown seal are registered
trademarks of QM S, Inc., and Stackler, ColorDepth, and PS Executive Ser ies are
trademarks of QMS, Inc. PostScr ipt is a trademark of Adobe Systems Incorporated for a
page description language and may be registered in cer tain jur isdictions. Throughout
this manual, “PostScr ipt Level 2” is used to refer to a set of capabilities defined by
Adobe Systems for its PostScript Level 2 page description language. These capabilities,
am ong others, are im plemented in this product thr ough a QMS-developed emulation
that is compatible with Adobe's PostScr ipt Level 2 language. Adobe/Adobe Systems
Incor porated. 3Com, 3+Open/3Com Corporation. Aldus, Aldus PageMaker, Aldus
FreeHand/Aldus Cor poration. Apple, AppleTalk, EtherTalk, LaserWr iter, LocalTalk,
Macintosh, TrueType/Apple Computer, Inc. VINES/Banyan. CompuSer ve /H & R Block.
DEC, DECnet, VMS/Digital Equipment Corporation. PhoneNET/Farallon Computing,
Inc. Hewlett-Packard, HP, PCL, HP-GL, LaserJet/Hewlett-Packar d Co. IBM PC, TokenRing/International Business Machines Corporation. Intel/Intel Corporation. Microsoft,
MS-DOS/Microsoft Cor poration. Novell and NetWare/Novell, Inc. QuarkXPress/Quark,
Inc. TOPS/Sun M icrosystems, Inc. UNIX/UNIX System s Laboratories.
3URSULHWDU\6WDWHPHQW
The digitally encoded software included with your QMS 2425/2425 TURBO Print
System is Copyr ighted © 1997 by QMS, Inc. All Rights Reserved. This softwar e may not
be repr oduced, modified, displayed, transfer red, or copied in any for m or in any manner
or on any media, in whole or in part, without the express wr itten per mission of QM S,
Inc.
&RS\ULJKW1RWLFH
This m anual is Copyr ighted © 1997 by QMS, Inc., One Magnum Pass, Mobile, AL
36618. All Rights Reser ved. This manual may not be copied in whole or in par t, nor
transferred to any other media or language, without the express written per mission of
QMS, Inc.
&RQWHQWV
,QWURGXFWLRQ
Introduction .................................................................................. 1-2
About This Manual 1-2
Typographic Conventions 1-4
&RQVXPDEOHV
Introduction .................................................................................. 2-2
Preventing Media Jams ............................................................... 2-2
Loading the Media Cassette ........................................................ 2-2
Feeding Media ............................................................................ 2-11
Cassette Feed 2-11
Manual Feed 2-11
Selecting Media Delivery ........................................................... 2-12
Face-down Tray 2-13
Face-up Tray 2-14
Other Media Delivery Options 2-15
Loading the Multipurpose Tray ................................................ 2-15
Envelopes: Special Considerations 2-19
Labels: Special Considerations 2-19
Letterhead and Memo Media: Special Considerations 2-21
Odd-size Media: Special Considerations 2-21
Transparencies: Special Considerations 2-22
Printing Envelopes .................................................................... 2-22
Formatting Data for Envelopes 2-23
Loading Envelopes via the Multipurpose Tray 2-23
Loading Envelopes via the Envelope Feeder 2-25
Using Toner Cartridges ............................................................. 2-25
Toner Cartridge Life 2-25
Toner Cartridge Handling 2-26
Toner Cartridge Storage 2-26
Refilled Toner Cartridges 2-27
Extending Toner Cartridge Life 2-27
Replacing a Toner Cartridge .................................................... 2-28
Removing the Empty Toner Cartridge 2-28
Installing a Toner Cartridge 2-29
$GYDQFHG3ULQWLQJ)HDWXUHV
Introduction .................................................................................. 3-2
High-Resolution Printing ............................................................ 3-2
Setting the Resolution 3-2
Smoothing 3-3
How Much Memory Do You Need? 3-3
Printing Duplex ............................................................................ 3-6
Automatic via a Cassette 3-7
Manual Feed via the Multipurpose Tray 3-7
High-Resolution and Duplex Printing 3-8
Duplex Printing Tips 3-8
Cassette Chaining ....................................................................... 3-9
Collating Output ........................................................................ 3-10
LL
406785%23ULQW6\VWHP2SHUDWLRQ
Improving Collation Performance 3-10
Chunk Collation 3-11
Advantages of Collation 3-12
Working with Status Pages ....................................................... 3-13
Cancelling/Ending Print Jobs ................................................... 3-14
Cancel a Single Print Job 3-15
Cancelling all Print Jobs 3-15
Ending a Print Job 3-16
3ULQWHU&DUH
Introduction .................................................................................. 4-2
Handling the Printer ..................................................................... 4-2
Cleaning the Printer ..................................................................... 4-3
Cleaning Guidelines 4-4
Cleaning the Outside of the Printer 4-4
Cleaning the Anti-static Teeth 4-5
Cleaning the Transfer Guide Area 4-6
Cleaning the Registration Roller Area 4-8
Using the Maintenance Kit .......................................................... 4-9
Repacking the Printer ................................................................ 4-10
Remove Cables and Cassette(s) 4-10
Remove the Toner Cartridge 4-11
Repack the Printer 4-13
3ULQW4XDOLW\
Introduction .................................................................................. 5-2
About Halftone Types .................................................................. 5-2
About Print Density ...................................................................... 5-3
About Print Resolution ................................................................ 5-4
&RQWHQWV
LLL
7URXEOHVKRRWLQJ3ULQWHU
3UREOHPV
....................................................................................................... 6-1
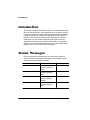
Introduction .................................................................................. 6-2
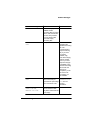
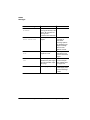
Status Messages ......................................................................... 6-2
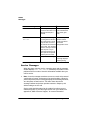
Service Messages 6-8
HP-GL Error Codes and PCL Error Codes 6-10
Testing PC-Printer Communication ......................................... 6-10
Creating the Test File 6-11
Sending the Test File 6-11
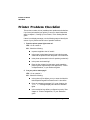
Printer Problem Checklist ......................................................... 6-16
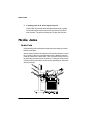
Media Jams ................................................................................ 6-18
Media Path 6-18
Automatic Jam Recovery 6-19
Locating Media Jams 6-19
Clearing Envelope Feeder Area Jams 6-21
Clearing a Multipurpose Tray Area Jams 6-24
Clearing Paper Pick-up Area Jams 6-25
Clearing Upper and Lower Cassette Area Jams 6-25
Clearing Duplexer Unit Area Jams 6-26
Clearing Left Cover and Fixing Area Jams 6-30
Clearing Optional Paper Deck Area Jams 6-31
Clearing Top Cover Area Jams 6-33
Clearing Top Cover Fixing Area Jams 6-35
Clearing CrownCopy ADF Paper Jams 6-36
Clearing Stackler Media Jams 6-37
Stapler Jams .............................................................................. 6-42
Troubleshooting CrownCopy ................................................... 6-47
Understanding the LEDs 6-47
Solving Other Problems 6-48
Control Panel Problems ............................................................ 6-49
Data Indicator Stays Lit 6-49
No Advanced Status Page’ 6-49
No Start-up Page 6-49
Paper Jam Message Stays On 6-50
LY
406785%23ULQW6\VWHP2SHUDWLRQ
Printer Resets 6-50
PostScript Errors 6-51
Windows Driver Problems ......................................................... 6-51
Printer Description Files 6-51
CrownNet Problems ................................................................... 6-52
Output Problems ........................................................................ 6-52
600x600, 1200x1200 dpi Printing Unavailable 6-52
Blank Pages 6-53
Not All Pages Print 6-54
Printer Will Not Duplex 6-54
Disk Problems ............................................................................ 6-54
IDE Internal Hard Disk Not On Line 6-54
External SCSI Hard Disk Not On Line 6-55
Kanji Option Kit Problems ......................................................... 6-55
Can't Download Kanji Fonts 6-55
Can't Access Kanji Fonts 6-56
Can't Access the Kanji File Through Your Application 6-57
Print Quality Problems .............................................................. 6-57
Paper Jams Always Occur 6-58
Printer Will Not Print 600 dpi 6-58
Image Defects ............................................................................. 6-59
White or Light Lines 6-59
Light Image (Entire Page) 6-59
Dark Image (Entire Page) 6-59
Stain Along the Edge of the Page 6-60
Stains on the Back of the Page 6-60
Image Easily Smears when Rubbed 6-60
Placing a Service Call ................................................................ 6-60
&URZQ9LHZ3ULQWHU:HE
3DJH
Introduction .................................................................................. 7-2
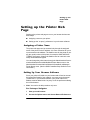
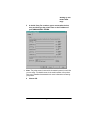
Setting up the Printer Web Page ................................................ 7-3
Assigning a Printer Name 7-3
&RQWHQWV
Y
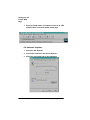
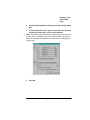
Setting Up Your Browser Software 7-3
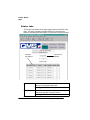
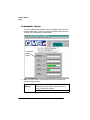
Printer Home Page ...................................................................... 7-9
Home 7-10
Operator Control 7-11
General Settings 7-14
Printer Jobs 7-22
Consumable Status 7-24
System Support Page 7-26
QMS, Inc. Page 7-28
Local Online Help Page 7-28
Web Page Help System ............................................................. 7-29
$ 406&XVWRPHU6XSSRUW
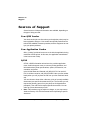
Sources of Support .....................................................................A-2
Your QMS Vendor A-2
Your Application Vendor A-2
Q-FAX A-2
The QMS Corporate Bulletin Board System A-3
CompuServe A-3
Internet A-3
QMS Customer Response Center (CRC) A-4
QMS World-wide Offices .............................................................A-5
.......................................................................................................A-7
,QGH[
YL
406785%23ULQW6\VWHP2SHUDWLRQ
,QWURGXFWLRQ
,Q7KLV&KDSWHU
“Introduction” on page 1-2
“Typographic Conventions” on page 1-4
,QWURGXFWLRQ
,QWURGXFWLRQ
This manual provides information on installing consumables such as
media and toner cartridges. You’ll also find information on advanced
printing features, printer care, print quality, and troubleshooting. Use
this guide in conjunction with your other QMS 2425/2425 TURBO
Print System documentation.
This chapter gives you a brief overview of this manual.
$ERXW7KLV0DQXDO
»
Note: Some of the procedures throughout this documentation refer to
applications, utilities, and printer drivers being located on disks, but
recently QMS has begun placing these on CD-ROM.
If you need alternate media, please contact your QMS vendor for
media availability and purchase information. You can also download
some of these files via ftp from our World Wide Web Server at
http://www.qms.com, our Bulletin Board at (334) 633-3632, or
CompuServe at go qmsprint. See the “QMS Customer Support”
section of your QMS printer documentation, for sales and support
locations and telephone numbers.
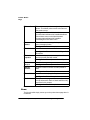
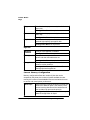
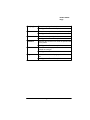
The information in this manual is divided into the following sections:
Introduction
Consumables
Explains how to print duplex, chain
Advanced
cassettes, collate output, print a status
Printing Features page, cancel a print job, and end a
Provides an overview of this guide.
Describes the media that’s best suited
for your printer; how to load paper,
labels, transparencies, envelopes; and
how to replace the toner cartridge.
print job.
406785%23ULQW6\VWHP2SHUDWLRQ
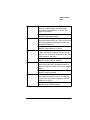
,QWURGXFWLRQ
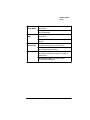
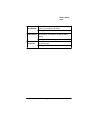
Printer Care
Describes how to handle and clean
the printer.
Print Quality
Gives information on how to improve
print quality through adjustments of
print density and printer resolution.
Troubleshooting Provides media jam prevention tips,
explains how to locate and clear media
Printer Problems jams, lists printer status messages,
outlines printer and print quality
problems and solutions, and describes
how to place a service call.
Printer Web Page Contains information on how to access
$
QMS Customer
Support
,QWURGXFWLRQ
the most frequently accessed printer
configurations and gives you instant
access to printer status by use of the
World Wide Web (WWW).
Provides product sales and support
telephone numbers and describes
how to communicate with QMS
through the QMS Bulletin Board,
CompuServe, the Internet, and
Q-FAX.
,QWURGXFWLRQ
7\SRJUDSKLF&RQYHQWLRQV
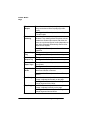
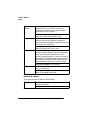
The following typographic conventions are used in this manual:
Mixed-Case
Courier
Text you type, and messages and information
displayed on the screen
Mixed-Case
Italic
Courier
Variable text you type; replace the italicized
word(s) with information specific to your printer or
computer
UPPERCASE
COURIER
Information displayed in the printer message
window
lowercase bold PostScript operators and DOS commands
»
lowercase italic
Variable information in text.
UPPERCASE
File and utility names
↵
Press the Enter key (PC) or Return key
(Macintosh)
^
Press and hold down the Ctrl key (PC)
Note: Notes contain tips, extra information, or important information
that deserves emphasis or reiteration.
▲ Caution: Cautions present information that you need to know to avoid
equipment damage, process failure, or extreme annoyance.
0 WARNING! Warnings indicate the possibility of personal injury if a
specific procedure is not performed exactly as described in the
manual.
ACHTUNG! Bitte halten Sie sich exakt an die im Handbuch
beschriebene Vorgehensweise, da sonst Verletzungsgefahr
bestehen könnte.
406785%23ULQW6\VWHP2SHUDWLRQ
&RQVXPDEOHV
,Q7KLV&KDSWHU
“Preventing Media Jams” on page 2-2
“Loading the Media Cassette” on page 2-2
“Feeding Media” on page 2-11
“Selecting Media Delivery” on page 2-12
“Loading the Multipurpose Tray” on page 2-15
“Loading the Multipurpose Tray” on page 2-15
“Loading the Multipurpose Tray” on page 2-15
“Printing Envelopes” on page 2-22
“Using Toner Cartridges” on page 2-25
,QWURGXFWLRQ
,QWURGXFWLRQ
This chapter covers basic printer operation, such as preventing media
jams; loading media; transparencies, labels and envelopes; replacing
toner cartridges; and using various kinds of print media.
3UHYHQWLQJ0HGLD-DPV
There are several things you can do to reduce the occurrence of
media jams:
Use paper, envelopes, labels, and overhead transparencies that
match the printer specifications. See appendix B, “Technical
Specifications,” in the Reference guide.
If you have problems with double feeding, remove the media from
the cassette or input bin and fan the edges. The sheets may be
sticking together.
Note: Do not fan transparencies since this causes static.
»
Print media must be stored away from moisture and humidity. The
recommended relative humidity is 5%-90% with no condensation.
Many manufacturers place an arrow on the end of the wrapperindicating the side of the media to use for printing. If you cannot
determine which side of the media to print on, remove the media
from the cassette, rotate the stack a half-turn, turn the stack over,
and then place it back in the cassette.
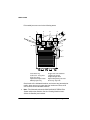
/RDGLQJWKH0HGLD&DVVHWWH
The QMS 2425/2425 TURBO Print System comes standard with two
500-sheet universal media cassettes. The upper tray holds letter/A4
or legal/B4 media, and the lower tray holds letter/A4, legal/B4, or 11”
x 17”/A3 media. The printer automatically pulls media from the
406785%23ULQW6\VWHP2SHUDWLRQ
/RDGLQJWKH
0HGLD&DVVHWWH
cassette. Loading media in either cassette involves the following
basic steps:
Open the cassette
Set correct media size for the cassette
Load media in the cassette
Close the cassette
These steps are described in detail, later in this procedure.
»
Note: Ensure that the media size matches the cassette size (for
example, letter/A4 media must be loaded only when the cassette is
set to letter/A4 size). Since the media cassette sends a media size
signal to the printer controller, using the wrong size media will cause
your image to be positioned incorrectly on the page or clipped.
Load media in either 500-sheet cassette as follows.
2SHQWKH&DVVHWWH
»
Note: Open and close the cassette like a drawer when loading media.
If you remove the cassette it may take several minutes to correctly
reposition the cassette on the guide rails.
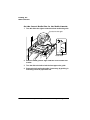
1
Using the cassette handle, inside the pocket of the cassette,
pull the cassette away from the printer as far as it will go
without removing it from the printer.
&DVVHWWH+DQGOH
&RQVXPDEOHV
/RDGLQJWKH
0HGLD&DVVHWWH
6HWWKH&RUUHFW0HGLD6L]HIRUWKH0HGLD&DVVHWWH
1
Turn the dial to the right to unlock the front media size guide.
7XUQGLDOWRWKHULJKW
LGL
B4
LTR
A4
0HGLD6L]H
2
Slide the media guide to align it with the correct media size
marker.
3
Turn the dial to the left to lock the front paper size guide.
4
Remove the left media size guide, if necessary, by pushing in
and lifting it from its paper size slot.
406785%23ULQW6\VWHP2SHUDWLRQ
/RDGLQJWKH
0HGLD&DVVHWWH
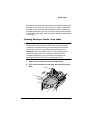
5
Align the tip of the guide with the desired paper size marker,
then insert the rest into the paper cassette.
/HIW0HGLD
7LS
8SSHU&DVVHWWH
/HJDO%/HWWHU$VL]HSDSHU
B4 LGL
1
LTR A4
2
LTR/A4
LGL/B4
/RDG0HGLDLQWKH&DVVHWWH
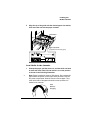
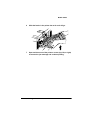
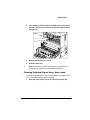
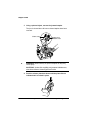
1
»
Unwrap the paper, pull the stack out, and then with one hand
at each end of the stack, lift and hold it in a curved position
as shown in the following illustration.
Note: Paper is packed in reams of 500 sheets. Don’t unpack the
paper above the printer as this might cause particles to fall into
the printer components. Note the arrows on the wrapper. They
show which side of the paper should be on the top when it is
loaded in the cassette.
+ROG
:LWKRXW
*ULSSLQJ
&RQVXPDEOHV
/RDGLQJWKH
0HGLD&DVVHWWH
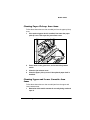
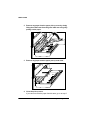
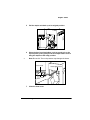
2
Grip each end of the stack firmly.
*ULS
3
Straighten the stack, and then roll the fanned sheets from
side to side to get air through the sheets and prevent static
buildup.
6WUDLJKWHQDQG5ROO
IURP6LGHWR6LGH
4
Take off the top and bottom sheets.
The top and bottom sheets sometimes have residual glue buildup
that could cause the printer to jam.
5HPRYH7RS6KHHW
5HPRYH%RWWRP
406785%23ULQW6\VWHP2SHUDWLRQ
/RDGLQJWKH
0HGLD&DVVHWWH
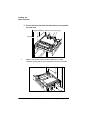
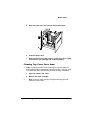
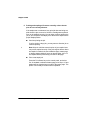
5
Place a stack of media in the cassette with the print side facing down.
/RZHU&DVVHWWH/HJDO%/HWWHU$[$VL]HSDSHU
7RS
&RQVXPDEOHV
/RDGLQJWKH
0HGLD&DVVHWWH
6
Ensure that the media stack lies flat and does not exceed the
top limit mark.
8SSHU&DVVHWWH/HJDO%/HWWHU$VL]HSDSHU
7RS/LPLW
»
Note: If you need to remove excess media from a media
cassette, simply push up the metal panel to lift the media stack.
0HWDO
406785%23ULQW6\VWHP2SHUDWLRQ
/RDGLQJWKH
0HGLD&DVVHWWH
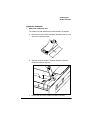
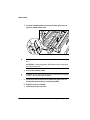
2SHQWKH&DVVHWWH
1
Attach the media size card
The media size card identifies the media loaded in a cassette.
a
Remove two of the media size labels and place one on each
side of the media size card.
b
After the media is loaded in a media cassette, insert the
media size card into the slot.
0HGLD6L]H
c
&RQVXPDEOHV
Ensure that the correct media size label is showing.
/RDGLQJWKH
0HGLD&DVVHWWH
2
Slide the cassette into the cassette slot until it’s firmly
seated.
6ORW
0HGLD2ULHQWDWLRQ%/HJDO
[
3
Flip up the media stop, and slide it to the correct media size.
0HGLD
»
Note: When printing different-sized media in the face-down tray,
set the media stop to the largest media size. If it is set to a smaller
size, large-size media will curl, block the opening (when delivered
to the output tray), and cause a media jam.
406785%23ULQW6\VWHP2SHUDWLRQ
)HHGLQJ0HGLD
)HHGLQJ0HGLD
There are two ways of feeding media through your printer:
Cassette feed (automatically)
Manual feed (from the multipurpose tray)
&DVVHWWH)HHG
Cassette feed automatically pulls media from one of the cassettes at
the front of the printer. The cassettes handle media as light as 17 lbs
(64 g/m2) or as heavy as 28 lbs (105 g/m2), and the maximum loading
depth is 1.97" (50 mm).
See “Loading the Media Cassette” on page 2-2, for details on how to
load the cassette.
0DQXDO)HHG
Manual feed is the method of feeding single sheets or small increments of media, such as envelopes, labels, paper, odd-sized media,
or transparencies from the multipurpose tray only. Media weight can
range from 17 to 34 lbs (64 to 128 g/m2).
»
Note: Use the face-up output bin (described in the following section)
when printing heavy-weight stock and envelopes. Using this bin
bypasses some internal printer rollers and results in less curl. It is
used often with manual feed.
Manual feed is very useful for
Odd-sized media (cut sheets)
Transparencies
Heavy-weight labels and envelopes
Use the following instructions to manual-feed media:
1
Adjust the media guides on the multipurpose tray to match
the width of the media you are using.
&RQVXPDEOHV
6HOHFWLQJ0HGLD
'HOLYHU\
2
Load media in the multipurpose tray.
The print side should be facing up and placed as shown, depending on the media size. The media is automatically fed into the
printer, and the printed media is forwarded to the selected output
tray. See chapter 2, “Print Media,” of the Reference for information on feed edge.
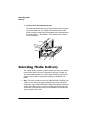
6HOHFWLQJ0HGLD'HOLYHU\
Your media delivery selection controls whether you want your output
to stack face-down or face-up. It depends on the type of media, as
well as personal preference. For best results, always test print a few
pages to ensure that the selected print delivery is suitable for the
media.
»
Note: The order of output on the your QMS 2425/2425 TURBO Print
System is from first to last page in both the face-up and face down
output trays. If your QMS 2425/2425 TURBO Print System is the base
model (with 8 MB memory), complex multiple page documents sent
via the face-up output tray must be chunk collated to ensure that the
order of pages is first to last.
406785%23ULQW6\VWHP2SHUDWLRQ
6HOHFWLQJ0HGLD
'HOLYHU\
However, the base model system may have insufficient memory to
store the entire document before printing begins, so you could experience unexpected ordering of your output pages. You can purchase
the executive model of this printer with 24 MB of memory, the 2425
TURBO EX with 32 MB of memory, or you can add additional memory
to the base model system to avoid this type of chunk collation problem. See appendix A, “QMS Customer Support,” for sales and support telephone numbers.
)DFHGRZQ7UD\
After being printed, media normally stacks face-down in the recessed
area on top of the printer. The face-down tray holds up to 500-sheets
of media.
0HGLD
6HWWLQJWKH0HGLD6WRS
The media stop keeps the media positioned in the output tray. For
face-down delivery, you must set the media stop to the correct media
size.
Use the following directions to set the media stop:
1
»
Flip up the media stop, and slide it to the correct media size.
Note: When printing different-sized media in the face-down tray,
set the media stop to the largest media size. If it is set to a smaller
size, large-size media will curl, block the opening (when delivered
to the output tray), and cause a media jam.
&RQVXPDEOHV
6HOHFWLQJ0HGLD
'HOLYHU\
)DFHXS7UD\
For face-up output, you must attach the face-up tray to the left side of
the printer and configure the printer to access it. This tray holds up to
100 sheets of media.
$WWDFKLQJWKH)DFHXS7UD\
Use the following instructions to attach the face-up tray.
»
Note: When printing transparencies with face-up delivery, remove
them from the face-up tray as soon as delivered to prevent excessive
curling and jams.
1
Insert the left tab on the face-up tray into the slot on the back
of the printer.
2
Press lightly on the right side and insert the right tab into the
slot.
5LJKWWDE
3
Access the Operator Control/Outputbin menu and enable
Face Up.
406785%23ULQW6\VWHP2SHUDWLRQ
/RDGLQJWKH
0XOWLSXUSRVH
7UD\
5HPRYLQJWKH)DFHXS7UD\
Use the following instructions to remove the face-up tray:
1
»
Remove first the right tab, and then the left tab on the faceUp tray from the slot on the back of the printer.
Note: Remember to disable the Operator Control/Outputbin/Face
up setting.
2WKHU0HGLD'HOLYHU\2SWLRQV
The QMS Stackler Option, which includes three large-capacity output
trays, provides face-up, face-down, job offset, and stapling media
delivery options. See chapter 8, “Document Finishing Options,” in the
Options manual for more information.
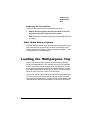
/RDGLQJWKH0XOWLSXUSRVH7UD\
Use the multipurpose tray to print on envelopes, labels, odd-size
media, and transparencies. The multipurpose tray is also especially
useful if you want to print on a single sheet of letterhead or colored
media without changing the media in the media cassettes. Its capacity is approximately 100 sheets of 20 lbs (75 g/m2) cut-sheet media.
When the tray is not in use, retract it into the printer.
This section explains how to load print media in the multipurpose tray.
For tips on how to get the best possible printing results, see “Envelopes: Special Considerations,” “Labels: Special Considerations,” and
“Transparencies: Special Considerations,” at the end of this section.
&RQVXPDEOHV
/RDGLQJWKH
0XOWLSXUSRVH
7UD\
»
Note: A MEDIA SIZE MISMATCH error can be caused if the media in
the multipurpose tray is not the media size selected for the
multipurpose tray (inputbin 1). If the printer supports the media size
you want, insert the correct size media in the multipurpose tray. If the
printer does not support the media size you want, set Operator
Control/Multipurpose Sz to universal to clear the error. See “Media
Size” in chapter 4, “Printer Configuration,” of the Reference for more
information on multipurpose size.
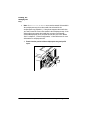
1
Reach into the pocket of the multipurpose tray and pull it
open.
406785%23ULQW6\VWHP2SHUDWLRQ
/RDGLQJWKH
0XOWLSXUSRVH
7UD\
2
Pull out the large tray extension from the two grips.
7UD\
3
Pull out the small tray extension from the center grip.
4
Adjust the media guides to the size of the media.
&RQVXPDEOHV
/RDGLQJWKH
0XOWLSXUSRVH
7UD\
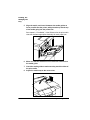
5
Align the media, and insert it between the media guides as
far as possible into the printer, with print-side up and the top
of the media going into the printer first.
See chapter 2, “Print Media,” of the Reference for the print media
chart that indicates appropriate feed edge for each paper-size.
6
Make sure that the media does not exceed the limit mark on
the media guide.
7
Check the media guides to make sure they touch the sides of
the print media.
8
Adjust the media stop to the correct size.
406785%23ULQW6\VWHP2SHUDWLRQ
/RDGLQJWKH
0XOWLSXUSRVH
7UD\
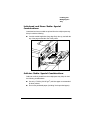
(QYHORSHV6SHFLDO&RQVLGHUDWLRQV
Use landscape orientation to create the envelope text in your
application short-edge first.
Before printing envelopes
—Disable the duplexer if it is installed.
—Remember that you can only print on the address side of the
envelope.
—Make sure that the media guides are set to the height of the
envelope (media jams or misfeeds may occur if they are too loose
or too tight).
We recommend that you use Canon USA office envelopes with
diagonal joints and ordinary gummed flaps.
Use envelopes with the flap toward the rear of the printer when
loaded.
Keep the following conditions in mind when choosing an envelope:
—It must not contain any fasteners, clasps, windows, or peel-off
strips; otherwise, the printer may be seriously damaged.
—The envelope material must not melt, vaporize, offset, discolor,
or emit dangerous fumes at high temperatures (190° C/ 374° F).
—The edges must be square and it must not be wrinkled, torn, or
curled.
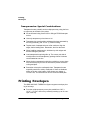
/DEHOV6SHFLDO&RQVLGHUDWLRQV
Labels are printed from the multipurpose tray. The procedure for feeding labels is almost the same as for regular media; however, you must
use the face-up output bin. Keep in mind the following considerations:
Use Avery Label Stock 5160 or Canon USA labels. Adhesive
label stock should have pressure-sensitive (peel-and-stick) adhesive backing and should be 17-34 lbs (64 -128 g/m2).
Use only label sizes letter or A4.
&RQVXPDEOHV
/RDGLQJWKH
0XOWLSXUSRVH
7UD\
The surface (print face) of the labels must be made of normal
paper with a matte-finish, similar to copy paper.
The label backing must be able to withstand the heat generated
by the fixing assembly (190° C/374° F).
Ensure that the label backing is not made of easily removable
coated paper.
Avoid using labels with exposed adhesive; it may stick to the toner
cartridge or the fixing roller, causing labels to peel off and printer
jams to occur.
Label data should be formatted within your application. Try printing your data on a plain sheet of media first to check placement.
This reduces the number of label sheets you use.
Before printing labels, disable the duplexer if it is installed and
check the manual feed guides to make sure they’re not too tight
and buckling the labels. Also, make sure label size and type meet
specifications listed in appendix B, “Technical Specifications,” of
your Reference guide. If labels curl excessively, use the face-up
output bin at the rear of the printer.
Load the labels lengthwise (long edge first), face up, and with the
top of the page toward the rear of the printer.
406785%23ULQW6\VWHP2SHUDWLRQ
/RDGLQJWKH
0XOWLSXUSRVH
7UD\
/HWWHUKHDGDQG0HPR0HGLD6SHFLDO
&RQVLGHUDWLRQV
Letterhead and memo media are printed from the multipurpose tray.
Keep in mind the following:
Load the media lengthwise (long edge first), face up, and with the
top of the page toward the rear of the printer.
2GGVL]H0HGLD6SHFLDO&RQVLGHUDWLRQV
Odd-size media is printed from the multipurpose tray. Keep in mind
the following considerations:
Use only 17-28 lbs (64-105 g/m2) odd-size paper recommended
for laser printers.
Do not use perforated paper (including 3-hole-punched paper).
&RQVXPDEOHV
3ULQWLQJ
(QYHORSHV
7UDQVSDUHQFLHV6SHFLDO&RQVLGHUDWLRQV
Transparencies are printed from the multipurpose tray, using the faceup output tray at the back of the printer.
We recommend using Canon USA or 3M type PP2500 transparencies.
Use only transparency sizes letter or A4.
Transparencies must be able to withstand the heat generated by
the fixing assembly (190° C/374° F), without melting.
Tap the stack of transparencies on a flat surface to align the
edges, before loading them. Remember, don’t fan the stack.
When handling transparencies, hold them by their edges and
avoid touching the print side.
Load transparencies printing side up. The correct print side is
usually marked on the transparency package. About 20 sheets
can be loaded at one time.
When printing transparencies with face-up delivery, remove them
from the face-up tray as soon as delivered to prevent excessive
curling and jams.
Remember to keep the media path clean. Transparencies are
especially sensitive to a dirty media path. If there are shadows
either on the top or the bottom of the sheets, see chapter 4,
“Printer Care,” for instructions on how to clean the media path.
3ULQWLQJ(QYHORSHV
The QMS 2425/2425 TURBO Print System supports envelope printing in two ways:
From the multipurpose tray on any size media from 6.92'' x
10.23''—176 mm x 260 mm by manually inserting up to 10 envelope in the tray.
406785%23ULQW6\VWHP2SHUDWLRQ
3ULQWLQJ
(QYHORSHV
From the optional envelope cassette on up to 100 envelopes in
the following sizes: envelope 9.76'' x 6.93'', COM 10 (9.5'' x
4.125”), Monarch (7.5” x 3.875”), DL size (8.66'' x 4.33'') 229 mm
x 162 mm, and C5 size (9.02'' x 6.38'') 229 mm x 162 mm.
)RUPDWWLQJ'DWDIRU(QYHORSHV
Your printer receives the necessary instructions to print on envelopes
from your application. Read the printing section of your application
manual to find out how it supports envelope printing. The printer
should be in landscape mode for most applications. Usually, this is
accomplished through the application.
When formatting data for envelopes, leave a 0.6'' (15 mm) margin
from the edges of the envelope. Print on only one side. Remember,
some parts of an envelope consist of three layers of media: the front,
back, and flap. Print in these layered regions may be faded.
/RDGLQJ(QYHORSHVYLDWKH0XOWLSXUSRVH7UD\
1
Place the envelopes on a flat surface and flatten them by
pressing down the corners in the direction shown.
&RQVXPDEOHV
3ULQWLQJ
(QYHORSHV
2
Flex the envelope stack (including the edges) to remove any
stiffness. Correct any dog-eared corners, then tap the envelopes on a flat surface to align.
7DS6WDFN7R6WUDLJKWHQ
3
Open the multipurpose tray.
4
Adjust the media guides to the height of the envelopes.
406785%23ULQW6\VWHP2SHUDWLRQ
8VLQJ7RQHU
&DUWULGJHV
5
Slide the envelope stack into the printer as far as it will go, with
the print side facing up and the flap should be on your right.
Because envelopes pass through heated rollers, the gummed
area on the flap may seal. Open the flap immediately after it
passes through the printer, before the seal cools. You may then
reseal it in the usual manner. The use of envelopes with emulsion-based glue avoids this problem.
/RDGLQJ(QYHORSHVYLDWKH(QYHORSH)HHGHU
To load up to 100 envelopes at a time, use the optional envelope
feeder. Instructions for installing and using it are in chapter 6, “Media
Input,” in the Options guide. See your QMS vendor for more information on the optional envelope feeder.
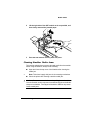
8VLQJ7RQHU&DUWULGJHV
Characters and images are created in your laser printer through a
process that applies toner (made of carbon particles) to the page in
the printer’s fusing unit. When an image is formed, a positive electrical charge is applied to transfer the image to the page. The toner cartridge contains the toner and the photosensitive drum needed to
operate the laser printer. The photosensitive drum has characteristics
similar to those of photographic film.
7RQHU&DUWULGJH/LIH
The toner cartridge contains enough toner to print about 15,000 letter/A4-size pages at normal (4%) page coverage. If the printer is run
entirely in Conserve Toner mode (Administrator/Engine/Conserve
Toner menu), a toner cartridge lasts for over 52,500 letter/A4-size
pages at normal (4%) page coverage.
When the cartridge toner supply runs low, the printer message TONER
LOW displays. Usually, parts of the page print lighter. It is your option
whether or not to continue printing when the engine senses it is low of
toner.
&RQVXPDEOHV
8VLQJ7RQHU
&DUWULGJHV
When toner is low, it is sometimes helpful to take the cartridge out of
the printer and redistribute the toner. This is done by gently rocking
the cartridge side to side. Then reinstall the cartridge. If the TONER
LOW message remains in the display panel after redistributing toner,
the cartridge must be replaced.
Additional toner cartridges may be purchased from your QMS vendor.
Toner specifications are in appendix B, “Technical Specifications,” of
your Reference manual.
7RQHU&DUWULGJH+DQGOLQJ
The cartridge contains the toner and laser-sensitive drum needed to
operate the laser printer.
The cartridge has a wide opening for the laser beam guided via
the reflecting mirror. Be careful not to drop any foreign objects,
such as clips or pins, when handling and installing the cartridge.
The drum is extremely sensitive to light and may deteriorate if
exposed to bright light; do not open or touch the drum protective
shutter.
7RQHU&DUWULGJH6WRUDJH
The toner cartridge
Should be kept in its protective bag until you’re ready to install it.
Is sensitive to bright light. Do not store it in direct sunlight or room
light (more than 1500 lux). Store it horizontally in a cool, dry location away from sunlight. The maximum storage temperature is
95º F (35º C) and the maximum storage humidity is 80% without
condensation.
Should be kept level during storage. Do not stand or store the
cartridge on its end or turn upside down; the toner inside the cartridge may become caked or unequally distributed.
Should be kept away from salty air environments, corrosive gases
such as aerosols, and extreme heat or humidity.
406785%23ULQW6\VWHP2SHUDWLRQ
8VLQJ7RQHU
&DUWULGJHV
Should be kept away from monitors, disk drives, and floppy disks.
The magnets in the cartridge can damage stored data.
5HILOOHG7RQHU&DUWULGJHV
QMS does not recommend using refilled toner cartridges on this
printer. Refilled toner cartridges may produce variations in toner quality and reliability and may reduce the print quality of your documents.
In addition, toner leaks affect your warranty.
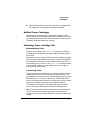
([WHQGLQJ7RQHU&DUWULGJH/LIH
5HGLVWULEXWLQJ7RQHU
When the toner supply is low, TONER LOW displays in the printer’s
message window, and parts of the page usually start printing lighter
than normal.
Sometimes, you can increase the life of the toner cartridge by taking it
out of the printer and redistributing the toner—hold the cartridge with
both hands and then gently rock it from side-to-side (as you do for a
new cartridge) five or six times. If the TONER LOW message remains
in the message window, you must replace the toner cartridge, as
described later in this chapter.
&RQVHUYLQJ7RQHU
To help you lower your printing costs, your printer provides an option
called Conserve Toner, which simulates draft-quality printing. The
printer reduces the amount of toner used during printing by screening
the black dots in a 1:3.5 ratio. In other words, 1 black dot prints for
every 3.5 black dots that would print in normal printing mode. Increasing the Toner Density may darken your draft-quality printing.
The Conserve Toner option can be enabled through your printer
driver or through the Administration/Engine/Print Quality menu.
»
Note: The Conserve Toner option is designed for draft printing only.
Turn off Conserve Toner when printing proof or final copies of
documents to avoid any possible distortion of patterns, halftone, and
images.
&RQVXPDEOHV
5HSODFLQJD
7RQHU&DUWULGJH
5HSODFLQJD7RQHU&DUWULGJH
You may purchase additional cartridges from your QMS vendor. See
the “Print Engine Specifications” section of appendix B, “Technical
Specifications,” in the Reference for more information on toner cartridges.
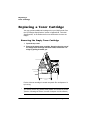
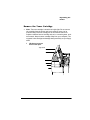
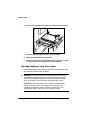
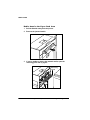
5HPRYLQJWKH(PSW\7RQHU&DUWULGJH
1
Open the top cover.
2
Remove the empty toner cartridge. Grasping the grip area of
the empty toner cartridge with both hands, remove the cartridge by pulling it toward you.
Put the old toner cartridge in a trash receptacle. Do not dispose of it
by burning.
s
Caution: Remember that each time you replace the toner cartridge,
you should remove any residual toner powder from inside the printer.
(See the “Cleaning the Printer,” section of chapter 4 of this manual.)
406785%23ULQW6\VWHP2SHUDWLRQ
5HSODFLQJD
7RQHU&DUWULGJH
,QVWDOOLQJD7RQHU&DUWULGJH
In your laser printer, characters and images are created through a
process that applies toner (made of carbon particles) to the page in
the printer’s fusing unit. When an image is formed, heat and pressure
are applied to transfer the image to the page. The toner cartridge contains the toner and photosensitive drum needed to operate the laser
printer.
You may purchase additional toner cartridges from your QMS vendor.
See appendix B, “Technical Specifications,” of the Reference manual
for specifications.
1
Open the top cover, if it’s not already opened.
2
Lift the toner cartridge out of its shipping carton, open the
protective bag, and remove the cartridge.
Note: After taking the toner cartridge from its protective bag, do
not open the cover or touch the photo-sensitive drum of the toner
cartridge because it may deteriorate the drum and reduce print
quality.
»
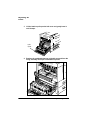
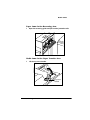
3
Remove the black protective sheet, and discard it.
Place the cartridge on a stable, flat surface to get a good grip on
the white protective tape. Lift the tape, pull gently to remove it with
the black protective sheet, and discard it.
&RQVXPDEOHV
5HSODFLQJD
7RQHU&DUWULGJH
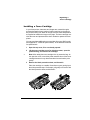
4
Distribute the toner in the cartridge.
Hold the cartridge with both hands, and gently rock it from sideto-side five or six times to distribute the toner.
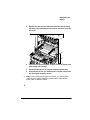
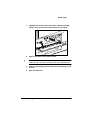
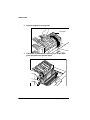
5
Remove the tape seal.
Holding the cartridge in place with one hand, use your other hand
to grasp the orange tab on the right side of the tape seal. Pull the
orange tab straight out, and then discard both the orange tab and
the tape seal. If the ring breaks off from the tape, pull the tape by
its end.
7DSH6HDO
406785%23ULQW6\VWHP2SHUDWLRQ
5HSODFLQJD
7RQHU&DUWULGJH
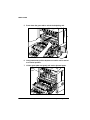
6
Slide the toner cartridge in the printer.
Grasp the tabs on the toner cartridge and place the cartridge on
the rails inside the printer. Then lift the tabs slightly, and slide the
cartridge straight back into the printer until it is firmly seated.
*XLGH
5DLOV
7
Close the printer’s top cover.
&RQVXPDEOHV
$GYDQFHG
3ULQWLQJ)HDWXUHV
,Q7KLV&KDSWHU
“High-Resolution Printing” on page 3-2
“Printing Duplex” on page 3-6
“Cassette Chaining” on page 3-9
“Collating Output” on page 3-10
“Working with Status Pages” on page 3-13
“Cancelling/Ending Print Jobs” on page 3-14
,QWURGXFWLRQ
,QWURGXFWLRQ
This chapter describes changing print resolution, using high-resolution while duplexing, chaining paper cassettes, collating output, printing a status page, cancelling a print job, and ending a print job.
+LJK5HVROXWLRQ3ULQWLQJ
The QMS 2425/2425 TURBO Print System supports three print resolutions: 300x300, 600x600, and with Multi-Res daughterboard. For
printed pages that don’t require optimum print quality, such as rough
drafts, memos, or text-only pages without graphics (dependent on
shading details), you may choose to set the printer at 300 dpi. Printing
at 300 dpi reduces the amount of processing time the printer requires
before printing the page. For pages that demand high-quality output,
especially those containing detailed graphics or varying background
shades, you’ll want to set the printer resolution to a higher resolution.
»
Note: To print at 1200x1200 dpi you need to install an optional MultiRes daughterboard, and you may also need to add more memory.
(See the “How Much Memory Do You Need?,’’ section beginning on
page 3-3 of this chapter for memory details.)
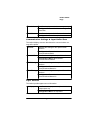
6HWWLQJWKH5HVROXWLRQ
You can set the default resolution of your printer through the Administration/Engine/Def Resolution menu.
Menu
Choices
Administration/Engine/Def Resolution
300 dpi—300x300 dpi resolution.
600 dpi—600x600 dpi resolution.
Note: If you have the optional Multi-Res
daughterboard installed, the 1200 dpi option also
appears.
600 dpi
»
Default
406785%23ULQW6\VWHP2SHUDWLRQ
+LJK
5HVROXWLRQ
3ULQWLQJ
Your printer offers greatly improved print quality at 600 and 1200 dpi.
To take best advantage of these higher resolutions use
»
The resident PostScript and PCL 5e typefaces
The QMS printer drivers designed for your printer
Note: Whenever possible, set the print resolution through your
application. If the print resolution can’t be set through the application,
through the printer driver, through the printer configuration menu, or
through QMS Document Option Commands.
6PRRWKLQJ
Your 2425/2425 TURBO Print System offers a smoothing option
under the Administration/Engine/Print Quality menu. See chapter 4,
“Printer Configuration,” of Reference for details on this QMS edgesmoothing technique which alters the size and position of dots that lie
on the outer edges of an object by reducing the width of the laser
pulse to a fraction of the full pulse width. It smooths jagged-edges in
text, lines, and graphics and generally improves their print quality.
»
Note: When you are printing halftones, smoothing is not
recommended because it may introduce artifacts in the halftone or
scanned image. For better results, if smoothing is required for your
documents in text and line art, use the basic option for halftone types.
+RZ0XFK0HPRU\'R<RX1HHG"
Your QMS 2425/2425 TURBO Print System base model comes with 8
MB of memory, the executive model comes with 24 MB of memory,
and the 2425 TURBO EX comes with 32 MB of memory.
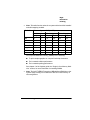
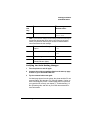
The following tables list the minimum framebuffer and total system
memory requirements for each resolution/media combination.
»
Note: If a certain resolution is chosen and the minimum amount of
memory is not installed in the printer, the file is printed using the next
lower resolution. For example if you have a base-model printer and
you choose 600 dpi resolution, legal media, and duplex (optional
duplexer required), but the printer has only the standard memory
instead of the required 10 MB minimum, the file prints at 300x300 dpi.
$GYDQFHG3ULQWLQJ)HDWXUHV
+LJK
5HVROXWLRQ
3ULQWLQJ
0LQLPXP)UDPHEXIIHU0HPRU\5HTXLUHPHQWV
Media Size
Minimum Framebuffer RAM (in MB)
300x300 dpi
600x600 dpi
1200x1200 dpi
Simplex Duplex Simplex Duplex Simplex Duplex
A3
2
4
8
16
32
64
A4
1
2
4
8
16
32
Executive
1
2
4
8
13
26
11 x 17
2
4
8
16
32
64
Legal
1.5
3
5
10
20
40
Letter
1
2
4
8
16
32
Universal
2.2
4.4
8.6
17.2
34.4
68.8
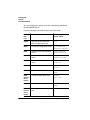
0LQLPXP6\VWHP0HPRU\5HTXLUHPHQWV
»
Note: This table lists the values for a system without a hard disk
installed.
Media Size
Minimum System RAM (in MB)
300x300 dpi
600x600 dpi
1200x1200 dpi
Simplex Duplex Simplex Duplex Simplex Duplex
A3
6
8
12
20
36
68
A4
5
6
8
12
20
36
Executive
5
6
8
12
17
26
11 x 17
6
8
12
20
36
68
Legal
4.5
7
9
14
24
44
Letter
5
6
8
12
20
36
Universal
6.2
8.4
12.6
21.2
38.4
72.8
406785%23ULQW6\VWHP2SHUDWLRQ
+LJK
5HVROXWLRQ
3ULQWLQJ
»
Note: This table lists the values for a system with a hard disk installed
and disk swapping enabled.
Media Size Minimum System RAM (in MB)
300x300 dpi
600x600 dpi
1200x1200 dpi
Simplex Duplex Simplex Duplex Simplex Duplex
A3
4
6
10
18
34
66
A4
3
4
6
10
18
34
Executive
3
4
6
10
15
24
11 x 17
4
6
10
18
34
66
Legal
3.5
5
7
12
22
42
Letter
3
4
6
10
18
34
Universal
4.2
6.4
10.6
19.2
36.4
70.8
You may need additional memory (SIMMs) for the following:
To print complex graphics or complex PostScript documents
For increased collation performance
For increased spooling performance
See chapter 2 of the Options guide, the “Single In-Line Memory Modules’’ section, for more information on installing SIMMs.
»
Note: The 2425 TURBO EX requires 8 MB additional RAM due to the
system image running out of RAM since their is no flash memory in
this configuration.
$GYDQFHG3ULQWLQJ)HDWXUHV
3ULQWLQJ'XSOH[
3ULQWLQJ'XSOH[
The QMS 2425/2425 TURBO Print System supports duplex printing.
From either universal cassette on any supported size media
(17—28 lbs/64—105 g/m2 ). When the optional duplexer is
installed, media is automatically fed via the media cassettes.
Note: Odd-size paper cannot be used in automatic duplex
printing as it will cause media jams.
»
From the multipurpose tray on any supported size media by manually inserting the media in the tray and printing on one side, and
then manually flipping the media, inserting it in the tray again, an
then printing on the other side.
▲ Caution: Duplexing may lower the print quality, cause media jams, or
cause media to curl or wrinkle. With the minimum system memory
available, graphics intensive duplex printing at 600 dpi or 1200 dpi
with error recovery on reduces engine speed. Duplex printing is not
possible on envelopes, labels, and transparencies.
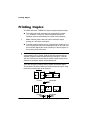
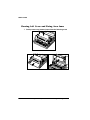
There are two types of duplex printing: duplex and tumble duplex.
This illustration shows the difference between these two types, using
three-hole-punched paper as an example.
Side 1
Side 2
Portrait
Side 1
Side 2
Portrait
Side 1
Side 2
Landscape
Side 1
Side 2
Landscape
406785%23ULQW6\VWHP2SHUDWLRQ
3ULQWLQJ'XSOH[
$XWRPDWLFYLDD&DVVHWWH
Once the duplex printing option is installed on your printer, the Duplex
option appears in the Operator Control menu. See chapter 4, “Printer
Configuration,” in the Reference guide for more information on this
option. Use you application to choose duplexing on a per-job basis or
the configuration menu to set duplexing as the default for all print jobs.
»
Note: Odd-size paper cannot be used in automatic duplex printing.
0DQXDO)HHGYLDWKH0XOWLSXUSRVH7UD\
For duplex printing from the multipurpose tray, follow this procedure:
▲
1
Access the Configuration menu and set the printer to Manual
Feed.
2
Print on one side of the media.
3
Insert the media in the multipurpose tray with the leading
edge first and the side you want to print next facing down.
Caution: Straighten the leading-edge of the media if it’s curled
because curling can cause print media jams and wrinkles. Also,
make sure that the media guides are set to the width of the media.
Printing problems may occur if they’re set too loose or too tight.
3ULQWLQJRQRQHVLGH
$GYDQFHG3ULQWLQJ)HDWXUHV
3ULQWLQJRQWKHRWKHUVLGH
/RDGLQJIURPWKHWUD\
3ULQWLQJ'XSOH[
+LJK5HVROXWLRQDQG'XSOH[3ULQWLQJ
If your printer has the optional duplexer, duplexing option, you can
print on any of the media sizes at 300x300 dpi. However, printing
duplex via the cassettes at 600x600 dpi resolutions may require additional memory. (See the memory table in the previous section for
each resolution/media size memory requirement).
'XSOH[3ULQWLQJ7LSV
Select paper with high opacity for duplex printing. Opacity refers
to how much paper blocks out what is written on the opposite side
of the page. Paper with high opacity has low transparency. If
paper has low opacity (high transparency), then the printed data
from one side of the page will show through to the other side. For
best results, test a small quantity to make sure the opacity is
acceptable.
For duplex printing on pre-printed letterheads, place the sheet
face-down with the bottom of the page inserted first. In the duplex
mode, the printer prints side two first, then side one.
406785%23ULQW6\VWHP2SHUDWLRQ
&DVVHWWH
&KDLQLQJ
&DVVHWWH&KDLQLQJ
The QMS 2425/2425 TURBO Print System comes standard with two
500-sheet universal cassettes (also known as trays or input bins) for a
total media capacity of approximately 1000 sheets before a reload is
necessary. You may choose to have the printer automatically draw
from another cassette when the current cassette empties. Here are
five ways to chain cassettes:
Your application may include a specific procedure for using a
dual-cassette printer. Check your documentation.
The QMS Level 2 Windows printer driver allows you to select an
alternate cassette for chaining.
On a network, use CrownAdmin2 via a remote console to configure chaining.
Configure the printer through configuration menu. The following
section has more information.
8VLQJWKH&RQILJXUDWLRQ0HQX
The Chain Inputbins option in the Operator Control menu allows you
to “chain” inputbins (tray and cassettes) so that when the first inputbin
empties, the printer automatically draws paper from another inputbin.
Menu
Operator Control/Chain Inputbins
Choices
On—Switches to the next inputbin with the same size
and type of media when the default inputbin is empty.
Off—Doesn’t switch inputbins; uses only the default
inputbin.
On Any—Switches to the next inputbin, regardless of
the size and type of media installed, when the default
input bin is empty.
Default
On
Notes
Use the Operator Control/Inputbin menu to set the
default inputbin. Also, make sure that the two
cassettes installed in your printer are set to the same
size media.
$GYDQFHG3ULQWLQJ)HDWXUHV
&ROODWLQJ
2XWSXW
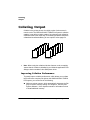
&ROODWLQJ2XWSXW
Collation is the printing of sets of multiple copies of a document in
numeric order. The QMS 2425/2425 TURBO Print System is collation
capable. It can deliver multiple copies of your document in collated or
uncollated order to the output tray. The following illustration shows the
collated and uncollated stacking for two copies of a four-page file.
&ROODWHG
»
8QFROODWHG
Note: When using the collation with other features, such as stapling,
ensure that the collation is disabled in your Windows application Print
dialogue box but enabled in the QMS printer driver.
,PSURYLQJ&ROODWLRQ3HUIRUPDQFH
To greatly improve collation performance, which allows you to collate
longer and more complex print jobs on the QMS 2425/2425 TURBO
Print system, you can do one of the following:
Add more printer memory, which automatically increases the Display List client’s memory setting. See chapter 2, “Memory and
System Software,” of the Options manual for information on how
to install additional memory.
406785%23ULQW6\VWHP2SHUDWLRQ
&ROODWLQJ
2XWSXW
▲
»
Take any memory, if available and not being used by other clients,
and add it to Administration/Memory/K Mem Display.
Caution: This option should be used only by individuals who are
familiar with adjusting memory settings. Incorrect use of this
option could cause your system to operate incorrectly.
If your printer has an optional hard disk and if Administration/
Memory/Enable Disk Swap is set to On, then any extra memory is
distributed to all memory clients.
Collate through your application.
Note: Collating through your application is more time consuming
than collating through the printer. The application sends the
complete job the requested number of times rather than sending
it once and holding data in printer memory.
For a multiple-copy document with collation On, there must be
enough Display List memory to hold the display list blocks for all
pages in the collation range. (See the “Display List” memory section
in the Reference, for detailed information on display list blocks.) If
there is not enough memory, then a chunk collation boundary is
forced after the last compiled page of the collation range.
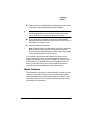
&KXQN&ROODWLRQ
This mechanism of introducing a forced boundary is known as chunk
collation. Chunk collation breaks a document into several smaller,
more manageable sets by gathering the pages into “chunks.” When
each set is printed, it frees up memory resources to compile subsequent pages of the document.
$GYDQFHG3ULQWLQJ)HDWXUHV
&ROODWLQJ
2XWSXW
For example, in the following illustration, copies “a” and “b” of each set
must be manually combined to create one collated document. The
order of printing is copy 1(a), copy 2(a), copy 3(a), copy 4(a), copy
1(b), copy 2(b), copy 3(b), and copy 4(b).
»
Note: The order of output on the your QMS 2425/2425 TURBO Print
System is from first to last page in both the face-up and face-down
output trays. So on the base model of this printer (with 8 MB
memory), complex multiple-page document sent via the face-up
output tray must be chunk collated to ensure that the order of pages is
first to last.
However, the base model system may have insufficient memory to
store the entire document before printing begins, so you could experience unexpected ordering of your output pages. With the executive
model of this printer with 24 MB of memory, and with the 2425
TURBO EX with 32 MB of memory, you add additional memory to the
base model system to avoid this type of chunk collation problem. See
appendix A, “QMS Customer Support,” for sales and support telephone numbers.
$GYDQWDJHVRI&ROODWLRQ
The main advantages of collation are user convenience and the time
savings derived from not having to separate and sort individual copies
of a print job. Each copy of the print job exists as a whole set unless
chunk collation has occurred.
406785%23ULQW6\VWHP2SHUDWLRQ
:RUNLQJZLWK
6WDWXV3DJHV
If chunk collation does occur, it may be best to use a header and
trailer page to determine the beginning and end of each collation
sequence. (See chapter 4, “Printer Configuration,” of the Reference
for information on using header and trailer pages.)
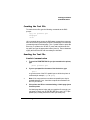
:RUNLQJZLWK6WDWXV3DJHV
Printing a status page is a two-step procedure: Identify the type of
status page you want to print, and then print it.
,GHQWLI\LQJD6WDWXVSDJH7\SH
Two types of status pages are available
Menu
Administration/Special Pages/Status Page Type
Choices
Standard, Advanced
Default
Standard
Standard
This one-page document provides
Printer identification (the printer’s name, firmware information,
and number of sheets printed)
Printer settings (printer set-up options for paper handling)
Current memory configuration (printer memory settings)
Timeouts (printer timeout settings)
Communication settings and input buffer sizes (host-printer communication settings, including spooling memory sizes)
Tickmarks in the lower-left corner for image alignment
$GYDQFHG3ULQWLQJ)HDWXUHV
&DQFHOOLQJ
(QGLQJ3ULQW
-REV
Advanced
This document, which can be five or more pages long, provides
All the information from the standard status page
The configuration menu settings
A full list of fonts and downloaded emulation
3ULQWLQJD6WDWXV3DJH
After you have identified the type of status page, press the Print Status key on the control panel to print it.
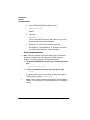
&DQFHOOLQJ(QGLQJ3ULQW-REV
The Cancel key has three functions:
It cancels the oldest print job in the system.
It cancels all jobs with a printing, interpreting, terminating, or
spooled status.
It allows you to send an end-of-job indicator to a currently compiling print job waiting on incoming data.
You don’t have to press the Online key before using the Cancel key.
There are no equivalent functions in the configuration menu.
406785%23ULQW6\VWHP2SHUDWLRQ
&DQFHOOLQJ
(QGLQJ3ULQW
-REV
&DQFHOD6LQJOH3ULQW-RE
Press the control panel keys in the order shown in the following
instructions to cancel a single print job.
Press this
key...
to...
The message
window reads...
Cancel
Access the JOB CANCEL
menu.
JOB CANCEL
CANCEL JOB
Cancel
or
Select
Cancels the job currently
CANCEL JOB
printing, interpreting, spooling, IS SELECTED
or terminating. The CANCEL
JOB message displays until the
print job is completely removed.
&DQFHOOLQJDOO3ULQW-REV
Press the control panel keys in the order shown in the following
instructions to cancel all print jobs.
Press this
key...
Cancel
Next
(twice)
Cancel
or
Select
to...
Access the JOB CANCEL
menu.
Advance to the Cancel All Jobs
option.
The message
window reads...
JOB CANCEL
CANCEL JOB
JOB CANCEL
CANCEL ALL JOBS
Cancel all jobs with a printing, CANCEL ALL JOBS
interpreting, spooled, or
IS SELECTED
terminating status. The
CANCEL ALL JOBS message
displays until all print jobs are
completely removed.
▲ Caution: Keep in mind thatalljobs with a printing, interpreting, or
terminating status are cancelled.
$GYDQFHG3ULQWLQJ)HDWXUHV
&DQFHOOLQJ
(QGLQJ3ULQW
-REV
(QGLQJD3ULQW-RE
»
Note: This procedure does not end print jobs that are still receiving
data. Its only purpose is to provide an end-of-job indicator for a print
job that does not have one. You can identify an end-of-job indicator in
the Administration/Communications/Parallel and Administration/
Communications/Serial menu. (See chapter 4, “Printer
Configuration,” in the Reference for more information). Also see
chapter 5, “Additional Technical Information,” in the Reference for a
complete discussion of End Job Mode.
When the message window displays
WAITING ON INPUT
END JOB?
press the control panel keys in the order shown in the following
instructions to end a print job.
Press
this
key...
Cancel
Next
(twice)
Cancel
or
Select
to...
The message
window reads...
Access the JOB CANCEL
JOB CANCEL
menu.
CANCEL JOB
Advance to the End Job mode. JOB CANCEL
END JOB
Select End Job.
END JOB
IS SELECTED
406785%23ULQW6\VWHP2SHUDWLRQ
3ULQWHU&DUH
,Q7KLV&KDSWHU
“Handling the Printer” on page 4-2
“Cleaning the Printer” on page 4-3
“Using the Maintenance Kit” on page 4-9
“Repacking the Printer” on page 4-10
,QWURGXFWLRQ
,QWURGXFWLRQ
This chapter describes how to handle and clean the printer.
Blurred or splotchy prints and paper jams can result from dusty printer
parts. Regular cleaning takes only a few minutes and helps ensure
print quality. Printer parts that require cleaning are the paper pick-up
rollers and the outside surface of the printer.
+DQGOLQJWKH3ULQWHU
Handle the printer with care to preserve its life. Abuse may cause
damage. Keep the following guidelines in mind:
Avoid spraying cleaning solution directly on the printer’s surface;
the spray could penetrate through the air vents of the printer and
damage the internal circuits.
Be careful when cleaning the inside or removing paper jams, as
the fixing assembly and other internal parts become very hot.
Leave the printer cover open before handling the inside of the
printer.
Do not close the covers abruptly, or expose the printer to vibrations.
Do not cover the printer immediately after using it. Turn it off and
wait until it cools down.
Do not leave the printer open for any length of time, especially in
well-lit places; light may damage the toner cartridge.
Do not open the printer during printing and do not tap paper
stacks on the printer.
Do not place anything on the printer and/or option deck covers.
Do not tilt, lubricate, or disassemble the printer.
406785%23ULQW6\VWHP2SHUDWLRQ
&OHDQLQJWKH
3ULQWHU
Do not touch the electrical contacts, gears, or laser beam
devices. Doing so may damage the printer and cause the print
quality to deteriorate.
Keep media in the output tray at minimum level. If the media
stacks too high, your printer may experience media jams and
excessive media curl.
Make sure two people are available to lift the printer when moving
it. The printer weighs about 106 lbs (48 kg); do not attempt to
move it by yourself.
Keep the following in mind when storing the printer for an
extended period:
—Unplug the printer.
—Remove the toner cartridge from inside the printer. After
removing the cartridge from the printer, return it to the aluminum bag in which it was originally packaged or wrap it in a thick
cloth to protect it from direct sunlight or any other bright light.
—See the “Environmental Requirements” section of appendix B,
“Technical Specifications,” in the Reference guide, for storage
specifications.
&OHDQLQJWKH3ULQWHU
Fine particles of dust from the paper may accumulate inside the
printer which could affect the printer’s performance. The printer
should be cleaned on a regular basis to prevent potential malfunctions. You need to clean only the following areas:
The outside of the printer
The anti-static teeth
The transfer guide area
The registration roller area
3ULQWHU&DUH
&OHDQLQJWKH
3ULQWHU
&OHDQLQJ*XLGHOLQHV
0 WARNING! Turn off the printer, unplug the power cord, and
disconnect any interface cables before cleaning.
ACHTUNG! Ziehen Sie den Netzstecker aus der Steckdose bevor
Sie den Drucker reinigen.
In addition to unplugging the printer, follow these guidelines when
cleaning the printer:
Clean the printer before use or allow a few minutes after unplugging it so that the fusing unit can cool down.
Do not leave moisture inside the printer. Allow all parts to dry
thoroughly before closing the printer cover.
Use a soft, lint-free cloth.
&OHDQLQJWKH2XWVLGHRIWKH3ULQWHU
0 WARNING! Turn off the printer, unplug the power cord, and
disconnect any interface cables before cleaning.
ACHTUNG! Ziehen Sie den Netzstecker aus der Steckdose bevor
Sie den Drucker reinigen.
To protect and maintain the appearance of your printer, wipe the
cover and external parts with a soft cloth moistened with water or mild
detergent.
0 WARNING! Do not spill water or detergent into the printer or the
printer will be damaged and an electric shock may occur.
ACHTUNG! Verschütten Sie kein Wasser oder andere Flüssigkeiten
auf dem Drucker, da das Gerät sonst beschädigt wird oder die Gefahr
eines elektrischen Schlages besteht.
406785%23ULQW6\VWHP2SHUDWLRQ
&OHDQLQJWKH
3ULQWHU
▲ Caution: Avoid using solvents, such as alcohol and benzene, or
sprays as they may damage the finish.
&OHDQLQJWKH$QWLVWDWLF7HHWK
0 WARNING! Turn off the printer, unplug the power cord, disconnect
any interface cables, and make sure that the fusing unit has cooled
down before cleaning.
ACHTUNG! Schalten Sie vor der Reinigung bitte den Drucker aus,
ziehen den Netzstecker heraus und entfernen alle Kabel von den
Schnittstellenanschlüssen, bis die Fixiereinheit abgekühlt ist.
To maintain clear, crisp print quality, and to help prevent paper jams,
clean the anti-static teeth after replacing a toner cartridge, or when
necessary. Use the following procedure:
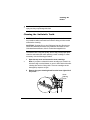
1
Open the top cover and remove the toner cartridge.
Note: If you plan to reinstall the toner cartridge, put it back in its
aluminum bag or a desk drawer, or cover it with a thick cloth while
cleaning the interior of the printer. The toner cartridge can be
damaged by exposure to light.
»
2
Remove the green cleaning brush from the inner right side of
the printer.
*UHHQ
&OHDQLQJ
%UXVK
3ULQWHU&DUH
&OHDQLQJWKH
3ULQWHU
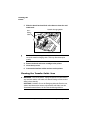
3
▲
Slide the brush back and forth a few times to clean the antistatic teeth.
7UDQVIHU&KDUJLQJ5ROOHU
$QWL
6WDWLF
7HHWK
Caution: When cleaning the anti-static teeth, be careful not to
touch the transfer charging roller. This may deteriorate print
quality.
4
Return the brush and toner cartridge to the printer.
5
Close the top cover.
6
Connect the interface cables and turn on the printer.
&OHDQLQJWKH7UDQVIHU*XLGH$UHD
0 WARNING! Turn off the printer, unplug the power cord, disconnect
any interface cables, and make sure that the fusing unit has cooled
down before cleaning.
ACHTUNG! Schalten Sie vor der Reinigung bitte den Drucker aus,
ziehen den Netzstecker heraus und entfernen alle Kabel von den
Schnittstellenanschlüssen, bis die Fixiereinheit abgekühlt ist.
406785%23ULQW6\VWHP2SHUDWLRQ
&OHDQLQJWKH
3ULQWHU
To maintain clear, crisp print quality, and to help prevent paper jams,
clean the transfer guide area after replacing a toner cartridge, or
when necessary. Use the following procedure:
1
Open the top cover and remove the toner cartridge.
Note: If you plan to reinstall the toner cartridge, put it back in its
aluminum bag or a desk drawer, or cover it with a thick cloth while
cleaning the interior of the printer. The toner cartridge can be
damaged by exposure to light.
»
2
Wipe off any toner residue and paper dust from the silver
metal strip with a soft cloth dampened with water.
7UDQVIHU&KDUJLQJ5ROOHU
7UDQVIHU*XLGH
$UHD
3
▲
Then use a soft dry cloth to wipe off any remaining water.
Caution: When cleaning the transfer guide area, be careful not to
touch the transfer charging roller. This may deteriorate print
quality.
4
Return the brush and toner cartridge to the printer.
5
Close the top cover.
6
Connect the interface cables and turn on the printer.
3ULQWHU&DUH
&OHDQLQJWKH
3ULQWHU
&OHDQLQJWKH5HJLVWUDWLRQ5ROOHU$UHD
0 WARNING! Turn off the printer, unplug the power cord, disconnect
any interface cables, and make sure that the fusing unit has cooled
down before cleaning.
ACHTUNG! Schalten Sie vor der Reinigung bitte den Drucker aus,
ziehen den Netzstecker heraus und entfernen alle Kabel von den
Schnittstellenanschlüssen, bis die Fixiereinheit abgekühlt ist.
To maintain clear, crisp print quality, and to help prevent paper jams,
clean the registration roller area (around the guide lock plate tray)
after replacing a toner cartridge, or when necessary. Use the following procedure:
1
»
Open the top cover and remove the toner cartridge.
Note: If you plan to reinstall the toner cartridge, put it back in its
aluminum bag or a desk drawer, or cover it with a thick cloth while
cleaning the interior of the printer. The toner cartridge can be
damaged by exposure to light.
406785%23ULQW6\VWHP2SHUDWLRQ
8VLQJWKH
0DLQWHQDQFH
.LW
2
▲
Wipe off any toner residue and paper dust from the registration roller area with a soft cloth dampened with water.Then
use a soft dry cloth to wipe off any remaining water.
Caution: When cleaning the registration roller area, be careful
not to touch the transfer charging roller. Finger oil, other
contaminants, or scratches on the roller may reduce print quality.
7UDQVIHU&KDUJLQJ5ROOHU
5HJLVWUDWLRQ5ROOHU$UHD
3
Return the brush and toner cartridge to the printer, then
close the top cover.
4
Connect the interface cables and turn on the printer.
8VLQJWKH0DLQWHQDQFH.LW
After about every 350,000 prints, the fixing assembly, the transfer
charging roller and gear assembly, and the feed and retard rollers
should be replaced. See chapter 9 of the Options guide, the “Installing the Maintenance Kit” section, for details on this kit.
3ULQWHU&DUH
5HSDFNLQJWKH
3ULQWHU
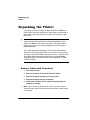
5HSDFNLQJWKH3ULQWHU
If you need to relocate or ship your QMS 2425/2425 TURBO Print
System after it has been installed, you must follow the procedures in
this section to prevent damage to the printer and to keep your warranty valid.
▲ Caution: QMS cannot be held responsible for damage to your printer
during shipment that results from the improper packaging of your
printer. You must use the instructions given in this section before
repacking the printer in its original shipping box with the original
packing materials.
If you need replacement packaging, in the US call QMS National
Service at 1 (334) 633-4300 x 2530. If you need to return the printer
for service, in the US call QMS Customer Service at 1 (334) 633-1072
for an RMA (Return Merchandise Authorization) number before
shipping the printer. In other countries, refer to appendix A, “QMS
Customer Support.”
5HPRYH&DEOHVDQG&DVVHWWHV
1
Turn off the printer.
2
Remove the power cable and all interface cables.
3
Remove the paper cassette(s) from the printer.
4
Remove the paper from the cassette(s).
5
Repack the cassettes in their original shipping boxes for
shipping or storage.
»
Note: If you’re returning the printer for service, you don’t need to
return the power cable, interface cables, sheet feeder, output stacker,
or cassettes.
406785%23ULQW6\VWHP2SHUDWLRQ
5HSDFNLQJWKH
3ULQWHU
5HPRYHWKH7RQHU&DUWULGJH
»
Note: The toner cartridge is sensitive to bright light. Do not remove
the cartridge from the printer until you’re ready to return it to its
protective bag. Store the cartridge in an environment that is not
subject to extreme heat or humidity, salty air, or corrosive gases, such
as aerosols. Keep the toner cartridge away from your computer. The
magnets in the cartridge can damage data, particularly on your floppy
disks.
1
Lift the top cover as
far as it will open.
7RS&RYHU
3ULQWHU&DUH
5HSDFNLQJWKH
3ULQWHU
2
Remove the toner
cartridge.
While grasping the handle of the toner cartridge, remove the
cartridge by pulling it up
and then towards you.
3
»
Repack the toner cartridge in its original protective aluminum bag and shipping carton.
Note: If you’re disposing of the toner cartridge, put it in a trash
receptacle. Don’t dispose of it by burning.
406785%23ULQW6\VWHP2SHUDWLRQ
5HSDFNLQJWKH
3ULQWHU
5HSDFNWKH3ULQWHU
0 WARNING! The printer weighs about 106 lbs (48 kg). Don’t lift it by
yourself.
ACHTUNG! Der Drucker wiegt ca 48 kg; bitte versuchen Sie
niemals, das Gerät alleine anzuheben oder zu tragen.
1
Insert the packing material that was originally removed upon
installation of the printer.
2
Close the printer’s top cover.
3ULQWHU&DUH
5HSDFNLQJWKH
3ULQWHU
3
Lift the latch to pull open the left cover and gently lower it
until it stops.
/HIW
&RYHU
4
Replace the cardboard that was originally removed from the
fixing assembly area upon installation of printer.
406785%23ULQW6\VWHP2SHUDWLRQ
5HSDFNLQJWKH
3ULQWHU
»
5
Replace the two spacers that were removed from the fixing
assembly upon installation of the printer, and then close the
left cover.
6
If you have an optional feeder, remove it from the printer, and
then repack it for storage.
7
Put the printer back in its original protective plastic bag.
8
Get someone to help you with this step: Lift the printer back
into its original shipping carton.
Note: If you’re returning the printer for service, you don’t need to
return the toner, paper cassette(s), sheet feeder, output stacker,
power cable, or interface cables.
3ULQWHU&DUH
3ULQW4XDOLW\
,Q7KLV&KDSWHU
“About Halftone Types” on page 5-2
“About Print Density” on page 5-3
“About Print Resolution” on page 5-4
,QWURGXFWLRQ
,QWURGXFWLRQ
Density, gamma correction, and print resolution are some of the factors that affect print quality. High-resolution technology, while more
complex, gives you more flexibility to control the print quality factors.
This chapter will aid you in setting your printer up for maximum performance. For a more detailed explanation of factors that affect your
printer’s output, refer to chapter 5, “Additional Technical Information,”
in your Reference guide.
$ERXW+DOIWRQH7\SHV
The ability of the printer to produce halftones allows you to add
scanned images or halftone graphics to your documents.
Your printer provides three different types of halftones—basic,
advanced, and standard.
Menu
Choices
Administration/Emulations/PostScript/Halftone Type
Basic—See the following table for details on screen
frequency, screen angles, and gray levels.
Standard—See the following table for details on screen
frequency, screen angles, and gray levels.
Default
Advanced—See the following table for details on screen
frequency, screen angles, and gray levels.
Standard
These options allow you to customize the smoothness of the printed
image according to the number of grayscales it uses. The number of
gray levels increase by increasing the halftone type and the printer
resolution.
406785%23ULQW6\VWHP2SHUDWLRQ
$ERXW3ULQW
'HQVLW\
Halftone
Type
300 DPI
LPI
600 DPI
Angle Level LPI
1200 DPI
Angle Level LPI
Basic
53.03 45.0
33
70.71
45.0
Standard
53.03 45.0
129
106.06 45.0
Advanced
67.08 26.56 81
Angle Level
73
84.85 45.0
200
129
106.06 45.0
256
102.89 59.04 137
126.49 18.43 256
See chapter 5, “Additional Technical Information,” in the Reference,
for more detailed information on halftones and how to change their
characteristics via the printer configuration menu.
»
Note: The standard settings listed in this table are optimized for
performance, and the advanced settings are optimized for quality.
$ERXW3ULQW'HQVLW\
Print density is the amount of toner placed on each dot, making the
print appear lighter or darker. The higher the density, the darker the
print looks and the higher the contrast is on the page. Toner density
can be used to change contrast on scanned images, or to customize
smoothing.
»
Note: If the print density is too light, make sure that the
Administration/Engine/Print Quality/Normal option is turned on before
making any adjustments. The Conserve Toner option saves toner by
simulating draft-quality printing. (See chapter 4, “Printer
Configuration,” of the Reference for more information.)
Adjust the print density using the Administration/Engine/Toner Density setting.
Menu
Choices
Default
3ULQW4XDOLW\
Administration/Engine/Toner Density
00—15
00—The lightest available setting
15—The darkest available setting
07
$ERXW3ULQW
5HVROXWLRQ
$ERXW3ULQW5HVROXWLRQ
Another way to sharpen the images printed on your pages is through
setting the print resolution. Your printer is capable of printing at 300,
600, and 1200 dpi. This choice of resolutions allows you to customize
the quality of your output according to its use. For pages requiring the
best quality your printer can provide, set the printer resolution to 600
dpi or to 1200 dpi if the optional Multi-Res daughterboard is installed
with appropriate memory.
»
Note: Printing at 600x600 dpi resolution on certain media sizes
requires additional memory. To print at 1200x1200 dpi you need to
install an optional Multi-Res daughterboard, and you may also need
to add more memory. See the“High-Resolution Printing” section in
chapter 3, “Advanced Printing Features,” of this manual for memory
and high resolution printing details. See the Options manual for more
information on the Multi-Res daughterboard.
6HWWLQJWKH5HVROXWLRQ
You can set the default resolution of your printer through the Administration/Engine/Def Resolution menu.
Menu
Choices
Administration/Engine/Def Resolution
300 dpi—300x300 dpi resolution
600 dpi—600x600 dpi resolution
Note: If you have the optional Multi-Res
daughterboard installed, the 1200 dpi option also
appears.
600 dpi
»
Default
406785%23ULQW6\VWHP2SHUDWLRQ
7URXEOHVKRRWLQJ
3ULQWHU3UREOHPV
,Q7KLV&KDSWHU
“Status Messages” on page 6-2
“Testing PC-Printer Communication” on page 6-10
“Printer Problem Checklist” on page 6-16
“Media Jams” on page 6-18
“Stapler Jams” on page 6-42
“Clearing CrownCopy ADF Paper Jams” on page 6-36
“Windows Driver Problems” on page 6-51
“CrownNet Problems” on page 6-52
“Output Problems” on page 6-52
“Kanji Option Kit Problems” on page 6-55
“Print Quality Problems” on page 6-57
“Image Defects” on page 6-59
,QWURGXFWLRQ
,QWURGXFWLRQ
This chapter provides information to aid you in resolving printer problems you may encounter, or at least guide you to the proper sources
for help. You’ll find in this chapter tables of common status messages,
a problem checklist, and actions you should take when a specific
problem occurs. There are step-by-step instructions for removing
media jams from key locations along the media path, as well as
descriptions of common print quality problems with corresponding
solutions. You’ll also find what information you’ll need to have before
placing a service call if one becomes necessary.
6WDWXV0HVVDJHV
Printer control panel messages help you locate many problems.
When the printer needs operator assistance, the message window
displays one of the following messages:
This status message...
means...
ACC ALREADY DISABLED
The accounting option
selected is already in
effect.
ACC ALREADY ENABLED
The accounting option
selected is already in
effect.
ACC DISABLED
The accounting option
selected is already
disabled.
ACC ENABLED
The accounting option
selected is already in
effect.
do this...
406785%23ULQW6\VWHP2SHUDWLRQ
6WDWXV0HVVDJHV
This status message...
means...
do this...
ACC FILES GOT REMOVED The accounting option is
disabled and the
accounting files are empty.
After a reset, the files are
removed. This prevents
you from wasting disk
space with empty
accounting files.
ACC XXXXXXXX FILE
FULL
The specified file is full.
(XXXXXXXX
represents the
specified accounting
file—Job
Accounting file or
Paper Accounting
file.) If you want
accounting
enabled, copy
these files to floppy
disk/s or transfer
them to your host
computer using ftp
(if available). Then
reset the accounting
files so that new
jobs can be
accepted. If you do
not want to use
accounting, you
can disable it.
ACC FILE IS XXX %
FULL
The Job Accounting File is
80% or more full (XXX
represents the percentage
full in increments of 5%.
See ACC
XXXXXXXX FILE
FULL error for
recovery
information.
ACC FILES NOT EMPTY,
CANNOT SHRINK,
KEEPING OLD SIZE
The Job Accounting file
can be reduced in size
only after a reset when the
file is empty.
7URXEOHVKRRWLQJ3ULQWHU3UREOHPV
6WDWXV
0HVVDJHV
This status message...
means...
do this...
x ACTIVE JOBS
The printer is on line. (x
identifies the number of
jobs in process.)
ADJUST INPUTBIN BIN
The specified input bin
(cassette) is not inserted
correctly.
Adjust the cassette,
Multipurpose tray.
INPUTBIN BIN JAM
Media has jammed while
being pulled from the
specified input bin.
Clear jam from the
specified input bin.
See “Media Jams”
on page 6-18.
CANCEL JOB
The Cancel key has been
pressed and all of the print
jobs in the print queue are
being canceled.
Press Select and
the oldest job in the
print queue will be
canceled.
CANCEL ALL JOBS
The Cancel key has been
pressed and all of the print
jobs in the print queue are
being canceled.
Press Select for all
jobs with a printing,
interpreting,
spooled, or
terminating status to
be completely
removed from the
system.
CREATED FILE
The accounting file is
being created.
CREATING
XXXXXXXXXXXX FILE,
PLEASE WAIT
The specified accounting
file is created when
accounting is enabled and
the files are not in
existence or these files are
created following a Reset
Accounting.
(XXXXXXXXXXXX
represents the Job
Accounting or Paper
Accounting file.
406785%23ULQW6\VWHP2SHUDWLRQ
6WDWXV0HVVDJHV
This status message...
means...
do this...
END JOB
The Cancel key has been Press Select to
pressed.
provide an end-ofjob indicator for a
print job that does
not have one
CLOSE ENGINE DOOR(S)
One or more of the front or Close the front or
side covers is open and
side covers.
must be closed.
DUPLEXER ABSENT
The optional duplexer unit
is not installed.
DUPLEXER JAM
Media has jammed while
passing through the
duplexer.
EXTENDED ACCOUNTING
FILE SIZE
The size of the non-empty
accounting file has been
increased successfully.
FINISHER STAPLE JAM
The Stackler has a staple Use the instructions
jam.
in “Media Jams” on
page 6-18 of this
chapter.
IDLE
The printer is on line, but
no jobs are in process.
ILLEGAL DUPLEX
PRINTING
The optional envelope
feeder was selected as the
input bin and the duplexer
as the output bin. The
printer does not support
duplexing envelopes.
ILLEGAL MANUAL FEED
PRINTING
Media has been inserted Remove the media
and reinsert it.
in the manual feed slot
before the paper tray lifting
mechanism is in the ready
position.
INITIALIZING
The printer is getting ready
to go on line.
7URXEOHVKRRWLQJ3ULQWHU3UREOHPV
Locate and clear the
media jam. See
“Media Jams” on
page 6-18.
Access Operator
Control/Duplex via
the control panel
and set Duplex to
Off.
6WDWXV
0HVVDJHV
This status message...
do this...
INPUT IDLE
PRINTING
The printer is on line and
printing jobs already in the
queue. No new jobs are
arriving at the
communication interfaces.
LOAD STAPLES
PRESS STAPLE TAB
The stapler is out of
staples.
Use the instructions
in chapter 8,
“Document
Finishing Options”
the “Replacing the
Staple Cartridge”
section of the
Options manual.
OUTPUTBIN OUTPUTBIN
FULL
The specified tray or
output bin is full.
Normally this
indicates that you
need to remove the
pages.
OUTPUTBIN OUTPUTBIN
JAM
PRINTING STATUS
means...
Media has jammed
between the print engine
and the specified output
bin (tray).
A status page is printing
Locate and
remove the jam.
See “Media Jams”
on page 6-18.
Wait until after the
status page prints,
and the message
clears.
406785%23ULQW6\VWHP2SHUDWLRQ
6WDWXV0HVVDJHV
This status message...
PUT SIZE PAPER IN
INPUTBIN BIN
means...
That Operator Control/
Chain Inputbins is set to
Off and that the displayed
cassette or tray is empty.
Refill it with the specified
size media. In the case of
a cassette, SIZE is the
media size detected by the
engine. In the case of the
tray, the SIZE is the media
size of the tray configured
in the Operator Control
Multipurpose Sz menu.
INPUTBIN is the empty
cassette or tray (the
default input bin set i the
Administration/Engine/
Inputbin # menu).
PUT SIZE PAPER IN ANY That Operator Control/
Chain Inputbins is set to
BIN
On and that a chained
inputbin is empty.
do this...
Refill the empty
cassette with the
specified media
size.
Refill the empty
inputbin with the
specified paper size.
RESETTING ACCOUNTING
The reset accounting
operation is in process.
TEST PRINT
A test print page is
printing.
TONER ABSENT
The toner cartridge is not
installed.
Install a toner
cartridge.
TONER LOW
The toner is low. There is
enough toner to print
about 100 pages from the
point the message first
appeared.
Replace the toner
cartridge. Refer to
chapter 2,
“Consumables,” for
details.
TRANSPORT JAM
Media has jammed while
passing through the
engine.
Locate and remove
the jam. See
“Media Jams” on
page 6-18.
7URXEOHVKRRWLQJ3ULQWHU3UREOHPV
6WDWXV
0HVVDJHV
This status message...
means...
do this...
WAITING FOR IDLE
An active job is in process.
Access to the menu is not
allowed until the job is
finished.
Wait until the print
job is finished and
the printer goes
idle.
WAITING ON INPUT
END JOB?
The compiler is waiting on
incoming data for the first
job in the queue. The job
may not have an end-ofjob indicator and therefore
cannot end. The message
clears if more input arrives
from the port or if you
press the Cancel key. No
other jobs can be printed
until this job has ended.
Wait until the job is
finished and the
printer goes idle to
access the
configuration menu.
WARMING UP
The printer is warming up.
Wait until the IDLE
message displays
before printing.
6HUYLFH0HVVDJHV
When the printer requires service, operation stops and the message
window displays CALL FOR SERVICE followed by the location of the
problem and error number. Have this information available when you
call for service.
»
Note: A service message sometimes occurs as a result of an unusual
combination of events, not because of an actual problem. When the
printer stops and a service message displays in the message window,
turn the printer off and back on. This often clears the service
message indicator and printer operation resumes. Always try this
before making a service call.
Service calls should be placed to the vendor from whom you purchased the printer. If you cannot get service from your vendor, see
appendix A,“QMS Customer Support,” for contact information.
406785%23ULQW6\VWHP2SHUDWLRQ
6WDWXV0HVVDJHV
&DOOIRU6HUYLFH (UURU&RGHV
The following table lists Call for Service error codes that could
appear on the printer message window and their meanings.
Error
Code
Error Description
1
General fuser malfunction
2
Fuser temperature low malfunction
3
Fuser temperature high malfunction
4
Fuser warm up malfunction
10
Main motor malfunction
11
Scanner motor malfunction
12
Outlet fan motor malfunction
13
Power supply fan motor malfunction
14
Controller fan motor malfunction
15
Outlet fan motor 2 malfunction
20
Beam detect malfunction
21
No VSYNC from controller malfunction
30
Duplex guide malfunction
40
MPT lifter malfunction
7URXEOHVKRRWLQJ3ULQWHU3UREOHPV
7HVWLQJ3&
3ULQWHU
&RPPXQLFDWLRQ
+3*/(UURU&RGHV DQG3&/(UURU&RGHV
The following tables list error codes that could appear on the printer
message window when running the HP-GL or PCL emulation.
HPGL
Description
Error
Codes
PCL
Error Description
Code
s
0
Not enough memory for
job.
0
Not enough memory for
job.
1
Too many
transformations.
1
State lost.
2
Math error.
2
Math error.
3
Job aborted.
3
Job aborted.
4
Instruction not
recognized.
4
Out of memory for
macros.
5
Wrong number of
parameters.
5
Disk full. Cannot store
fonts.
6
Out of range parameter,
or illegal character.
6 - 13
Internal error 1 - 8.
7
Not used.
8
Unknown character set.
9
Position overflow.
10
Buffer overflow.
7HVWLQJ3&3ULQWHU
&RPPXQLFDWLRQ
To test communication between your printer and your PC, first create
a short file that ejects a page from the printer. Then send the file to
the printer.
406785%23ULQW6\VWHP2SHUDWLRQ
7HVWLQJ3&3ULQWHU
&RPPXQLFDWLRQ
&UHDWLQJWKH7HVW)LOH
To create the test file, type the following commands at the DOS
prompt:
copy con printest.ps↵
showpage↵
^D^Z↵
(All commands above except the DOS copy command are case sensitive and must be typed exactly as shown.) Showpage is a PostScript
command that prints a blank page. The ↵ symbol means to press the
Enter key. To produce the ^D and ^Z, press and hold down the Ctrl
key while you type the appropriate letters (d and z). These characters
signify the end of the file and must always be included.
6HQGLQJWKH7HVW)LOH
3DUDOOHO&RPPXQLFDWLRQ
1
To send the PRINTEST.PS file you just created to the printer,
type
print printest.ps↵
2
If you’re prompted for the name of the list device, type
lpt1↵
or type the name of the PC’s parallel port to which the printer is
connected (for example, lpt2 or lpt3).
Note: If the computer has more than one parallel port, they're
probably labeled. If not, check the computer documentation for
the LPT port names.
»
3
If the printer and PC are communicating, a blank page ejects
from the printer.
If a blank page doesn’t eject and you typed the file correctly, you
may want to check your AUTOEXEC.BAT file to see if LPT1 (the
parallel port) is being directed to COM1 (the serial port):
7URXEOHVKRRWLQJ3ULQWHU3UREOHPV
7HVWLQJ3&
3ULQWHU
&RPPXQLFDWLRQ
a
If the AUTOEXEC.BAT file contains the line
MODE LPT1:=COM1:
delete it.
b
Then type
MODE LPT1:,,P↵
The “P” represents infinite retry and it tells the PC to send
print jobs until the printer accepts them.
c
Restart the PC and retry the communication test.
See chapter 6, “Troubleshooting,” of Operation and refer to
your DOS documentation for more information.
6HULDO&RPPXQLFDWLRQ
»
Note: The serial interface is an option which must be purchased
through your QMS vendor. See appendix A, “QMS Customer
Support,” for a list of locations and telephone numbers.
1
To send the PRINTEST.PS file you just created to the printer,
type
print printest.ps↵
2
If you’re prompted for the name of the list device, type
com1↵
or type the name of the PC’s serial port to which the printer is
connected (for example, com2 or com3).
»
Note: If the PC has more than one serial port, they're probably
labeled. If not, check the PC’s documentation for the COM port
names.
406785%23ULQW6\VWHP2SHUDWLRQ
7HVWLQJ3&3ULQWHU
&RPPXQLFDWLRQ
3
If the printer and PC are communicating, a blank page ejects
from the printer.
If a blank page doesn’t eject and you typed the file correctly, you
may want to check your AUTOEXEC.BAT file in DOS to make
sure that the printer's serial port settings match those of the PC.
a
Look for a command line like this in your AUTOEXEC.BAT
file:
MODE COM1:9600,N,8,1,P↵
In this example, the serial port settings are 9600 for baud
rate, N (no) parity, 8 data bits, and 1 stop bit. The “P” stands
for infinite retry.
Note: If the mode statement isn’t in your AUTOEXEC.BAT
file, you may temporarily set these parameters at the DOS
prompt to continue this test by typing the modestatement as
shown above. To make this setting permanent, you’ll need to
add this statement to your AUTOEXEC.BAT file.
»
b
Restart the PC, and then check the start-up page, which
prints when you turn on the printer (unless you disabled it).
This tells you the current serial port settings for the printer.
c
If the serial settings (baud rate, parity, data bits, and stop bits)
shown on the start-up page match those in your
AUTOEXEC.BAT file, you need make no further changes. Go
to the section “Special PC Concerns” later in this chapter.
If the printer’s serial port settings are different from your PC’s
settings, use the printer control panel, as described in the following section, “Changing Serial Port Settings,” to make them
match.
&KDQJLQJ6HULDO6HWWLQJV
Since your printer is configured at the factory for the most typical
printing environments, the serial settings in your AUTOEXEC.BAT file
and on the start-up page should be the same. However, if they differ,
7URXEOHVKRRWLQJ3ULQWHU3UREOHPV
7HVWLQJ3&
3ULQWHU
&RPPXQLFDWLRQ
you must configure the printer to use the serial settings specified in
the AUTOEXEC.BAT file.
Press the following control panel keys in the order shown:
Press
this
key...
to...
The message
window reads...
Online
Take the printer off line (the
Online indicator goes out.
IDLE
Menu
Access the configuration menu.
CONFIGURATION
OPERATOR CONTROL
Next
Advance to the Administration
menu.
CONFIGURATION
ADMINISTRATION
Select
Access the Administration
menu.
CONFIGURATION
COMMUNICATIONS
Select
Access the Communications
menu.
COMMUNICATIONS
TIMEOUTS
Next
Advance to the Serial menu.
COMMUNICATIONS
SERIAL
Select
Access the Serial menu.
SERIAL
MODE
Next
(one or
more
times)
Access the Baud Rate menu.
SERIAL
BAUD RATE
Select
Access the Baud Rate menu.
BAUD RATE
*9600
Next
(one or
more
times)
Advance to the correct baud
rate.
BAUD RATE
#
406785%23ULQW6\VWHP2SHUDWLRQ
7HVWLQJ3&3ULQWHU
&RPPXQLFDWLRQ
Press
this
key...
Select
»
to...
Select the displayed baud rate.
The message
window reads...
# IS SELECTED
BAUD RATE
Note: If you need to change other settings, press the Next key to
access the appropriate menu option, then return to the point
where you press the Select key to access the Administration
menu and select the new settings.
Online
Access the Save Changes
option.
SAVE CHANGES?
*NO
Next
Advance to the Yes option.
SAVE CHANGES?
YES
Select
Save changes.
IDLE
Online
Put the printer back on line (the
Ready indicator lights).
IDLE
9HULI\LQJWKH6HULDO6HWWLQJ&KDQJHV
1
Turn the printer on and off again.
2
Compare the serial port settings listed on the start-up page
to those in your AUTOEXEC.BAT file.
3
Try the communication test again.
If a blank page ejects from the printer, the printer and the PC are
communicating. Skip ahead to “PC Printing Software,” below, to
finish connecting the printer. If a blank page does not eject and
you typed the file correctly, see chapter 6, “Troubleshooting,” of
the Operation guide, and refer to your DOS documentation for
more information.
7URXEOHVKRRWLQJ3ULQWHU3UREOHPV
3ULQWHU3UREOHP
&KHFNOLVW
3ULQWHU3UREOHP&KHFNOLVW
This section contains a list of possible printer problems and solutions.
If you have just installed your printer, be sure you have followed the
steps in chapter 2, “Setting Up Your Printer,” in the Getting Started
guide.
If there is no display message, use the following steps to identify the
source of your problem and to learn of possible solutions:
1
Does the printer power light come on?
YES - Go to number 2.
NO - Check the following:
2
Is power supplied to the AC outlet?
Is the power cord plugged securely into both the power
outlet and the printer? Check the power cord connection.
Is the printer power switch in the On position (pushed in)?
Is the power outlet working?
Does the line voltage from the power outlet match the
printer's power requirements? See appendix B, “Technical Specifications,” in your Reference guide.
Can you print a status page?
YES - Go to question 3.
NO - Check the following:
Is the printer off line before you try to enter the Administration/Special Pages/Print Status menu? It should be.
Does the cassette have paper? If it is out of paper, the
PAPER OUT message displays and the Error indicator
lights.
Is the method of tray delivery configured correctly? See
chapter 4, “Printer Configuration,” in your Reference
guide.
406785%23ULQW6\VWHP2SHUDWLRQ
3ULQWHU3UREOHP
&KHFNOLVW
3
4
Are all the printer covers closed securely?
Is there a media jam? If a paper jam message displays
and the Error indicator lights, go to one of the following
sections in this chapter on clearing a media jam.
Is the printer receiving data from the computer? If the Data
indicator blinks after a file is sent, the printer is receiving the
data. If not, check the following:
Is the printer on line? The online indicator should be on
and the message window should display IDLE.
Has the emulation been changed from ESP to an emulation that doesn’t match the file you are sending? See
chapter 4, “Printer Configuration,” in the Reference
guide.
Print a status page from the control panel. If you are
using the serial interface, is the baud rate (speed of data
transmission) of the printer, the computer, and your software application the same? See chapter 4, “Printer Configuration,” in the Reference guide.
If you still cannot identify the problem, contact your QMS
vendor.
Is the printer printing codes or not printing at all when in
ESP mode?
Reconfigure the port to the specific printer emulation of
the file you are trying to print. See chapter 4, “Printer
Configuration,” in the Reference guide for instructions.
If a PostScript file prints PostScript emulation statements
while in ESP mode, increase the ESP timeout. See chapter 4, “Printer Configuration,” in your Reference guide to
change it from the control panel.
If you continue to have problems with the ESP mode
selecting the appropriate printer emulation, contact your
QMS vendor.
7URXEOHVKRRWLQJ3ULQWHU3UREOHPV
0HGLD-DPV
5
If nothing prints at all, do an engine test print.
Use a paper clip that has been straightened and insert it gently
into a small square access hole on the right side of the printer
near the back. The printer should print a vertical line test print.
0HGLD-DPV
0HGLD3DWK
Understanding how media travels inside the printer helps you better
handle media jams.
After a sheet of media is fed manually or from a tray, cassette, or input
bin, it travels to the toner cartridge where toner is attracted onto the
media by means of the laser beam. Then, the media moves to the fixing assembly area where toner is fused to it. Finally, the media comes
out from either the face-down or face-up tray, depending on the media
delivery selected.
406785%23ULQW6\VWHP2SHUDWLRQ
0HGLD-DPV
$XWRPDWLF-DP5HFRYHU\
With most printers, if a jam occurs, you must remove the jammed
media and then reprint the job. However, the QMS 2425/2425
TURBO Print System provides automatic jam recovery (when
enabled through the Administration/Engine/Page Recovery menu). If
a media jam occurs, remove the jammed media, and printing automatically resumes from the page the printer stopped at when the jam
occurred.
▲ Caution: For automatic jam recovery to work, it is necessary to leave
the printer turned on when you remove the jammed media. After the
jam is cleared, open and close one of the doors (top, left, or right)
before printing. Printing will not resume until you do this.
/RFDWLQJ0HGLD-DPV
When a media jam occurs, a PAPER JAM message displays in the
message window. Frequent jams in any area indicate that area should
be checked, repaired, or cleaned. Repeated jams may also happen if
you are using the wrong weight print media. (See the “Print Media”
section of appendix B, “Technical Specifications,” in the Reference,
for print media specifications.)
7URXEOHVKRRWLQJ3ULQWHU3UREOHPV
0HGLD-DPV
Print media jams can occur in the following areas:
)DFH'RZQ7UD\
/HIW&RYHU)L[LQJ$UHD
7RS&RYHU$UHD
2SWLRQDO(QYHORSH)HHGHU
0XOWLSXUSRVH7UD\
8SSHUDQG/RZHU&DVVHWWH
3DSHU3LFN8S$UHD
2SWLRQDO3DSHU'HFN
2SWLRQDO'XSOH[LQJ8QLW$UHD
)DFH8S7UD\$UHD
Check each of the indicated locations, and remove any jammed print
media. Jams can occur in more than one location at a time, so be
sure to check all the indicated locations.
»
Note: This illustration shows the QMS 2425/2425 TURBO Print
System without the Stackler. See the “Clearing Stackler Jams”
section for Stackler jam locations.
406785%23ULQW6\VWHP2SHUDWLRQ
0HGLD-DPV
After checking for and removing media from the areas indicated, open
and close one of the printer covers (top, left, or right) to clear the jam
message. If all the jammed media has been removed, printing automatically restarts when the cover is closed. If printing does not restart
or if the printer jams again, make sure that no pieces of media remain
in the printer.
&OHDULQJ(QYHORSH)HHGHU$UHD-DPV
0 WARNING: The fixing assembly and print delivery areas become
extremely hot when the printer is used. Wait until the printer has
completely cooled down before you touch these areas. Personal
injury could result if you touch these areas while they are hot.
ACHTUNG! Die Fixeriereinheit sowie Teile der Papierausgabe
werden im Betrieb extrem heiá. Warten sie, bis der Drucker
vollständig abgekühlt ist, bevor Sie diese Teile berühren. Ein
Berühren der heiáen Teile kann zu Verletzungen führen
1
Remove any envelopes from the envelope feeder.
2
Push in the extension tray and lower the envelope pressure
plate.
7URXEOHVKRRWLQJ3ULQWHU3UREOHPV
0HGLD-DPV
3
Slightly raise the end of the feeder, and remove it from the
printer.
4
Reach into the access opening under the feeder to remove
the jammed envelope.
5
Align the envelope feeder’s tabs with the slots on the printer
to reinstall it.
406785%23ULQW6\VWHP2SHUDWLRQ
0HGLD-DPV
6
Slide the feeder in the printer slot as far as it will go.
7
Open and close one of the printer’s covers (top, left, or right)
to remove the jam message and continue printing.
7URXEOHVKRRWLQJ3ULQWHU3UREOHPV
0HGLD-DPV
&OHDULQJD0XOWLSXUSRVH7UD\$UHD-DPV
Follow these instructions to clear a media jam from the multipurpose
tray area:
1
Remove any jammed media by pulling gently on it.
If the jammed media can’t be pulled out easily, don’t force it out.
Open the top cover and follow the directions for removing a media
jam in the “Clearing Top Cover Area Media Jams” section.
406785%23ULQW6\VWHP2SHUDWLRQ
0HGLD-DPV
&OHDULQJ3DSHU3LFNXS$UHD-DPV
Follow these instructions to clear a media jam from the paper pick-up
area:
1
If the optional paper deck is installed, first lower the paper
pick-up cover. Then open the jam release cover.
2
Press down on the green lever, and remove the jammed
media.
3
Close the jam release cover.
4
Close the paper pick-up cover if the optional paper deck is
installed.
&OHDULQJ8SSHUDQG/RZHU&DVVHWWH$UHD
-DPV
Follow these instructions to clear a media jam from the upper and
lower cassette area:
1
Determine which media cassette is currently being used and
open it.
7URXEOHVKRRWLQJ3ULQWHU3UREOHPV
0HGLD-DPV
2
Pull out the cassette and gently remove any jammed media.
3
Adjust the remaining print media in the cassette.
4
Slide the cassette back in the printer.
5
Open and close one of the printer’s covers (top, left, or right)
to remove the jam message and continue printing.
&OHDULQJ'XSOH[HU8QLW$UHD-DPV
Follow these instructions to clear a media jam from the duplexer area,
if the optional duplexer unit is installed.
0 WARNING: The fixing assembly and print delivery areas become
extremely hot when the printer is used. Wait until the printer has
completely cooled down before you touch these areas. Personal
injury could result if you touch these areas while they are hot.
ACHTUNG! Die Fixeriereinheit sowie Teile der Papierausgabe
werden im Betrieb extrem heiá. Warten sie, bis der Drucker
vollständig abgekühlt ist, bevor Sie diese Teile berühren. Ein
Berühren der heiáen Teile kann zu Verletzungen führen.
406785%23ULQW6\VWHP2SHUDWLRQ
0HGLD-DPV
1
Lightly press the top center area of the duplexing unit jam
release cover (on the front of the printer) to pop it open.
2
Open it and remove the jammed media.
▲
Caution: Do not force the jammed media out. Otherwise, the
media may tear and leave residual pieces in the duplexing unit.
3
Close the duplexing unit jam release door by pressing it until
it clicks.
4
Open the left cover.
7URXEOHVKRRWLQJ3ULQWHU3UREOHPV
0HGLD-DPV
5
Press down the green tab to unlock the duplexing unit.
6
Using both hands, pull the duplexer out until it can be moved
to a vertical position.
7
Lift the green plate and gently pull out the jammed paper.
*UHHQ
3ODWH
406785%23ULQW6\VWHP2SHUDWLRQ
0HGLD-DPV
8
Return the green plate to its initial position.
9
If the paper is already inside the duplexing unit, gently pull
the paper straight up to remove it.
10 Reinstall the duplexer.
11 Close the door.
7URXEOHVKRRWLQJ3ULQWHU3UREOHPV
0HGLD-DPV
&OHDULQJ/HIW&RYHUDQG)L[LQJ$UHD-DPV
1
Gently remove any jammed paper from the following areas
406785%23ULQW6\VWHP2SHUDWLRQ
0HGLD-DPV
2
If the media is still in the fixing assembly area, press down
the green tab to open the door and pull the jammed media
straight out.
*UHHQ
3
Release the tab door to close it.
4
Close the left cover.
Note: Remember to pull the media gently to avoid tearing or
leaving scraps, which may cause another media jam.
»
&OHDULQJ2SWLRQDO3DSHU'HFN$UHD-DPV
Follow these instructions to clear a media jam from the paper deck
area, if the optional paper deck is installed;
1
Open the paper pick-up cover to remove the paper jam.
7URXEOHVKRRWLQJ3ULQWHU3UREOHPV
0HGLD-DPV
2
Remove any paper from the paper pick-up cover by simply
lifting the metal frame from the green label area and gently
pulling out the paper.
3
Remove any paper from the paper pick-up roller area.
4
Close the pick-up cover.
If you cannot remove the paper from this area, go on to step 5.
406785%23ULQW6\VWHP2SHUDWLRQ
0HGLD-DPV
5
Open the paper deck and remove the jammed paper.
6
Close the paper deck.
7
Open and close one of the printer’s covers (top, left, or right)
to remove the jam message and continue printing.
&OHDULQJ7RS&RYHU$UHD-DPV
»
»
Note: Leaving print media in the multipurpose tray can cause the
print media position to shift during removal of the jam. This may result
in a media feed failure and another jam when printing is restarted.
1
Open the printer’s top cover.
2
Remove the toner cartridge.
Note: Place the toner cartridge in its protective bag to avoid
exposure to direct light.
7URXEOHVKRRWLQJ3ULQWHU3UREOHPV
0HGLD-DPV
3
0
Open the transfer-guide lock-tray and lift the green lever to
open the media access door.
WARNING: Be careful; the area around the fuser assembly is
hot
ACHTUNG! Verletzungsgefahr! Bei Betrieb wird die Umgebung
der Fixiereinheit heiß.
4
▲
Pull out the jammed media.
Caution: Do not lift the transfer-guide lock-tray beyond its upright
position. This may damage the printer.
5
Close the media access door and place the green lever on
the transfer-guide lock-tray in the lock position.
6
Replace the toner cartridge.
7
Close the printer’s top cover.
406785%23ULQW6\VWHP2SHUDWLRQ
0HGLD-DPV
&OHDULQJ7RS&RYHU)L[LQJ$UHD-DPV
Follow these steps to clear a jam from the fixing unit area:
1
0
Open the printer’s top cover, remove the toner cartridge, and
locate the fixing unit assembly.
WARNING: Be careful; the area around the fuser assembly is
hot.
ACHTUNG! Verletzungsgefahr! Bei Betrieb wird die Umgebung
der Fixiereinheit heiß.
2
If the media is jammed inside the fixing unit assembly, grasp
the edge of the media and remove it.
)L[LQJ8QLW-DP$UHD
3
If the jammed media has passed completely through the
fuser assembly and is partially visible in the upper output
bin, close the printer top cover, and then lift the media guide
arm and pull out the media slowly.
7URXEOHVKRRWLQJ3ULQWHU3UREOHPV
0HGLD-DPV
&OHDULQJ&URZQ&RS\$')3DSHU-DPV
Use the following procedure to remove a paper jam in the automatic
document feeder:
1
Push the button near the front left side of the scanner.
The ADF module will lift slightly.
406785%23ULQW6\VWHP2SHUDWLRQ
0HGLD-DPV
2
Lift the right side of the ADF module as far as possible, and
then slowly removed the jammed paper.
3
Push the ADF module securely back into place.
&OHDULQJ6WDFNOHU0HGLD-DPV
This section explains how to remove jammed media from the stackler.
When using the stackler, always do the following:
Open and close the top cover of the Stackler after clearing the
media jam.
Note: This doesn’t apply with jams in the reversing mechanism.
»
Check the printer after clearing a stackler media jam.
▲ Caution: Do not use excessive force when pulling jammed media
from the Stackler, as this may tear the media leaving pieces inside the
transport mechanism. Torn edges left inside the Stackler may cause
further media jams.
7URXEOHVKRRWLQJ3ULQWHU3UREOHPV
0HGLD-DPV
0HGLD-DPVLQWKH3DSHU)HHG$UHD
1
Pull the Stackler away from the printer.
2
Remove the jammed media.
3
If you’re unable to remove the jammed media, open the
reversing guide and try again.
5HYHUVLQJ
*XLGH
406785%23ULQW6\VWHP2SHUDWLRQ
0HGLD-DPV
3DSHU-DPVLQWKH5HYHUVLQJ$UHD
1
Open the reversing guide and pull out the jammed media.
0HGLD-DPVLQWKH3DSHU7UDQVIHU$UHD
1
Lift the top cover handle.
7RS&RYHU
+DQGOH
7URXEOHVKRRWLQJ3ULQWHU3UREOHPV
0HGLD-DPV
2
Open the hinged top cover gently.
7RS&RYHU
3
If the paper is jammed by the face-up print, lift the upper
guide and remove the jammed paper.
406785%23ULQW6\VWHP2SHUDWLRQ
0HGLD-DPV
4
▲
If the media is jammed by the face-down print, lift the lower
guide and remove the jammed media.
Caution: Lower the upper and/or lower guide after clearing the
media jam.
7URXEOHVKRRWLQJ3ULQWHU3UREOHPV
6WDSOHU-DPV
0HGLD-DPVLQWKH3DSHU'HOLYHU\$UHD
1
Remove the jammed media from the tray.
If the jammed media is difficult to remove, gently lift the paper
guide.
3DSHU*XLGH
6WDSOHU-DPV
▲ Caution: Remove the staple cartridge only when it has run out of
staples. If it is removed, always leave half-used staples in the bottom
of the staple cartridge.
406785%23ULQW6\VWHP2SHUDWLRQ
6WDSOHU-DPV
1
Open the front cover and pull down the stapler unit.
)URQW&RYHU
6WDSOHU
0
WARNING! Never insert your fingers all the way into the open
stapler compartment, unless instructed to do so.
ACHTUNG! Stecken Sie niemals Ihre Finger in die offene
Klammervorrichtung, es sei denn, Sie werden dazu aufgefordert.
2
While holding down the green lever, lift up the staple jam
release plate.
*UHHQ/HYHU
7URXEOHVKRRWLQJ3ULQWHU3UREOHPV
6WDSOH-DP
5HOHDVH3ODWH
6WDSOHU-DPV
3
Using a pointed object, remove the jammed staples.
The jam is cleared when all bent or skewed staples have been
removed.
*UHHQ/HYHU
0
6WDSOH-DP
5HOHDVH/HYHU
WARNING! Watch carefully for jammed staples as they may
cause injury.
ACHTUNG! Achten Sie sorgfältig auf gestaute Heftklammern,
denn diese können Verletzungen hervorrufen.
4
Push the release plate back down until the plate clicks to
indicate that it is locked in place.
406785%23ULQW6\VWHP2SHUDWLRQ
6WDSOHU-DPV
5
Pull the stapler unit back up to its original position.
6
Using the tip of a pointed object, such as a push pin or the
tip of a pencil, press gently on the test staple button once to
bring the staples to the ready position.
Note: Be careful. Too much pressure may damage the button.
»
)URQW&RYHU
7
7HVW6WDSOH%XWWRQ
Close the front cover.
7URXEOHVKRRWLQJ3ULQWHU3UREOHPV
6WDSOHU-DPV
8
Printing and stapling will resume normally, unless the staples do not correctly advance.
If the staples are not advanced, any print job that was being stapled when the jam occurred or when the cartridge was replaced
may not be stapled correctly. You can either continue printing the
job, or you can print a test staple job to advance the staples to the
proper staple position.
Continue printing the job.
If you’re printing a large job, you may want to allow the job to
continue printing.
Note: Keep in mind that several copies of your stapled sets
may not be stapled correctly. If the print engine detects that a
test staple is needed, the next calibration page, status page,
or startup page printed will serve as the test page. Up to 12
test staples will be placed along one side of the page.
»
Print a test staple job.
Press the Print Status key on the control panel, and select
Yes. A standard or advanced status page prints. Up to 12 test
staples will be placed along one side of the status page. The
printer is now ready to resume normal operation.
406785%23ULQW6\VWHP2SHUDWLRQ
7URXEOHVKRRWLQJ
&URZQ&RS\
7URXEOHVKRRWLQJ&URZQ&RS\
8QGHUVWDQGLQJWKH/('V
The scanner has three LEDs—Power (amber), Ready (green), and
Jam (red). Alone and in combination they indicate the scanner’s
status.
If these LEDs are. . .
they indicate. . . Do this . . .
Power
Ready
Jam
Off
Off
Off
Not ready to
copy.
On
Off
Off
The scanner
Wait for the Ready LED to
has been turned light.
on.
On
On
Off
Ready to copy.
Copy.
On
On
On
Paper jam.
Remove the paper jam. See
chapter 5, the “Removing ADF
Paper Jams” section, of the
Options manual.
On
Off
Blinking ADF cover open. See chapter 5, the “Removing
a Paper Jam” section, of the
Options manual for
information on opening and
closing the ADF cover. If
necessary, turn the scanner
off and on again.
On
Blinking Off
On
Blinking Blinking A service
problem.
Lamp failure—
the lamp is either
burnt out or too
dark due to
aging.
7URXEOHVKRRWLQJ3ULQWHU3UREOHPV
Ensure that the power cord is
firmly plugged into the power
supply and the scanner and
that the scanner is turned on.
Replace the lamp. See
chapter 5, the “Replacing the
Lamp” section, of the Options
manual for instructions.
Check that the shipping
bracket was removed. If this
does not solve your problem
contact your vendor.
7URXEOHVKRRWLQJ
&URZQ&RS\
6ROYLQJ2WKHU3UREOHPV
Symptom
Solution
Documents don’t
feed smoothly into
the ADF.
Clean the ADF (see chapter 5, the “Cleaning the
Automatic Document Feeder” section, of the
Options manual).
Edges of the copy
are cut off
Make sure you’re centering documents at the top
of the scanner glass and that the scan size setting
“Scan Size” of the Options manual) is correct. Also
keep in mind that the printer’s maximum imageable
area is 18.16'' x 10.66''/207.43 x 270.93 mm for letter-size media and 7.93'' x 11.36''/201.46 x 288.54
mm for A4.
Image quality of
Clean the scanner glass: dampen a lint-free cloth
copies is not optimal.
with alcohol or a mild detergent and wipe the glass
clean.
Clean the ADF (see chapter 5, the “Cleaning the
Automatic Document Feeder” section, of the
Options manual).
If you’re scanning at 150 dpi, some printed materials, such as magazines, cause moiré patterns. To
remove these patterns, change the scan resolution
to 200 or 300 dpi (choose Copier/Copy Mode/Custom Gray, and then Copier/Copy Mode/Custom
Config/Scan Resolution/200 or 300).
Ready and Jam
LED’s are blinking
The scanner has been turned on before the shipping bracket was removed. Use the instructions in
chapter 5, the “Installing CrownCopy” section, of
the Options manual for removing the shipping
bracket.
Scanner lamp flicker,
is dim, or fails to
come on
The scanner lamp is failing or has failed and needs
to be replaced. (See chapter 5, the “Replacing the
Lamp” section, of the Options manual for instructions on how to change the lamp.)
Several pages feed
into the ADF at the
same time
Clean the ADF (see chapter 5, the “Cleaning the
Automatic Document Feeder” section, of the
Options manual).
406785%23ULQW6\VWHP2SHUDWLRQ
&RQWURO3DQHO
3UREOHPV
&RQWURO3DQHO3UREOHPV
'DWD,QGLFDWRU6WD\V/LW
If the printer has warmed up and the Data indicator stays on, two
problems may exist:
If you are downloading additional typefaces, too many can overload the printer’s memory, causing the printer to reset and lose
information previously downloaded to RAM. Make sure you have
enough printer memory.
On a LocalTalk network, Macintosh computers sometimes interfere with each other. If this happens often, reinstall the LaserWriter and Laser Prep files, which reset the printer. If neither of
these is the problem, place a service call to your QMS vendor.
1R$GYDQFHG6WDWXV3DJH
If your printer prints a standard status page even though you’ve configured the printer in the Administration/Special Pages/Status Page
Type menu to print an advanced status page, your printer probably
doesn’t have enough free memory available. To print an advanced
status page you may need to reduce the amount of memory assigned
to one or more of the memory clients or add more memory (see the
“Memory” section in chapter 5, “Additional Technical Information,” of
the Reference guide for information about memory clients).
1R6WDUWXS3DJH
If the Ready indicator is on, but no start-up page prints, check the following:
1
Has the start-up page been disabled?
Use the control panel to make sure the start-up page is on.
7URXEOHVKRRWLQJ3ULQWHU3UREOHPV
&RQWURO3DQHO
3UREOHPV
2
Turn the printer off. From a cold start, the printer takes
approximately 1 to 2 minutes to warm up.
Be sure you wait long enough for a start-up page before suspecting a problem.
3
Check to be sure the paper cassettes are loaded with paper,
in place and secure.
4
Open the top cover of the printer and check for a media jam.
5
Make sure a toner cartridge is installed.
If you still have not solved the problem, you need to call your QMS
vendor for help. Go to the last section of this chapter, “Placing a Service Call.”
3DSHU-DP0HVVDJH6WD\V2Q
If a PAPER JAM message stays on, open the printer and clear the
jam. If the message is still there, try opening and closing the top of the
printer again. See “Media Jams” on page 6-18 in this chapter for more
information.
3ULQWHU5HVHWV
Occasionally, Macintosh applications interfere with each other. Applications send a printer prep file to the printer at the beginning of each
document. Other prep files cannot be sent without resetting the
printer. Monitor your activities to see if there is a correlation between
your use of a certain application and the printer resetting. If so, contact the application developer.
Downloading too many typefaces can overload the printer memory
and cause the printer to reset to default. Additional memory (RAM),
which can be used for font storage, is available and easily installed.
Contact your QMS vendor for information on RAM upgrades. See
chapter 2, “Memory and Systems Software,” in your Options guide.
If the printer resets in other circumstances, you should call your QMS
vendor for service.
406785%23ULQW6\VWHP2SHUDWLRQ
:LQGRZV'ULYHU
3UREOHPV
3RVW6FULSW(UURUV
If your printer is having trouble printing when using PostScript emulation, you should turn on the Error Handler in the control panel menu.
Error Handler is a diagnostic tool that identifies PostScript errors
encountered during a print job.
Menu
Administration/Startup Options/Do Error Handler
Choices
Yes—Load the Error Handler.
No—Don’t load the Error Handler.
Default
No
Notes
Refer to the PostScript Language Reference Manual
(Adobe Systems Incorporated, Reading, PA:
Addison-Wesley, 1990, ISBN 0-201-18127-4) for
information on PostScript errors. You may also want
to turn on the header page to verify the proper
emulation.
:LQGRZV'ULYHU3UREOHPV
3ULQWHU'HVFULSWLRQ)LOHV
If you experience problems either when installing or using printer
description files on a PC, see “Notes on Installing Printer Description
Files” on page 6-11, in chapter 3, “Connecting to a PC,” of Getting
Started.
7URXEOHVKRRWLQJ3ULQWHU3UREOHPV
&URZQ1HW
3UREOHPV
&URZQ1HW3UREOHPV
If you have trouble installing and setting up your QMS CrownNet interface, check the following:
If the printer requires a network interface card, is it correctly
installed in the printer?
Is the printer connected to the network?
Is the printer plugged in, turned on, and correctly configured?
Do the printer start-up and status pages list the interface? Is the
configuration information correct?
Is the interface enabled?
Is the appropriate protocol (or protocols) enabled?
Are all printer and protocol addresses configured correctly?
2XWSXW3UREOHPV
[[GSL3ULQWLQJ
8QDYDLODEOH
The amount of RAM installed in your printer governs which resolutions can be used with each media size. If you purchased a
QMS 2425/2425 TURBO Print System base model with
— 8 MB RAM, 600x600 is available with letter/A4 media sizes
for simplex printing on the QMS 2425/2425 TURBO base
model.
»
Note: The 1200x1200 dpi resolution is only available with the
optional Multi-Res daughterboard, and additional memory.
406785%23ULQW6\VWHP2SHUDWLRQ
2XWSXW3UREOHPV
— If you purchased a QMS 2425Ex with 24 MB RAM or a 2425
TURBO Ex with 32 MB RAM, 600x600 is available with all
media sizes for simplex and duplex printing.
Note: The 1200x1200 dpi resolution is only available with the
optional Multi-Res daughterboard and additional memory.
»
See the “High-Resolution Printing” section in chapter 3,
“Advanced Printing Features,” for specific requirements. Then
check a start-up page to make sure the printer has enough RAM
installed. Also, see the Options guide for more information on
memory upgrades (SIMMs—single-in-line memory modules).
If you have enough RAM installed, and you have configured the
printer from the control panel to print at 600x600 or 1200x1200
dpi resolution (Administration/Engine/Def Resolution menu) but
the printer continues printing at a lower resolution, you may need
additional memory allocated to the frame buffer.
To allocate the correct amount of memory, use the Memory/K
Mem Framebuff menu. See chapter 4, “Printer Configuration,” in
the Reference for more information.
%ODQN3DJHV
If a blank start-up page ejects or blank pages come out during a printing job, try the following:
1
Check the toner cartridge.
The image does not print if the cartridge is empty.
2
Be sure you have broken the tab on the side of the toner cartridge and removed the sealing tape.
3
If the toner cartridge is not empty, the sealing tape has been
removed, and blank pages are ejecting, take the cartridge
out, roll it from side to side, and reinstall the cartridge in the
printer.
4
If these solutions do not work, contact your QMS vendor to
purchase another toner cartridge.
7URXEOHVKRRWLQJ3ULQWHU3UREOHPV
'LVN3UREOHPV
1RW$OO3DJHV3ULQW
If the printer stops printing in the middle of your file, try the following:
1
Check your cable.
You could have the wrong kind of cable, or your printer may not
be configured for the correct cable and port.
2
Make sure no one pressed the Cancel key while your job was
printing.
3
Check the message window to see if the cassette you are
using needs more media.
3ULQWHU:LOO1RW'XSOH[
If the error message DUPLEXER ABSENT appears in the message
window, make sure you have the optional duplexer correctly installed.
See the Options guide for information on installing the duplexer. If you
have correctly installed the duplexing unit and configured the printer
from the front panel to duplex (Operator Control/Def.Duplex), but the
printer continues printing simplex, you may need additional memory
allocated to the frame buffer. See chapter 3,“Advanced Printing Features,” in this guide for additional information on memory required for
duplexing.
'LVN3UREOHPV
,'(,QWHUQDO+DUG'LVN1RW2Q/LQH
If your printer doesn’t have enough memory, then you need to
enable disk swapping. See chapter 4, “Printer Configuration,” in
the Reference guide for information on how to enable this option
through the Administration/Memory/Enable Disk Swap menu.
406785%23ULQW6\VWHP2SHUDWLRQ
.DQML2SWLRQ.LW
3UREOHPV
([WHUQDO6&6,+DUG'LVN1RW2Q/LQH
If DISK ONLINE does not appear on the start-up or status page,
check the hard disk cable connections to the hard disk and to the
SCSI interface port on the back of the printer. (See your hard disk
documentation for more information.)
Is the hard disk turned on? Check that the Power indicator is on.
Did you turn on the hard disk before you turned on the printer.
Always turn the hard disk on first, and then turn the printer on.
Is the SCSI ID set for one of the reserved positions? Do not use
the reserved positions 7, 8, and 9. Make sure each device on the
SCSI chain has a unique address.
Did you terminate a hard disk in the middle of the chain? There
should be only one terminated disk in the chain, and it should
physically be the last disk in the chain. (See your hard disk
instructions for more information.)
.DQML2SWLRQ.LW3UREOHPV
Use the information in this section to locate and solve problems that
may arise when installing and using this Kanji SIMM or Kanji external
kit.
&DQ
W'RZQORDG.DQML)RQWV
Are you attempting to download Kanji TrueType fonts using the
PS Executive Series Utilities?
This utility cannot be used to download Kanji TrueType fonts. See
your Kanji TrueType font software documentation for information
on how to download these fonts.
7URXEOHVKRRWLQJ3ULQWHU3UREOHPV
.DQML2SWLRQ.LW
3UREOHPV
Did the printer run out of memory while downloading Kanji fonts?
If you experience memory problems when downloading Kanji
fonts, then you can do one of the following to increase printer
memory:
Add 4 MB more printer memory.
Decrease the number of fonts that you are downloading. When
downloading a large number of fonts, packet them in smaller
groups for downloading. (For example, instead of downloading
four fonts at one time, download two).
Are you getting the following message:
The Resolution of this PostScript Device Exceeds
the Maximum Resolution Specified in the Licensing Agreement.
It is possible to get this message when attempting to download
Adobe Type Library or Morisawa Type Library Kanji fonts without
first downloading the JFontPrep file.
If you get this message, you must download the JFontPrep file.
&DQ
W$FFHVV.DQML)RQWV
Does the start-up page indicate that the QMS Kanji external hard
disk 1 is on line?
When this disk is on line, Japanese fonts print in the lower half of
the start-up page. If not, check that the disk is installed correctly
and that the disk is not damaged.
Does your application support Japanese fonts?
You should be able to select these fonts if the application supports them.
Did you inadvertently initialize or reformat the internal Kanji IDE
hard disk?
If so, contact your QMS vendor. See appendix A, “QMS Customer
Support,” for product sales and service information.
406785%23ULQW6\VWHP2SHUDWLRQ
3ULQW4XDOLW\
3UREOHPV
Did you correctly configure the printer?
See chapter 4, “Software,” of the Options manual for complete
printer configuration information.
&DQ
W$FFHVVWKH.DQML)LOH7KURXJK<RXU
$SSOLFDWLRQ
If you are using Windows, ensure that the Japanese version of
the Windows driver is installed.
Double-click the Windows control panel icon, double-click Printers, choose your Windows driver, click Setup, and then click
About. Check that you are using the QMS Windows 3.1J driver.
If you are using a Macintosh, ensure that the system is KanjiTalk,
and the appropriate Kanji screen fonts are installed.
The two Morisawa screen fonts are included on your Macintosh
system disk. The four Typebank screen fonts are included on the
Macintosh bitmapped screen fonts disk that comes with the Kanji
Option Kit.
3ULQW4XDOLW\3UREOHPV
Print quality problems are those related to the appearance of the
pages you print. Print quality problems include white lines on the
page, uneven blacks, and other print distortions.
If you are having problems with the quality of your printed pages, try
this quick-check procedure:
1
Check that you are using the correct type media.
See appendix B, “Technical Specifications,” in the Reference, for
media specifications.
7URXEOHVKRRWLQJ3ULQWHU3UREOHPV
3ULQW4XDOLW\
3UREOHPV
2
Check that there is enough toner in the printer.
If the TONER LOW message appears in the message window,
remove the toner cartridge and gently rock it from side to side to
redistribute the toner. Then reinsert the cartridge and try printing
again.
3
If the message remains on, replace the toner cartridge.
4
Place a service call to your QMS vendor.
3DSHU-DPV$OZD\V2FFXU
1
Check that the media does not exceed the media limit mark.
Make sure that the stack does not exceed the paper limit mark on
the media cassette.
2
Check that the paper stack is correctly aligned.
Make sure that the stack is correctly aligned in the media cassette or in the multipurpose tray.
3
Check that the correct paper type is used.
See appendix B, “Technical Specifications,” in the Reference, for
media specifications.
4
Check the printer for residual jammed media.
5
Remove any jammed media remaining inside the printer by
checking the locations in “Media Path” on page 6-17.
3ULQWHU:LOO1RW3ULQWGSL
If you have set the printer from the configuration menu to print at 600
dpi resolution but the printer continues printing 300 dpi, you may need
additional memory allocated to the frame buffer. See the “Memory”
section in chapter 5, “Additional Technical Information,” in your Reference guide for additional information on memory configuration.
406785%23ULQW6\VWHP2SHUDWLRQ
,PDJH'HIHFWV
,PDJH'HIHFWV
The following list includes several image defects with possible solutions. Try the solutions in the sequence given. If the solutions listed
don’t solve the problem, place a service call to your QMS vendor. See
the next section in this chapter, “Placing a Service Call.”
:KLWHRU/LJKW/LQHV
1
Remove the toner cartridge and gently rock it from side to
side as you would before installing a new cartridge.
This redistributes toner inside the cartridge. Reinstall the cartridge.
2
If step 1 does not solve the problem, install a new toner cartridge.
/LJKW,PDJH(QWLUH3DJH
1
Make sure you pulled the tab from the toner cartridge.
2
Increase the print density by adjusting the print density
through the Administration/Engine configuration menu.
3
Make sure that the Conserve Toner option is disabled under
the Administration/Engine/Print Quality configuration menu.
4
Remove the toner cartridge and gently rock it from side to
side as you would when installing a new cartridge.
This redistributes toner inside the cartridge. Then, reinstall the
cartridge.
5
If steps 1, 2, 3, and 4 do not solve the problem, install a new
cartridge.
'DUN,PDJH(QWLUH3DJH
1
Decrease print density by adjusting the print density through
the Administration/Engine menu on the configuration panel.
7URXEOHVKRRWLQJ3ULQWHU3UREOHPV
3ODFLQJD
6HUYLFH&DOO
2
Remove the toner cartridge and gently rock it from side to
side as you would when installing a new cartridge.
This redistributes toner inside the cartridge. Then, reinstall the
cartridge.
3
If steps 1 and 2 do not solve the problem, install a new toner
cartridge.
6WDLQ$ORQJWKH(GJHRIWKH3DJH
Install a new toner cartridge.
6WDLQVRQWKH%DFNRIWKH3DJH
The media path may be dirty. Clean the media path area. See chapter
4, “Printer Care,” for more information.
,PDJH(DVLO\6PHDUVZKHQ5XEEHG
Place a service call to your QMS vendor. See appendix A,“QMS Customer Support,” for sales and support information.
3ODFLQJD6HUYLFH&DOO
If you have a problem you cannot resolve, contact your QMS vendor.
Your QMS vendor is best equipped to immediately handle any problem you may encounter.
If you have technical questions your vendor is unable to answer, you
can call or fax questions to QMS Customer Technical Assurance (See
Appendix A,“QMS Customer Support,” for information on contacting
QMS Customer Technical Assurance). If you’ve determined your
printer needs to be examined by a QMS service technician, contact
QMS National Service for work inside the US, or one of the QMS
international offices for work outside of the US. (National and international contacts are listed in appendix A, “QMS Customer Support.”)
406785%23ULQW6\VWHP2SHUDWLRQ
3ODFLQJD6HUYLFH
&DOO
Before calling, be sure you have the answers to these questions
handy to help our technicians serve you more quickly:
1
What is your printer model and serial number?
2
What kind of host computer do you have?
3
What operating system do you have and what version?
4
What interface are you using and what protocol?
5
What application are you using?
6
What is the emulation of the file you're trying to print? In
what emulation mode is the port?
7
What is the firmware revision number for your printer? (It is
listed on both the status and start-up pages.)
8
If you can print, have a status page available.
Your service representative needs to know these things prior to helping you.
7URXEOHVKRRWLQJ3ULQWHU3UREOHPV
&URZQ9LHZ
3ULQWHU:HE3DJH
,Q7KLV&KDSWHU
“Setting up the Printer Web Page” on page 7-3
“Setting Up Your Browser Software” on page 7-3
“Printer Home Page” on page 7-9
“Web Page Help System” on page 7-29
,QWURGXFWLRQ
,QWURGXFWLRQ
QMS CrownView is a printer-based application using the World Wide
Web portion of the Internet as a framework for the QMS 2425/2425
TURBO Print System. This feature allows you to monitor printer consumables as well as access information that is not normally available
only by printing a status page.
Inside your new QMS printer resides an HTTP (Hyper-Text Transfer
Protocol) based web page that can be accessed from the most common web-browser software, Netscape Navigator and Microsoft Internet Explorer. This web page gives you access to the most frequently
accessed printer configurations and gives you instant access to
printer status. Anyone on your company intranet can access the QMS
printer through their web-browser software.
»
Note: The sample windows and dialog boxes shown in this chapter
are as they appear in Netscape Navigator and Microsoft Internet
Explorer, and coincide with the step-by-step instructions provided.
This chapter provides you with details on
Setting up and using the web page
The different types of pages in the printer
Accessing the QMS web site and performance support
406785%23ULQW6\VWHP2SHUDWLRQ
6HWWLQJXSWKH
3ULQWHU:HE
3DJH
6HWWLQJXSWKH3ULQWHU:HE
3DJH
Setting up the printer web page to run on your intranet involves two
basic steps:
Assigning a name to your printer
Setting up the “no proxy” preferences in your browser software
$VVLJQLQJD3ULQWHU1DPH
The printer web page can be accessed only through the assigned
name of the printer or the IP address. It is more convenient for you to
use a name than the address. The default name for the printer is usually the model number of the printer, for example, QMS 2425/2425
TURBO Print System. Change the default name to one that is more
easily remembered and typed.
You can change the printer name through the Administration/Communications/Networkx/CrownNet/NetWare/Printer Name menu or the
Administration/Communications/Networkx/CrownNet/LanManager/
Printer Name menu. (See the QMS CrownNet Setup Guide for more
information.)
6HWWLQJ8S<RXU %URZVHU6RIWZDUH
Since your printer will reside on your intranet and will not be accessible beyond the firewall of your network, you must set up the proper
“preferences” in your browser software. Your printer name or IP
address must be added to the “no proxy” list in the preferences dialog
box of the browser.
»
Note: You need to do this procedure only once.
)RU1HWVFDSH1DYLJDWRU
1
Start your web browser.
2
Access the Options menu and choose Network Preferences.
&URZQ9LHZ3ULQWHU:HE3DJH
6HWWLQJXSWKH
3ULQWHU:HE
3DJH
3
Select the Proxies tab in the dialog box.
4
Select the Manual Proxy Configuration radio button and
press the View... button.
406785%23ULQW6\VWHP2SHUDWLRQ
6HWWLQJXSWKH
3ULQWHU:HE
3DJH
5
»
In the No Proxy For: text box, type a comma after the last
entry and then type the printer name or the IP address of
your QMS 2425/2425 TURBO.
Note: The printer name is entered in the network protocol menu that
you are using. The default name is the model number of the printer.
See your CrownNet documentation for more information on naming
your printer.
6
Choose OK.
&URZQ9LHZ3ULQWHU:HE3DJH
6HWWLQJXSWKH
3ULQWHU:HE
3DJH
7
Enter the printer name or IP address in the Go to: URL
address box to access the printer home page.
)RU,QWHUQHW([SORUHU
1
Start your web browser.
2
Access the View menu and choose Options.
3
Select the Connection tab on the dialog box.
406785%23ULQW6\VWHP2SHUDWLRQ
6HWWLQJXSWKH
3ULQWHU:HE
3DJH
»
4
Click the Settings button to display the Proxy Settings dialog
box.
5
In the Exceptions text box, type a comma after the last entry
and then type the printer name or the IP address.
Note: The printer name is entered in the network protocol menu that
you are using. The default name is the model number of the printer.
See your CrownNet documentation for information on changing the
printer name.
6
Click OK.
&URZQ9LHZ3ULQWHU:HE3DJH
6HWWLQJXSWKH
3ULQWHU:HE
3DJH
7
Now you should be able to enter the printer name in the URL
address box to access the printer home page.
406785%23ULQW6\VWHP2SHUDWLRQ
3ULQWHU+RPH
3DJH
3ULQWHU+RPH3DJH
The Home Page is the starting point for all access to the printer web
pages. On this page you will find hotlinks to all of the supporting web
pages for your printer.
+RWOLQNV
3URGXFW
3ULQWHU1DPH
&RQILJXUDWLRQ
,QIRUPDWLRQ
3ULQWHU*UDSKLF
+RWOLQNV
The printer home page provides the following information.
Product Name Identifies the particular printer that you are browsing. This printer is pictured in the graphic with all
installed paper handling options.
Configuration Menu: No equivalent
&URZQ9LHZ3ULQWHU:HE3DJH
3ULQWHU+RPH
3DJH
Printer Name
Shows the name you have assigned to your
printer. The default printer name is the same as
the product name.
Configuration Menu: Administration/
Communications/Networkx/CrownNet/NetWare/
Printer Name menu or the Administration/
Communications/Networkx/CrownNet/
LanManager/Printer Name menu
Current
Status
Echoes the status message in the printer control
panel message window.
Configuration Menu: No equivalent
Resolution
Identifies the resolution and halftone.
Configuration Menu: Administration/Engine/Def
Resolution
Default
Inputbin
Identifies the input cassette or tray, the media size,
and the percent filled with media.
Configuration Menu: Operator Control/Inputbin
Default
Output
Identifies the output tray.
Sheets
Printed
Lists the number of sheets of media printed to
date.
Configuration Menu: Operator Control/Outputbin
Configuration Menu: No equivalent
Faces Printed Lists the number of page faces printed to date.
Configuration Menu: No equivalent
Hotlinks
Take you to other pages of status, configurations,
or help information. Each of these hotlinks is fully
explained in this chapter.
Configuration Menu: No equivalent
+RPH
The Home hotlink simply returns you to the printer home page when it
is selected.
406785%23ULQW6\VWHP2SHUDWLRQ
3ULQWHU+RPH
3DJH
2SHUDWRU&RQWURO
The Operator Control hotlink on the home page jumps to the Operator
Control page. This page contains a form which allows you to configure settings in your printer.
»
Note: The Operator Control page is password protected. If a
password is enabled for the Operator Control menu (Installation/Use
Operator Pwd menu), you must enter the password before you can
view this page.
After you make your choices, choose the Submit button to make them
take effect.
&RQILJXUDWLRQ)RUP
&URZQ9LHZ3ULQWHU:HE3DJH
3ULQWHU+RPH
3DJH
The Operator Control page contains the following options. For complete information on any options see chapter 4, “Printer Configuration,” of the Reference manual.
Copies
Allows you to enter the number of copies to print.
Configuration Menu: Operator Control/Copies
Duplex
Allows you to set duplexing to Off, On, or Tumble.
Configuration Menu: Operator Control/Duplex
Collation
Allows you to turn collation Off or On.
Configuration Menu: Operator Control/Collation
Orientation
Allows you to select Portrait or Landscape
orientation.
Configuration Menu: Operator Control/
Orientation
Inputbin
Allows you to choose Multipurpose, Upper, Lower,
Optional as the input source.
Configuration Menu: Operator Control/Inputbin
Outputbin
Allows you to choose Upper or Face Up as the
output location.
Configuration Menu: Operator Control/Outputbin
Face-Up
Order
This line allows you to select Reverse or Normal
as the face-up order.
Configuration Menu: Operator Control/Face-Up
Order
Chain
Inputbins
Allows you to set input bin chaining to Off, On, or
On Any.
Configuration Menu: Operator Control/Chain
Inputbins
Multipurpose
Size
Provides a menu to select the size media in the
multipurpose tray.
Configuration Menu: Operator Control/
Multipurpose Size
406785%23ULQW6\VWHP2SHUDWLRQ
3ULQWHU+RPH
3DJH
Accounting
Setup Mode
Allows you to select Disable or Enable print job
accounting.
Configuration Menu: Operator Control/
Accounting/Mode
Disk Space
(KB)
Allows you to set the available disk space for job
accounting.
Configuration Menu: Operator Control/Disk
Space
Reset
Accounting
Allows you to erase the accounting files and
recreate them using the current file size.
Configuration Menu: Operator Control/
Accounting/Resetaccounting
File Segment
Allows you to specify whether accounting
information is stored in the printer in single or
multiple files.
Configuration Menu: Operator Control/
Accounting/File Segment
&URZQ9LHZ3ULQWHU:HE3DJH
3ULQWHU+RPH
3DJH
*HQHUDO6HWWLQJV
The General Settings hotlink takes you to the General Settings page.
6HWWLQJV/LQNV
This page links to different groups of printer configuration settings;
Printer settings
Communications settings and input buffer sizes
Paper sources
Options available with the printer (such as duplexer or emulation)
Current memory configuration
Internal hard disk status
Timeouts
406785%23ULQW6\VWHP2SHUDWLRQ
3ULQWHU+RPH
3DJH
This information can be viewed to show you the status of the printer,
but it cannot be changed. To change these settings you must access
the printer’s configuration through the control panel of the printer, a
remote or local console, or CrownAdmin 3.
3ULQWHU6HWWLQJ
This table provides you with data relative to the settings of the printer.
Compatibility
Level
Identifies the PostScript emulation level.
Do Start-up
Page
Identifies whether the printer start-up page is
turned on or off.
Configuration Menu: No equivalent
Configuration Menu: Administration/Startup
Options/Do Start Page
Do Error
Handler
Identifies whether the PostScript Error Handler is
on or off. Error Handler is a diagnostic tool that
identifies PostScript errors encountered during a
print job.
Configuration Menu: Administration/Startup
Options/Do Error Handler
Do Sys/Start
Identifies whether the printer controller checks the
hard disk for a PostScript file named SYS\START
and then executes the file. This file does not print.
Configuration Menu: Administration/Startup
Options/Do Sys Start
Is Password
0?
Identifies whether the Administration menu
password is set.
0=Off
Configuration Menu: Installation/Use Admin Pwd
Duplex
Identifies whether the duplex option (if available) is
enabled.
Configuration Menu: Operator Control/Duplex
&URZQ9LHZ3ULQWHU:HE3DJH
3ULQWHU+RPH
3DJH
Tumble
Duplex
Identifies whether duplex print jobs are to print so
they can be bound at the top edge (flip-chart
style).
Configuration Menu: Operator Control/Duplex/
Tumble Duplex
Default
Chaining
Identifies whether tray chaining is enabled or
disabled. Tray chaining allows the printer to draw
media from another input source with either the
same or any size and type of media (dependent on
the choice selected) automatically when the first
input source empties.
Configuration Menu: Operator Control/Chain
Inputbins
Default Paper
Tray
Tells you which input source is the default.
Default
Output Tray
Tells you which output tray is the default
Number of
Paper Trays
Tells you the number of input sources available on
your printer.
Configuration Menu: Operator Control/Inputbin
Configuration Menu: Operator Control/Outputbin
Configuration Menu: No equivalent.
Page Stack
Order
Tells you the page stack order of the printed
document: Normal or Reverse.
Configuration Menu: Operator Control/Face up
Order
Left Margin
Identifies the amount (in .01" increments) the
image is adjusted horizontally on the page.
Configuration Menu: Administration/Engine/
Image Alignment/Horiz Offset
Top Margin
Identifies the amount (in .01" increments) the
image is adjusted vertically on the page.
Configuration Menu: Administration/Engine/
Image Alignment/Vertical Offset
406785%23ULQW6\VWHP2SHUDWLRQ
3ULQWHU+RPH
3DJH
Resolution
Identifies the printer resolution.
Configuration Menu: Administration/Engine/Def.
Resolution
Multi-Res
Identifies whether the Multi-Res board is installed.
Configuration Menu: No equivalent
&RPPXQLFDWLRQ6HWWLQJV ,QSXW%XIIHU6L]HV
This hotlink displays a screen that shows the communications settings of the printer.
Serial IF
Identifies the settings for the optional serial
interface.
Configuration Menu: Administration/
Communications/Serial
Parallel IF
Identifies the settings for the parallel interface.
Configuration Menu: Administration/
Communications/Parallel
IF1 IF String
Identifies the settings for the optional Network1
interface.
Configuration Menu: Administration/
Communications/Network1
IF 2 IF String
Identifies the settings for the optional Network2
interface.
Configuration Menu: Administration/
Communications/Network2
3DSHU6RXUFHV
This hotlink provides paper source information.
Multipurpose
Identifies the size paper currently installed in the
multipurpose tray.
Configuration Menu: No equivalent
&URZQ9LHZ3ULQWHU:HE3DJH
3ULQWHU+RPH
3DJH
Upper
Identifies the size paper currently installed in the
upper tray.
Configuration Menu: No equivalent
Lower
Identifies the size paper currently installed in the
lower tray.
Configuration Menu: No equivalent
Optional
Identifies the size paper currently installed in the
optional high-capacity input paper deck.
Configuration Menu: No equivalent
2SWLRQV
Duplexer
Installed
Tells you if the duplexer is installed.
Disk(s)
Tells you how many hard disks are attached to the
printer and what their addresses are.
Configuration Menu: No equivalent.
Configuration Menu: No equivalent
ImageServer
Tells you whether ImageServer is installed and
what its version number is.
Configuration Menu: Operator Control/General
Settings/Options/ImageServer
&XUUHQW0HPRU\&RQILJXUDWLRQ
Memory configuration affects the number of jobs that can be
accepted by the printer, the number of options available simultaneously, the number of downloadable fonts and emulations that can
be stored, and overall printer performance.
Host Input
Shows the size (in KB) of the Host Input field, also
known as K Mem for Spool. This memory client
stores incoming data from all the interfaces until
the emulation can process the print job.
Configuration Menu: Administration/Memory/
Manual Config/K Mem for Spool
406785%23ULQW6\VWHP2SHUDWLRQ
3ULQWHU+RPH
3DJH
Display List
Shows the size (in KB) of the Display List, also
known as K Mem Display. This client stores
compressed representations, or blocks, of the
pages to be printed.
Configuration Menu: Administration/Memory/
Manual/Config/K/Mem Display
Font Cache
Shows the size (in KB) of the Font Cache, also
known as K Mem for PS Fonts. This memory client
stores bitmapped representations of previously
scaled PostScript fonts.
Configuration Menu: Administration/Memory/
Manual Config/K Mem for PS Fonts
Heap
Shows the size (in KB) of the Heap, also known as
K Mem for PSHeap, PostScript VM, and Virtual
Memory. This client holds downloaded fonts, PostScript operators, and forms.
Configuration Menu: Administration/Memory/
Manual Config/K Menu for PSHeap
Framebuffer
Shows the size (in KB) of the Frame Buffer. This
client holds rasterized or bitmapped images of
page faces which are ready to be sent to the print
engine.
Configuration Menu: Administration/Memory/
Manual Config/Framebuffer
Emulation
Shows the size (in KB) of the Emulation client,
also known as K Mem Emulation. This client is
used to store any optional emulations, such as
LN03 Plus or QUIC II.
Configuration Menu: Administration/Memory/
Manual Config/K Mem Emulation
&URZQ9LHZ3ULQWHU:HE3DJH
3ULQWHU+RPH
3DJH
Emulation
Temp
Shows the size (in KB) of the Emulation
Temporary client. This client is used by nonPostScript emulations for storing downloaded
(soft) fonts, forms, or macros.
Configuration Menu: Administration/Memory/
Manual Config/K Mem Emulation Temp
Disk Cache
Shows the size (in KB) of the Disk Cache. This
memory client stores frequently used data in
system memory instead of continually storing and
retrieving it from a hard disk.
Configuration Menu: Administration/Memory/
Manual Config/K Mem /Disk Cache
System Use
Shows the size (in KB) of the System Use. Also
known as System Memory, this non-configurable
client is the amount of RAM used to run the
printer’s operating system. It’s never increased or
decreased. The system memory subtracted from
the total amount of RAM identifies the amount of
RAM available for all the other memory clients.
Configuration Menu: No equivalent
Total Memory
Shows the size (in KB) of the total amount of RAM
that your printer has.
Configuration Menu: Administration/Memory/
Manual Config/MB Printer Mem
+DUG'LVN6WDWXV
This hotlink provides the status of the hard disk.
Disk(s)
Provides the name, size, and free space on all
attached hard disks.
Configuration Menu: No equivalent
406785%23ULQW6\VWHP2SHUDWLRQ
3ULQWHU+RPH
3DJH
7LPHRXWV
This hotlink provides the status on established timeouts.
Wait Timeout
Shows the maximum number of seconds the
PostScript emulation waits for incoming data.
Configuration Menu: Administration/
Communications/Timeouts/PS Wait TImeout
Job Timeout
This shows the maximum number of seconds the
printer processes a print job before it ends the job.
Configuration Menu: Administration/
Communications/Timeouts/Job Timeout
Emulation
Timeout
Shows the maximum number of seconds emulations other than PostScript wait for incoming data.
Configuration Menu: Administration/
Communications/Timeouts/Emulation Timeout
ESP Timeout
Shows the maximum number of seconds the
printer uses to match an emulation before printing
the job in the default emulation.
Configuration Menu: Administration/
Communications/Timeouts/ESP Timeout
&URZQ9LHZ3ULQWHU:HE3DJH
3ULQWHU+RPH
3DJH
3ULQWHU-REV
The Printer Jobs hotlink on the home page jumps to the Printer Jobs
page. This page contains information about the current jobs the
printer is processing and information on the previous five jobs printed.
3UHYLRXV
-RE6WDWXV
Job
&XUUHQW-RE
6WDWXV
Indicates the job number of the current print jobs
and up to five previous print jobs.
Configuration Menu: No equivalent.
Status
Indicates the status of each job. (Interpreting,
Spooling, Spooled, Printing, Printed)
Configuration Menu: No equivalent
406785%23ULQW6\VWHP2SHUDWLRQ
3ULQWHU+RPH
3DJH
Prio[rity]
Shows the priority of each job.
Configuration Menu: No equivalent
Owner
Shows the name of the owner of each current job.
Configuration Menu: No equivalent
Title
Shows the title of each job.
Configuration Menu: No equivalent
Interface
Identifies the interface over which the job was sent
to the printer.
Configuration Menu: No equivalent
Sheet
Shows the number physical sheets of media
printed for each job.
Configuration Menu:
Page
Indicates the number of pages printed for each
job.
Configuration Menu: No equivalent
&URZQ9LHZ3ULQWHU:HE3DJH
3ULQWHU+RPH
3DJH
&RQVXPDEOH6WDWXV
The Consumable Status hotlink on the home page jumps to the Consumable Status page. This page contains information about the level
of usage of all of the printers’ consumables.
&RQVXPDEOH
6WDWXV
6FDOHV
»
Note: The scale used is a percentage and does not indicate the
number of pages printed.
Consumable
Name(s)
Shows the name of the consumable; for example,
Multipurpose (tray), Optional (lower cassette),
Toner, and Face-up (output).
Configuration Menu: No equivalent
406785%23ULQW6\VWHP2SHUDWLRQ
3ULQWHU+RPH
3DJH
Consumable
Max Number
Shows the maximum capacity of the consumable
(100%); for example, 500 sheets.
Configuration Menu: No equivalent
Consumable
Descriptions
Provides more information about the
consumables; for example, A4 (paper), black
(toner).
Configuration Menu: No equivalent
Consumable
Usage Bar
Shows the remaining amount of the consumable
(in percentages).
Configuration Menu: No equivalent
&URZQ9LHZ3ULQWHU:HE3DJH
3ULQWHU+RPH
3DJH
6\VWHP6XSSRUW3DJH
The System Support hotlink on the home page jumps to the System
Support page. This page can be used to set up internal support for
the printer as well as to link to the QMS web site.
6XSSRUW
)RUP'DWD
Once you have made the desired changes, choose Select.
If you need
assistance,
contact
A text box for entering the name of a local expert
Printer Help
URL
A text box for entering the Printer Help URL.
Configuration Menu: No equivalent
Configuration Menu: No equivalent
406785%23ULQW6\VWHP2SHUDWLRQ
3ULQWHU+RPH
3DJH
Contact
Number
A text box for entering a local or QMS contact
number
Configuration Menu: No equivalent
QMS
Corporate
URL
The QMS corporate URL (web address)
Configuration Menu: No equivalent
&URZQ9LHZ3ULQWHU:HE3DJH
3ULQWHU+RPH
3DJH
406,QF3DJH
The QMS, Inc. hotlink on the home page jumps to the QMS web site
configured on the System Support page (QMS Corporate URL). From
the QMS web site you can access information about other QMS printers, contact information, a FAQ database, printer manuals, and online
performance support.
/RFDO2QOLQH+HOS3DJH
The Local Online Help hotlink on the home page jumps to any help
information that has been configured on the System Support page
(Printer Help URL). You can configure this to jump to your own help
406785%23ULQW6\VWHP2SHUDWLRQ
:HE3DJH+HOS
6\VWHP
web site set up on your local intranet. You can also configure this to
jump to the QMS online performance support information for your
QMS print system.
:HE3DJH+HOS6\VWHP
Your printer web page is supported with help and support tools
located at the QMS web site. When you click on the Help button on
the printer home page you will be linked to an HTML page located at
the QMS web site. From here you can link to topic which applies to
your specific problem. You can also access a list of current FAQs
(Frequently Asked Questions) about your print system.
&URZQ9LHZ3ULQWHU:HE3DJH
$
406&XVWRPHU
6XSSRUW
,Q7KLV$SSHQGL[
Sources of customer support on page A-2
QMS world-wide offices on page A-5
6RXUFHVRI
6XSSRUW
6RXUFHVRI6XSSRUW
Several sources of help and information are available, depending on
the type of help you need:
<RXU4069HQGRU
Your local vendor (the one from whom you bought the printer) may be
best equipped to help you. Your vendor has specially trained service
technicians available to answer questions, and the equipment to analyze your printer problems.
<RXU$SSOLFDWLRQ9HQGRU
Often, “printing” problems have more to do with the application being
used than with the printer. In this case, the application manufacturer
is the best source of help.
4)$;
Q-FAX, a QMS information retrieval service, provides application
notes, technical support notes on common printing problems, and
information about printer specifications, options, accessories, consumables, and prices.
In the United States and Canada, call (800) 633-7213 to reach QFAX. In all other countries, call (334) 633-3850. Have your fax number
handy when you call (or place the call from your fax machine's handset).
You can choose to have either a directory (a list of currently available
documents) or a specific document sent to you. The first time you call,
request the directory (press 2 on your phone or fax keypad when
prompted). Then call back to request specific documents. You can
order up to three documents per call.
»
$
Note: FAQ numbers may be subject to change, so you may want to
obtain a directory of Q-FAX documents before requesting a specific
document.
406785%23ULQW6\VWHP2SHUDWLRQ
6RXUFHVRI
6XSSRUW
7KH406&RUSRUDWH%XOOHWLQ%RDUG6\VWHP
The QMS Corporate Bulletin Board System (BBS) contains technical
support notes, application notes, drivers, patches, and utilities, and
you may leave technical questions not requiring an immediate
response on electronic mail for the Sysop (System Operator).
The bulletin board [(334) 633-3632] operates at 1200, 2400, 9600,
and 14400 baud, 8 data bits, no parity, 1 stop bit, with XMODEM,
YMODEM, and ZMODEM capabilities. Contact the QMS Customer
Response Center (CRC) for more information about the bulletin
board.
&RPSX6HUYH
Through CompuServe, you ask general (non-technical) questions,
share information with other users, and access printing information
and programs. When you use CompuServe, type go qmsprint↵ to
go directly to the forum where QMS is located. The QMS library section contains application notes, printer drivers, utilities, technical information, and announcement files.
,QWHUQHW
The QMS server provides access to technical reports, new product
announcements, a trade show schedule, and other general information about QMS.
If you have access to the World Wide Web, you can view the QMS
home page at http://www.qms.com/. The QMS ftp resource is
ftp.qms.com.
406&XVWRPHU6XSSRUW
$
6RXUFHVRI
6XSSRUW
406&XVWRPHU5HVSRQVH&HQWHU&5&
You can contact the QMS Customer Response Center (CRC) in three
different ways:
Telephone—You can call the CRC at (334) 633-4500 (US)
Monday–Friday, 7:00 am–6:00 pm, Central Time.
Note: If you call for assistance, have the following information
ready so our technicians can help you more quickly:
»
; Your phone number, fax number, and shipping address
; A description of the problem
; The printer model
; The type of host computer you’re using
; The type and version of operating system you’re using
; The interface you’re using, and, if serial, the protocol (for
example, XON/XOFF)
; The application and version you’re using
; The emulation you’re using
; Your printer firmware version (listed on the status/start-up
pages)
$
Fax—You can fax questions to the CRC at (334) 633-3716 (US).
Provide the same information as listed above, and indicate
whether you would like a faxed or a phoned reply.
Internet—If you have access to the World Wide Web, you can
access the CRC through the QMS home page at
http://www.qms.com/.
406785%23ULQW6\VWHP2SHUDWLRQ
406:RUOG
ZLGH2IILFHV
406:RUOGZLGH2IILFHV
4068QLWHG6WDWHVDQG/DWLQ$PHULFD
General Contact
1 (334) 633-4300
Fax 1 (334) 633-4866
Email [email protected]
Internet http://www.qms.com
Customer Response Center (CRC)
Technical Assistance
1 (334) 633-4500
7:00 am–6:00 pm Central Time
Fax 1 (334) 633-3716
Internet http://www.qms.com
Bulletin Board Service
1 (334) 633-3632
Latin America Fax
1 (334) 639-3347
National Service
Service Information, Installation, and Maintenance Pricing
1 (800) 762-8894
On-Site Service and Depot Repair Information
1 (800) 858-1597
7:00 am–7:00 pm Central Time
Spare Parts Ordering and Information
1 (334) 633-4300 x2530
8:00 am–5:00 pm Central Time
406&DQDGD
General Contact
1 (514) 333-5940
Fax 1 (514) 333-5949
Supplies and Accessories
1 (800) 268-0343 x223
National Service
On-Site Service and Depot Repair Information
1 (800) 268-4969
8:30 am–7:00 pm Eastern Time
Spare Parts Ordering and Information
1 (905) 206-9234 x238
8:30 am–5:00 pm Eastern Time
Bulletin Board Service
1 (905) 206-0084
406&XVWRPHU6XSSRUW
$
406:RUOG
ZLGH2IILFHV
406LQ-DSDQ
General Contact
(+81)- 3 3779-9600
Fax (+81)-3 3779-9650
Internet http://www.qmsj.co.jp
406LQ/DWLQ$PHULFD
General Contact
Cra 43 DD#8-42
Officina 201
Medellin, Colombia
(+57) (4) 312 13 70
Fax (+57) (4) 268 92 97
406(XURSH
$XVWUDOLD
Anitech
Sydney Business & Tech. Centre
52/2 Railway Parade
2141 Lidcombe NSW
Australia
(+61) 2–9901 3235
Fax (+61) 2–9901 3273
%HQHOX[
Planetenbaan 60 ‘Corner Plaza’
3606 AK Maarssen
Belgium, NetherThe Netherlands
lands, and all
(+31) 346–551333
unlisted countries
Fax (+31) 346–550170
Internet http://www.qms.nl
)UDQFH
Vélizy Plus
1 Bis, Rue du Petit Clamart
78142 Vélizy Cedex
France
(+33) 1–410 79 393
Fax (+33) 1–408 30 110
*0%+
Germany and
Austria
$
Willstätterstrasse 10
40549 Düsseldorf
Germany
(+49) 211–596 1333
Fax (+49) 211–596 1397
406785%23ULQW6\VWHP2SHUDWLRQ
,WDO\
Via della Repubblica 56
43100 Parma
Italy
(+39) 52–1231 998
Fax (+39) 52–1232 902
1RUGLF
Arenavägen 41, 6th floor
121 77 Johanneshov
Sweden, Finland,
Sweden
Norway, and
(+46) 8–600 01 30
Denmark
Fax (+46) 8–600 01 33
6RXWK$IULFD
6SDLQ
8.
United Kingdom
and Ireland
Saskay House
Unit 24 Sunninghill Business Park
Peltier Road, Sunninghill, Johannesburg
Republic of South Africa
(+27) 11–807 6957
Fax (+27) 11–807 6960
Josefa Valcárcel 8
28027 Madrid
Spain
(+34) 1– 742 5013
Fax (+34) 1–742 3152
Old Bridge House, The Hythe
Staines, Middlesex TW18 3JF
United Kingdom
(+44) 1784–442255
Fax (+44) 1784–461641
406&XVWRPHU6XSSRUW
$
,QGH[
$
ADF
Jams 6-36
Adjusting Cassette Media Size 2-4
Advanced printing features
Memory 3-3
All pages don’t print 6-54
%
Blank pages 6-53
Browser software
Setting up 7-3
Bulletin board, QMS A-3
&
Cable
Removing 4-10
Call for service 6-9
Cancel key 3-14
Cancelling a print job 3-14
Cancelling job 3-14
Status message 6-4
Cassette
Removing 4-10
Chunk collation 3-11
Cleaning the printer 4-3
Cleaning guidelines 4-4
Cleaning the inside 4-5, 4-6, 4-8
Cleaning the outside 4-4
Collation
Advantages 3-12
Chunk 3-11
Communication
Testing, parallel port 6-10
Testing, serial port 6-12
Communication settings
Hotlink 7-17
Configuration
Current memory 7-18
Manual proxy 7-4
Consumable status
Hotlink 7-24
Control panel
Cancel key 3-14
Control panel messages 6-2
Conventions, typographic 1-4
CrownCopy
Jams 6-36
Troubleshooting 6-47
Understanding LED’s 6-47
CrownNet problems 6-52
Current memory
Configuration 7-18
Customer Response Center (CRC),
QMS A-4
Customer support, QMS A-2
'
Dark image 6-59
Data indicator
Stays lit 6-49
Will not light 6-17
Disk problems
External hard disk not on line 6-55
Internal hard disk not on line 6-54
Documentation
Conventions, typographic 1-4
Overview of this manual 1-2
DOS
mode command 6-13
Downloading typefaces 6-50
Duplexing
Problems 6-54
Tumble 3-6
(
Ending a print job 3-14
Engine test print 6-18
Error codes 6-9
ESP 6-17
,
External hard disk
Not on line 6-55
)
Face-up output 2-14
Feeding paper
Cassette 2-11
Manual feed 2-11
*
General settings
Hotlink 7-14
+
Hard disk
Not on line 6-54, 6-55
Hard disk status
Hotlink 7-20
High-resolution printing 3-2
Home
Hotlink 7-10
Hotlink
Communication settings 7-17
Consumable status 7-24
General settings 7-14
Hard disk status 7-20
Home 7-10
Input buffer sizes 7-17
Local Online help 7-28
Operator control 7-11
Options 7-18
Paper sources 7-17
Printer jobs 7-22
Printer setting 7-15
QMS, Inc. page 7-28
System support 7-26
Timeouts 7-21
,
Idle
Status message 6-5
406785%23ULQW6\VWHP2SHUDWLRQV
Image defects 6-59
Initializing
Status message 6-5
Input bin chaining 3-9
Input buffer sizes
Hotlink 7-17
Installation
Toner cartridge 2-29
Internal hard disk
Not on line 6-54
Internet A-3
Jam LED, CrownCopy 6-47
Jams
Clearing 6-35
Duplexer 6-26
Envelope feeder 6-21
Left cover and fixing area 6-30
Locations 6-19
Multipurpose tray 6-24
Paper deck 6-31
Paper pick-up area 6-25
Preventing 2-2
Scanner ADF 6-36
Top cover area 6-33
Upper and lower cassettes 6-25
.
Kanji Option Kit problems 6-55
/
Label printing 2-19, 2-21
LED
Data 6-49
Troubleshooting 6-47
LED, CrownCopy
Jam 6-47
Power 6-47
Ready 6-47
Scanner 6-47
,QGH[
Light image 6-59
Loading the media cassette 2-2
Local Online help
Hotlink 7-28
0
Maintenance Kit 4-9
Manual
Overview 1-2
Manual feed 3-7
Manual proxy
Configuration 7-4
Media size 2-4
Media size card 2-9
Messages 6-2
Service 6-2
Mode command (DOS) 6-13
Moving, printer 4-10
Replacement packaging 4-10
1
Not all pages print 6-54
2
Operator control
Hotlink 7-11
Options
Hotlink 7-18
Output
Face-up tray 2-14
Output problems 6-52
3
Paper
Jams 6-35
Paper feeding 2-11
Paper jam
Message stays on 6-50
Paper path 6-18
Paper sources
Hotlink 7-17
,
Paper stacking
Face-up 2-14
Parallel port 6-10
Testing communication 6-10
PC
Testing parallel port 6-10
Testing serial port 6-12
PostScript operators
showpage 6-11
Power LED
Will not light 6-16
Power LED, CrownCopy 6-47
Preventing paper jams 2-2
Print density 5-3
Print job
Cancelling 3-14, 3-16
Print problems 4-2
Print quality problems 6-57
Printer
Blank pages 6-53
Cleaning 4-2
Handling 4-2
Lifting 4-3
Problem checklist 6-16
Resets 6-50
Will not print 6-17
Printer home page 7-9
Printer jobs
Hotlink 7-22
Printer name
Assigning 7-3
Printer setting
Hotlink 7-15
Printer web page
Setting up 7-3
Printing
Labels 2-19, 2-21
Transparencies 2-22
Printing status
Status message 6-6
Problem checklist 6-16, 6-60
Print quality 6-57
,
4
Q-FAX A-2
QMS
Customer Response Center (CRC)
A-4
World-wide offices A-5
QMS, Inc. page
Hotlink 7-28
Quality problems 6-57
5
Ready LED, CrownCopy 6-47
Relocating, printer 4-10
Replacement packaging 4-10
Removing
Cable and cassette(s) 4-10
Toner cartridge 4-11
Repacking, printer 4-10, 4-13
Replacement packaging 4-10
Resets
Printer 6-50
Resolution
Changing 3-2
Problems 6-58
Return Merchandise Authorization
number 4-10
Returning, printer
RMA number 4-10
RMA number 4-10
6
Scanner
Jams, ADF 6-36
Troubleshooting 6-47
Serial port 6-12
Parameters, changing 6-13
Testing communication 6-12
Service
RMA number 4-10
United States A-4
Service call
406785%23ULQW6\VWHP2SHUDWLRQV
Placing 6-60
Service messages 6-2, 6-8
Setting up
Browser software 7-3
Printer web page 7-3
Shipping, printer 4-10
Replacement packaging 4-10
RMA number 4-10
showpage operator (PostScript) 6-11
Smears 6-60
Software
Macintosh 6-50
PC 6-15
Stain 6-60
Start-up page
Will not print 6-49
Status Error 6-2
Status message
Cancelling job 6-4
Idle 6-5
Initializing 6-5
Printing status 6-6
Test print 6-7
Waiting for idle 6-8
Waiting on input end job 6-8
Warming up 6-8
Status page
Printing 3-13
Selecting the status page type 3-13
Will not print 6-16
Support, QMS
Bulletin board A-3
Customer A-2
Internet A-3
Technical A-4
World-wide A-5
System support
Hotlink 7-26
Status message 6-7
Testing, PC 6-12
Parallel port 6-10
Serial port 6-12
Timeouts
Hotlink 7-21
Toner cartridge
Care 2-26
Installing 2-29
Removing 4-11
Troubleshooting
Kanji Option Kit problems 6-55
LED, CrownCopy 6-47
Scanner 6-47
Window driver problems 6-51
Tumble Duplexing 3-6
Typographic conventions 1-4
8
Unwrap 2-5
:
Waiting for idle
Status message 6-8
Waiting on input end job
Status message 6-8
Warming up
Status message 6-8
Web page help system 7-29
White lines 6-59
Windows driver problems 6-51
7
Technical support, QMS A-4
Test print
,QGH[
,