1
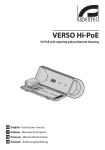
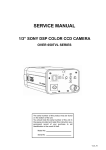
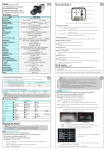
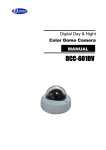
Quick Installation Guide 1/2.8” Network Full HD Speed Dome, PTZ, 18x, Day&Night PXD-2018PTZ1080 Safety Instructions _____ • Read these safety instructions and the operation manual first before you install and commission the camera. • Keep the manual in a safe place for later reference. • Protect your camera from contamination with water and humidity to prevent it from permanent damage. Never switch the camera on when it gets wet. Have it checked at an authorized service center in this case. • Never operate the camera outside of the specifications as this may prevent the camera functioning. • Do not operate the cameras beyond their specified temperature, humidity or power ratings. • Operate the camera only at a temperature range of -40°C to +50°C and at a humidity of max. 90%. • To disconnect the power cord of the unit, pull it out by the plug. Never pull the cord itself. • Pay attention when laying the connection cable and observe that the cable is not subject to heavy loads, kinks, or damage and no moisture can get in. • Do not attempt to disassemble the camera board from the dome. • The warranty becomes void if repairs are undertaken by unauthorized persons. Do not open the camera housing. • Never point the camera towards the sun with the aperture open. This can destroy the sensor. • Installation, maintenance and repair have to be carried out only by authorized service centers. Before opening the cover disconnect the unit from mains input. • Contact your local dealer in case of malfunction. • Only use original parts and original accessories from Videor E. Hartig GmbH. • Do not use strong or abrasive detergents when cleaning the dome. Use a dry cloth to clean the dome surface.In case the dirt is hard to remove, use a mild detergent and wipe gently. • All openings provided in the housing for assembly purposes must be closed and/or sealed. • The installer is responsible for ensuring that the degree of protection as per the technical specifications is upheld, e.g. by using all enclosed gasket seals and O-rings, by waterproofing the cable exits with silicon or through laying the cable in such a way that the cable does not act as a „gutter”. • During assembly, care must be taken to ensure that existing seals are correctly inserted and are not displaced as a result of assembly. You must not continue to use damaged seals. NOTE: This is a class A digital device. This digital device can cause harmful interference in a residential area; in this case the user may be required to take appropriate corrective action at his/her own expense. This Quick Guide is for quick installing and connecting the network Speed Dome IP Camera. For details, please refer to the camera’s User Manual and Installation Guide. Switch Definition _____ Outdoor A B C D E F RJ-45 Connector ALARM I/O Power Micro SD Card Slot Factory Reset Button Audio I/O Power & Audio Connector Definition _____ Please refer to the illustrations below to connect power core through the supplied power adaptor, and set up the audio according to the Audio pin definition. Power Connector Audio Connector Pin Definition Pin Definition 1 AC 24_1 1 LINE_OUT 2 FG 2 GND 3 AC 24_2 3 LINE_IN To power up the Camera, please connect the Ethernet cable to the Camera’s Ethernet Port and plug the other end of the cable into an IEEE 802.3at High Power over Ethernet (PoE Plus) Switch. If there is a need to operate the Heater for Outdoor Models, please plug the AC 24V cable into the Camera’s Power Connector to power up the Camera instead. Alarm I/O Connector _____ When cabling, please refer to the table below for pin definition of the Alarm I/O setting Pin 1 2 3 4 5 6 Definition ALARM_OUT_NO_1 ALARM_OUT_NC_1 ALARM_OUT_COM_1 GND ALARM_OUT_NO_2 ALARM_OUT_NC_2 Before Login to the Camera Pin 7 8 9 10 11 12 Definition ALARM_OUT_COM_2 GND ALARM_IN_4 ALARM_IN_3 ALARM_IN_2 ALARM_IN_1 _____ A client program will be automatically installed on your PC when connecting to the network Speed Dome Camera. Before logging in to the Dome Camera, please ensure downloading the ActiveX control is allowed by either changing the ActiveX controls and plug-ins or setting Internet’s security level to default. For further details, please refer to the network Speed Dome Camera’s Software Guide. ActiveX Controls and Plug-ins Settings Step 1: Start the Internet Explorer (IE). Step 2: Select <Tools> from the main menu of the browser. Then Click on <Internet Options>. Step 3: Click on the <Security> tab and select “Internet”, and click on <Custom level> to change ActiveX settings. Step 4: Set “ActiveX controls and plug-ins” items to <Prompt> or <Enable>. Internet Security Level Step 1: Start the IE. Step 2: Select <Tools> from the main menu of the browser. Then Click on <Internet Options>. Step 3: Click on the <Security> tab and select “Internet.” Step 4: Down the page, press “Default Level” and click on <OK> to confirm the setting. Close the browser window, and open a new one later for accessing the IP Camera Camera Login _____ The network Speed Dome Camera’s default IP address is: 192.168.1.10. Therefore, to access the camera for the first time, set the PC’s IP address as: 192.168.1.XXX; for example: IP Address: 192.168.1.20 Subnet Mask: 255.255.255.0 Login ID & Password Key in the camera’s IP address in the URL bar of the Web browser window and press “Enter.” Enter the default user name (admin) and password (admin) in the prompt request dialogue. Note that user name is case sensitive. Install the ActiveX Control After connecting to the network Speed Dome Camera, the request for installing the ActiveX control will appear just below the URL bar. Right Click on the information bar, and press “Install ActiveX Control…” to permit ActiveX control installation. In the pop-up security warning window, click on “Install” to start downloading DC Viewer software on the PC. Click on “Finish” after DC Viewer installation is complete. Browser-based The main page of the network Speed Dome Camera user interface is as shown below. _____ Technical Specifications Type Art. No. Resolution standard System Sensor size Imager Sensitivity (at 50% video signal) Automatic gain control (AGC) Automatic electronic shutter (ESC) Digital Noise Reduction (DNR) Low speed shutter White balance Backlight compensation Wide Dynamic Range (WDR) IR cut filter Resolution max. Resolution Image transmission rate max. Frame rate Privacy zones masking Activity detection Motion detector Analysis functions Text display Sharpness correction Menu languages OSD function control External connections Video outputs Audio support Audio Alarm inputs Alarm output Alarm processing Internal storage Compression standard Audio standards Bandwidth Stream types Network connection Network interface Web browser Network protocols _____ PXD-2018PTZ1080 200824 HD 1080p True Day&Night 1/2.8" CMOS Sony Progressive Scan 0.1Lux (colour); 0.03Lux (B&W) supplied 1/25 ~ 1/10,000sec. yes, 2D-DNR yes, ON/OFF switchable automatic, indoor, outdoor, ATW, manual BLC Yes, D-WDR switchable 1920x1080 1920x1080 (16:9), 1280x1024 (5:4), 1280x720 (16:9), 1024x768 (4:3), 800x600 (4:3), 720x480 (4:3), 640x480 (4:3), 352x288 (4:3) 25 images/sec. 25fps at 704x576 16 zones masking, ON/OFF switchable yes 10 zones activity detection supplied adjustment range: 0 ~ 15 German, English, French, Italian, Russian, Spanish resolution, presets, motion detection, BLC, DNR, WDR, bit rate, day&night, password alarm input, alarm output, audio input, audio output no yes 1/1 Line input and output 4 2 SD-card recording, alarm out, FTP, E-Mail, PTZ action Micro SD card / SD HC 32GB H.264, MJPEG G.711, G.726, ADPCM/AAC controllable bandwidth and frame rate H.264, MJPEG multiple RJ-45 10Base-T, 100Base-TX MS Internet Explorer vers. 7.0 or higher, Safari (Java), Mozilla Firefox (Java), Google Chrome (Java) TCP/IP, UDP, RTP, RTSP, HTTP, HTTPS, ICMP, Lens type Lens mount Focal length Horizontal angle of view Aperture range Digital zoom Iris control Focus control MOD (Minimum object distance) Illumination Serial interfaces Remote configuration Firmware update Operation protection Password protection e-PTZ support Speed (manual control) Preset speed Rotation range Auto flip function Proportional pan and tilt Patterns Presets Home position Tours Supply voltage Power over Ethernet Blower Heater Power consumption Mounting Temperature range (operation) Vandalism resistant Housing Housing material Colour (housing) Colour (bubble) Protection rating Management Software Support SDK ONVIF Certificates Dimensions Weight Parts supplied FTP, SMTP, DHCP, PPPoE, UPnP, IGMP, SNMP, IPv4, IPv6, IEE 802.1 auto focus zoom 4.7mm – 84.6mm 55.2° - 3.2° F1.6 ~ F2.7 8x DC automatic and manual 1m no no via web browser, remote software via network interface Password protected yes, two levels (administrator and user) no 1-80°/sec. up to 400°/sec. Continuous: 360° mechanical, digital, off continually decreases pan and tilt speeds in proportion to depth of zoom 8 patterns 256 presets included (with multiple park actions) up to 8 user programmable guard tours 24VAC HiPoE w/o heather function yes yes 65W optional wall/flush mounting accessories -40°C~+50°C yes outdoor metal / plastic RAL 9003 clear IP66 www.eneo-security.com/software available yes CE, IK10 see drawing 2.4kg screw set, manual Optional Accessories The optional accessories currently available can be found on our Homepages: www.videor.com and www. eneo-security.com Drawings: eneo® is a registered trademark of Videor E. Hartig GmbH Exclusive distribution through specialised trade channels only. Videor E. Hartig GmbH Carl-Zeiss-Straße 8 · 63322 Rödermark, Germany Tel. +49 (0) 6074 / 888-0 · Fax +49 (0) 6074 / 888-100 V 1.4 www.videor.com www.eneo-security.com Technical changes reserved. © Copyright by Videor E. Hartig GmbH 02/2014