1
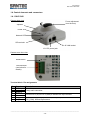
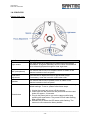
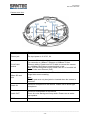
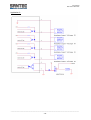
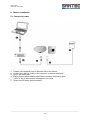
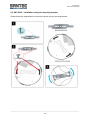
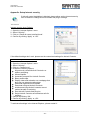
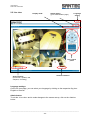
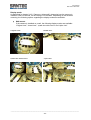
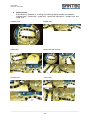
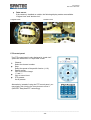
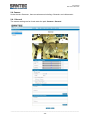
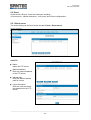
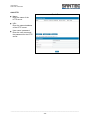
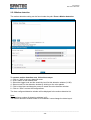
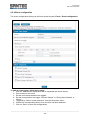
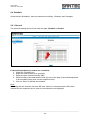
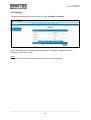
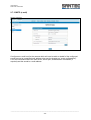
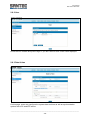
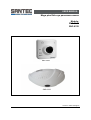
USER MANUAL
Mega pixel fish-eye panorama camera
Models:
SNC-3342
SNC-6332
SNC-3342
SNC-6332
Version 1.0sfi/0112/engl/A5
Dear customer,
Thank you for purchasing a high quality SANTEC device.
We recommend that you read this manual thoroughly before operating your new
system for the first time. Please follow all instructions and observe the warnings
contained in this manual.
Please contact your local dealer or SANTEC directly if you have any questions or if
you wish to claim for a service or warranty.
You will find further information on our website:
www.santec-video.com
All rights reserved. This publication may not be reproduced, stored in a retrieval system or transmitted,
in any form or by any means (electronic, mechanical, photocopying, recording or otherwise), without
the written prior permission of SANTEC BW AG.
No reproduction of any part or excerpts thereof are permitted.
Errors excepted. Specifications are subject to change without notice for quality improvement.
SANTEC is a registered trademark of SANTEC BW AG. All other companies or products mentioned in
this publication are trademarks, registered trademarks or brands of the respective company.
© Copyright by SANTEC BW AG, Ahrensburg (Germany)
User Manual
SNC-3342 / SNC-6332
Table of contents
Safety precautions
5
Safety instructions
6
About this user manual
7
Quick installation guide
8
PART I: CAMERA CONNECTIONS; CABLING, TECHNICAL SPECIFICATIONS
1. General
1.1 Included items
1.2 System requirements
1.3 Dimensions
1.4 Control elements and connectors
1.4.1 SNC-3342
1.4.2 SNC-6332
10
10
10
11
12
12
13
2. Camera installation
2.1 Connect to power
2.2 SNC-6332: Installation using the mounting bracket
17
17
18
3. Technical specifications
19
Appendix: Setup Internet security
21
PART II: CAMERA CONFIGURATION AND CONTROL VIA THE WEB
1. General
22
2. Menu overview
2.1 Administration page (home page)
2.2 Live view
2.3 Video
2.3.1 General
2.3.2 Advanced
2.4 Camera
2.4.1 General
2.4.2 Advanced
2.5 Event
2.5.1 Event server
2.5.2 Motion detection
2.5.3 I/O ports
2.5.4 Event configuration
22
22
23
28
28
29
30
30
32
34
34
36
37
38
_________________________________________________________________________________
-3-
User Manual
SNC-3342 / SNC-6332
2.6. Schedule
2.6.1 General
2.6.2 Storage
2.7 Network
2.7.1 General
2.7.2 Advanced
2.7.3 SMTP (e-mail)
2.7.4 DDNS
2.8 System
2.8.1 Information
2.8.2 User
2.8.3 Date & time
2.8.4 Server maintenance
2.8.5 Log service
39
39
40
41
41
42
43
44
45
45
46
46
47
47
_________________________________________________________________________________
-4-
User Manual
SNC-3342 / SNC-6332
Safety precautions
Caution
Description of symbols
Danger: This symbol is intended to alert the user to the presence of un-insulated
"dangerous voltage" within the product’s enclosure that may be of sufficient
magnitude to constitute a risk of electric shock to a person.
Warning: This symbol is intended to alert the user to the presence of important
operating and maintenance (servicing) instructions in the literature accompanying
the appliance.
CE compliance
Attention: Any changes or modifications to this appliance which have not been explicitly
approved of by the respective regulatory authority, may lead to a prohibition of usage of this
appliance.
This appliance complies with the CE guidelines.
_________________________________________________________________________________
-5-
User Manual
SNC-3342 / SNC-6332
Safety instructions
Before operating the appliance, please read this manual carefully and retain it for further
reference.
Before cleaning the appliance, it has to be switched off and unplugged from the power outlet.
Wipe the appliance with a soft damp cloth.
Do not use harsh cleansers or aerosols for cleaning. The type label may not be replaced.
Do not use attachments unless recommended by the manufacturer as they may affect the
functionality of the appliance and result in the risk of fire, electric shock or injury.
Never install the appliance in areas exposed to water or other liquids.
The appliance has to be installed in a safe and stable location according to the instructions of the
manufacturer. Care should be used when moving heavy equipment. Quick stops, excessive force,
and uneven surfaces may cause the appliance to fall causing serious injury to persons and
damage to objects.
Openings in the appliance, if any, are provided for ventilation to ensure reliable operation of the
appliance and to protect if from overheating. These openings must not be covered or blocked.
Please make sure that the appliance does not overheat.
The appliance should only be operated from the type of power source indicated on the marking
label. If you are not sure of the type of power supplied at the installation location, please contact
your local dealer.
An appliance which is powered through a polarized plug (a plug with one blade wider than the
other) will fit into the power outlet only one way. This is a safety feature. If you are unable to insert
the plug into the outlet, try reversing the plug. Do not defeat the safety purpose of the polarized
plug.
If the appliance is powered through a grounding-type plug, the plug will only fit into a groundingtype power outlet. This is a safety feature. If your outlet does not have the grounding plug
receptacle, contact your local electrician.
Route power cords and cables in a manner to protect them from damage by being walked on or
pinched by items places upon or against them.
For protection of the appliance during a lightning storm or when it is left unattended and unused
for a longer period, unplug the appliance from the wall outlet. Disconnect any antennas or cable
systems that may be connected to the appliance. This will prevent damage to the appliance due to
lightning or power-line surges.
Do not overload wall outlets and extension cords as this can result in a risk of fire or electric
shock.
Never insert items into the openings of the appliance. They may touch parts under electric current
which may cause an electric shock.
Never pour any liquids over the appliance.
_________________________________________________________________________________
-6-
User Manual
SNC-3342 / SNC-6332
In case of any operating interruption or a complete operating failure please switch off the
appliance and disconnect it from the wall outlet. Never attempt to service or repair the appliance
yourself, as opening or removing covers may expose you to dangerous voltage or other hazards.
Refer all servicing to qualified service personnel.
When replacement parts are required, be sure that the service technician uses replacements parts
specified by the manufacturer or that have the same characteristics as the original part.
Unauthorized substitutions may result in fire, electric shock or other hazards.
Upon completion of any service or repairs to the appliance, ask the service technician to perform
safety checks to verify that the appliance is in proper operating condition.
The appliance should only be installed by qualified service personnel and has to comply with local
specifications and regulations.
Never point the camera at an object with a high degree of luminance. Bright vertical or horizontal
lines can result in a distortion (outshine) of the entire image on the monitor. This artifact is not an
error but a particularity of semiconductor CCDs when they are directly exposed to a powerful light
source.
If the camera is operated in locations with extremely differing light conditions, the aperture has to
be adapted.
Please respect the local legal regulations on waste if you need to dispose of discarded appliances.
This symbol means that electrical appliances need to be disposed of properly and not
simply with unsorted household refuse. Please respect local regulations on waste
disposal.
About this user manual
This manual aims at assisting the user on how to operate cameras SNC-3342 and
SNC-6332.
This manual is subject to rigid quality control. However, no guarantee can be given that
mistakes are not present. We reserve the right to make changes to the manual without prior
notice.
Before operating the appliance, please read this manual carefully and retain it for further
reference.
Verify that all appliance items are included in the delivery. Should items be missing, do not
operate the appliance and contact your local dealer.
Never attempt to repair the appliance yourself. This should only be done by qualified service
personnel.
Improper handling of the appliance will invalidate the warranty.
Subject to technical changes without prior notice. Errors excepted.
_________________________________________________________________________________
-7-
User Manual
SNC-3342 / SNC-6332
QUICK INSTALLATION GUIDE
QUICK INSTALLATION GUIDE
IP panorama camera SNC-3342
To operate the panorama camera, please follow these steps:
1. Install the camera in the desired location.
2. Connect the camera to power using a suitable power adapter (12 V DC) or via PoE
(PoE switch or PoE injector required).
Focus adjustment
(turn the lens to adjust the focal
length)
Power LED
Network LED
SD card slot
RJ-45 LAN socket
12 V DC power jack
3. Connect the camera to the network using a LAN cable.
The network LED lights up in orange.
1.
2.
2
No. 3 and 4 are not necessary if PoE
is used.
3. Plug-in the power jack.
4. Connect the 12 V DC adapter to
power..
5
3
4
Prepare a PC/laptop with an Ethernet
link to the network.
Connect the LAN port (RJ45) of the
camera to a network switch/hub.
1
5.
Check the network LED status.
4. Insert the CD (included in the delivery) into your PC/laptop and install the IP-finder.
5. The IP-finder displays an IP address for the camera. Double-click on the IP address
and the Internet Explorer comes up automatically. In case this doesn’t work, you may
also enter the IP address (as shown by the IP-finder) manually into the Internet
Explorer. Using the IP-finder, another IP address can be assigned to the camera, if
required.
Note:
The camera comes with a default IP address:
Default IP address: 192.168.1.168 (or DHCP, if available)
User name:
admin
Pass word:
9999
Please refer to the following chapters in this user manual for further information on camera
configurations.
_________________________________________________________________________________
-8-
User Manual
SNC-3342 / SNC-6332
QUICK INSTALLATION GUIDE
IP panorama camera SNC-6632
To operate the panorama camera, please follow these steps:
1. Install the camera in the desired
location.
2. Connect the camera to power using
a suitable power adapter
(12 V DC) or via PoE (PoE switch or
PoE injector required).
Lens adjustment
3. Connect the camera to the network
using a LAN cable. The network LED lights up in orange.
1. Prepare a PC/laptop with an Ethernet
link to the network.
2.
Connect the LAN port (RJ45) of
the camera to a network switch/hub.
No. 3 and 4 are not necessary if PoE
is used.
3. Plug-in the power jack.
4. Connect the 12 V DC adapter to
power.
5. Check the LED status
(power/network).
4. Insert the CD (included in the delivery) into your PC/laptop and install the IP-finder.
5. The IP-finder displays an IP address for the camera. Double-click on the IP address
and the Internet Explorer comes up automatically. In case this doesn’t work, you may
also enter the IP address (as shown by the IP-finder) manually into the Internet
Explorer. Using the IP-finder, another IP address can be assigned to the camera, if
required.
Note:
The camera comes with a default IP address:
Default IP address: 192.168.1.168 (or DHCP, if available)
User name:
admin
Pass word:
9999
Please refer to the following chapters in this user manual for further information on camera
configurations.
_________________________________________________________________________________
-9-
User Manual
SNC-3342 / SNC-6332
Part I: Camera connections, cabling, technical specifications
1. General
1.1 Included items
1x
1x
1x
1x
1x
IP camera SNC-3342 or SNC-6332
CD (IP-Finder and user manual)
Quick installation guide
Mounting bracket for SNC-6332
Camera stand/bracket for SNC-3342
1.2 System requirements
To control the IP camera via the web browser, please ensure your PC has a good network
connection and meets the system requirements as described below.
Item
Personal Computer
Operating System
Web browser
Network Card
Viewer
System requirement
1. Intel® Pentium® M, 2.16 GHz or
Intel® CoreTM2 Duo, 2.0 GHz
2. 2 GB RAM or more
Windows VISTA / Windows XP / Windows 7
Microsoft Internet Explorer 6.0 or higher
10Base-T (10 Mbps) or 100Base-TX (100 Mbps)
ActiveX control plug-in for Microsoft IE
_________________________________________________________________________________
- 10 -
User Manual
SNC-3342 / SNC-6332
1.3 Dimensions
SNC-3342:
85
85
56
SNC-6332:
190
60
All dimensions in mm. Pictures not true to scale.
Illustrations may vary from the actual product.
_________________________________________________________________________________
- 11 -
User Manual
SNC-3342 / SNC-6332
1.4 Control elements and connectors
1.4.1 SNC-3342
Camera side view:
Focus adjustment
(turn the lens)
Speaker
Power LED
Network LED
SD card slot
RJ-45 LAN socket
12 V DC power jack
Camera rear view view:
Reset button
Terminal block
(see below for
details)
Terminal block: Pin assignments:
Pin
7
6
5
4
3
2
1
Function
GND
Audio Out
Audio In
GND
DI
DO__COM
DO_NO
Description
2-way audio connector.
Connect Pin 3 (DI) to Pin 4 (GND) to activate the input contact.
When activating the output contact, Pin 7 (GND) is connected to Pin 2
(DO_COM). Normal Open status.
_________________________________________________________________________________
- 12 -
User Manual
SNC-3342 / SNC-6332
1.4.2 SNC-6332
Camera front view:
Interface
Description
Light sensor
The light sensor is for detecting the camera’s environmental
illumination. At night/in darkness, the IR cut filter is switched off
to let infrared light pass through for clear night view.
MIC (microphone)
The camera has a built-in microphone which is hidden in the
pinhole located on the front panel.
Lens focus
adjustment
Turn the lens to adjust the focus to get the best image.
If necessary, clean the lens with a soft cotton cloth.
Speaker
The camera has a built-in speaker which is hidden in the
pinhole located on the front panel.
This button is hidden in the pinhole. It is used to restore factory
default settings. To do so, please follow these steps:
Reset button
1. Unplug the power jack to turn off the camera.
2. Insert a pin into the reset hole and press and hold the reset
button for approx. 10 seconds.
3. Plug-in the power jack to turn on the camera while keep
pressing the reset button. The power LED will start flashing
after a short while.
4. Release the pin when the LED starts quick flashing. The
camera is now restored to factory default.
_________________________________________________________________________________
- 13 -
User Manual
SNC-3342 / SNC-6332
Camera rear view:
Interface
Description
Power jack
The input power is 12 V DC, 2A.
RJ-45 LAN
socket
Connect to PC or hub/switch.
For connection to 10Base-T Ethernet or 100Base-TX fast
Ethernet cabling. Please use CAT-5 cable to connect the camera
to a 100Mbps fast Ethernet network switch or hub.
Note: Only use one power source, either from DC or from 802.3af
Power-over-Ethernet (PoE).
The camera has a built-in micro SD card slot which is used for
image/video event recording.
Micro SD card
slot
Note:
The SD card must only be ejected or inserted when the camera is
turned off.
Audio IN
Connect a microphone to the camera. Please use an active-type
microphone.
Audio OUT
Connect a loud speaker to the camera.
This is for voice alerting and 2-way audio. Please use an activetype speaker.
GPIO
7 pin terminal block (see following table for details).
_________________________________________________________________________________
- 14 -
User Manual
SNC-3342 / SNC-6332
I/O terminal block: Pin assignments:
Pin
1
Function
GND
Description
2
Digital input 4
3
Digital input 3
4
Digital input 2
Four sets of digital input, DI1 until DI4. The internal device is
also photo-coupled electrical relay. In practice, the external
device can be simply an on/off switch. Four sets of on/off
switches can be connected as different trigger source.
5
Digital input 1
6
DO_NO
7
DO_COM
When activating the output contact, Pin 7 (GND) is connected to
Pin 2 (DO_COM). Normal Open status
Application 1:
_________________________________________________________________________________
- 15 -
User Manual
SNC-3342 / SNC-6332
Application 2:
_________________________________________________________________________________
- 16 -
User Manual
SNC-3342 / SNC-6332
2. Camera installation
2.1 Connect to power
1.
2.
3.
4.
Prepare a PC/notebook with an Ethernet link to the network.
Connect the LAN port (RJ45) of the camera to a network switch/hub.
Plug-in the power jack.
Ensure that the power adaptor specification matches the power system
(110 V or 220 V) and connect the adaptor to the outlet.
5. Check the LED status (power/network).
_________________________________________________________________________________
- 17 -
User Manual
SNC-3342 / SNC-6332
2.2 SNC-6332: Installation using the mounting bracket
Please follow the steps below to mount the camera using a mounting bracket.
_________________________________________________________________________________
- 18 -
User Manual
SNC-3342 / SNC-6332
3. Technical specifications
Camera
Camera type
SNC-3342
180° panorama IP camera
Sensor type
Resolution (pixel)
Video codec
Max. frame rate
Number of video streams
Video stream 1
Video stream 2
Lens mount
Iris control
Lens type
Focal length
Picture angle (horizontal)
Sensitivity
IR cut filter
Day/night mode adjustment
Automatic Gain Control (AGC)
Digital Noise Reduction (DNR)
White balance
Backlight compensation
Wide Daynamic Range (WDR)
Digital zoom
EasyView PTZ
Mirroring (vertical)
Motion detection
Privacy zones
Tampering alarm
Camera title
Video output
Audio support
Speakers
Microphone
Audio input/output
Audio codec
Alarm contacts I/O
SNC-6332
360° panorama IP camera
2 mega pixel CMOS sensor
2 MP (1600 x 1200)
H.264 / MJPEG
15 fps at 2 MP (1600 x 1200)
2
1600 x 1200
800 x 600
640 x 480 at 15 fps
640 x 480
320 x 240 at 15 fps
Internal
Manual
Fix lens
1.25 mm / F2.0
180°
360°
0.1 (color)
Yes
Auto / color / BW / external
Yes
No
Auto / cloudy / sunny / indoor
No
No
Yes
Yes
Yes
Yes
No
No
Yes
No
2-way
Yes
Yes
1/1
G.711 / AAC
1/1
(continue on next page)
_________________________________________________________________________________
- 19 -
User Manual
SNC-3342 / SNC-6332
Camera
Alarm management
Schedule
Management software support
Security features
Supported protocols
Internal memory
Video Content Analytics (VCA)
Ethernet connector
Ethernet standards
Classification
Vandal-proof
Heater & fan
Installation
Camera mounting
Housing color
Housing material
Integrated LEDs
Voltage
PoE standard
Power consumption
Operating temperature
Storage temperature
Rel. humidity
Dimensions
Weight
Certification
Items included in the delivery
Supported languages
SNC-3342
SNC-6332
HTTP, FTP, SMTP
Yes
NUUO, Genetec and others
HTTPS, IP filter, IEEE 802.1X
UPnP, Bonjour, DHCP, FTP, HTTP, SMTP, RTSP
Micro SD card (optional)
No
RJ-45
10Base-T / 100Base-TX
IP-44
No
No
Wall mount
Ceiling mount
Screw fastening
White
Plastic
No
12 V DC / PoE
IEEE 802.3af
6 watt
0° to +50° C
-10° to +50° C
20-80% non-condensing
85 x 85x 56 mm (WxHxD)
190 x 60 mm (D x H)
Approx. 240 g
Approx. 370 g
CE, RoHS
Bracket, quick installation guide,
CD (IP-Finder, user manual)
English, German
Subject to technical changes without prior notice. Errors excepted.
_________________________________________________________________________________
- 20 -
User Manual
SNC-3342 / SNC-6332
Appendix: Setup Internet security
If ActiveX control installation is blocked, please either set the Internet security
level to default or change ActiveX controls and plug-in settings.
Internet security level: Default:
1.
2.
3.
4.
Open the „Internet Options“ menu.
Select “Security”.
Click on „Reset all zones to default level“.
Confirm by clicking “Apply” or “OK”.
If the default settings don’t work, please use the customized settings for ActiveX Controls.
Internet security level: Customized:
Open the „Internet Options“ menu.
Select “Security”.
Click on „Custom level“
Enable the following options:
All previously unused ActiveX Controls run
without prompting.
Allow scriptlets.
Automatic promptinf for ActiveX Controls.
Binary and scripts.
Display video and animation on a webpage that
does not use external media player
Download signed ActiveX controls
Download unsigned ActiveX Controls.
Initialize and script ActiveX controls are not
marked as safe for scripting
Run ActiveX Controls and plug-ins.
Script ActiveX Controls are marked as safe for
scripting. .
5. Confirm by clicking “OK“.
6. Confirm by clicking „Apply“ or „OK“.
1.
2.
3.
4.
To activate all settings in the Internet Explorer, please restart it!
_________________________________________________________________________________
- 21 -
User Manual
SNC-3342 / SNC-6332
Part II: Camera configuration and control via the web
1. General
The camera is equipped with a user-friendly browser-based configuration interface. In this
part of the user manual, information on system related settings and camera settings will be
described in detail.
Start your Web browser and enter the URL or IP address in the address field.
Default IP address:
Default user name:
Default password:
192.168.1.168
(or DHCP-assigned address if available (see IP-Finder))
admin
9999
When prompted by the Internet security note, please click on “install”.
The live view of the camera is now displayed.
2. Menu overview
Once the camera is connected to the power and the camera is accessed via the web
browser, you will see the following main tabs on the top of the screen:
<Live view>, <Video>, <Camera>, <Event>, <Schedule>, <Network> and <System>.
2.1 Administration page
Click on the <Admin> button to access the administration page. Here you can make a
number of adjustments and settings (see the following chapters).
_________________________________________________________________________________
- 22 -
User Manual
SNC-3342 / SNC-6332
2.2 Live view
Admin button
(go to administration page )
Display mode
Language
setting
PTZ control
panel
Channel selection
Action buttons
(Full screen, speaker, talk,
snapshot, recording)
Language settings:
On the live view page, you can select your language by clicking on the respective flag icon:
English or German.
Admin button:
To exit the <Live view> and to make changes to the camera set-up, click on the <Admin>
button.
_________________________________________________________________________________
- 23 -
User Manual
SNC-3342 / SNC-6332
Display mode:
As described in chapter 2.4.2 (“Camera > Advanced”), determine how the camera is
installed, either on the wall, on the ceiling or on the table. Depending on the selected
mounting, the following options regarding the display modes are available:
Wall mount:
If the camera is installed on a wall, the following display modes are available:
“Original view”, “broad view”, “quad view with source” and “triple view”.
Original view:
Broad view:
Quad view with source:
Triple view:
_________________________________________________________________________________
- 24 -
User Manual
SNC-3342 / SNC-6332
Ceiling mount:
If the camera is installed on a ceiling, the following display modes are available:
“Original view”, “broad view”, “quad view”, “quad view with source”, “double view” and
“triple view”.
Original view:
Broad view:
Quad view:
Quad view with source:
Double view:
Triple view:
_________________________________________________________________________________
- 25 -
User Manual
SNC-3342 / SNC-6332
Table mount:
If the camera is installed on a table, the following display modes are available:
“Original view” and “double view”.
Original view:
Double view:
PTZ control panel:
The PTZ control panel is only displayed in “quad view”,
“quad view with source” or “triple view” mode.
Channel:
Select the channel number.
Step:
Select the speed of the pan/tilt function (1-10).
Pan/tilt arrows:
Click to move the image.
“+” and “-“:
Click to zoom in/out.
PTZ presets:
List of presets.
Alternatively, instead of using the PTZ control panel, you
may simply click into the live view picture to move it
(SANTEC “EasyViewPTZ” technology).
_________________________________________________________________________________
- 26 -
User Manual
SNC-3342 / SNC-6332
Action buttons:
Full screen
When activated, one channel is displayed in 4 different views.
Speaker
Click on this button to mute/activate the audio function.
Note:
This function is only open to a “user” who has been granted this privilege by the
administrator.
Talk
The talk function allows the local site to talk to the remote site. Click on the button to
switch it to on/off.
Note:
This function is only open to a “user” who has been granted this privilege by the
administrator.
Snapshot
Click on this button and a JPEG/JPG snapshot is made of the live picture. By default,
it will be stored on your C:\ drive.
Note:
For users with Windows 7 operating system, it is required to log on as an
administrator to implement the snapshot function.
Recording
Click on this button and the live picture is recorded. The recording button lights up in
bright red colour while recording. The recorded clip is by default saved to your C:\
drive.
Note:
For users with Windows 7 operating system, it is required to log on as an
administrator to implement the snapshot function.
_________________________________________________________________________________
- 27 -
User Manual
SNC-3342 / SNC-6332
2.3 Video
Under the tab <Video>, there are submenus including <General> and <Advanced>.
2.3.1 General
The video setting can be found under the path: Video > General
Check the OSD “enable” box to display the camera name (max. 20 characters) and
date/time.
_________________________________________________________________________________
- 28 -
User Manual
SNC-3342 / SNC-6332
2.3.2 Advanced
The video setting can be found under the path: Video > Advanced
Stream 1 setting:
RTSP path:
This is the stream ID used for RTSP client streaming connection, such as VLC player
(default: v00).
Image format:
Choose MJPEG or H.264.
Resolution:
1600 x 1200, 800 x 600, 640 x 480.
GOP:
Choose the number of P-frame or B-frame between I-frame from 2 to 32. The lower
the number, the higher the video quality you will get. On the other hand, it will
consumer more network bandwidth and storage size.
Video mode:
Choose between variable bit rate (VBR) and constant bit rate (CBR):
o VBR:
Choose the quality level “best”, “good” or “standard”. For some environments,
it is important to ensure a high video quality level. However, a high quality
level will consume more network bandwidth.
o CBR:
Choose target bit rate range from 1000 Kb to 6000 Kb. For some
environments, it is very helpful for network bandwidth management but the
video quality will be variable up to the complexity of video scene.
Frame rates (fps):
Choose the number of frames to be displayed per second (from 5 to 15).
Stream 2 setting:
Proceed in the same way as for stream 1 (described above).
_________________________________________________________________________________
- 29 -
User Manual
SNC-3342 / SNC-6332
2.4 Camera
Under the tab <Camera>, there are submenus including <General> and <Advanced>.
2.4.1 General
The camera setting can be found under the path: Camera > General
_________________________________________________________________________________
- 30 -
User Manual
SNC-3342 / SNC-6332
Camera general setting:
The following parameters can be adjusted in terms of image color/vision:
Brightness: Luminance of image.
Hue: Color hue can be modified.
Saturation: Intensity of a specific color.
Contrast: Difference in color and light between parts of an image.
Sharpness: Sharpness of image.
Audio setting:
Audio enable: Turn on/off the audio.
Encoder: Select “G711” or “AAC”.
Input of listen pattern: Select the audio source: „Mic in“ or „Line in“.
Output of talking pattern: Select the audio source: „Speaker out“ or „Line out“.
Web record setting:
Save path / File name: Click on the “Browse” button to select the desired path to save
the video file.
Web snapshot image setting:
Save path / File name: Click on the “Browse” button to select the desired path to save
the video file.
_________________________________________________________________________________
- 31 -
User Manual
SNC-3342 / SNC-6332
2.4.2 Advanced
The camera setting can be found under the path: Camera > Advanced
White balance:
Adjustment to compensate for different environments in terms of light source. Users can
choose from “auto”, “hold”, “sunny”, “cloudy” or “indoor” so that the camera can determine
the correct color compensation due to different light environments. Please note that “hold”
indicates that the parameter will apply default settings.
Exposure:
Anti-flicker setting for image sensor to fit the net frequency. For instance, the power
frequency is 50Hz for most European countries, while 60Hz is typical for the USA. This
setting is therefore regionally different. Default setting is 50Hz.
Max exposure time:
Refers to shutter speed.
Max gain control:
Amplification factor for incoming light.
_________________________________________________________________________________
- 32 -
User Manual
SNC-3342 / SNC-6332
Infrared (IR) cut filter:
Auto:
Default setting.
Enable:
Indicates that the filter is enabled to cut the IR light.
Disable:
Indicates that the filter is disabled and allows IR light (such as IR LED illuminator) to
enter into the camera.
Day / night threshold:
The threshold to change from day to night mode. Default setting is 20 lux. This means that if
the illumination is < 20 lux, the camera will automatically change to night mode and allow
infrared light to enter into the camera.
Color / mono mode:
Default setting is “auto”. It can also be forced to display color image even in a low light
environment.
Camera mount (only available for SNC-6332):
Choose camera mounting type: “wall”, “ceiling” or “table”.
Depending on the selected mounting type, different display options are available (see
chapter 2.2 “Live view”).
_________________________________________________________________________________
- 33 -
User Manual
SNC-3342 / SNC-6332
2.5 Event
Under the tab <Event>, there are submenus including:
<Event server>, <Motion detection>, <I/O ports> and <Event configuration>.
2.5.1 Event server
The event setting can be found under the path: Event > Event server.
Add FTP:
Name:
Name the FTP server.
Network address:
Enter the network address
of the FTP server.
Upload path:
Enter the desired upload
path for events.
Login information:
Enter the user name and
the password for the FTP
server.
_________________________________________________________________________________
- 34 -
User Manual
SNC-3342 / SNC-6332
Add HTTP:
Name:
Enter the name of the
HTTP server.
URL:
Enter the network address
of the HTTP server.
User name / password:
Enter the user name and
the password for the HTTP
server.
_________________________________________________________________________________
- 35 -
User Manual
SNC-3342 / SNC-6332
2.5.2 Motion detection
The motion detection setting can be found under the path: Event > Motion detection.
To create a motion detection area, follow these steps:
1. Click on “Add” to set-up a detection area.
2. Give a name to this window area.
3. Select the trigger level and the sensitivity level for this detection window (0-100).
4. Select a color for the detection window by clicking on the color palette.
5. Click in the picture and drag the mouse to create a motion detection window.
6. Click on “Save” to store the configurations.
The thus configured detection window will be displayed in the motion detection list.
Note:
The maximum number of detection windows is 10.
The motion detection window needs to be modified if users change the video layout.
_________________________________________________________________________________
- 36 -
User Manual
SNC-3342 / SNC-6332
2.5.3 I/O ports
The I/O port setting can be found under the path: Event > I/O ports.
The relay inputs and outputs are photo-coupled (see chapter 1.4.2 for I/O terminal
connectors’ pin assignment).
_________________________________________________________________________________
- 37 -
User Manual
SNC-3342 / SNC-6332
2.5.4 Event configuration
The event configuration setting can be found under the path: Event > Event configuration.
To add an event trigger, follow these steps:
1. Click on “Add” and the setup panel will be expanded (as shown above).
2. Give a name to this event.
3. Set the time interval between the triggers.
4. Set the time period for the trigger. Choose “Always” or “During time between” or
“Never”.
5. Triggered by: Select “motion detection” from the drop-down menu.
6. Choose the corresponding action once a motion has been detected.
7. Click on “Save” to store the configurations.
_________________________________________________________________________________
- 38 -
User Manual
SNC-3342 / SNC-6332
2.6 Schedule
Under the tab <Schedule>, there are submenus including: <General> and <Storage>.
2.6.1 General
The schedule setting can be found under the path: Schedule > General.
Follow the steps below on how to set a schedule:
1. Check the “Enabled” box.
2. Select the video stream to be recorded.
3. Define the size of each sliced file (MB).
4. Define the day of the week and the time (by hour of the day) of the scheduled period
to be recorded (simply click into the respective field).
5. Click on “Save” to activate the schedule.
Note:
Recording files are saved to the micro SD card. Hence it is necessary that a SD card is
inserted into the respective slot in order for the schedule to be displayed.
_________________________________________________________________________________
- 39 -
User Manual
SNC-3342 / SNC-6332
2.6.2 Storage
The schedule setting can be found under the path: Schedule > Storage.
Here, information on the storage status is displayed. A message is displayed when a
recording is currently running.
Note:
The micro SD card must not be removed during the recording process.
_________________________________________________________________________________
- 40 -
User Manual
SNC-3342 / SNC-6332
2.7 Network
Under the tab <Network>, there are submenus including:
<General>, <Advanced>, <SMTP (e-mail)> and <DDNS>.
2.7.1 General
The network setting can be found under the path: Network > General.
On this page, the camera’s IP configuration is displayed including DHCP and static IP
setting.
“Enable ARP/ping” enables the camera to accept ARP or ping packets from the network.
Disabling this option may provide extra security from intentional ping.
The default IP address is 192.168.1.168 if no DHCP service is available.
_________________________________________________________________________________
- 41 -
User Manual
SNC-3342 / SNC-6332
2.7.2 Advanced
NTP configuration:
Users may configure a NTP (Network Time Protocol) server so that the camera’s system
date and time can be synchronized with a specified time server or DHCP server.
HTTP setting:
Users may set the HTTP port that will be applied for web access. Default port = 80.
RTSP setting:
Users may set the RTSP (video) port for video data transmission. Default port = 554.
UPnP notification:
Check “Enable UPnP” so that the camera can be discovered in a UPnP compliant network.
NAT traversal setting:
Check “Enable NAT traversal” so that a client from the Internet can have access to the
devices behind the router.
Note:
With UPnP enabled, the IP sharing device (router) – capable of UPnP function – will
automatically be notified about the camera’s NAT port.
_________________________________________________________________________________
- 42 -
User Manual
SNC-3342 / SNC-6332
2.7.3 SMTP (e-mail)
Configure an e-mail host for the camera which will send e-mails on behalf of the configured
e-mail account to a specified mail address (also see the chapter on “event configuration”).
Fill-in the information about the mail server, server port, authentication information (if
required) and the sender’s e-mail address.
_________________________________________________________________________________
- 43 -
User Manual
SNC-3342 / SNC-6332
2.7.4 DDNS
Check the box “DDNS enable” for dynamic DNS configuration.
Host name:
Assigned name that will be used for accessing the camera.
User name / password:
Account authentication for logging on to this service.
Update time:
Periodically, the camera updates its access information in the defined time.
Response:
The camera responds to the connection information (yes or no).
_________________________________________________________________________________
- 44 -
User Manual
SNC-3342 / SNC-6332
2.8 System
Under the tab <System>, there are submenus including:
<Information>, <User>, <Date & time>, <Server maintenance> and <Log service>.
2.8.1 Information
The system setting can be found under the path: System > Information.
On this page, a list of system and network configuration is displayed. These data are for
information only and cannot be changed on this page.
_________________________________________________________________________________
- 45 -
User Manual
SNC-3342 / SNC-6332
2.8.2 User
Check the box “Enable anonymous login” if you don’t wish to have a user name displayed.
2.8.3 Date & time
On this page, users may configure the system date and time as well as synchronization
options with a PC and NTP server.
_________________________________________________________________________________
- 46 -
User Manual
SNC-3342 / SNC-6332
2.8.4 Server maintenance
This page provides some tools for system maintenance, such as firmware information and
upgrades, backup and upload settings.
2.8.5 Log service
Most system operations and/or processes will be kept in a log system. The link provides the
review of these records.
_________________________________________________________________________________
- 47 -
Notes:
Your local distributor:
__________________________________________________________________________
www.santec-video.com