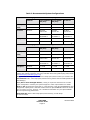
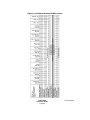
1
SPECTRUM
Installation Guide
Document 0675
Notice
Copyright Notice Copyright © 2002-present by Aprisma Management Technologies, Inc. All rights reserved
worldwide. Use, duplication, or disclosure by the United States government is subject to the restrictions set
forth in DFARS 252.227-7013(c)(1)(ii) and FAR 52.227-19.
Liability Disclaimer Aprisma Management Technologies, Inc. (“Aprisma”) reserves the right to make
changes in specifications and other information contained in this document without prior notice. In all cases,
the reader should contact Aprisma to inquire if any changes have been made.
The hardware, firmware, or software described in this manual is subject to change without notice.
IN NO EVENT SHALL APRISMA, ITS EMPLOYEES, OFFICERS, DIRECTORS, AGENTS, OR
AFFILIATES BE LIABLE FOR ANY INCIDENTAL, INDIRECT, SPECIAL, OR CONSEQUENTIAL
DAMAGES WHATSOEVER (INCLUDING BUT NOT LIMITED TO LOST PROFITS) ARISING OUT OF OR
RELATED TO THIS MANUAL OR THE INFORMATION CONTAINED IN IT, EVEN IF APRISMA HAS BEEN
ADVISED OF, HAS KNOWN, OR SHOULD HAVE KNOWN, THE POSSIBILITY OF SUCH DAMAGES.
Trademark, Service Mark, and Logo Information SPECTRUM, IMT, and the SPECTRUM IMT/VNM logo
are registered trademarks of Aprisma Management Technologies, Inc., or its affiliates. APRISMA,
APRISMA MANAGEMENT TECHNOLOGIES, the APRISMA MANAGEMENT TECHNOLOGIES logo,
MANAGE WHAT MATTERS, DCM, VNM, SpectroGRAPH, SpectroSERVER, Inductive Modeling
Technology, Device Communications Manager, SPECTRUM Security Manager, and Virtual Network
Machine are unregistered trademarks of Aprisma Management Technologies, Inc., or its affiliates. For a
complete list of Aprisma trademarks, service marks, and trade names, go to:
http://www.aprisma.com/manuals/trademark-list.htm
All referenced trademarks, service marks, and trade names identified in this document, whether registered
or unregistered, are the intellectual property of their respective owners. No rights are granted by Aprisma
Management Technologies, Inc., to use such marks, whether by implication, estoppel, or otherwise. If you
have comments or concerns about trademark or copyright references, please send an e-mail to
[email protected]; we will do our best to help.
Restricted Rights Notice (Applicable to licenses to the United States government only.)
This software and/or user documentation is/are provided with RESTRICTED AND LIMITED RIGHTS. Use,
duplication, or disclosure by the government is subject to restrictions as set forth in FAR 52.227-14 (June
1987) Alternate III(g)(3) (June 1987), FAR 52.227-19 (June 1987), or DFARS 52.227-7013(c)(1)(ii) (June
1988), and/or in similar or successor clauses in the FAR or DFARS, or in the DOD or NASA FAR
Supplement, as applicable. Contractor/manufacturer is Aprisma Management Technologies, Inc. In the
event the government seeks to obtain the software pursuant to standard commercial practice, this software
agreement, instead of the noted regulatory clauses, shall control the terms of the government's license.
Virus Disclaimer Aprisma makes no representations or warranties to the effect that the licensed software is
virus-free. Aprisma has tested its software with current virus-checking technologies. However, because no
antivirus system is 100-percent effective, we strongly recommend that you write protect the licensed
software and verify (with an antivirus system with which you have confidence) that the licensed software,
prior to installation, is virus-free.
Contact Information Aprisma Management Technologies, Inc., 273 Corporate Drive, Portsmouth, NH
03801 USA
Phone: 603.334.2100
U.S. toll-free: 877.468.1448
Web site: http://www.aprisma.com
SPECTRUM
Installation Guide
Page 2
Document 0675
Contents
Notice ........................................................................................... 2
Preface ......................................................................................... 8
Intended Audience ..................................................................... 8
Text Conventions ....................................................................... 8
Document Feedback ................................................................... 9
Online Documents ...................................................................... 9
Getting Started ........................................................................... 10
Installation Process Tasks ..........................................................10
System Requirements and Recommendations ............................ 11
System Requirements ................................................................11
Optimizing Your Operating Environment for SPECTRUM ..................12
Disk Striping and RAID .........................................................14
Installing SpectroSERVER on Its Own Workstation ....................14
SpectroSERVER Landscape Handle Requirements ..........................14
Assigning Landscape Handles ................................................15
Determining and Changing Landscape Handles .........................16
Determining the Current Landscape Handle ........................16
Changing the Landscape Handle Of a SpectroSERVER
Database With Existing Models .......................................16
Types of SPECTRUM Installations ............................................... 18
First-Time Installations ..............................................................18
Upgrades .................................................................................18
Upgrading From SPECTRUM 5.0.1
(With CS2 and MMS2) or Earlier ..........................................18
Compatibility Between SPECTRUM Releases .............................19
Upgrading in Place ...............................................................19
Migrating and Upgrading .......................................................19
Preserving Database Customizations .......................................19
Installing Additional Components ................................................20
SPECTRUM
Installation Guide
Page 3
Document 0675
Installing SPECTRUM Patches ......................................................21
Installing SPECTRUM Advanced and Value-Added Applications .........21
Distributed and Fault-Tolerant SPECTRUM Configurations ...............21
Installing on Solaris ................................................................... 22
Prerequisites (Solaris) ...............................................................22
Root Privileges .....................................................................22
Fixed IP Address ..................................................................22
CDE Style Manager Settings ..................................................23
Required Solaris Patches .......................................................23
Configuring a 24-Bit Color Graphics Card .................................25
Checking Your 24-Bit Frame Buffer ....................................25
Configuring 24-Bit Color Mode ..........................................27
Stopping the Process Daemon (processd) [Upgrades From
5.0.1 Only] .......................................................................28
First-Time Installation (Solaris) ...................................................29
In-Place Upgrade (Solaris) .........................................................29
Migration and Upgrade (Solaris) ..................................................30
Installing on Windows ................................................................ 32
Prerequisites (Windows) ............................................................32
Administrative Privileges .......................................................32
Fixed IP Address ..................................................................32
NTFS File System Partitioning ................................................32
SNMP Services Software [Windows NT Only] ............................33
Creating an Emergency Repair Disk ........................................33
Setting Color and Display Properties .......................................33
Checking Network and Security Settings .................................33
User Auditing ......................................................................34
Converting Your File System to NTFS ......................................34
Stopping the Process Daemon (processd)
[Upgrades From 5.0.1 Only] ...............................................35
Uninstalling NuTCRACKER [Upgrades From 5.0.1 Only] .............35
First-Time Installation (Windows) ................................................36
SPECTRUM
Installation Guide
Page 4
Document 0675
In-Place Upgrade (Windows) ......................................................36
Migration and Upgrade (Windows) ...............................................37
Running the Installation Software .............................................. 39
SpectroGRAPH and SpectroSERVER on Separate Workstations ........39
Starting the Installation on Solaris ..............................................40
Starting the Installation on Windows ...........................................43
Installation GUI Screens ............................................................48
File Extraction Screen ...........................................................48
Software Extraction Key Screen .............................................49
End User License Agreement Screen .......................................50
Host Evaluation Screen .........................................................51
Installation Configuration Screen ............................................52
Selecting an Installation Type ...........................................53
Selecting Location Configuration .......................................54
Installing Individual Components ......................................54
Installing All SPECTRUM Components on a
Single Workstation ........................................................55
Installing SpectroGRAPH Only ...........................................55
Installing SpectroSERVER Only .........................................55
Resetting the Default Component Configuration Values ........56
Using the Command Buttons ............................................56
Component Selection Screen .................................................57
Components Available for Installation Table ........................58
Using the Selector Buttons ...............................................60
Selection Filters ..............................................................61
Using the Command Buttons ............................................62
SpectroSERVER Validation Screen ..........................................63
Field Descriptions ............................................................64
Entering an Expiration Date ..............................................64
Entering an SS Activation Key ...........................................64
Entering a Landscape Handle ............................................65
Using the Command Buttons ............................................66
SPECTRUM
Installation Guide
Page 5
Document 0675
Location Server Configuration Screen .....................................67
Selecting a Main Location Server .......................................68
Using the Command Buttons ............................................68
User Model Index Service Screen ...........................................69
Installation Summary Screen .................................................70
Installation Monitor Screen ....................................................71
Using the Command Buttons ............................................72
Completing the Installation ...............................................72
Installing the Exceed X Server (Windows) ...............................72
When Installation Is Complete ....................................................73
Starting SPECTRUM and Postinstallation Configuration .............. 74
Starting SPECTRUM ...................................................................74
Upgrading SPECTRUM Models and Model Types .............................74
Configuring SPECTRUM CORBA Services .......................................75
Changing the OSAGENT_PORT ...............................................77
Scheduler Requirements (Windows) ............................................78
Important Files Created During Installation ..................................78
SPECTRUM Process Daemon (processd) Files ...........................78
SPECTRUM Remote Administration Daemon (SRAdmin) Files ......79
Installation Database Savefiles ..............................................79
Setting up Client Access .............................................................80
Remote Display of SPECTRUM .....................................................80
Configuring Exceed X Server for Remote Display ......................81
Initiating Remote Display ......................................................82
Terminating a Remote Display Session ....................................83
Remote Display Limitations ...................................................83
Upgrading SPECTRUM Models, Model Types, and Management
Modules ................................................................................... 84
Ensuring Database Compatibility With Your Upgrade ......................85
Postinstallation Scripts and Templates ....................................85
If You Used Model Type Editor ...............................................87
Attributes and Elements Preserved With Model Types ................87
SPECTRUM
Installation Guide
Page 6
Document 0675
Upgrading Model Types and Models From SPECTRUM 5.0.1 .............89
MM_dep_50R1_script.pl ........................................................89
Convert_to_SSX.script ..........................................................90
MT_del_50R1_script.pl .........................................................91
Removing Discontinued Ethernet Application Models and
Model Types ..........................................................................92
Rem_EnetApp_Mdls.sh .........................................................92
Removing the Discontinued Model Types .................................93
Upgrading Host Models and Model Types ......................................94
host_conversion.pl ...............................................................95
Removing the Discontinued Model Types .................................95
Upgrading Nortel Accelar Models and Model Types .........................97
Upgrading Generic Cable Modem Models
and Model Types ....................................................................98
Upgrading Juniper Router Models and Model Types ........................99
Upgrading Management Modules ............................................... 100
Troubleshooting ....................................................................... 102
Uninstalling SPECTRUM ............................................................ 106
Uninstalling SPECTRUM 6.5.1 on Solaris ..................................... 106
Uninstalling SPECTRUM 6.5.1 on Windows .................................. 107
Appendix A ............................................................................... 109
Using the Online Backup Utility ................................................. 109
Mounting the SPECTRUM CD ..................................................... 109
Installing From a Local CD Drive .......................................... 110
Installing From a Remote CD Drive ....................................... 110
Setting the Solaris Display Environment ..................................... 111
Using the DBconv Utility .......................................................... 112
Index ........................................................................................ 115
SPECTRUM
Installation Guide
Page 7
Document 0675
Preface
In this section:
Intended Audience [page 8]
Text Conventions [page 8]
Document Feedback [page 9]
Online Documents [page 9]
Intended Audience
This guide is intended for system administrators who are installing or
upgrading SPECTRUM on a Windows or Solaris platform.
Text Conventions
The following text conventions are used in this document:
Element
Convention Used
Example
User-supplied parameter
names
Courier and Italic in angle The user needs to type the
brackets <>.
password in place of
<password>.
On-screen text
Courier
The following line displays:
path=”/audit”
User-typed text
Courier
Type the following path
name:
C:\ABC\lib\db
Cross-references
Underlined and hypertextblue
See Document Feedback
[page 9].
References to SPECTRUM
documents (title and
number)
Italic
SPECTRUM Installation Guide
(0675)
The directory where you
installed SPECTRUM
<$SPECROOT>
Navigate to:
<$SPECROOT>/app-defaults
SPECTRUM
Installation Guide
Page 8
Document 0675
Element
Convention Used
Example
Solaris and Windows
directory paths
Unless otherwise noted,
directory paths are common
to both operating systems,
with the exception that
forward slashes (/) should be
used in Solaris paths, and
backslashes should be used
in Windows paths.
<$SPECROOT>/app-defaults
on Solaris is equivalent to
<$SPECROOT>\app-defaults
on Windows.
Document Feedback
Please send feedback regarding SPECTRUM documents to the following
e-mail address:
[email protected]
Thank you for helping us improve our documentation.
Online Documents
SPECTRUM documents are available online at:
http://www.aprisma.com/manuals
Check this site for the latest updates and additions.
SPECTRUM
Installation Guide
Page 9
Document 0675
Getting Started
This guide contains prerequisites, instructions,
troubleshooting tips, and reference information related to
SPECTRUM installation. Refer to the table below to
determine where to begin the installation process and how
to proceed from there.
In this section:
Installation Process Tasks [page 10]
Installation Process Tasks
The table below lists the common tasks for installing SPECTRUM. Use this
as a guide for determining how to proceed for your specific installation.
Chronology
Task
Applicable Sections
Before
Installation
Check the SPECTRUM system
requirements.
System Requirements [page 11]
Optimize your operating
environment for best
performance.
Optimizing Your Operating Environment
for SPECTRUM [page 12]
Determine the type of installation Types of SPECTRUM Installations
you need to perform.
[page 18]
During
Installation
After
Installation
Complete the installation
prerequisites.
Installing on Solaris [page 22]
Run the installation software.
Running the Installation Software
[page 39]
Troubleshoot, if necessary.
Troubleshooting [page 102]
Installing on Windows [page 32]
If you are upgrading SPECTRUM, Upgrading SPECTRUM Models, Model
you must also upgrade your
Types, and Management Modules
SPECTRUM models, model types, [page 84]
and management modules.
Complete postinstallation
procedures and configure your
system.
SPECTRUM
Installation Guide
Page 10
Starting SPECTRUM and Postinstallation
Configuration [page 74]
Document 0675
System Requirements and
Recommendations
This section contains system requirements along with
recommendations for configuring your operating
environment—before you install SPECTRUM—for enhanced
SPECTRUM performance and efficiency.
In this section:
System Requirements [page 11]
Optimizing Your Operating Environment for SPECTRUM [page 12]
SpectroSERVER Landscape Handle Requirements [page 14]
System Requirements
The following tables list the hardware and software required to run
SPECTRUM.
Table 1: Solaris System Requirements
Component
Requirement
Operating System
Solaris 7 with CDE or Solaris 8 with CDE, and required patches
(see Required Solaris Patches [page 23])
Memory (RAM)
Dependent on configuration and number of managed devices
(see Table 3 [page 13])
Processor
Dependent on configuration and number of managed devices
(see Table 3 [page 13])
Disk Space
Dependent on configuration and number of managed devices
(see Table 3 [page 13])
Video System
24-bit color graphics system capable of 65,000 colors at
1024 x 768 pixel resolution (see Configuring a 24-Bit Color
Graphics Card [page 25])
20-inch or larger monitor
Web Browser
Solaris Netscape 4.7x (from Sun)
PDF Document Viewer
Acrobat Reader With Search 4.x or later (see Documentation CD
ReadMe file)
SPECTRUM
Installation Guide
Page 11
Document 0675
Table 2: Windows System Requirements
Component
Requirement
Operating System
Windows NT 4.0 with Service Pack 6a or later, or
Windows 2000 (service packs supported but not required)
Memory (RAM)
Dependent on configuration and number of managed devices
(see Table 3 [page 13])
Processor
Dependent on configuration and number of managed devices
(see Table 3 [page 13])
Disk Space
Dependent on configuration and number of managed devices
(see Table 3 [page 13])
Video System
2 MB PCI bus card capable of 32-bit color at 1024 x 768 pixel
resolution
20-inch or larger monitor
X server
Hummingbird Exceed 7.1.0.2 (included with SPECTRUM)
Web Browser
Internet Explorer 5.5 or 6.0, or Netscape 4.7x, 6.1, or later
PDF Document Viewer
Acrobat Reader With Search 5.x or later (see Documentation CD
ReadMe file)
Optimizing Your Operating Environment for
SPECTRUM
Beyond the System Requirements [page 11], this section explains how to
configure your operating environment for optimum SPECTRUM
performance and efficiency.
Due to the complexities and variables of polling frequency, device types,
and the number of devices within a network, it is impossible to define all
possible configurations and system requirements for all users. Aprisma
recommends the configurations in Table 3 [page 13] as a guideline for
SPECTRUM to take advantage of all system resources and run at peak
efficiency. The maximum benefit is achieved from any system when all
three system resources—memory, processor, and disk space—are robust
enough that no one resource limits any of the others.
Consult your Aprisma support or sales representative for more help in
determining the ideal configuration for your network.
SPECTRUM
Installation Guide
Page 12
Document 0675
Table 3: Recommended System Configurations
One Workstation Managing Fewer Than 500 Devices/Avg. 24 Ports on Each Device
Platform
SpectroSERVER SpectroGRAPH
(SS) Only
(SG) Only
SS and SG
Memory
Windows
512 MB
512 MB
1024 MB
(RAM)
Solaris
512 MB
512 MB
1024 MB
Processor
Windows
550 MHz
Pentium III
550 MHz
Pentium III
550 MHz
Pentium III
Solaris
167 MHz
UltraSPARC I
167 MHz
UltraSPARC I
167 MHz
UltraSPARC I
2 x 4 GB3
1 x 4 GB
2 x 4 GB3
2 x 4 GB3
1 x 4 GB
2 x 4 GB3
Disk Space1,2 Windows
Solaris
One Workstation Managing 500 or More Devices/Avg. 24 Ports on Each Device4
Platform
SpectroSERVER SpectroGRAPH
(SS) Only
(SG) Only
SS and SG
Memory
Windows
1024 MB
512 MB
1536 MB
(RAM)
Solaris
1024 MB
512 MB
1536 MB
Processor
Windows
Xeon 733 MHz
Pentium III5
550 MHz
Pentium III
Xeon 733 MHz
Pentium III5
Solaris
360 MHz
UltraSPARC II
167 MHz
UltraSPARC I
360 MHz
UltraSPARC II
3 x 4 GB6
1 x 4 GB
3 x 4 GB6
3 x 4 GB6
1 x 4 GB
3 x 4 GB6
Disk Space1,2 Windows
Solaris
1Disk Drives: For optimum performance, Aprisma recommends running SPECTRUM on
systems with multiple, ultrawide, 10 K-rpm, SCSI disk drives using disk striping and/or RAID
(see Disk Striping and RAID [page 14]).
2
Swap/Virtual Memory: Set the amount of swap space/virtual memory to at least 2 GB.
3
Two-Disk Set: Disk 1=OS+swap space/virtual memory; Disk 2=SS+SG+DDM (Distributed
Data Manager).
4
For 1,000 or more managed devices, a sizing is required to determine an accurate
system configuration. Contact your Aprisma support or sales representative for details.
5
Xeon vs. P4: Aprisma tests show that a 1.4 GHz Pentium 4 (P4) SpectroSERVER has less
management capacity than a 550 MHz Pentium III Xeon SpectroSERVER unless the P4 has
512 K L2 cache. You may, however, use a P4-based workstation for your SpectroGRAPH
without compromising performance.
6
Three-Disk Set: Disk 1=OS+swap space/virtual memory; 2-Disk Stripe
Set=SS+SG+DDM.
SPECTRUM
Installation Guide
Page 13
Document 0675
Disk Striping and RAID
For optimum performance, Aprisma recommends running SPECTRUM on
systems with multiple, ultrawide, 10 K-rpm, SCSI disk drives using disk
striping and/or RAID (redundant array of independent disks) technologies.
Disk striping is a technique for spreading data over multiple disk drives.
RAID is a disk drive system that employs two or more drives in
combination for fault tolerance and performance improvement. For a more
complete discussion of disk striping and RAID, see the white paper,
Techniques for Optimizing SPECTRUM Performance.
Installing SpectroSERVER on Its Own Workstation
Although the latest processors enable SPECTRUM to manage more devices
and do more work on a single workstation, Aprisma recommends that
SpectroSERVER be installed on a dedicated workstation. To ensure
optimum performance, no other applications should be installed on this
workstation.
If you choose to install SpectroSERVER on a workstation with other
applications (including SpectroGRAPH), memory must be sufficient to
handle the increased load, or the system will be saturated at a lower CPU
utilization than would normally be considered a healthy maximum
(approximately 80 percent). Similarly, high-speed disk input/output is
required to handle these loads.
SpectroSERVER Landscape Handle Requirements
All SpectroSERVER landscape handles must be divisible by 4 and be in the
range of 4 to 16,376. In a distributed SpectroSERVER environment, each
landscape is identified by its landscape handle; therefore, each landscape
must be unique. If you enter the landscape handle in hexadecimal format,
the range is 0x100000 to 0xffe00000, where the lower 20 bits are set to
zero. The encoded landscape handle appears at the top of all views
associated with that landscape.
Aprisma recommends that you use a sequential numbering scheme when
you establish landscape handles. At first it might seem appropriate to
associate a landscape handle with a significant feature of the landscape it
represents, such as a building number, or some portion of an IP subnet
address. However, your entry is encoded into the most significant 14 bits
of the landscape handle, and the result may not appear to relate to the
landscape feature you wanted.
SPECTRUM
Installation Guide
Page 14
Document 0675
WARNING! You must run the lh_set utility before you run
SpectroSERVER for the first time after installation.
If you run SpectroSERVER before running lh_set,
SPECTRUM assigns a default landscape handle that
is the same whenever and wherever it is assigned
by SPECTRUM. This creates the potential for
duplicate landscape handles when multiple
landscapes are configured. This means that these
landscapes can never be accessed simultaneously
from the same SpectroGRAPH or application.
If you start SpectroSERVER with invalid landscape
handles, you must change the landscape handle of
all models that are created automatically at
startup. You must also update the landscape
handle specified in several resource files. The
landscape handle is included in the model handle of
each model in the SpectroSERVER database.
Changing the landscape handle at this point would
require converting all model handles from the old
landscape handle to the new.
Assigning Landscape Handles
Procedure
To assign a landscape handle with the lh_set utility:
1. Navigate to
<$SPECROOT>/SS
2. Run the following command:
../SS-Tools/lh_set <landscape handle>
The new landscape handle can be specified in either decimal or
hexadecimal notation. If you use decimal notation, the lh_set utility
converts your entry to a hexadecimal landscape handle.
SPECTRUM
Installation Guide
Page 15
Document 0675
Determining and Changing Landscape Handles
This section contains the procedure for changing a SPECTRUM landscape
handle. You may need to complete this procedure if you are upgrading an
existing SpectroSERVER database and need to change its landscape handle
to meet SPECTRUM requirements
Determining the Current Landscape Handle
Procedure
1. Navigate to:
<$SPECROOT>/SS
2. Run the following command:
../SS-Tools/lh_set
Changing the Landscape Handle Of a SpectroSERVER Database With
Existing Models
Procedure
1. Navigate to:
<$SPECROOT>/SS
2. Run the following command:
../SS-Tools/dbpart1/converter <-ss or -ddm>
../SS-Tools/dbpart1/ConvTable <new landscape handle>
The above two lines are a single command, typed at the command
line.
Use the -ss or -ddm arguments to change landscape handles in only
the SpectroSERVER database or only the DDM database. If you do not
specify either one, both databases will be converted. Your new
landscape handle can be specified in either decimal or hexadecimal
format.
Several SPECTRUM resource files specify the landscape handle. You
must manually change each of these files to ensure that all
SPECTRUM applications continue to function. A mismatch of
landscape handles between resource files and what the
SpectroSERVER is actually using can cause problems with Archive
Manager, Data Export, and the Report Generator. After changing a
SpectroSERVER’s landscape handle, you must also change the
landscape handle in the following files:
<$SPECROOT>/app-defaults/SDE
SPECTRUM
Installation Guide
Page 16
Document 0675
<$SPECROOT>/app-defaults/Reports
3. Navigate to:
<$SPECROOT>/app-defaults
4. Edit the SDE and Reports files where they contain entries like the
following:
*PreferredLandscapes : <landscape handle>
5. Enter the value that represents the updated landscape handle.
SPECTRUM
Installation Guide
Page 17
Document 0675
Types of SPECTRUM Installations
This section describes the types of SPECTRUM installations
and the differences between them. Read these
descriptions to determine which kind of installation to
perform. If you have existing SPECTRUM data that you
want to preserve, it is important to perform the correct
type of installation.
In this section:
First-Time Installations [page 18]
Upgrades [page 18]
Installing Additional Components [page 20]
Installing SPECTRUM Patches [page 21]
Installing SPECTRUM Advanced and Value-Added Applications [page 21]
Distributed and Fault-Tolerant SPECTRUM Configurations [page 21]
First-Time Installations
A first-time installation installs SPECTRUM on a workstation where
SPECTRUM has never been installed. For instructions on first-time
installations, see First-Time Installation (Solaris) [page 29] or First-Time
Installation (Windows) [page 36].
Upgrades
You can upgrade SPECTRUM on the same workstation (see Upgrading in
Place [page 19]) or migrate SPECTRUM databases and other components
from one workstation or directory to another and then upgrade (see
Migrating and Upgrading [page 19]).
Upgrading From SPECTRUM 5.0.1
(With CS2 and MMS2) or Earlier
Direct upgrades to SPECTRUM 6.5.1 from releases earlier than SPECTRUM
5.0.1 (with CS4 and MMS4) are not supported. If your SPECTRUM version
SPECTRUM
Installation Guide
Page 18
Document 0675
is 5.0.1 (with CS2 and MMS2) or earlier, contact your Aprisma support or
sales representative for information on upgrading.
Compatibility Between SPECTRUM Releases
Using new versions of SpectroGRAPH and other client applications with an
older version of SpectroSERVER is not supported. You may, however,
connect to a newer version of SpectroSERVER from older clients. When
upgrading in a distributed SpectroSERVER environment, upgrade all
SpectroSERVERs before upgrading SpectroGRAPHs to ensure connections
are maintained.
Upgrading in Place
An in-place upgrade installs a new version of SPECTRUM directly over an
earlier version on the same workstation, in the same directory. Additional
steps are required for preserving existing SPECTRUM databases and other
upgradeable components resident in the older version. For instructions on
performing an in-place upgrade, see In-Place Upgrade (Solaris) [page 29]
or In-Place Upgrade (Windows) [page 36].
Migrating and Upgrading
Use this procedure to migrate your existing SPECTRUM databases and
other upgradeable components to a different directory or workstation, and
then install SPECTRUM as part of the upgrade. This allows you to continue
managing your network with the older version of SPECTRUM during the
installation process. For instructions on performing a migration and
upgrade, see Migration and Upgrade (Solaris) [page 30] or Migration and
Upgrade (Windows) [page 37].
Important: You cannot move an installed SPECTRUM area from
one workstation to another, or from one directory
to another. The correct procedure is to copy or
move the SPECTRUM database first and run the
SPECTRUM installation program to install
SPECTRUM over the relocated database.
Preserving Database Customizations
The installation program creates backup copies of existing SPECTRUM
resource files in your Spectrum/app-defaults directory, preserving a
record of any customizations you may have made (see When Installation Is
Complete [page 73]).
SPECTRUM
Installation Guide
Page 19
Document 0675
If you have modified any .pib files (not recommended) and want to retain
the changes in the post-upgrade database, create a default.p file and add
your .pib file entries before beginning the installation. For further
instructions, see the SPECTRUM Extension Integration (SEI) Developer
Guide (0623).
If you made any changes to the resource files listed in Table 4, make a
note of them, since these files are overwritten by any upgrade or patch
installation.
Table 4: Resource Files (Overwritten)
File Name
Directory
.vnmrc
<$SPECROOT>/SS
.vnmshrc
<$SPECROOT>/vnmsh
.configrc
<$SPECROOT>/SS/DDM
LocalRegFile
<$SPECROOT>
The following resource files are preserved in the
<$SPECROOT>/Install-Tools/SAVES/<date>/<time> directory:
.sanmrc
.alarmrc
.arsgrc
Installing Additional Components
When you install a new application or management module on an existing
SPECTRUM system, you are installing additional components. If you
already have a license for the components, you can install them using your
current SPECTRUM CD extraction key. If you purchased additional
components, you should have received a new CD extraction key.
Insert your new SPECTRUM application CD and follow the installation
prompts. Use the Component Selection Screen [page 57] to select the
individual products that you wish to install.
SPECTRUM
Installation Guide
Page 20
Document 0675
Installing SPECTRUM Patches
When necessary, Aprisma issues software updates (“patches”) to existing
versions of SPECTRUM. Patches are supplied on a CD complete with the
SPECTRUM installer. Use the Component Selection Screen [page 57] to
view the components to be installed. Each patch release includes a
software release notice that gives step-by-step installation instructions,
including those for relinking SPECTRUM components.
Installing SPECTRUM Advanced and Value-Added
Applications
If you purchased SPECTRUM advanced and value-added applications (addons to the main SPECTRUM application), follow the installation instructions
included with each application.
Distributed and Fault-Tolerant SPECTRUM
Configurations
In addition to the basic types of installations, certain SPECTRUM
configurations require special planning or a particular sequence of
installation procedures.
If you are planning to install multiple SpectroSERVERs to manage different
portions of your network, refer to the Distributed SpectroSERVER
(9032770) guide before beginning your installation. Also see
SpectroSERVER Landscape Handle Requirements [page 14]).
Important: If you plan to set up a distributed SpectroSERVER
configuration, perform model conversion before
partitioning your database (see Ensuring Database
Compatibility With Your Upgrade [page 85]).
SPECTRUM also supports a fault-tolerant configuration where one or more
SpectroSERVERs can function as standbys for a primary SpectroSERVER,
ready to take over management functions should the primary
SpectroSERVER become unavailable. This configuration has special
requirements and is discussed in detail in the section of the Distributed
SpectroSERVER (9032770) guide that covers fault tolerance.
SPECTRUM
Installation Guide
Page 21
Document 0675
Installing on Solaris
In this section:
Prerequisites (Solaris) [page 22]
First-Time Installation (Solaris) [page 29]
In-Place Upgrade (Solaris) [page 29]
Migration and Upgrade (Solaris) [page 30]
Prerequisites (Solaris)
These prerequisites must be satisfied before you begin installing
SPECTRUM on a Solaris system.
Root Privileges
You must have root privileges to perform a SPECTRUM installation on
Solaris systems; therefore, before running the installation software, you
must log on as root. The installation software needs root privileges to
evaluate available resources and run custom installation scripts. Installing
as root also ensures root privileges for the setuid executable so that
SpectroSERVER can connect to SNMP ports. Since an initial installation
generates residual files with root ownership, any upgrade installation also
requires root privileges.
Fixed IP Address
The system you want to install on must have a fixed IP address.
SPECTRUM cannot be installed on a workstation with more than one IP
address. The target workstation can have Dynamic Host Control Protocol
(DHCP) enabled as long as the DHCP server issues a static address that will
never change.
SPECTRUM
Installation Guide
Page 22
Document 0675
CDE Style Manager Settings
To set up your desktop environment for SPECTRUM, use the CDE Style
Manager to make the following selections:
In Style Manager-Window, select Allow Primary Windows On Top to
allow pop-up windows to appear on top of SpectroGRAPH views.
Also in Style Manager-Window, select Raise Window When Made
Active to allow a partially blocked window to appear on top when active.
In Style Manager-Color, click Number of Colors; then select More
Colors for Applications to display all SPECTRUM colors properly (see
Configuring a 24-Bit Color Graphics Card [page 25]).
Required Solaris Patches
The patch level of your target Solaris workstation operating system must
be up-to-date. Table 5: Solaris 7 Patches and Table 6: Solaris 8 Patches
[page 25] list the patches required for installing SPECTRUM. You can
download the listed patches from the following Web site:
http://sunsolve.Sun.COM/pub-cgi/show.pl?target=patches/patch-access
These tables show the minimum required patch revision number (after the
hyphen); the patches on the Sun Web site may be later revisions.
SPECTRUM
Installation Guide
Page 23
Document 0675
Table 5: Solaris 7 Patches
Patch Number
OS
Description
106144-20
Solaris 7
Elite3D AFB Graphics Patch
106145-17
Solaris 7
Creator 7 FFB Graphics Patch
106146-14
Solaris 7
M64 Graphics Patch
106147-06
Solaris 7
VIS/XIL Graphics Patch
106148-12
Solaris 7
XFB Graphics Patch
106327-08
Solaris 7
Shared Library Patch for C++
106541-12
Solaris 7
Kernel Update Patch
106944-03
Solaris 7
/kernel/fs/fifos and kernel/fs/sparc9/fifofs Patch
106950-13
Solaris 7
Linker Patch
106980-13
Solaris 7
libthread Patch
107081-22
Solaris 7
Motif 1.2.7 and 2.1.1: Runtime library patch
107359-02
Solaris 7
Patch for SPARCompiler Binary Compatibility
107448-01
Solaris 7
/usr/lib/fs/cachefs/cachefsd patch
107450-01
Solaris 7
/platform/SUNW, Ultra-Enterprise10000/lib/cvcd patch
107458-10
Solaris 7
sd & ssd drivers patch
107636-05
Solaris 7
X Input & Output Method Patch
107709-07
Solaris 7
libssasnmp/libssagent/snmpdx/mibiisa Patch
107716-10
Solaris 7
PGX32 Graphics Patch
108376-12
OpenWindows 3.6.1
Xsun Patch
109104-04
Solaris 7
/kernel/fs/sockfs Patch
SPECTRUM
Installation Guide
Page 24
Document 0675
Table 6: Solaris 8 Patches
Patch Number OS
Description
108434-01
Solaris 8
Shared Library Patch for C++
108528-02
Solaris 8
Kernel Update Patch
108576-06
Solaris 8
Expert3D IFB Graphics Patch
108604-10
Solaris 8
Elite3D AFB Graphics Patch
108605-10
Solaris 8
Creator 8 FFB Graphics Patch
108606-07
Solaris 8
M64 Graphics Patch
108652-16
X11 6.4.1
Xsun Patch
108827-01
Solaris 8
libthread Patch
108869-02
Solaris 8
snmpdx/mibiisa/libssasnmp/snmplib Patch
108921-07
CDE 1.4
dtwm Patch
108940-10
Motif 2.1.1
Runtime library patch for Solaris 8
108991-02
Solaris 8
libc and watchmalloc Patch
109147-06
Solaris 8
linker Patch
109154-04
Solaris 8
PGX32 Graphics Patch
109472-02
Solaris 8
/kernel/drv/tcp and /kernel/drv/sparcv9/tcp Patch
Configuring a 24-Bit Color Graphics Card
Your Sun workstation must have a 24-bit color card to display SPECTRUM
colors properly. If you purchase a 24-bit color card, follow the
manufacturer’s installation instructions as well as the configuration
instructions in this section.
Checking Your 24-Bit Frame Buffer
You must first determine if your workstation has a 24-bit frame buffer.
Perform the following steps to determine this:
1. Log on as root.
2. Run the following command:
prtconf -F
This command returns data on your workstation’s frame buffer
device. If the output contains any of the following, your workstation
SPECTRUM
Installation Guide
Page 25
Document 0675
has an 8-bit frame buffer and does not meet SPECTRUM requirements
(you must upgrade):
cgfour
cgthree
cgsix
If the output contains any of the following, your workstation has a 24bit frame buffer, and you can continue with step 3:
afb
cgeight
ffb
gfxp
tcx
If the output contains m64, your workstation has an 8/24-bit frame
buffer that is configured for 8-bit operation, and you must perform
the following procedure before continuing with step 3:
• As root, create an empty file named S99m64setup in the
/etc/rc2.d directory; then type the following within the
S99m64setup file:
prtcon -F | /usr/xpg4/bin/grep -q m64
if [ $? = 0 ]
then
m64config -depth 24 -res 1152 now
fi
• Change the file permission as follows:
chmod u=rwx, go=r S99m64setup
3. Check for the existence of the /etc/dt/config/Xservers file.
If it exists, make sure it contains the string that follows. This string
must be continuous and on one line. It forces the CDE Style Manager
to take full advantage of a 24-bit color card. (This string contains
zeros, not uppercase Os.)
:0 Local local_uid@console root /usr/openwin/bin/Xsun :0
-nobanner -dev /dev/fb defclass TrueColor defdepth 24
4. Reboot the workstation.
Video card manufacturers write their card’s video driver to Sun’s standard
and therefore, the type of card is correctly returned in the above
SPECTRUM
Installation Guide
Page 26
Document 0675
procedure. If the type returned for your card is different from types listed
above, contact the video card manufacturer for instructions on how to
configure it for 24-bit, true color capability.
Configuring 24-Bit Color Mode
If a 24-bit color card is installed, but your workstation is not in 24-bit color
mode, follow these configuration instructions:
1. Log on as root.
2. Create your own, user-defined configuration directory, by running the
following command:
mkdir -p /etc/dt/config
3. Navigate to the new configuration directory; then run the following
command:
cd /etc/dt/config
4. Create the file Xservers by running the following command:
vi Xservers
5. Type the following string in the new Xservers file. This string must be
continuous and on one line. It forces the CDE Style Manager to take
full advantage of a 24-bit color card. (This string contains zeros, not
uppercase Os.)
:0 Local local_uid@console root /usr/openwin/bin/Xsun :0
-nobanner -dev /dev/fb defclass TrueColor defdepth 24
6. Save and exit the Xservers file.
7. Restart the X server.
If your workstation is still not in 24-bit color mode after following
installation instructions in the video card manual, or after editing the
/etc/dt/config file, contact your Sun Microsystems representative.
SPECTRUM
Installation Guide
Page 27
Document 0675
Stopping the Process Daemon (processd) [Upgrades From
5.0.1 Only]
If you upgrading from SPECTRUM version 5.0.1, the SPECTRUM process
daemon, processd, must be shut down before you install the newer
version.
Procedure
1. Log on as root.
2. Navigate to:
SPECTRUM/SDPM
3. Run the following command:
./processd.sh stop
Processd automatically restarts when you reboot the system after
installation. If you quit the installation before it is complete you can restart
processd without rebooting.
Procedure
1. Navigate to:
SPECTRUM/SDPM
2. Run the following command:
./processd.sh start
SPECTRUM
Installation Guide
Page 28
Document 0675
First-Time Installation (Solaris)
To install SPECTRUM on a Solaris workstation where SPECTRUM has never
been installed, proceed to Running the Installation Software [page 39] as
long as all prerequisites have been met (see Prerequisites (Solaris)
[page 22]).
In-Place Upgrade (Solaris)
This section contains the procedure for installing a new version of
SPECTRUM directly over an earlier version on the same Solaris
workstation, in the same directory. Follow this procedure carefully to
preserve your existing SPECTRUM data.
Procedure
1. Make a copy of your current SpectroSERVER database using the
Online Backup utility (see Using the Online Backup Utility
[page 109]), and save it in an area separate from the SPECTRUM
installation directory.
2. Save your current SPECTRUM Events and Statistics database.
a. Navigate to:
<$SPECROOT>/SS/DDM
b. Run the following command:
./ddm_save dbsavefile
3. Move the dbsavefile to an area separate from the SPECTRUM
installation directory.
4. Remove any executables, including SSdbsave, SSdbload, dbcheck, or
others that you may have copied from the SS-Tools directory to
other SPECTRUM locations, but do not remove the originals from the
SS-Tools directory. The original executables are upgraded
automatically as long as they have not been moved from SS-Tools.
5. Shut down your earlier version of SPECTRUM, as well as all
SPECTRUM applications (Model Type Editor, Command Line Interface,
SpectroRX, Archive Manager, and others). Also, review scheduled
tasks to make sure reports, online backups, and other automated
tasks do not attempt to run during installation. The installation
program will not run if your database is locked, as it is whenever
SpectroSERVER is running. If shutting down your SpectroSERVER is
SPECTRUM
Installation Guide
Page 29
Document 0675
not feasible, consult your Aprisma support or sales representative
before continuing.
6. Install SPECTRUM (see Running the Installation Software [page 39])
after all prerequisites have been met (see Prerequisites (Solaris)
[page 22]).
7. Follow the procedures in Upgrading SPECTRUM Models, Model Types,
and Management Modules [page 84].
Migration and Upgrade (Solaris)
This section contains the procedure for moving your current SPECTRUM
databases to a new location where you are upgrading to the new
SPECTRUM version. Follow this procedure carefully to preserve your
existing SPECTRUM data.
Procedure
1. In SpectroGRAPH, destroy any remote landscapes in your existing
database.
2. In User Editor, create a SPECTRUM user model that matches the
name of the owner of the directory where you will be installing the
new SPECTRUM version.
3. Make a copy of your current SpectroSERVER database using the
Online Backup utility (see Using the Online Backup Utility
[page 109]).
4. Rename the database backup copy you created in step 3 as:
dbsavefile.SSdb
Important: Use this exact file name.
5. Save your current SPECTRUM Events and Statistics database.
a. Navigate to:
<$SPECROOT>/SS/DDM
b. Run the following command:
./ddm_save dbsavefile
6. Create a SPECTRUM installation directory (<$SPECROOT>) where the
new version of SPECTRUM will reside, along with subdirectories for
the two database files. Make sure the directory owner is the same as
in step 2. Run the following command:
SPECTRUM
Installation Guide
Page 30
Document 0675
mkdir -p <$SPECROOT>/SS/DDM
Important: Do not use /opt/SPECTRUM as an installation
directory name; this location is reserved for a
directory that will be created automatically during
the installation.
7. Copy or FTP (in binary mode) the dbsavefile.SSdb file from step 4
to the new <$SPECROOT>/SS directory.
8. Copy or FTP (in binary mode) the dbsavefile file from step 5 to the
new <$SPECROOT>/SS/DDM directory. When this step is completed, the
new installation directory structure should match Figure 1 [page 31].
Figure 1: Directory Structure—Migration and Upgrade
(Solaris)
New SPECTRUM installation directory
SS subdirectory
dbsavefile.SSdb
(file containing saved SpectroSERVER
database from the current SPECTRUM
location)
DDM subdirectory
dbsavefile (file containing saved Events and Statistics
database from the current SPECTRUM
location)
9. Install SPECTRUM (see Running the Installation Software [page 39])
after all prerequisites have been met (see Prerequisites (Solaris)
[page 22]).
10. Follow the procedures in Upgrading SPECTRUM Models, Model Types,
and Management Modules [page 84].
SPECTRUM
Installation Guide
Page 31
Document 0675
Installing on Windows
In this section:
Prerequisites (Windows) [page 32]
First-Time Installation (Windows) [page 36]
In-Place Upgrade (Windows) [page 36]
Migration and Upgrade (Windows) [page 37]
Prerequisites (Windows)
These prerequisites must be satisfied before you begin installing
SPECTRUM on a Windows system.
Administrative Privileges
You must be logged in as administrator and have administrative privileges
to perform a SPECTRUM installation on Windows systems. The installation
software needs administrative privileges to evaluate available resources
and run custom installation scripts. And, since an initial installation
generates residual files with administrator ownership, any upgrade
installation also requires administrative privileges.
Fixed IP Address
The system you want to install on must have a fixed IP address.
SPECTRUM cannot be installed on a workstation with more than one IP
address. The target workstation can have Dynamic Host Control Protocol
(DHCP) enabled as long as the DHCP server issues a static address that will
never change.
NTFS File System Partitioning
SPECTRUM must be installed in an NTFS file system partition. If you do not
have an NTFS file system, see Converting Your File System to NTFS
[page 34].
SPECTRUM
Installation Guide
Page 32
Document 0675
SNMP Services Software [Windows NT Only]
SNMP Services software must be installed on Windows NT systems before
installing SPECTRUM. See Checking Network and Security Settings
[page 33].
Creating an Emergency Repair Disk
Aprisma recommends that you create an emergency repair disk before
installing SPECTRUM in the event that the SPECTRUM installation causes
file corruption. The ERD can be used to restore Windows configuration files
to their original condition. Aprisma also recommends that you create
another ERD after the successful installation of SPECTRUM. Windows help
files contain detailed instructions on creating an ERD.
Setting Color and Display Properties
Before installing SPECTRUM, make sure your Windows Display Properties
settings are appropriate.
Procedure
1. Right-click an open area of the desktop and select Properties.
2. On the Display Properties dialog box Plus! tab [Windows NT] or
Effects tab [Windows 2000], make sure that Show window
contents while dragging is deselected.
3. On the Settings tab, set the Color Palette [Windows NT] or Colors
[Windows 2000] to True Color [Windows NT] or True Color (32bit) [Windows 2000] and the Desktop Area [Windows NT] or
Screen area [Windows 2000] to a minimum of 1024 by 768 pixels.
4. Click OK.
Checking Network and Security Settings
Note: The SNMP service is incorporated in the Windows
2000 operating system.
1. [Windows NT only] Open the Control Panel and double-click
Network.
2. [Windows NT only] On the Network dialog box Protocols tab,
ensure that TCP/IP Protocol is listed under Network Protocols.
SPECTRUM
Installation Guide
Page 33
Document 0675
3. [Windows NT only] On the Services tab, ensure that SNMP Service
is listed under Network Services; then click OK. If the SNMP
software is not listed, install it from the Windows NT disks.
4. Make sure that the user profile for the person logged on and running
SPECTRUM is configured to send e-mail using the supported service
provider if you plan to use e-mail for applications such as SPECTRUM
Enterprise Alarm Manager.
5. Set security as desired for the directory where you are installing
SPECTRUM. Any changes to the directory hierarchy security are
preserved by SPECTRUM if the settings are made prior to installation.
6. Restart your system.
User Auditing
If user auditing is enabled on Windows NT platforms, every action is
audited, resulting in many entries to the Windows EventLog. Aprisma
recommends that NT user auditing be disabled, as it will decrease
SPECTRUM system performance.
Converting Your File System to NTFS
SPECTRUM must be installed in an NTFS (versus FAT) partition. If your
hard drive is formatted as a FAT partition, you must to convert your
Windows file system to NTFS.
Procedure
1. Start Windows Explorer.
2. Select your hard drive.
3. Select File > Properties.
4. On the General tab of the Local Disk (X:) Properties window,
confirm whether the File system field displays NTFS or FAT.
If it displays FAT, you must convert your file system to NTFS by
running the CONVERT.EXE utility located, by default, in the
<drive letter>:\Winnt\system32 directory.
5. Navigate to:
\Winnt\system32
6. Run the conversion utility. For example, for a hard drive designated
C, enter the following command:
SPECTRUM
Installation Guide
Page 34
Document 0675
CONVERT C: /FS:NTFS
The conversion utility can be run without damaging or deleting
existing data. If the hard drive has already been converted, a
message to that effect display when you enter the command above.
7. Restart your workstation for the reformatting to take effect.
Stopping the Process Daemon (processd)
[Upgrades From 5.0.1 Only]
If you upgrading from SPECTRUM version 5.0.1, the SPECTRUM process
daemon, processd, must be shut down before you install the newer
version.
Procedure
1. Log in as Administrator.
2. Open a SpectroSHELL.
3. Navigate to:
<$SPECROOT>/SDPM
4. Run the following command:
./processd.sh stop
5. Processd automatically restarts when you restart the system after
installation. If you quit the installation before it is complete, you will
need to restart processd. To restart processd without restarting your
system, run the following command:
./processd.sh start
Uninstalling NuTCRACKER [Upgrades From 5.0.1 Only]
SPECTRUM no longer uses the NuTCRACKER product that automatically
installed with SPECTRUM 5.0.1. If you performed an upgrade on a Windows
workstation, you can save space and improve SPECTRUM performance by
removing NuTCRACKER; however, you should first make sure that no other
applications on your system will be affected by its removal.
SPECTRUM
Installation Guide
Page 35
Document 0675
First-Time Installation (Windows)
To install SPECTRUM on a Windows workstation where SPECTRUM has
never been installed, proceed to Running the Installation Software
[page 39] as long as all prerequisites have been met (see Prerequisites
(Windows) [page 32]).
In-Place Upgrade (Windows)
This section contains the procedure for installing a new version of
SPECTRUM directly over an earlier version on the same Windows
workstation, in the same directory. Follow this procedure carefully to
preserve your existing SPECTRUM data.
Procedure
1. Make a copy of your current SpectroSERVER database using the
Online Backup utility (see Using the Online Backup Utility
[page 109]), and save it in an area separate from the SPECTRUM
installation directory.
2. Save your current SPECTRUM Events and Statistics database.
a. Open a command prompt.
b. Navigate to:
<$SPECROOT>\SS\DDM
c. Run the following command:
.\ddm_save dbsavefile
3. Move the dbsavefile to an area separate from the SPECTRUM
installation directory.
4. Remove any executables, including SSdbsave, SSdbload, dbcheck, or
others that you may have copied from the SS-Tools directory to
other SPECTRUM locations, but do not remove the originals from the
SS-Tools directory. The original executables are upgraded
automatically as long as they have not been moved from SS-Tools.
5. Shut down your earlier version of SPECTRUM, as well as all
SPECTRUM applications (Model Type Editor, Command Line Interface,
SpectroRX, Archive Manager, and others). Also, review scheduled
tasks to make sure reports, online backups, and other automated
tasks do not attempt to run during installation. The installation
SPECTRUM
Installation Guide
Page 36
Document 0675
program will not run if your database is locked, as it is whenever
SpectroSERVER is running. If shutting down your SpectroSERVER is
not feasible, consult your Aprisma support or sales representative
before continuing.
6. Install SPECTRUM (see Running the Installation Software [page 39])
after all prerequisites have been met (see Prerequisites (Windows)
[page 32]).
7. Follow the procedures in Upgrading SPECTRUM Models, Model Types,
and Management Modules [page 84].
Migration and Upgrade (Windows)
This section contains the procedure for moving your current SPECTRUM
databases to a new location where you are upgrading to the new
SPECTRUM version. Follow this procedure carefully to preserve your
existing SPECTRUM data.
Procedure
1. In SpectroGRAPH, destroy any remote landscapes in your existing
database.
2. In User Editor, create a SPECTRUM user model that matches the
name of the owner of the directory where you will be installing the
new SPECTRUM version.
3. Make a copy of your current SpectroSERVER database using the
Online Backup utility (see Using the Online Backup Utility
[page 109]).
4. Rename the database backup copy you created in step 3 as:
dbsavefile.SSdb
Important: Use this exact file name.
5. Save your current SPECTRUM Events and Statistics database.
a. Open a command prompt.
b. Navigate to:
<$SPECROOT>\SS\DDM
c. Run the following command:
.\ddm_save dbsavefile
SPECTRUM
Installation Guide
Page 37
Document 0675
6. Create a SPECTRUM installation directory (<$SPECROOT>) where the
new version of SPECTRUM will reside.
7. Within <$SPECROOT>, create an SS subdirectory and navigate to that
subdirectory.
8. Copy or FTP (in binary mode) the dbsavefile.SSdb file from step 4
to the new <$SPECROOT>\SS subdirectory.
9. In the SS subdirectory, create a DDM subdirectory.
10. Copy or FTP (in binary mode) the dbsavefile from step 5 to the new
<$SPECROOT>\SS\DDM subdirectory. When this step is completed, the
new installation directory structure should match Figure 2: Directory
Structure—Migration and Upgrade (Windows).
Figure 2: Directory Structure—Migration and Upgrade
(Windows)
New SPECTRUM installation directory
SS subdirectory
dbsavefile.SSdb
(file containing saved SpectroSERVER
database from the current SPECTRUM
location)
DDM subdirectory
dbsavefile (file containing saved Events and Statistics
database from the current SPECTRUM
location)
11. Install SPECTRUM (see Running the Installation Software [page 39])
after all prerequisites have been met (see Prerequisites (Windows)
[page 32]).
12. Follow the procedures in Upgrading SPECTRUM Models, Model Types,
and Management Modules [page 84].
SPECTRUM
Installation Guide
Page 38
Document 0675
Running the Installation Software
This section explains how to use the SPECTRUM
installation software on the application CD.
In this section:
SpectroGRAPH and SpectroSERVER on Separate Workstations [page 39]
Starting the Installation on Solaris [page 40]
Starting the Installation on Windows [page 43]
Installation GUI Screens [page 48]
When Installation Is Complete [page 73]
SpectroGRAPH and SpectroSERVER on Separate
Workstations
If you run SpectroSERVER on one workstation and SpectroGRAPH on one
or more other workstations, you must repeat the installation process (with
the appropriate components) for each workstation. Also, if you are
installing individual management modules, you must install
SpectroSERVER and SpectroGRAPH components on the appropriate
workstations.
SPECTRUM
Installation Guide
Page 39
Document 0675
Starting the Installation on Solaris
Procedure
1. After completing the installation prerequisites (see Installing on
Solaris [page 22]), insert the SPECTRUM Application CD into your CD
drive. If the CD does not mount automatically, see Mounting the
SPECTRUM CD [page 109].
2. If you are using a remote display to install SPECTRUM, set the display
environment (see Setting the Solaris Display Environment
[page 111]).
3. Do one of the following:
• If you are installing from a local CD drive, use the Solaris File
Manager (Figure 3) to navigate to the location of the mounted CD.
• If you are installing from a remote CD drive, right-click to access
the Workspace Menu, select Files > File Manager; then use the
Solaris File Manager to navigate to the remote mount-point
directory (/cdrom)
Figure 3: SPECTRUM in Solaris File Manager
SPECTRUM
Installation Guide
Page 40
Document 0675
4. Double-click the Installer icon.
5. In the Password prompt, type the system’s root password.
6. In the Install screen (Figure 4), perform one or more of the following
options:
• Click the hyperlink to read the on-screen SPECTRUM Software
Release Notice.
• Click the hyperlink to install SPECTRUM.
• Click Close to stop the installation process.
Figure 4: Install Screen (Solaris)
SPECTRUM
Installation Guide
Page 41
Document 0675
7. In the Choose Destination Location screen (Figure 5), do one of
the following:
• To install SPECTRUM in the default directory, click Next. If you are
performing an in-place upgrade, the installer detects the previous
installation directory.
WARNING! Do not change the default destination to a location
other than the directory that contains the
SPECTRUM database you are upgrading.
Do not use /opt/SPECTRUM as an installation
directory; this location and name are reserved for a
directory that will be created automatically during
the installation.
• To install SPECTRUM in a location other than the default directory,
click Browse to select a new location; then click Next. Use this
option if you are performing a database migration and upgrade.
Figure 5: Choose Destination Location Screen (Solaris)
8. See Installation GUI Screens [page 48] to continue the installation.
SPECTRUM
Installation Guide
Page 42
Document 0675
Starting the Installation on Windows
Procedure
1. After completing the installation prerequisites (see Installing on
Windows [page 32]), insert the SPECTRUM Application CD into your
CD drive.
2. Do one of the following:
• If autorun starts and the Install screen (Figure 6) appears, go to
step 3.
• If autorun does not start, double-click My Computer, right-click
your CD drive; then select AutoPlay from the menu to display the
Install screen.
Figure 6: Install Screen (Windows)
SPECTRUM
Installation Guide
Page 43
Document 0675
3. In the Install screen (Figure 6 [page 43]), perform one or more of
the following options:
• Click the hyperlink to read the on-screen SPECTRUM Software
Release Notice.
• Click the hyperlink to install SPECTRUM.
• Click Close to stop the installation process.
4. In the Welcome screen (Figure 7), Click Next.
Figure 7: Welcome Screen (Windows)
SPECTRUM
Installation Guide
Page 44
Document 0675
5. In the Installation Selection screen (Figure 8), select the products
you want to install; then click Next.
Note: If the Exceed X server is already installed on your
system, and is not the same version that ships with
SPECTRUM, the installation program prompts you
to uninstall Exceed and restart your system.
If you select to install the Exceed X server, the
installation wizard appears at the end of the
SPECTRUM Installation. For information on
installing the Exceed X server, see Installing the
Exceed X Server (Windows) [page 72].
Figure 8: Installation Selection Screen
SPECTRUM
Installation Guide
Page 45
Document 0675
6. In the Choose Destination Location screen (Figure 9), do one of
the following:
• To install SPECTRUM in the default folder, click Next. If you are
performing an in-place upgrade, the installer detects the previous
installation folder.
WARNING! Do not change the default destination to a location
other than the folder that contains the SPECTRUM
database you are upgrading.
• To install SPECTRUM in a location other than the default folder, click
Browse to select a new location; then click Next. Use this option if
you are performing a database migration and upgrade.
Figure 9: Choose Destination Location Screen (Windows)
SPECTRUM
Installation Guide
Page 46
Document 0675
After clicking Next, the Setup screen appears. This screen
graphically monitors the installation process. The horizontal bar graph
in the Setup panel shows the percentage of files copied.
The three vertical gauges show, from left to right: percentage of the
current file copied; percentage of the CD copied; and the space
available on the target system’s hard disk. When the available space
falls to less than 5%, the Low indicator turns bright red. When the
installation software has finished loading, the Setup window closes
automatically.
7. See Installation GUI Screens [page 48] to continue the installation.
SPECTRUM
Installation Guide
Page 47
Document 0675
Installation GUI Screens
This section provides a description of each installation screen and explains
user input when required. The sequence and appearance of the installation
GUI screens described in this section are almost identical for Solaris and
Windows.
File Extraction Screen
The File Extraction screen (Figure 10) dynamically lists the components
extracted from the Application CD. When this process is complete, a
message appears at the bottom of the scrollable display area.
Procedure
Click Next to continue the installation.
Figure 10: File Extraction
SPECTRUM
Installation Guide
Page 48
Document 0675
Software Extraction Key Screen
Procedure
1. In the Software Extraction Key screen (Figure 11), check that the
Platform and CDROM Version fields display the correct values for
the target workstation.
2. In the Extraction Key data field, type the extraction key that is
printed on the certificate accompanying the CD.
3. In the License Number field, type the SPECTRUM license number
(also printed on the certificate).
4. Click Next to continue the installation.
Figure 11: Software Extraction Key Screen
SPECTRUM
Installation Guide
Page 49
Document 0675
End User License Agreement Screen
The End User License Agreement screen (Figure 12) shows the license
agreement associated with the key you entered in the Software Extraction
Key screen (see Figure 11 [page 49]).
Procedure
1. Use the scroll bar to view the entire agreement.
2. Do one of the following:
• To accept the terms of the agreement and continue the installation,
click Accept.
• To decline the terms of the agreement and terminate the
installation, click Decline.
• To return to the preceding view for any reason (for example, to
correct an extraction key), click Back.
Figure 12: End User License Agreement
SPECTRUM
Installation Guide
Page 50
Document 0675
Host Evaluation Screen
The SPECTRUM installation software automatically checks the operating
system version and disk space resources of your workstation to make sure
they are compatible with installation requirements. The results of this
evaluation are displayed in a Host Evaluation screen (Figure 13).
This information is critical to successful installation and operation of
SPECTRUM. You are advised to comply with all recommendations returned
by the evaluation. If your system is in compliance, click Next.
Procedure
If your system is in compliance, click Next.
Figure 13: Host Evaluation
SPECTRUM
Installation Guide
Page 51
Document 0675
Installation Configuration Screen
The Installation Configuration screen (Figure 14) displays default settings
for the installation and lets you change them as necessary.
Figure 14: Installation Configuration Screen
SPECTRUM
Installation Guide
Page 52
Document 0675
The following sections provide more detailed instructions for using the
Installation Configuration screen:
Selecting an Installation Type [page 53]
Selecting Location Configuration [page 54]
Installing Individual Components [page 54]
Installing All SPECTRUM Components on a Single Workstation [page 55]
Installing SpectroGRAPH Only [page 55]
Installing SpectroSERVER Only [page 55]
Resetting the Default Component Configuration Values [page 56]
Using the Command Buttons [page 56]
Selecting an Installation Type
Procedure
In the Installation Type Choices panel (see Figure 14 [page 52]), do
one of the following:
• To install (and link) any or all of the SPECTRUM components, select
Install.
• To rebuild previously installed SpectroGRAPH and SpectroSERVER
executables and selectively link individual management modules, select
Re-link previously installed components.
Note: If you are installing for the first time, the relinking
option is grayed out.
SPECTRUM
Installation Guide
Page 53
Document 0675
Selecting Location Configuration
Procedure
Important: If you are doing an upgrade installation on either
Solaris or Windows, the owner of the target
directory must have a SPECTRUM user model in the
database being upgraded. Otherwise, the directory
owner will not be able to start SpectroGRAPH after
the installation is completed.
In the Location Configuration panel’s Target Ownership field (see
Figure 14 [page 52]), do one of the following:
• For Solaris installations, this field is blank. Type the user name of the
owner of the target directory (the directory in which you are installing
SPECTRUM).
Note: Although you must log in as root to run the
installation, the owner of the target directory
should NOT be root.
• For Windows installations, this field shows the user name used to log
into the workstation. Type the user name of the owner of the target
directory (the directory in which you are installing SPECTRUM).
Installing Individual Components
Procedure
1. In the Component Configuration panel (see Figure 14 [page 52]),
click Select Individual Components.
2. In the Component Selection screen (see Figure 15 [page 57]),
select (or deselect) the individual components you want to install.
See Component Selection Screen [page 57] for more information on
installing individual components.
SPECTRUM
Installation Guide
Page 54
Document 0675
Installing All SPECTRUM Components on a Single Workstation
Procedure
In the Component Configuration panel (see Figure 14 [page 52]), select
the following options:
• Select all SpectroSERVER components
• Select all SpectroGRAPH components
• Select all external applications.
Note: The Select all external applications option is
required; it not only installs optional applications
(such as gateways and developer’s tools) that are
licensed for installation from this CD, but also
certain components required by SpectroSERVER
and SpectroGRAPH.
Installing SpectroGRAPH Only
Procedure
In the Component Configuration panel (see Figure 14 [page 52]), select
the following options:
• Select all SpectroGRAPH components
• Select all external applications option
Note: The SPECTRUM Control Panel is not included with a
SpectroGRAPH-only installation. Consequently, you
must manually edit the .hostrc and .locrc files.
For more information, see the Security and User
Maintenance Guide (9032602).
Installing SpectroSERVER Only
Procedure
In the Component Configuration panel (see Figure 14 [page 52]), select
the following options:
• Select all SpectroSERVER components
• Select all external applications
SPECTRUM
Installation Guide
Page 55
Document 0675
Resetting the Default Component Configuration Values
Procedure
In the Component Configuration panel (see Figure 14 [page 52]), click
Reset to undo any entries or settings you made and restore the default
values.
Using the Command Buttons
Procedure
At the bottom of the Installation Configuration screen, do one of the
following:
• Click Next to continue the installation. If you are installing
SpectroSERVER components, the SpectroSERVER Validation screen
(Figure 17 [page 63]) appears. If not, the Location Server
Configuration screen (Figure 18 [page 67]) appears.
• Click Back to return to the previous screen.
• Click Cancel to exit the installation program.
• Click Help to open another screen that provides instructions for the
Installation Configuration screen.
SPECTRUM
Installation Guide
Page 56
Document 0675
Component Selection Screen
The Component Selection screen (Figure 15) displays a listing of all
purchased SPECTRUM components and lets you select individual
components for installation and linking. If you have already installed
SPECTRUM and select Re-link previously installed components from the
Installation Configuration screen, this list will not show any components
because individual components cannot be selected during relinking. This
screen also provides descriptive and dependency information.
If for some reason a component of a patch is inappropriate for installation
on your system, the Status Column (see Figure 15) displays BADVERSION
and you will not be able to install that component. If you have problems
installing a patch, contact your Aprisma service representative.
Figure 15: Component Selection Screen
SPECTRUM
Installation Guide
Page 57
Document 0675
The following sections provide more detailed information on the
Component Selection screen:
Components Available for Installation Table [page 58]
Using the Selector Buttons [page 60]
Selection Filters [page 61]
Using the Command Buttons [page 62]
Components Available for Installation Table
The scrollable table at the top of the Component Selection screen (see
Figure 15 [page 57]) identifies each of the components purchased, or
already installed on the target system. For each component listed, the
table provides the following information:
F (Fold/Unfold) Components that show a plus symbol (+) in this column
have sub-components that display (or unfold) by clicking the plus
symbol (+). Components showing a minus symbol (-) either have no
selectable sub-components or have already been unfolded, in which
case, clicking the symbol folds the sub-components back into the
original parent component.
Part Name This column displays the part name of the component. Click
any cell in this column to display the component’s description in the
Component Description panel. Only major components and
components that have no sub-components can be selected or
deselected by clicking the part name.
Status This column identifies the component as belonging to one of the
following categories based upon the component’s internal revision
(Irev) number:
• DIST (Distribution) - The component exists only on the CD and has
not yet been installed. For an initial installation, all components will
be listed as DIST.
• INST (Installed) - The component has already been installed and is
present on the system, but is not part of the new installation.
• SAME - The version number of the CD component is the same as
the version number of another copy of the same component
installed on the target system.
• DNGRD (Downgrade) - The version number of the CD component is
older than the version number of an installed copy of the same
component type and represents a downgrade.
SPECTRUM
Installation Guide
Page 58
Document 0675
• UPGRD (Upgrade) - The version number of the CD component is
newer than the version number of an installed copy of the same
component type and represents an upgrade.
• BADVERSION - This indicates that the version of the component is
inappropriate to install on this system. Typically, this will indicate a
mismatch between your version of SPECTRUM and a patch you are
attempting to install.
Note: Components that are selected for installation have
a Y in the appropriate SS, SG, or EXT columns
described below. For upgrades, the default is:
components with a status of EQUAL or DNGRD are
not selected for installation and cannot be selected
except via the Selection Filters screen (Figure 16
[page 61]). Components with a status of UPGRD
are selected by default, for installation.
Part Type This column identifies the type of the component as either Core,
CoreMM (Core Management Module), ManMod (non-core Management
Module), or XtnApp (External Application). For most installations, it is
essential to install all Core and CoreMM components.
Descriptive Name The common descriptive name of the component.
Version The version number of the component, identifying the SPECTRUM
major and minor release numbers, revision number, and patch version.
SS, SG, EXT These three columns indicate (by the letter Y or N) whether
the component contains elements associated with SpectroSERVER (SS)
or SpectroGRAPH (SG), or whether it is an external application (EXT).
The letter Y indicates that the elements are selected for installation or
re-linking while the letter N indicates they are not selected. The initial
settings depend on how the selector buttons were set in the Installation
Configuration screen. For example, if you clicked Select all
SpectroGRAPH components in the previous screen’s Component
Configuration panel, then Y will only appear in the SG column.
This is the preferred method of selecting only one type of component,
even though you can toggle SS and SG values here for components
that are not sub-components of a larger group. On the other hand, SS
and SG elements are not separately selectable for sub-components. In
any case, clicking on any Y or N cell in these columns will display a
description of the associated component in the panel described below.
SPECTRUM
Installation Guide
Page 59
Document 0675
Disk Space Required The KB column indicates the approximate amount of
disk space (in kilobytes) required for all elements of each component
(i.e., both SS and SG). The values in this column and at the bottom of
the panel for
Total KB of Disk Space Required are dynamically updated to reflect
current Y and N settings.
In cases where you are installing over an existing version of
SPECTRUM, individual KB values may be zero (if the new component
requires the same amount of space as the existing one) or a negative
number (if the new component requires less space).
Component Description This panel displays an expanded narrative
description of the currently selected component.
Using the Selector Buttons
The selector buttons in the Component Selection screen (see Figure 15
[page 57]) change multiple settings in the component list. The four smaller
buttons let you do this with a single mouse click.
Procedure
Do one of the following:
• Click Expand All to display all sub-components for any components
showing a plus symbol (+) in the F column.
• Click Collapse All to refold all subcomponents back into the parent
components.
• Click Select All to change any N settings in the SS, SG, or EXT
columns to Y, providing the component type was selected in the
Installation Configuration screen (Figure 14 [page 52])).
• Click Deselect All to change any Y settings in the SS, SG, or EXT
columns to N.
• Click Selection Filters to display a dialog box (Figure 16 [page 61])
that lets you resolve version conflicts between components on the
installation CD and those already installed.
SPECTRUM
Installation Guide
Page 60
Document 0675
Selection Filters
The Selection Filters dialog box (Figure 16) lets you apply special filters to
override certain normal installation constraints by using the (SAME),
(UPGRD), and (DNGRD) buttons. Click OK to confirm settings and return to
the Component Selection screen, or click Help for instructions for this
screen.
The (SAME), (UPGRD), and (DNGRD) buttons (see Figure 15 [page 57])
can be used in situations where SPECTRUM is already installed to allow
selection of installation components that are the same as, newer than, or
older than, their installed counterparts. The UPGRD button is always set to
ON by default, although there is nothing to upgrade in an initial
installation. In subsequent installations, however, you may want to select
components in all three categories.
Note: The selection filters are not needed for normal
installation, and Aprisma recommends that you not
use them unless you first consult your Aprisma
service representative.
Figure 16: Selection Filters
SPECTRUM
Installation Guide
Page 61
Document 0675
Using the Command Buttons
The command buttons are located at the bottom of the Component
Selection screen (see Figure 15 [page 57]).
Procedure
Do one of the following:
• Click OK to close the Component Selection screen (with the current
settings in effect) and return to the Installation Configuration
screen (Figure 14 [page 52]).
• Click Cancel to cancel any changes you made to the default settings
and returns to the Installation Configuration screen
• Click Reset to restore the default values.
• Click Exit to exits the installation program.
• Click Help to open a screen that provides online instructions for the
Component Selection screen.
SPECTRUM
Installation Guide
Page 62
Document 0675
SpectroSERVER Validation Screen
The SpectroSERVER Validation screen (Figure 17) lets you verify
installation information, enter an SS Activation Key, and enter a landscape
handle.
Figure 17: SpectroSERVER Validation
The following sections provide more detailed instructions for using the
SpectroSERVER Validation screen:
Field Descriptions [page 64]
Entering an Expiration Date [page 64]
Entering an SS Activation Key [page 64]
Entering a Landscape Handle [page 65]
Using the Command Buttons [page 66]
SPECTRUM
Installation Guide
Page 63
Document 0675
Field Descriptions
The following describes each field in the SpectroSERVER Validation screen:
Hostname This value is derived from the Hostname(s) in the Installation
Configuration screen (see Installation Configuration Screen [page 52]).
Authorization Code This value is derived from the installation software.
SSVersion This value is derived from the installation software.
Expiration Date This is the expiration date obtained from either the
Aprisma Web site, or from Aprisma Technical Assistance Center (see
Entering an Expiration Date [page 64]).
SS Activation Key This is your SS Activation Key (see Entering an SS
Activation Key [page 64]).
Landscape Handle This is the unique identifier for each SpectroSERVER
you are installing (see Entering a Landscape Handle [page 65]).
Entering an Expiration Date
Procedure
In the Expiration Date box (see Figure 17 [page 63]), type the date
obtained from either the Aprisma Web site, or from Aprisma Technical
Assistance Center, in MM/DD/YYYY format.
Entering an SS Activation Key
Procedure
In the SS Activation Key box (see Figure 17 [page 63]), type the SS
Activation Key (this value is case sensitive) as obtained either from the
Aprisma Web site at: http://www.aprisma.com/swmfg/act-keygen/ or from
Aprisma Technical Assistance Center.
SPECTRUM
Installation Guide
Page 64
Document 0675
Entering a Landscape Handle
Procedure
In the Landscape Handle box (see Figure 17 [page 63]), type a numeric
value that is a multiple of 4 and is between 4 and 16,376 to serve as a
unique identifier for each SpectroSERVER you are installing. You can also
enter hexadecimal values in the range from 0x100000 to 0xffe00000,
where the lower 20 bits are set to zero.
On Solaris systems, you can convert a decimal value to the proper format
for a SPECTRUM hexadecimal landscape handle by running the following
three commands:
1. bc
2. obase=16
3. <decimal value> * 262144
The bc utility displays a hexadecimal value that you enter in the Landscape
Handle field, prefixed by 0x. For example, a decimal value of 24 multiplied
by 262144 will yield a hexadecimal value of 600000. You would enter
0x600000 in the Landscape Handle field.
If you are migrating or upgrading an existing database, its landscape
handle is listed in this field. However, this field is not editable for
upgrade/migration installations.
WARNING! If your existing landscape handle is not evenly
divisible by 4 and within the range of 4 to 16,376,
you must exit the installation and assign a valid
landscape handle using the SPECTRUM landscape
handle conversion utility (see SpectroSERVER
Landscape Handle Requirements [page 14]).
Unique landscape handles are crucial if you are configuring a distributed
SpectroSERVER environment (see SpectroSERVER Landscape Handle
Requirements [page 14]).
SPECTRUM
Installation Guide
Page 65
Document 0675
Using the Command Buttons
The command buttons are located at the bottom of the Component
Selection screen (see Figure 17 [page 63]).
Procedure
Do one of the following:
• Click Help to open a screen that provides online instructions for the
SpectroSERVER Validation screen.
• Click Back to return to the previous screen.
• Click Next to continue the installation.
• Click Cancel to exit the installation program.
SPECTRUM
Installation Guide
Page 66
Document 0675
Location Server Configuration Screen
The Location Server Configuration screen (Figure 18 [page 67]) lets you
select a Main Location Server. When you install SPECTRUM components on
a workstation, you also automatically install a location server. In a
distributed environment, where there are multiple SpectroSERVERs,
SPECTRUM uses these location servers to maintain the VNM landscape
map, and to provide connection services to client applications. See
Distributed SpectroSERVER (2770) for more information.
This scheme requires that one of the location servers be designated the
Main Location Server. This workstation should be highly reliable and
available; ideally the same one hosting the SpectroSERVER you designated
as your Master Modeling Catalog.
Figure 18: Location Server Configuration Screen
SPECTRUM
Installation Guide
Page 67
Document 0675
Selecting a Main Location Server
Procedure
Do one of the following:
• To select a Main Location Server, select Point the Local Location
Server to the Location Server on the Following Machine; then
type the name of the Main Location Server in the Main Location
Server Host box.
• To select the target workstation as the Main Location Server, select
This machine will host a Main Location Server. (Also Use this
option if this machine will not be part of a distributed
environment.)
Using the Command Buttons
Procedure
Do one of the following:
• Click Back to return to the previous screen.
• Click Next to continue the installation.
• Click Cancel to exit the installation program.
SPECTRUM
Installation Guide
Page 68
Document 0675
User Model Index Service Screen
The User Model Index Service screen appears only when the workstation
on which you are currently installing SPECTRUM is also going to be the
Main Location Server.
The User Model Index Service allows information stored in the user models
(such as preferences) to be shared by all systems using the same main
location server. For example, an application preference set by a user will
apply on the user’s own system, and also when the user accesses the
application from another system that connects to the same location server.
User Model Index Service can only be installed on one workstation in a
distributed environment; usually the same workstation designated as a
Main Location Server.
Procedure
1. To install the user model tracking service, select Enable….
2. Do one of the following:
• Click Back to return to the previous screen.
• Click Next to continue the installation.
• Click Cancel to exit the installation program.
SPECTRUM
Installation Guide
Page 69
Document 0675
Installation Summary Screen
The Installation Summary screen (Figure 19) lists the entries you made
and the settings you selected in the previous series of screens.
Procedure
Do one of the following:
• Click Back to return to previous screens and make changes.
• Click Finish to start the actual installation.
• Click Cancel to exit the installation program.
Figure 19: Installation Summary Screen
SPECTRUM
Installation Guide
Page 70
Document 0675
Installation Monitor Screen
The top panel of Installation Monitor screen (Figure 20) displays the status
of the installation (Initial, Running, Paused, Failed, or Completed). It also
displays the current installation phase (Initializing, MediaExtract,
DBImporting, Custom Scripts, LinkingSG, LinkingSS, or ValidatingSS). The
Progress Meter shows a graphical representation of the percentage of the
installation completed, and the total kilobytes of free disk space remaining.
Clicking within this panel causes the display to refresh.
The bottom panel displays the installation log generated during the
installation process. A scroll bar on the right side of the panel lets you view
the entire log, and a Freeze Scrolling button lets you stop the display at
any point during log generation. Using the scroll bar automatically
activates the Freeze Scrolling feature.
Figure 20: Installation Monitor Screen
SPECTRUM
Installation Guide
Page 71
Document 0675
Using the Command Buttons
The command buttons at the bottom of the screen let you cancel the
installation or view online help on the Installation Monitor screen.
Procedure
Do one of the following:
• Click Cancel to exit the installation program.
• Click Help to open another screen that provides instructions for the
Installation Monitor screen.
Completing the Installation
When the Installation Status field (see Figure 20 [page 71]) value changes
to “Completed,” a message box displays to inform you that the installation
has completed successfully and on Solaris systems, that you must log out
and log back in to update the SPECTRUM icons and environment variables.
Procedure
1. In the message box, click OK.
2. In the next message box, click Yes to complete the installation on a
Solaris system, or to continue with the installation on Windows
systems as described in Installing the Exceed X Server (Windows)
[page 72].
Installing the Exceed X Server (Windows)
If you selected to install the Exceed X server in the Installation Selection
screen (Figure 8 [page 45]), an installation wizard appears. The wizard
leads you through the Exceed installation process with a series of prompts.
At the end of the installation process, a message box informs you that your
X server installation is complete.
SPECTRUM
Installation Guide
Page 72
Document 0675
When Installation Is Complete
Procedure
1. When the installation software is finished running, do one of the
following:
• On Solaris systems, restart the CDE workspace manager to update
your desktop icons.
• On Windows systems, restart your workstation.
2. If you have performed an upgrade, back up your SpectroSERVER
database before starting SPECTRUM.
Important: Aprisma strongly recommends that you create a
backup of the upgraded database using the
SSdbsave utility with the -cm options before
starting SpectroSERVER for the first time. This
ensures the integrity of the upgraded database if
your new SpectroSERVER fails before you are able
to use the OnLine Backup feature
SPECTRUM
Installation Guide
Page 73
Document 0675
Starting SPECTRUM and
Postinstallation Configuration
This section explains how to start SPECTRUM after its
installation and describes required and optional
postinstallation configuration tasks.
In this section:
Starting SPECTRUM [page 74]
Upgrading SPECTRUM Models and Model Types [page 74]
Configuring SPECTRUM CORBA Services [page 75]
Scheduler Requirements (Windows) [page 78]
Important Files Created During Installation [page 78]
Setting up Client Access [page 80]
Remote Display of SPECTRUM [page 80]
Starting SPECTRUM
The SPECTRUM documents Getting Started with SPECTRUM for
Administrators (9030985) and Control Panel User Guide (9035100) provide
detailed information on starting SPECTRUM. Before starting SPECTRUM,
however, back up your SpectroSERVER database if you have just installed
a new version of SPECTRUM over an earlier one (see When Installation Is
Complete [page 73]).
Important: Aprisma strongly recommends that SpectroGRAPH
and other SPECTRUM applications be started either
from the SPECTRUM Control Panel or the from
desktop. Starting SPECTRUM from the command
line is not recommended.
Upgrading SPECTRUM Models and Model Types
If you are upgrading SPECTRUM, your existing SpectroSERVER database
may contain models created from obsolete or unsupported model types
from the earlier SPECTRUM version. For instructions on converting and
SPECTRUM
Installation Guide
Page 74
Document 0675
deprecating obsolete models and model types, see Upgrading SPECTRUM
Models, Model Types, and Management Modules [page 84].
Configuring SPECTRUM CORBA Services
Some SPECTRUM operations rely on CORBA agents. When these agents are
started on the local network, they discover each other using UDP broadcast
messages. If your SPECTRUM environment spans multiple broadcast
domains, make sure the primary IP address of the host for each of these
agents is available to the agents in different domains.
Complete this procedure for each system on which SPECTRUM Components
are installed.
Procedure
[Windows]
1. If Spectrum Visibroker SmartAgent is running, complete the
following steps to stop the process.
a. From the Windows Control Panel, select Administrative Tools >
Services.
b. Select Spectrum Visibroker SmartAgent.
c. Select Action > Stop.
2. Navigate to:
<$SPECROOT>\bin\VBOA
3. Create a file named agentaddr.
4. In the agentaddr file, create a list of the IP Addresses of all
workstations outside of your SpectroSERVER’s broadcast domain.
Place a carriage return at the end of this list, so the agent can read
the last entry.
5. Restart Spectrum Visibroker SmartAgent.
6. Using the Registry Editor (regedit.exe), verify that the following
subkey appears in the registry:
HKEY_LOCAL_MACHINE/SOFTWARE/Visigenic Software Inc
If the Visigenic Software Inc subkey does not appear in the
registry, do the following:
SPECTRUM
Installation Guide
Page 75
Document 0675
a. Using the Registry Editor, add the Visigenic Software Inc subkey
information as indicated by bold text in Figure 1:
Figure 1: Visigenic Software Inc Subkey
- HKEY_LOCAL_MACHINE
- SOFTWARE
- Visigenic Software Inc
- Visibroker
- 3.0
- OSAGENT_PORT:REG_SZ:14000
- PathName:REG_SZ:<$SPECROOT>/bin/VBOA
- vbc:REG_SZ:
- vbj:REG_SZ:
- VBROKER_ADM:REG_SZ:<$SPECROOT>/bin/VBOA
b. Restart Spectrum Visibroker SmartAgent.
[Solaris]
1. If Spectrum Visibroker SmartAgent is running, complete the
following steps to stop the process.
a. From CDE select Tools > Find Process. The Process Manager
opens.
b. Select processd.
c. Select Process > Kill.
2. Navigate to:
<$SPECROOT>/bin/VBOA
3. Create a file named agentaddr.
4. In the agentaddr file, create a list of the IP Addresses of all
workstations outside of your SpectroSERVER’s broadcast domain.
Place a carriage return at the end of this list, so the agent can read
the last entry.
5. In the <$SPECROOT>/spectrum60.env file, add the following
variables:
VBROKER_ADM=<$SPECROOT>/bin/VBOA
OSAGENT_PORT=14000
6. Save and close the spectrum60.env file.
7. Restart processd.
SPECTRUM
Installation Guide
Page 76
Document 0675
Changing the OSAGENT_PORT
You can configure SPECTRUM to use an osagent port (OSAGENT_PORT)
other than the default of 14000. In environments where Visibroker
applications in addition to SPECTRUM are used, each Visibroker application
must have a unique osagent port to avoid conflicts. Additionally, to avoid
conflict in a distributed SPECTRUM environment, you can define a unique
OSAGENT_PORT for each distributed SpectroSERVER.
Complete this procedure to change the OSAGENT_PORT.
Procedure
1. Use one of the following procedures to change the osagent port.
[Windows]
a. From the Windows Control Panel, open System.
b. On the Advanced tab, click Environment Variables.
c. From the Environment Variables dialog, highlight the
OSAGENT_PORT system variable and click on the Edit... button.
d. Change the variable value to the new port number and click OK.
e. Click OK in the Environment Variables dialog.
f.
Reboot your system.
[Solaris]
a. Open the /opt/SPECTRUM/spectrumXX.env file for editing.
b. Replace the value of the OSAGENT_PORT variable with the new port
value (for example, OSAGENT_PORT=14001).
c. Save and exit the file.
d. Restart the SPECTRUM processd. For more information about
processd, see the Distributed SpectroSERVER (2770) guide.
SPECTRUM
Installation Guide
Page 77
Document 0675
Scheduler Requirements (Windows)
This section describes how to configure the Windows Scheduled Tasks
service to work with the SPECTRUM Scheduler.
Procedure
1. [Windows NT] Select Start > Windows NT Explorer.
[Windows 2000] Select Start > Settings > Control Panel.
2. Open Scheduled Tasks.
3. Select Advanced > AT Service Account.
4. In the AT Service Account Configuration dialog box, select This
Account.
5. Enter a user name (including the domain, if applicable) of a valid
SPECTRUM user (e.g., “WORKGROUP\jsmith”).
Note: By default, this field contains the current user. If
the default is the SPECTRUM user, no change is
necessary.
SPECTRUM scheduled tasks are run on behalf of the designated user.
6. Enter the user’s password in the Password and Confirm Password
fields.
Important Files Created During Installation
The SPECTRUM installation adds the following file types:
SPECTRUM Process Daemon (processd) Files [page 78]
SPECTRUM Remote Administration Daemon (SRAdmin) Files [page 79]
Installation Database Savefiles [page 79]
SPECTRUM Process Daemon (processd) Files
The SPECTRUM installation adds a SPECTRUM process daemon (processd)
file to the following startup areas of Solaris operating systems:
/etc/init.d/processd
/etc/init.d/processd.pl
/etc/rc0.d/K09processd
SPECTRUM
Installation Guide
Page 78
Document 0675
/etc/rc2.d/S97processd
WARNING! These files are required for SPECTRUM operation
and should not be removed.
For more information about processd, see the Distributed SpectroSERVER
(9032770) guide.
SPECTRUM Remote Administration Daemon (SRAdmin)
Files
The installation adds the SPECTRUM Remote Administration daemon
(SRAdmin) files required by SPECTRUM for user authentication and
distributed administration:
/sw/SPECTRUM/SRAdmin/sradmin.exe
/etc/init.d/sradmin
/etc/rc0.d/K01sradmin
/etc/rc2.d/S99sradmin
WARNING! These files are required for SPECTRUM operation
and should not be removed.
Installation Database Savefiles
The SPECTRUM installation software automatically creates two savefiles in
the <$SPECROOT>/SS directory, each containing a copy of the database
modeling catalog being installed. The first file is date-stamped, with the
extension .after. A copy of the .after file is created and named
legacy.SSdb (overwriting any previous legacy.SSdb file).
The legacy.SSdb file is used with the SSdbload utility to reinitialize your
database with the most recently installed modeling catalog, while the
.after files let you restore the catalog associated with any particular
installation. A sequential counter following the date portion of the file name
lets you distinguish between multiple .after files generated on the same
day. For example, if three of these files were generated on May 4, 2002,
they would be labeled:
db_20020504,1.after.SSdb
db_20020504,2.after.SSdb
db_20020504,3.after.SSdb
SPECTRUM
Installation Guide
Page 79
Document 0675
Setting up Client Access
Client access to SPECTRUM is controlled by the .hostrc file in your
SPECTRUM installation directory. By default, this file is configured to
prevent other workstations from connecting to your SpectroSERVER (or
your SpectroGRAPH from connecting to a SpectroSERVER if you have
installed only SpectroGRAPH).
You can configure the .hostrc file from the SPECTRUM Control Panel to set
up client access.
Procedure
1. Start the SPECTRUM Control Panel.
2. Select Configure > Host Security.
3. The Host Security window opens.
4. In the Server List, add the names of workstations that will be
granted access to the local SpectroSERVER.
5. In the User List, add the names of users that will be granted access
to the local SpectroSERVER.
6. Click OK.
Remote Display of SPECTRUM
This section describes the process of setting up a Windows workstation to
remotely display SPECTRUM that is running on a Solaris workstation. The
Solaris workstation must be installed with the applications that you wish to
remotely display, and must be configured to support Telnet services.
Windows workstations used for remote display must be configured to
support a Telnet client and must meet the same requirements as those
listed in Table 2 [page 12] and those listed in Table 3 [page 13] (for
SpectroGRAPH only). SPECTRUM supports one remote display session open
at any one time on a client workstation.
SPECTRUM
Installation Guide
Page 80
Document 0675
Configuring Exceed X Server for Remote Display
Use this procedure to configure the Hummingbird Exceed X server for
remote display:
1. Install the SPECTRUM-required version of Exceed (see Table 2
[page 12]) on the intended remote display workstation if it is not
already present.
2. [If your Exceed X server is already running, disregard this step.]
Using Windows Explorer, migrate to Program Files>Exceed.nt, and
double-click exceed.exe to start the Exceed X server.
3. Right click the Exceed button in the Windows tool bar. Select Tools
> Configuration. The Xconfig Password window displays. Enter the
default password spectrum. The Xconfig configuration panel
displays, showing various icons.
4. Double-click the Security icon in the Xconfig window. The Security
window displays, showing the Host Access Control List for the Exceed
X server.
5. To setup host access to your Windows workstation, click File to
display a menu of Host Access Control Lists. Use the Browse button
to select a Host Access Control List (shown in the Host Access Control
List window) from the menu. Then, click Edit to add the host name of
the Solaris workstation that you are going to display from.
6. [Optional] To allow any host to connect, select Disabled (any host
access). Click OK. The Xconfig panel displays.
7. The Exceed server must be reset to accept any configuration
changes, before you attempt remote display. Click Exit from the File
menu in the Xconfig panel. If this is the first time Xconfig has been
accessed after installing Exceed, a Reset Server warning window
displays. Click Yes to reset the Exceed server.
If your Exceed server has been accessed before, right click the
Exceed icon in the Windows toolbar. Select Tools > Server Reset,
and click Reset to reset the Exceed server. The server reset dialog
window appears with the warning: this will disconnect all Exceed
clients. Click OK.
8. Your Solaris SpectroSERVER must be set up for client access before
you can initiate remote display. See Setting up Client Access
[page 80].
SPECTRUM
Installation Guide
Page 81
Document 0675
Initiating Remote Display
To initiate remote display at your Windows workstation, follow these
instructions:
1. Make sure the SPECTRUM Control Panel, and any applications that
you want to remotely display, are installed on the Solaris workstation
and configured to support remote display.
Note: SpectroGRAPH does not need to be running to
initiate remote display.
2. From the Windows Start menu, click Run. The Run window displays.
3. Type: Telnet <Solaris workstation host name> and hit Enter.
The Solaris login window displays.
4. Log into the Solaris workstation using your SPECTRUM User name
and password. The system will report your last login, host name,
operating system version, etc., followed by the Solaris prompt.
5. To set the remote display environment:
In the K (default) shell, type:
export DISPLAY=<remote display workstation name>:0.0
and hit Enter.
in the C Shell, type:
setenv DISPLAY <remote display workstation name>:0.0
and hit Enter.
In the Bourne shell type:
DISPLAY=<remote display workstation name>:0.0 export
display and hit Enter.
Note: If you are going to be using remote display
frequently, the display environment can be added
to your profile, so this step won’t have to be
repeated at each login.
6. Navigate to the <$SPECROOT> directory, type ./SCP and hit Enter.
The SPECTRUM Control panel displays. You now have remote access
to all SPECTRUM Control Panel functions, including access to client
SPECTRUM applications.
SPECTRUM
Installation Guide
Page 82
Document 0675
Terminating a Remote Display Session
Exit all remotely displayed SPECTRUM applications properly. Then type
exit at the prompt in the Telnet terminal window to end the Telnet
session.
Remote Display Limitations
The limitations to the functionality of remote display of SPECTRUM are:
• Java applications that are run from remote display sometimes display
in a window that is too small for the contents. Try resizing the window.
If resizing is not successful, launch the application again.
• Color variations can occur in the SPECTRUM Control Panel and in text
box backgrounds for some applications. Occasionally, a pop-up window
will appear decorated with a scroll bar, etc.
• Within some SPECTRUM applications, filters will change position on the
window slightly when you select Advanced or Simple operations. To
alleviate this problem, select Tools > Configuration > Screen in the
Exceed server, and change the Window Manager to X.
• Errors are sometimes reported when launching SPECTRUM applications,
or when launching the SPECTRUM Control Panel from the command
line. Ignore these warnings.
• When the menu picks for AutoDiscovery are selected while viewing the
application remotely, the menu options may appear at the center of the
window, instead of under the file menu pick.
• The number pad on Windows workstations should not be used with
applications under Remote Display. Results are unpredictable.
SPECTRUM
Installation Guide
Page 83
Document 0675
Upgrading SPECTRUM Models,
Model Types, and Management
Modules
This section contains information about upgrading your
SPECTRUM models, model types, and management
modules after you install the new version of SPECTRUM.
In this section:
Ensuring Database Compatibility With Your Upgrade [page 85]
Upgrading Model Types and Models From SPECTRUM 5.0.1 [page 89]
Removing Discontinued Ethernet Application Models and Model Types
[page 92]
Upgrading Host Models and Model Types [page 94]
Upgrading Nortel Accelar Models and Model Types [page 97]
Upgrading Generic Cable Modem Models and Model Types [page 98]
Upgrading Juniper Router Models and Model Types [page 99]
Upgrading Management Modules [page 100]
SPECTRUM
Installation Guide
Page 84
Document 0675
Ensuring Database Compatibility With Your
Upgrade
To ensure compatibility between your SpectroSERVER database and your
SPECTRUM upgrade, you must convert SPECTRUM models created with
older model types and remove the discontinued model types after you
install the new version of SPECTRUM. This procedure is not required for
first-time installations.
In some cases, a model type has changed based on vendor requirements.
In other cases, SPECTRUM no longer supports a particular device with a
unique model type, and these need to be converted to GnSNMPDev model
types.
If you have questions about converting model types, the model conversion
process, or any errors you may encounter during conversion, contact your
Aprisma support or sales representative.
Important: If you plan to set up a distributed SpectroSERVER
configuration, perform model conversion before
partitioning your database.
Postinstallation Scripts and Templates
With each SPECTRUM version, Aprisma provides scripts and templates that
help you upgrade your SpectroSERVER database. These tools convert your
existing models to new models and remove the model types that are no
longer supported. It is not necessary to run every script; use Table 1 to
determine the scripts to run and procedures to follow to complete the
upgrade from your exiting SPECTRUM version.
The conversion procedure uses the DBconv utility in the
<$SPECROOT>/SS-Tools directory. For more information about this utility,
read the DBconv.html help file in the SS-Tools or see Using the DBconv
Utility [page 112].
SPECTRUM
Installation Guide
Page 85
Document 0675
Table 1: Upgrade Scripts, Templates, and Procedures
Listed by SPECTRUM Version
If you are upgrading from this SPECTRUM
version:
Use the following script, template or
procedure:
5.0.1
6.0
6.0.1
6.0.2
MM_dep_50R1_script.pl [page 89]
X
Convert_to_SSX.script [page 90]
X
MT_del_50R1_script.pl [page 91]
X
Rem_EnetApp_Mdls.sh [page 92]
X
X
X
X
Removing the Discontinued Model Types
[page 93]
X
X
X
X
host_conversion.pl [page 95]
X
X
X
X
Removing the Discontinued Model Types
[page 95]
X
X
X
X
6.0.3
Psp2Accelar.dbc [page 97]
6.5
X
DocsisCM_migration.pl [page 98]
X
X
juniperConv.pl [page 99]
X
X
X
X
X
X
Enterasys/Riverstone Conversion (not
documented; call support or check for
Web updates)
X
X
X
X
X
Zeitnet Conversion (not documented; call
support or check for Web updates)
X
X
X
X
X
X
Catalyst Reconfiguration (not
documented; call support or check for
Web updates)
X
X
X
X
X
X
Scripts and Templates for Upgrading
Management Modules [page 100]
These scripts are used with templates below, in
specific combinations (see Table 8 [page 100]).
Ntlwf_dep_template [page 100]
X
X
X
X
DocsisDepTemplate [page 100]
X
X
X
X
NortelShasta [page 100]
X
X
X
X
X
CPQdepTemplate [page 100]
X
X
X
X
X
EmpDepTemplate [page 100]
X
X
X
X
X
SPECTRUM
Installation Guide
Page 86
X
X
Document 0675
If You Used Model Type Editor
If you used the Model Type Editor (MTE) to customize your SpectroSERVER
database, make a record of all changes that you made with the MTE. Some
changes made with the MTE are not preserved when the database is
upgraded to a later version of SPECTRUM. Specifically, if you use the MTE
to change relations, metarules, or attributes of Aprisma-supplied or other
developer-supplied model types, those changes most likely will not survive
the database upgrade, and you will have to reapply the changes manually
after completing the upgrade.
Model types can be changed and improved in the upgraded version of
SPECTRUM, and these changes may need to overwrite customized values
for the new release of SPECTRUM to operate correctly. See the Model Type
Editor User’s Guide (9030659) for specific information about how to
preserve database changes, and which types of changes can be preserved.
Attributes and Elements Preserved With Model Types
Refer to the Figure 2 [page 88] to determine which model type attributes
and other elements are preserved when you use the listed scripts to
upgrade your SpectroSERVER database.
WARNING! The elements listed below do not survive model
and model type conversion.
SpectroWATCHes These must be rebuilt on the new model type.
SANM Policies At publication time, these polices were not preserved with
conversion. Check with your Aprisma support or sales representative
for updates if you need to preserve SANM policies.
Device Model Note Attributes (ID 0x11564) Unless otherwise stated,
conversion scripts do not preserve device model note attributes. Prior
to conversion, save the contents of any attributes for population into
the new models.
Device Model Submodel Note Attributes (ID 0x11564) A device model’s
submodel (i.e., application and interface models) notes are not
preserved. Prior to model conversion, save the contents of any
attributes for population into the new models.
SPECTRUM
Installation Guide
Page 87
Document 0675
Figure 2: Attributes Preserved With Scripts
SPECTRUM
Installation Guide
Page 88
Document 0675
Upgrading Model Types and Models From
SPECTRUM 5.0.1
This section contains the procedure for upgrading your SPECTRUM models
if you are upgrading from SPECTRUM 5.0.1. Several management modules
were deprecated since this SPECTRUM version. In addition, see
Postinstallation Scripts and Templates [page 85] for additional scripts you
must run to upgrade to the latest SPECTRUM version.
MM_dep_50R1_script.pl
The MM_dep_50R1_script.pl script identifies and converts old models. The
script creates a db_conv_template file, using the old model type as old MT
and using GnSNMPDev as the new MT. It then calls DBconv, using the
db_conv_template as a parameter. DBconv finds all old MT models, reads
the attributes listed in the db_conv_template file (including Model_Name,
Network_Address, Community_Name, Security_String, and
Polling_Interval) for each model, copying those values to the
GnSNMPDev-based model.
DBconv then reads the relations that the model is in and sets the same
relations for the new GnSNMPDev model. It then destroys the old model and
continues to the next model. The MM_dep_50R1_script.pl routine also
includes provisions for any Kentrux and LANPlex models found on the
system, directly converting them from older models to newer models.
Procedure
1. Start the SpectroSERVER.
2. Navigate to:
<$SPECROOT>/SS-Tools/MM_Dep_50R1
3. Run the following command:
MM_dep_50R1_script.pl <SpectroSERVER host> <landscape handle>
4. After the script runs, check the Dep_Log_50R1_<DATE>_<TIME> file to
see if all models converted.
If a model was not in contact when the script was running, it will not
be converted. Ensure that the devices are active on the system and
repeat step 3 and step 4 until you have confirmed that all models are
converted. If a WARNING.txt file exists, a model did not convert
because of its contact status, and unconverted models are identified
in this file. If any model still has not converted after repeating this
SPECTRUM
Installation Guide
Page 89
Document 0675
procedure, delete that model and manually create it as a new
GnSNMPDev model or the appropriate LANPlex or Kentrux model type.
Troubleshooting
If the MT_dep_50R1_script.pl script does not run:
1. Make sure you are logged in as a valid SPECTRUM user.
2. Navigate to:
<$SPECROOT>/vnmsh
3. Run the following command:
./connect <SpectroSERVER host>
4. Run the following command:
./disconnect <SpectroSERVER host>
You may have to perform this procedure more than once.
Note: For more information on running the deprecation
script, see the README file in the
<$SPECROOT>/SS-Tools/MM_Dep_50R1 directory.
Convert_to_SSX.script
Convert_to_SSX.script converts models listed in Table 2, using the
procedure that follows.
Table 2: Models Converted by Convert_to_SSX.script
Old Model Type
New Model Type
Supports
Gen9000
9E5xx
Cabletron SmartSwitch 9000
devices with the 9E5xx model type:
(model type handle
0x3860001)
Gen9000
9G5xx
(model type handle
0x3860003)
Gen9000
9H5xx
(model type handle
0x3860002)
SPECTRUM
Installation Guide
Page 90
9E531-24
Cabletron SmartSwitch 9000
devices with the 9G5xx model type:
9G536-04
Cabletron SmartSwitch 9000
devices with the 9H5xx model type:
99H532-18, 9H531-18, 9H539-18,
9H532-17, 9H531-17, 9H539-17,
9H532-24, 9H531-24, 9H539-24,
9H533-24
Document 0675
Procedure
1. Start the SpectroSERVER.
2. Navigate to:
<$SPECROOT>/SS-Tools/Convert_to_SSX
3. Run the following command:
Convert_to_SSX.script <SpectroSERVER host> <landscape handle>
The -gnsnmpdev flag can be added to the end of this command to
convert both Gen9000 and GnSNMPDev models. Only models of 9x5xx
devices are converted; other Gen9000 and GnSNMPDev models are not
converted.
4. After the script runs, check the Conv_SSX_Log_<DATE>_<TIME> file to
see if all models converted.
If a model was not in contact when the script was running, it will not
be converted. Ensure that the devices are active on the system and
repeat step 3 and step 4 until you have confirmed that all models are
converted.
Troubleshooting
If Convert_to_SSX.script does not run:
1. Ensure that you are a valid SPECTRUM user.
2. Navigate to:
<$SPECROOT>/vnmsh
3. Run the following command:
./connect <SpectroSERVER host>
4. Run the following command:
./disconnect <SpectroSERVER host>
MT_del_50R1_script.pl
The MT_del_50R1_script.pl script uses the db_remove utility to delete
deprecated model types from the SpectroSERVER database, ensuring that
a user will not inadvertently create a new model based on a deprecated
model type.
SPECTRUM
Installation Guide
Page 91
Document 0675
Procedure
1. When you have determined that all models have converted, stop the
SpectroSERVER.
2. Run the MT_del_50R1_script.pl script, using a logon identity that
has permissions to delete database entries, files, and directories in
the SPECTRUM installation directory (<$SPECROOT>).
Removing Discontinued Ethernet Application
Models and Model Types
The section contains the procedure for removing the discontinued models
and model types listed in Table 3, using the procedure that follows.
Table 3: Discontinued Ethernet Application Models
and Model Types
Name
Script
Details
FastEnetApp
Rem_EnetApp_Mdls.sh
This application is no longer
supported by SPECTRUM, and
the model types for this
application have been
removed from the current
release.
EnetControlApp
Rem_EnetApp_Mdls.sh
This application is no longer
supported by SPECTRUM, and
the model types for this
application have been
removed from the current
release.
Rem_EnetApp_Mdls.sh
Procedure
1. Start the SpectroSERVER.
2. Navigate to:
<$SPECROOT>/SS-Tools/Remove_EnetApps
3. Run the following command:
Rem_EnetApp_Mdls.sh <SpectroSERVER Host> <landscape handle>
SPECTRUM
Installation Guide
Page 92
Document 0675
4. Check the Rem_Mdls_Log_<DATE>_<TIME> file to confirm that all of
the FastEnetApp and EnetControlApp models were successfully
removed.
If a model was not in contact when the script was running, it will not
be removed. Ensure that the devices are active on the system and
repeat step 3 and step 4 until you have confirmed that all models are
removed.
Troubleshooting
If the Rem_EnetApp_Mdls.sh script does not run:
1. Ensure that you are a valid SPECTRUM user.
2. Navigate to:
<$SPECROOT>/vnmsh
3. Run the following command:
./connect <SpectroSERVER host>
4. Run the following command:
./disconnect <SpectroSERVER host>
Removing the Discontinued Model Types
After the discontinued models have been removed, you must remove the
discontinued model types from your database. A file in the directory
SS-Tools/Remove_EnetApps contains a white-space-separated list of
model type handles that have been discontinued.
Procedure
1. Stop the SpectroSERVER.
2. Navigate to:
<$SPECROOT>/SS
3. Run the following command:
../SS-Tools/db_remove ../SS-Tools/
Remove_EnetApps/obsmdltyplist.txt
You can also run the above command with the debug flag turned on,
as follows:
../SS-Tools/db_remove -debug
../SS-Tools/Remove_EnetApps/obsmdltyplist.txt
SPECTRUM
Installation Guide
Page 93
Document 0675
Upgrading Host Models and Model Types
The section contains the procedure for converting the host model types
listed in Table 4 to new model types as part of your SPECTRUM upgrade.
The table shows model conversion data for old host model types and the
new converted host model types.
Table 4: Host Model Type Conversions
Old Host Model Type
New Host Model Type
SM-GHO1000:
Host_NT, Host_HP, Host_SGI, Host_IBM,
Host_DEC, Host_Sun, and GenericHost model
types.
New Host_Device model type (model
type handle 0x1160089)
The following attributes are preserved
from the original host model and
populated into the newly created model:
0x001006e (model name)
0x00010024 (community string)
0x0001027f (network address)
0x00011564 (notes)
SM-SUN1000:
New Host_Sun model type (model type
Sun workstations that support Sun Management handle 0x116008c)
Center agent—Host_Device, GnSNMPDev (if the
optional command flag is used (see
host_conversion.pl [page 95]), and Host_Sun
(model type handle 0x1160002).
SM-EMP1000:
Host_NT and Host_Sun model types that
support the Empire_UnixApp, Empire_NTApp,
and Empire_ExtApp Empire agents.
New Host_Empire model type (model
type handle 0x1160088)
SM-DEL1000:
Dell workstations that support the Dell Open
Manage agent—Host_NT and GenericHost
model types.
New Host_Dell model type (model type
handle 0x1160097)
SPECTRUM
Installation Guide
Page 94
Document 0675
host_conversion.pl
Procedure
1. Start the SpectroSERVER.
2. Navigate to:
SS-Tools/Convert_to_Host
3. Run the following command:
host_conversion.pl <SpectroSERVER host>
<landscape handle> [gnsnmpdev]
Note: If you run the script with the gnsnmpdev flag, it will
also convert any workstations modeled as a
GnSNMPDev. It may take a few minutes for the
script to run.
4. Check the Conv_HOST_Log_<DATE>_<TIME> file to confirm that all
models and model types have been converted.
If a model was not in contact when the script was running, it will not
be converted. Ensure that the devices are active on the system and
repeat step 3 and step 4 until you have confirmed that all models are
converted.
Troubleshooting
If the host_conversion.pl script does not run:
1. Ensure that you are a valid SPECTRUM user.
2. Navigate to:
<$SPECROOT>/vnmsh
3. Run the following command:
./connect <SpectroSERVER host>
4. Run the following command:
./disconnect <SpectroSERVER host>
Removing the Discontinued Model Types
After the older model types have been converted, you must remove the
older model types from your database. A file in the directory
SS-Tools/Convert_to_Host contains a white-space-separated list of
model type handles that have been discontinued.
SPECTRUM
Installation Guide
Page 95
Document 0675
Procedure
1. Stop the SpectroSERVER.
2. Navigate to:
<$SPECROOT>/SS
3. Run the following command:
../SS-Tools/db_remove ../SS-Tools/
Convert_to_Host/obsmodellist.txt
You can also run the above command with the debug flag turned on,
as follows:
../SS-Tools/db_remove -debug
../SS-Tools/Convert_to_Host/obsmodellist.txt
SPECTRUM
Installation Guide
Page 96
Document 0675
Upgrading Nortel Accelar Models and Model Types
The section contains the procedure for upgrading the models and model
types listed in Table 5, using the procedure that follows.
Table 5: Nortel Accelar Upgrade
Old Model Type
New Model Type
Template
PassportDev
Accelar1200
Psp2Accelar.dbc
(model type handle
0x2ec0005)
(model type handle
0x2ec0002)
Note: You can use Search Manager to determine if you
have models that meet this criteria. Create a
search where the model type name equals
“PassportDev” and device type attribute equals
“Accelar.”
Procedure
1. Start the SpectroSERVER.
2. Navigate to:
<$SPECROOT>/SS-Tools/Nortel
3. For a single landscape, run the following command:
<$SPECROOT>/SSHTools/DBconv –landscape=<landscape handle>
-file=Psp2Accelar.dbc
4. For a multiple landscapes, run the following command:
<$SPECROOT>/SSHTools/DBconv –all_landscapes
-file=Psp2Accelar.dbc
SPECTRUM
Installation Guide
Page 97
Document 0675
Upgrading Generic Cable Modem Models
and Model Types
The section contains the procedure for upgrading the models and model
types listed in Table 6, using the procedure that follows.
Table 6: Generic Cable Modem Upgrade
Old Model Type
New Model Type
Script
Details
GnCableModem
DocsisCM
DocsisCM_migration.pl
The new model type
retains the same
model type handle, so
information about
that model is retained
in the upgrade.
Procedure
1. Start the SpectroSERVER.
2. Navigate to:
<$SPECROOT>/SS-Tools/deprecation
3. Run the following command:
./DocsisCM_migration.pl
SPECTRUM
Installation Guide
Page 98
Document 0675
Upgrading Juniper Router Models and Model Types
The section contains the procedure for upgrading the models and model
types listed in Table 7, using the procedure that follows.
Table 7: Juniper Router Upgrade
Old Model Type
New Model Type Script
Details
JNPR_Mxxx
JnprRedundRtr
Improved redundancy
components for the M20,
M40e, and M160
devices.
juniperConv.pl
Procedure
1. Start the SpectroSERVER.
2. Navigate to:
<$SPECROOT>/SS-Tools/juniperConversion
3. Run the following command:
juniperConv.pl
4. At the prompt, enter the landscape handle (in hexadecimal format)
and the SpectroSERVER host name.
The script continues to run until the conversion process is complete.
5. Open juniperLog.txt to see a list of converted models.
SPECTRUM
Installation Guide
Page 99
Document 0675
Upgrading Management Modules
Use Table 8 to determine the script and template combination to run to
upgrade the SPECTRUM management modules listed; then complete the
procedure—or individual steps—that follow.
Table 8: Scripts and Templates for Upgrading
Management Modules
For this management
module:
Use this template:
With these scripts:
SM-WEL1003
Ntlwf_dep_template
MM_Model_Migration.pl
MM_MType_Deletion.pl
MM_rediscovery.pl
SM-CSI1097
DocsisDepTemplate
MM_MType_Deletion.pl
MM_rediscovery.pl
SM-NTL1001
NortelShasta
MM_Model_Migration.pl
MM_MType_Deletion.pl
MM_rediscovery.pl
SM-CPQ1000
CPQdepTemplate
MM_Model_Migration.pl
SM-EMP1000
EmpDepTemplate
MM_Model_Migration.pl
Procedure
1. Start the SpectroSERVER and navigate to:
<$SPECROOT>/SS-Tools/deprecation
2. Run the following command using a logon identity that has
permissions to delete database entries, files, and directories in the
SPECTRUM installation directory (<$SPECROOT>):
MM_Model_Migration.pl <SpectroSERVER host> <landscape handle>
<template file name>
3. Stop the SpectroSERVER and run the following command:
MM_MType_Deletion.pl <SpectroSERVER host> <landscape handle>
<template file name>
4. Start the SpectroSERVER and run the following command:
MM_rediscovery.pl <SpectroSERVER host> <landscape handle>
<template file name>
SPECTRUM
Installation Guide
Page 100
Document 0675
Troubleshooting
If one of the scripts fails:
1. Ensure that you are running the scripts in the order presented in the
procedure.
2. Ensure that the SpectroSERVER is running or stopped, as indicated in
the procedure.
3. Ensure that the database is not locked by another process.
SPECTRUM
Installation Guide
Page 101
Document 0675
Troubleshooting
This section describes error messages and problems you
may encounter when using the SPECTRUM installation
software. Possible causes and solutions are provided
wherever possible.
Error:
On Solaris systems, the screen displays inverted text, partially missing
text, or other improper elements.
Solution: Make sure you are using the latest drivers for your video card.
Error Message:
You must have the correct privileges to run Install. On a Unix system,
you must be root. On a Windows NT, you must be Administrator. Exiting
installation. Installation Phase: Initializing
Cause: On Windows systems, this message indicates that the person has
not logged on as a member of the Administrators group.
On Solaris, it indicates that you have not provided the correct root
password during installation.
Solution: Make sure you log in as a member of the Administrators group
during Windows installations, or provide the correct root password
during Solaris installations.
Error Message:
Error: <index file name> not found!
Installation Phase: Initializing
Cause: Incomplete extraction of Install (first) record from the distribution
medium, or improper removal or modification of the Install record files
extracted from the medium prior to installation.
Solution: Retry installation. If failure persists, contact your Aprisma
support or sales representative.
SPECTRUM
Installation Guide
Page 102
Document 0675
Error Message:
- - - - - - - - - - - TRACEBACK
Module "X
" Message
Module "Dsply" Message
Module "Err
- - - - - - - -
2: file "err.c
" line 438
0: file "./xdsply.c" line 102
" Message -1: file "err.c
" line 1456
- - - - - - - - - - - - - - - - - - - - - - - - ERROR Cannot open display "(null)" while Initializing windowing
environment
EXITING cannot recover from error
Installation Phase:
Initializing
Cause: Your DISPLAY environment variable is not set to the host name of
the workstation on which you are running the installation software.
Solution: Set the DISPLAY environment variable as described in Setting
the Solaris Display Environment [page 111].
Error Message:
** Error during Database Initialization
Installation Phase:
DBImporting
Cause: The installation is unable to create the SpectroSERVER database.
Solution: This is a serious problem. Contact your Aprisma support or sales
representative.
Error Message:
** Error during Set Landscape Handle
Installation Phase:
DBImporting
Cause: Install is unable to set the SpectroSERVER landscape handle value.
Solution: This is a serious problem. Contact your Aprisma support or sales
representative.
SPECTRUM
Installation Guide
Page 103
Document 0675
Error Message:
** Error during Database save as db_<extension>
Installation Phase:
DBImporting
Cause: Installation software is unable to save the existing SS database,
most likely because the SS database is write-protected or does not
exist (was deleted).
Solution: Use the chmod utility to make the SS database writable, and
reinstall. If this does not work, contact your Aprisma support or sales
representative.
Error Message:
** Error during Import of <MM names>
Installation Phase:
DBImporting
Cause: Install is unable to import an SS database import file into the SS
database. There are two likely reasons for this: either the SS database
does not contain a Model Type required by the SS database import file,
or the SS database has become corrupted.
Solution: This is a serious problem. Contact your Aprisma support or sales
representative.
Error Message:
** Error during Link of SpectroSERVER
** Error during Link of SpectroGRAPH
** Error during Patch of SpectroSERVER
** Error during Patch of SpectroGRAPH
** Error during chmod u+s of SpectroSERVER
** Error during Incremental link of Icon Objects
** Error during Incremental link of View Objects
** Error during Incremental link of SG Objects
** Error during Incremental link of Icon Objects
** Error during Incremental link of View Objects
Installation Phase:
LinkingSS or LinkingSG
SPECTRUM
Installation Guide
Page 104
Document 0675
Cause: These and similar messages during linking are caused by failure of
on-site linking of a product executable. Often, these messages are
preceded by output of various link utilities, for example:
ld: SS.o: No such file or directory
ld: : output write error: Bad file number
nm: SpectroSERVER: cannot open
The exact format and nature of these errors may vary somewhat
between platforms. There are several causes of link errors, including:
• Failure to install all MMs needed to properly link a product
executable. Currently, install does not manage link dependencies
between MMs, and may not warn you if you attempt to install an
MM without installing a second MM on which it depends for proper
linking of a product executable. In such cases, you will observe link
errors, typically accompanied by a list of undefined symbols.
• Failure of link utilities. This most often happens because of lack of
space in the installation area, but can occur for other reasons.
• Missing MMs or files on the medium. If you are installing a patch. it
may not contain enough SPECTRUM MMs to successfully link
product executables. Patches are intended for installation into
previously existing SPECTRUM install areas.
Solution: •Install all MMs required for proper linking of product
executables.
• Do not install on a heavily-loaded or space-bound system (the
Install GUI will warn you if it feels there is not enough space to
complete installation). Do not tamper with the installation area
during installation.
• If the above measures do not work, contact your Aprisma support
or sales representative.
Error Message:
** Error during Processing of vnmrc file
Installation Phase:
ValidatingSS
Cause: Install is unable to properly set values in the SpectroSERVER
defaults file SS/.vnmrc.
Solution: Cannot be handled at installation site. Contact your Aprisma
support or sales representative.
SPECTRUM
Installation Guide
Page 105
Document 0675
Uninstalling SPECTRUM
You should uninstall SPECTRUM when you are migrating
from one machine to another; or when removing
SPECTRUM from your network environment.
You should not uninstall SPECTRUM when upgrading in
place.
In this section:
Uninstalling SPECTRUM 6.5.1 on Solaris [page 106]
Uninstalling SPECTRUM 6.5.1 on Windows [page 107]
Uninstalling SPECTRUM 6.5.1 on Solaris
The uninstall program deletes everything in the directory tree, regardless
of file permissions.
Prerequisites
Stop all processes (for example, Alarm Manager, Event Log).
Procedure
4. Go to <specroot>/Install-Tools.
5. Type: ./uninstall
6. Select y (yes) when prompted to confirm uninstall action.
7. Once the uninstall operation is complete, log out and log back in to
update the desktop icons.
SPECTRUM
Installation Guide
Page 106
Document 0675
Uninstalling SPECTRUM 6.5.1 on Windows
The uninstall program deletes everything in the directory tree, regardless
of file permissions.
Prerequisites
Stop all processes (for example, Alarm Manager, Event Log).
Procedure
1. Go to Start > Settings > Control Panel.
2. Double-click Add/Remove Programs.
3. Select SPECTRUM 6.5.1.0; then click the Change/Remove button
(Windows 2000) or Add/Remove button (Windows NT).
4. The SPECTRUM Uninstall screen displays. Select the components of
SPECTRUM to uninstall.
The default is for all components to be selected. If Hummingbird
Exceed was not installed as part of the SPECTRUM installation and it
is used by other installed applications, deselect it in the component
list.
5. Click Start.
6. Click Yes to confirm the uninstall operation; click No to abort the
operation.
If a file cannot be deleted during the uninstall operation, a pop-up
message prompts you to retry or cancel the action.
Note: Also, as each component is removed, a screen may
display to confirm the action, and another screen
may display to show the results of the action. In
each case, click OK to continue the uninstall
operation.
Also, the Details window for SPECTRUM Runtime
Environment shows four messages that look like
errors (for example, “Unable to delete folder
<path>.” These messages are not errors.
SPECTRUM
Installation Guide
Page 107
Document 0675
7. To uninstall Hummingbird Exceed, click Next.
8. Make sure Remove is selected in the Program Maintenance window;
then click Next.
9. Click Remove.
10. In the SPECTRUM Uninstall screen, click Done.
Note: The uninstalled programs still appear selectable in
the Change/Remove (or Add Remove) window until
the window is closed and reopened.
SPECTRUM
Installation Guide
Page 108
Document 0675
Appendix A
This section contains detailed information on topics
referenced from other parts of this guide.
In this section:
Using the Online Backup Utility [page 109]
Mounting the SPECTRUM CD [page 109]
Setting the Solaris Display Environment [page 111]
Using the DBconv Utility [page 112]
Using the Online Backup Utility
Procedure
1. In the SPECTRUM Control Panel select File > Save Database.
The Online Database Backup Configuration View opens.
2. In the Backup Configuration panel, toggle Backup Compression
to Disabled.
3. In the Backup Directory box, type a directory path to an area
separate from your SPECTRUM installation directory.
4. Accept the default Minimum Required Disk Space (MB) value
unless your think your backup file size may exceed your available disk
space.
5. Select File > Save All Changes; then click OK in the confirmation
dialog box.
6. Click Begin Backup Now!.
The Begin Backup Now! button label changes to Working…, and
the Status line indicates your progress. When the backup operation
is complete, the button label changes back to Begin Backup Now!.
Mounting the SPECTRUM CD
If your Solaris system has Volume Management enabled, the SPECTRUM
Application CD mounts automatically.
SPECTRUM
Installation Guide
Page 109
Document 0675
If Volume Management is disabled, you will need to set up a CD mountpoint directory and enter a mount command to access the installation
software on the SPECTRUM CD. This procedure varies depending on
whether the installation is local (the target workstation is the host for the
CD drive) or remote (the drive is hosted by a workstation other than the
target workstation). CD mounting procedures for local and remote
installations are described separately in the following sections.
Installing From a Local CD Drive
If you are installing SPECTRUM on the CD drive host workstation:
1. Log in as root using the su - command.
2. Type mkdir /cdrom to create a directory for the CD mount point.
3. Insert the SPECTRUM Application CD into your CD drive.
4. Mount the CD file system by entering the following command (where
<cdrom> is the name of the directory created in step 2 above).
mount -r -F hsfs /dev/sr0 /<cdrom>
Installing From a Remote CD Drive
If you are using a non-Solaris workstation as the CD drive host, the mount
command in Step 4 and the file system export entry in Step 5 will vary.
Consult the CD drive host workstation operating system documentation for
the proper syntax.
To install SPECTRUM from a remote CD drive, follow these instructions:
1. Log onto the CD drive host workstation as root (superuser) using
the su - command.
2. Create a directory for the CD mount point (e.g., type mkdir /cdrom).
3. Insert the SPECTRUM Application CD into the CD drive.
4. Mount the CD file system by entering the following command (where
<cdrom> is the name of the directory created in Step 2 above):
mount -r -F hsfs /dev/sr0 /<cdrom>
5. Prepare to export the CD file system by adding the following entry to
your system /etc/dfs/dfstab file:
share -F nfs -o ro /cdrom/cdrom0
SPECTRUM
Installation Guide
Page 110
Document 0675
If the dfstab file does not already exist, you will have to create it. Add
this entry, perform Step 6, and then reboot
(or run etc/rc2.d/K28nfs.server.start) before proceeding
to Step 7.)
6. Export the file system by making the following command line entry:
exportfs -a
7. Log onto the target workstation as root using the su - command.
8. Type mkdir /cdrom to create a directory for the CD mount point. If
you are using a Solaris workstation as the drive host, enter the
following command:
mount -r -o hard,intr <remote _name>:/cdrom/cdrom0 /cdrom
[Where <remote_name> is the hostname of the CD ROM drive
workstation, the first instance of cdrom is the mount-point directory on
the CD_ROM drive workstation, and the second instance of cdrom is the
mount-point directory on the target workstation].
9. If you are using a non-Solaris workstation as the CD drive), type:
mount -r -o hard,intr <remote _name>:/cdrom /cdrom
Note: ]Although SPECTRUM can be installed from a
remote CD drive, components of SPECTRUM can
not be installed on remote drives under the control
of automount. When a directory is placed under the
control of the automount daemon (i.e.; an entry is
placed in one of the
/etc/auto_* files), subdirectories can not be
created in that mount point.
Setting the Solaris Display Environment
Follow these instructions to set up the Solaris display for SPECTRUM:
1. If you want to display the installation GUI on a workstation other than
the target workstation, enter the following command from the display
workstation, specifying the hostname of the target workstation.
/usr/openwin/bin/xhost +<hostname>
2. Set the DISPLAY variable to the hostname of the target workstation.
Use the echo $DISPLAY command to determine whether this setting
SPECTRUM
Installation Guide
Page 111
Document 0675
is in effect on your workstation. If it is not, set the variable by
entering one of the following commands:
From the C shell: setenv DISPLAY <hostname>:0
From the Bourne or Korn shells: DISPLAY=<hostname>:0 ; export
DISPLAY
Using the DBconv Utility
SPECTRUM provides a DBconv utility that converts a set of models in the
SPECTRUM database from one model type to another. You can also use
DBconv to rediscover applications and to reconfigure the interfaces in a set
of models.
DBconv is provided with a resource file for each of the management
modules, supporting both old and new model types. The resource files are
named according to the convention <abbreviated model type name>.
Use the SpectroGRAPH New Model selection option under the Edit menu
to determine which model types exist in your database. Then perform the
following procedure for each model type to be converted:
1. Ensure that SpectroSERVER is running and that SpectroGRAPH is not
running.
2. Open the appropriate resource file with your preferred text editor.
The resource file lists the model type handles for the old model types,
immediately followed by a list of the new model type handles for the
model types included in the management module.
Change the value of the old model type handle (old_mtype) and the
value of the new model type handle (new_mtype) for the individual
model type you wish to convert.
3. If you changed the landscape handle from its default value of
0x400000, you must remove the comment symbol (#) from the
beginning of the #landscape_handle line and change the value of
your landscape handle accordingly. With the comment symbol in
place, DBConv will automatically use the 0x400000 default value to
contact SpectroSERVER.
4. Navigate to the #right_rel_to_ignore and #left_rel_to_ignore
lines and see if a comment symbol (#) exists at the beginning of each
line. If so, remove the comment symbol in each case.
SPECTRUM
Installation Guide
Page 112
Document 0675
If you wish to convert only a subset of the models present, you can
remove the comment symbol from the #models_to_convert line and
enter a specific number of models to be converted. This action will
cause the DBConv utility to selectively convert the number of models
you specify from among those present in your database. Leaving the
line commented (with the # in place) will convert all models of the
specified type with which SpectroSERVER has established contact.
5. Save your changes and exit the resource file.
6. Run DBconv, specifying which SpectroSERVER to connect to and also
the resource file for the model type to be converted. It is a good idea
to first migrate to the SS directory. From the SS directory, type the
following entry, including SS-Tools in the path, all on one line:
../SS-Tools/DBconv <name of vnm host>
rc.<abbreviated model type name>
For example,
../SS-Tools/DBconv monarch ../SS-Tools/rc.cisco
The program will proceed through a short initial phase and a longer second
phase, noting in the window which phase is in effect. Models that have not
been contacted will not be converted; in each case, an error message will
be displayed. Here are some possible causes of these error messages:
• Specified Model Types do not exist in the database.
• SpectroSERVER is not responding.
• SpectroSERVER does not have a model for your user-id.
7. Repeat steps 1 through 6 of this procedure for each model type that
needs to be converted. After verifying the success of the conversion,
save your SPECTRUM database
Note: Archive or remove any database savefiles left from
SPECTRUM 5.0.1. They can no longer be used to
recover a database under the new release.
Attempting to restore a SPECTRUM 6.x.x database
with a 5.0.1 database savefile will render the
existing 6.x.x database unusable.
After you have installed the new SPECTRUM version and run the DBconv
program to delete all old model types, the system expects new model
types only. If you later create a model using one of the old model types
SPECTRUM
Installation Guide
Page 113
Document 0675
(e.g., Rtr_cisco_IGS instead of Rtr_CiscoIGS), the system will generate an
Event00010644 model mismatch alarm.
The DBconv utility can take its configuration from two places:
• A file that is specified on the command line
• Directly from the command line itself.
Options entered via the command line will override corresponding
options specified in the configuration file. To get a list of available
command line options, run DBconv with no option listed. For further
details on DBconv functions, see the DBconv.html file in the
SS-Tools directory.
SPECTRUM
Installation Guide
Page 114
Document 0675
Index
C
Client Access
setting up Solaris for clients [80]
Components Available for Installation
status [58]
converting models during an upgrade [84]
D
databases
backing up after an upgrade [73]
installation savefiles [79]
preserving customizations [19]
using online backup utility [109]
directory structure
migration and upgrade (Windows) [38]
E
emergency repair disk
creating (Windows) [33]
Exceed X server
configuring for remote display [81]
incorrect version [45]
Expiration Date [64]
F
File System
converting to NTFS [34]
files
preserving .pib changes [20]
resource, overwritten [19]
resource, preserved [19]
files created during installation (Solaris) [78]
first-time installation (Solaris) [29]
first-time installation (Windows) [36]
SPECTRUM
Installation Guide
Page 115
Document 0675
G
getting started [10]
graphics
24-bit color (Solaris) [25]
checking 24-bit frame buffer [25]
configuring 24-bit color mode [27]
I
in-place upgrade (Windows) [36]
installation
files created during (Solaris) [78]
prerequisites (Windows) [32]
Solaris prerequisites [22]
types [18]
Windows prerequisites [32]
installation GUI
displaying on a remote Solaris workstation [111]
installation GUI screens [48]
Choose Destination Location (Solaris) [42]
Choose Destination Location (Windows) [46]
Component Configuration panel [54], [55], [56]
Component Selection [57]
End User License Agreement [50]
File Extraction [48]
Host Evaluation [51]
Install (Solaris) [41]
Install (Windows) [43]
Installation Configuration [52]
Installation Monitor [71]
Installation Summary [70]
Installation Type Choices panel [53]
Location Configuration panel [54]
Software Extraction Key [49]
SpectroSERVER Validation [63]
installation types
distributed and fault tolerant SPECTRUM configurations [21]
first-time [18]
first-time (Solaris) [29]
first-time (Windows) [36]
in-place upgrade (Solaris) [29]
in-place upgrade (Windows) [36]
installing additional components [20]
migration and upgrade (Solaris) [30]
migration and upgrade (Windows) [37]
SPECTRUM
Installation Guide
Page 116
Document 0675
migrations [18]
SPECTRUM advanced and value-added applications [21]
SPECTRUM patches [21]
upgrades [18]
installing SpectroSERVER on its own workstation [14]
installing SPECTRUM
preserving database customizations [19]
upgrading models [84]
installing SPECTRUM on Solaris
in-place upgrade [29]
migration and upgrade [30]
IP address
of target workstation [22], [32]
L
Landscape Handle
assigning [14]
changing [14]
changing your database landscape handle [16]
determining current [16]
entering [65]
numeric value [64]
requirements [14]
using -ss and -dm arguments [16]
using the lh_set utility [15]
Location Server
configuration [67]
window [67]
M
migrate and upgrade (Windows)
directory structure [38]
migration and upgrade (Solaris)
directory structure [31]
migration and upgrade (Windows) [37]
model conversion [84]
upgrading from 5.0.1 [89]
using the DBconv utility [112]
models and model types
removing discontinued [92]
upgrading [74]
upgrading from SPECTRUM 5.0.1 [89]
upgrading host types [94]
SPECTRUM
Installation Guide
Page 117
Document 0675
N
NuTCRACKER
uninstalling (Windows) [35]
O
OSAGENT_PORT [77]
P
patches
Solaris 7 [24]
Solaris 8 [25]
privileges
administrator (Windows) [32]
root (Solaris) [22]
processd
stopping in SPECTRUM version 5.0.1 (Solaris) [28]
stopping in SPECTRUM version 5.0.1 (Windows) [35]
R
Remote Display
initiating [82]
limitations [83]
terminating a session [83]
remote display
configuring Exceed X server [81]
of SPECTRUM [80]
Running Installation Software
command buttons [56]
components available for installation [58]
installing all SPECTRUM components [55]
installing SpectroGRAPH only [55]
installing SpectroSERVER only [55]
SPECTRUM in Solaris File Manager [40]
starting installation on Solaris [40]
starting installation on Windows [43]
running installation software [39]
S
Scheduler Requirements [78]
SPECTRUM
Installation Guide
Page 118
Document 0675
security
checking network settings (Windows) [33]
SpectroGRAPH and SpectroSERVER on separate workstations [39]
SPECTRUM application CD
installing from a local drive [110]
installing from a remote drive [110]
mounting on Solaris [109]
SPECTRUM releases
compatibility between [19]
SS Activation Key [64]
swap space
recommended setting [13]
System configurations
recommended [13]
System performance
disk striping and RAID [14]
optimizing [12]
recommended system configurations [13]
user auditing (Windows NT) [34]
System requirements
Solaris [11]
Windows [12]
T
troubleshooting
error messages and solutions [102]
U
uninstalling SPECTRUM [106]
upgrading
compatibility between releases [19]
from SPECTRUM 5.0.1 (with CS2 and MMS2) or earlier [18]
User Model Index Service [69]
V
virtual memory
recommended setting [13]
X
X server
SPECTRUM
Installation Guide
Page 119
Document 0675
installing on Windows [72]
SPECTRUM
Installation Guide
Page 120
Document 0675