1
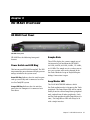
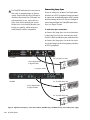
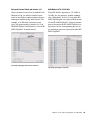
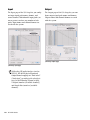
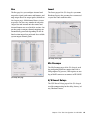
HD MADI Guide
Version 8.1
Legal Notices
This guide is copyrighted ©2010 by Avid Technology, Inc.,
(hereafter “Avid”), with all rights reserved. Under copyright
laws, this guide may not be duplicated in whole or in part
without the written consent of Avid.
003, 96 I/O, 96i I/O, 192 Digital I/O, 192 I/O, 888|24 I/O,
882|20 I/O, 1622 I/O, 24-Bit ADAT Bridge I/O, AudioSuite,
Avid, Avid DNA, Avid Mojo, Avid Unity, Avid Unity ISIS,
Avid Xpress, AVoption, Axiom, Beat Detective, Bomb Factory,
Bruno, C|24, Command|8, Control|24, D-Command, D-Control,
D-Fi, D-fx, D-Show, D-Verb, DAE, Digi 002, DigiBase,
DigiDelivery, Digidesign, Digidesign Audio Engine, Digidesign
Intelligent Noise Reduction, Digidesign TDM Bus, DigiDrive,
DigiRack, DigiTest, DigiTranslator, DINR, D-Show, DV Toolkit,
EditPack, Eleven, HD Core, HD Process, Hybrid, Impact,
Interplay, LoFi, M-Audio, MachineControl, Maxim, Mbox,
MediaComposer, MIDI I/O, MIX, MultiShell, Nitris, OMF,
OMF Interchange, PRE, ProControl, Pro Tools M-Powered,
Pro Tools, Pro Tools|HD, Pro Tools LE, QuickPunch, Recti-Fi,
Reel Tape, Reso, Reverb One, ReVibe, RTAS, Sibelius,
Smack!, SoundReplacer, Sound Designer II, Strike, Structure,
SYNC HD, SYNC I/O, Synchronic, TL Aggro, TL AutoPan,
TL Drum Rehab, TL Everyphase, TL Fauxlder, TL In Tune,
TL MasterMeter, TL Metro, TL Space, TL Utilities, Transfuser,
Trillium Lane Labs, Vari-Fi Velvet, X-Form, and XMON are
trademarks or registered trademarks of Avid Technology, Inc.
Xpand! is Registered in the U.S. Patent and Trademark Office.
All other trademarks are the property of their respective
owners.
Product features, specifications, system requirements, and
availability are subject to change without notice.
Guide Part Number 9320-62018-00 REV B 10/10
Documentation Feedback
At Avid, we are always looking for ways to improve our
documentation. If you have comments, corrections, or
suggestions regarding our documentation, email us at
[email protected].
contents
Chapter 1. Introduction . . . . . . . . . . . . . . . . . . . . . . . . . . . . . . . . . . . . . . . . . . . . . . . . . . . . . . 1
HD MADI Features. . . . . . . . . . . . . . . . . . . . . . . . . . . . . . . . . . . . . . . . . . . . . . . . . . . . . . . . 1
What’s Included . . . . . . . . . . . . . . . . . . . . . . . . . . . . . . . . . . . . . . . . . . . . . . . . . . . . . . . . . 1
System Requirements and Compatibility . . . . . . . . . . . . . . . . . . . . . . . . . . . . . . . . . . . . . . . . 2
Registration . . . . . . . . . . . . . . . . . . . . . . . . . . . . . . . . . . . . . . . . . . . . . . . . . . . . . . . . . . . . 2
About this Guide . . . . . . . . . . . . . . . . . . . . . . . . . . . . . . . . . . . . . . . . . . . . . . . . . . . . . . . . . 2
About www.avid.com . . . . . . . . . . . . . . . . . . . . . . . . . . . . . . . . . . . . . . . . . . . . . . . . . . . . . . 3
Chapter 2. HD MADI Overview . . . . . . . . . . . . . . . . . . . . . . . . . . . . . . . . . . . . . . . . . . . . . . . . 5
HD MADI Front Panel. . . . . . . . . . . . . . . . . . . . . . . . . . . . . . . . . . . . . . . . . . . . . . . . . . . . . . 5
HD MADI Back Panel . . . . . . . . . . . . . . . . . . . . . . . . . . . . . . . . . . . . . . . . . . . . . . . . . . . . . . 8
Chapter 3. Connecting HD MADI . . . . . . . . . . . . . . . . . . . . . . . . . . . . . . . . . . . . . . . . . . . . . 11
Pro Tools|HD Systems. . . . . . . . . . . . . . . . . . . . . . . . . . . . . . . . . . . . . . . . . . . . . . . . . . . . 11
Chapter 4. Pro Tools Configuration for HD MADI . . . . . . . . . . . . . . . . . . . . . . . . . . . . . . . 13
Hardware Setup . . . . . . . . . . . . . . . . . . . . . . . . . . . . . . . . . . . . . . . . . . . . . . . . . . . . . . . . 13
I/O Setup . . . . . . . . . . . . . . . . . . . . . . . . . . . . . . . . . . . . . . . . . . . . . . . . . . . . . . . . . . . . . 18
Appendix A. Compliance Information . . . . . . . . . . . . . . . . . . . . . . . . . . . . . . . . . . . . . . . . . 23
Environmental Compliance. . . . . . . . . . . . . . . . . . . . . . . . . . . . . . . . . . . . . . . . . . . . . . . . . 23
EMC (Electromagnetic Compliance). . . . . . . . . . . . . . . . . . . . . . . . . . . . . . . . . . . . . . . . . . . 24
Safety Compliance . . . . . . . . . . . . . . . . . . . . . . . . . . . . . . . . . . . . . . . . . . . . . . . . . . . . . . 24
Contents
iii
iv
HD MADI Guide
chapter 1
Introduction
HD MADI is a 64-channel, digital audio interface designed for use with Pro Tools|HD®
systems. HD MADI supports the Multichannel
Audio Digital Interface (MADI) format and
sample rates of up to 192 kHz.
HD MADI provides simplified connectivity
between your Pro Tools|HD system and MADIcompatible audio equipment, such as routers,
digital mixing consoles, VENUE systems (with
the MADI option), and converters.
HD MADI Features
• 2 MADI Optical and Coaxial inputs and 2
MADI Optical and Coaxial outputs for up to
64 discrete channels of digital input and output (32 channels per DigiLink Mini port)
• BNC Loop Sync I/O for synchronizing HD
MADI with additional Pro Tools|HD audio
interfaces and peripherals (such as HD I/O,
HD OMNI, or SYNC HD)
• Dedicated BNC Word Clock input and XLR
AES/EBU input (clock input only) for external
MADI synchronization (when using SRC on
output)
• Clock support for the following formats: Internal, Loop Sync, Word Clock, AES/EBU, and
MADI
• Varispeed modes (supports both 64- and 56channel standards)
What’s Included
• HD MADI audio interface
• Supports sample rates of 44.1, 48, 88.2, 96,
176.4, and 192 kHz
• AC power cable
• 24- or 16-bit resolution
• 2 DigiLink Mini to DigiLink adapter cables
(1 ft.)
• Sample Rate Conversion (SRC) on input or
output
• 2 DigiLink Mini cables (12 ft.)
• 2 BNC cables (2 ft.)
• Front panel clock and SRC indicators
• 4 rubber adhesive feet
• Front panel signal present LEDs for input and
output
• 4 rack screws and washers
• BNC Word Clock I/O for synchronizing HD
MADI with external 1x Word Clock
• Health and Safety Guide
• HD MADI Guide
• Registration Information Card
Chapter 1: Introduction
1
System Requirements and
Compatibility
HD MADI requires a qualified Pro Tools|HD system.
Avid can only assure compatibility and provide
support for hardware and software it has tested
and approved.
For complete system requirements and a list of
qualified computers, operating systems, hard
drives, and third-party devices, visit:
www.avid.com/compatibility
Registration
Review the enclosed Registration Information
Card and follow the instructions on it to quickly
register your purchase online. By registering,
you become eligible to receive the following:
• Technical support information
Conventions Used in This Guide
All of our guides use the following conventions
to indicate menu choices and key commands:
:
Convention
Action
File > Save
Choose Save from the
File menu
Control+N
Hold down the Control key
and press the N key
Control-click
Hold down the Control key
and click the mouse button
Right-click
Click with the right
mouse button
The names of Commands, Options, and Settings
that appear on-screen are in a different font.
The following symbols are used to highlight
important information:
User Tips are helpful hints for getting the
most from your system.
• Software update and upgrade notices
• Hardware warranty information
Important Notices include information that
could affect your data or the performance of
your system.
About this Guide
This guide provides a basic overview of HD
MADI features and functionality.
For complete instructions on connecting and
configuring your Pro Tools|HD system, see the
Pro Tools|HD User Guide.
For additional information about using
Pro Tools software, see the Pro Tools Reference
Guide (in Pro Tools, choose Help > Pro Tools
Reference Guide).
2
HD MADI Guide
Shortcuts show you useful keyboard or
mouse shortcuts.
Cross References point to related sections in
this guide and other Pro Tools guides.
About www.avid.com
The Avid website (www.avid.com) is your best
online source for information to help you get
the most out of your Pro Tools system. The following are just a few of the services and features
available.
Product Registration Register your purchase
online.
Support and Downloads Contact Avid Customer
Success (technical support); download software
updates and the latest online manuals; browse
the Compatibility documents for system requirements; search the online Knowledge Base
or join the worldwide Pro Tools community on
the User Conference.
Training and Education Study on your own using
courses available online or find out how you can
learn in a classroom setting at a certified
Pro Tools training center.
Products and Developers Learn about Avid
products; download demo software or learn
about our Development Partners and their plugins, applications, and hardware.
News and Events Get the latest news from Avid
or sign up for a Pro Tools demo.
Chapter 1: Introduction
3
4
HD MADI Guide
chapter 2
HD MADI Overview
HD MADI Front Panel
HD MADI front panel
HD MADI has the following front panel
features:
Power Switch and LED Ring
This button turns HD MADI on and off. The LED
ring around the power button will light green or
orange to indicate the system status:
Green LED Ring Indicates that the unit has powered up successfully and is connected to an active Pro Tools|HD system.
Orange LED Ring Indicates that the unit has
power, but the computer it is connected to is
shut down.
Sample Rate
These LEDs display the current sample rate of
the internal crystal oscillator for HD MADI:
44.1 kHz, 48 kHz, 88.2 kHz, 96 kHz, 176.4 kHz,
or 192 kHz. The sample rate is set when you create a new session, and can be changed in the
Pro Tools Hardware Setup or Playback Engine
dialogs if no session is open.
Loop Master LED
The LOOP MASTER LED indicates which
Pro Tools audio interface is the master Pro Tools
peripheral. The Loop Master LED will be continuously lit on the current Loop Master peripheral
only, and unlit on all other peripherals. (Only
one Pro Tools peripheral can be Loop Master at a
time.) The Loop Master LED will always be lit
with a single interface.
Chapter 2: HD MADI Overview
5
Loop Master defaults to the first Pro Tools audio
interface connected to the primary, or “core”
Pro Tools|HD card. On Pro Tools|HD (for PCIe)
this is the Accel Core card. On Pro Tools|HD (for
PCI) this is the HD Core card.
Sync Mode LEDs
The SYNC MODE LEDs indicate the current
Clock Source as set in Pro Tools.
INT (Internal) Indicates HD MADI sample clock
is generated by its internal crystal oscillator, as
determined by the session Sample Rate.
Session Sample Rate
Word Clock Support
44.1 kHz
44.1 kHz
48 kHz
48 kHz
88.2 kHz
DIG (Digital) Indicates that MADI digital sync is
providing system clock.
88.2 kHz
44.1 kHz
96 kHz
LOOP Indicates that HD MADI is slaving to another Pro Tools peripheral using Loop Sync.
96 kHz
48 kHz
176.4 kHz
176.4 kHz
44.1 kHz
192 kHz
192 kHz
48 kHz
EXT (External) Indicates that HD MADI is using
the Word Clock in port (BNC) for system synchronization.
6
When synchronized to Word Clock, External
Clock input and output do not have to be at the
same Word Clock Rate. Synchronization to External Clock is typically 1x the current session
sample rate. However, for sample rates higher
than 48 kHz, HD MADI generates a choice of 1x,
2x, or 4x the base rate of 44.1 kHz or 48 kHz, as
follows:
HD MADI Guide
Sample Rate Convert
Signal Present
HD MADI provides real-time sample rate
conversion on Input or Output. Sample Rate
Convert (SRC) is configured in the Pro Tools
Hardware Setup dialog (Setup > Hardware).
The Signal Present LEDs indicate signal for Input
and Output. The top LED indicates input and
the bottom LED indicates output.
Input Indicates HD MADI Sample Rate Convert
on Input is active.
Output Indicates HD MADI Sample Rate Convert
on Output is active.
Input Lights when signal is being passed to
Pro Tools from the MADI input ports.
Output Lights when signal is being passed from
Pro Tools to the MADI output ports.
AES/EBU Indicates that AES/EBU is being used
as the clock source for the MADI ports when using Sample Rate Conversion (SRC). If AES/EBU is
selected as the Clock Source for Sample Rate
Conversion in the Hardware Setup dialog, but
no valid word clock is detected, the AES/EBU
LED blinks on and off until a valid clock source
is selected.
Word Clock Indicates that the dedicated (SRC)
Word Clock ports are being used as the clock
source for the MADI ports when using Sample
Rate Conversion (SRC). If Word Clock is selected
as the external sync format for Sample Rate Convert in the Hardware Setup dialog, but no valid
word clock is detected, the AES/EBU LED blinks
on and off until a valid clock source is selected.
Chapter 2: HD MADI Overview
7
HD MADI Back Panel
MADI OPTICAL 1
MADI COAXIAL 1
OUT
OUT
MADI OPTICAL 2
IN
IN
MADI COAXIAL 2
OUT
OUT
IN 1
IN
IN 2
OUT
IN
IN
PORT 1
PORT 2
SRC AES/EBU
SRC WORD CLOCK
WORD CLOCK
LOOP SYNC
AC ~ 100-240V;50-60HZ; .5A
HD MADI rear panel
HD MADI has the following back panel features:
MADI Optical In and Out
HD MADI provides 2 sets of MADI Optical In
and Out ports. Using high-quality optical cable,
connect these ports to the corresponding MADI
optical inputs and outputs of MADI-compatible
audio equipment, such as routers, digital mixing
consoles, and converters.
The maximum length for MADI optical
cables is 2 kilometers (SC FDDI fiber-optic
cable).
MADI Coaxial In and Out
HD MADI provides 2 sets of MADI Coaxial In
and Out ports. Using high-quality coaxial cable,
connect these ports to the corresponding MADI
coaxial inputs and outputs of MADI-compatible
audio equipment, such as routers, digital mixing
consoles, and converters.
HD MADI supports 75 Ohm coaxial (BNC)
cable (such as Belden 1855 and 1694 type).
The maximum length for copper MADI coaxial cables is 100 meters.
8
HD MADI Guide
Number of Channels
For Pro Tools sessions at 44.1 and 48 kHz, up to
64 channels of MADI Optical I/O are available
through each set of inputs (Optical or Coaxial).
At higher sample rates, both sets can be used to
achieve up to 64 channels of MADI Optical or
Coaxial I/O as shown in the table below.
Channels of HD MADI by port (optical or coaxial) and
sample rate
Port
Channels
Sample rate
1
1–64
44.1/48 kHz
1
1–32
44.1/48 kHz
2
33–64
44.1/48 kHz
1
1–32
88.2/96 kHz
2
33–64
88.2/96 kHz
1
1–16
176.4/192 kHz
2
17–32
176.4/192 kHz
Real-Time Sample Rate Conversion
HD MADI inputs can stream in at any sample
rate and be converted to the current Pro Tools
session sample rate using hardware-based realtime sample-rate conversion (SRC). SRC is also
supported on output.
Primary DigiLink Mini Ports
DigiLink Mini to DigiLink Adapter Cables
HD MADI provides 2 Primary DigiLink Ports.
The Primary port is where the DigiLink Mini to
DigiLink cable connects a Pro Tools|HD card to
HD MADI. Each Primary port sends and receives
up to 32 channels to and from the Pro Tools
cards.
Use DigiLink Mini to DigiLink adapter cables to
connect HD MADI to Pro Tools|HD cards.
DigiLink Mini and DigiLink Cables
Use DigiLink cables with a DigiLink Mini to
DigiLink adapter cable to connect HD MADI to a
Pro Tools|HD Accel Core or Accel card.
DigiLink Mini Cable Length Specifications
There are six different lengths of DigiLink Mini
cables:
• 18” (0.46m)
• 12’ (3.6m), two are included with
HD MADI
• 25’ (7.62m)
There are two types of DigiLink Mini to DigiLink
adapter cables:
• 12” DigiLink Mini female to DigiLink male,
two are included with HD MADI
• 12” DigiLink Mini male to DigiLink female
The DigiLink Mini to DigiLink adapter cables let
you connect HD MADI to Pro Tools|HD Accel
cards (Pro Tools|HD Accel Core and Accel cards
include a 12’ DigiLink cable for connecting
Pro Tools|HD audio interfaces).
For more information about DigiLink Mini
and DigiLink Mini to DigiLink cables, visit
our website (www.avid.com).
SRC AES/EBU
• 100’ (30.5m), the maximum length supported by 96 kHz sessions (sold separately)
A single female AES/EBU port (clock input only)
is provided for synchronizing to an external
AES/EBU digital clock source when using MADI
Sample Rate Conversion (SRC) on output. This
can be configured in the Pro Tools Hardware
Setup dialog.
• 200’ (30.5m), the maximum length supported by 48 kHz sessions (sold separately)
SRC Word Clock In 1 & 2
• 50’ (15.25m), the maximum length supported for 192 kHz sessions (sold separately)
The SRC Word Clock In ports 1 & 2 are standard
BNC connector that provides Word Clock input
for synchronizing to an external Word Clock
digital clock source when using MADI Sample
Rate Conversion (SRC) on MADI output. This
can be configured in the Pro Tools Hardware
Setup dialog.
Chapter 2: HD MADI Overview
9
Word Clock In & Out
LOOP SYNC In and Out
The Word Clock In and Out ports are standard
BNC connectors that receive and output word
clock signal. These ports can be used to synchronize HD MADI with any word clock-capable device.
Loop Sync is a dedicated clock loop for synchronizing multiple Pro Tools peripherals together
(such as SYNC HD™ I/O and one or more audio
interfaces). Loop Sync uses a word clock signal
based on sample rates of either 44.1 kHz or
48 kHz. As sample rate increases in the system,
Loop Sync operates at 1x, 2x, or 4x the base rate
of 44.1 kHz or 48 kHz.
The External Clock In is configured by your
choice for Clock Source in the Hardware Setup
dialog. The External Clock Out is configured using the External Clock Output selector in the
Hardware Setup dialog.
Because the Loop Sync and Word Clock ports
pass crucial timing information, use highquality 75-ohm coaxial cables.
The Loop Sync In and Out ports are standard
BNC connectors that output a 1x Word clock
signal. Loop Sync should only be used to chain
multiple Pro Tools|HD peripherals together.
AC Power
This connector accepts a standard AC power cable. HD MADI is auto power-selecting (100V to
240V) and will automatically work with a standard modular cable to connect to AC power receptacles in any country.
10
HD MADI Guide
chapter 3
Connecting HD MADI
Pro Tools|HD Systems
You can get a full 64 channels of MADI I/O with
HD MADI connected to two Pro Tools|HD cards
using two DigiLink Mini cables. If you have
more than two Pro Tools|HD cards in your system (such as with a Pro Tools|HD 3 Accel system), you can add additional Pro Tools|HD audio interfaces (such as HD I/O or HD OMNI).
To connect HD MADI to a Pro Tools|HD 2 or
greater system:
1 Connect HD MADI Primary Port 1 to the Digi-
Link Port on the Pro Tools|HD Accel Core card
with the included DigiLink Mini to DigiLink cable.
2 Connect HD MADI Primary Port 2 to the Digi-
Link Port on the Pro Tools|HD Accel card with
the included DigiLink Mini to DigiLink cable.
For more information about installing
Pro Tools|HD cards, see the Pro Tools|HD
User Guide.
Pro Tools|HD Core card
12-foot DigiLink Mini
to DigiLink cables
Pro Tools|HD Accel card
Figure 1. HD MADI connected to DigiLink Ports on a Pro Tools|HD Core card and a Pro Tools|HD Accel card
(64-channel system)
Chapter 3: Connecting HD MADI
11
Connecting Loop Sync
Pro Tools|HD audio interfaces need room at
their sides to maintain proper air flow for
cooling. Do not block the sides of the unit or
disconnect the internal fan. If the units are
rack-mounted in a case, remove the case
lids or doors before operating the system.
Failure to do so can result in the units overheating very quickly, which can permanently damage sensitive components.
If you are using two (or more) Pro Tools audio
interfaces or a SYNC peripheral, Loop Sync must
be connected to maintain proper clock synchronization among the devices. For an example of
connecting multiple Pro Tools|HD audio interfaces, see Figure 2 below.
To make Loop Sync connections:
1 Connect the Loop Sync Out of each interface
to the Loop Sync In of the next interface with
the BNC cables included in your audio interface.
2 Connect the Loop Sync Out of the last inter-
face to the Loop Sync In of the primary interface
or SYNC peripheral.
HD OMNI
Pro Tools|HD Core card
12-foot DigiLink Mini
to DigiLink cable
Loop Sync cables
Pro Tools|HD Accel card
HD MADI
12-foot DigiLink Mini
to DigiLink cables
Pro Tools|HD Accel card
Figure 2. DigiLink and Loop Sync connections between HD OMNI (top), HD MADI (below), and an HD3 system (right)
12
HD MADI Guide
chapter 4
Pro Tools Configuration for HD MADI
This chapter explains how to configure
HD MADI in Pro Tools.
For more information about configuring your
Pro Tools|HD system, see the Pro Tools|HD
User Guide.
To change the default Sample Rate for new
sessions:
1 If a Pro Tools session is currently open, close
it.
2 Choose Setup > Hardware.
Hardware Setup
In the Hardware Setup dialog, you can set the
default sample rate (if no session is open) and
clock source for your system, as well as access a
range of controls specific to each type of audio
interface connected to you Pro Tools system.
Default Sample Rate
The Sample Rate setting appears as the default
sample rate when you create a new session. (This
setting is available in the Hardware Setup dialog
only when no session is open.)
You can change the sample rate when
creating a new Pro Tools session by
selecting a different sample rate in the
New Session dialog.
Hardware Setup dialog, HD MADI (Port 1 shown)
3 From the Sample Rate pop-up menu, select the
sample rate that you want.
4 Click OK.
High Sample Rates and Expanded Pro Tools|HD
Systems
With 176.4 kHz and 192 kHz sample rates, as
many as four Pro Tools|HD cards can be used.
Any additional cards (up the total system maximum of seven cards) will switch to Inactive
mode. The cards and any attached peripherals
will become active again when the sample rate is
set to 96 kHz or lower.
Chapter 4: Pro Tools Configuration for HD MADI
13
Clock Source
Identify
The Pro Tools Hardware Setup dialog lets you select the Clock Source for your Pro Tools system.
If you have multiple audio interfaces of the
same type connected to your system, you
should confirm the identity of each interface.
This ensures that you select the appropriate interface in the Peripherals list when defining its
inputs and outputs, and other settings, in the
Hardware Setup dialog.
Internal If you are recording an analog signal directly into Pro Tools, you will usually use the
Pro Tools Internal clock source.
External If you are transferring material into
Pro Tools from an external digital device, or if
you utilize a common house clock signal, you
will synchronize Pro Tools to that digital device
or common signal. The external options for HD
MADI are dependant on the sample rate and include:
Available Clock Sources for HD MADI
1 Choose Setup > Hardware.
2 From the Peripherals list, select an audio interface connected to your system.
Use the Up and Down Arrow keys to scroll
though the Peripherals list in the Hardware
Setup dialog.
44.1/48 kHz
88.2/96 kHz
176.4/192 kHz
SYNC/SYNC
HD (if present)
SYNC/SYNC
HD (if present)
SYNC/SYNC HD
(if present)
Internal
Internal
Internal
MADI IN
MADI IN
MADI IN
Word Clock
(44.1/48 kHz)
Word Clock
(44.1/48 kHz)
Word Clock
(44.1/48 kHz)
4 Make a note of which interface in your studio
Word Clock
(96 kHz)
Word Clock
(176.4/192 kHz)
5 Repeat the above steps for each additional audio interface in your setup.
To select the Clock Source:
1 Choose Setup > Hardware.
2 Choose the clock source from the Clock
Source pop-up menu.
3 Click OK.
Your digital input device must be connected
and powered on for Pro Tools to synchronize
to it. If your input device is not powered on,
leave the Clock Source set to Internal.
14
To identify audio interfaces in your system:
HD MADI Guide
3 Select the Identify option, located in the lower
left corner of the Hardware Setup dialog. This illuminates all the LEDs on the front panel of the
selected audio interface.
setup corresponds to the identified interface.
Configuring HD MADI
Coaxial Select this option to use the Coaxial
MADI ports for input and output.
To configure controls for HD MADI:
1 Choose Setup > Hardware.
2 From the Peripherals list, select either
HD MADI DigiLink 1 or HD MADI DigiLink 2
and configure the options as desired.
MADI Routing
The MADI Routing setting lets you choose between Normal or Split MADI input routing options.
Normal Uses just the first Physical MADI port
(Optical 1 or Coaxial 1 ) for MADI input. The
number of available input channels varies depending on the sample rate (see Table 1 on
page 16).
HD MADI Hardware Setup
The settings for HD MADI DigiLink 1 and
HD MADI DigiLink 2 are linked, any
changes are global regardless of which is selected in the Peripherals list.
3 When you are finished, click OK.
HD MADI Hardware Setup Options
HD MADI provides a single page of Hardware
Setup options. These settings determine which
physical MADI ports are used, MADI routing,
and whether or not sample rate conversion is
applied to MADI input and output.
Physical MADI
The Physical MADI setting lets you select the
physical MADI I/O ports for HD MADI input
and output.
Split Uses both of the currently selected Physical
MADI ports (Optical 1 and 2 or Coaxial 1 and 2)
for MADI input. The number of available input
channels varies with sample rate (see Table 1 on
page 16). At 88.2 or 96 kHz, channels are routed
across two 32-channel groups for connecting to
DigiLink Mini ports 1 and 2. At 176.4 or
192 kHz, all channels appear in Pro Tools on
MADI DigiLink 1.
MADI Channel Count
The MADI Channel Count setting lets you choose
between Standard channel modes or Varispeed
channel modes.
Full Channel Count (64) Select this option for up
to 64 channels of MADI I/O without varispeed.
The number of available channels is dependent
on the session sample rate (see Table 1 on
page 16).
Varispeed Channel Count (56) Select this option
for up to 56 channels of MADI I/O with varispeed. The number of available channels is dependent on the session sample rate (see Table 1
on page 16).
Optical Select this option to use the Optical
MADI ports for input and output.
Chapter 4: Pro Tools Configuration for HD MADI
15
Table 1. Available MADI channels by sample rate
Session Sample
Rate
Full Channel
Count
Varispeed
Channel Count
44.1/48 kHz
64
56
88.2/96 kHz
32
28
176.4/192 kHz
16
14
When using Varispeed, or when working with
higher sample rates, any unavailable channels
become grayed out in the I/O Setup dialog.
Clock Source
Select the desired Clock Source option to set the
clock source for Sample Rate Conversion (SRC)
on input.
SRC Word Clock In 1 Select this option to clock
to the SRC Word Clock In 1 port for SRC.
SRC Word Clock In 2 Select this option to clock
to the SRC Word Clock In 2 port for SRC.
SRC AES/EBU Select this option to clock to the
SRC AES/EBU port for SRC.
HD MADI VSO Range
When using Varispeed with HD MADI, it is possible to exceed the available bandwidth. When
Varispeed exceeds the maximum frequency for
the current nominal sample rate, audio drops
out. The maximum frequency for Varispeed at
each nominal sample rate is listed in Table 2.
Table 2. Varispeed maximum sample rate limits
Maximum
Frequency
Nominal sample
rate
Channel Count
44.1/48 kHz
64
48.8 kHz
44.1/48 kHz
56
55.6 kHz
88.2/96 kHz
32
97.5 kHz
88.2/96 kHz
28
111.5 kHz
176.4/192 kHz
16
194.9 kHz
176.4/192 kHz
14
223.0 kHz
MADI IN Select this option to clock to the incoming MADI signal (Optical or Coaxial) for
SRC.
Word Clock Base Frequency (44.1/48)
Enable this option if you are synchronizing to
Word Clock at either 44.1 kHz or 48 kHz, but
you are receiving input at a sample rate of
88.2 kHz or higher.
Input Rate
Select the correct input sample rate frequency
range for the incoming MADI signal:
• 44.1 kHz/48 kHz
• 88.2 kHz/96 kHz
• 176.4 kHz/192 kHz
Output
Sample Rate Conversion
Input
Enable the Input option to apply sample rate
conversion on input. Select this option if
HD MADI is receiving external MADI sources at
any sample rate other than the Pro Tools Session
sample rate.
16
HD MADI Guide
Enable the Output option to apply sample rate
conversion on output. Select this option if
HD MADI is sending to external MADI sources
at any sample rate other than the Pro Tools Session sample rate.
Clock Source
Select the desired Clock Source option to set the
clock source for Sample Rate Conversion (SRC)
on output.
SRC Word Clock In 1 Select this option to clock
to the SRC Word Clock In 1 port for SRC.
SRC Word Clock In 2 Select this option to clock
to the SRC Word Clock In 2 port for SRC.
The available options for Ext. Clock Output
change depending on the session sample rate.
See the table below for a list of default external
clock settings and available options.
Ext. Clock Output options by sample rate
SRC AES/EBU Select this option to clock to the
SRC AES/EBU port for SRC.
MADI IN Select this option to clock to the incoming MADI signal (Optical or Coaxial) for
SRC.
Sample Rate
(kHz)
Available Ext.
Clock Default
Available Ext.
Clock Option
44.1 kHz
Word Clock
(44.1 kHz)
N/A
48 kHz
Word Clock
(48 kHz)
N/A
88.2 kHz
Word Clock
(88.2 kHz)
Word Clock
(44.1 kHz)
96 kHz
Word Clock
(96 kHz)
Word Clock
(48 kHz)
176.4 kHz
Word Clock
(176.4 kHz)
Word Clock
(44.1 kHz)
192 kHz
Word Clock
(192 kHz)
Word Clock (48
kHz)
Word Clock Base Frequency (44.1/48)
Enable this option if you are synchronizing to
Word Clock at either 44.1 kHz or 48 kHz, but
you are sending at a sample rate of 88.2 kHz or
higher.
Target Output Rate
Select the desired output sample rate frequency
range for the MADI signal target output:
• 44.1 kHz/48 kHz
• 88.2 kHz/96 kHz
• 176.4 kHz/192 kHz
If the Word Clock Base Frequency option is enabled, the Target Output Rate setting multiplies
the Word Base Frequency (either 44.1 or 48 kHz)
to match the output sample rate range.
Set To Default
The Set To Default button restores all settings to
the factory defaults.
Ext. Clock Output
If you want to send clock output to other devices attached to HD MADI, select the appropriate output from the Ext. Clock Output pop-up
menu.
Chapter 4: Pro Tools Configuration for HD MADI
17
I/O Setup
2 Choose Setup > I/O.
This section describes how to configure input,
output, and bus signal paths for HD MADI in the
Pro Tools I/O Setup.
For more information the I/O Setup dialog,
see the Pro Tools Reference Guide.
Opening the I/O Setup Dialog
To open the I/O Setup dialog:
1 Make sure HD MADI is configured properly in
the Hardware Setup dialog (see “Hardware
Setup” on page 13).
I/O Setup dialog (Output page with HD MADI shown)
Figure 1. HD MADI in the I/O Setup with both DigiLink ports connected
18
HD MADI Guide
Varispeed Channel Count and Inactive I/O
Split Mode at 176.4/192 kHz
When Varispeed Channel Count is enabled in the
Hardware Setup, the reduced channel count
results in the highest numbered physical input
and output channels being made inactive. For
example, at 48 kHz with Varispeed Channel
Count (28) option enabled, channels 29–32 of
HD MADI DigiLink 1 and channels 61–64 of HD
MADI DigiLink 2 are made inactive.
When HD MADI is operating at 176.4 kHz or
192 kHz, the Split option is enabled automatically. Additionally, in the I/O Setup, both HD
MADI DigiLink ports are represented on the matrix for HD MADI DigiLink 1. All inputs and outputs on the matrix for HD MADI DigiLink 2 are
greyed out, but the corresponding physical input and output ports are represented under HD
MADI DigiLink 1.
I/O Setup, Input page with inactive channels
I/O Setup, Input page at 192 kHz
Chapter 4: Pro Tools Configuration for HD MADI
19
Input
Output
The Input page of the I/O Setup lets you configure input signal path names, formats, and
source channel. Multichannel input paths (stereo or greater) can have any number of subpaths. Input names and channel formats are
saved with the system.
The Output page of the I/O Setup lets you configure output signal path names and formats.
Output names and channel formats are saved
with the system.
I/O Setup, Output page
I/O Setup, Input page
Unlike other HD audio interfaces (such as
HD I/O), HD MADI physical Input and
Output channel mappings are “hard-coded”
(“hard-wired”) according to the selected settings for MADI Routing (Normal or Split),
Varispeed (number of available channels),
and Sample Rate (number of available
channels).
20
HD MADI Guide
Bus
Insert
The Bus page lets you configure internal and
output bus signal path names and formats, and
map output busses to output paths (defined on
the Output page). Multichannel busses (stereo
or greater) can have any number of sub-paths.
Output bus and internal mix bus names and
channel formats are saved with the session. Output bus paths to output channel mappings are
automatically generated depending on the defined session output bus paths and the available
system output channel paths.
The Insert page of the I/O Setup lets you name
Hardware Inserts that you may have connected
to your Pro Tools audio interface.
I/O Setup, Insert page
Mic Preamps
The Mic Preamps page of the I/O Setup is used
for configuring hardware connections with a
PRE peripheral (if present). PRE requires an analog to MADI converter to connect to HD MADI.
I/O Setup, Bus page
H/W Insert Delays
The H/W Insert Delays page of the I/O Setup is
used for compensating for the delay (latency) of
any Hardware Inserts.
Chapter 4: Pro Tools Configuration for HD MADI
21
22
HD MADI Guide
appendix a
Compliance Information
Environmental Compliance
Disposal of Waste Equipment by Users
in the European Union
Proposition 65 Warning
This product contains chemicals, including lead,
known to the State of California to cause cancer and
birth defects or other reproductive harm. Wash hands
after handling.
Perchlorate Notice
This product may contain a lithium coin battery. The State of
California requires the following disclosure statement:
“Perchlorate Material – special handling may apply, See
www.dtsc.ca.gov/hazardouswaste/perchlorate.”
This symbol on the product or its packaging indicates that this
product must not be disposed of with other waste. Instead, it
is your responsibility to dispose of your waste equipment by
handing it over to a designated collection point for the recycling
of waste electrical and electronic equipment. The separate
collection and recycling of your waste equipment at the time of
disposal will help conserve natural resources and ensure that
it is recycled in a manner that protects human health and the
environment. For more information about where you can drop
off your waste equipment for recycling, please contact your
local city recycling office or the dealer from whom you
purchased the product.
Recycling Notice
Appendix A: Compliance Information
23
EMC (Electromagnetic
Compliance)
Australian Compliance
Avid declares that this product complies with the following
standards regulating emissions and immunity:
• FCC Part 15 Class A
• EN55103-1 E4
• EN55103-2 E4
• AS/NZS 3548 Class A
• CISPR 22 Class A
Canadian Compliance
FCC Compliance for United States
This Class A digital apparatus complies with Canadian
ICES-003
Radio and Television Interference
This equipment has been tested and found to comply with the
limits for a Class A digital device, pursuant to Part 15 of the
FCC Rules.
Avid
Cet appareil numérique de la classe A est conforme à la norme
NMB-003 du Canada
CE Compliance
(EMC and Safety)
DECLARATION OF CONFORMITY
We, Avid, 2001 Junipero Serra Boulevard
Daly City, CA 94014-3886, USA
650-731-6300
declare under our sole responsibility that the product
HD MADI
complies with Part 15 of FCC Rules.
Operation is subject to the following two conditions:
(1) this device may not cause harmful interference, and
(2) this device must accept any interference received,
including interference that may cause undesired operation.
Communication Statement
NOTE: This equipment has been tested and found to comply
with the limits for a Class A digital device, pursuant to Part
15 of the FCC Rules. These limits are designed to provide
reasonable protection against harmful interference in a
residential installation. This equipment generates, uses,
and can radiate radio frequency energy and, if not installed
and used in accordance with the instructions, may cause
harmful interference to radio communications. However,
there is no guarantee that interference will not occur in a
particular installation. If this equipment does cause harmful
interference to radio or television reception, which can be
determined by turning the equipment off and on, the user is
encouraged to try and correct the interference by one or
more of the following measures:
• Reorient or locate the receiving antenna.
• Increase the separation between the equipment and
receiver.
• Connect the equipment into an outlet on a circuit
different from that to which the receiver is connected.
• Consult the dealer or an experienced radio/TV technician
for help.
Any modifications to the unit, unless expressly approved by
Avid, could void the user's authority to operate the
equipment.
24
HD MADI Guide
Avid is authorized to apply the CE (Conformité Europénne)
mark on this compliant equipment thereby declaring conformity
to EMC Directive 89/336/EEC and Low Voltage Directive
2006/95/EEC.
Safety Compliance
Safety Statement
This equipment has been tested to comply with USA and
Canadian safety certification in accordance with the
specifications of UL Standards: UL60065 7th /IEC 60065 7th
and Canadian CAN/CSA C22.2 60065:03. Avid Inc., has been
authorized to apply the appropriate UL & CUL mark on its
compliant equipment.
Warning
Important Safety Instructions
1) Read these instructions.
12) For products that are not rack-mountable: Use only with a
cart, stand, tripod, bracket, or table specified by the
manufacturer, or sold with the equipment. When a cart is used,
use caution when moving the cart/equipment combination to
avoid injury from tip-over.
2) Keep these instructions.
3) Heed all warnings.
4) Follow all instructions.
5) Do not use this equipment near water.
6) Clean only with dry cloth.
7) Do not block any ventilation openings. Install in accordance
with the manufacturer’s instructions.
8) Do not install near any heat sources such as radiators, heat
registers, stoves, or other equipment (including amplifiers)
that produce heat.
9) Do not defeat the safety purpose of the polarized or
grounding-type plug. A polarized plug has two blades with one
wider than the other. A grounding type plug has two blades and
a third grounding prong. The wide blade or the third prong are
provided for your safety. If the provided plug does not fit into
your outlet, consult an electrician for replacement of the
obsolete outlet.
10) Protect power cords from being walked on or pinched
particularly at plugs, convenience receptacles, and the point
where they exit from the equipment.
13) Unplug this equipment during lightning storms or when
unused for long periods of time.
14) Refer all servicing to qualified service personnel. Servicing
is required when the equipment has been damaged in any way,
such as power-supply cord or plug is damaged, liquid has been
spilled or objects have fallen into the equipment, the
equipment has been exposed to rain or moisture, does not
operate normally, or has been dropped.
15) For products that are a Mains powered device:
The equipment shall not be exposed to dripping or splashing
and no objects filled with liquids (such as vases) shall be
placed on the equipment.
Warning! To reduce the risk of fire or electric shock, do not
expose this equipment to rain or moisture.
16) For products containing a lithium battery:
CAUTION! Danger of explosion if battery is incorrectly
replaced. Replace only with the same or equivalent type.
17) For products with a power switch:
The main power switch is located on the front panel of the
HD MADI. It should remain accessible after installation.
18) The equipment shall be used at a maximum ambient
temperature of 40° C.
11) Only use attachments/accessories specified by the
manufacturer.
Appendix A: Compliance Information
25
Avid
Technical Support (USA)
Product Information
2001 Junipero Serra Boulevard
Daly City, CA 94014-3886 USA
Visit the Online Support Center at
www.avid.com/support
For company and product information,
visit us on the web at www.avid.com


![Stage 48 - akmedia.[bleep]digidesign.](http://vs1.manualzilla.com/store/data/007247961_1-0fc36f720a3108317a47260e3de3799a-150x150.png)