1
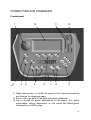
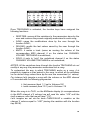
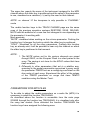
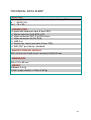
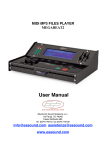
MIDI FILES MP3 PLAYER User’s Manual Electronic Sound Solutions s.r.l., via Monviso 54, 46042 Castel Goffredo MN, tel. + 39 0376 780360, fax + 39 0376 778225 www.essound.com e-Mail [email protected] E.S.S Customer Service, strada Cipata 25, 46100 Loc Frassino, Mantova. Tel + 39 0376 274658, fax + 39 0376 373253 e-Mail [email protected] INDEX INTRODUCTION....................................................................................... 3 CONNECTION AND COMMANDS....................................................... 4 POWER SUPPLY ................................................................................. 6 AUDIO CONNECTIONS ....................................................................... 6 HOW TO START ...................................................................................... 6 SWITCHING ON ................................................................................... 7 SONGS ................................................................................................. 8 HOW TO PLAY A SONG ......................................................................... 8 EASY TUNE.......................................................................................... 8 OPERATIONAL MODE ............................................................................ 9 FUNCTION KEYS (FIG.1/6)................................................................... 9 SONGS MODE ................................................................................... 10 CHORDS AND LYRICS VISUALIZATION.......................................... 11 PLAY/STOP/CONTINUE .................................................................... 12 PARAM. (PARAMETERS)....................................................................... 13 TRKCHANG (TRACK CHANGE)........................................................ 15 PARAMETERS FOR MIDI FILE ..................................................... 15 PARAMETERS FOR MP3 FILES ................................................... 18 PLAY LIST .......................................................................................... 19 HOW TO CHOOSE A LIST OF SONGS IN “PLAY LIST” MODE…21 HOW TO PLAY SONGS IN PLAY LIST ......................................... 21 LIST Visualize the list of songs in a group ..................................... 22 TEXT and TRKCHANG .................................................................. 22 MENU/INFO ............................................................................................ 22 SONGS ERASE .................................................................................. 23 USB..................................................................................................... 24 TV SETUP........................................................................................... 24 CLEAR ALL DATA .............................................................................. 25 OPERATING SYSTEM........................................................................... 26 TECHNICAL DATA SHEET................................................................ 27 WHAT TO DO IF: .................................................................................. 28 2 INTRODUCTION First of all, ESS would like to thank you for your purchase of M-Blaster. M-Blaster is a MIDI, Karaoke and MP3 player characterized by a very intuitive user interface. M-Blaster plays: • Standard MIDI files (.mid format 0 and 1) • Karaoke files (.kar format 1) • MP3 files (VBR/CBR, successfully tested up to 256 Kbps (depending on the encoder) M-Blaster utilizes as a data storage unit a Compact Flash Card that can be loaded up to 511 songs. Included in the packaging are: - n.1 Off- Line Switching Power Supply Adapter; n.1 CdRom containing the software E-link to transfer, manage files and Backup; n.1 Operating manual; n.1 USB cable; n.1 Compact Flash card; n.1 Audio/Video cable (L+R Red/White / Video Yellow). 3 CONNECTION AND COMMANDS Frontal panel 1 2 10 3 4 5 6 7 11 12 8 9 Fig.1 1) Alpha dial encoder, to modify the values of the various parameters and change the displayed page; 2) Key to use to go back to the page previously displayed; 3) Key to access the global adjustments on the player, like: global equalization, effects adjustment on the inputs Mic1/Mic2,global transposition on MIDI songs; 4 4) Key to access options like: song erasing, adjustment of the TV set if connected, page for the files transfer from the PC and the format of Compact Flash. If the key is pressed while a song is in “play” mode, the screen will display info about the song. It is possible to adjust the display contrast pressing the MENU key (fig 1/4) and rotating the alpha dial knob (fig. 1/1). 5) “Easy Tune” to instantly adapt the tonality key of the song on the performer peculiarities; 6) Function keys to select different functions; depending on the page displayed on the screen; 7) Compact Flash Card housing; 8) Play/Stop, to start or stop the song playback; 9) Slider keys, to underline the wanted element among those visualized on the screen; 10) High brightness backlit display; 11) Individual microphones volume fader; 12) Global volume fader. Back Panel 1 2 3 4 5 6 7 8 9 10 Fig.2 1) Stereo mini-jack output for headphones connection; 2 - 3) Microphones input (Jack 6,3 mm TSR); 4) Audio output (to be connected to the audio system); 5) Video connectors. Output (Video out) / Input (Video in) 6) Connector for video camera power supply (optional) or external lyrics display (optional); 5 7) Port MIDI Out to connect an external Synth generator; 8) USB connector to connect M-Blaster to a PC; 9) Power Switch; 10) Connection to the supplied external power supply adapter; POWER SUPPLY Connect the adapter plug (male) to the PWR IN female connector positioned on the M-Blaster back panel (Fig.2/10). Finally, connect the adapter plug to the main socket. IMPORTANT Please use exclusively the supplied adapter. Otherwise, the equipment can be damaged. AUDIO CONNECTIONS Connect the M-Blaster Audio Outputs (fig 2/4) to your audio equipment (mixer line input or directly to the line inputs of an audio equipment, inputs AUX or TAPE of your home Hi-Fi or else). Note: in order not to damage the audio equipment it is strongly recommended that M-Blaster is turned on before the amplification set-up. HOW TO START M-Blaster is supplied with a software E-link for the Personal Computer that allows the MIDI and MP3 file transfer directly from the PC to the MBlaster data storage unit (Compact Flash Card) and moreover can be used for backup operations. First of all install the supplied software on the Personal Computer and, successively, connect M-Blaster through a standard USB cable A/B (such as the one used for USB printers ) to a properly functioning USB port on the PC. 6 Note: when executing the program, if correctly set, M-Blaster will automatically position on the “USB” page. After having done this, launch the program double clicking on the icon previously created during installation. As for the utilization, please refer to the on-line guide included with the software. SWITCHING ON To switch the M-Blaster on, it is sufficient to insert the supplied adapter connector in the corresponding socket positioned on the back panel and push the ON button. The display will light and after a few seconds wait, the display will read the following: READING PROGRAM Shorty followed by ESS M-BLASTER VERSION XXXX MIDI Karaoke Mp3 Player fig.3 For its correct functioning M-blaster needs the Data storage unit (Compact Flash Card), to be inserted in its proper housing (fig1/7). Otherwise, on the display it will appear the following message: “COMPACT FLASH NOT PRESENT” note: The Compact Flash Cards are formatted when the product is sold; However, if necessary, the formatting should be executed with the following characteristics: FAT 12/16 bit formatting (it will be implemented to FAT 32). 7 Insert the Compact Flash in its proper housing (fig1/7) without forcing its introduction. M-Blaster will then display the page Songs. It is possible to adjust the display contrast pressing the MENU key (fig 1/4) and rotating the alpha dial knob (fig. 1/1). SONGS The page on the display (PAGE xxx) contains the songs list, in MIDI or MP3 format, in alphabetical order, 6 titles of 26 letters per page where, the audio songs (MP3) are marked by the “A” letter before the title while the MIDI files are preceded by the suffix “M” (.mid) or “K” (.kar). Above left on the display it is displayed the current page number. To visualize the other pages it is sufficient to rotate the switch (fig. 1/1): at every click the page will change to a new one containing 6 songs. It is also possible to move from a song to another one, utilizing the slider keys; after the last song the next page will be displayed. HOW TO PLAY A SONG It is extremely easy to play a song, it is sufficient to select the requested song on the current page through the slider keys (fig. 1/9), and then push the PLAY button. To stop the playback, just push the STOP button. It is also possible to keep playing the song just halted by pushing the CONTINUE key that appears on the display after having used the STOP button. EASY TUNE Thanks to this exclusive function it is possible to instantly adjust, before or while playing a MIDI song, the tonality key depending on the user needs. The functioning is extremely intuitive: • MALE: if this key is lighted M-Blaster will adjust the MIDI song key for a male voice; 8 • NORMAL: if this key is lighted M-Blaster will play the MIDI song in its original key; • FEMALE: if this key is lighted M-Blaster will adjust the MIDI song key for a female voice. Note: the tonal transposition of “EASY TUNE” is not automatically saved. In order to do that, the transposition will have to be done (and then saved) in the “TRKCHANG” (track change) page. Despite the fact that “EASY TUNE” adjusts correctly most of the MIDI songs and the transposition depending on the performer (male/female), it is possible that certain songs, with special peculiarities, will not adapt perfectly to the transposition. You can find the tonal transposition of “EASY TUNE” on PARAM-MIDI page. OPERATIONAL MODE Before describing the various operational modes, it is necessary a preliminary remark on the display and on the slider key. The meaning of the words and the symbols visualized on the display varies depending on the chosen mode: • in SONGS mode: name of the songs; • in PLAYLIST mode: name of the groups; • in MENU/INFO mode: player managing functions or played song characteristics; • in PARAM.mode: MIDI/Audio global adjustments functions, like the MIDI transposition and equalizations. FUNCTION KEYS (fig.1/6) The use given to the four function keys F1-F2-F3-F4 is variable and changes from time to time depending on the active operational mode. Clearly, it is not necessary to remember which function is assigned to every key as it shows on the last line displayed: in correspondence of every function key there is a box that displays the possible use of the below key in that moment. 9 In this way the four function keys can always access the “typical” functions of the operational mode running in that moment. SONGS MODE The functions offered by the SONGS mode allow to: • choose via the slider keys a single song to play using the PLAY key; • visualize chords and lyrics (if memorized in the song); • adjust volume, effects, transposition and playing metronomic time of the song (“TRKCHANG”); • exclude instantly from the listening the melody track (if present in the MIDI file). Authorised function keys: If in SONGS mode and with no song in PLAY (or if the previous song is finished), M-Blaster is in “stand-by” (the STOP button is lighted while the PLAY button is off). In the last line of the display the following function keys are active: • “TRCK ON” / “TRCK OFF”: it allows halting the melody track from playing. The factory set MIDI channel is 4, however in “Param.”→ “MIDI” it is possible to assign the value to other channels as well. Once set, the parameter will remain active until the equipment is turned off or when the function is disabled; “TRCK ON” the melody track (ch4 default) is activated; “TRCK OFF” the melody track (ch4 default) is disabled; • “PLAYLIST”: allows to access the PLAYLIST mode described later; • “TEXT”: allows to access the visualization mode of chords and lyrics. When the M-Blaster is in “PLAY” (Green led above the PLAY key is lighted), in the last line of the display the following function keys are active: • “TRCK ON” / “TRCK.OFF” (see above); • “LIST” (see above); 10 • “TEXT” (see above); • “TRKCHANG (TRACK CHANGE)”: allows to access the page where to adjust the following parameters: volume, reverberation, chorus, transposition and playing metronomic time of the song being played. Note: the function TRKCHANG is not available when the song is not in “PLAY” because the adjustment values of the single parameters vary depending on the starting value that’s preset on each song. To read the preset starting values of each song (normally included in the first measure of the song) it is necessary to put the song in PLAY. Pushing twice the STOP button the effects (Rev./Delay/Chorus) come momentarily off from MIC1/2 (“TALK” mode). The effects will automatically reactivate when playing a song. When a song is interrupted through the STOP button, in the last line of the display the function TRKCHANG is replaced by: • “CONTINUE”: it is the function which usually is coupled with the functions Play/Stop, and it is used to restart a song exactly from the point where it had been interrupted by the STOP button. CHORDS AND LYRICS VISUALIZATION The function is activated by the function key “TEXT” and it can be used either before or after having put a song in PLAY. If you active the function before playing the song, you are sure not to loose the first phrase. The underlined song contains lyrics or chords and lyrics it is sufficient to push TEXT and then PLAY. To leave the TEXT mode, push the EXIT button. 11 NOTES: Lyrics and chords, if present in the midi file, are visualized slightly in advance with respect to the part of the song being played, to give the performer the time to change the sentence/chord. The time of advance depends from the setup of the midi file. It is possible to enter the TEXT mode even after having the song in PLAY. It is also possible to enter and to exit the TEXT mode various times during the song performance. Entering the TEXT mode while the song is being played, it is sometimes necessary a short wait before being able to visualize correctly the lyrics on the display, it may happen to “lose” the lyric portion that should be visualized while activating the TEXT mode. In fact, the lyric is memorized in the song and then read by the Mblaster with a short advance on the point of playing (therefore the lyric that should be visualized on the display could actually belong to a previous section of the song, played shortly before activating the TEXT mode) To be visualized on the display, the chords and the lyrics have got to be memorized in the MIDI file. The readable formats are: • • • • Tune 1000 (files with extension “.mid”): in format “1” or “0” Solton (files with extension “.mid”): in format “1” or “0” Word Box/M-Live (files with extension “.mid”): in format “1” or “0” Karaoke (files with extension “.kar”): in format “1” PLAY/STOP/CONTINUE In SONGS mode, to PLAY a song, it is necessary to select it with the slider key (to underline it). Pushing the PLAY button the underlined song is selected and played. Pushing the button MENU/INFO during the song playback the display will show: • The full title of the song in playback; • For the MIDI files, the time signature (4/4, 3/4 etc); • For the MIDI files the current position, indicated in measures and in quarter of measures, for the Mp3 files it will be visualized the time gone from the start of the playback; • For the MIDI files the metronomic time, for the MP3 files the bit rate value (kbps). 12 If during the song playback the STOP button is pushed, the song is interrupted. At this point it is possible to use the function key CONTINUE (to restart the song playback from the point where it was halted) or push the PLAY button again to restart the song from the beginning. NOTES: The song that is playing is always the one underlined with the slider key. If during a song another one is underlined and the PLAY button is used, the playback will be halted and the new song will start immediately. If a song is interrupted with the STOP button see the following: After having halted a song with the STOP button and underlined another one, using the PLAY button the new song will start playing from the beginning, using the CONTINUE function the first song will resume playing (from the point where it was halted) PARAM. (Parameters) Press the button PARAM, also during the playback of a song, to access the “Parameters” page where it will be possible to adjust the MIDI and Audio parameters in real time (during playback). From left, the function keys permit the selection of the page relating to: 1. MIDI, where is possible to find the following regulations: • MIDI TRANSPOSE: to adjust the global transposition (of all the MIDI files). The value can be varied of +/- 12 semitones before or during the song playback. This parameter will be active until the equipment is turned off. • MIDI VOLUME: to adjust the quantity of volume only for the midi files. You should put this parameter on level 0, if you want to use MBlaster2 with an external expander, maintaining the audio functionalities (microphone, MP3). • MIDI REVERB: to adjust the global quantity of the reverberation effect on the MIDI songs; this parameter is saved. • MUTE TRACK: to choose the intervention channel of the function key TRKON/OFF. The factory preset value is 4, a MIDI channel to which is usually assigned the melody track; this parameter is saved. 13 • EASY TUNE: visualizes the value of the transposition applied to the song being played. 2. “OUT EQ” : to adjust the output global equalization. The adjustable parameters are: TREBLE : high frequencies; BASS : low frequencies. 3. “MIC EQ” : to adjust the equalization of the microphone inputs Mic 1 and Mic 2. The adjustable parameters are: HIGH MID F MID LOW : high frequencies; : MID intervention frequency; : medium frequencies; : low frequencies. NOTES: On the medium frequencies the equalizer is of the “semi-parametric” type. Through the parameter “MID F” it is possible to adjust the frequency on which intervene, enhancing or easing it up through the “MID” parameter. This means that intervening exclusively on the “MID F” parameter no tonal variation will be heard. The intervention frequencies start from 110hz (identified as low frequencies) up to 1800hz (identified as high frequencies, or high pitched) and cover the range of frequencies not modifiable by the “HIGH or “LOW” regulations. A practical example to understand the regulation of the semi-parametric filter: enhance the “MID” parameter, then, speaking in the corresponding microphone move as you please the parameter “MID F”. It will be then possible to hear the different frequencies to enhance (or ease up) using the “MID”. 4.“MIC FX”. To adjust the type and quantity of the effect for the Mic1 and Mic2. The adjustable parameters are: • DELAY TYPE : it is possible to choose among three types of delay: 14 Mono/Stereo/Triple; • DELAY LEVEL : quantity of delay effect; • REVERB SEND : quantity of reverberation; • CHORUS SEND : quantity of chorus effect. “EXIT” to leave the page “PARAM.” TRKCHANG (TRACK CHANGE) How to adjust customized parameters of each song (volumes/effects /transposition /time etc). During the playback it is possible to adjust and save customizations for each single song pressing the TRKCHANG function key (activated during the song playback) The TRKCHANG page is different depending on the type of file played, MIDI or audio (MP3). NOTE: As the effect generator (reverberation and chorus) is common between the MIDI playback and the MIC1/2, it is possible that the reverberation and/or chorus characteristics can modify depending on the type of messages coming from the MIDI file in playback PARAMETERS FOR MIDI FILES To be able to adjust the volume, the effects, the transposition, the metronomic time and other parameters on a MIDI file, it is necessary to select the function TRKCHANG. As explained above, the function is accessible from the main page SONGS through the function key TRKCHANG and visualized only after that the song has started. 15 Once TRKCHANG is activated, the function keys have assigned the following functions: • RESTORE: zeroes all the variations to the parameters done by the user and restores the presets originally memorized in each song; • SAVE: saves the modifications done by the user through the function SAVE; • RELOAD: recalls the last values saved by the user through the function SAVE; • MUTE: it mutes a track (same as zeroing the volume of the corresponding MIDI channel) if on the status bar CHANNEL VOLUME TRKCHANG is underlined; • SOLO: it puts to “solo” the underlined channel if on the status CHANNEL VOLUME TRKCHANG is not underlined; NOTES: All the variations done through the function TRKCHANG do not modify in any way the parameters memorized into a song. To understand the way in which TRKCHANG works on a song, it is possible to imagine a chart paired to the song, in which all the variations on the default song values done by the user are memorized (+/- values). For instance let’s imagine a song with the volume on the MIDI channel n°2 recorded with the following progression: first measure (beat 1.1) set to Volume=100 tenth measure (beat 10.1) set to Volume=110 When the song is in PLAY, on the M-Blaster display (in correspondence to the MIDI channel n°2 volume) we will read the value “100” until the tenth measure, after that we will read “110”. Let’s imagine we set via the knob PAGE/VALUE a variation on the channel 2 volume equal to “-020” (saving the variation with the function key SAVE). 16 Playing the song again the display (in correspondence to the MIDI channel n°2 volume) will read the value “080” until the tenth measure and “90” after that. This means that with the TRKCHANG function it is possible to set variations that will add up (or subtract) the preset parameter values of the songs. Such variations can be saved on the Compact Flash (in a chart paired to the song) and will have effect only when the song is being played not affecting the original parameters that can be recalled any time. Once activated TRKCHANG, the display shows a page divided in two zones by a status bar. The upper part concerns the managing of the single MIDI channels, while the lower one allows to choose on which parameter to work. The choice can be done on the following parameters: • • • • • • • • VOL (Volume) TRN (Transpose) PRG (Program change) BNK (Bank select) REV (Reverberation) CHR (Chorus) PAN (Panpot) TEMPO (metronomic time) It is very important to understand what changers depending on the position of the slider key: using it in the lower part it is possible to select the parameter on which to work, being able at the same time to globally modify it in all the MIDI channels using the adjustment knob. In that case on the status bar the indications shown will be those of GLOBAL followed by the name of the parameter in use and from the word TRKCHANG. It is obviously forbidden the global regulation of PROGRAM CHANGE and BANK SELECT Moving the slider key to the upper part (in that case the status bar will report the word “CHANNEL” followed by the name of the variation in use and by the word TRKCHANG) it will be possible to adjust singularly, only for the MIDI channel on which the slider key is positioned, the parameter in use. 17 The upper bar reports the name of the instrument assigned to the MIDI channel where the slider key is positioned and the value of the parameter in use, visualized as a variation (-/+) set by the user for that channel. NOTE: on channel 10 the transpose is only possible in “CHANNEL” mode The usable function keys in the TRACK CHANGE page are the same ones of the previous operative systems RESTORE, SAVE, RELOAD, MUTE with the addiction of a new one that changes its use depending on the parameter it is working with. More precisely: “MUTE”: visualized when working on the volume parameter. Pushing the function key it changes the track on which the slider key is positioned. “SOLO”: Visualized for all the other parameters. Pushing this function key, as already said, it will be possible to hear only the channel on which the slider key is positioned in that moment. NOTE: 1. The MUTE values set for the various channels are saved through SAVE, on the Compact Flash in a chart paired to the song. The saving is not done for the SOLO values that have been modified; 2. Differently to other parameters (that act in a additive way, summing to the preset parameters memorized in every song) the parameter TEMPO acts as a multiplying coefficient on the time setup of each song. Experiment the effect of the setups of the TEMPO parameter on songs that have TEMPO variations using the Master Track. PARAMETERS FOR MP3 FILES To be able to adjust the usable parameters on a audio file (MP3) it is necessary to select the function TRKCHANG. As described above the function is accessible from the main page SONGS through the function key TRKCHANG, it is visualized only after the song has started: Once activated the function TRKCHANG the function keys have assigned the following uses: 18 • RESTORE: “zeroes” all the variations done to the parameters by the user and restores the presets originally memorized in each song; • SAVE: saves the modifications done by the user; • RELOAD: recalls the last values saved by the user with the SAVE function; • MUTE: parameter not usable in this page. The parameters available in this page are: • LEVEL: adjusts the volume of the song in playback; • TREBLE: increases or decreases the high frequencies level (treble); • BASS: increases or decreases the low frequencies level (bass); • PANPOT: to adjust the balancing between the two stereo channels (left/right); • PITCH: to modify the key of the song in playback without altering its pace (tempo) The values allowed are +/- 6 halftones; • TIME STRETCH: to modify the tempo of the song in playback without altering its key (pitch). The values allowed are +/- 3; NOTE: The parameters “PITCH” and “TIME STRETCH” are functions that can be very useful, particularly ”PITCH”. However is better to remember that the sonic quality will be altered and that, the more the original key is modified the more the sonic signal quality will decrease. PLAY LIST The PLAY LIST is what M-Blaster uses to organize the files in a simple and intuitive manner. It is possible to create PLAY LIST containing songs to be played sequentially (to help organize own repertoire) or to group song by genre thanks to the software E-LINK. It is also possible that one song can be part of more than one Play List (without duplicating the song on the Compact Flash) in order to choose among alternative play lists. Each Play List can contain maximum 48 songs, mixed between MIDI files and/or MP3. M-Blaster capacity is up to 100 groups. The functions offered by the play list mode allow to: 19 • Choose a group of songs to play through the PLAY button; • Choose whether to play the songs in sequence (one after the other) or if to select and then play one or more songs from the PLAY LIST; • Visualize chords and lyrics (if memorized into a song); • Customize parameters like volumes, effects, transposition and metronomic time of the song playback. To activate the PLAY LIST mode it is necessary to start from the SONGS mode and then push the function key PLAY LIST. Function Keys activated: If in PLAY LIST mode and no song in PLAY LIST (or if the previous song is finished) M-Blaster is in “Stand-by” (STOP button lighted – PLAY button off); in the last line of the display the following function keys are active: • LOOP/NOLOOP: to decide whether, after one song from the group is finished the next one should automatically start (LOOP) or viceversa if the song that are part of the group should be played individually (NOLOOP) ; • LIST: to visualize the list of songs that are part of the group and to choose from which one to start among them; • TEXT: similar to the SONGS mode. When the M-Blaster is in “PLAY” (green led above the PLAY button lighted) in the last line of the display further function keys, compared to what previously described, are active: • TRKCHANG: identical to the one described in the SONGS mode; when the song playback is halted through the STOP button, the function key TRKCHANG is substituted by CONTINUE. • CONTINUE: is the function normally called Continue, his behaviour is analogue to the one seen in the SONGS mode. 20 HOW TO CHOOSE A LIST OF SONGS IN PLAY LIST MODE Once accessed the PLAY LIST mode, it is possible to see on the display the group of songs created by the user (they can be setup only through the management software supplied with M-Blaster) To choose a PLAY LIST is enough to underline the one chosen with the slider key. To do that is enough to be positioned on the chosen group with the slider keys (fig. 1/9) or with the alpha dial switch (fig.1/1) HOW TO PLAY SONGS IN PLAY LIST Before playing the songs contained in a PLAY LIST, it is possible to decide whether the songs should be played sequentially, one after another, or if by the end of the song the switchover to the next song should be done manually. This regulation is done through the function key LOOP/NOLOOP. The actual value of the regulation is visible on the lower left part of the display. Pushing the proper function key it is possible to go from LOOP to NOLOOP and viceversa. NOTE: The switchover between the two modes LOOP/NOLOOP can be activated also during the group of songs PLAY Pushing the PLAY button the first song from the group will start Just like in the SONGS mode, pushing the MENU/INFO button during the song playback, it will be possible to access the page where the playback characteristics are shown: The name of the selected song; The time signature (4/4 – 3/4 etc); The current position, in beats and quarters (for instance 059.4); The metronomic time. Similarly to the SONGS mode when a song of a PLAY LIST is in playback, the function keys TEXT and TRKCHANG are active; once the playback is halted with the STOP button, TRKCHANG switches to CONTINUE. 21 LIST Visualize the list of songs in a group To see the songs of a PLAY LIST, it is enough to push the function key LIST. On the display it will be visualized the SONG LIST page with the list of the songs belonging to the selected group. As usual, with the alpha dial switch it is possible to go the next page with the rest of the songs list (if present), for a maximum of 8 pages (each of 6 pages for a total of 48 per list) With the slider keys it is possible to move among the songs that are part of the group. After having moved the slider key onto a song, pushing the PLAY button that song will start. When the LOOP mode is active (previous page GROUP PLAY) after the first song all the others will follow automatically until the last one of the group. To go back one page just push the EXIT button. TEXT and TRKCHANG In PLAY LIST mode the behaviour of the functions TEXT and TRKCHANG is similar to the one previously described for the SONGS function. If during the playback in LOOP one of the functions TEXT or TRKCHANG is active, at the end of each song all the data about the following one will be visualized on the TEXT or TRKCHANG display. The functions TEXT and TRKCHANG can be recalled through the related function keys, available both on the main page PLAY LIST or in the LIST pages. MENU/INFO The menu MENU/INFO contains various and important management utilities for the M-Blaster. To access the page MENU it is necessary to push the MENU/INFO button when the M-Blaster is in “Stand-by”, (not playing – led on PLAY button is off). It is otherwise impossible to access the MENU page. 22 The functions contained in the MENU section are: SONGS ERASE: to erase a song from the Data Storage Unit (Compact Flash); USB: to access a page where to transfer, thanks to the supplied software, MIDI files and/or MP3 to the Data Storage Unit (Compact Flash); TV SETUP: to access the TV visualization options menu; CLEAR ALL DATA: to cancel the Compact Flash. Moreover, in the lower right part of the page it is possible to find infos related to the single device: • • • • S.N. Sysop Eprom Songs : Device serial number; : Operative system version installed on the device; : Version of resident software; : The number of songs in the Compact Flash. The activated function keys are : • INTRO ON / OFF allow the user to activate / deactivate the short musical intros at the unit startup. • SELECT: allows to access one of the functions previously described (the selected one). Once visualized the MENU page, to access one of the functions previously described, it is enough to bring the slider key onto the wanted function (CURSOR keys) and then select it with the SELECT function keys SONGS ERASE This function allows the permanent deleting of a song, to activate it : 1. push the button MENU/INFO; 2. bring the slider key onto SONGS ERASE; 3. push the SELECT function key. 23 On the display it will appear the list of all the songs present in the Flash Card (divided in pages and accessible through the CURSOR button (fig. 1/9) and the alpha dial switch (fig. 1/1) The function keys activated are: • ERASE: delete procedure 1. Choose the song to delet with the CURSOR keys (fig 1/9) (or with the alpha dial knob) (fig. 1/1) then push the function key ERASE; 2. If you wish to leave the ERASE mode without any cancellation, push the EXIT button. To delete the song push the function key YES when requested, otherwise push NO. It is possible to cancel a further song or push the button “EXIT” to return to the MENU page. USB This is the page to visualize for a right connection to the PC. If you modify the content of the Compact Flash, the “INDEX” is automatically created, when you exit from the USB page. TV SETUP In this section it is possible to adjust the functions related to the device connected through the video connector positioned on the back panel (fig 2/5) To activate the function TV SETUP: 1. push the MENU button; 2. bring the slider key to TV SETUP; 3. push the function key SELECT. The activated function keys are: - SAVE: it memorizes the changes made in this page; CHANGE: it allows the variation of the selected parameter. The functions on which it is possible to intervene are : 24 • LIST SONGS ON TV: It allows (or prevents) the visualization of the list of songs on the connected TV screen. If positioned on ENABLED at the end of the song, on the external screen it will be possible to visualize the song titles, just like in the M-Blaster display (6 songs). IF switched to DISABLED the list will not be visualized. NOTE: the different regulation of this parameter does not affect the MBlaster internal display • CHORDS ON TV: It allows (or prevents) the visualization of the chords, if present in the MIDI file, on the connected TV screen; • BACKGROUND COLOR: it allows the adjustment of the background color in the chords/lyrics page (if present in the MIDI file; • CURSOR COLOR:it allow the adjustment of the underlined color; • VIDEO/CAMERA IN: if the optional Video camera is connected this parameter will allow the background visualization of the sent signal; • CLEAR ALL DATA CLEAR ALL DATA This function allows to cancel by fast way the Compact Flash. Attention: This function cancel all the songs in the Compact Flash. To cancel Compact Flash, “YES” has to be pushed, and in order to confirm deleting the songs, you have to push “YES” again. At the end of removing, this message shows: “SWITCH POWER OFF – THEN ON AGAIN”. 25 OPERATING SYSTEM The M-Blaster Operating System comprehends all the commands and functions that allow all the operations described in this manual to happen. The Operating System is preloaded by ESS and automatically loaded by the device when switched on. Just like in the Computer it is possible to update the M-Blaster Operating System to add new functions and/or to better the already existing ones. The update procedure is very easy. Please refer to the On-Line guide of the supplied data transferring software. PLEASE NOTE CAREFULLY Once the transfer of the SysOp is over, please switch the M-blaster off only when the following message appears on display: SWITCH POWER OFF THEN ON AGAIN It requests that the M-Blaster is switched off and then on again. After switching on the Operative System will be installed, the version number can be verified on the opening screenshot. 26 TECHNICAL DATA SHEET • ADAPTER : External off-line power supply adapter desktop switching Off Line In .......90/240 Vac Out ....15 v. 2A • CONNECTORS : n.2 Inputs Mic balanced (Jack 6,3mmTSR) n.1 Stereo output (n.2 pin RCA L+R) n.1 Video connector OUT (Pin RCA) cinch n.1 Video connector IN (Pin RCA) n.1 USB Port n.1 Earphones output (mini-jack 3,5mm TSR) n.1 MIDI OUT port (din 5p. standard) • BACKLIT GRAPHIC DISPLAY: 192 x 64 dot size 0,4x0,4 mm / dot pitch 0,45x0,45 mm • DIMENSIONS 250 x 170 x 60 mm • WEIGHT M-Blaster 0,5 Kg Power supply adapter + Cable 0.45 Kg 27 WHAT TO DO IF IF THE MESSAGE “COMPACT FLASH NOT FORMATTED” APPEARS WHILE THE CARD IS IN, PLEASE FORMAT THE CARD ON YOUR PC WITH FILE SYSTEM “FAT” IN SLOW MODE. IF THE MESSAGE “FAT TYPE NOT SUPPORTED” APPEARS WHILE THE CARD IS IN, PLEASE FORMAT THE CARD ON YOUR PC WITH FILE SYSTEM “FAT” IN SLOW MODE. PLEASE PAY ATTENTION: NOT EVERY COMPACT FLASH ARE COMPATIBLE WITH M-BLASTER. IF M-BLASTER STOPS WITH THE MESSAGE “INIT COMPACT FLASH” DURING INITIALISING OF THE CARD, PLEASE SWITCH OFF M-BLASTER AND TURN ON IT AGAIN, PUSHING SIMULTANEOUSLY THE BUTTONS “PARAM” AND RIGHT POINTER. BY THIS PROCEDURE THE INITIALIZING OF THE SONGS IS STOPPED AND YOU CAN CANCEL THE FILE BY ELINK SOFTWARE. 28