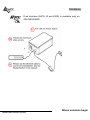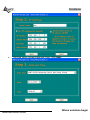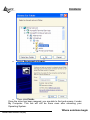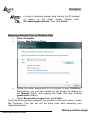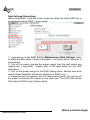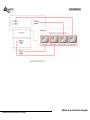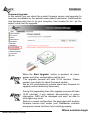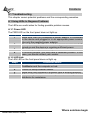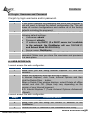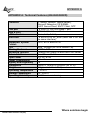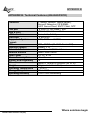
1
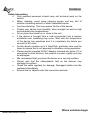
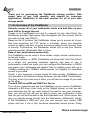
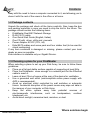
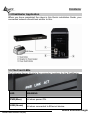
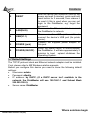
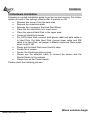
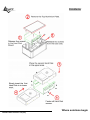
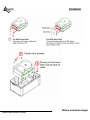
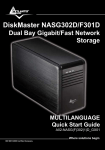
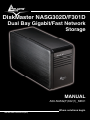
DiskMaster NASG302D/F301D Dual Bay Gigabit/Fast Network Storage MANUAL A06-NASG(F)302(1)_ME01 Where solutions begin ISO 9001:2000 Certified Company ITALIANO Questo prodotto è coperto da garanzia Atlantis Land On-Center della durata di 2 anni. Per maggiori dettagli in merito o per accedere alla documentazione completa in Italiano fare riferimento al sito www.atlantis-land.com. ENGLISH This product is covered by Atlantis Land 2 years On-Center warranty. For more detailed informations please refer to the web site www.atlantis-land.com. For more detailed instructions on configuring and using the Switch, please refer to the online manual. FRANCAIS Ce produit est couvert par une garantie Atlantis Land On-Center de 2 ans. Pour des informations plus détaillées, référez-vous svp au site Web www.atlantis-land.com. DEUTSCH Dieses Produkt ist durch die Atlantis Land 2 Jahre On-Center Garantie gedeckt. Für weitere Informationen, beziehen Sie sich bitte auf Web Site www.atlantis-land.com. ESPAÑOL Este producto està cubierto de garantía Atlantis Land On-Center por 2 años. Para una información más detallada, se refiera por favor al Web site www.atlantis-land.com. Where solutions begin ISO 9001:2000 Certified Company The award of the information is facultative, but its lack will prevent ATLANTIS LAND® from starting the Guarantee process requested. R R g o u p o d u Reeeg giiisssttteeerrr yyyo ou urrr p prrro od du ucccttt!!! w w w w n n d o m ww ww w...aaatttlllaaan ntttiiisss---lllaaan nd d...ccco om m Registration on the web site www.atlantis-land.com within 15 days from the purchase of the product dismiss the customer from showing a valid proof of purchase (Sale Receipt or Invoice) in case of the request of intervention. For further information we invite you to look at our web site at the section WARRANTY. Copyright The Atlantis Land logo is a registered trademark of Atlantis Land. All other names mentioned mat be trademarks or registered trademarks of their respective owners. Subject to change without notice. No liability for technical errors and/or omissions. Where solutions begin ISO 9001:2000 Certified Company DiskMaster INDEX 1.1 An Overview of the DiskMaster ..................................................8 1.2 Package contents .......................................................................9 1.3 Choosing a place for your DiskMaster........................................9 1.4 DiskMaster Application .............................................................10 1.5 The Front LEDs.........................................................................10 1.6 The Rear Ports..........................................................................11 1.7 Default Settings.........................................................................12 1.8 Hardware Installation ................................................................13 1.9 Hard Disk setup ........................................................................17 Single Hard Drive installation ......................................... 18 Dual Hard Drive installation ............................................ 20 1.10 How to login ............................................................................22 1.11 Mapping a Network Drive .......................................................25 Mapping a Network Drive in Windows XP...................... 25 Mapping a Network Drive in Windows Vista................... 27 2.1 WEB Configuration ...................................................................29 2.2 Basic .........................................................................................30 Wizard 31 Add User 33 Add Group ...................................................................... 34 Add Folder ..................................................................... 35 2.3 Control Panel ............................................................................36 Users and Groups .......................................................... 37 File and Print .................................................................. 41 System 46 Network Service ............................................................. 51 Maintenance ................................................................... 54 Log File 65 2.4 Personal Info.............................................................................66 2.5 Logout .......................................................................................66 3.1 Troubleshooting ........................................................................67 A.1 Using LEDs to Diagnose Problems.......................... 67 A.1.1 Power LED....................................................................67 A.1.2 LED Link .......................................................................67 Where solutions begin ISO 9001:2000 Certified Company DiskMaster A.2 Login: Username and Password............................ 68 A.3 WEB INTERFACE.................................................... 68 A.4 General..................................................................... 69 3.2 Product Support ........................................................................71 APPENDIX APPENDIX A: Technical Features (A06-NASG302D)....................72 APPENDIX B: Technical Features (A06-NASF301D) ....................73 A06-NASG(F)302(1)D_ME01(V1.0 January 2008) Where solutions begin ISO 9001:2000 Certified Company DiskMaster Copyright Statement No part of this publication may be reproduced, stored in a retrieval system, or transmitted in any form or by any means, whether electronic, mechanical, photocopying, recording or otherwise without the prior writing of the publisher. Windows™ 98SE/2000/ME/XP/VIsta are trademarks of Microsoft® Corp. Pentium is trademark of Intel. All copyright reserved. The Atlantis Land logo is a registered trademark of Atlantis Land. All other names mentioned mat be trademarks or registered trademarks of their respective owners. Subject to change without notice. No liability for technical errors and/or omissions. CE/EMC Restriction of Liability The product described in this handbook was designed, produced and approved according to the EMC-regulations and is certified to be within EMC limitations. If the product is used in an uncertified PC, the manufacturer undertakes no warranty in respect to the EMC limits. The described product in this handbook was constructed, produced and certified so that the measured values are within EMC limitations. In practice and under special circumstances, it may be possible, that the product may be outside of the given limits if it is used in a PC that is not produced under EMC certification. It is also possible in certain cases and under special circumstances, which the given EMC peak values will become out of tolerance. In these cases, the user himself is responsible for compliance with the EMC limits. CE Mark Warning This is a Class B product. In a domestic environment, this product may cause radio interference, in which case the user may be required to take adequate measures. Declaration of Conformity (CE Mark) Hereby, Sidin SpA, declares that this Dual Bay NAS is in compliance with the essential requirements and other relevant provisions of Directive 2004/108/EC “Electromagnetic Compatibility” and 92/31/ECC and 93/68/EEC within CE Marking Requirememnt. Limited Warranty Our warranties (for hardware and software) do not cover data loss – back up the contents of your drive to a separate storage medium on a regular basis. Also, consequential damages; incidental damages; and costs related to data recovery, removal and installation are not recoverable under our warranties. Where solutions begin ISO 9001:2000 Certified Company DiskMaster Safety Information • Only qualified personnel should carry out technical work on the device. • When cleaning, avoid using cleaning sprays and any kinf of solution containing alcohol or other flammable liquids. • Avoid overheating. This may reduce the life of the device. • Protect your device from humidity, direct sunlight as well as high and extremely low temperatures. • Do no place any liquids on or close to the unit. • If the device is brought from a cold environment into a warmer installation site, bedewing may occur. Wait until the temperature of the device has equalised and it is completely dry before you connect to AC main. • As this device contains up to 2 Hard Disk, particular care must be taken to ensure that is not exposed to vibrations during operation. • Please use the supplied AC/DC Adapter included into g-box. If it is connected to other devices, this product or power supply unit may be damaged. • We recommend that you place the device on a non-slip surface. • Please note that the rubber/plastic feet on the devices may damage the surface. • Check the cable regularly for damage. Damaged cables must be replaced immediately. • Ensure that no objects enter the connection sockets. Where solutions begin ISO 9001:2000 Certified Company DiskMaster Thank you for purchasing the DiskMaster storage solution. With speed, ease of use, high capacity, and support for numerous applications, DiskMaster is the ideal solution for all of your data storage needs. 1.1 An Overview of the DiskMaster Securely access all of your multimedia, music and data files on your local LAN or through Internet. Thanks to its Fast/Gigabit port and its capacity for two Hard Disks, the DiskMaster provides high speed data throughput with the security that all your data is safe (only RAID1). Based on the IP protocol, the DiskMaster allows you to access all of your files from anywhere (an FTP server is included), giving you complete control on space and user or group access providing a very granular level of security. Furthermore, the Diskmaster allows you to use your favorite operating system; Windows®, Mac or Linux. Ease of use, performance and security. The DiskMaster can be used in three modes: single volume, performance, or security mode. As a single volume, or JBOD, DiskMaster will show both Hard Disk Drives as a single unit, providing maximum capacity and ease of use. If performance is what you need, you can configure the Diskmaster in RAID0 and stream your multimedia and graphic files for multiple users with up to 160Mb/s reading and 120Mb/s writing speeds (for Gigabit) for immediate access to your data. Finally, if your business or home needs full data security, DiskMaster not only provides a full featured backup software, but also RAID1 functionality. This way, even if you lose one of disks, you will have an image of your data on the other. iTunes®, BitTorrentTM and USB Print Server Turn off your computer and use the DiskMaster as your server. DiskMaster integrates a BitTorrent client (only on the Gigabit device) so that you can now download any file you want without the need to use your computer. Now, you will not only will you be able to share your multimedia or data files, but you will also be able to use the Diskmaster as a iTunes server and play your favorite songs directly from the Diskmaster. Additionally, thanks to the DiskMaster’s USB port, you can now connect your normal USB printer and turn it into a fully functional networked shared printer. Doing Where solutions begin ISO 9001:2000 Certified Company DiskMaster away with the need to have a computer connected to it, and allowing you to share it with the rest of the users in the office or at home. 1.2 Package contents Unpack the package and check all the items carefully. Also, keep the box and packing materials in case you need to ship the unit in the future. The package should contain the following items: DiskMaster Dual BAY Network Storage RJ45 CAT 5 cable One Quick Start Guide (English, Italian) One CD with driver, utility and manuals Power Adapter AC-DC (12V, 4A) Eide/SATA cables and screw pack and four rubber feet (to be used for shock cushioning) If any item contained is damaged or missing, please contact your local dealer as soon as possible. Eide interface is available only on Gigabit Device. 1.3 Choosing a place for your DiskMaster When selecting a place to set up your Disk Array, be sure to follow these guidelines: Place on a flat and stable surface capable of supporting at least 5Kg. Place the DiskMaster close enough to a network jack for the Ethernet cable to reach it. Leave at least 10cm of space at the rear of the device for ventilation. Use a grounded wall outlet (uninterruptible online power supply with AVR is recommended.) Avoid an electrical outlet controlled by wall switches or automatic timers. Accidental disruption of the power source may wipe out data in the memory of your computer or Disk Array. Keep the entire system away from potential sources of electromagnetic interference, such as loudspeakers, cordless telephones, etc. Avoid direct sunlight, excessive heat, moisture, or dust. Where solutions begin ISO 9001:2000 Certified Company DiskMaster 1.4 DiskMaster Application When you have completed the steps in this Quick installation Guide, your connected network should look similar to this: 1.5 The Front LEDs The following figures illustrate the connector locations for the DiskMaster. LED MEANING PWR(Blue) Lit when power ON. LINK(Green) Lit when connected to Ethernet device. Where solutions begin ISO 9001:2000 Certified Company DiskMaster ACT(Red) Flashes when sending/receiving data. 1.6 The Rear Ports PORT MEANING 1 Leave at least 10cm of space at the rear of the device for ventilation. FAN Where solutions begin ISO 9001:2000 Certified Company DiskMaster 2 RESET 3 LAN(RJ45) 4 USB(V1.1) 5 POWER (jack) 6 POWER(ON/OFF) After the device has turned on (turn on the power and wait 3 minutes), press and hold reset button for 5 seconds, then release it to reset it (this is used when you can not login to the DiskMaster, e.g. forgot the password. Please use the Ethernet cable to connect the DiskMaster to network. Please use the USB printer cable to connect the device’s USB port (fro printe server). Connect the supplied power adapter to this jack. Press the power switch to start/shutdown the DiskMaster. It will take approximately 3 minutes to boot up/and shutdown the Operating System. 1.7 Default Settings The TCP/IP protocol stack and Ethernet network adapter must be installed. If not, please refer to MS Windows relative manuals. Before you configure this device you need to know the following default settings: • Username: admin • Password: atlantis • IP address: by DHCP, (If a DHCP server isn’t available in the network, the DiskMaster will use 192.168.1.1 and Subnet Mask 255.255.255.0). • Server name: DiskMaster Where solutions begin ISO 9001:2000 Certified Company DiskMaster 1.8 Hardware Installation Following is a quick installation guide to get you up and running. For further details on each of the settings, please refer to manual on CD. • Release two screws from the back side. • Remove the aluminium plate. • Release the 4 screws in the Hard Disk Mount. • Place the first Hard Disk in to lower mont. • Place the second Hard Disk in the upper area. • Fasten all Hard Disk screws. • For SATA Hard Disk: connect both power cable and data cable in to Hard Disk. For Eide Hard Disk: connect pwer cable and IDE cable in to Hard Disk, set jumper in Master mode and Slave mode when install 2 HD. • Slowly put the Hard Disk mount back to case. • Fasten the 4 screws. • Fasten the Aluminium plate screws. • Please use the ethernet cable to connect the device and the Router/Switch in the network. • Please turn on the Power Switch. Please check the following pictures. Where solutions begin ISO 9001:2000 Certified Company DiskMaster Where solutions begin ISO 9001:2000 Certified Company DiskMaster Where solutions begin ISO 9001:2000 Certified Company DiskMaster Dual Interface (SATA I/Il and EIDE) is available only on A06-NASG302D. Where solutions begin ISO 9001:2000 Certified Company DiskMaster 1.9 Hard Disk setup If the hard disks are being installed for the first time, you need to initialize the disks before you can use them. Follow the steps described below. Open the web browser, enter the local port IP address of this DiskMaster, which default at 192.168.1.1, and click Go to get the login page. The default username is admin, password atlantis and click “OK” to continue. To configure your DiskMaster, you will need to use the web browser, enter the IP address and then use the web configuration for further setup. To find out the IP address (if You changed) of your device once it is connected to the network, there are several different ways as described on the following pages. Use the Setup utility included on the CD (CDRom\Utility\setup.exe). This will list the device automatically and allow you to access the web configuration interface with a simple click of your mouse. Where solutions begin ISO 9001:2000 Certified Company DiskMaster Single Hard Drive installation The following illustrates the layout of the Web-based Configuration Tool main screen. This page allows you to format the physical hard disks into DiskMaster. Click on Maintenance then Disk Utility. Select the mode for the NAS system to partition and format disks. Select, in the combo box, the system file (EXT2 / EXT3 / FAT32), EXT 3 is recommend. Press Format to start formatting (it may require some times; do not perform other jobs during hard drive formatting). Now please check that this disk is correctely mounted (check Status=mount). Once the drive has been formatted, go to Quick Start Wizard (using Utility) in order to finish the product setup. Where solutions begin ISO 9001:2000 Certified Company DiskMaster When the settings are made, the DiskMaster system starts formatting the disks. This procedure will destroy all the data on the disks. Make sure You have backed up any important data on the disks before the format process. It may require some times; do not perform other jobs during hard drive formatting The DiskMaster supports 128bit loop-AES encryption for the EXT2 file system. When enabled, the drive has to be formatted again and you will be prompted for a password (has to be exactly 20 characters). Allow system file EXT2 / EXT3 or FAT32. Where solutions begin ISO 9001:2000 Certified Company DiskMaster Dual Hard Drive installation The following illustrates the layout of the Web-based Configuration Tool main screen. This page allows you to format the physical hard disks into DiskMaster. Click on Maintenance then Raid Settings. In this section you can manage the RAID array and set up your drives. The DiskMaster supports RAID 0 and RAID 1. Two hard drives of identical capacity and make are required. Please Select the RAID mode (RAID 0, RAID 1 or JBOD) then Create Raid Systems. Where solutions begin ISO 9001:2000 Certified Company DiskMaster If only one drive is installed, the RAID configuration will not be available. Creating the RAID system will take several hours, depending on HDD capacity. Do not turn off the power or interrupt the system in any other way during this process! We recommend using the EXT2 file system for optimum performance and functionality. Changing the RAID setup will require you to re-format the drives. Make sure you backup all data before doing so! There are 3 differents RAID mode: • RAID 0= RAID 0, known as disk striping, has generally the best performance, but does not offer any redundancy. In this level, data is broken into small units called sectors, and sectors are distributed across all disks in the array. As it does not provide any data protection, if any disk in the array fails then all data in the array is lost. Such stripes allocation allows to enhance I/O performance. • RAID 1= RAID Level 1, known as disk mirroring, is a popular approach to protect data from adisk failure. To implement RAID Level 1, you need at least two physical hard drives. As the disks are paired up, all disk writes are duplicated on both disks. You can back up data without interruption using this algorithm. In case of a disk failure, the system can continue to run without being affected. • JBOD=JBOD (Just a Bunch Of Disks) is a group of disks. JBOD is not technically RAID but “disk spanning.” In this mode, all the disks are grouped together so they appears as a large single disk. Each Where solutions begin ISO 9001:2000 Certified Company DiskMaster disk can operate independently and is seen as an individual disk. Therefore, the total capacity of JBOD is the sum of the capacities of each disk. This allows the user to add disks until the desired total capacity is reached. Since JBOD provides no performance increase and data protection, it is seldom used. 1.10 How to login To configure your DiskMaster , you will need to use the web browser, enter the IP address and then use the web configuration for further setup. To find out the IP address of your device once it is connected to the network, there are several different ways as described on the following pages. Use the Setup utility included on the CD. This will list the device automatically and allow you to access the web configuration interface with a simple click of your mouse. You may also use the same utility at a later point to map the network drive after you setup your shares. • Turn on your DiskMaster and make sure it is connected to the same network as your computer. • Start the Setup utility (CDRom:\Utility\setup.exe) by double clicking on the Setup file and then pressing the Setup button. • Your DiskMaster will automatically show up in the device list, but if not (click again on Search Again), make sure the Setup utility has access to the network and search again. You might have to configure your firewall or even temporarily turn it off. • Select your device and click on OK to start the setup wizard. Where solutions begin ISO 9001:2000 Certified Company DiskMaster • • Before you can access the device, you will have to enter the admin password. The default login is admin/atlantis, so enter admin for the password and press OK to login. You can define the name (Server Name) for your device and set up the IP configuration. When set, press Next to continue. Where solutions begin ISO 9001:2000 Certified Company DiskMaster • Set time zone, current Date and Time. Click Next. Where solutions begin ISO 9001:2000 Certified Company DiskMaster • you can compare your new settings with the previous configuration. If you find a mistake, go back to make changes but if everything is OK, press Save, then OK. Alternatively, you could also simply write down the IP address in the first step of the setup wizard and then access the web configuration interface via your web browser. Input the IP address in the URL field of your web browser, hit the Enter key, enter admin for the username, once more admin for the password and then login. You can now use the setup wizard online or configure the individual settings yourself. 1.11 Mapping a Network Drive Mapping a Network Drive in Windows XP • • • Start->Control Panel. Go to the Tools menu and select Map Network Drive. Follow the setup wizard and fill in the path to your DiskMaster. Alternatively, you can also browse for the shares by clicking on the Browse button and locating the folder that way (choose guest-share folders). Where solutions begin ISO 9001:2000 Certified Company DiskMaster • Select Reconnect at Logon. • Then click Finish. Once the drive has been mapped, you are able to find and access it under My Computer. This link will still be there even after rebooting your Operating System. Where solutions begin ISO 9001:2000 Certified Company DiskMaster In event of problem, please write directly the IP (instead of name) in the folder name. Please write: \\IP address\guest-share. Then click Finish. Mapping a Network Drive in Windows Vista • • Start->Computer Click on Map Network Drive. • Follow the setup wizard and fill in the path to your DiskMaster. Alternatively, you can also browse for the shares by clicking on the Browse button and locating the folder that way (choose guest-share folders). • Select Reconnect at Logon then click Finish. Once the drive has been mapped, you are able to find and access it under My Computer. This link will still be there even after rebooting your Operating System. Where solutions begin ISO 9001:2000 Certified Company DiskMaster If event of problem , please write directly the IP (instead of name) in the folder name. Please write: \\IP Address\guest-share. Then click Finish. Where solutions begin ISO 9001:2000 Certified Company DiskMaster 2.1 WEB Configuration Open the web browser, enter the local port IP address of this device, which defaults at http://192.168.1.1, and click “Go”, a username and password window will appear. The default username & password are admin & atlantis, in respectively. To configure your DiskMaster, you will need to use the web browser, enter the IP address and then use the web configuration for further setup. To find out the IP address (if You changed) of your device once it is connected to the network, there are several different ways as described on the following pages. Use the Setup utility included on the CD (CDRom\Utility\setup.exe). This will list the device automatically and allow you to access the web configuration interface with a simple click of your mouse. You will get a status report web page when login successfully. At the configuration homepage, the left navigation page where bookmarks are provided links you directly to the desired setup page, including: • • Basic [Quick Setup] Control Panel [Users and Groups, File and Print, System, Network Service, Maintenance, Log File] • Personal Info [Personal Information] • Logout Click on the desired item to expand the page in the main navigation page. Where solutions begin ISO 9001:2000 Certified Company DiskMaster 2.2 Basic The settings in this menu are aimed at the user who wants to quickly set up the DiskMaster and share files on the local network. Only the most basic functions and settings are available but it is ideal for someone first using this device. For a more advanced set up, see Control Panel. Click on Quick Setup will open all the following subsections: • Wizard • Add User • Add Group • Add Folder Where solutions begin ISO 9001:2000 Certified Company DiskMaster Wizard The setup wizard can be used to configure all the basic LAN settings for your DiskMaster. For PC users, if you have followed the setup wizard previously, there is no need to go through this again unless you want to change some of the settings or have not yet completed the setup. Step 1: Select your preferred language for the web interface from the drop down list. Step 2: Set a new password for the web configuration interface. Not required but strongly recommended. Step 3: If you prefer a different hostname for your Dual Giga NAS, you can change the name here, otherwise simply use the default name. Step 4: We recommend setting both IP Address and DNS Server to obtain the IP automatically but if required, you can set it manually. If you need assistance in manually filling out these fields, please contact your network administrator for help. Step 5: Set the date and time manually or select your time zone from the drop down list and use a NTP server to synchronise the time via the internet. Step 6: Compare the new settings with the previous configuration and if OK, complete the setup wizard to save the new settings. Click on Complete. Where solutions begin ISO 9001:2000 Certified Company DiskMaster To avoid languages support issue, you are suggested to create/share folders with English characters only. Where solutions begin ISO 9001:2000 Certified Company DiskMaster Add User Use this setup wizard to quickly add and configure a new user account. Step 1: Enter the user name and password for the new account. At the same time, you can also create a private folder for that user and set the quota limit. Step 2: If there are other users already set up, they can be added to the user account management. Step 3: In the last step you can configure the permissions to the shared folder and add or remove other users. Where solutions begin ISO 9001:2000 Certified Company DiskMaster Add Group Use this setup wizard to quickly add a new group. Step 1: Enter the group name. Step 2: Configure which members will be included in this group by adding and removing the members from the list. Step 3: Configure the share permissions by adding (read only or writable) and removing the shares from the list. Where solutions begin ISO 9001:2000 Certified Company DiskMaster Add Folder Use this setup wizard to quickly add a new share folder. Step 1: Enter the share folder name and an optional description for the share. Step 2: Configure the Windows/FTP access permissions by adding (read only or writable) and removing the members or group from the list. Step 3: Configure the NFS access permissions by adding unique IP addresses or a subnet. Where solutions begin ISO 9001:2000 Certified Company DiskMaster 2.3 Control Panel This menu includes all the settings and information the DiskMaster offers. Sorted into individual categories, the user can access only particular settings or adjust and modify everything manually. Click on Control Panel will open all the following subsections: • Users and Groups • File and Print • System • Network Service • Maintenance • Log File Where solutions begin ISO 9001:2000 Certified Company DiskMaster Users and Groups In this menu, the admin can manage the users and groups for the DiskMaster. Start by adding your users first, then create the groups and assign the members to their groups. Click on Users and Group will open all the following subsections: • User Management • Group Management User Management In this section you can see all existing users for the DiskMaster and manage them by adding or removing them from the list. Existing Users: Lists the current users of the DiskMaster. Adding Users: To add a new user, click on Add User, use this setup wizard to quickly add a new share folder. • Step 1: Enter the user name and password for the new account. At the same time, you can also create a private folder for that user and set the quota limit. • Step 2: If there are other users already set up, they can be added to the user account management. • Step 3: In the last step you can configure the permissions to the shared folder and add or remove other users. Where solutions begin ISO 9001:2000 Certified Company DiskMaster Modifying Users: Select the user from the existing users list and modify the settings (Groups). Once done, press the Save button to apply the new settings. Removing Users: To remove a user, select it from the existing users list and then press the Delete User button. To add a new user (A06-NASF301D) clear the form by pressing the Clear Form button, then fill out a user name and password. The description is optional but will help you to manage multiple users, so we recommend filling out a short description. If required, you can create a private folder for that user and set a limit for the capacity. Once done, press the Save button to create the new user. If you would like to add this user to an existing group, select the user from the existing users list and press the Groups button for further settings. To remove a user, select it from the existing users list and then press the Delete User button. Where solutions begin ISO 9001:2000 Certified Company DiskMaster Add Group In this section you can see all existing groups for the DiskMaster and manage them by adding or removing them from the list. Groups are not required to grant access to the DiskMaster but will help the admin to manage multiple users and easily share a folder among a group of people. Existing Groups: Lists the current groups of the DiskMaster. Adding Groups: To add a new Group, click on AddGroup, use this setup wizard to quickly add a new share folder. • Step 1: Enter the group name. • Step 2: Configure which members will be included in this group by adding and removing the members from the list. • Step 3: Configure the share permissions by adding (read only or writable) and removing the shares from the list. Modifying Groups: Select the group from the existing groups list and modify the members by pressing the Members button for further settings. Once done, press the Save button to apply the new settings. Removing Groups: To remove a group, select it from the existing groups list and then press the Delete Group button. Where solutions begin ISO 9001:2000 Certified Company DiskMaster To add a new group (A06-NASF301D) clear the form by pressing the Clear Form button, then enter a new group name. Once done, press the Save button to create the new group. If you would like to add some members to this group, select the group from the existing groups list and press the Members button for further settings. Where solutions begin ISO 9001:2000 Certified Company DiskMaster File and Print In this menu, you can configure all the settings related to the FTP, NFS and printer server. Use this to manage how your files and folders are shared. Click on File and Print will open all the following subsections: • File Server • Share Management • Printer Server File Server In this section you can modify the server settings and also enable or disable a service. Character set: By default, this is set to English (CP437). If your file names include characters from another language, change the encoding here and select your language from the drop down list. Where solutions begin ISO 9001:2000 Certified Company DiskMaster Windows Setting: In this section, you can change the workgroup that the DiskMaster belongs to and modify its description. The IP for the WINS Server (Windows Internet Name Server) can be left blank unless this is required for your network. FTP Server: This service can be enabled or disabled. When enabled, the default FTP port number will be set to 21 but you can change that if required. NFS Server: This service can either be enabled or disabled depending on your requirements. Guest Access: To enable guest access (guest-share), enable it and if required, set a limit for the disk space (only for A06-NASG302D). For security reasons, the guest access can also be disabled. After changing any of the settings, press the Save button to apply the new configuration and save its settings. Where solutions begin ISO 9001:2000 Certified Company DiskMaster Share Management In this section you can manage the shares and access rights. Existing Shares: Lists the current shares on the DiskMaster Add Share: Click on Add Share, use this setup wizard to quickly add a new share folder. • Step 1: Enter the share folder name and an optional description for the share. • Step 2: Configure the Windows/FTP access permissions by adding (read only or writable) and removing the members or group from the list. • Step 3: Configure the NFS access permissions by adding unique IP addresses or a subnet. Modify a Shared folder: Select the new group from the existing shares list, then depending on how you share the files, click on Windows, FTP Access or NFS Access and add the users or groups that will have access to this share. You can allow access for all users or define each user and group separately. The names with an @ for the first letter are groups. Where solutions begin ISO 9001:2000 Certified Company DiskMaster For A06-NASF301D To add a new share, clear the form by pressing the Clear Form button, then enter a new share name. Once done, press the Save button to create the new group. Select the new group from the existing shares list, then depending on how you share the files, click on Windows, FTP Access or NFS Access and add the users or groups that will have access to this share. You can allow access for all users or define each user and group separately. The names with an @ for the first letter are groups. Where solutions begin ISO 9001:2000 Certified Company DiskMaster Printer Server DiskMaster support most of major brand of printers, user can share printer resource form the network. Simply follow the steps below: Step1. Power on and connect your USB printer in to your DiskMaster. Step2. Browse the Web UI and see whether the printer has been detect the by DiskMaster. Step3. Install your Printer driver in to your computer, (for example. if XYZ Printer is connected to DiskMaster, you must install XYZ driver in to the computer which going to perform the print job. After driver installation please click Start->Setting->Printer and Faxes->Add a printer->Next. Step4. Select A network printer or printer attached to another computer, and then click Next. Step5. Select Browse for a printer than click Next. Step6. Search the DiskMaster\LP and USB Printer attached, then click next to browse the printer driver. Step7. Go to Printer wizard and select the printer driver. Click OK to complete setup. Where solutions begin ISO 9001:2000 Certified Company DiskMaster System In this menu you can configure the basic network settings for the DiskMaster, find some details related to the firmware, disk usage and set up the error notification. Click on System will open all the following subsections: • LAN Settings • Time Settings • Turn OFF Server • Information • Disk Usage LAN Settings In this section you can define the hostname for your DiskMaster and set up the IP configuration. We recommend using the Obtain IP/DNS address automatically. When selecting a hostname, make sure to use a unique name and not one that has already been used on the local network. If required, you can also set the individual addresses yourself. If you need assistance in manually filling out these fields, please contact your network administrator for help. After changing any of the settings, press the Save button to apply the new configuration and save its settings. Where solutions begin ISO 9001:2000 Certified Company DiskMaster Time Settings In this section, you can set the date and time manually or select your time zone from the drop down list and use a NTP server to synchronise the time via the internet When set manually, press the Save button to apply the new time and save the settings or when synchronised via the internet, select the NTP server and press the Update Time button. Where solutions begin ISO 9001:2000 Certified Company DiskMaster Turn OFF Server In this section, you can restart the server or turn off the DiskMaster via the web browser. Make sure that nobody is accessing the device when you restart or turn it off. Press the Restart button to restart the server. The system will restart and automatically prompt you for the login when it’s ready. Press the Turn Off button to shut down the system. The browser will prompt you to close it the window after about 90 seconds (Internet Explorer only, for other browser close it manually). Where solutions begin ISO 9001:2000 Certified Company DiskMaster Information In this section, you can find the product name, the current firmware and the current IP address. Where solutions begin ISO 9001:2000 Certified Company DiskMaster Disk Usage In this section, you can find a summary of the hard disk status and disk usage. Press the Refresh button to update the information. Where solutions begin ISO 9001:2000 Certified Company DiskMaster Network Service In this menu, you can enable or disable the network services like the DHCP server, Bonjour and the BitTorrent™ download service. Click on Network Service will open all the following subsections: • DHCP Server • Bonjour • BitTorrent DHCP Server In this section, you can enable and set up the DHCP server. In general, there is already a DHCP server on the local network, so you don’t need to enable this but if required, enable it and configure the addresses. Once you have set everything up, press the Save button to start the DHCP server and save the settings. Where solutions begin ISO 9001:2000 Certified Company DiskMaster Bonjour In this section, you can enable or disable the Bonjour service. By default, this is enabled, offering easy access to the login page. In addition to that, you can also enable the iTunes service. When the iTunes option is enabled, you can store your MP3 music files in the /public/music folder and play them directly from iTunes. The DiskMaster will automatically appear in iTunes under shared devices. Where solutions begin ISO 9001:2000 Certified Company DiskMaster BitTorrent In this section, you can manage your torrents and add new downloads to the queue. Before you add the first job, set a limit for the download and upload speed according to your network’s bandwidth. After changing the settings, press the Save button to apply the new configuration. To start downloading files, you will have to download a torrent file from the internet first and then upload it to the DiskMaster; using browser to select the torrent in your computer. Once the torrent file has been added, you can start downloading. The files will be stored in your /public/btdownload folder. To update downloaded percentage simply press Refresh button. BitTorrent is available only on Gigabit NAS (A06NASG302D). If there is no hard drive installed or the HDD is not yet formatted, this menu is not available. To add a new torrent file, use Internet Explorer! Where solutions begin ISO 9001:2000 Certified Company DiskMaster Maintenance In this menu, you can format the hard drives, setup the RAID array, upgrade the firmware and manage the configuration settings. Click on Maintenance will open all the following subsections: • Disk Utility • Raid Settings • Firmware Upgrade • Save Configuration • Restore Configuration • Factory Reset Where solutions begin ISO 9001:2000 Certified Company DiskMaster Disk Utility This utility can be used to format the individual hard drives and also to see all the information related to those disks. Disk spin down time: To save power and reduce heat, you can let the hard disk spin down if not used for a certain amount of time. Enter a time in minutes and press the Save button to apply the new setting. Encryption: The DiskMaster supports 128bit loop-AES encryption for the EXT2 file system. When enabled, the drive has to be formatted again and you will be prompted for a password (has to be exactly 20 characters). File System: For drives that are not in a RAID array, there is a choice between EXT2, EXT3 and FAT32. For drives installed in the DiskMaster, we recommend using EXT2 for optimum performance and functionality. Scandisk: Press the Scan button to check the disk integrity. If possible, any errors found will automatically be fixed. This will take a while to finish depending on the capacity of the drive, and also the disk can not be used in that time. Detail: Press the Detail button to see further disk information. If the HDD supports S.M.A.R.T, it will also report the disk’s health status. Where solutions begin ISO 9001:2000 Certified Company DiskMaster Raid Settings In this section you can manage the RAID array and set up your drives. The DiskMaster supports RAID 0 and RAID 1. Two hard drives of identical capacity and make are required. If only one drive is installed, the RAID configuration will not be available. Two hard drives of identical capacity and make are required for RAID 0/1. Where solutions begin ISO 9001:2000 Certified Company DiskMaster There are 3 differents RAID mode: • RAID 0= RAID 0, known as disk striping, has generally the best performance, but does not offer any redundancy. In this level, data is broken into small units called sectors, and sectors are distributed across all disks in the array. As it does not provide any data protection, if any disk in the array fails then all data in the array is lost. Such stripes allocation allows to enhance I/O performance. • RAID 1= RAID Level 1, known as disk mirroring, is a popular approach to protect data from adisk failure. To implement RAID Level 1, you need at least two physical hard drives. As the disks are paired up, all disk writes are duplicated on both disks. You can back up data without interruption using this algorithm. In case of a disk failure, the system can continue to run without being affected. • JBOD=JBOD (Just a Bunch Of Disks) is a group of disks. JBOD is not technically RAID but “disk spanning.” In this mode, all the disks are grouped together so they appears as a large single disk. Each disk can operate independently and is seen as an individual disk. Therefore, the total capacity of JBOD is the sum of the capacities of each disk. This allows the user to add disks until the desired total capacity is reached. Since JBOD provides no performance increase and data protection, it is seldom used. Creating the RAID system will take several hours, depending on HDD capacity. Do not turn off the power or interrupt the system in any other way during this process! We recommend using the EXT2 file system for optimum performance and functionality. Changing the RAID setup will require you to re-format the drives. Make sure you backup all data before doing so! Where solutions begin ISO 9001:2000 Certified Company DiskMaster Raid Settings (Rebuilding) When using RAID 1 and one of the drives has failed, the faulty HDD has to be replaced and the RAID 1 array rebuilt. 1. Login and go to the RAID Setting (Maintenance->Raid Settings) menu to check the disk status. If there is a problem, it will show which drive has to be replaced. 2. Turn off the power, remove the power supply from the wall socket and replace the a new HDD. Please refer to the table below for the HDD allocations. 3. Turn on the power and go to the RAID setting menu. Add the new drive and the Dual Giga NAS will start to rebuild your RAID array. 4. Depending on the capacity, this will take several hours. Do not turn off the power or interrupt the system in any other way. The HDD LED will be ON while the RAID array is being rebuilt. Where solutions begin ISO 9001:2000 Certified Company DiskMaster Where solutions begin ISO 9001:2000 Certified Company DiskMaster Firmware Upgrade In this section you can check the current firmware version and upgrade if a new one is available on the website (www.atlantis-land.com). Download the new firmware and store in on your computer, then browse for the *.gz file, select it and start the upgrade. When the Start Upgrade button is pressed, all users, groups and other configurations will be lost! The upgrade process will take 10-20 minutes. Please contact your dealer for latest Firmware update. We do not recommend to provide users new firmware for upgrade unless absolutely necessary. During the upgranding time (the upgrade process will take 10-20 minutes), if any network disconnection or power interruption, NAS will be damaged and won't be able to start again any more. Restore a saved configuration file generated with another firmware version may render your DiskMaster unstable and prevent some functions from working properly. Where solutions begin ISO 9001:2000 Certified Company DiskMaster When uploading software to the Router, it is important not to interrupt the Web browser by closing the window or loading a new page. If the browser is interrupted, it may corrupt the software. In order to achieve a succesfull upgrade please uninstall or remove the Hard Disk drive from the NAS before upgrading firmware. Where solutions begin ISO 9001:2000 Certified Company DiskMaster Save Configuration For backup and before every firmware upgrade, you can use this function to save your current configuration. Press the Save button and save the config.tar file on your computer. Where solutions begin ISO 9001:2000 Certified Company DiskMaster Restore Configuration To quickly restore previous settings or set up multiple units, you can save the configuration and then use this function to upload a previous backup. Browse for the config.tar file on your computer and press the Restore button to restore the previous settings. When the Restore button is pressed, all users, groups and other configurations will be lost! Where solutions begin ISO 9001:2000 Certified Company DiskMaster Factory Reset Pressing the “Factory Reset” button will restore all settings to their default configuration. Before pressing this button, we recommend saving your current configuration (Save Configuration) in case you want to restore it again later. When the Factory Reset button is pressed, all users, groups and other configurations will be lost! Where solutions begin ISO 9001:2000 Certified Company DiskMaster Log File This menu includes all the log files of yourDiskMaster . You can find logs for the SAMBA, FTP and DHCP server as well as system and administration logs. Click on Log File will open all the following subsections: • Samba Log • FTP Log • DHCP Server Log • System Log • Administration Log Where solutions begin ISO 9001:2000 Certified Company DiskMaster 2.4 Personal Info This menu is for the system administrator account. It includes the option to set the password and some other options related to the web interface. 2.5 Logout This can be used to logout once all the settings have been configured. Without installing and formatting a drive first, several functions will not be available (example: User&Group Management, BitTorrent download). Where solutions begin ISO 9001:2000 Certified Company DiskMaster 3.1 Troubleshooting This chapter covers potential problems and the corresponding remedies. A.1 Using LEDs to Diagnose Problems The LEDs are useful aides for finding possible problem causes. A.1.1 Power LED The PWR LED on the front panel does not light up. Steps Corrective Action Make sure that the DiskMaster’s power adaptor is connected 1 to the device and plugged in to an appropriate power source. Use only the supplied power adaptor. Check that the DiskMaster and the power source are both 2 turned on and the device is receiving sufficient power. Check the power jack and verify. 3 If the error persists, you may have a hardware problem. In this 4 case, you should contact your vendor. A.1.2 LED Link The LAN LED on the front panel does not light up. Steps Corrective Action Check the Ethernet cable connections between the 1 DiskMaster and the computer or hub. Check for faulty Ethernet cables. 2 Make sure your computer’s Ethernet card is working properly. 3 If these steps fail to correct the problem, contact your local 4 distributor for assistance. Where solutions begin ISO 9001:2000 Certified Company DiskMaster A.2 Login: Username and Password I forgot my login username and/or password. Steps 1 2 3 Corrective Action If you have changed the password and have now forgotten it, you will need to upload the default configuration file. This will erase all custom configurations and restore all of the factory defaults including the password. Before you configure this device you need to know the following default settings: • Username: admin • Password: atlantis • IP address: by DHCP, (If a DHCP server isn’t available in the network, the DiskMaster will use 192.168.1.1 and Subnet Mask 255.255.255.0). • Server name: DiskMaster It is highly recommended to change the default username and password. Make sure you store the username and password in a save place. A.3 WEB INTERFACE I cannot access the web configurator. Steps Corrective Action Make sure you are using Internet Explorer 5.0 and later 1 versions. Delete the temporary web files and log in again. 2 In Internet Explorer, click Tools, Internet Options and then click the Delete Files ... button. When a Delete Files window displays, select Delete all offline content and click OK. (Steps may vary depending on the version of your Internet browser.) E.G. Internet Explorer 7 (Tools->Internet Options->Advanced>Reset). I cannot access the web configurator. Steps Corrective Action Check Link LED (green). 1 Make sure you are using the correct IP address of the 2 DiskMaster. Found the new IP address of the DiskMaster with Utility. 3 Where solutions begin ISO 9001:2000 Certified Company DiskMaster 4 Reset the device. A.4 General Why Can’t I perform RAID function under FAT32 format? Steps Corrective Action FAT32 format doesn’t support RAID functions. 1 To perform RAID functions please use EXT2 or EXT3 format. 2 Some of the functions and menus are not available! Steps Corrective Action Many of the functions require a hard drive to be installed. 1 Make sure you have at least one HDD installed and formatted in EXT2 or EXT3. When install two HDD without performing RAID setting, and creating a Share-Folder, Why NAS can only to create Folder an the second Disk (/mnt/ide3/sharefolder) and not on the first Disk (/mnt/ide1/sharefolder). Steps Corrective Action The NAS GUI Software is designed to managing RAID 1 or 0 1 functions, if user wants to use two separate HDD in the NAS, share management will recognize only the first formatting disk. For example, if user format Ide1 HDD first than managing priority goes to Ide1. But still another HDD space can be recognize in the LAN development. User can browse it through “My Network place” What is the limitation of user on the NAS FTP, Samba and account mode? Steps Corrective Action There are following limitations. 1 1. Maximum user number: FTP: 8 Users, Samba: 8 Users (total 24 sessions at the same time). 2. FTP Server: Maximum is able to create 32 users accounts, 8 users account connect at the same time, and maximum 16 folders shared by one account). 3. Samba Server: Share Level Access (maximum 16 folders shared by root). Where solutions begin ISO 9001:2000 Certified Company DiskMaster Does the NAS support Hard disk Power Management? Steps Corrective Action The NAS uses standby mode for power management (Sleep 1 time), if there is no any activity ranging 5-60 min. You can go to web base > Disk Utility > Set Sleep Time function (0 to disable function, range 5-60 to enable function. What is the protocol of network file sharing system using by DiskMaster? Steps Corrective Action DiskMaster has the built-in Samba Server for file sharing, it is 1 using SMB (Server Message Block) protocol to integrate TCP/IP, NETBUEI and IPX/SPX protocol. In other words, if the client PC that can support TCP/IP, NETBUEI or IPX/SPX, it will be compatible with DUAL HDD NAS. You can also use the built-in FTP Server for file sharing with Internet client. Why My USB Printer can not be detected by the NAS Printer server? Steps Corrective Action The NAS Printer server does not support GDI/Host-based 1 printers. For some Multi Function Printers (MFP); scanning functions might not be functional probably. Please contact Printer Manufacture for detail Specifications Where solutions begin ISO 9001:2000 Certified Company DiskMaster 3.2 Product Support If you have any problems with the DiskMaster, please contact the dealer where you bought this product. If you have any other questions you can contact the Atlantis Land company directly at the following address: Atlantis Land Via Pelizza da Volpedo, 59 20092 Cinisello Balsamo (MI) Italy Fax: +39.(0)2.93906161 Help Desk :+39.(0)2.93907634 Email: [email protected] WWW: www.atlantis-land.com Where solutions begin ISO 9001:2000 Certified Company APPENDIX A APPENDIX A: Technical Features (A06-NASG302D) Protocols LAN port USB A Port LED Indicators Hard Disk Supported System Format: CPU Sharing Protocol Advanced Features External buttons Input Power Power Consumption Agency and Regulatory Dimensions Weight Operating Temperature Storage Temperature Operating Humidity IP, NBNS(“NetBios” Name Server), Microsoft Networks (CIFS/SMB), DHCP Server/Client, SNTP Client, NTP 1 x RJ45 10/100/1000 Base-T port USB V1.1 Print Server Port Power, Link, Activity 2 x SATA I/II or 2x EIDE (must use 2 HD with the same interface)* EXT2, EXT3 and FAT32 ARM , 300Mhz (SL 3516 Gemini TM) SAMBA, FTP iTunes®, BitTorrentTM and USB Print Server Reset/Power Switch 12V DC @ 4A < 7 watts CE 82mm x 135mm x 220mm (W*H*D) 700g (exclude Hard Disk) 0° to 40°C -10° to 60°C 10-85% non-condensing Where solutions begin ISO 9001:2000 Certified Company APPENDIX B APPENDIX B: Technical Features (A06-NASF301D) Protocols LAN port USB A Port LED Indicators Hard Disk Supported System Format: CPU Sharing Protocol Advanced Features External buttons Input Power Power Consumption Agency and Regulatory Dimensions Weight Operating Temperature Storage Temperature Operating Humidity IP, NBNS(“NetBios” Name Server), Microsoft Networks (CIFS/SMB), DHCP Server/Client, SNTP Client, NTP 1 x RJ45 10/100/ Base-T port USB V1.1 Print Server Port Power, Link, Activity 2 x SATA I/II EXT2, EXT3 and FAT32 ARM , 300Mhz (SL 3516 Gemini TM) SAMBA, FTP iTunes® and USB Print Server Reset/Power Switch 12V DC @ 4A < 7 watts CE 82mm x 135mm x 220mm (W*H*D) 700g (exclude Hard Disk) 0° to 40°C -10° to 60°C 10-85% non-condensing Where solutions begin ISO 9001:2000 Certified Company Atlantis Land Via Pelizza da Volpedo, 59 20092 Cinisello Balsamo – MI – Italy [email protected] Where solutions begin ISO 9001:2000 Certified Company