1
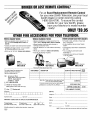
Advanced
V deo Imaging
Direct View Color TV
MTS Stereo Audio
Picture-In-Picture
Surround Sound
Return the Product
Registration Card,
and your TV
could be
FREE!
OPERATING GUIDE & WARRANTY
for
model ...
SR2787, SR3287, SR3543, SR3587
iAviso para nuestros
WATCH
clielltes de habla hispana:
consulte la informaci6n que
aparece al final de este manual!
recycled paper
50 percent
U S,.
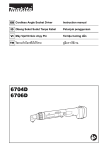
WARNING:
TO REDUCE
THE RISK OF ELECTRIC
SHOCK DO NOT
REMOVE COVER (OR BACK). NO USER SERVICEABLE
PARTS
INSIDE.
REFER
TO
QUALIFIED
SERVICE
PERSONNEL.
TO PREVENT FIRE OR SHOCK HAZARDS, DO NOT EXPOSE
THIS PRODUCT TO RAIN OR MOISTURE.
The lightning flash with arrowhead
symbol, within an equilateral
triangle, is intended to alert the user to the presence of uninsulated
"dangerous
voltage"
sufficient magnitude
_]k
Safety
within the product's enclosure that may be of
to constitute a risk of electric shock to per,;ons.
alert the user to the presence of important operating and maintenance
The exclamation
point within an equilateral triangle is intende.d to
(servicing) instructions in the literature accompanying
the appliance.
Note
Tips
Refer to the "Safety Tips" booklet that came with your
product for important safety considerations.
to Cable
TV System
This reminder is provided to c.all the cable TV system
installer's attention to Article 820-40 of the NEC that
provides
guidelines
specifies
that the cable ground shall be connect,_
for proper
g:ounding
grounding system of the building,
the cable entry as practical.
Power-Cord
and, in particular,
to the
as close to the point of
CAUTION
Polarization
This product is equipped with a polarized alternatingcurrent line plug (a plug having one blade wider than the
other.) This plug will fit into the power outlet only one
way. This is a safety feature. If you are unable to insert the
plug fully into the outlet, try reversing the plug. If the plug
should still fail to fit, contact your electrician to replace
your obsolete outlet. Do not defeat the safety purpose of
the polarized plug.
_WARN2
Installer
Copyright
© Zenith
To prevent
electric shock, match wide blade of plug to
wide slot, fully insert.
ATTENTION
Pour gviter les chocs glectriques,
introduire
large de la fiche,, dans la borne correspondante
pousser jusqu'au
Electronics
Corporation
fond.
1995
la htme la plus
de la prise et
CONTENTS
INTRODUCTION
Welcome ............................................
Installation Considerations ..............................
CONNECTIONS
FOR YOUR TV
Connection Center ...................................
Other Jacks on TV ...................................
Basic Cormection to TV Without VCR ...................
Basic Connection to TV With VCR ......................
Stereo VCR Cormections to "IV .........................
ii
ii
1-1
1- l
1-2
1-3
1-4
A/V Cormecdons for Optional Video Equipment ...........
Audio Amplifier/Surround
Sound Connections to TV .......
Connections for Using PIP .............................
TtIE FIRST TIME YOU OPERATE YOUR TV
1-5
1-5
1-6
Typical Control Panel .................................
Step 1. Installing: the Batteries Into the Remote Control ......
Step 2. Connect the Power .............................
Step 3. Select Your Main Viewing Source ................
Step 4. Use Auto Program ..........
: ..................
Step 5. Set the Clock ..................................
Step 6. Use Other Options .............................
UNIVERSAL
REMOTE
CONTROL
Intz:oduction.........................................
2-1
2-I
2-1
2-2
2-2
2-2
2-2
Bal_tery Installation ...................................
Choosing Operating Mode .............................
TV Operations ......................................
Remote Control Operating Mode Chart ...................
Programming Your Remote ............................
Special Features .....................................
Aul:o Find Option ....................................
TV, VCR and Cable-TV Brand Codes ....................
QUICK REFERENCE
TO ON-SCREEN
MENUS
Available Menus .....................................
Basic Menu Operation ................................
SOURCE MENU
Menu Operation ......................................
Source Selection ......................................
Source Identification ..................................
3-1
3-I
3-2
3-3
3-4
3-4
3-5
3-6
3- l
FEATURES
PROVIDED
WITH
5-1
5- I
5-1
6-1
6-1
6-l
6-1
6-1
YOUR
6-1
6-1
6-1
6-1
Sharpness ............................................
Color Temp (Temperature) ..............................
Video Filter ...........................................
Auto Flesh ............................................
Picture Pref. (Preference) ..............................
PIP MENU
Ch. Guide ..........................................
Ch. Review .........................................
PIP Color ...........................................
PIP Tint ............................................
PIP Size .............................................
PIP OPERATION
Introduction ........................................
8-1
8-1
8-1
8-1
8-1
Selecting Main Picture and PIP Sources .................
PIP Functions ......................................
Operation with Antenna or Direct Cable .................
Operation with Cable Decoder .........................
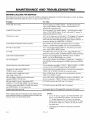
MAINTENANCE
AND TROUBLESHOOTING
Caring for Your TV .................................
Extended Absence ...................................
'IV Picture Interference ..............................
Before Calling for Service ............................
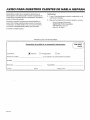
Replacement Product Registration Card
4-I
4-1
SETUP MENU
Auto Program .......................................
Ch. (Channel) Add/Del ................................
Ch. (Channel) Labels .................................
Source ID ..........................................
Clock Set .... : ......................................
Timer Setup ..........................................
Parental Ctl (Control) ..................................
Caption/Text .........................................
Background .........................................
AUDIO MENU
Bass ...............................................
Treble .............................................
Balance ............................................
Audio .............................................
SEQ (Spatial Equalization) ..............................
Surround ...........................................
VIDEO MENU
Contrast ............................................
Brightness ..........................................
Color ..............................................
Tint ...............................................
Aviso para nuestrns clientes de habla hispana
Accessories for Your Television
Your Zenith Warranty
TV
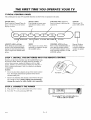
This operating guide describes a family of TV models. Not all models have all of the features described in this guide. Different
control panels may be used from model to model. Most models include the following features:
•
On-Screen Menus Accessed By Remote or TV Controls
•
Audio/Video (A/V) Jacks
•
Universal Programmable Remote Control
•
Super-VHS A/V Input Jacks
•
Picture-In-Picture
•
Surround Sound System
•
•
Automatic Channel Programming
Favorite Channel Add/Delete
•
MTS Stereo with _SEQ(Spatial Equalization)
•
Surround Sound Speaker Terminals
•
Channel Labels (ABC, TNT, etc.) for Easy Channel Identification
•
Variable Audio Output Jacks
•
]Multiple Input Sources
•
Surround Sound Speakers
•
Source Identification (VCR, Cable, etc.)
•
Sleep Timer and On/Off Timer
•
Anterma/Cable and Loop Out Jacks
•
Closed Caption and Text Modes
•
181 ChannelTuning
•
Parental Control
2919-o
i
(Optional)
7- I
7-1
7-1
7-1
7-1
7-1
8-1
8-1
8-1
8- l
9-1
9-1
9-1
9-1
9-1
10-1
10-1
10-1
10-2
10-3
11-1
11-1
11-1
11-2
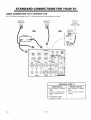
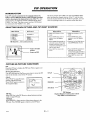
STANDARD
BASIC
CONNECTION
If a VCR will not be connected
CONNECTIONS
TO TV WITHOUT
FOR YOUR TI/
VCR
to your TV, you have three basic connection options, as shown.
Cable TV
Wall Jack
Cable TV
Wall Jack
Antenna
OR
Cable
OR
Box
300/75
ohm
Adaptor
IT
IN
OUT _%
j
,"" ,'" .". ...
Round Wire
'_75 ohm)
",,. ,,,"
"-_
•
as
: STARSIGHT "
m
:.:
VARIABLE
AUDIO
OUTPUT
J
RIGHT
LEFT
TO EXTERNAL
AMPORSPKR
LOOP OUT
ANTENNA
"roOECODER CA_BLE
VIDEO1 IN
VIDED
i--AUDIO_
1
ANTENNA
C_
SPEAKERS
IHT_
;EXT
_VIDEO2 IN
r--AUDIO_
VIDED
[!
0 I III]1
"._ ; ;'r?,
;
--__--
@
L
E
F
T
]l
i[
[I
JR
G
R
G
0 i llll]
LOOPOUT
S-VIOEO
H
T
+
L SURROUNDSPKRS
OPERATING YOUR TV
With Cable Box
Menu.
Select Ant/Cable 1 in Source
Tune TV to cable box output
channel (usually channel 3
or 4).
• Use cable box to select
channels for viewing.
29J8-o
1 -- 2
Without
Cable
Box
,, Select Ant/Cable 1 in Source
Menu.
,,Use TV to select channels for
viewing.
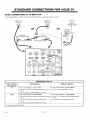
STANDARD
BASIC
CONNECTION
If you are connecting
CONNECTIONS
TO TV WITH
FOR YOUR
TV
VCR
a VCR to your TV, you have three basic connection
Cable TV
Wall Jack
options,
as :shown.
Cable TV
Wall Jack
AntennEt
\\\l
\ X"
OR
OR
Flat Wire
(300ohm)
30(')a/P75r° h rn
_lb
_IN
ble B_UT_
"_N-"""" °
"'--..
///.L/Z
1
I
o2J
........
Round Wire
(7!5 o hi)
"',
STARSIGHT
......... .........................
•
_
:_f_,
\_J
\_J
VCR's TV/VCR*
Switch Setting
TV
_.
/¢"_\
(','f_'_
VARIABLE
L _\vj)
_ _)
AUDIO
I
R GHT
LEFT
2 .......... .... I___
ANTENNA
ANTENNA
7A[JOIO_
LOOPOUT
•
/ _
,
_PORSPKR
VIDEOllN
VIDEO
.'
\_/:::
_
LOOP OUT
::
r IRT7
-
TEXT
VIDEO2)N
VIDEO
r--AUOlO-'n
B-VIDEO
g
L
J Jl "(_'iJ[Jll t_
!It-
-
I I I_,,_
"
SURROUNDSPKRS
OPERATING YOUR TV
With Cable Box
' ......
Without Cable Box
* Select Antenna/Cable 1 in Source Menu.
• Tune TV to cable box output channel (usually channel
• Select Antenna/Cable 1 in Source Menu.
• Use TV I:oselect channels for viewing.
3 or 4).
Use the cable box to select channels for viewing.
VCR
• Select Antenna/Cable
• Select Antenna/Cable 1 in Source Menu.
Tune VCR to cable box output charmel (usually channel
3 or 4).
Tune TV to VCR output channel (usually channel
3 or 4).
• Use VCR to select channels for viewing.
Use the cable box to select channels for viewing.
*
2918-o
l i:a Source Menu.
• Tune TV to VCR output channel (usually channel
3 or 4).
May be labeled TV/Video.
1_3
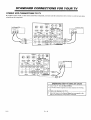
STANDARD
CONNECTIONS
FOR YOUR TV
i
STEREO
VCR CONNECTIONS
TO TV
If you have a stereo VCR, or other stereo audio/video
sound from the component.
lrst
Stereo
component,
@
VCR
:
you must make the connections
: :
_ : ::.
VARIAIILE
STARSIGHT
@
--
I A/vOUTPUT
]
1
SPEAKERS
LOOPOUT ANTENNA ANTENNA INT7
v,oEol,,
F---
O_I_UT
2qd Stereo
[_
r-EXT Ill W JillII I,"_l
vIDsoz,_ Ill
VIDEO FAOD'O_ _
_" IDEO1 IN "'%,
;;;@...@
@
•
LOOP OUT
VCR
I A/V OUTPUT
_'_°'°R
v,0E0
I1_1
FAUD'O_ ]J_l_.l
""
s"_s'°_ I /_
.o
(_)
NIQHT
LER"
TO EXTERNAL AMP OR SPKR
2
....
shown below in order to hear stereo
_
.......
"-.lid
'e
o,-.
$-¥1OEO
R
_
N._,,_
_
OUTPUT
L
SURROUND
SPKRS
TO EI"TERNAL AMP OR SPKR
2
1
$PEAJ(ER$
lookoutANTENNA
ANTENNA
,,T_ rE.
TOO'COOER
CABLE
CABLE"
YIDEO1 IN
VIDEO
_
_
-
"dllll_le
/_
11_1',
¥1DEO2 IN
SUPI--R-VHS
VCR
L
F
rAUDIO_
®®C
VIDEO
r-AUO,O_
Xo-oT[h--_h T"
J Ailg'_T::E:
l
nl
@@@
i ....
LOOPOUT
OPERATING
YOUR "W USING
A/V JACKS
* Select Video 1" from the Sour,.'e Menu.
• Use VCR (or other component) to select channe]ls for viewing.
O1",
• Watch a tape playing in the VCR.
* Select the Source in the Source Menu that corresponds to the
jacks to which the A/V component is connected.
291s-o
1 -- 4
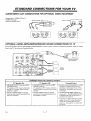
STANDARD
CONNECTIONS
FOR YOUR TV
I
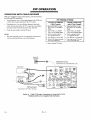
AUDIO/VIDEO
(A/V)
CONNECTIONS
C,onnections to VIDEO 3 IN or SVIDEO 2 IN jacks.
(Some TV models only.)
OPTIONAL
AUDIO
FOR OPTIONAL
VIDEO
EQUI'PMENT
Stereo Camcorder
Super-VHS
VCR
AUDIO
O{J r
R
AMPLIFIER/SURROUND
SOUND
CONNECTIONS
L
TO TV
ffyou wish to listen to the TV audiothroughan external ampfifier or stereo system, or listen to surround sound audio, make the connections to the TV shown in the illustration below.
...-'''"
............
o
z
......
_ooPou,
,,,E..,
va[]zo
1iN
]
R]
=P,_r,
zns _
tF
VZOEO
zJx --III
LOOP OUT
_
ft
To____._Speakers
L
S-VIDe01 I#
AU _ INPUT
B_
o_n_
StereoAmplifier
11;I
_\\
k
Itl\_"'l-'_
Jj_
--"
II
I
t.uT=_,_ I1_
•
"_-_
_
__
1
,.,,..,
_
• "°"_"'--"_:_- -- - ............
"
4_'"
STARSIGHT
_
]_('€_1
G.VID£O
_,.
co ....
Surround
Speakers
_-'_-"'_
I
DIFFERENT
TV Speakers On
• SPEAKER EXT/INT switch in the INT
(internal) posiuon -TV speakers are ON. Sound is heard from
both the TV's speakers and the external
amplifier's speakers.
• Use TV's volume control to raise and
lower the level of sound being heard from
both sets of speakers.
WAYS
TO LISTEN
TO YOUR TV
TV Speakers Off
• SPEAKER EXT/INT switch in the EXT
(external) position -TV speakers are OFF. Sound is only heard
from the speakers connected to the external
amplifier.
• Use TV's volume control to raise and
lower the level of sound being heard from
the amplifier's speakers.
Surround
o
Sound
Connect surround sound speakers as shown.
The level of surround sound will wary,
depending on the program being viewed.
Note that not all programs have smTound
sound andi_.
The SURROUND SPKR terminals are
always active. The SPEAKERS EXT/INT
switch doe:t not affect the ope:rationof
surround sourd speakers.
If you want to connect only one surround
speaker to your TV, connect the speaker
wires to the, terminals adjacent to the
positive (+) and negative (-) symbols that
are circled.
2918-0
1 --5
STANDARD
CONNECTIONS
FOR USING
CONNECTIONS
FOR YOUR TV
PIP
The illustrations
that follow show the three most common connections for using Picture-In-Picture
the actual use of PIP, refer to the "PIP OPERATION"
section of this operating guide.
(PIP). For further
Option 1: Antenna or Direct Cable Connection To VCR.
(Optional cables are not supplied with television.)
Cable TV
Wall Jack
Option 2: Cable-TV Decoder Connection via Loop Out To VCR.
(Optional cables are not supplied with television.)
2918-0
1--6
info:rmation
on
THE FIRST TIME
YOU OPERA TE YOUR TV
I
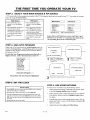
"ITPICAL
The control
CONTROL
I
I
PANEL
panel on your TV may differ from the one shown but its operation
ENTER (ENT)
Press to see the Channel/Time
display, or to remove any on-screen
display or menu.
SELECT (SEL)
Press during on-screen menu
operations to select a menu
option.
is the same.
VOLUME (VOL) Up/Down
Press to increase or decrease the
sound level.
OFF-ON
Press to turn TV
power ON or OFF.
]
ENTEFJ/
</ADJUST
I_
MENU
Press once to see a menu. Press
repeatedly to sequence through
the available menus.
ADJUST (ADJ) Left/Right
Press during on-.screen menu operation to see information/status
display for selected option. Press
again to adjust the selected menu
option.
STEP
1. INSTALL
A VOLUME:'_" ,L CHANNELXX
THE BATTERIES
INTO
OFF/ON
CHANNEL (CH) Up/Down
Press to select channels higher or
lower than the current channel.
To add or delete channels; stored
in the scanning sequence, see CH.
ADD/DEL option.
THE REMOTE
Remote Window
Poinl: the remote
control towards this
window to operate
the "I'V.
CONTROl.
Ba_:teries are provided,
but they must be installed before using
the remote control. When it no longer functions normally, or
when it loses memory, replace the batteries with two highquality, alkaline, size AAA batteries. Match plus with plus (+
with +), minus with minus (- with -), as shown in the battery
corapartment.
NOTES:
•
Do not to place heavy objects on top of the remote control
keys. Prolonged unintentional operation of the remote
shortens battery life.
•
Remove
the batteries if the remote control
will not be used
for a month or more. Battery leakage can permanently
damage the remote, for which Zenith is not responsible.
STEP
2. CONNECT
THE POWER
1.
Plug
your
2.
Turn
the TV on by pressing
TV into an unswitched
AC power
source.
,
OFF-ON.
Do not plug TV into switched outlet on a
VCR or cable-TV decoder
2919-0
2 -- 1
THE FIRST TIME YOU OPERATE
YOUR TV
l
STEP
3.
SELECT
YOUR
A TV source refers to the equipment
source by using the Source Menu.
MAIN
SOURCE
connected
& PIP SOURCE
to the TV that supplies the picture and sound to your 'IV.
PIP Source
Main Source
• Press SOURCE on your
remote to view the Source
Menu.
• Press SOURCE on your
remote to view the Source
Menu.
• Press SOURCE repeatedly to
select the source which
corresponds to the jack on the
TV connection panel that is
receiving the input signal.
• Press the Left or Right key to
select PIP Source column.
[ Main Source
[ PIP Source
Ant/Cable 1
AnVCable 2
Video 1
2
I Video
nVCable
1
S-Video 1
• Press SOURCE repeatedly to
select the source which
corresponds to the jack that is
receiving the PIP input signal.
• Press QUIT to remove the
menu.
]
You select the viewing
_
Main/PIP
Video 1
Video 2
S-Video 1
1'4, To Select Source ]
Source Menu with Main Source set to Ant/Cable 1 and
PIP Source set to Video 1. Connection must made to the
• Press QUIT to remove the
menu.
corresponding jacks on the connection
STEP
4. USE AUTO
PROGRAM
r
When your TV is first powered up, Auto Program will be seleoted in the Setup Menu. Auto Program finds all available
channels on the currently selected source and stores them in
the memory of the TV.
PP_SS$.L TOGHANGESI_-LECllON
_,5_,ql]HINOrjt,B_ IV INPUTTYPE
To start the Auto Program procedure, press the Left or
Right arrow key. Follow the instructions on the TV.
PRESS• P,' TOI_GIN PROGRAMMING
1
Auto Proqram
Ch. Add/Del
Ch. Labels
Source ID
Clock Set
"timer Setup
Parental Ctl
CaptionFrext
Backg round
L Press <). To Program
Setup Menu with Auto Program
panel:.
--÷
J
Press
1".1.toANTENNA
select eitheror
OFF AIR
CABLE "IW.
2
Press
to begin
channel+--'-_
search.
SEARCHING
CABLEIV
I
CHANN£L _ __ IS (NOT)FOUND
Highlighted
Wait a few seconds for the TV screen to clear.
STEP
5. SET THE CLOCK
STEP
Set The Clock
OPTIONS
You may want 'to consider using the following options:
•
Delete unde_drable channels or add additional charmels: Refer
,, Press MENU on your remote until the SETUP icon is selected
and the Setup Menu is displayed.
to the Ch. (Charmd)
,, Press the Up or Down arrow key to select Clock Set.
,, Use the numbered buttons on the universal remote control to
enter the correct time. Press the TIMER button to select AM or
PM. You can also use the Left or Right arrow keys to advance
the clock.
2_2
Add/Del
option for details.
•
Label channels (such as ABC) that appear in the Channel/
Time display: Refer to the Ch. (Channel)
Labds option
for details
•
Label the input sources with more descriptive names. (For example, label Video 1 source as VCR.) Refer to the Source ID
option for details.
•
Adjust options
,, Press QUIT to remove the menu.
2919-O
6. USE OTHER
in the Audio
and Video Menus.
UNIVERSAL
REMOTE
CONTROL
INTRODUCTION
This universal remote control operates the common features of
most, but not all, models and brands of IR (infrared) controlled TVs, VCRs, cable converters, video disc players, and
audio equipment. The remote may provide functions that are not
BATTERY
available on your equipment, e.g., menu operations. Some
functions of your particular equipment may not be controlled
by this remote. In such cases, use. the original remote control
for your equipment.
INSTALLATION
Batteries are provided, but they must be installed before using
the remote control. When it no longer functions normally, or
wihen it loses memory, replace the batteries with two highquality, alkaline, size AAA batteries. Match plus with plus (+
with +), minus with minus (- with -), as shown in the battery
compartment.
Unless your equipment responds to the factory preset codes
commonly used for Zenith products, i.e.., 101 for TV, 201 for
VCR, 353 for CABLE, and 401 for AUX., you will need to
program the remote control with the codes for your particular
equipment.
NOTES:
Push tab in
• Do not to place heavy objects on top of the remote control
keys. Prolonged unintentional operation of the remote shortens battery life.
• Remove the batteries if the remote control will not be used
for a month or more. Battery leakage can permanently
damage the remote, for which Zenith is not responsible.
CHOOSING
OPERATING
MODE
Some keys on the remote will always operate a particular prod-
To control your TV, VCR, cable box, or auxiliary equipment with
this;remote, you must first choose the mode of operation. Press the
desired mode key for TV, VCR, CABLE or AUX.
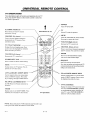
INDICATOR
uct function. For example,
level, and PLAY controls
LIGHT
_--
Illuminates whenever remote sends signal.
OPERATING
VOLUME
controls the TV sound
the VCR play function.
POWER KEY
Switches power ON or OFF to selected
equipment.
MODE KEYS
UPPER
Selects equipment to be controlled.
ARROW
KEY PAD
These keys typically control Channel
changing and Volume operations.
NUMBER
KEY PAD
Provides direct channel
other functions.
selection
and
LOWER ARROW KEY PAD
The,;e keys typically perform on-screen
menu selection and adjustment.
2916-o
3 --1
SPECIAL
FUNCTION
Activates
special features
KEYS
on some products.
UNIVERSAL
TV OPERA
REMOTE
CONTROL
TIONS
These descriptions apply to functions and operations of your TV.
First, press the TV button on the remote control to select the
TV mode of operation.
FLASHBK
t
(Flashback)
Turns TV ON or OFF.
TV
Point
Return to the previous TV channel
selected for viewing.
CHANNEL
POWER
Remote
at TV.
Selects TV mode of operation.
MUTE
(Up Arrow)
Tunes to the next (higher) channel as
programmed into TV memory. Press
artd hold to repeat.
\
Turns off sound while the picture remains.
Press again to restore the sound.
VOLUME
(Right
Arrow)
Increases the TV's sound level.
CC (Closed
Captioning)
Displays the closed caption menu. Press
CHANNEL
again to move the highlight bar within the
menu and select your choice.
Tunes to next (lower) channel programmed
into TV memory. Press and hold to repeat.
VOLUME
Arlrow)
ENTER
(Left Arrow)
Press to see the Channel/Ti me display.
Also us,_ to enter channel digits.
Decreases the TV's sound level.
NUMBER
(Down
KEY PAD
SEQ/QU[T
Se,lect a number for direct channel tuning.
Press to reraove any on-scream menu.
Also, when no menus are showing on the TV,
acfivate_/d_ctivates the Spatial Equalization
(SEQ) aadio enhancement.
MENU
D;splays menus for TV options. Press repeatedly to view other menus.
LEFT
and RIGHT
ARROW
KEYS
UP and DOWN
Used to respond when an on-screen menu
and FREEZ
See PIP (Picture-in-Picture)
fo Fmation.
KEYS
section for in-
TV/VCR
T:[MER
Displays and sets the SLEEP TIMER. Press
repeatedly to set desired TV shut-off time.
TV Operations
NOTE: Keys dedicated to VCR functions may be used to operate your VCR while the remote is in TV mode.
29,6-o
KEYS
Used to regpond when an on-screen menu
needs a SELECT response. Press to move
the highlight bar within the menu.
needs an ADJUST response. Press either
key to sequence through available choices.
P][P, SWAP,
ARROW
3 _2
SOURCE
Displays the menu of TV sources for some
TV's. P_es_TV/VCR SOURCE. repeatedly
to step through the source selections. On
some TV's, press TV/VCR SOURCE to
select the AUX (Auxiliary) cha:mael.
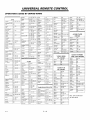
UNIVERSAL
REMOTE
CONTROL
l
OPERATIONAL
Pushbutton
or Key Label
MODES
FOR ZENITH
PRODUCTS
VCR Mode
Zenith Code 201
TV Mode
Zenith Code 101
USING
FACTORY
PRESET
Cable Mo
Zenith
Code
CODES
AUX
353
Zenith
Mode
Code
POWER
"IV Power On/Off
VCR Power On/Off
Cable Power On/Of
AUX TV/Disc
CABLE
Selects Cable Mode
Selects Cable Mode
Selects Cable Mode
Selects Cable Mode
VCR
Selects VCR Mode
Selects VCR Mode
Selects VCR Mode
Selects VCR Mode
AUX
Selects AUX Mode
Selects AUX Mode
Selects AUX Mode
Selects AUX Mode
TV
Selects TV Mode
Selects TV Mode
Selects TV Mode
Selects "D¢ Mode
TV Closed Captions
VCR AM!PM
CABLE FC (Favori
AUX Frame_JTime
CC
Ch.)
AUX Audio
FLASHBK
TV Flashback
VCR Flashback
CABLE [qashback
MUTE
TV Mute
TV Mute
"l_Z Mute (See Note 1)
TV Mute
UP
TV Channel Up
VCR Channel Up
CABLE Channel IS
AUX Skip >>
DN
TV Channel Dn
VCR Channel Dn
CABLE Channel D
AUX Skip <<
VOLUME RIGHT
TV Volume Up
TV Volume Up
"Ia/Volume
Up (See Note 1)
TV Volume Up
VOLUME
TV Volume Dn
TV Volume Dn
7V Volume Dn (See Note 1)
TV Volume Dn
1
TV Digit 1
VCR Digit 1
CABLE Digit I
AUX Digit 1
2
TV Digit 2
VCR Digit 2
CABLE Digit 2
AUX Digit 2
3
TV Digit 3
VCR Digit 3
CABLE Digit 3
AUX Digit 3
4
TV Digit 4
VCR Digit 4
CABLE Digit 4
AUX Digit 4
5
TV Digit 5
VCR Digit 5
CABLE Digit 5
AUX Digit 5
6
TV Digit 6
VCR Digit 6
CABLE Digit 6
AUX Digit 6
7
TV Digit 7
VCR Digit 7
CABLE Digit 7
AUX Digit 7
AUX Digit 8
CHANNEL
CHANNEL
LE,FT
8
"IV Digit 8
VCR Digit 8
CABLE Digit 8
9
TV Digit 9
VCR Digit 9
CABLE Di git 9
AUX Digit 9
"IV Digit 0
VCR Digit 0
CABLE Digit 0
AUX Digit 0
ENTER
TV Enter
VCR Enter
CABLE Enter
AUX Display
MENU
TV Menu
VCR Menu
CAI3 LE Menu
AUX Program
TV Select Up
VCR Select Up
CABLE Up Arrow
AUX Part
DOWN ARROW
TV Select Dn
VCR Select Dn
CABLE Down Arrc
AUX Random
LEFT ARROW
TV Adjust Left
VCR Adjust Left
CABLE Left Arrow
AUX x3 FAST <
RIGHT ARROW
"IV Adjust Right
VCR Adjust Right
CABLE Right Arro
AUX x3 FAST :>
AUX Clear
0
UP ARROW
SEQ/QUIT
"IV SEQ Sound
VCR Quit
CABLE Quit
PIP/A
TV PIP
VCR VCR+
CABLE Day Up
AUX Repeat-Side
SWAP/B
TV PIP Swap
VCR Channel Map
CABLE Day Down
AUX Repeat-A-B
FREEZ/C
TV PIP Freeze
VCR Search
CABLE Pg Up/*
AUX Repeat-Chap
MEMRY/D
No Function
VCR Memory
CABLE Pg Dn/#
AUX Memory
TIMER
TV Timer
VCR Timer
CABLE Timer
AUX Still
TV/VCR/SOURCE
TV Source
VCR TV/VCR Tuner
CABLE lnfo
AUX TV/Disc
RECORD
VCR Record
VCR Record
CABLE
Buy
AUX Edit
PAUSE
VCR Pause
VCR Pause
CABLE
Guide
AUX Pause
REWIND
VCR Rewind
VCR Rewind
VCR Rewind
AUX Scan <<
]?LAY
VCR Play
VCR Play
VCR Play
AUX Play
IJTOP
VCR Stop
VCR Stop
VCR Stop
AUX Stop/Eject
]:17WD
VCR Fast Forward
VCR Fast Forward
VCR Fast Forward
1. Can be overwritten
2916-o
AUX Scan >>
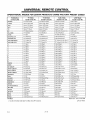
Reference:
bIOTES:
with Cable Vol t Mute when 399 is entered.
401
124-212-03
and
gP 221-952A
3---3
UNIVERSAL
PROGRAMMING
YOUR
REMOTE
REMOTE
If you are using Zenith products, the remote is programmed
for
tile most commonly used codes. For other brands -- or if your
remote fails to control your Zenith products -- you will have
to program
4.
Key in the three-digit
code for your equipment,
then press ENTER. The indicator ligh_Lshould
flash, then turn off to ir.tdicate that the code was accepted. If the indicator _tays on, repeat steps 3 and
4 or try using a different code.
5.
Write the code that operate_ your equipment, on the label inside the battery compartment for future reference.
the remote.
Follow these steps for each product
you are using:
1.
Look up the three-digit
code for your brand (such as
Zenith) and type of equipment
(such as VCR) in the
code table provided.
2.
Press and hold PRG with
the indicator
lights (about
3.
Press TV, VCR, CABLE,
or AUX to select the product you want your remote to control.
(Use CABLE
or AUX, to program
your remote for a second TV or
VCR. Use AUX, to program
your remote for a video
disc player or audio equipment.).
SPECIAL
CONTROL
a small blunt object
three seconds).
To erase all code programming, and return to the factory preset
codes, key in code 911 when programming
the remote.
until
NOTES:
•
If no key on '.your remote is pressed within 60 seconds, the
programming
process stops, and you will have to start again.
•
You may cancel programming
at any time by pressing
PRG.
FEATURES
AUX+ 1, AUX+2
and AUX+3
Amplifier Volume Override (C,ade 499)
Capability
Your remote can control up to seven electronic components.
If
you have programmed the remote for four components using the
TV, VCR, CABLE and AUX keys, you may also program it
You may use your remote to ovellide your TV, VCR or video
disk player's volume functions with your amplifier's volume and
muting.
for up to three additional components (AUX+I, AUX+2, AUX+3)
by HOLDING the AUX key and pressing the 1, 2 or 3 key during
programming. Once programmed, HOLD down the AUX key and
press 1, 2 or 3, to access the additional AUX +1, 2 or 3 mode.
1.
Program your amplifier c_:,de into the CABLE mod
or one of the AUX modes.
2.
Select the :mode on your remote (TV, VCR, etc.)
where you want the amplifier volume control function to be retained. In other words, if you want to
operate the', volume and m_ate of your amplifier while
the remote is in TV mode, press TV for this step.
3.
Begin the programming steps as described :in "Programming Your Remote" and enter code 4-9-9, followed by ENTER.
Cable/Converter
Volume
(Code
399)
You may use your remote to control cable/converter volume and
muting if available on your equipment. First program your remote
vAth the brand czx:lefor your cable device using the CABLE or AUX
key. Then repeat the programming steps, again using the CABLE
ar AUX key, but key in code 399 instead of a brand code.
The amplifier volume and mute fe_tturesare now available in the
current mode.
To restore TV volume/mute to the CABLE or AUX mode, simply
re-enter you_ cable converter code number into that mode.
To restore normal volume and muting control tc, your TV,
VCR, cable or laser disc player, re-program the remote for these
units into each mode (TV, VCR, e':c.) to be restored.
NOTE:
• CD and tape players will automatically selec_tamplifier volume and mute.
2,_16-o
3 --4
UNIVERSAL
AUTO
FIND
REMOTE
CONTROL
OPTION
If you have tried all the codes listed for your brand and type of
product in the code table, and none of those codes operate your
equipment, you can use Auto Find to search for the code you need.
Follow these steps for each product you are using:
1.
Turn the product
ON and aim the remote toward
it.
2.
Press and hold PRG with a small blunt object until
the indicator lights (about three seconds).
o
Press and hold POWER, then release it, repeating
this action about once a _;econd until the product
turns OFF.
.
Press ENTER
immediately
to save the code. If your
remote fails to operate the functions
you use most
often, you can re-enter
Auto Find and search for a
better code.
NOTES:
3. Press the mode key on the remote for the product
you want to control: TV, VCR, CABLE, or AUX.
•
4. Key in "000", then press ENTER within two seconds. When the indicator light flashes three times
and remains lit, Auto Find is active.
•
The indicator light
POWER
and back
light stays on when
all available codes.
you want to control
control that product.
Pressing
should flash OFF when you press
ON whert you release it. If the indicator
you pres,; POWER,
Auto Find has tried
If you finish Auto Find ',andthe product
has not turned off, your remote cannot
PRG at any time during
the use of Auto Find will
cancel Auto Find, and you will have to start again.
ON
POWER
[]
OFF
Equipment to be
controlled
Typical Remote
Control
2f16-o
3 m5
UNIVERSAL
REMOTE
CONTROl.
l
OPERATING
CODES
TVS
Admiral
116.
PaJvenalra TV/VCR
154
_afk
103.
AOC
I(M
BY BRAND
Prosoan
116.157.162.167
Logik
239
M_navox
334
Sharp
441. 442
Quasar
106. 107
L.XI
209.231
NSC
335.339.368
Sony
443,444,
445
RCA
104.116. I26.157.
Magnavox
207. 214. 231
Soundesign
461,498.
501,502
161.162.167.168
Mamntz
2{17.218
Sylvania
433
Realistic
105.123.124
Marta
2{)9
Teac
446
Sampo
119
Technics
432.459
Samsung
1(13. 119. 134. 141
Toshiba
44:1
Sanyo
108. 109. 118
Yamaha
448
Zenith
460, 461,498,
502
121,130.133
146
NAME
2{)8. 214. 216.
2 t9.23 I. 249
Pioneer
239
RCA I)SS
373
Regency
329
354.355
131, 136
Sears
103. 108. 109.110.
Multi Tech
111. 118. 134
Citizen
121. 139
137.156.
Signature 2000
Contec
141
Coronado
103
Crown
103
Sony
Curtts Mathes
116. 119. 121
Dmwoo
149. 159
Dmwoo
TV/VCR
I33.
Elektra
12 I
Eanerson
103.104.123.124.
250
Panasonic
214.25
335
Denon
455
339.356.37l
Harrnan/Kardo
a
456
Tocc,m
317.318.346
IVC
45_
Unika
348.362
Kenwood
450
344
Ookyo
45g
358.362
Philips DCC
45a
Vid Tech
340
Pioneer
451,478
240. 242,260
Video Way
349
Sony
45.2
2_k5.208. 212.
Viewslar
354.355.372
Technics
45,_..497
Zeni_
301. 353.374
Yamaha
452
2{)7. 214. 227
Soundesign
139
Pioneer
210.215
Sylvania
I1Z 113.117.119.
Portland
2.16
Pro Scan
2!6.260
Tatung
106
Teknika
103.112.121.
124.139
131. 136.145
Realisoc
Telerent
103.121
Toshiba
110.111.134.171
Samsung
XRI000
121
Sansui
Yorx
119
Sanyo
Zenith
101.149.175
Scott
Zenith TV/VCR
153.154.172
Scars
214.231
158
Fisher
109, 118
Funal TV/VCR
15z_
G.meral
106. 1(17. I14.
Electric
116.117.
G3ldstar
102;. 104. 119. 147
G 31dstar TV/VCR
1531
Hitachi
102. 103. 129. 163
J.C. Penney
I(_L 110. 114.
117.119
Admiral
208.261
JVC
125. 132. 164
Adventura
231
K'vlC
103
Aiwa
231
Sony
KI'V
I03. 104. 138
Akai
223.238.241
Sylvania
Karazm
121
Audio
202.218
Symphonic
231
lardgenet
121
Taahiko
2{)9
Lngik
12 I
Tatung
2(12
Teac
202, 231
Dynamics
Bell
IZ([
118. 119. 133. 137
Magnavox
103. 112. 113.
117, 119. 127.
12g. 139. 165
& Howell
Broksonic
Majestic
173
221. 226. 250. 255
209
Cidzen
212
Crmg
Curds
_l2 I
206. 247
214
Canon
Magnavox TVN(_
Mathes
Daewoo
214. 259
244. 246. 248. 254
Marantz
10z_, 120, 155
Megatron
146
DBX
202. 218
Memorex
121
Emerson
203.22 I. 223.
MGA/
Mitsubishi
104. 119, 120.
131), 140,155
Montgomery
_a_
I(I-'L104, 105.
113, 114,119.
P_masonic
p_masonic TVNCR
106.
Daytron
236. 246
226. 233. 235.
243. 250
Fisher
21 I. 212. 213. 247
FunaJ
231
214. 216. 220
119
General
Electric
107.160.166
Goldstar
209
130,
I33
; 174
Philco
103, 104. 112.
113, 139
Philips
I 12, 113
Pioneer
135
Portland
103
29:6-0
Zeni_
Satellite
312.328.330
351
239
AUDIO TUNERS
AND AMPLIFIERS
' 206, 212,247
VIDEO DISK
PLAYERS
204, 2(15,233,243
2{)6, 209,211,
Pioneer
Sharp
2{18,261
Shintom
2 _9
Signature 2000
208,214,216.
219, 231. 249
2 [7,232.
Denon
402. 403
Son)
Sanyo
Zenith
Fisher
404
40__1
[ 462,463
464
Goldstar
460
Harman!
1465
Kardon
JVC
466
Kenwood
468. 469
237
AUDIO CD
PLAYERS
!207.214.227
Maramz
472.503
Onkyo
]473
1475,476
Akai
409,424
Philips
Crown
410
Pioneer
477,478,479
Denon
411
Radio Shack
487,488
Fisher
412,438
Realistic
480
Goldstar
460
Sanyo
481
Hamaan/Kardoo
413
Scott
482
IVC
415
Sharp
483
Kenwood
412. 416.4
Sherwood
487. 488
Magnavox
421. 422. 433. L34
Sony
489. 490. 491. 492
Mitsalz iahi
423. 424
Soundesign
461. 498.501.
NA£)
425. 426.4,17
Teac
494.495
CABLE/SATELLITE
Nakamichi
427.428
Technics
497
AUegm
NEC
429
Yamaha
1496
Allegro NB Switch [ 361
Onkvo
430
Zenith
Gemini
] 305. 331. 338
Panasc,nic
431,432
General Electric
1367
Teknika
2_4
Toshiba
205. 215
XR1000
239
Vector Research
2_14. 218
Yamaha
202.218
Zenith
201. 224. 225.
229. 237
: 358. 362
L7. z41
460,461,498,501.
502
i
12].
: 220, 230
_212,215
V( :RS
Satellite
lniversal
215.216.220.227.
Emerson TV/VCR
161
Uni_d
214.259
RCA
AUDIO 'rAPE
DECKS
364
Texscan
Philips
Quasar
316.323.336
Standard Comp
2{/7. 214
115.143.151.170
154
Atlanta
313
215
Go Video
256. 262. 263
Hitachi
215. 257
Instant Replay
214. 227
J C. Penney
214. 215. 218. 227
JVC
Kenwood
501,
335
Scientific
Sprucer
Philco
TVNCR
315.343
Samsung
I. 259
103. 104. 105.
127.128.139
119
2{12.218
Orion
Pentax
Symp&_
DD_on
NEC
169
113.114.119.
121.130.133
148
347.350.352
Philips
Bl_oksonic
103. I05.122.
333
2{)4. 222. 252. 264
119.124
Sha:'p
313.320
Mitsubishi
SCo_
119
Panascnic
2{k5. 212. 214. 231
121
139
311.332.342
Memovex
Bell & Howell
Omturion
Oak
Paragon
Montgomery
Ward
C;mdle
369.370
Philips
421,433,
General lnsa-ument
3O5,306
Pioneer
431,435
Hamlin
302, 303, 345,
Qua...ar
432
4:M
365,366
Radio Shack
Jerrold
304, 307, 308, 309.
31(I. 318. 360. 363
43 I, 436,439,
441
RCA
437
202. 225. 258
Kale
3_5
202
Macom
Vision
314. 321
3 -----6
San3,o
438. 439
Scott
440
Ref: 124-212-03
_.40,
l.tP 221-952A
and
502
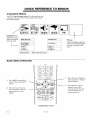
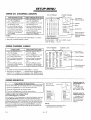
QUICK
AVAILABLE
REFERENCE
TO MENUS
MENUS
"four TV is icon and menu operated. In other words, an icon
is selected at the top of the TV screen and a menu of adjustment options appears.
[ ........
Ruotoj UiOEO PiP
50URIIE
]Highlighted Icon
The menu for the selected icon appears
I Main Source
below the icons.
1
1.
2.
PIP Source
Ant/Cable
Ant/Cable 1
Ant/Cable 2
Video 1
Video 2
S-Video 1
,1_ Main/PIP
BASIC
}
MENU
Video 1
Video 2
S-Video 1
1
i
PIP Inset
A PIP inset appears while the
5ource icon is :selected to show
_he result of selecting a PIP
source.
'1'4, To Select Source
OPERATION
Press the Left or Right arrows to adjust or change a
selected
option.
Press MENU repeatedly to
choose between available
menus.
Press QUIT to remove
menus or wait a few
seconds and the TV will
Press the Up or Down arrows repeatedly until the
desired option is highlighted.
return automatically
normal operation.
Typical Remote Control
2919-O
]
i
4--
1
to
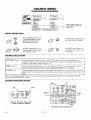
SOURCE
MENU
PIP Source
Ant/Cable 1
Ant!Cable 2
Video 1
Video 2
-Video t
ideo 3
-Video 2
,, Main/PIP
Ant/Cable 1
ISgU R EI
I "'i"s°ur°e
MENU
fl
I
Video 1
Video 2
S-Video 1
Video 3
S-Video 2,)'
_rideo 3 and S-Video 2 are
source options fo,r some TV
models only.
'1'4,To Select Source I
OPERATION
@
or
___
1 :::_
Press
for direct
entry
to the SOURCE
Source Menu,
or press
MENU repeatedly until the
Source Menu is selected.
.@_
(_)_x..@(_
,_
SOURCE
_
g-.gJ
Press the Left/Right keys to select
either
Maincolumn.
Source column
or PIP
Source
_
_rT_,_v:_
Press SOURCE repeatedly until
the desired Source is selected.
@
Press QUIT or wait a few seconds for the TV to return to norreal operation.
SELECTION
ANT/CABLE
I or 2
Routes the antenna or cable-TV source to the TV for viewing. You see prcgram material from
whichever signal source is connected to the ANT/CABLE 1 or 2 jack. (If the signal is from a VCR or
a cable box, tune the TV to either channel 3 or 4.)
VIDEO 1, 2 or 3
Routes the audio and video from an A/V source (such as a VCR or a video disc player) tc, the TV for
viewing. The source must be connected to the corresponding VIDEO I, 2 or 3 IN jacks.
S-VIDEO
Routes the audio and video from an auxiliary Super-VHS video source (such as a VCR or a video disc
player) to the TV for viewing. The source must be connected to the corresponding S-VIDEO I or 2 IN
jacks.
1 or 2
Refer to the "Standard Connections for Your TV" section to make the proper equipment connections to the TV Forinformation about PIP
sources, refer to the "PIP Operation" section.
SOURCE'IDENTIFICA
TiON
Yellow
l_',ed
|TARSIGFIT /
::_:_:_:_
.....................
Blue
[_'_,_
v_tE
White
Magenta
VIDEO1 IN
_rloEO ! IN
¥19E0
Auxiliary A/V Jacks, Video 3 and
S-Video 2 (Some TV Models)
LO(IpOUT
r- AO_IO_
_
Z+L_
L
5 -- 1
X
IUflROUMD IPI_RI
Green
Connection
2919-o
_
1/',€%_
Center orJtBack of TV
Lt. Blue
l
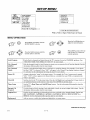
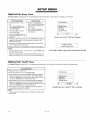
SETUP
MENU
SoarcaiD:
Auto Pro qram
Ch. Add/Del
Ch. Labels
Source ID
Clock Set
Timer Setup
Parental Ctl
Caption/Text
Background
Press
,1_ To Program
Clock Set
Timer Setup
Parental Gtl
Caption/Text
Background
]
Press _ll_To Label Sources]
While a Video or Super-Video Source is Chosen
MENU
OPERATION
Press the Left/Right keys to
adjust the selected option.
Press MENU repeatedly until the
SETUP MENU is shown.
Press QUIT or walt a few seconds for the TV to return to
normal operation.
Press the Up/Down keys until the
desired option is selected.
Auto Program
Finds all active channels and stores them in the TV's memory for use by CHANNEL up/down.
'q'I-IE FIRST TIME YOU OPERATE YOUR TV" for more details.
See
Ch. (Channel)
Add/Del
Edits the channels found by Auto Program to create your own personzd list of favorite channels. See the
information following this chart for more details.
Ch. (Channel)
Labels
Assigns a network/station label, name or call letters to specified channel_. For example, if you choose
the label "ABC" for channel 9, then "ABC" will appe_u:in the Channe_?ime display whenever channel
9 is selected. See the information following this chart flgrmore details.
Source ID
Assigns a descriptive "name" to the input sources. For example, the Video 1 source may be named
VCR. "VCR" will now appear in the Source Menu as a reminder that your VCR is connected to the
Video 1 input jacks.
Clock Set
Sets the clock in the TV to the correct time. Press the Left/Right keys to advance the 24-hour clock, or
use numbered buttons on the remote to enter time. Press ENTER to start the clock.
Timer Setup
Sets the TV's Sleep Timer and On/Off Timer features. See the info:anation following thi:; chart for
more details.
Parental Cfl.
(Control)
Use this feature to block viewing of any undesirable channels or an entire input video source. See the
information following this chart for more details.
Caption/Text
Displays closed captioning or informational text when available on the ';elected channe,l. Options are:
OFF, CAPTION 1, CAPTION 2, CAPTION 3, CAIrrlON 4, TEXT 1, TEXT 2, TEXT 3, or
TEXT 4. See the information following this chart for more details.
/
Background
i Adds or removes a solid-color background behind the on-screen menus
continued on next page
2919-0
6_
1
SETUP
USING
CH.
(CHANNEL)
MENU
ADD/DEL
Available Channels
Selector Highlighl:
Add ChanneLs
to Scan
Delete
Channels
J
from Scan
• Press the Up/Down keys to
select Ch. Add/Delete.
select Ch. Add/Delete.
Press the Up/Down keys to
Press Left!Right keys to view
the add/delete screen.
• Press Left/Right keys to view
the add/delete screen.
• Use the Left/Right and Up/
Down keys to move selector
to the channel being added.
• Use the Left/Right and Up/
Down keys to move selector
to the channel being deleted.
• Add the channel by pressing
SOURCE unul the display
shows Added.
,, Delete the channel by
pressing SOURCE until the
display shows Deleted.
NOTES:
_.
• Ch. AddiDel can only be used with ANT/CABLE 1 or 2 Source.
• The audio of deleted channels is muted.
USING
CHANNEL
4
5
['9-'7
Live view of
select_ channel.
3
7
8
10
11
13
14
15
"16
17
18
19
20
21
22
23;
24
25
26
27
28
29
30
31
32
33
34
3..=; 36
37
38
39
40
41
42
43
44
45
46
47'
48
49
50
51
52
53
6,
fPress -2--
55
56
57
58
59
60
| Source
61
62
63
64
65
68
69
70
71
66
72
_
67
73
74
75
76
72'
78
[More
Channels
12
Status
Instructions
/
C,hange
J
Llse Down key to
selector to
additional numbers
if present.
..---- tuove
4,]
J
Available channels are:
Broadcast Band -- VHF 2 to 13, UHF 14 to 83
Cable-TV Bands1to 139
LABELS
Selector Highlight
Assign
----" C,hannel
Remove/Prevent
Labels
Available Labels
Labels
• Press the Up/Down keys to
select Cb. Labels.
• Press the Up/Down keys to
select Ch. Labels.
• Press Left/Right keys to view
the Channel Label screen.
•
Press Left/Right keys to view
the Channel Label screen.
, Select a channel by pressing
the CHANNEL Up/Down
keys.
• Select a channel by pressing
the CHANNEL Up/Down
keys.
,. Use the Left/Right and Up/
Down keys to move selector
to the desired label.
• Use the Left/Right and Up/
Down keys to move selector
to the four dashes or NONE.
NOTE:
Live view of
"" selected channel.
ADC AMC
CA
C8C
CNBC CNN
BCC
CBN
COM
BET
CBS
CSPN
BRAV
CMTV
CSP2
CTN
CTV
DIS
DISC
E!
ENC
FAM
GALA
IC
ME/U
NOS
ESPN
FNN
HBO
INSP
MMT
PBS
ESPN2
FOX
HN
JCN
MTV
PLAY
[iT
F:&V
FtSE
I.IFE
NBC
PTL
EWTN
F:X
[
HSN
t
MAX
NICK
OVC
RDS
REQ
SC
SCFI
SHOW
SIN
TBS
TBN
TELE
7LC
[More
Labels
---" C,urrent Channel
Ch 9
AI3C
'
_J
Selected Label
"--
_/
Press Down arrow
fi)r more labels.
4,
• Ch. Labels can only be used with ANT/CABLE 1 or 2 Source.
• Selecting the four dashes (.... ) specifies that no channel label is
assigned. Or, in addition to not assigning a label, NONE blocks the
station or network labels that are transmitted by some television stations.
USING
SOURCE
ID
_,
f
selected
• In the Setup Menu, press the Up/Down keys to select Source ID.
_, Press the LefffRight keys to view the Source ID screen.
Live view of
to choose
a Source.
I ,, Press the Up/Down
Assign keys
Names
To Your
Sources
,, Press the LeR/Right keys to Label the chosen Source.
Source
VIDEO GAMES AND OTHER FIXED
PATTERN DISPLAY CAUTION
Ant/Cable 2
Video I
Video
2 I
Ant/Cable
S-Video 1
If you use your "IV for video games or other fixed displays, avoid settiag the BRIGHTNESS control for an excessively bright picture. A
bright, fixed patl:ern, if used for long periods of time, can result in a
permanent imprint on the TV picture tube. You can reduce this possib:ility by alternating the use of the fixed pattern display with normal
TV picture viewing, by turning down the CONTRAST control for
sustained fixed pattern use, and by turning off the fixed pattern display when not irt use.
2919-0
Source.
[_!_
l
Anten 7a
VCA
VClq
,_
C__t)le
Video Game
• Disabling a Source prevents it from
appearing in the Source Menu.
2
.... , Disabled, Antenv:a, Cable, Cable
Box, Satellite, VCR.
[ Label
NOTE:
6--
Optional names for
ANT/CABLE 1 or 2
Sources are:
Oplional names for
VE)EO Sources are:
.... , Disabled, VCR,
VCR2 Camcorder,
Video Game, Laser
Dis(,, Audio Only,
Satellite.
SETUP
'TIMER
SETUP:
Sleep
MENU
Timer
The Sleep Timer programs the TV to automatically turn itself off after a period from 15 minutes up _:o4 hours.
Direct Access
From Setup Menu
• Make sure the TV's clock is
set.
Timer Menu
• With no menus showing on
the TV, press TIMER on your
remote to directly access the
Sleep Timer.
• Press the Up/Down keys to
select Timer Setup and view
the Timer Menu.
I_i_i
• Press TIMER repeatedly to
set the period of time the TV
will remain on.
• Press the Up/Down keys to
select Sleep Timer.
]
Tirner
me
Time
/Off Timer
[<
• Use the Left!Right keys to set
the period of time the TV will
remain on.
0:15
Timer Set to Turn TV OFF in 15 Minutes
• One minute before the TV turns off, the GOOD NIGHT display
appears on the screen. At this time you have a choice of the
following two actions.
• Do nothing;. The GOOD NIGHT display remains on the screen.
Sleep Timer
Good N,ght 0:58
,i• The TV will turn off in one minute.
Delay the turn-off by resetting the timer with a new time period.
NOTES:
"Good
• To cancel tile Sleep Timer, turn off the TV or press TIMER repeatedly until OFF is showing.
• As the Good Night display counts down the final 60 seconds, the
audio and video of the TV also "dim" for a soft, discreet turn-off.
TIMER
The On/Off
SETUP:
Timer
On/Off
programs
Display
Appears
60 Seconds
Belbre
Shut-Off
Timer
the TV to automatically
Set On/Off
Night"
turn itself on at a specific
time and turn itself off at another time
Timer
• Make sure the TV's clock is set.
Timer Menu
• Press the Up/Down keys to select Timer Setup
]
• Press Up/Down keys to select On Time. and use the numbered
buttons on your remote to enter a time for the TV to turn itself
ON. Press TIMER on the remote to select AM or PM. (You can
also use tile Left/Right keys to advance the time.)
• Press Up, Down keys to select OffTime and use the numbered
buttons on your remote to enter a time for the TV to turn itself
OFF. Press TIMER on the remote to select AM or PM. (You can
also use the Left/Right keys to advance the time.)
imer
I<
• Press Up/Down keys to select On/Off Timer and use ADJUST
on remote to turn timer ON (or OFF).
On/Off Timer Set to Turn TV ON at 11:00 am
NOTE:
• A time must be set for either On Time or Off Time in order to turn
the timer ON.
2919
0
1" :00 AM
6--3
SETUP
LISING
PARENTAL
CONTROL
Period of time PC
willbe
(PC)
/
active.
_
Blocks entire source. _"_
BLocks individual
_
channels for Ant/
_
Cable 1 or 2 sources.
(Does not appear if
the entire Ant/Cable
source is blocked
B lock Source.)
MENU
L Parental
Menu
BlockHours
Block
-]- Block
Source
Channels
OFF
[-
by
Block Entire
Control
1
2
4
5
6
7
8
13
14
15
10
11
12
16
17
19
20
18
21
22
23
24
25
31
26
27
28
29
30
32
33
34
35
36
37
38
39
40
41
42
43
44
45
46
47
48
49
50
51
52
53
54
55
56
57
58
59
60
61
62
63
64
65
66
67
68
69
70
71
72
73
74
75
76
77
78
Block Individual
Source
(Ant/Cable
• Press the Up/Down keys to select Parental
Ctl and press the Left/Right keys to view
the PC Menu.
Select Block Hours and use Left/Right keys
to set the length of time PC will be active:
OFF, 12, 24, 48 or 72 hours.
3
[]
Channel
Channels
1 or 2 Sources
Unbloi_
Status
Press
l
Source
"-t--"
To ('h_.tng_
Instructions
Re-enter
PC WhUe it is Activated
Only)
• Press the Up/Down keys to select Parental
Ctl and press the Left/Right keys to view the
PC Menu.
Select Block Hours and use Left/Right keys
to set the length of time PC will be actiw.:
OFF, 12, 24, 48 or 72 hours.
• Select Block Source and use Left/Right
keys to"Block" the current input source.
• DO NOTHING WITH BLOCK SOURCE.
• To block other sources, press the SOURCE
key and set them to "Block."
• Use Left/Right and Up/Down keys to select
a channel and press the SOURCE key to set
it to "Block." Repeat this for each channel
you want blocked.
Press ENTER to exit and enter any 4-digit
"Parental Access Code" when prompted to
do so. (You will be prompted to verify the
number by entering it a second time.)
Live view of
selected channel.
• Select Block Channels.
Press the Up/Down keys to select Parental
Ctl and press the Left!Right keys to view
the PC Menu.
Enter your access code.
Make your changes (block more channels,
reset the dn:e period, etc.).
Press ENTER to exit.
You will be prompted to change :four access
code. Either enter a new 4-digit code or do
nothing to retain the current code.
• Press ENTER to exit and enter any 4-digit
"Parental Access Code" when prompted to
do so. (You will be prompted to verify the
number by entering it a second time.)
REMEMBER
YOUR CODE! TO RE-ACCESS PARENTAL CONTROL WHILE IT IS ACTIVATED, YOU MUST EI_TER THIS
?_MBER.
Otherwise, simply allow the specified period of time to elapse.
NOTE:
• Do not unplug the TV in an attempt
USING
to deactivate
the Parental
Control.
This only resets Parental
Corttrol.
CAPTIONS
Activating
Captions
(With CC Button)
,, Press CC button on remote.
o, Press CC repeatedly to
toggle through the five
choices: Off, Caption 1,
Caption 2, Caption 3 And
Caption 4.
Activating
Captions/Text
(From Setup Menu)
• Press the Up/Down keys to
select Caption/Text.
• Press Left/Right keys to toggle
through the nine choices: Off,
Caption 1, Caption 2, Caption
3, Caption 4, Text 1, Text 2,
Text 3, or Text 4.
i _,_ll:!'a _',_'_" _ "
\
j
i
See special newscast
tonight at 7:00PM on
channel2.
T
NOTE:
Typical Captions Display
• At present, very few TV programs or video tapes offer text captioning for any option other than CAPTION 1. Therefore, CAPTION
1 is the only recommended choice, unless you know that a specific
program is providing captioning using one of the other selections.
291949
Captions may be shown anywhere on the screen.
6 -- 4
Typical Text Display
Fixed size text window fills
lower half of screen.
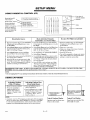
AUDIO
MENU
f
CH 2
10:56
STEREO
/ Treble
{ Balance
| Audio
l.d
,lL
FIUDIDI Surround
STEREO is selected and
a stereo signal is being received. You will hear
stereo sound.
L SEQ
Audio Mode Shown in
Channel/Time Display
MENU
OPERATION
G
Press the Left/Right keys to
adjust the selected option.
Press MENU repeatedly until the
AUDIO MENU is shown.
Press QUIT or wait a few seconds for the TV to return to
normal operation.
Press the Up/Down keys until the
desired option is selected.
Bass
Adjusts the BASS (low-frequency) level.
Treble
Adjusts the TREBLE (high-frequency) level.
Balance
Adjusts the balance of sound between the two speakers.
Audio
Allows you to select STEREO, MONO or 2ND AUDIO/SAP operation See information below this chart
for more details.
(SAP is not an option
for the video sources,
Audio signals received
from a video source are
assumed to be monaural
or stereo, )
SEQ
(Spatial
Surround
Equalization)
STEREO:
Directs the sound to the Left and Right speakers as supplied by the pro grarn. Stereo is
the recommend choice: The TV switches automaticall 3 between the STEREO and
MONO modes depending on the type of signal being received.
MONO:
Directs the same sound to both Left and Right speakers,
received is in stereo.
2ND AUDIO/
SAP:
Directs the sound for the Second Audio Progam (second language) to both the Left
and Right speakers. SAP sound is always monaural. If SAP is selected, you hear the
SAP (usually a second language). When the SAP broadcast ends, the TV switches
automatically (defaults) to the type of signal, being r_eived, STEREO or MONO. The
TV switches back to 2ND AUDIO/SAP when the SAP broadcast resumes.
Produces a spacious and more tonal sound. SEQ is only available
and processed by the TV.
being
while a stereo signal is being received
Adjusts the level of Surround Sound provided to the optional surround so_md speakers. Surround Sound
is only available if a surround encoded stereo signal is being rcxzeived and STEREO is either selected
using the AUDIO option or selected by default.
NOTE:
• All adjustments on the AUDIO MENU are optional. You do not
have to adjust these features in order to use your TV.
2919-O
even if the program
7_
1
VIDEO
|
VIC]Erl
MENU
MENU
Contrast
Brightness
Color
Tint
Sharpness
Color Temp
Video Filter
Auto Flesh
Picture Pref
OPERATION
@
Press the Lefv_Right keys to
adjust the selected option.
VIDEO MENU is shown.
Press MENU repeatedly until the
Press QUIT or wait a few seconds for the TV to return to
normal operation.
Press the Up/Down keys until the
desired option is selected.
Contrast
Adjusts the overall contrast and color level of the picture.
Brightness
Adjusts the brightness level of black areas in the picture.
Color
Adjusts the intensity of the colors in the picture.
Tint
Adjusts the color of the flesh tones to more Green or more Red.
Sharpness
Adjusts the clarity of the edges around objects for the clearest picture qu_ ity.
Color Temp
(Temperature)
Changes the "color temperature" or picture white balance between cooler natural whites and warmer
(red) colors.
Video Filter
Reduces video "noise" or interference in dark picture areas resulting in clearer overall pictures.
Auto Flesh
Automatically maintains natural skin tones under changing scene and video source conditions.
Picture Pret.
(Preference)
Lets you decide if you want to use your own CUSTOM video settings, the factory PRESET video
settings or the factory preset THEATER video settings. The THEATER _.ettings are preset to provide
optimum visual performance in low light "theater-like" conditions
NOTES:
•
All adjustments on the Video Menu are optional. It is not
necessary, to adjust these features in order to operate the
TV.
Any adjustments
made to the Video Menu settings while
Picture Pref. is in PRESET or THEATER mode will automatically
ting.
29t9-O
store the current
settings
as the CUSTOM
set-
8--
1
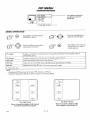
PIP MENU
fCh.:Guide
_Ch. Review
PiP Color
PIP Tint
PIP
/
PIP Size
Press
MENU
Ch. Guide and Ch. Review
are options on some TV
models only.
<I, To View
OPERATION
@
Press the Left/Right keys to
adjust the selected option.
PIP MENU is shown.
Press MENU repeatedly until the
Press QUIT or wait a few seconds for the "IV to return to
normal operation.
Press the Up/Down keys until the
desired option is selected.
Provides a visual review of all channels in the channel ,;can memory for the currently selected
Ch. Guide *
Ch. Review
ANT/CABLE source.
.......
;, Provides a visual review of the last three (3) channels tuned on the "1%.
*
PIP Color
Adjusts the intensity of the colors in tile PIP inset.
PIP Tint
Adjusts the color of the flesh tones in the PIP inset to more Green or more Red.
PIP Size
Adjusts the size of the PIP inset. Choose between small or large.
•
Some models only.
NOTE:
',
Selecting the PIP Menu does not "activate" PIP. However, a PIP inset
will appear during menu operation to show the effect of any setting changes.
CH3
O-t5
2918-0
CH5
O-t9
Ch. Guide Screen
Ch. Review Screen
Shows 3-second live displays of all channels
saved in the channel scan sequence.
Shows 3-second live displays of the
last 3 channels viewed on the TV.
9--
1
PIP OPERA TION
INTRODUCTION
The most common use of PIP is to view two different channels; one from the channel selector of the TV and the other
from the channel selector of the VCR. For example, you can
view two spoI_tingevents or two movies at the same time.
Your TV must be connected to two separate sources in
order to view a different picture in the PIP inset from that
which is showing in the main picture area of the TV. One
source (such as an antenna) must be connected to the ANT/
CABLE 1 or 2 jack. The other source (such as a VCR) must
be connected to the VIDEO 1 or 2 jacks.
SELECTING
MAIN
[.al°Sou.
PICTURE
Ant/Cable 2
Video 1
Video
2
Ant/Cable
1
S-Video 1
Main/PIP
PIP INSET
SOURCES
J [ P,PSou.ce I
Ant/Cable
_
AND
1
Video 1
Video 2
S-Video 1
q',l, To Select Source
I
-- Source of main
picture
Source of PIP
PIP Source
Main Source
• Make sure remote is in TV
mode.
• Make sure remote is in TV
mode.
• Press SOURCE on your remote to view the Source
Menu.
• Press SOURC, E on your
remote to view the Source
Menu.
• Press SOURCE repeatedly to • Press the Left or Right key to
select PIP Source column.
select the source which corre..
spends to the jack on the TV
connection panel that is recei vine the input signal.
• Press QUIT to remove the
• Press SOURCE repeatedly to
select the source which
menu.
corresponds t_ the jack that is
receiving the PIP input signal.
• Press QUIT to remove the
menu.
PICTURE-IN-PICTURE
FUNCTIONS
PIP
Press the PIP key to display the PIP inset. Press it again to remove the PIP inset.
Moving the PIP Inset
Use the Left/Right and Up/Down arrow keys to move the PIP
inset to the desired corner of the TV screen.
SWAP
Press SWAP to swap the main
picture with lhe PIP inset.
Press SWAP again to return to
the original display.
SWAP
PIP
I
FREEZE
AIN
PICTURE
SOURCE
PIP Buttons
(Typical Remote Control; your remote
may differ from unit shown.)
PIP Size
Select PIP Size in the PIP Menu to choose between seeing a
:;mall or large PIP inset.
FREEZE
:Press FREEZE to freeze motion of the picture shown in the
PIP inset. Press FREEZE again to return to a live PIP inset,
:z91s-o
10 -- 1
PIP OPERATION
OPERATION
WITH
ANTENNA
OR DIRECT
CABLE
This illustration shows the basic connection of your TV to a
stereo VCR. With your equipment setup in this manner, your
television has the following PIP capabilities:
',
Simult,meously
view a video tape playing
a channel selected by the TV's tuner.
•
Simultaneously
view two different
by the "l-_r's tuner and another
•
PIP VIEWING
Viewing
in the VCR and
channels;
one selected
using the VCR's
tuner.
Swap the main picture and the PIP inset.
OPTIONS
Two Different
Channels
Viewing a Video Tape
and a "IV Channel
Set VCR's TV/VCR* switch
to TV.
• Set VCR's TV/VCR* switch
to TV.
Select Ant/Cable 1 as the Main
Source in the Source Menu.
• Select Ant/Cable 1 as the
Main Source: in the Source
Menu.
• Select Videc_1 as the PIP
Source in the Source Menu.
Select Videc, 1 as the PIP
Source in the Source Menu.
• Select a chaxmel with the TV's
channel selector.
i
• Press PIP key to activate PIP.
Press PIP key to activate PIP.
Play a tape in the VCR and
view it in the PIP' inset.
(Make sure VCR's TV/VCR*
switch is still set to TV.)
Option 1: Antenna or Direct Cable Connection To VCR.
(Optional cables are not supplied with television.)
10 -- 2
Select a channel with the
TV's channel selector.
• Select a PIP channel using the
VCR's channel selector.
* May be labeled TV/Video.
2918-O
....
PIP OPERATION
OPERATION
WITH
CABLE
DECODER
With your equipment setup in this manner, your television has
the following PIP capabilities:
•
•
•
PIP VIEWING
Simultaneously view a video tape playing in the VCR and
ZLbasic cable channel selected by the TV's tuner.
Simultaneously view two different channels; one basic
cable channel selected by the TV's tuner and a scrambled
(premium) cable channel selected by the cable box.
Swap the main picture and the PIP inset.
NOq['E:
•
OPTIONS
i
"De cable channels you can view depends on the service
you have purchased from your cable company.
Viewing Two Different
Cable Channels
Viewing a Video Tape
and a Cable Channel
Select Ant/Cable 2 as the
Main Source in the Source
Menu.
o, Select Ant/Cable 2 as the
Main Source in the Source
Menu.
Select Video 1 as the PIP
Source in the Source Menu.
- Select Video 1 as the PIP
Source in the Source Menu.
Select a channel with the
TV' s channel selector.
,, Select a channel 'with the
7['V's channel selector.
Press PIP key to activate PIP.
Select a PIP channel using the
tuner in the Cable Box.
,, Press PIP key to activate PIP.
,, Play a tape in the VCR and
_iew it in the PIP inset.
May be labeled TV/Video.
Cable TV
Wall Jack
Main Picture Source
Connected to the Aatenna/Cable 2 jack.
CABLEBOX
STAR$1GHT
ANT_
TO £IT'RNAL
Option 2: Cable-TV Decoder Connection via Loop Out To VCR.
(Optional cables are not supplied with television.)
29180
l0 -- 3
AMP OR SpI(IH
MAINTENANCE
CARING
FOR YOUR
AND
71t'
Your TV will look better, have a longer life and perform
better
if you care for it properly.
First check to see that the TV is off. For added
safety, unplug the TV from the power outlet.
NOTE:
If you unplug your TV, you will have to
reset the clock to the current time.
Cabinet
TROUBLESHOOTING
Care
Non-Wood
Cabinet or Cabinet Components
Moisten a soft
cloth with a mild soap solution or Ivory dishwashing
detergent. Wipe the surface with a damp cloth. Then rinse the cloth
in clean water' and wipe the surface again. Allow the TV to airdry before turning it on.
Picture
Glass Cleaning
The picture tube face attracts dust particles
and should be
cleaned regularly. To clean tile face, spray a sraall amount of
glass cleaner on a cleaning cloth and wipe the picture tube
glass face until clean. Repeat if necessary.
To delay new ,Just accumulalion,
wet a soft cloth in lukewarm
water in which a little fabric _oftener or Ivory dishwashing
detergent has been mixed. Wring the cloth almost dry. Wipe the
glass face. Make sure no drops of moisture are squeezed onto
the glass. Do not wipe the glass dry. Allow the glass to air-dry
before you turn the TV on aoain.
'Wood Cabinets or Cabinet Components
Use any good furniture cleaner and polish. Regular care will help preserve the
finish.
EXTENDED
ABSENCE
Before an extended absence (such as a vacation) you may
want to unplug the power cord from the electrical wall outlet.
This will protect the TV from possible damage from lightning
or power line surges. If you have an outdoor antenna, you may
also want to disconnect the antenna lead-in wires on the back
of the TV.
TV PICTURE
INTERFERENCE
Your TV picture may be affected by interference caused by
one or a number of factors. These include:
Speckled or Streaked
Picture
Can be caused by nearby automobile ignition, electrical appliances, etc. This is most noticeable in weak signal areas.
Snow in Picture
Caused by insufficient signal. Usually
caused by the TV being located too far from the TV station or
by an improper antenna installation.
TVCARDIR
NOTE:
If you unplug your TV, you will have to reset the
clock to the current time.
Ghosts or Reflections
Caused by signals being reflected
from surrounding buildings, water tanks, or other high structures.
Radio Signal Police,
cause'interference.
amateur
or CB radio mmsmitters
may
These interference problems; can often be con'ected through
the use of a better antenna, sigaal amplifiers, or wu'ious filter
devices. See your TV dealei for additional information, and
available TV accessories.
11 -- 1
MAINTENANCE
AND
TROUBLESHOOTING
I
BEFORE
CALLING
FOR SERVICE
Check these items and see if you can correct the trouble by changing the adjustment
these simple checks before calling for service, you may save time and money.
Problem
of a control or the se_ing of a switch.
By making
Try This
i
Picture OK. Poor sound.
Re-orient antenna. Try another channel --- possible station trouble.
Adjust AUDIO MENU options. Check fo: local interference. [s
antenna/cable connection loose?
Sound OK. Poor picture,
Re-orient antenna. Try another channel --- possible station trouble.
Adjust VIDEO MENU options. Trouble with cable-TV system? Is
antenna/cable
connection loose?
No picture or sound.
Is TV on? Is there power in wall outlet? i[s TV plugged in? is antenna
hooked up? Is cable hooked up? Trouble with cable-TV system?
Check auxiliary audio/video equipment. Check channel sele,ction. Is
the channel blocked by PARENTAL
CONTROL?
Picture
blurred
or distorted.
Ghost in picture.
Check antenna or cable hook up for brol_:en wires. Try another
channel -- possible station trouble. Check for local interference.
No color, or poor color.
Is it a color program? Check antenna or cable hook up for broken
wires. Adjust VIDEO MENU options.
No sound.
VOLUME
operation
Cannot
select certain
channels.
(VOL) setling may be too low. Check MU'IE
on remote control.
button
Is Speaker EXT/INT switch set to EXT?
Channels may be skipped in CH. ADD/DEL option of SETUP
MENU. Use AUTO PROGRAM
a seco:ad time.
No closed captions
Are captions available? Is CAPTION 1, CAPTION 2, CAPTION 3,
OR CAPTION 4 selected using the CAP'FIONS option on the SETUP
MENU?
Black or blue box covers half of screen.
Is text information
4 selected
No picture or sound when VIDEO
VIDEO 2 source is selected.
1 or
PIP inset frame is "snowy"
Is TEXT
1, TEXT 2, TEXT 3 or TEXT
option of the SETUP MF_AIU.
Is audio/video source hooked up properily? Are all wires connected
VIDEO 1 IN or VIDEO 2 IN jacks on connection center?
No stereo sound or weak stereo sound
when using a stereo VCR.
PIP inset frame is black or lacks contrast
selecting VIDEO 1 for PIP inset,
available?
in the CAPTIONS
Check AUDIO mode. Was stereo sou n(_ present before selecting
VIDEO 1 or VIDEO 2 source?
when
when using ANT/
Adjust PIP COLOR AND CONTRAS'[
settings in PIP MENU.
all wires connected to VIDEO 1 IN jacks on connection center?
Is TV/VCR
switch on the VCR in the "fV position?
No picture when using VIDEO 1 for PIP inset source
_md ANT/CABLE
1 or 2 for main picture.
Is TV/VCR
switch on the VCR in the qZ_ position?
Remote
Are batteries okay? Is TV turned ON? ls remote
CABLE
1 or 2 for PIP and VIDEO
control
Are
1 for main picture.
does not work.
Always request that your technician use only genuine Zenith
exact replacement parts for continued Quality and Safety performance. Kee, p your Zenith ALL Zenith.
:_918-o
to
in TV mode?
NOTES:
•
If your TV fails to respond io the PICTUKE PPEF. selection, or to any other menu selection, you must reset the
TV. Simply disconnect t_:e AC power cord from the
power outlet. Wait a few minutes, then plug the TV back
into the power outlet. Yoa will have to reset the clock to
the current time.
•
Unplugging
Control.
11 --- 2
the TV does nc,t deactivate
the Parental
REPLACEMENT
PRODUCT
REGISTRATION
CARD
You could win a full refund on your new Zenith product.
Product Card lost or misplaced?
Look for the Product Registration
product.
The Product Registration Card t_arnished with your video product is pre-printed with its Model and Serial numbers. Please
fill out the card and mail it at your earliest convenience. It is
imperative that Zenith know how to reach you promptly if we
discover a safety problem that _ould affect you. If the original
card has been lost or misplaced, you may use the replacement
card provided below. Either card will qualify you for the free
drawing, but you are limited to only one entry in the drawing.
Complete the card, place it in ar envelope and mail it to:
Each month a drawing
Card on your new video
is held by Zenith from the completed
Product Registration Cards received during the preceding
month. Zenith will reimburse the winner for the full purchase
price of the product purchased.
In order to participate, simply complete and return the Product
Registration Card at once, even if you choose not to complete
tile information
and interests portion of the questionnaire.
Zenith Electronics Corporation
P. O. Box 173257
Denver, CO 80217-3257
Use the replacement Product Registration Card only if the
original card has been misplaced or lost.
The odds of winning the flee drawing described above, depend on the number of participants. Free drawing offer is
void in Canada and other places where restricted or prohibited by law. Offer is void for HotelfMotel and Institutional
models. Rental models are not eligible.
PHOTOCOPY
U
llmunl
I
u
u
u..lulla.nulnnu.guunulnulmnum.uun
Zenith
u
Product
n
ill
AND CUT ALONG
inn
l
Registration
2. DIVlrs.
LINE
i
n
n
n
u
.
n
n
n
m
inn
n
uln
n
n
.unmulnlmn
n
ulnulnnuol
H5Z01-01
Card
(1_ Please Print Clearly or Type
1.DMr.
DASHED
uuulnulnlunlnnllnllmnuu.lllunnu
(_) Area Code Telephone
3.[--1Ms.
4.1_]Miss
[
First Name
Initial
I111111111
Illllllllllll!_Illll
[
[ _] I
[
I
I'-[
IIII
Last Name
Street
Apt. No.
IIIlll[lllll[llllllllll_Jllll
City
I Illllllllllllll
State
® Date
ofPurchase
Zip Code
Mo.
IIIIIIII1-11111
IIIIII11
Copy Numbers Here
From Label on Set
TVCARD3
[lay
Yr.
l__1__31_11l__!__1
Please record the model number
and serial number horn the sticker
on the back of your set.
A VISO PARA NUESTROS
CLIENTES
DE HABLA
HISPANA
mm
Zenith publica muchos de sus manuales de instrucciones en
idioma espafiol. Si le interesa pedir la versi6n en espafiol de este
manual, llene el formulario provisto a continuaci6n, fotoc6pielo y
envfelo a la direx:ci6n indicada.
Instrucciones:
1. Llene el formulario proporcionado a continuaci6n con la
informaci6n solicitada.
.
Haga una fotocopia del formulario de pedido y envfela a:
No todos los manuales de instrucciones estfin disponibles en
espafiol. Sin embargo, podemos proporcionarle el manual que
corresponde a un modelo similar a este, en el cual se describen
c_i todas las caracterfsticas del producto que usted utiliza.
Service.,Literature Department
Zenith Video Tech Corporation
1000 lVlilwaukee Avenue
Glen,Aew, IJ_,60025
E1 manual en espafiol es gratis.
Fotocopie lap gina y corte la I[nea punteado
Formulario
El producto:
[_
de pedido de su manual
Televisor
Nfimero de rnodelo
de instruccione._ _,
[] Videograbadora
E] Otro
(lo encontrarg en la pane posterior
del aparato)
Nombre
Direcci6n
Ciudad
SPNCOUP2
Apartamento
Estado
C6digo postal
(2'06-2947
R-C8
BROKEN
ORLOSTREMOTE
CONTROL?
Foran ExactReplacementRemoteControl
,J
for your new Zenith Televiision,seeyour local
Zenith Dealeror order direct by calling
1-800-255-67(,)0. To assure the correct
remote for your new Zenith, please
haveyour television's model number
co_
ready
ONLYs39.95
OTHERFINEACCESSORIES
FORYOURTEILEVISION.
WlrellessSpeakerSystem:
WirelessHeadphoneSystem:
CV4000SurroundSoundStereoSpeakers:
• Wirelessspeakersreceivesoundfrom TV,
VCB,or Stereothrough walls, floors, or
out._;ide.
• Wireless Headphonesreceivesound from TV,
VCRor Stereothrouoh walls, fleers or outside.
• A Sound so real...almostas if you were
part of the action!
• An idealaddition to any HomeTheater
system.
• Speakersare easyto move--"nocord clutter."
An attractiveadditionto any room.
• Allows freedom of activity while relaxingor
working around your home.
• Greatfor bedroomiV--listen without disturbing
others.
• Works up to 150 feet! Indoors and outdoors.
• Works up to 150 feet! Indoors andoutdoors.
• Createsan instant homeentertainmentcenter!
• Contemporaryblack finish complements
anyroom.
• Forusewith anySurround Sound
cornp_tiblerv.
• Bookshelfsize,can be wall mounted
or sel on a shelf.
• Greatfor the hearing-impaired.
ZENSO0
WIRELESS
SPEAKERSYSTEM
ZEN801
WIRELESS
HEADPHONESYSTEM
CV4000
STEREOSPEAKERS:
ONLY$249.95
ONLY$119.95
ONLY$124.95
PHOTOCOPYPAGEAND DETACHHERE
.....................................................................................................................
To order these fine accessories,
pleasefill out this card and
return a photocopy to:
l .............................
ITEMNUMBER DESCRIPTION
i
i
m,
Attr,: Accessory Offers
Zenith Video Tech Corporation
1900 N. Au,stin Avenue
Chicago, IL 60639
or call 1-800-255-6790
l
i
SalesTax: Pleaseaddyour statesales tax if you
live in one of the following states.
SUBTOTAL
CA7 314%,GA4%, IL8 3t4%,KS4.9%,KY6%, ME8%,
PA8%, RI7%.TX 7 314%,VA4 1I_, WA8.2%.
[] Check or money order
(Madepayable
toZenithVideoTechCorp.)
STATESALESTAX
SHIPPING& HANDLING
[] Visa [] Mastercard
$4.50
TOTALAMOUNTOF ORDER
Account
#
(
TOTAL
QUANTITYPRICEPERITEM PRICE
SHIPTO:
-F
ExpirationDate:
(i
Telephone:(
Signature:
Name:
IMPORTANT:PLEASEBESURETO COMPLETE
THEINFORMATIONBELOW.
/
TVModelNumber
(fromstickeronbackof unit)
"iV SerialNumber
(fromsticker
onbackofunit)
)
Mo.
Address:
/
Day
Yr.
Apt.#
City
State
Zip Code
(Approx.
dateofpurchase.)
PLEASE
ALLOW
UP"i'03 WEEKS
FORDELIVERY.
THANK
YOU!
I"VAC _$4
1I14/95
NOTE:Orderscan3nlybesenltocustomerswithinthe UnitedStates.
YOUR ZENITH
WARRANTY
m
Consumer
Welcome
Protection
Plan for Zenith TV
into the Zenith family!
Owner's Responsibility
We believe that you will be
pleased with your new Zenith Color TV. Please read this
C,onsumer Protection Plan carefully. It is a "LIMITED
WARRANTY"
as defined under Federal Law. This warranty
gives you specific legal rights, and you may also have other
riights that vary from state to state within the U.S.A.
Zenith's
Responsibility
Effective Warranty Date -- Warranty begins on the date of
original consumer installation. For your convenience, keep the
dealers dated bill of sale or delivery ticket as evidence of the
purchase date,
Operating Guide --- Read yore Operating Guide carefully so
that you will understand the operation of your set and how to
adjust the customer controls.
Service Labor -- During a period of 90 days from effective
warranty date, Zenith will pay for service labor by a Zenith
authorized service center when needed as a result of
Carry-In Sere'ice --- Models under 19" diagonal (U.S.A.)
screen size must be taken to a Zenith authorized service center
raanufacturing
Antenna -- Reception problen_ s caused by inadequate home
antennas or faulty antenna connections are the owner's
responsibility.
defects.
Parts -- New or remanufactured replacements for
factory-defective
parts will be supplied by a Zenith authorized
service center tbr one year from effective warranty date (color
picture tube --- two years). Such replacement parts are warranted
t0r the remaining
Home Service
portion of the original warranty period.
-- Warranty
service for 19" diagonal
(U.S.A.)
or larger screen size models is provided in the home in most
cases. (Some repairs may require the unit to be taken by the
servicer to the: repair facility and returned, at no additional
charge.)
Not Covered -- This warranty covers manufacturing
defects
and does not cover installation, adjustment of customer
controls in the home, installation or repair of home antenna
systems, cable converters or cable company-supplied
equipment; it also does not cover damage due to misuse,
abuse, negligence, acts of God or other causes beyond the
control of Zenith. Any alteration of the product after
manufacture voids this warranty in its entirety.
for warranty service and must be picked up by the owner.
Important: Product Registration -- Please fill out and mail
your Product Registration Card It is imperative that Zenith
know how to reach you promptty if we should discover a
safety problem that could aff,ecl you.
Warranty Service --- For warranty service information,
contact any 7x.,nith authorized service center. ['arts and service
labor that are Zenith's resportsibility (see above) will be
provided without charge. Other service is at the owner's
expense. If you have any problem in obtaining: satisfactory
warranty service, call or write:
Zenith Electronics Corporation
Customer Service Department
1000 Milwaukee Avenue
Glenview, IL 60(',25
Telephone: (312) 745-5152
Mon-Fri, 8:00 a.ra. - 4:30 p.m. Central Time
NOTE: Before you ask for Warranty service, ,check the
Operating Guide section entitled, "MAINTENANCE
AND TROUBLESHOOTING."
It may be possible to
avoid a service call.
ZENITH ELECTRONICS
CORPORATION
1000 MILWAUKEE
AVENUE
GLENVIEW,
ILLINOIS
60025
TVWRDIR2
]Part No. 206-2919
Printed in U.S.A.
EP-EDCBAO