1
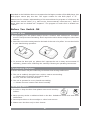
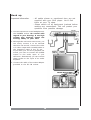
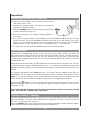
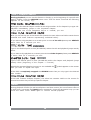
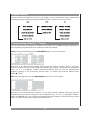
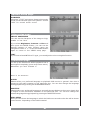
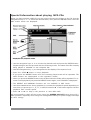
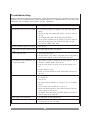
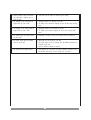
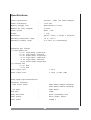
3
Thank you very much . . .
. . . for choosing one of our portable DVD players. For your own safety and in order to learn
all about the functions available, please read this manual and keep it for future reference.
And if you once sell the unit please include the manual.
www.dk-digital.com
© 2005 Copyright DK digital AG, Germany
2
Important Safety Guidelines!
• This unit is meant to playback DVDs as • This product uses invisible “Class-1well as other digital media. Using it in any
other way invalidates the warranty and you
risk electric shock.
• Never attempt to open the housing of your
Laser”. Never expose your eyes to this
dangerous laser beam.
• Mains adapters don’t have an on/off
switch. So disconnect the adapter from
the mains when the unit is not in use.
DVD player or to service the product
beyond that described in this manual. All
servicing or repair must be referred to • If you should use this device inside a
qualified service personnel authorised
motor vehicle it must not distract the
by us.
driver.
• To avoid the risk of electric shock never • If you transport the unit from cold to warm
use the product in humid areas or near
water - e.g. near a bathtub, washbowl,
kitchen sink, in a wet basement or near a
swimming pool, or the like.
• This unit is intended for exclusive use
conditions, condensation inside may
cause moisture leading to malfunctions.
If so please open the disc compartment
and wait about 30 minutes, until the
moisture has evaporated.
- with the mains adaptor supplied, • After disconnection from the mains you
mains voltage of AC230V~/50 Hz, or
can use a soft damp cloth to clean the
- with the cigarette lighter adapter
housing. Don’t use strong cleansing
supplied,
products.
- with the rechargeable battery pack
supplied.
Never try to use any other voltage supply.
• IF objects have fallen inside or liquid
has been spilt onto the product disconnect
it immediately from its actual voltage
supply and consult qualified service
personnel.
• Never let children play with the unit or
stick anything into it. Otherwise you face
the risk of electric shock.
• Do not place the unit near strong
magnetic fields, water or heat. It
should not be exposed to direct sunlight
for a longer period. Avoid positions with
heavy dust or poor ventilation. The unit
should not be exposed to mechanical
vibrations or shock.
3
Table of contents
Important Safety Guidelines!
. . . . . . . . . .
About this Manual . . . . . . . . . . . . . .
Many Disc Formats are supported . . . . . . .
Important Information . . . . . . . . . . .
Comments on the copyright . . . . . . . . .
Region Management Information . . . . . . . .
Before You Switch ON . . . . . . . . . . . . .
Place of Use . . . . . . . . . . . . . .
Condensing Moisture . . . . . . . . . . .
Handling Disc’s . . . . . . . . . . . . .
Cleaning a Disc . . . . . . . . . . . . .
Using the Remote Control Handset . . . . . . .
Overview of the control elements . . . . . . . . .
The Remote Control Handset (R/C)
. . . . . . . .
Hook up
. . . . . . . . . . . . . . .
Operation
. . . . . . . . . . . . . . .
Switching On and Off, Stand-by . . . . . . .
DVD Playback . . . . . . . . . . . . .
Volume Control / Muting . . . . . . . . . .
Key Lock . . . . . . . . . . . . . .
Directly calling up Titles and Chapter . . . . . .
Skip & Search . . . . . . . . . . . . .
Titel / Chapter Search . . . . . . . . . .
Zoom
. . . . . . . . . . . . . . .
Various Camera Angles . . . . . . . . . .
Repeat Modes . . . . . . . . . . . . .
A-B Repeat Mode . . . . . . . . . . . .
Toggle Audio Language . . . . . . . . . .
Show Subtitles . . . . . . . . . . . . .
DVD Menu . . . . . . . . . . . . . .
Display button . . . . . . . . . . . . .
Programming Chapter / Tracks . . . . . . . .
Digest . . . . . . . . . . . . . . .
Bookmark . . . . . . . . . . . . . .
3D Sound . . . . . . . . . . . . . .
Switch off the screen. . . . . . . . . . .
The DVD Setup Menu
. . . . . . . . . . . .
General Setup Page . . . . . . . . . . .
Speaker Setup Page . . . . . . . . . . .
Video Setup Page . . . . . . . . . . . .
Preference Page . . . . . . . . . . . .
Use in a car . . . . . . . . . . . . . . .
Important Notes about the built-in rechargeable Battery
Special Information about playing CDs
. . . . . . .
Random Playback . . . . . . . . . . . .
Intro Scan . . . . . . . . . . . . . .
Special Information about playing MP3-CDs . . . . . .
Special Information about about VCD Playback . . . . .
Data Discs with Pictures in JPEG format . . . . . . .
Disposal advice . . . . . . . . . . . . . . .
Troubleshooting . . . . . . . . . . . . . . .
Specifications . . . . . . . . . . . . . . .
4
.
.
.
.
.
.
.
.
.
.
.
.
.
.
.
.
.
.
.
.
.
.
.
.
.
.
.
.
.
.
.
.
.
.
.
.
.
.
.
.
.
.
.
.
.
.
.
.
.
.
.
.
.
.
.
.
.
.
.
.
.
.
.
.
.
.
.
.
.
.
.
.
.
.
.
.
.
.
.
.
.
.
.
.
.
.
.
.
.
.
.
.
.
.
.
.
.
.
.
.
.
.
.
.
.
.
.
.
.
.
.
.
.
.
.
.
.
.
.
.
.
.
.
.
.
.
.
.
.
.
.
.
.
.
.
.
.
.
.
.
.
.
.
.
.
.
.
.
.
.
.
.
.
.
.
.
.
.
.
.
.
.
.
.
.
.
.
.
.
.
.
.
.
.
.
.
.
.
.
.
.
.
.
.
.
.
.
.
.
.
.
.
.
.
.
.
.
.
.
.
.
.
.
.
.
.
.
.
3
5
5
5
5
5
6
6
6
6
7
7
8
10
12
13
13
13
13
14
14
14
15
15
16
16
16
16
16
16
17
17
18
18
19
19
20
20
21
21
21
22
23
23
23
23
24
25
25
25
26
28
About this Manual
The operation described here mainly refers to the use of the remote control handset (R/C).
Buttons with same or similar marking at the main unit have the same function like those of
the R/C. If this symbol
occurs on the screen during operation, that function requested is
not supported by the media type inserted.
Many Disc Formats are supported
R
R
R
R
R
R
R
R
£
^
^
DVD-Video
CD-R
CD-RW
CD Audio
JPEG Photo CD
DVD-RW
DVD-R
VCD 1.0
MVCD
SVCD
DVCD
R
= yes,
£
= no
DVD+RW
DVD+R
DVD-ROM
MP3
DVD-RAM
CD-G
SACD
VCD 2.0
XVCD
XSVCD
HDCD
^
R
R
£
R
£
R
£
R
^
^
£
= maybe
Important Information
Usually the unit plays CD-R, CD-RW, MP3 discs as well as “burned” DVDs. But due to
the variety of blank disc types, recording computers, operating systems and
burning software we cannot guarantee that every “burned disc” is playable. The
unit does not play DVD-ROM, CD-ROM etc.
The types of functions and operations that can be used for a particular disc vary depending
on the features of that disc. In some cases, these functions and operations may differ from
the descriptions given in this Operations Manual. In this event, follow the instructions given
on the screen and on the sleeve of the disc.
Comments on the copyright
This product incorporates copyright protection technology that is protected by method
claims of certain U.S. patents and other intellectual property rights owned by Macrovision
Corporation and other rights owners. Use of this copyright protection technology must be
authorized by Macrovision Corporation, and is intended for home and other limited viewing
uses only unless otherwise authorized by Macrovision Corporation. Reverse engineering or
disassembly is prohibited.
Region Management Information
This DVD player is designed and manufactured to respond to the region
management information that is recorded on a DVD disc. If the region number
5
described on the DVD disc does not correspond to the Region number of this DVD player, this
DVD player cannot play this disc. The region number for this DVD player is “2”.
Please note for a better understanding of this manual that the program of a DVD may be
divided into several “titles” (e.g. main movie, bonus material, interviews etc.). Each of
these titles can be divided into “chapters”. The program of audio CD’s is divided into
“tracks”.
Before You Switch ON
Place of Use
Ø For operating the unit please always choose a location with sufficient air circulation
around. That prevents overheating. Don’t expose the unit to direct sunlight or other heat
sources.
Ø Stand the unit on the casing stand on the back of the unit or lay it flat. You can also hold it
in your hand during operation.
Ø To protext the laser pick up, please don’t operate the unit in dusty environments. If
necessary, please use a cleansing disc carefully following its operating instructions.
Condensing Moisture
In these cases water may be condensing on the laser lens causing malfunction:
Ø The unit is suddenly brought from a cold to a warm surrounding.
=> Please take out the disc and wait for about
an hour, until the unit has warmed.
Ø The unit is operated in a very humid surrounding.
=> Please choose a location with lower humidity.
Handling Disc’s
Ø In order to keep the disc clean please never touch its shiny
surface.
Ø Never put any sticker or adhesive label on the disc. Imbalance would occur and cause
malfunction.
Ø Dont expose discs to direct sunlight or other heat sources.
Ø Please store the discs only in their sleeves.
6
Cleaning a Disc
To clean a disc use a soft cloth without any cleaning agent, liquid or solvent.
Only wipe from the center hole towards the outer edge, never in circular
movement.
Using the Remote Control Handset
1. The remote control uses a pre-installed NiMH type battery
(CR2025 3V). To prevent an anticipated discharge of the
battery, we’ve inserted an insulating strip. Please pull it out
prior to first operation.
Should the r/c start to work unreliably replace the battery with
a new one of the same type. Open the battery compartment.
Push the retention clip in the direction of arrow and pull out the
battery mounting.
2. Before you take out the empty battery, please memorise its
position. The “+” marking must show upwards, otherwise the
r/c will not work and may be damaged.
3. Please point the r/c towards the main unit when operating its buttons.
The r/c works properly in a distance below 6m and in an angle of up to 30° of the front of
the unit. No obstacles may stand in the way between r/c and infrared sensor.
Ø Batteries should not be disposed by ordinary refuse disposal. Please lead
empty batteries towards appropriate collecting points. Never throw batteries
into fire.
Ø If you won’t use the r/c for some time, please remove the battery from the compartment,
to prevent damage by leakage.
7
Overview of the Control Elements
. . . on top:
1
3.
4.
5.
6.
7.
8.
& 2. PHONES
VOLUME
S-VIDEO
VIDEO
AUDIO
POWER
DC IN
-
headphones sockets
volume control
S-video output
video line socket
audio line socket
on / off switch
connect the mains adaptor cable or the cigarette
lighter cable here
. . . on the bottom and rear side:
8
. . . on the front-side:
10. 3456
11. IR
12. ;
13.
14.
15.
16.
17.
18.
19.
20.
21.
22.
23.
24.
25.
26.
- navigation key to operate the menus
- sensor, receives the remote control signals
- holds playback and gives still picture, shows video
frame by frame
9
- skips to previous chapter (DVD) or audio track (CD)
:
- skips to next chapter (DVD) or audio track (CD)
STANDBY
- standby indicator
CHARGE
- indicates the charging of the battery
FULL
- indicates that the battery is fully charged
Disc compartment cover
TFT display
SETUP
- calls up the OSD menus for basic setup
DISPLAY
- shows time information of current program
TITLE MENU
- calls up the title menu (if supported by DVD)
ENTER
- confirms your inputs
DVD MENU
- shows the DVD’s content options to choose from
4
- starts playback
<
- stops playback
9
The Remote Control Handset (R/C)
10
1.
2.
3.
4.
5.
6.
7.
8.
9.
10.
11.
KEY LOCK
0 - 9
DVD MENU
TITLE MENU
PBC
DISPLAY
3456
RETURN
BOOKMARK
SLOW/R
PAUSE/STEP
12. RANDOM
13. MUTE
14. REPEAT / A-B
15.
16.
17.
18.
19.
20.
21.
22.
23.
24.
25.
26.
27.
28.
29.
30.
31.
32.
33.
34.
35.
8
7
:
9
SLOW/F
STOP <
PROGRAM
SEARCH
ENTER
PLAY 4
SETUP
3D
ANGLE
SUBTITLE
AUDIO MENU
AUDIO MODE
ZOOM
CLEAR
DIGEST
STANDBY ON/OFF
SCREEN ON/OFF
-
to lock the keys of the device
numeric buttons 0 - 9
shows the DVD’s content options to choose from
calls up the title menu (if supported by DVD)
PlayBackControl (VCD 2.0 only)
shows time information of the current program
navigation key to operate the menus
return-key (VCD only)
sets bookmarks
slow motion backward, 1/2, 1/4, 1/8, or 1/16 speed
holds playback and gives still picture, shows video
frame by frame
plays the CD tracks at random, no function with DVD
mutes the sound
activates repeat mode, A/B repeats a certain portion
of the program
speeds up playback forward, 2-, 4-, 8- up to 16fold
speeds up playback backward, 2-, 4-, 8- up to 16fold
skips to next chapter (DVD) or audio track (CD)
skips to previous chapter (DVD) or audio track (CD)
slow motion ahead, 1/2, 1/4, 1/8, or 1/16 speed
stops playback
allows the playback in individual order
activates search mode
confirms your inputs
starts playback
calls up the menus for basic setup
activates 3D sound settings
toggles camera angles (if provided by the DVD)
shows subtitles available
toggles certain audio options
toggles certain audio options
activates 3-step zoom
clear button
shows various program overviews
to switch the unit on and off
switches the built-in screen on and off
11
Hook up
Important information:
- All cables shown or mentioned here are not
supplied with your DVD player. You’ll find
them at your TV shop.
- Please switch off all equipment involved before
making any connections. This will protect your
speakers from possible damage.
1. You can connect one or two headphones to
the PHONES socket. Be careful with
regard to your hearing. A too high
volume may lastingly impair the
hearing ability of your ears.
2. Although this unit has its own screen, you
can surely connect it to an external
television set as well. Connect the video
or S-video output with a suitable cable to
the respective input of the TV set.
If you want your TV set to playback the
sound, you have to connect the AUDIO
output to the audio input of your
television. Alternatively you can connect
these socket to the input of an audio
amplifier.
3. Connect the cable of the mains adaptor
provided to the DC IN socket.
12
Operation
Switching On and Off, Stand-by
Ø Plug the mains adapter into a properly wired mains
wall outlet (230V~ AC).
Ø Connect the adapter cable to the DC IN input at the
right side of the DVD player.
Ø Slide the POWER switch on the top right of the player
to ON to switch the player on.
Ø If no disc is inserted, our welcome image appears on
the screen.
Ø If you wish to put the player onto standby, press the STANDBY ON/OFF button on the
remote control. The green STANDBY indicator will light up on the bottom left of the
player. You can wake the player up from standby mode by pressing the STANDBY
ON/OFF button on the remote control or the PLAY button 4 on the player.
Ø To switch the unit off, slide the POWER switch into the OFF position.
DVD playback
Press the disc compartment opener to open the front of the casing, which is the lid of the
disc compartment at the same time. Insert a CD with the label side up. Use two fingers to
carefully press the middle of the CD onto the spindle of the CD plate. Close the disc
compartment by gently pressing down on the area marked PRESS TO CLOSE on the disc
compartment lid.
Play back starts automatically. Usually DVD discs now show a menu to choose from. You can
control this menu with the navigation buttons 3445. Mark the desired option and press
ENTER to activate. Mostly you find additional information about the DVD’s content on its
sleeve.
To interrupt playback press STOP < once. The screen shows “PRESS PLAY KEY TO
CONTINUE”. So the player memorizes the location where playback was stopped. Press
PLAY 4 to resume playback there. Press STOP twice and the unit completely stops and
won’t remember the last position. Maybe resume play is not supported by all discs.
If this symbol
appears on the screen while pressing a button the unit can’t carry out the
desired function, 'cause it’s not supported by either the DVD inserted or the current
operating mode.
TIP: When the disc has stopped the unit automatically changes to stand-by mode
after 30 minutes without any operation.
Volume control / Muting
We have equipped the player with a volume control. The VOLUME control is found on the top
panel of the player. Turn the control rightwards to increase the volume. Turn the control to
the left to decrease the volume.
Press the MUTE button if you wish to turn the sound off completely. “Mute” will then appear
on the screen. Press the button again to turn the sound back on.
13
Key lock
Press the KEY LOCK button if you want to deactivate all buttons on the player except the
POWER button. If you do so, “Key lock ON” will remain visible on the screen. Press the
button again to release the key lock.
Directly Calling up Titles and Chapters
When the disc has been stopped, you can call a title directly for playback by pressing any
number button and then entering the respective title number using the number keys on the
remote control. Playback will then start at this title. All numbers must be entered as two
digits, so if you wish to play “3”, for example, you need to enter “03”.
If this title contains multiple chapters, the select bar remains visible on the screen for
several seconds to let you call up a specific chapter.
During playback, you can make the playback jump to a specific chapter. Simply enter the
number of the chapter you want. Playback will then continue from this chapter
Skip & Search
Press SKIP 9 or : to let playback jump to the beginning of the previous / next chapter
(DVD) or track (CD).
Press the SLOW/R or SLOW/F button repeatedly to start playing in slow motion at 1/2,
1/4, 1/8 or 1/16 speed. Press this button again or press the PLAY button to resume normal
playback. The sound will be set to mute during slow motion playback.
If you want a freeze frame, press the PAUSE/STEP ; button. A moving DVD logo appears
as a screen saver after one minute of freeze frame to prevent the image being burned onto
the screen. Press the PLAY button twice to resume normal playback.
78 With these buttons, you can fast forward or reverse during playback. Depending on
how often you press, the images run at 2, 4, 8 or 16 times speed. The sound will be set to
mute. Press the 7 or 8 button or the PLAY button again to resume normal playback.
14
Title / Chapter Search
During playback you can use this feature to directly go to the beginning of a specific title
and/or chapter. Press the SEARCH button once. Then for about 5 seconds the following
appears on the screen, e.g.:
Now type in the desired chapter number as two-digit number. So for chapter 8 you type: 08.
Playback immediately jumps to the requested chapter.
If you press one of the navigation keys 34 instead, you see:
Now you can call up one of the DVD’s title (beside the main title most DVDs contain bonus
material and extra features representing individual titles).
If you want to skip playback to a certain point in time of the title please press SEARCH
twice. Now for 5 seconds you see:
Type in the desired point in time (HH:MM:SS) within the title and playback jumps exactly
there.
If you want to skip playback to a certain point in time of the chapter please press SEARCH
3 times. Now for 5 seconds you see:
Type in the desired point in time (HH:MM:SS) within the chapter and playback jumps
exactly there (beginning of the chapter = 0:00:00).
Should the requested data be incorrect or not available the
and you have to repeat the input.
symbol appears on the screen
If the DVD is completely stopped the SEARCH button lets you only type in the desired
title number:
If this title contains multiple chapters, the select bar remains visible on the screen for
several seconds to let you call up a specific chapter.
Zoom
During playback of DVDs (as well as still picture and slow motion) the zoom feature offers a
3-step zoom. Just press the ZOOM button repeatedly. Using the navigation keys you can
move the detail. Press ZOOM again to resume normal playback.
15
Various Camera Angles
The movies on some DVDs have been recorded from various camera positions. This lets you
enjoy the same scene from different perspectives. In this case you’ll usually find a marking
on the DVD sleeve.
When playing a DVD containing various camera angles the camera symbol appears on the
screen:
followed by the no. of the current perspective / total no. perspectives available.
Press the ANGLE button repeatedly until the desired perspective is shown. The picture will
be adjusted in 1 - 2 seconds. If the
symbol appears instead of
, the DVD inserted does
not support different camera perspectives.
Repeat Mode
Depending on the disc type inserted various repeat functions are available:
DVD: repeating a chapter (press once), repeating a title (press twice).
CD:
repeating one track (press once), repeating all tracks (press twice).
During playback press REPEAT once, and the DVD chapter (or CD track) will be repeated
after reaching its end. Press REPEAT twice and the complete DVD title (or all CD tracks) will
be repeated. Press the button again to cancel the repeat function.
A-B Repeat Mode
If you want the player to repeat a certain portion of the program press the A-B button at the
beginning of this portion. Press it again at the portion’s end. This selection will be repeated
again and again until you press the A-B button again to cancel the function.
Toggle Audio Language
During DVD playback press the AUDIO MENU button to select a different language track
(in case the DVD does provide the sound track in different languages).
Show Subtitles
During DVD playback press the SUBTITLE button to select the language for subtitles (if
supported by the DVD inserted) or to deactivate that function.
DVD Menu
Pressing the DVD MENU button calls up the content menu of the DVD (if available). Here
you can often activate various titles, bonus material and specials. To resume playback just
press the PLAY 4 button. Um die Wiedergabe fortzusetzen, drücken Sie einfach die PLAY
4 -Taste. Some DVDs additionally contain a title menu. Call it up by pressing TITLE
MENU.
16
Display Button
During playback of DVDs and CDs you can display various information about elapsed and
remaining playing time by pressing the DISPLAY button. Please note this overview:
Programming Chapter / Tracks
You can store up to 20 chapters of a DVD (or 20 tracks of a CD, not working for MP3 CDs) in
an individually programmed order. Please proceed accordingly:
DVD: Insert the DVD and press the PROGRAM button. The screen shows:
Now type in the desired title number followed by the chapter number (both in two-digit
format). Repeat this input until all desired chapters are stored. Then press the navigation
keys 3456 to highlight “START” and press ENTER. Now you see the programmed
chapters playing in the previously stored order. To delete the program please press
STOP < twice.
CD: Insert the CD and press the PROGRAM button. The screen shows:
Now type in the desired track number (in two-digit format). Repeat this input until all
desired tracks are stored. Then press the navigation keys 3456 to highlight “START”
and press ENTER. Now you hear the programmed tracks playing in the previously stored
order. To delete the program please press STOP twice.
17
Digest
This function allows an interesting overview of the disc’s program.
1.
2.
During playback press DIGEST and select the desired digest type. Press ENTER to activate.
Usually title/chapter overview are offered as well as interval overview.
3.
If you choose CHAPTER DIGEST the first 3 seconds of 6 chapters at a
time are shown on screen. By choosing “NEXT” you see the next 6
chapters, and so on.
4.
That gives you an impressive survey. Use the navigation keys to select the
desired chapter and hit ENTER. Playback starts with the requested chapter.
5.
Or maybe you choose “TITLE INTERVAL”, then you get an overview about
the current title in 10-minute steps on the screen.
6.
Now again select the desired scene using the navigation keys and press ENTER. Or you choose EXIT to leave the digest function.
Bookmark
During playback of a DVD this unit allows you setting and storing bookmarks for up to 12
different locations. This function lets you jump to one of these locations to proceed playback
there. The bookmarks keep stored until you open the disc tray or switch off the player.
Please proceed as follows:
1.
2.
During playback please press the BOOKMARK button. Now the screen shows
12 empty boxes.
At the first desired location press PLAY button to store the first bookmark.
3.
Using the navigation keys you select the next box to store in.
4.
You may now press BOOKMARK again to temporarily leave the function and
call up another chapter of the DVD.
5.
There you can again call up the bookmark function to mark further
locations of the program.
6.
To delete a bookmark, select it and press the CLEAR button.
7.
To start playback of a marked position select the desired box with the navigation keys and press PLAY.
18
3D Sound
3D Sound produces a sound effect that simulates a multichannel sound system although
using only 2 speakers. But this only works with discs encoded with Dolby ProLogic, Dolby
Digital or DTS multi-channel audio tracks.
Press the 3D button repeatedly to activate your favorite sound effect. On screen appear the
following effects for your selection:
SURROUND ROCK
SURROUND POP
SURROUND LIVE
SURROUND DANCE
SURROUND TECHNO
SURROUND CLASSIC
SURROUND SOFT
SURROUND OFF
Do NOT use this feature if you have more than 2 speakers connected.
Turn off the TV surround sound or any other surround effects when using 3D sound.
Switch off the Screen
Use the SCREEN ON/OFF button to switch off the screen separately, e. g. when halting
playback. Especially when using the rechargeable battery for power supply this helps to
save energy.
19
The DVD setup menu
This is the place where you arrange all important settings for the cooperation of the DVD
with the TV set and other audio equipment. Press the SETUP button to access those menus
shown below. Use the navigation keys 3456 to operate the menu.
To activate or confirm the marked items please press the ENTER button. When you have
highlighted a menu item but want to change to an other menu page, please press the 3
button (once or twice) before. Having done all desired settings press SETUP button again to
leave the menu and resume playback.
The menu’s in detail - general setup page
TV-Display
The program’s screen format (4 : 3 normal
TV / 16 : 9 wide screen) is fixed by the DVD.
Please note that this format might not
necessarily match the built-in screen format
or your TV’s screen format.
Then this will be helpful:
— NORMAL/PS: Choose this mode when the
connected TV set has 4 : 3 screen format.
The picture will fill the screen but some right and left portion will be cut.
— NORMAL/LB: Choose this mode when the connected TV set has 4 : 3 screen format. The
picture will appear in its entire width but framed by black bars at the top and the bottom.
— WIDE: Choose this mode when using the built-in screen or a 16 : 9 wide scrren TV set.
TV-TYP
This lets you choose the connected TV’s color system, either NTSC (American standard) or
PAL (Europe).
ANGLE MARK
If this function is enabled the camera symbol appears on the screen as soon as various
perspectives are available on the DVD. Choose “OFF” and no camera symbol will appear.
OSD LANG(uage)
Please select the preferred language for the OSD menus. English, Spanish, German,
French, Italian and Dutch are available.
SCREEN SAVER
When you enable this function a moving DVD symbol appears on the screen when ths unit is
stopped or showing a still picture for more than 1 minute. This saves to screen from getting
damaged by constant pictures. Choose “OFF” to disable the feature.
20
Speaker setup page
DOWNMIX
Choosing “LT/RT” activates a theatrical downmix
mode for the left and right front speaker. Choose
“STR” for normal stereo sound.
Video setup page
IMAGE SHARPNESS
You can set the sharpness of the image to high,
middle or low here.
If you select Brightness, Contrast or Color and
then press the ENTER button, you can set the
desired intensity of each function using the
navigation button 34. Press the ENTER button
again to return to the VIDEO setup page.
TINT
If you have selected NTSC as TV type, you can adjust the colors using this function.
Preference page
To call up the Preference SETUP playback has to
be stopped completely (press stop button twice).
Otherwise you can’t activate it.
Here is its structure:
AUDIO
Please select your preferred language to playback DVD movies in general. Sure this is
subject to the audio material on the particular disc. You can also change the language
during playback by pressing the AUDIO MENU button.
SUBTITLE
Please select your preferred language to generally show subtitles on the screen. Again this
is subject to the information available on the particular disc. You can also change the
subtitle language during playback by pressing the SUBTITLE button.
DISC-MENU
Here you can choose the language in which the DVD menu stored on the disc will be shown
on the screen - depending on the DVD’s material.
21
PARENTAL (CONTROL)
This function allows to prevent the playback of DVDs containing material inappropriate for
children, on condition the DVD is coded accordingly. 8 classifications are available:
1.
2.
3.
4.
5.
6.
7.
8.
KID SAF:
G:
PG:
PG13:
PGR:
R:
NC17:
ADULT:
safe for kids
for all ages
parental guidance
parental guidance for
parental guidance for
parental guidance for
for kids of 17 years
for adults only
kids under 13 years old recommended
kids under 17 years old recommended
kids under 13 years old strongly recommended
and older
Choose the classification desired and press ENTER. Now you have to input a password to
authorise the amended of the parental control’s level. The factory setting for this password
is 1234. Next you’ll learn how to change the password (and you should, `cause kids can also
read manuals).
PASSWORD
Here you can change the password you need to adapt the parental control level.
Having activated CHANGE please enter the old password (factory setting is 1234). Now
type in the new one and repeat it for safety confirmation. You close this procedure by
pressing ENTER. From now on the new password has to be entered for changing the
parental control level.
Use in a Car
Your DVP-800 can be used in a car by connecting the adapter to the cigarette lighter socket.
We want to emphasize particularly, that in cars the DVD player may only be used
on the back seats and with headphones cutting out the internal speakers to avoid
distracting the driver. The unit may not be of any danger to the car passengers in
the event of an accident!
Use the cigarette lighter adapter to connect the DC IN socket of the unit to the car’s
cigarette lighter. The further operation is identical to the operation with the mains adapter
described above.
22
Important Notes about the built-in rechargeable Battery
1. Once the built-in battery has been fully spent, please immediately recharge the battery
(regardless of whether you plan to use battery power again soon) in order to maximize
battery life.
2. Never attempt to charge the built-in battery in any other way, than described in this
booklet.
3. Recharge effectiveness will degrade when environmental temperatures drop below 50°F
(10°C) or exceed 95°F (35°C).
4. If you plan to not use the unit for an extended period of time, please recharge the battery
at least once every two weeks to avoid irreparable damage to the battery.
5. If you plan to not use the battery power for an extended period of time (say, one week or
longer), we recommend that you nevertheless first fully charge the battery.
6. Avoid unnecessarily recharging of a fully charged battery.
Special Information about playing CDs
During playback of a CD (MP3 as well) the AUDIO MENU button lets you choose various
audio modes. Depending on the disc type inserted usually these are the options:
— MONO LEFT: left stereo signal feeds right and left speakers
— MONO RIGHT: right stereo signal feeds right and left speakers
— MIX MONO: MONO signal feeds right and left speakers
— STEREO: normal stereo sound, recommended
Random Playback
To play the CD tracks in random order please press the RANDOM button. The screen shows
“RANDOM”. When all tracks have been played once the playback stops. To cancel the
RANDOM mode just press the the RANDOM button again.
Intro Scan
When playing a CD the DIGEST function allows an intro scan giving an acoustic overview.
So if you press the button the first few seconds of all tracks will be played one after the
other. When the track you’ve been looking for is on, just hit the PLAY button to resume
normal playback. That ends the Digest function.
23
Special Information about playing MP3-CDs
When you have inserted a MP3 CD you see a menu showing the folders on the CD. Use the
navigations keys 56 to select the desired folder, then press the ENTER button. Now the
MP3 tracks inside are displayed.
— Use the navigation keys 56 to choose the desired track and press the ENTER button.
Playback begins and will proceed with the following tracks. The name of the file currently
being played is indicated on the turquoise bar.
— With this navigation key 3 you change back to the display of the superior level.
— Press the STOP < button to stop playback.
— If you press the REPEAT button once the currently played track will be repeated. The
SKIP buttons are deactivated in this operation mode!
— When you press the REPEAT button twice all files within the folder will be repeated. To resume normal playback just press the REPEAT button again, until “FOLDER” is displayed.
— The REPEAT and RANDOM functions are not available in MP3 mode.
— Use these 78 buttons during playback to increase the playback speed depending on
how often you press up to 2-, 4-, 8-, or 16fold. Press the 7 or 8 button again to resume
playback with normal speed.
— Press 9 or : to skip to the previous or next MP3 track.
We recommend to switch off the screen using the SCREEN ON/OFF button during CD /
MP3 operation. Especially when using the rechargeable battery for power supply this helps
to save energy.
24
Special Information about VCD Playback
(VCD 2.0 only)
— During playback of a VideoCD with PBC functions you can call up simple interactive
functions at your TV set.
— During playback, you can select functions such as Title select, Stop, Previous/Next scene, Fast forward or reverse, Play/Pause and Karaoke.
— The PBC function can be run automatically after the disc is loaded and the logo appears.
Data Discs with pictures in jpeg format
You can burn computer graphics or pictures on CD and let the DVD player show them on you
TV screen. But these grphic files must be stored in “jpeg” format (file extension .jpg),
otherwise they won’t be recognized.
When you have inserted a CD with jpeg-files you see a menu showing the folders / files on
the CD. Use the navigations keys 56 to select the desired folder, then press ENTER. Now
the files inside are displayed.
— Use the navigation keys 56 to choose the desired file and press the ENTER button. That
picture will be displayed.
— This starts your “modern slide show” because the unit will change to the next picture automatically after a few seconds until all pics have been shown on screen once.
— Press the PAUSE button to hold the current picture on the screen. Use the PLAY 4 button
to continue.
— Use the 9 or : key to skip back or forward.
— Press the < button to cancel the picture show and to return to the folder menu.
— If you press the REPEAT button once, the currently displayed picture will constantly been
shown on the screen. Press this button twice to have all pictures in the current folder repeated. Press REPEAT again to cancel this mode.
Important note: When you’ve selected “REPEAT ONE” only that picture will be displayed
constantly. Then you cannot skip using the 9 or : button.
Disposal advice
When the operating life of this device has ended it must not be disposed as
domestic waste, but in accordance with national environmental guidelines.
25
Troubleshooting
Before requesting service for this player, check the chart below for a possible cause of the
problem you are experiencing. Some simple checks or an adjustment on your part may
eliminate the problem and restore proper operation.
Symptom
Remedy
• Display keeps dark, unit can’t be activated. • Is the mains (car) adapter firmly plugged into the power outlet (cigarette
lighter)?
• And does the plug of the adapter cable sit firmly in the DC IN socket on
the unit?
• The rechargable battery pack might be exhausted, please charge it.
• One of the safety mechanisms may be operating. In this event, unplug the
player from the actual power source briefly and then plug it in again.
• Try to press the SCREEN ON/OFF button.
• Noise (interference) appears in the picture.
• Clean the disc..
• The format of the picture cannot be changed.
• The format might be fixed by your DVD disc.
• No or only weak sound.
• Turn up the volume control.
• The unit might be in still, search, or slow motion mode. Then the sound is
muted. Press the PLAY key to resume normal playback with sound.
• No operations can be performed with the
remote control handset.
• Check whether the battery is installed with the correct polarity (+ and -).
• The battery is exhausted: replace it with a new one.
• Point the remote control at the sensor on the unit when pressing r/c buttons.
• Operation distance is too big.
• Remove any obstacles between the remote control handset and remote control sensor.
• The disc does not play.
• Insert the disc correctly with the shiny playback side facing down in the
disc compartment.
• Clean the disc.
• The system cannot play CD-ROMs, etc.. See page 5 for a list of supported
formats.
• Check the region code of the DVD disc. It must be “2”
• Moisture has condensed inside the system. Remove the disc and leave the
system turned on for about an hour.
• The parental control might prevent the playback, because the disc does not
match the setting for the control level
• DVD playback starts automatically.
• The DVD features the auto playback function.
• DVD playback stops automatically.
• Some DVDs may be recorded with an “auto pause”. When you playback
such a disc, the unit stops a the signal.
26
• Stopping playback, Search, Slow-motion
play, repeat play or Program play, etc.,
cannot be done.
• Some discs may not support this function (due to format).
• The language for the sound cannot be
changed when you play a DVD.
• Multilingual sound is not recorded on the DVD.
• The change of the soundtrack’s language can only be done using the DVD
menu.
• The language for the subtitles cannot be
changed when you play a DVD.
• Multilingual subtitles are not recorded on the DVD.
• The change of the subtitle’s language can only be done using the DVD
menu.
• The subtitles cannot be turned off when
you play a DVD.
• Depending on the DVD, you may not be able to turn the subtitles off.
• The camera angles cannot be changed
when you play a DVD.
• Multi-angles are not recorded on every DVD.
• The camera angle can only be changed, when the different perspectives are
displayed on the screen.
• Open the SETUP and enable this function.
• The system does not operate properly.
• Static electricity, etc., may affect the system’s operation. Disconnect it from
the particular power source for some seconds, then re-connect it.
27
Specifications
Power requirements
:
AC 230V~, 50Hz (via mains adaptor)
Power consumption
:
11 W max.
Battery charging time
:
approximately 8 hours
Battery life (fully charged)
:
2 hours
Signal system
:
NTSC / PAL
Weight
:
< 1 Kg
Dimensions
:
approx. 155(T) x 257(B) x 42(H)mm
Operating temperature range
:
+5 to +35° C
Operating humidity range
:
5 to 90% (no condensation)
Supported disc formats
(1) DVD-VIDEO disc
12 cm single-sided, single-layer
12 cm single-sided, dual-layer
12 cm double-sided, single-layer
8 cm single-sided, single-layer
8 cm single-sided, dual-layer
8 cm double-sided, single-layer
(2) Compact disc
12 cm Disc
8 cm Disc
Video output level
:
1 Vp-p
Audio output level
:
1 Vrms (1 KHz, 0dB)
· DVD (linear audio)
:
20Hz-20KHz (48KHz sampling)
20Hz-20KHz (96KHz sampling)
· CD audio
:
20Hz-20KHz
S/N ratio
:
70dB
Wow and flutter
:
below measurable level
Laser pickup
:
Wave length: 655nm
Laser power
:
CLASS 1
Audio signal output characteristics:
Frequency responses:
28
29
30
31
© 2005 Copyright
We reserve the right to correct errors and make technical alterations.
This manual is copyrighted. All rights reserved. Neither the manual as a whole
nor excerpts may be reproduced without our prior written permission.
DK digital AG
40878 Ratingen
Germany
www.dk-digital.com