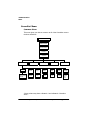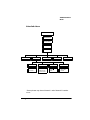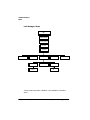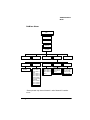
1
&RQILJXUHWKH ,QWHUIDFH 1 In the Administration/Communications/Networkx/CrownNet/ NetWare/Config PServer/PServer Context[1], PServer Context[2], and PServer Context[3] menus, enter the name of the configuration file server and print server context. Note: The three PServer Context[x] menus allow you to identify the name of the NDS configuration file server and the print server context. » The format for the option is File server name Space Print server context For example, if the configuration file server name is QMS-4 and the print server context is PRINTSERV2.SALES.QMS, you would enter: QMS-4 PRINTSERV2.SALES.QMS Note: Make sure to put a space between the file server name (QMS-4) and the print server context (PRINTSERV2.SALES.QMS). » Up to 16 characters can be entered in the Pserver Context[1] field, an additional 16 characters in Pserver Context[2] field, and 16 characters in the Pserver Context[3] field. Note: If you want to assign more than 14 characters to the file server name you must use CrownAdmin 3 to enter the name. » 2 Reset the CrownNet interface by using the Administration/ Communications/Network x/CrownNet/Common/Soft Reset menu. 3 You’re now ready to print. From this point, you’ll probably perform most printing tasks from your application. For specific information, check the printing section in your application documentation. For information on print media types and sizes, see chapter 2, “Print Media,” in the Reference guide. &RQQHFWLQJWRDQ(WKHUQHW1HWZRUN