1
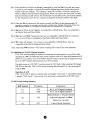
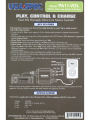
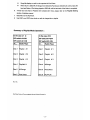
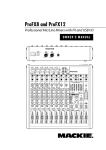
e
Thank you for purchasing USkSPEC product. This manual describes the functions and operation of
PA 11-VOL iPod interface for Volvo. Please read this manual before installing the product in your
vehicle.
!!lMPORTANT!!
.:. It is strongly recommended that the unit is installed in an accessible location, so that it can
later be easily reset or upgraded .
•:. Eject ALL CDs from the built-in CD player or CD changer before installation or
disconnect the power to radio!!!
.:. USA-spEC sells its products through authorized deaiers so we can insure customers wili
receive proper services from the dealers. USkSPEC reserves the right to offer technical
support or warranty only on products purchased through authorized USkSPEC accounts.
•:. It is strongly recommended that buy USkSPEC product from sellers who provide
dedicated phone contact support. USkSPEC will not provie technical support or warranty
for purchases made through any unauthorized internet sellers.
•:. SAFETY NOTE: You should always give full attention to driving. Do not operate iPod
such a way that distracts you while you are driving.
In
!!CAUTION!!
• In general, iPod has not been designed to withstand temperature extremes in automobiles.
Please consult your iPod Owner's Manual regarding acceptable operation and storage
temperatures.
.. Do not disassemble or alter the cable and interface box.
• Make the connections correctly.
• Do not cut away the wire sheath or use the power for other equipments.
Do not install in locations which might hinder vehicle operation or create hazards for vehicle
occupants.
f! Having the wiring and installation done by professionals.
• Arrange wiring so it is not crimped or pinched.
II Do not use this product for purposes other than stated for the vehicle.
Section 1. ABOUT YOUR INTERFACE PA11-VOL
This interface connects an iPod directly to your Volvo audio system. Its on-board software translates
commands from your Volvo CD changer controls into commands that the iPod understands. This
interface enables the iPod to take the place of a Volvo CD changer and provides the following benefits:
• Directs the iPod's audio output to Volvo vehicle audio system for optimal sound quality playback.
• Controls the iPod via vehicle's radio and steering wheel controls.
• Charges the iPod 's internal battery, and charging stops automatically at one hour after iPod is
paused.
Future firmware updates for your iPod may affect the features and functions described in this owner's
manual.
e
Display of artist and song title information, track search by artist, song title, album or genre are NOT
supported. Only the Playlist number and track number are displayed on radio.
This interface is designed as an alternative replacement to the Volvo 6 Disc CD changer unit in your
Volvo vehicle. Therefore it is not possible to have the Volvo 6 Disc CD Changer and PA 11- VOL iPod
interface simultaneously connected to your Volvo radio.
Package Contents
PAll-VOL contains one each of PAl I-VOL interface adopter, CAS-V05i and CB-PA14 cables.
Applications
PAll-VOL is applicable to the following Volvo vehicles equipped with HU series radio:
YEAR
01-07
01-04
01-06
MODEL
S60, S70, V70, S80, XC70
S40, V40
C70
A cable adapter CAS-VOL_NAV is required for vehicles have factory installed navigation system.
This cable adapter is sold separately. Plese contact USkSPEC @626-3363836 or your
distributor to order it.
* USkSPE
verified the published radio and vehicle application to the best of our ability. Due to
uncontrollable factors,U$kSPEC can not 100% guarantee every published application. These
fartors include variables such as, anomalies within a factory radio, factory radio heretofore
unknown to USkSPEC and partial model year changes.
!'/"'''f· !~,
,"
-"" ;;
.~-
,
• -
J
::/: ..-4r,.w~·;.,-~iIMl~~~~~, ~':~:'1"-
.,;,
<t
HYBRID MODE, DIRECT MODE and AUX OPTION
PAll-VOL provides three ways to control yomfPod through the car radio, namelyHybrid Mode,
Playlist Mode and Direct Mode. Playlist Mode and Hybrid Mode share the same DIP switch
setting (DIP # 2= ON) and only one of them will be operative depends on iPod model and its
firmware version.
2-1 Direct Mode: Search and select music on iPod directly just as you would in portable use.
The music will play back through your car stereo. Use the track up/down, fast forward, and
reverse buttons on your radio to control music playback. All control functions on iPod are
available to use too. Please see Section 4 of this manual for additional information.
2-2 Playlist Mode: Operate and control the iPod like it is a CD changer. This mode allows you
to access five playlists on iPod from radio. iPod screen always diaplay" OK to disconnect" or
" Attached to accessory" and iPod IS keypad is not functional or locked. The insructions for
Playlist naming and playback controls are in Section 5 of this manual.
2-3 Hybird Mode: Access Playlists on iPod in the same way as it is in Playlist Mode. Additionally,
iPod screen is not locked and the keypads on iPod can be operated directly as if it were
in Direct Mode.
e
2-3-1 Ifthe playback of a Playlist is manually interrupted by using the iPod 's key pad, and a song
or music in a new category is played, the interface module memorizes the last played track
number of the new category. "New category" means file, or folder, or Playlist, or artist, etc.
which is different from the Playlist being played. When you return to the same DISC on radio
later, the interface module will use the "memorized" track number (note: just the track number,
not the last played song in the new category) to playback the Playlist related to this DISC.
2-3-2 When the iPod is connected to the interface module, the iPod will take approximately 30
seconds to complete its external control mode configuration. During this period of time, the
iPod screen's display will continue to change until the configuration is completed.
2-3-3 iPod touch, iPhone and G3 iPod are not compatible to Hybrid Mode. They are compatible to
the Playlist Mode and Direct Mode.
2-3-4 iPod classic and iPod j'd generation nano are not compatible to Hybrid Mode if is firmware
is 1.1 or newer. They are compatible to the Playlist Mode and Direct Mode.
2-3-5 iPod video with firmare 1.2.3 or newer is not compatible to Hybrid Mode. They are
compatible to the Playlist Mode and Direct Mode.
Note: Disconnect iPod from PAil-VOL before switching DIP switch #2 for mode alteration.
2-4 Additional AUX INPUT Option Selection
PA 11-VOL interface adaptor is capable of connecting two audio sources to your Volvo radio
including the iPod The additional audio source connects to the RCA input jack labeled asAUX
INPTUT. If you choose to use AUX INPUT, the DIP switch # 1 at the side of adaptor box must
be set to "OFF" position (factory presets it at "ON" position).
The audio source at AUX INPUT can be accessed at CD 6 Track 1 after selecting CD changer
SOURCE on the radio. CD 1 to CD 4 are for accessing Playlists and CD 5 is for accessing all
songs on iPod.
Operation of AUX
If the "AUX INPUT" option is selected, radio will display "CD 6 Track 1" when DISC button
is pressed. "CD 6 Track 1" gives access to the audio source connected to AUX INPUT port.
2-5 DIP Switch Setting Summary
DIP Switch
Position
FUllction
ta
ON
RCA AlTX Input Disabled
tn
OFF
RCA AlTX Input Enabled
#2
ON
Hybrid 1\Iode 01' Playlist 1\Iode
Selected (depenes on iPo(1
finllware ,~ersien)
#2
OFF
Dil'ect 1\.fode Selected
e
Step I - Remove radio from dash. (DO NOT unplug the power harness that is connected to the radio.
Some radio models require a SAFETY code to resume radio operation from battery power
loss.)
Step 2 - Disconnect existing CD changer from the radio if there is one.
Step 3 - Connect the black wire on CAS- VOL cable to radio chassis or car body.
Step 4 - Locate the battery B+ (CaNSTANT POWER) wire on the power harness to radio and
connect the yellow wire on CAS-VOL cable to it.
Step 5 - Plug the 90 degree angled DIN connector of the CDL-V05i cable to the radio.
Step 6 - Set the DIP switch #2 to "OFF" position only if the Direct Mode is preferred.
Step 7 - Plug the round DIN plug on the other end of the CDL-V05i to PAll-VOL adapter where it
is labeled "RADIO". (DO NOT connect your iPod to PAil-VOL prior the completion of this
installation step!!!)
Step 8 - Connect the audio output of your auxiliary devices to AUX input jack on PAil-VOL ifAUX
option is selected.
Step 9 - Plug CB-PAI4 cable to PAll-VOL adaptor box where it is labeled" iPod "
Step I 0 - Reinstall radio to dash.
WARNING!!
Use only the iPod connection cable which comes with PA 11-VOL interface adaptor.
iPod connection cables from other sources may look similar, but they may damage your iPod .
CONNECT
TO RADIO
2-POSITION DIP SWITCH
ON: when switch is at bottom position
CONNECT TO iPod
FRONT VIEW
Black wire to
radio chassis or car body
CAS-V05i
O@)
Yellow wire to Battery B+
~~~<J)~~
CAR AUDIO
Q)Q)Q)Q)Q)
@Q)@~
CB-PA14
~
Player or Satellite Receiver
SectiQn4.. CONNECTING & PLAYING of iPod in DIRECT MODE
When the iPod is connected to the adaptor, iPod 's screen will go blank for few seconds before the
nonnal screen returns. Set source to CD changer on your radio, the audio of iPod music will be played
back at DISC 5 and Track I. Adjust VOLUME, BASS, TREBLE and etc. as you would nonnally do
for the other program sources on the radio.
S~ctiolt·5~ CONNECTING & PLAYING of iPod in HYBRID I PLAYLIST
MODE
5-1 Connecting iPod to the interface
After connection, the iPod will take a few moments to change to external control mode.
5-2 Select iPod mode on VOLVO radio
Turn the Source knob to go to CD Changer mode. Then turn the 1-20/Disc knob until "CD06 TRK-x"
appears on the radio display (x is the track number of "Now Playing" song on iPod). This display
confinns that iPod mode has been completely synchronized and activated. Synchronization timing
varies according to the number of Playlists on your iPod.
If iPod was playing previously before radio or ACC power was OFF, and the iPod was not
disconnected, playback resumes from where it was stopped.
5-3 Disconnecting iPod from the interface
If your iPod is disconnected during playback in iPod mode, the radio will automatically switch to
AM/FM mode.
After disconnecting, iPod screen changes from the external control mode screen back to the nonnal
menu. Press and hold the Play/Pause button on iPod may get the nonnal menu back faster.
5-4 Playback of songs on iPod
All audio tracks on your iPod will be played (All play) at DISC 6. Track order is detennined by the
default order on your iPod. Selecting DISC I to DISC 5 on radio will allow playback of 5 Playlists
on iPod. Every time when iPod is connected to the interface adaptor, the playback starts from "Now
Playing" song at DISC 6 by default. If iPod was playing any of its Playlist right before the connection,
the same Playlist will continue to play and repeated at disc 6 but iPod will switch to "All" as soon as
fast forward button (~~) is pressed.
5-5 Selecting a Playlist
Press DISC UP (1\) or DISC DOWN (V) button to select a Playlist. The selected Playlist will begin
playing and the Playlist number and track number will be displayed. In rare cases, this may take up to
few seconds for the completion of synchronization.
o
After playing the last song in the current Playlist, playback will start again from the first track of this
Playlist.
Playlist naming
• When iPod is connected to your radio via PA 11-VOL interface adaptor, the adaptor scans all
available Playlists on iPod and looks for designated VOL va Playlists which are created for direct
access with DISC buttons on Volvo radio. The designated VOLVO Playlists are related to DISC
number in the following manner:
DISC
DISC
DISC
DISC
DISC
DISC
1:
2:
3:
4:
5:
6:
VOLVO 1...
VOLV02,..
VOLV03,..
VOLV04 ...
VOLV05,..
ALL SONGS on iPod
The naming of designated VOLVO Playlists in iTune for PA II-VOL interface must be exactly as
shown. VOLVO must be in capital letters and there can be no spaces between VOLVO text and
number.
However, you may add any text after the correct naming of a Playlist. (i.e. VOLVO I-Jazz,
VOLV03_Favorite3 are acceptable Playlist names for PAll-VOL iPod interface.)
• If no designated VOLVO Playlists are created, PA II-VOL adaptor automatically relates to the
first five available Playlists on iPod to DISC number 1 to 5 regardless Playlist's naming.
• Ifless than five designated VOLVO Playlists are created, PAll-VOL adaptor automatically fills
up the rest of DISC numbers beginning with the first available Playlist on iPod.
Example: if only three designated VOLV01, VOLV03 and VOLV05 Playlists are created,
the disc number on radio will be:
DISC
DISC
DISC
DISC
DISC
1:
2:
3:
4:
5:
VOLV01...
(l st available Playlsit on iPod)
VOLV03,..
nd
(2 available Playlist on iPod )
VOLV05.,.
The iPod interface does not recognize a Playlists that contains no audio tracks regardless of Playlist
naming. The iPod interface also does not recognize the "On-The-Go" Playlist on your iPod.
5-6 Playback function controls
You can control playback with several functions. These functions are generally cancelled when you
press select radio buttons; disconnect the iPod, or POWER OFF the radio or ACe.
SCAN
Press the scan button, each track in the current Playlist play for 10 seconds. If SCAN is pressed at
DISC 6, it will play all songs in iPod for 10 seconds each.
Random (Shuffle)
Press the random button (RND), songs within a Playlist will playback in random order. The display
of track number will change to start from 1 as it does on the iPod.
o
Repeat
Repeat of a song being played is not supported.
Track Up/Down
Press the track up button to advance to the next track in the Playlist. Press the track down button to
go to the beginning of the track that's being played. Press the track down button twice to go to the
previous track.
If the track up or track down buttons is pressed quickly in repetition, the track numbers displayed may
change unevenly. You may also hear short bits of audio during repeated presses of track up and track
down buttons.
If your Volvo radio currently displays a maximum of two digits for track number.
Track number 100 will be displayed as 01, Track 101 displayed as 02, track 102 as 03
Changing source to AM/FM, CD, Cassette
When a source other then the iPod is selected on radio, the iPod will pause.
Note: iPod and iTune are registered trade marks of Apple Computer, Inc.
XM is a trade mark of XM Satellite Radio Inc.
Volvo is a registered trade mark of Volvo Group.
Design and specifications are subject to change without notice.
LIMITED WARRANTY
Thank you for choosing a UsASPEC product. LTI Enterprises Inc., is committed to providing high
quality defect free products. All USA>SPEC products are tested before leaving the factory and are
warranted against defects in materials and workmanship for a period of one year to the original owner.
The one-year warranty period begins at the date of manufacture or the date of original installation.
Please see installation registration below.
PRODUCTS COVERED:
Products and related accessories supplied by LTT Enterprises Inc. with the brand name of UsASPEC
are covered by this warranty. Only products purchased in the U.S.A. is covered.
WARRANTYDOESNOTCOVER:
1.
2.
3.
4.
5.
6.
Damage due to improper installation, operation, accident, negligence, abuse, or not following
instructions, warnings, and acceptable industry procedures.
Damage caused dUling the shipment or transportation of the product. All claims of this nature
must be presented to the carrier.
Damage caused by acts of God, War, or civil disturbance, including without limitation, flood, fire,
stonns, earthquake or other acts of nature.
Any expenses or cost to remove or reinstall products.
Any product without the original serial number and factory seal, or has been serviced or modified
without the authorization of LTT Enterprises Inc.
Any product not distributed by an authorized LTT Enterprises Inc. Dealer.
INSTALLATION REGISTRATION:
To provide warranty coverage from the date of installation the limited warranty registration card with
this infonnation must be completed and returned to LTI Enterprises Inc. within thirty(30) days of the
installation.
TO OBTAIN WARRANTY SERVICE:
Contact the Customer Service center printed on the back of this manual for assistance. A detailed
description of the problem(s) is required for service. Proof of purchase is also required when sending
a product for warrant service. If the problem cannot be resolved and the product must be returned for
service you will receive an authorization from the service center. The product must be delivered
pre-paid to the service center. LTI Enterprises Inc. will, at our option, repair the product or replace it
with new or reconditioned product, and if it was shipped to the service center, the return shipping will
be pre-paid free of charge provided the repairs are covered by the warranty. The product must be
packed securely for shipment to the service center in order to preserve the warranty and prevent
damage.
NO IMPLIED WARRANTY, INCLUDING MERCHANTABILITY AND FITNESS FOR USE,
APPLIES TO THIS PRODUCT AFTER THE ONE YEAR PERIOD AS DEFINED ABOVE,
AND NO OTHER EXPRESSED WARRANTY OR GUARANTEE, EXCEPT AS MENTIONED
ABOVE, GIVEN BY ANY PERSON, FIRM OR CORPORATION WITH RESPECT TO THIS
PRODUCT SHALL BIND THE WARRANTOR. NEITHER THE WARRANTOR NOR ANY
OTHER PERSON, FIRM OR CORPORATION, IS RESPONSIBLE FOR LOSSES OR
INCONVENIENCES, OR FOR ANY CONSEQUENTIAL DAMAGES CAUSED BY THE
PRODUCT. SOME STATES/PROVINCES DO NOT ALLOW LIMITATIONS ON HOW
LONG AN IMPLIED WARRANTY LASTS, AND SOME DO NOT ALLOW THE
EXCLUSION OR LIMITATION OF INCIDENTIAL OR CONSEQUENTIAL DAMAGES.
This warranty gives you specific legal rights, and you may also have other rights, which vary, from
state to state and province to province. Some of the limitations or exclusions may not apply to you.
Design Change Notice
(101508)
(for Model PA11·VOL)
In order to improve the handling of Audiobook and to support streaming music downloads on iPhone or
iTouch, the Hybrid Mode is deleted and design changes are also implemented to Playlist Mode and Direct
Mode.
Playing iPod with revised Playlist Mc;>de and Direct Mede as follow:
In case of configuration A: (in Playlist Mode and RCAAUX is OFF or Disabled)
1.
When iPod is connected to interface and CD CHANGER SOURCE on radio is selected, iPod will
begin play at DISC #5. iPod screen will show "OK to Disconnect" or "Accessory is attached".
iPed will continue play the tracks in the Folder which was played prior to iPod is connected to
interface adaptor. As soon as the last track of the Folder is played, iPed will go to the first track in All
Songs folder.
2.
When return to DISC #5 from a Playlist (i.e. any DISC among DISC #1 to DISC #4), DISC #5 will
continue play the track where it was left but points to All Songs folder regardless which Folder or
Playlist was played at DISC #5 preViously.
3.
When do DIRECT control from IPod is desired, select DISC #6 on radio. IPod's screen and
click wheel will be unlocke<l and switch folder or playllst as you would In portable use of
IPod.
•
Application Tip: Use DISC #6, iPod Direct to listen the stream music downloads from iPhone
or iTouch (wi - fi).
•
•
Song title display on radio is not supported in iPod Direct.
When return to DISC #5 (All Songs) from DISC #6 (iPod Direct), DISC #5 will continue play the
track and folder of iPed being played at DISC #6 until the last track of the Folder is completed.
4.
If iPed has more than 4 Playlists were created with iTune, please refer to the Playlist Naming
section of interface manual.
. 5.
Use DISC up and DISC down knob on radio to change disc or playlist.
In case of configuration B: (in Playlist Mede and RCAAUX is ON or Enabled)
1.
When iPed is connected to interface and CD CHANGER SOURCE on· radio is selected, iPod will
begin play at DISC #4. iPed screen will show "OK to Disconnect" or "Accessory is attached".
iPed will continue play the song tracks in the Folder which was played prior to iPod is connected to
interface adaptor. As soon as the last track of the Folder is played, iPod will go to the first track in All
Songs folder.
2
When return to DISC #4 from a Playlist (i.e. any DisC among DISC #1 to DISC #4), DISC #4 will
continue play the track where it was left but points to All Songs folder regardless which Folder or
Playlist was played at DISC #4 previously.
3
When do DIRECT control from IPod Is desired, select DISC #5 on radio. IPod's screen and
click wheel will be unlocked and switch song or playllst as you would In portable use of IPod.
•
Application Tip: Use DISC #5 iPod Direct to listen the stream music downloads from iPhone or
iTouch (wi - fi).
.....continue next page
- 1-
•
Song title display on radio is not supported in iPod Direct.
•
When return to DISC #4 (All Songs) from DISC #5 (iPod Direct), DISC #5 will continue play the
track and folder of iPod being played at DISC #6 until the last track of the folder is completed.
6.
If iPod has more than 3 Playlists were created with iTune, please refer to the Playlist Naming
section of interface manual.
7.
DISC #6 is for the RCAAUX.
8.
Use DISC up or DISC down knob on radio to change disc or playlist.
Summary of Playlist Mode Operation:
In the case of
A:
In the case of B:
DIP switch #1=ON
DIP switch #1 =OFF
DIP switch #2 =ON
DIP switch #2 =ON
. ~t....
At....
Radio Plays
!Radio Plays
Disc 1
Playlist #1
Disc 1
Playlist #1
Disc 2
Playlist #2
Disc 2
Playlist #2
Disc 3 ' Playlist #3
Disc 3
Playlist
Disc 4
Playlist# 4
Disc 4
~IISongs
Disc 5
All Songs
Disc 5
iPod Direct
Disc 6
iPod Direct
Disc 6
RCAAUX
PAIl-VOL
iPod. iPhone, iTouch and iTune are registered trade mark orApple Computer Inc.
- 2-
#3