1
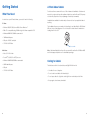
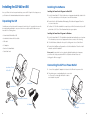
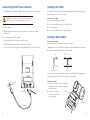
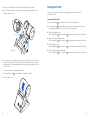
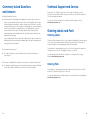
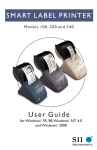
Smart Label Printers
®
Series
User Guide
Models 440 and 450
For Windows® 2000, XP, 2003, Server 2003, Vista and Windows 7
or Mac OS® X 10.2 or later.
FCC Compliance Statement
This equipment has been tested and found to comply with the limits for a Class B
digital device, pursuant to Part 15 of the FCC rules. These limits are designed to provide
reasonable protection against harmful interference in a residential application. This
equipment generates, uses and can radiate radio frequency energy and, if not installed
and used in accordance with the instructions, may cause harmful interference to radio
communications. However, there is no guarantee that interference will not occur in a
particular installation. If this equipment does cause harmful interference to radio or
television reception, which can be determined by turning the equipment off and on,
the user is encouraged to try to correct the interference by one or more of the following
measures:
• Reorient or relocate the receiving antenna.
• Increase the separation between the equipment and receiver.
• Connect the equipment into an outlet on a circuit different from that to which the
receiver is connected.
• Consult the dealer or an experienced radio/TV technician for help.
Changes or modifications not expressly approved by Seiko Instruments could void the
user’s authority to operate the equipment.
Applicable EC Directives and Standards
Directive 2004/108/EC
2006/95/EC
2002/95/EC
2002/96/EC
2009/125/EC
Title
EC Electromagnetic Compatibility Directive
EC Low Voltage Directive
Restricting the use of Certain Hazardous Substances in
Electrical and Electronic Equipment (RoHS)
Waste Electrical and Electronic Equipment(WEEE)
Directive on Eco-Design of Energy-related Products
Standards EMC
LVD
Title
EN55022 class B EN61000-3-2, EN61000-3-3
EN55024
EN60950-1
Copyright
Copyright © 1989-2011 by Seiko Instruments USA Inc. All rights reserved. No parts of this
publication may be reproduced, stored in a retrieval system, or transmitted, in any form,
or by any means, electronic, mechanical, photocopying, recording, or otherwise without
the prior written permission of Seiko Instruments USA Inc. No patent liability is assumed with
respect to the use of information contained herein. While every precaution has been taken
in the preparation of this publication, Seiko Instruments USA Inc. assumes no responsibility
for errors or omissions. Nor is any liability assumed for damages resulting from the use of
information contained herein. Further, this publication and features described herein are
subject to change without notice.
Trademark Information
SII and the SII logo are registered trademarks of Seiko Instruments Inc. Smart Label Printer is
a registered trademark and SmartLabels, SmartCapture, SmartCopy and Smart Label Icons
are trademarks of Seiko Instruments USA Inc.
Other brand and product names are trademarks or registered trademarks of their
respective holders.
Seiko Instruments USA Inc., 2990 Lomita Blvd., Torrance, California 90505 USA
v10312011
Important Safety Instructions
The following symbols are used in this User Guide.
WARNING. Warning statements are used to indicate actions
that may result in risk of severe personal injury or loss of life.
CAUTION. Caution statements are used to indicate actions
that may result in damage to the printer or other property, or
may result in risk of minor personal injury.
Warning
1 Use only the AC adapter provided with this printer, or an AC adapter that has been
approved by Seiko Instruments for use with this printer. Use of an incorrect AC adapter
may cause risk of overheating or fire.
2 Do not bend or place a heavy object on the power cord as it could damage the cord
and result in risk of electric shock or fire. Do not use the power cord if damaged or
frayed.
3 The thermal print head may become quite hot after printing. Be careful when changing
labels and cleaning the thermal head.
Caution
1 Never insert objects of any kind into this printer as they may touch dangerous voltage
points or short out parts, and may result in a risk of fire or electric shock. Never spill liquid
of any kind on the printer.
2 This printer contains no user-serviceable parts. Do not attempt to service the printer
yourself as this can expose you to dangerous voltage points or other risks. Repair service
should be performed by a trained technician.
3 Do not use this printer near water or in extreme humidity.
4 Be sure to hold only the connector end of the power cord or interface cable when
disconnecting. Repeated pulling on the cable could damage the cable.
5 If any of the following conditions occur, turn off the printer and unplug the power cord
from the power outlet:
• The power cord is damaged or frayed.
• Liquid has been spilled into the printer or the printer has been exposed to rain or water.
• The printer does not recover from an error or the printer does not operate normally when
the operating instructions are followed.
• The printer exhibits a distinct change in performance, such as emitting a strange noise,
odor or smoke.
6 Before using your SLP, please remove the clear protective tape covering on the engine
cover and Roll cover.
7 When the SLP is unused for a period of time without a label, the platen rubber may
become stuck. This condition may cause a fatal error in the printer mechanism. To avoid
this, please keep a label loaded in the SLP — even when not in use.
Installation
For best performance, we recommend that you install your printer on a flat surface in a
location that satisfies the following environmental conditions:
• Not subject to vibration
• Not exposed to direct sunlight
• Dust-free
• Condensation-free
• Temperatures: 59 to 95°F (15 to 35°C)
• Humidity: 30% RH to 80% RH (non-condensing)
About This Guide
As you‘ll soon realize, the Smart Label Printer is easy to set up and use. Chances are, once
you’ve read what you need to know in order to get going, you won’t have to use this guide
except as a quick reminder or a reference.
This guide will help you set up your SLP 440 or 450, install the software, and use your SLP.
In writing this guide we assume that you are familiar with common operations using
Microsoft Windows ® 2000, XP, 2003, Server 2003, Vista or Windows 7 on a Windows
compatible PC, or Mac OS ® X 10.2 or later on an Apple Macintosh computer.
This guide has six sections for easy reference:
Introduction, provides some general information about the SLP 440 and 450 as well as
the Smart Label program.
Getting Started, provides instructions for connecting the SLP 440 and 450 to your Windowscompatible PC or Mac, and loading labels into the printer. It also describes how to use
on-line help.
Changing Labels and Printer Care, provides information for replacing a label roll and taking
care of your SLP.
Specifications, provides SLP 440 and 450 specifications.
Commonly Asked Questions and Answers, provides a list of questions and answers that can
help you resolve problems.
Technical Support and Service, provides technical support and service information.
Ordering Labels and Parts, provides information for ordering SmartLabels and replacement
parts and accessories.
Contents
Introduction
Introduction 1
About Your Smart Label Printer 1
Software Features 1
Getting Started 2
What You Need 2
A Word About Labels 3
Caring for Labels 3
Installing the SLP 440 or 450 4
Unpacking the SLP 4
Installing the Software
5
Connecting the SLP to a Power Outlet 5
Connecting the SLP to your computer 6
Setting up the Printer
7
Loading a Roll of Labels 7
Testing the Printer 9
About Your Smart Label Printer
The Smart Label Printer is the best way to instantly print one-at-a-time labels. Direct
thermal printing technology does not use ink, toner or ribbon, just labels. The SLP
produces fast, laser quality output on a variety of label sizes with the ability to print text,
graphics, POSTNET codes and bar codes.
With the wide variety of available SmartLabels, you can use your SLP to create labels for
just about anything. Here are some examples:
• Envelope labels • Bar code labels
• File folder labels • 3.5" Diskette and Zip Disks labels
• Business/Appointment Card
• 8mm Video/DAT Tape
• Name badge labels • Videocassette labels
• Security Voucher
• CD or DVD labels
• Shipping labels • Jewelery labels
Changing Labels and Printer Care 10
Overview 10
• Storage container labels • Binder labels
Caring for Your Printer 10
• Notebook labels • Shelf labels
Off Line and On Line Mode 11
Changing a Label Roll 11
Removing the Old Roll 11
Loading the New Roll 11
Adjusting the Position of Labels 12
Removing Stuck Labels 13
• WYSIWYG editor displays labels as they will print.
Cleaning the Printer 14
• Prints in background so you can work with other applications while labels are printing.
Print labels one at a time or whole mailing lists.
Specifications 16
Smart Label Printer 440 and 450 Specifications 16
Status Light Indicators 17
Commonly Asked Questions and Answers 18
Technical Support and Service 19
Ordering Labels and Parts 19
Ordering Labels 19
Ordering Parts 19
Software Features
The Smart Label program provides a rich set of features to simplify your labeling needs. • Object-oriented user interface makes it easy to include text, pictures, bar codes, etc.
on your label.
• Mixed text possible within each text object—different font types, sizes and styles (bold/
italic/underline) can be included on a single line.
• Shrink-to-fit and word wrap ensure that addresses and other text fit on the label.
• Built-in database to save labels and formats in user-definable database categories.
• Find feature makes it easy to locate saved labels by label name, database field or
words within the label.
• Contact-based records updated automatically from label addresses.
1
Getting Started
A Word About Labels
What You Need
For best results we recommend the use of Seiko Instruments SmartLabels. Other brands
may not be engineered to provide optimum, trouble-free results with your SLP; they may
not work with your printer or they may damage it and void your warranty.
In order to use your SLP and software, you need to have the following: PC Users:
• Windows 2000, XP, 2003, Server 2003, Vista or Windows 7
• IBM ® PC or compatible using 233MHz or higher Pentium-compatible CPU
SmartLabels are available in a wide variety of sizes and colors to properly label almost
anything.
The SmartLabels have a sensor mark on the backing of each label that the SLP 440 and
450 uses for top of label alignment. Check to be sure the labels have this mark before
loading them into the SLP.
• Minimum 64MB RAM, 128MB recommended
• 16MB hard disk space
• USB port or RS232C serial port
• CD-ROM or DVD drive
Sensor mark
Mac Users:
• Mac OS X v10.2 or later
Note: Older SmartLabels did not have this sensor mark. Be sure that the SLP 440 and 450
are listed as supported printers on the SmartLabels package.
• PowerPC ® G3/G4/G5 or Intel ® processor
• Minimum 128MB RAM, 256MB recommended
• 30MB hard disk space
• USB port
• CD-ROM or DVD drive
Caring for Labels
The labels are sensitive to heat, moisture, and light. With this in mind: • Store labels in a cool, dry place.
• Do not scratch or rub labels with a hard object.
• Do not expose labels to high heat or direct light for an extended period of time.
• Keep organic solvents away from labels.
2
3
Installing the SLP 440 or 450
Here, you’ll find out how to unpack and set up your new SLP. As part of the setup process,
you’ll load a roll of standard address labels and run a quick test.
Installing the Software
Installing the Smart Label Program for MacOS X
1 Insert the Smart Label CD. If the installer does not appear automatically, double-click
the CD on your desktop or in the left pane of a new Finder window.
Unpacking the SLP
2 Double-click the file SIISmartLabelPrinter.mpkg. The installer will appear. Follow the
on-screen instructions.
Carefully remove the printer and its components from the box. It’s a good idea to save the
box and packing materials in case you need to store or ship the printer. Make sure you
have all of the following items.
3 For Mac OS X 10.2: After installation is complete, open Print Center and select your SLP
printer. Mac OS X 10.3 or 10.4 will automatically set up your printer.
Installing the Smart label Program for Windows
• A Smart Label Printer 440 or 450
1 Insert the Smart Label CD. The installation wizard starts automatically on most systems.
If the introductory screen doesn’t appear after a few seconds, do the following:
• Smart Label software with User Guide
• USB cable
2 Click the Windows Start button then point to Settings and choose Control Panel.
• AC adapter
3 Double-click Add/Remove Programs then click the Install button. Follow the install
wizard to assist with installation.
• Starter roll of SmartLabels
• Quick Start Card
Please note: If your printer is not recognized or all label templates do not appear,
you will need to set-up your printer within the SLP printer software. Please see
Setting up the Printer on page 7.
Connecting the SLP to a Power Outlet
Smart Label Printer
440 or 450
1 Connect the supplied AC adapter to the back of the SLP and to a power outlet.
2 The printer powers on automatically when connected
to AC power. The status light will flash if no labels
are loaded in the printer.
Quick Start
SmartLabels
Form Feed button
Smart Label Software
USB Cable
Power button
AC Adapter
Status light
4
5
Connecting the SLP to your computer
Setting up the Printer
Use the USB cable provided with the SLP 440 or 450 to connect the SLP to your computer.
If the printer is not recogonized using the installation wizard, you will need to set up your
printer manually. To do so, follow these steps:
CAUTION: Connecting or disconnecting the interface cable
while the printer is turned on may damage the printer.
Prepare the roll of labels
1 Open the Smart Label printer software
2 Under the Label pull-down menu, select Printer Set-up
3 Select Add a printer
Follow these steps:
1 Make sure that the SLP is turned off. If the status light is on, hold the power button
until it turns off.
2 Connect the printer to your PC or Mac.
• Insert the USB cable into the USB port on your PC or Mac.
4 Select how your printer is connected and click Done.
Loading a Roll of Labels
• If all USB ports are in use, you may need to purchase a USB hub.
Prepare the roll of labels
1 Remove the sticker from the beginning of the roll of labels.
• Connect the other end of the cable into the appropriate port on the back of the SLP.
Note: Make sure there is a black sensor mark on the label backing as shown on page 3.
2 If needed, cut between the labels to create a “leader.”
Roll
Prepared end
Waste
Roll
Cut here
If the end of the roll is not prepared as shown above, cut between the labels leaving as
much backing as possible on the end of the roll to act as a leader.
Load the roll of labels
1 Make sure the power cord is connected and
the printer is turned on. The green status light
should be flashing.
Computer
USB port
SLP USB port
2 Lift the base of the label
cover and rotate it open
as shown at right.
Spindle
Label Cover
USB cable
6
7
3 Remove the spindle from the SLP and insert the label roll on the spindle.
4 Insert the labels and spindle into the SLP. If necessary, adjust the guides to fit the
labels as shown below.
Testing the Printer
A quick test lets you know your printer is operating properly and that the labels
are loaded correctly.
Testing the SLP 440 or 450
1 Press and hold the
power button for 2 seconds to turn the printer off.
2 Press and hold the
form feed button and then press the power button. The green
status light will begin to flash. Do not release the form feed button.
Label guides
SLP 440/450
3 To print the SII graphic logo:
• While holding the
button, press the
power button 1x and release both buttons.
4 To print the SII sample address label:
• While holding the
button, press the
power button 2x and release both buttons.
5 To print the density test:
• While holding the
button, press the
power button 3x and release both buttons.
6 To print the serial number and firmware:
• While holding the
button, press the
power button 4x and release both buttons.
5 Insert the free end of the label roll, label side down, into the slot on the back of the
printer. Push the label stock into the slot until you feel a slight resistance. Continue
pushing gently. The SLP automatically feeds the labels through and aligns the end
in the exit slot.
If the label end doesn’t appear through the slot:
Press and release the
form feed button to advance the labels.
6 Close the label cover.
8
9
Changing Labels and Printer Care
Off Line and On Line Mode
Overview
Pressing and releasing the
power button toggles the printer between off line and
on line mode. An amber status light indicates that the printer is off line. There is no
communication with the computer when the printer is off line.
The SLP 440 and 450 uses advanced thermal print technology to provide crisp,
high-contrast printing. There are no ribbons or cartridges to replace.
For best results we recommend the use of Seiko Instruments SmartLabels. Other brands may
not be engineered to provide optimum, trouble-free results with your Smart Label Printer;
they may not work with your SLP or they may damage it and void your warranty.
This feature is a handy way to stop printing so you don’t waste labels while you delete
labels from the print queue.
Changing a Label Roll
This procedure describes how to remove and replace label rolls.
Caring for Your Printer
Your SLP 440 and 450 is a high-precision device that’s designed for trouble-free operation.
Just follow these few precautions:
• Note: The SLP 440 and 450 is designed for use only with Seiko Instruments SmartLabels.
Use of improper labels may damage the printer and void your warranty.
• Don’t operate the printer in a dusty environment.
• Keep the printer out of direct sunlight.
• If you are printing more than one label at a time, guide the labels over the front of the
label cover as they exit, making sure that they don’t curl under or over the cover and
loop through and into the feed slot.
• Turn off the printer when not in use.
• Pull out the power plug when the printer is not in use for a long time.
• You can load a different type of label at any time — you don’t have to wait until all of
the labels have been used.
• When you run out of labels, the green status light on the front of the SLP flashes. If printing
is in process, a message appears telling you that the printer is out of labels.
Removing the Old Roll
CAUTION: DO NOT pull on the labels to remove them from the
printer. This may cause labels to get stuck inside the printer.
1 Tear off any printed labels. If labels aren’t torn off, they may get jammed when you
perform step 2.
2 Press and hold the form feed button. The labels will reverse out of the SLP. If this
does not work, see "Adjusting your Label Position" on Page 12 to release the platen
to remove the labels.
Discarding Old Printers
When discarding old and used Smart Label Printers, please follow the disposal or recycling
regulations in your area.
10
Loading the New Roll
Prepare and load the new label roll as described in “Loading a Roll of Labels” on page 7.
11
Adjusting the Position of Labels
Removing Stuck Labels
If you find the labels are advancing at an angle, follow these steps to realign them:
If a label becomes stuck in your printer, remove it as follows:
1 Swivel the label cover open and remove the print engine cover by pulling forward on the
edges at the top of the cover.
1 With a pair of scissors, cut the label stock between the label roll and the label slot at the
back of the printer.
2 Release the pressure on the label stock by moving the platen release lever forward.
2 Swivel the label cover open and remove the print engine cover by pulling forward on the
edges at the top of the cover.
3 Release the pressure on the label stock by moving the platen release lever forward.
Remove the print engine cover
4 Remove the stuck label.
5 If the label – or pieces of the label – stick to the platen, use the Seiko Dual-Action
Cleaning Pen to dissolve the adhesive on the label and remove residue left on the printer.
CAUTION: DO NOT touch the print engine. It may be hot.
Release the platen lever
3 Realign the label stock so it is straight.
4 Return the platen release lever to the locked position.
5 Make sure the labels feed through the slot.
6 Replace the print engine cover, starting at the bottom, and push the top edge forward
until the cover snaps into place.
6 Once you have removed any remaining pieces of label, return the platen release lever to the locked position.
7 Replace the print engine cover, starting at the bottom, and push the top edge forward
until the cover snaps into place.
12
13
Cleaning the Printer
You may also purchase the Seiko Dual-Action Cleaning Pen (SLP-CLNPEN) to help keep the
printer clean and operating at it’s optimum.
1 Remove label stock from printer.
2 Insert the Seiko Smart Label Printer Cleaning Card (SLP-CLNCRD).
Removes Adhesive
3 The Card should feed automatically or you can press the “Form Feed” button to
manually feed the card (you may also gently pull the card to guide it through the roller).
Cleans the print head
Form Feed button
1 Remove label stock from printer.
2 Remove the front faceplate.
3 Use the Seiko Dual-Action Cleaning Pen to clean the print head, roller, and feed ramp to
remove any debris or adhesive that may have built up on your printer.
4 To clean your pen tip, wipe the tip across a clean paper surface.
** Please use the Alcohol end of the Pen on the area where the Adhesive Remover end
was used.
4 Repeat process if necessary.
5 Properly dispose of the used card.
14
15
Specifications
Environment
Smart Label Printer 440 and 450
Temperature Operating: 59°F to 95°F (15°C to 35°C )
Storage: -4°F to 140°F (-20°C to 60°C)
The Smart Label Printer is a compact printing device ideally suited for label printing
applications. There are no built-in fonts and any text must be converted to a bitmap image
by a host computer or device for printing.
Humidity Operating: 30% RH to 80% RH
(non-condensing)
Storage: 30% RH to 90% RH
(non-condensing)
Developer information can be found on our website at www.siibusinessproducts.com
Printer
Technology Direct thermal
Resolution 300 dpi (11.81 dots/mm)
Max. Paper Width
2.28 in. (58mm)
Max. Printable Width
1.89 in. (48mm)
Print Speed Model 440 2-3 seconds*
Model 450 1-2 seconds*
*average speed, standard address label
Interface USB and RS-232
Power
Input
Model 440 AC adapter:
PW-B0625-W1-U: 100-240V, 50/60Hz
(US version)
PW-B0625-W1-E: 100-240V, 50/60Hz
LED Indicator State
Off
Power off/Stand-by
Steady Green
On-line
Steady Amber
Off-line
Blinking Green 1*
No labels
Blinking Green 2*
Print head up
Blinking Amber 1*
Label jam
(EU version)
Blinking Amber 2*
Buffer overflow
PW-B0625-W1-B: 100-240V, 50/60Hz
Blinking Red 1*
Temperature error
(UK version)
Blinking Red 2*
Voltage error
PW-B0625-W1-A: 100-240V, 50/60Hz
(AU version)
Blinking Red 4*
Print head error
Model 450 AC adapter:
PW-B1230-W1-U: 100-240V, 50/60Hz
(US version)
PW-B1230-W1-E: 100-240V, 50/60Hz
(EU version)
PW-B1230-W1-B: 100-240V, 50/60Hz
(UK version)
PW-B1230-W1-A: 100-240V, 50/60Hz
(AU version)
16
Status Light Indicators
Output * The number refers to the number of blinks.
Model 440
DC6V 1.5A (2.0A max.)
Model 450
DC12V, 3.0A (5.0A max.)
Dimensions 4.61 in. (W) x 6.34 in. (D) x 6.22 in. (H)
117mm (W) x 160.9mm (D) x 157.9mm (H)
Weight 1.14 lbs. (515 grams)
Life Time Approx. 2.5 million characters
(24 H x 12 W dots)
17
Commonly Asked Questions
and Answers
Q Will my labels fade over time?
A Labels are made of thermal paper. Heat applied to the paper causes a chemical
reaction to generate black dots at the points where heat was applied. This technique
avoids using messy inks and ribbons. Because the paper is heat-sensitive, it is possible
for a label to darken if exposed to high heat or very bright light for an extended period
of time. It is also possible for certain plasticizers in some plastic binders to cause a
chemical reaction which results in the image fading over time. Placing another
adhesive (perhaps another label) between the vinyl surface and the label may help
minimize this type of fading.
In general, labels will last for years if they aren’t subjected to the above conditions. The
label material is much more stable than fax paper due to the special formulation and
coatings used by Seiko Instruments.
Q How many labels can I save?
A The number of labels you can save is limited only by the amount of disk space in
your computer.
Q There are no available USB or serial ports on the back of my computer. What do I do?
A You may wish to add another port to your system. Alternatively you may use a USB hub
to extend the number of USB devices or a switch box to share a serial port.
Technical Support and Service
Please refer to the “Troubleshooting” topic in on-line Help for information on how to
determine if your Smart Label Printer needs service and how to contact Seiko Instruments
for Technical Support and repairs.
You can contact Technical Support on our website under the Support section at: www.siibusinessproducts.com
Ordering Labels and Parts
Ordering Labels
For best results we recommend the use of Seiko Instruments SmartLabels. Other brands may
not be engineered to provide optimum, trouble-free results with your SLP; they may not
work with your printer or they may damage it and void your warranty.
For information on ordering labels, please choose the How to Order Labels command on
the Help menu or refer to the “Ordering Labels” topic in on-line Help.
You can order labels directly from Seiko Instruments on our website at the following
address: www.siibusinessproducts.com
Ordering Parts
For information on ordering replacement parts and accessories, please refer to your SLP
model in the “Troubleshooting” topic in on-line Help.
You can order parts directly from Seiko Instruments on our website at the following address: www.siibusinessproducts.com
18
19