1
IP Touch 4008/4018
Extended Edition
SIP Phone Installation Guide
8AL90824AAAA ed02
August, 2010
Alcatel-Lucent
All Rights Reserved © Alcatel-Lucent 2010
1.
2.
Overview...........................................................................................3
Connecting the Alcatel-Lucent IP Touch 4008/4018 Extended Edition phone...........3
2.1. Connecting the IP Touch 40x8 EE phone to the LAN ...................................4
2.2. Connecting power supply ..................................................................4
2.3. Plugging a PC to an IP Touch 4018 EE phone............................................4
3. SIP stand-alone mode ............................................................................4
3.1. Firmware version identification ..........................................................4
3.2. Switching From NOE To SIP Mode .........................................................5
3.3. Initializing an IP Touch 40x8 EE phone...................................................7
3.3.1. SIP configuration files.................................................................7
3.3.2. SIP binary files .........................................................................7
3.3.3. Selecting the downloading mode....................................................8
3.3.4. TFTP .....................................................................................8
3.3.5. HTTP(S) ............................................................................... 10
3.4. SIP registration ............................................................................ 14
3.5. Updating SIP binaries ..................................................................... 14
3.6. SIP configuration files description ...................................................... 15
3.7. Third-party certificate management................................................... 21
3.8. Phone features ............................................................................ 22
3.8.1. Direct key management ............................................................ 22
3.8.2. Multiline............................................................................... 22
3.8.3. Three-party conference ............................................................ 22
3.8.4. Speed dialing keys ................................................................... 23
3.8.5. Voice mail ............................................................................ 23
4. Troubleshooting................................................................................. 24
4.1. Overview ................................................................................... 24
4.2. Error and information messages ........................................................ 24
4.3. Ethernet link............................................................................... 26
4.4. Net log ...................................................................................... 27
All Rights Reserved © Alcatel-Lucent 2010
Page 2
1. Overview
The Alcatel-Lucent IP Touch 4008/4018 Extended Edition phones (IP Touch 40x8 EE) are part of
the Alcatel-Lucent IP Touch 8-series Extended Edition phone range.
The following chapters in this document describe SIP stand-alone operations. From firmware
version identification to switching from NOE to SIP stand-alone mode, SIP mode initialization
(configuration & binary), SIP registration, files update, phone features introduction and
troubleshooting.
2. Connecting the Alcatel-Lucent IP Touch
4008/4018 Extended Edition phone
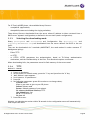
The following figure illustrates the Alcatel-Lucent IP Touch 4018 EE phone connectors. The
Alcatel-Lucent IP Touch 4008 EE phone connectors are identical except for the PC connector.
All Rights Reserved © Alcatel-Lucent 2010
Page 3
2.1. Connecting the IP Touch 40x8 EE phone to the LAN
To connect the set to the LAN:
1. Turn the set over
2. Plug the RJ45 cable into the set LAN connector
3. Connect the RJ45 cable to the LAN itself
2.2. Connecting power supply
The following procedure does not apply when power supply is provided via Power over Ethernet
(PoE).
To supply power via an AC/DC external adapter:
1. Plug the appropriate cable into the set power supply connector
2. Connect the plug to the power supply. Initialization starts.
2.3. Plugging a PC to an IP Touch 4018 EE phone
Only one additional equipment can be connected to the set connector labeled PC on an IP Touch
4018 EE phone.
Note 1: reminder, the Alcatel-Lucent IP Touch 4008 EE phone set has no PC connector.
Note 2: if 802.1x authentication is used, the PC port cannot be used until the IP Touch 418 EE
phone authentication is completed.
3. SIP stand-alone mode
3.1. Firmware version identification
In addition to existing call processing support for the Alcatel-Lucent OmniPCX™ Communication
Servers (NOE signaling protocol), the Alcatel-Lucent IP Touch 40x8EE phone can also be
configured as Session Initiation Protocol (SIP) endpoints and, therefore, operate in a standard SIP
environment. The Alcatel-Lucent IP Touch 40x8 EE phone may also switch to SIP survival mode in
SIP standalone mode.
Firmware version identification – phone out of the box.
In this context, the phone is natively configured in NOE mode
123456-
Power on the phone.
At the phase 2/5 network setup, press the "i" key and just after press the "#" key.
‘0 - MAC address’ menu appears.
Scroll down to ‘2 - Soft infos’.
Press the OK key.
The version is displayed : ‘Version NOE 4.xx.xx’. If the version is at least 4.xx.xx, SIP boot
mode is possible.
All Rights Reserved © Alcatel-Lucent 2010
Page 4
Firmware version identification – phone already installed.
1- Power on the phone.
2- At the phase 2/5 network setup, press the "i" key and just after the "#" key.
3- ‘0 - MAC address’ menu appears.
4- Scroll down to ‘2 - Soft infos’.
5- Press the OK key.
6- Scroll down to ‘Run mode’:
- if NOE is displayed, it means that the NOE signaling protocol is running,
- if SIP is displayed, it means that the SIP signaling protocol mode is running.
3.2. Switching From NOE To SIP Mode
There are two methods.
Method 1 - Manual
1- Power on the phone.
2- At the phase 2/5 network setup, press the "i" key and just after the "#" key.
3- ‘0 - MAC address’ menu appears.
4- Scroll down to ‘2 - Soft infos’.
5- Press OK.
6- ‘Version NOE x.xx.xx’ is displayed.
7- Scroll down to ‘Run mode’, ‘Set Mode: NOE’ is displayed.
8- Press OK to switch from NOE to SIP mode.
9- Press ‘#’ to save the new configuration.
10- Press the Hang Up key to reset the device to take into account the new configuration.
For checking SIP status, follow ‘Firmware version identification already installed’ section.
All Rights Reserved © Alcatel-Lucent 2010
Page 5
Method 2 - Automatic
‘lanpbx.cfg’ file template: use a text editor to create a very simple file with this contents:
APPLICATION_TYPE=APPL_SIP
This file must be reachable from root location of the TFTP Server.
The IP Touch 40x8EE phone is compatible with any DHCP server that correctly supports the
BOOTP server IP address - siaddr (also called ‘next-server’) field. See standard RFC 951 for
further information.
All Rights Reserved © Alcatel-Lucent 2010
Page 6
3.3. Initializing an IP Touch 40x8 EE phone
3.3.1.
SIP configuration files
There are two configuration files.
The first file, named “sipconfig.txt”, is the global configuration file and it should contain
parameters applying to all phones found on the system (proxy IP address, Registrar server IP
address, preferred codecs, SNTP server IP address …). Again, this file is downloaded only if the
download server address is provisioned, using the download protocol indicated in the
corresponding parameter (HTTP(S) or TFTP).
This file is optional since all parameters may be configured in the specific configuration file. It is
optional from an administrator point of view: in other words, the phone always tries to download
this file. If the file does not exist at server side, the phone receives a “file not found” error and
continues with the next file seamlessly.
The second file, named “sipconfig-MacAddress.txt”, is specific to each phone found on the
system and as such, should only contain parameters dedicated to a phone (user name…).
However, this rule is not enforced.
The name of this file is constructed by inserting the physical address of the phone (in
hexadecimal without columns) before the “.txt” extension. As an example, if the phone physical
address is “00:80:9F:56:07:AE”, the specific file name will be “sipconfig-00809F5607AE.txt”.
This file is mandatory since it contains configuration parameters specific to each phone. Again, it
is mandatory from an administrator point of view: the phone always tries to download this file,
but if it does not exist at server side and if the phone has already some parameters stored in
FLASH memory (see below), it continues its initialization with these flashed parameters.
The parameters, provisioned using the global configuration file, are overwritten by specific
configuration file parameters if both exist.
For more information on the structure of the sip configuration files, see: § SIP Configuration Files
Description.
3.3.2.
SIP binary files
The SIP binary files must be set into the server at the same location as the sipconfig.txt and
sipconfig-MacAddress.txt configuration files.
For IP Touch 4008EE phone, the available binary files are:
–
noesip4008 (application)
–
datsip4008 (resources including the ringing melodies)
All Rights Reserved © Alcatel-Lucent 2010
Page 7
For IP Touch 4018EE phone, the available binary files are:
–
noesip4018 (application)
–
datsip4018 (resources including the ringing melodies)
These binary files are downloaded from the server whose IP address is either retrieved from a
DHCP server (dynamic configuration) or defined in the set itself (static configuration).
3.3.3.
Selecting the downloading mode
Binary (noesip40x8 and datsip40x8) and Configuration files (sipconfig.txt and
sipconfig-MacAddress.txt) are downloaded from the server defined via DHCP or the set
itself.
They can be downloaded via 3 methods (IMPORTANT, the used method is under customer IT
Management policy):
–
Either TFTP
–
or HTTP
–
or HTTPS. HTTPS guarantees the authentication, based on TLS client authentication
mechanism, and the confidentiality of the files. This download requires certificates.
When downloading fails, the parameters stored in flash memory of the set are used.
3.3.4.
TFTP
Method 1 - Manual
123456-
Power on the phone.
At the phase 2/5 network setup, press the "i" key and just after the "#" key.
‘MAC address’ menu appears.
Scroll down to ‘IP parameters’.
Press OK.
Set following parameters (press OK to select or to change value).
IP Mode: Static
IP @: @ you want to give to your SIP phone
Subnet: Subnet mask
Router: Default gateway of your subnet
DL scheme (download scheme): TFTP
Use default port: Yes
DL @: TFTP Server @
DL port: 69
7- Press OK to save.
Warning: no administrator action within 30 seconds in the configuration menu will automatically
lead to quit this menu.
All Rights Reserved © Alcatel-Lucent 2010
Page 8
Method 2 - Automatic
The IP Touch 40x8EE phone is compatible with any DHCP server that correctly supports
the BOOTP server IP address - siaddr (also called ‘next-server’) field. See standard RFC
951 for further information.
The syntax for the ‘Option’ 43 IP is as follows:
<opcode> <length> <IP>
<opcode> = 0x40 (64 decimal)
<length> = 0x04 (4 decimal)
<IP> = IP Address in hexadecimal – e.g. for 192.168.1.30 content should be (0xC0 A8 01 1E)
All Rights Reserved © Alcatel-Lucent 2010
Page 9
3.3.5.
HTTP(S)
Method 1 – Manual
123456-
Power on the phone.
At the phase 2/5 network setup, press the "i" key and just after the "#" key.
‘MAC address’ menu is displayed.
Scroll down to ‘IP parameters’.
Press OK.
Set following parameters (OK to select or change value).
IP Mode: Static
IP @: @ you want to give to your SIP phone
Subnet: Subnet mask
Router: Default gateway of your subnet
DL scheme (download scheme): HTTP or HTTPS
Use default port: Yes
DL @: HTTP(S) Server @
DL port: 80 (443)
DL Path: The path to the directory where Configuration and Binaries are located
7- Press OK to save.
Warning: no administrator action within 30 seconds in the configuration menu will automatically
lead to quit this menu.
All Rights Reserved © Alcatel-Lucent 2010
Page 10
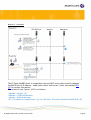
Method 2 - Automatic
DHCP options possibilities:
- Using TFTP
Priority 0* >>> Option 43 >>> with sub option 64:
Priority 1* >>>Next Server – Siaddr:
All Rights Reserved © Alcatel-Lucent 2010
Windows 2003 Server >>> Option 43 + Sub option 64
Linux (5305) >>> Option 43 + sub option 64
Windows 2003 Server >>> Option 66 (URL) + Option 67 (dummy)
Linux (5305) Siaddr
Page 11
- Using Http(s)
Priority 0* >>> Option 43 >>> with sub option 67:
Windows 2003 Server >>> Option 43 + Sub option 67
Linux (5305) >>> Option 43 + sub option 67
Priority 1* >>>Next Server – Siaddr:
Windows 2003 Server >>> Option 66 (URL) + Option 67 (dummy)
Linux (5305) Siaddr
* Priority is used in case of both Options are used !
• 'Next server' Siaddr (server identifier address) (option 66 in Windows server- see bellow)
The syntax for the ‘'Next Server' is as follows:
(config-dhcp)#option 066 ip 192.168.4.248
• Option 43
The syntax for the ‘Option’ 43 URL is as follows:
<opcode> <length> <URL>
<opcode> = 0x43 (67 decimal)
<length> = length of URL in hexadecimal
<URL> = URL
Example with Windows 2003 DHCP server
TFTP configuration: Using Windows Server 2003 the 'Next Server' – 'siaddr' value can be set by
setting option 66 with "IP Address of the HTTP(S) file server" and option 67 with "dummy non
empty value".
For Windows DHCP server, it is mandatory to activate option 67 with any name in it.
All Rights Reserved © Alcatel-Lucent 2010
Page 12
Http(s):
Please note that if a valid URL is found in option 43 then "Next server" is ignored.
Example with Linux DHCP ISC server (dhcpd.conf file):
option space ALU;
option ALU.https-server-address code 67 = text;
class "vendor-classes" {
match option vendor-class-identifier;
}
subclass "vendor-classes" "alcatel.sip.0" {
vendor-option-space ALU;
option ALU.https-server-address "https://fileserver.mycompany.com/iptouch/";
}
All Rights Reserved © Alcatel-Lucent 2010
Page 13
3.4. SIP registration
In order to perform SIP registration, some parameters are mandatory in the [email protected]
file:
authentication_realm=
authentication_name=
authentication_password=
proxy_addr=
registrar_addr=
Refer to SIP configuration files description.
3.5. Updating SIP binaries
To update SIP binaries on an IP Touch 40x8EE phone, SIP binaries must be made available on the
server as indicated in SIP binary files, and the set must reset. This can be done manually and
automatically.
–
Manually:
by disconnecting the power cable of the set and plugging it in again.
–
Automatically:
the set will reset by itself after a polling timer defined in the configuration file (field Binary
polling timer) registered in the set at first initialization. The set monitors the server to check
if new binary files are available. When there are new binary files, the set automatically
restarts and proceeds with a binary update.
After user changes any parameters in admin settings and exits, phone will reset automatically.
All Rights Reserved © Alcatel-Lucent 2010
Page 14
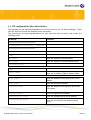
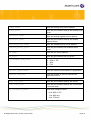
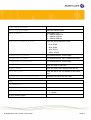
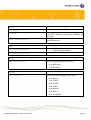
3.6. SIP configuration files description
The sipconfig.txt and sipconfig-MacAddress.txt files are built by the SIP Device Manager. These
files are text files and can be modified with a text editor.
The sipconfig.txt and sipconfig-MacAddress.txt files have the same structure and contain the
following items:
Parameter
Comment
###########################
# Configuration of SIP R7.1 Terminal
###########################
[basic]
[dns]
dns_addr=
Enter the address of the DNS server
dns2_addr=
Enter the address of the DNS backup server
hostname=noe_sip
[sip]
domain_name=
Enter the IP address, FQDN or domain name
proxy_addr=
Enter the address of the proxy server or PCX
address
proxy_port=
Enter the proxy port number
registrar_addr=
Enter the address of the registrar server and
PCX adresse
registrar_port=
Enter the registrar port number
outbound_proxy_addr=
Enter the outbound proxy server address
outbound_proxy_port=
Enter the port used by the outbound proxy
server
All Rights Reserved © Alcatel-Lucent 2010
Page 15
proxy2_addr=
Enter the backup proxy server address
proxy2_port=
Enter the port number used by the backup proxy
server
registrar2_addr=
Enter the backup registrar server address
registrar2_port=
Enter the port number used by the backup
registrar server
outbound_proxy2_addr=
Enter the outbound proxy server address
outbound_proxy2_port=
Enter the port used by the outbound proxy
server
pcs_addr=
Enter the PCS server address
pcs_port=
Enter the port used by the PCS server
sip_transport_mode_survi
Enter the Transport mode in PCS mode :
- 0 = UDP or TCP
- 1 = UDP
- 2 = TCP
option_timer=120
register_expire=3600
Enter the lifetime (in seconds) of a registration
register_retry=30
Enter the number of retry to connect the
registration server
local_sip_port=
Enter the port number used by the SIP set
local_sips_port=
Enter the port number used by the SIP set used
in secured mode
sip_transport_mode=0
Enter level transport mode:
All Rights Reserved © Alcatel-Lucent 2010
–
0 for UDP or TCP
–
1 for UDP only
–
2 for TCP only
Page 16
local_rtp_port=6000
Leave the default value
local_rtcp_port=6001
Leave the default value
prack_type=0
preferred_vocoder=0,4,8,18
Enter PRACK type :
- 0 = PRACK supported
- 1 = PRACK required
- 2 = PRACK disabled
Enter the preferred voice coder:
–
0 for PCMU
–
8 for PCMA
–
4 for G723.1
–
18 for G729A
authentication_realm=
If no authentication, leave empty
authentication_name=
If no authentication, PUT A VALUE LIKE none
authentication_password=
If no authentication, leave empty
user_name=
Enter the name of the user
display_name=
Enter the name to be displayed on the set
voice_mail_uri=
Enter the URI or the call number of the voice
mail
message_waiting_indication_uri=
Complete SIP URI of the voice mail
[qos]
sip_diffserv=0
rtp_diffserv=0
sip_qos_tickets_enable=0
sip_qos_tickets_target=
All Rights Reserved © Alcatel-Lucent 2010
–
–
0 : disable
1 : enable
Enter Domaine name
Page 17
[sntp]
sntp_addr=
timezone=
telnet_password=111111
Enter IP adresse of the SNTP server
/name_of_zone/:<(unused)>:/time_in_minutes_
from_UTC/:/daylight_saving_start/:/daylight_sa
ving_end/
telnet_password is also the switch to activate
the telnet service
[arp]
-
arp_spoofing_enable=1
0 : ARP spoofing disabled
1 : ARP spoofing enabled
arp_spoofing_timer=30
[init]
application_mode=1
Enter the operating mode of the set:
–
0 for NOE mode
–
1 for SIP mode
[audio]
Tone_country=0
All Rights Reserved © Alcatel-Lucent 2010
Enter the country language of the user:
–
0 for English
–
1 for French
–
2 for German
–
3 for Italian
–
4 for Spanish
–
5 for Dutch
–
6 for Portuguese
Page 18
Dtmf_type=0
Dtmf_level=0
Enter the DTMF type:
–
0 for DTMF according to RFC2833
–
1 for DTMF in band
–
2 for SIP INFO
Enter the audio level for DTMF:
–
0 for 0db
–
1 or +3db
–
2 for +6db
–
3 for -3db
–
4 for -6db
Dtmf_avt_payload_type=
Only 97-127 is allowed
vad=1
Voice Activity Detection:
dtmf_feedback_enable=1
–
0 VAD out of service
–
1 VAD in service
0 = disable
1 = enable
rlr_handset=10
slr_handset=10
sidetone_handset=2
hearing_aid_enable=1
All Rights Reserved © Alcatel-Lucent 2010
0 = disable
1 = enable
Page 19
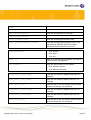
[appl]
admin_password=111111
Enter the set password in SIP mode
Bluetooth_parameters=
remote_forward_code=
Enter the forwarding activation code.
remote_forward_deactive_code=
Enter the forwarding deactivation code. This
code must be identical with the forward
cancellation prefix defined in the PCX.
power_priority=3
–
1 for critical
–
2 for hight
–
3 for low
asset_id=
asset_id by default is MAC address, it's used in
LLDP inventory management
time_format=0
Enter the time format for set display:
–
0 for 24 hours format
–
1 for AM and PM format
speed_dial_1_first_name=
Enter the first name to display when key 3 is
activated
speed_dial_1_last_name=
Enter the last name to display when key 3 is
activated
speed_dial_1_uri=
Enter the URI or the call number locally dialed
by the set when key 3 is activated
speed_dial_2_first_name=
Enter the first name to display when key 4 is
activated
speed_dial_2_last_name=
Enter the last name to display when key 4 is
activated
speed_dial_2_uri=
Enter the URI or the call number locally dialed
by the set when key 4 is activated
All Rights Reserved © Alcatel-Lucent 2010
Page 20
speed_dial_3_first_name=
Enter the first name to display when key 5 is
activated
speed_dial_3_last_name=
Enter the last name to display when key 5 is
activated
speed_dial_3_uri=
Enter the URI or the call number locally dialed
by the set when key 5 is activated
speed_dial_4_first_name=
Enter the first name to display when key 6 is
activated
speed_dial_4_last_name=
Enter the last name to display when key 6 is
activated
speed_dial_4_uri=
Enter the URI or the call number locally dialed
by the set when key 6 is activated
[admin]
binary_polling_timer=10
config_polling_timer=10
disable_pc_port=
activate_vlan_filter=
3.7. Third-party certificate management
Method
12345-
Scroll down to ‘Certificate’.
Press OK.
View Certificate.
Scroll down to ‘Get Certificate’.
Press OK. Fill up the fields as follow :
HTTP: HTTP Server IP @
Port: 80
Path: path to your directory containing certificates
Used MAC@file: Choose Yes if the name of the file is MAC @
File: name of the file containing the certificate
Type: Custom cert 1 or 2
6- Get: OK
All Rights Reserved © Alcatel-Lucent 2010
Page 21
If the Private Key of the certificate you download is protected by password or phrase, you’ll be
asked to enter the password or phrase.
The certificate is under PKCS#12 format (.pfx or .p12 extension).
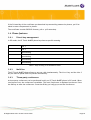
3.8. Phone features
3.8.1.
Direct key management
In SIP mode, the IP Touch 40x8EE phone keys have a specific meaning.
0
Line 1
1
Line 2
2
Speed dialing
3
Speed dialing
4
Speed dialing
5
Speed dialing
Table 1: Keys meaning in SIP standalone mode
3.8.2.
Multiline
The IP Touch 40x8EE phone allows to set two calls simultaneously. The Line 1 key and the Line 2
key are used to speak with two parties alternatively.
3.8.3.
Three-party conference
A three-party conference can be performed locally on IP Touch 40x8EE phone in SIP mode. When
two lines are set, the conference is available. The word Conference is displayed on the set. Press
the OK key to start the conference. Press the OK key (or hang up) to end the conference.
All Rights Reserved © Alcatel-Lucent 2010
Page 22
3.8.4.
Speed dialing keys
The user can make a call by pressing one of the speed dialing key. The set automatically dials the
content of the key.
A speed dialing key is configured with:
–
The first name and the last name of remote party
–
The URI or the call number of the remote party
Speed dialing keys can be programmed:
–
Locally on the set
–
Via the set configuration file
If a speed dialing key is configured via the configuration file, it cannot be modified from the set.
3.8.5.
Voice mail
In SIP mode, the set can access voice mail via the voice mail key.
The voice mail key is configured with the voice mail URI or voice mail call number in the SIP
configuration file.
To access voice mail, press the voice mail key. When connected, voice guides are played to help
you select options from the set keypad. Digits are transmitted via DTMF coding.
When a new message has been received, the voice mail LED is on. LCD will indicate one more
new message after pressing voice mail key.
Note:
In conversation, a SIP set switches automatically to DTMF mode.
All Rights Reserved © Alcatel-Lucent 2010
Page 23
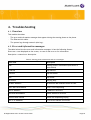
4. Troubleshooting
4.1. Overview
This module describes:
–
The error and information messages that appear during the starting phase on the phone
–
The Ethernet link table.
–
The system logs through network (Net Log).
4.2. Error and information messages
The table below lists the error and information messages. It has the following format:
Short text = text displayed on the screen, in case of real error or for information.
Description = status/error description
Table 2: Starting phase information and error messages
Short text
Description
END
Starting phase is terminated (successful or
unsuccessful)
STARTED
Step started
SUCCESS
Step successful
FAIL
Step failed
RETRYING
Retrying step
NO MAC ADDRESS
No Ethernet MAC address stored in flash
DHCP NOT RESPONDING
Server is not responding
BAD IP ADDRESS
IP address is incorrect
BAD ROUTER ADDRESS
Router address is incorrect
ROUTER PING FAILED
Router not responding to ping
BAD TFTP ADDRESS
TFTP server address is incorrect
All Rights Reserved © Alcatel-Lucent 2010
Page 24
ADDRESSES MISMATCH
Address, mask and router do not match
TFTP NOT RESPONDING
TFTP server is not responding
TFTP SERVER ERROR
TFTP server error
BAD FILE CONTENT
Error found in downloaded file
FILE TOO LARGE
File is too large (cannot be downloaded)
SAME VERSION FOUND
The version retrieved is the same as the version
running
NEW VERSION FOUND
New IP Touch software version found
(download)
FLASHING SUCCESS
Flashing successful
FLASHING FAILED
Failed to flash downloaded binary
TRYING ANOTHER CPU
Trying next address from configuration file
NO ETHERNET LINK
Ethernet link not connected (LAN port only)
RESOURCES NOT FOUND
Resources file not found in flash
DOWNLOAD FORCED
Download was forced because resources are
missing
NOT COMPATIBLE
Downloaded version not compatible with the
terminal hardware
initializing
First text message after hardware reset and
copyright information
1/5 network start
phase 1 is running: the set is starting its
network interface
2/5 network setup
Phase 2 is running: the set is looking for IP
addresses
3/5 config download
Phase 3 is running: the set is trying to get a
lanpbx file
All Rights Reserved © Alcatel-Lucent 2010
Page 25
4/5 binary download
Phase 4 is running: the set is downloading a new
binary
5/5 connecting
Phase 5 is running: the set is trying to set up the
signaling link with the system
802.1x Auth Failed
802.1x authentication has failed: RADIUS server
is unreachable, access is refused to the terminal
on the RADIUS server or the terminal has an
incorrect identity (bad login and/or password).
802.1x Auth Success
802.1x authentication process is complete. The
RADIUS server grants access to the terminal, the
authenticator opens its port.
4.3. Ethernet link
By default, the IP Touch 4018EE phone is configured to perform auto-negotiation on both ports
(LAN and PC). Provided that the PC and the LAN switch are also configured to perform autonegotiation, this is the best configuration for QoS improvement.
However, depending on the network configuration, it may not always be possible to leave the
terminal in auto-negotiation: link speed and duplex of both ports can be forced to determined
values using the supervisor menu:
1- Plug in the set
2- Once the set displays initialization, press the “i” key, then the “#” key or enter the
admin settings during phone idle status
3- Use the navigation key to select Ethernet Links
4- Modify data as requested
A configuration mismatch between the terminal and PC/LAN switch can lead to nasty effects on
the voice quality:
–
No link (or speed mismatch): 8, 9, 11 and 12
–
Packet loss (or duplex mismatch): 2, 4, 7 and 14
Note 1: collisions are not detected by the device operating in full-duplex mode: packets from this
device are never re-transmitted if a collision occurs on them.
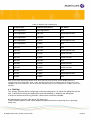
The following table lists all possible Ethernet port configuration combinations when connecting
an IP Touch set to an external device (switch on LAN side, PC on PC side). For each combination,
the table shows the link status: valid or invalid (duplex or speed mismatch), as described above.
All Rights Reserved © Alcatel-Lucent 2010
Page 26
Table 3: Ethernet link combinations
Terminal Port
External Device Port
Link Status
1
auto-negotiation
auto-negotiation
Valid
2
auto-negotiation
100-FULL
Invalid (packet loss)
3
auto-negotiation
100-HALF
Valid
4
auto-negotiation
10-FULL
Invalid (packet loss)
5
auto-negotiation
10-HALF
Valid
6
100-FULL
100-FULL
Valid
7
100-FULL
100-HALF
Invalid (packet loss)
8
100-FULL
10-FULL
Invalid (no link)
9
100-FULL
10-HALF
Invalid (no link)
10
100-HALF
100-HALF
Valid
11
100-HALF
10-FULL
Invalid (no link)
12
100-HALF
10-HALF
Invalid (no link)
13
10-FULL
10-FULL
Valid
14
10-FULL
10-HALF
Invalid (packet loss)
15
10-HALF
10-HALF
Valid
Note 2: to prevent slowness problem on PC when the two ports of the IP Touch 4018EE phone are
configured in auto-negotiation mode, if the negotiation has led to a 10 Mbps rate on the PC port and a
100 Mbps rate on the LAN port, the IP Touch set automatically tries to renegotiate a 10 Mbps rate on the
LAN port.
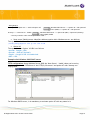
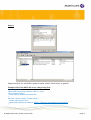
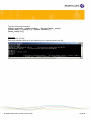
4.4. Net log
The ‘netlog’ function allows configuring a network syslog server on which the debug flux will be
sent. It also allows setting the debug flux level and enabling or disabling the debug link.
In order to activate this net log function, telnet service must be available.
On administrator console, type telnet SIP phone IP @
Telnet window appears. Enter telnet password (password stored in sipconfig.txt or [email protected]).
All Rights Reserved © Alcatel-Lucent 2010
Page 27
Type the following command
netlog [<live|boot>_<disable|enable> | <list|save|dump>_config |
{server <addr>} | {config <n>} | {uptime <minutes>} |
{dump_config <n>}]
Example:
telnet 172.26.179.207
Enter the password defined in the sipconfig.txt or [email protected] file.
All Rights Reserved © Alcatel-Lucent 2010
Page 28
www.alcatel-lucent.com
All Rights Reserved © Alcatel-Lucent 2010
Page 29