1
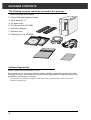
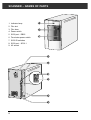
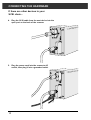
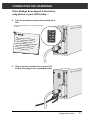
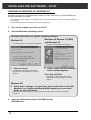
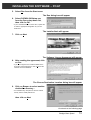
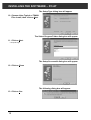
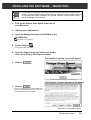
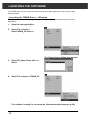
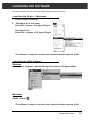
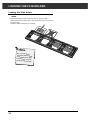
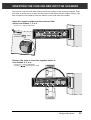
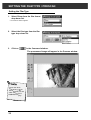
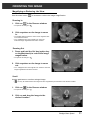
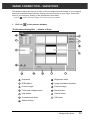
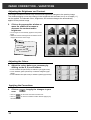
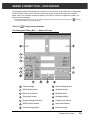
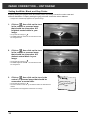
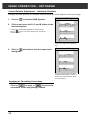
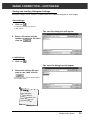
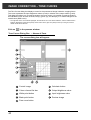
Thank you for purchasing the Minolta Dimâge Scan Speed. The Dimâge Scan Speed is a dual
format film scanner capable of scanning 35mm and, with the optional AD-10 APS Adapter,
Advanced Photo System film.
This manual has been designed to help you understand the operation of your scanner. Please read
this manual thoroughly to realize all the benefits of your scanner.
The instructions in this manual assume you have a working knowledge of the operating system for
your computer (Macintosh OS, Windows 95, Windows 98, or Windows NT) and its conventions.
Familiarity with the mouse and standard operating system menus and commands is necessary
before operating the driver software for the Dimâge Scan Speed.
This manual does not instruct in the:
• basic use of personal computers.
• use of Windows 95, Windows 98, Windows NT, or Macintosh OS.
• use of Adobe Photoshop, Paint Shop Pro, or Corel Draw.
The examples in this manual use Windows 95. The appearance of some screens may differ from
the examples when using Windows 98, Windows NT, or the Macintosh operating system.
Microsoft, Windows®, Windows 95®, Windows 98®, and Windows NT® are registered trademarks
of the Microsoft Corporation.
Macintosh™, Apple®, and Power Macintosh® are registered trademarks of Apple Computer, Inc.
Adobe® and Photoshop™ are registered trademarks of Adobe Systems Incorporated.
Corel Draw™ is a trademark of the Corel Corporation.
Paint Shop Pro is the copyright of Met’s Corporation.
Other corporate and product names are the trademarks and registered trademarks of their
respective companies.
• Changes or modifications not approved by the party responsible for compliance could void the user’s authority to
operate the equipment.
• This manual may not be copied in part or whole without prior written permission from Minolta Co., Ltd. ©1997
Minolta Co., Ltd.
• Every necessary caution has been taken to ensure the accuracy of this instruction manual. Please contact us if
you have any questions, find any errors, or notice missing information.
• Minolta is not responsible for loss, damage, or other results occurring during the operation of this product.
This mark certifies that this product meets the requirements of the EU (European
Union) concerning interference causing equipment regulations. CE stands for
Conformité Européenne.
This device complies with Part 15 of the FCC Rules. Operation is
subject to the following conditions: (1) This device may not cause
harmful interference, and (2) this device must accept any interference
received, including interference that may cause undesired operation.
To meet FCC regulations, the SCSI cables used with this scanner
must be equipped with ferrite cores.
This Class B digital apparatus complies with Canadian ICES-0003..
Cet appareil numérique de la classe B est comforme à la norm NMB-003 du Canada.
Tested by the Minolta Corporation 101 Williams Drive Ramsey, New Jersey 07446 USA
FOR PROPER AND SAFE USE
Please read and understand each caution before using this product.
CAUTION
To avoid fire or electric shock:
• Only use the voltage specified for this unit.
• Do not expose this unit to liquids.
• Do not insert metal objects into this unit.
• Do not touch the cord or plug if your hands are wet.
• Unplug this unit when it is not in use.
Improper use of the power cord may result in fire or electric shock.
• Insert the plug securely into an electrical outlet.
• Do not pull on the cord. Grasp the plug when removing the power cord from an outlet.
• Do not scratch, twist, modify, heat, or place a heavy object on the power cord.
• Do not connect the ground to a gas pipe, telephone ground, or a water pipe. Improper
grounding can result in electric shock.
This product must have sufficient ventilation while in use. Blocked ventilation
ducts may cause the unit to overheat, increasing the risk of fire.
• Do not use or store this product in dusty or very humid areas.
If there is smoke, a strange smell, or any other unusual conditions, shut down
and unplug the unit, then contact a Minolta Service Facility.
Do not attempt to disassemble this product. It contains high-voltage
circuits. Take the product to a Minolta Service facility for repairs.
Unexpected damage may occur if this unit is left unattended near young
children.
Dimâge Scan Speed
1
PACKAGE CONTENTS
The following contents should be included in this package.
1. Minolta Dimâge Scan Speed
2. 35mm Slide and Negative holders
3. SCSI cable SC-11
4. AC power cord
5. DS_Speed driver CD ROM
6. Instruction Manual
7. Warranty card
8. Photoshop 4.0 LE CD ROM
Software Registration
Please register this software before using it…
Once registered, you will receive technical support, software upgrade and product information.
Complete and return the enclosed Product & Software Registration form after detaching it form
the Warranty. No postage is necessary.
• The information you provide is confidential and will only be used by Minolta Customer Service and Product
Research & Development.
4
TABLE OF CONTENTS
FOR PROPER AND SAFE USE . . . . . . . . . . . . . . . . . . . . . . . . . . . . . . . . . . . . . . . . . . . . . .1
SYSTEM REQUIREMENTS PC/AT . . . . . . . . . . . . . . . . . . . . . . . . . . . . . . . . . . . . . . . . . . .2
SYSTEM REQUIREMENTS Macintosh . . . . . . . . . . . . . . . . . . . . . . . . . . . . . . . . . . . . . . . .3
PACKAGE CONTENTS . . . . . . . . . . . . . . . . . . . . . . . . . . . . . . . . . . . . . . . . . . . . . . . . . . . .4
TABLE OF CONTENTS . . . . . . . . . . . . . . . . . . . . . . . . . . . . . . . . . . . . . . . . . . . . . . . . . . . .5
NAMES OF PARTS . . . . . . . . . . . . . . . . . . . . . . . . . . . . . . . . . . . . . . . . . . . . . . . . . . . . . . .6
SCANNER SETUP
Setting the SCSI ID . . . . . . . . . . . . . . . . . . . . . . . . . . . . . . . . . . . . . . . . . . . . . . . . . . . . . . . . . . .8
Connecting the Hardware . . . . . . . . . . . . . . . . . . . . . . . . . . . . . . . . . . . . . . . . . . . . . . . . . . . . . .9
Installing the Software PC/AT . . . . . . . . . . . . . . . . . . . . . . . . . . . . . . . . . . . . . . . . . . . . . . . . . .12
Installing the Software Macintosh . . . . . . . . . . . . . . . . . . . . . . . . . . . . . . . . . . . . . . . . . . . . . . .15
STANDARD OPERATION
Launching the Software . . . . . . . . . . . . . . . . . . . . . . . . . . . . . . . . . . . . . . . . . . . . . . . . . . . . . . .18
Command Window - Names of Parts . . . . . . . . . . . . . . . . . . . . . . . . . . . . . . . . . . . . . . . . . . .20
Prescan Window - Names of Parts . . . . . . . . . . . . . . . . . . . . . . . . . . . . . . . . . . . . . . . . . . . .21
Setting the Preferences . . . . . . . . . . . . . . . . . . . . . . . . . . . . . . . . . . . . . . . . . . . . . . . . . . . . . . .22
Loading the Film Holder . . . . . . . . . . . . . . . . . . . . . . . . . . . . . . . . . . . . . . . . . . . . . . . . . . . . . .23
Inserting the Film Holder into the Scanner . . . . . . . . . . . . . . . . . . . . . . . . . . . . . . . . . . . . . . . . .25
Setting the Film Type . . . . . . . . . . . . . . . . . . . . . . . . . . . . . . . . . . . . . . . . . . . . . . . . . . . . . . . . .26
Prescan . . . . . . . . . . . . . . . . . . . . . . . . . . . . . . . . . . . . . . . . . . . . . . . . . . . . . . . . . . . . . . . . . .26
Auto-Exposure Lock . . . . . . . . . . . . . . . . . . . . . . . . . . . . . . . . . . . . . . . . . . . . . . . . . . . . . . . . .27
Orienting the Image . . . . . . . . . . . . . . . . . . . . . . . . . . . . . . . . . . . . . . . . . . . . . . . . . . . . . . . . .28
Image Correction . . . . . . . . . . . . . . . . . . . . . . . . . . . . . . . . . . . . . . . . . . . . . . . . . . . . . . . . . . .32
Variations Dialog Box - Names of Parts . . . . . . . . . . . . . . . . . . . . . . . . . . . . . . . . . . . . . . . . .33
Image Correction - Variations . . . . . . . . . . . . . . . . . . . . . . . . . . . . . . . . . . . . . . . . . . . . . . . . . .34
Histogram Dialog Box - Names of Parts . . . . . . . . . . . . . . . . . . . . . . . . . . . . . . . . . . . . . . . .35
Image Correction - Histogram . . . . . . . . . . . . . . . . . . . . . . . . . . . . . . . . . . . . . . . . . . . . . . . . . .36
Tone Curves Dialog Box - Names of Parts . . . . . . . . . . . . . . . . . . . . . . . . . . . . . . . . . . . . . .40
Image Correction - Tone Curves . . . . . . . . . . . . . . . . . . . . . . . . . . . . . . . . . . . . . . . . . . . . . . . .41
Job Type . . . . . . . . . . . . . . . . . . . . . . . . . . . . . . . . . . . . . . . . . . . . . . . . . . . . . . . . . . . . . . . . . .44
Final Scan . . . . . . . . . . . . . . . . . . . . . . . . . . . . . . . . . . . . . . . . . . . . . . . . . . . . . . . . . . . . . . . .46
SCANNING APS FILM
Launch Software . . . . . . . . . . . . . . . . . . . . . . . . . . . . . . . . . . . . . . . . . . . . . . . . . . . . . . . . . . . .48
Specify Film Type . . . . . . . . . . . . . . . . . . . . . . . . . . . . . . . . . . . . . . . . . . . . . . . . . . . . . . . . . . .48
Index Window - Names of Parts . . . . . . . . . . . . . . . . . . . . . . . . . . . . . . . . . . . . . . . . . . . . . .48
Preferences - APS Settings . . . . . . . . . . . . . . . . . . . . . . . . . . . . . . . . . . . . . . . . . . . . . . . . . . . .49
APS Adapter - Names of Parts . . . . . . . . . . . . . . . . . . . . . . . . . . . . . . . . . . . . . . . . . . . . . . .50
Loading the APS Adapter . . . . . . . . . . . . . . . . . . . . . . . . . . . . . . . . . . . . . . . . . . . . . . . . . . . . .50
Inserting the APS Adapter into the Scanner . . . . . . . . . . . . . . . . . . . . . . . . . . . . . . . . . . . . . . . .51
Index Scan . . . . . . . . . . . . . . . . . . . . . . . . . . . . . . . . . . . . . . . . . . . . . . . . . . . . . . . . . . . . . . . .52
Prescan and Image Correction . . . . . . . . . . . . . . . . . . . . . . . . . . . . . . . . . . . . . . . . . . . . . . . . .54
Scanning the Image . . . . . . . . . . . . . . . . . . . . . . . . . . . . . . . . . . . . . . . . . . . . . . . . . . . . . . . . .55
Removing the APS Adapter . . . . . . . . . . . . . . . . . . . . . . . . . . . . . . . . . . . . . . . . . . . . . . . . . . . .56
APPENDIX
Scan Settings . . . . . . . . . . . . . . . . . . . . . . . . . . . . . . . . . . . . . . . . . . . . . . . . . . . . . . . . . . . . . .58
Scan Settings Dialog Box - Names of Parts . . . . . . . . . . . . . . . . . . . . . . . . . . . . . . . . . . . . . .58
Creating/Deleting Job Files . . . . . . . . . . . . . . . . . . . . . . . . . . . . . . . . . . . . . . . . . . . . . . . . . . . .60
Job File List . . . . . . . . . . . . . . . . . . . . . . . . . . . . . . . . . . . . . . . . . . . . . . . . . . . . . . . . . . . . . . .61
Glossary . . . . . . . . . . . . . . . . . . . . . . . . . . . . . . . . . . . . . . . . . . . . . . . . . . . . . . . . . . . . . . . . . .64
ColorSync . . . . . . . . . . . . . . . . . . . . . . . . . . . . . . . . . . . . . . . . . . . . . . . . . . . . . . . . . . . . . . . . .66
Trouble Shooting . . . . . . . . . . . . . . . . . . . . . . . . . . . . . . . . . . . . . . . . . . . . . . . . . . . . . . . . . . . .67
Specifications . . . . . . . . . . . . . . . . . . . . . . . . . . . . . . . . . . . . . . . . . . . . . . . . . . . . . . . . . . . . . .68
User Technical Support . . . . . . . . . . . . . . . . . . . . . . . . . . . . . . . . . . . . . . . . . . . . . . . . . . . . . . .69
Dimâge Scan Speed
5
SCANNER – NAMES OF PARTS
1. Indicator lamp
2. Film slot
3. Film door
4. Power switch
5. SCSI port - DB25
6. Terminator power switch
7. SCSI ID switches
8. SCSI port - SCSI-1
9. AC socket
6
SCANNER SETUP
SETTING THE SCSI ID
Turn off the computer and all the devices in the SCSI chain
before changing SCSI IDs, connecting, or disconnecting SCSI
cables. Hardware damage may occur if this precaution is not
followed.
A SCSI ID is a unique address you assign to each SCSI device connected to your computer.
The SCSI ID range of your computer is from 0 to 7, however some ID's are already occupied.
Occupied SCSI ID
IBM PC/AT
7 - SCSI host adapter
Macintosh
0 - internal hard drive*
3 - internal CD ROM drive**
7 - operating system
* IDE Macintosh systems do not use SCSI ID 0 for the hard drive.
** SCSI ID 3 is available on the external bus on Macintosh systems with a dual bus.
Setting the SCSI ID
1. Turn off the computer and all connected SCSI
devices.
2. Determine which SCSI IDs are not being used.
3. Using a pointed object, set the switches to an
unused SCSI ID.
• The Dimâge Scan Speed’s SCSI ID is factory preset to 5. If 5 is not
occupied, there is no need to change the SCSI ID.
• Two operating SCSI devices in the same SCSI chain cannot share a
SCSI ID.
SCSI ID Dip Switch Settings
8
CONNECTING THE HARDWARE
Connecting the SCSI Cable
This scanner has been packaged with the SCSI cable SC-11 (DB25-to-SCSI-1). See your
dealer if you require a different SCSI cable.
• To meet FCC regulations, the SCSI cables used with this scanner must be equipped with ferrite cores.
BEFORE YOU BEGIN…
TURN THE COMPUTER AND ALL CONNECTED
DEVICES OFF.
1. Place the scanner on a level surface.
2. Connect one end of the SCSI cable to either
SCSI port on the back of the scanner
• Either SCSI port can be used for other configurations, there is no
dedicated in or out port.
3. Connect the other end of the SCSI cable to the
SCSI port on the computer or the last device in
the SCSI chain.
Continued on the following page.
Dimâge Scan Speed
9
CONNECTING THE HARDWARE
If there are other devices in your
SCSI chain…
4. Plug the SCSI cable from the next device into the
open port on the back of the scanner.
5. Plug the power cord into the scanner’s AC
socket, then plug it into a grounded outlet.
10
CONNECTING THE HARDWARE
If the Dimâge Scan Speed is the last or
only device in your SCSI chain…
4. Turn the terminator power switch (switch 4) to
ON.
• An external terminator is not necessary with this
scanner.
Terminating th
e SCSI chain
helps to supp
ress electron
ic
noise in the S
CSI chain.
Not terminatin
g the SCSI ch
ain
can cause slow
downs, data
errors, crashe
s, and other
unpredictable
errors.
5. Plug the power cord into the scanner’s AC
socket, then plug it into a grounded outlet.
Dimâge Scan Speed
11
INSTALLING THE SOFTWARE – PC/AT
WINDOWS 95/ WINDOWS 98 / WINDOWS NT
Dimâge Scan Speed for Windows Setup installs the Twain and Twain_32 driver software into
the drive and folder you select.
• The appearance and/or wording of some dialog boxes may vary depending on the version of Windows running on
your machine.
• These installation instructions assume drive D is the CD-ROM drive.
1. Turn on the scanner, then turn on the PC.
2. Start the Windows operating system.
This step varies with your specific operating software...
Windows 95
• The New Hardware Found dialog box will appear.
Windows 95 Release 2 (OSR2)
and Windows 98
• The Device Wizard dialog box will appear.
3. Click on Cancel.
• This dialog box may appear several times.
Repeat step 3 until the dialog box no longer
appears.
3. Click on Next until the Unknown
Device window appears…
then click on Finish.
• This dialog box may appear several times.
Repeat step 3 until the dialog box no longer
appears.
Windows NT
3. Select Start > Settings > Control Panel, then double-click on the SCSI
Adapters icon. Confirm that Minolta #2884 appears as a connected
device for your SCSI board.
• If Minolta #2884 does not appear, turn the system off and check all the connections. Repeat the
procedure.
4. Insert the Dimâge Scan Speed CD-ROM into the
CD-ROM drive.
12
INSTALLING THE SOFTWARE – PC/AT
5. Select Run form the Start menu.
The Run dialog box will appear
6. Select D:\ENGLISH\Setup.exe
from the Open drop-down list,
then click on OK.
• If your CD-ROM drive is not the D drive, replace the
D with the appropriate designation for your CDROM drive.
The installer flash will appear.
7. Click on Next
The Software License Agreement will appear.
8. After reading the agreement, click
on Yes.
• If you do not agree to the conditions stated in the
End-User License Agreement, click on No and the
software will not be installed.
The Choose Destination Location dialog box will appear
9. Click on Browse to select another
destination directory…
• An install directory and path can also be entered
directly into the install path list box.
then click on Next
Continued on the following page.
Dimâge Scan Speed
13
INSTALLING THE SOFTWARE – PC/AT
The Setup Type dialog box will appear
10. Choose either Typical or TWAIN
Files install, then click on Next.
The Select Program Folder dialog box will appear.
11. Click on Next.
• Setup will begin
The Setup Successful dialog box will appear.
12. Click on Close
The following dialog box will appear.
13. Click on Yes.
14
INSTALLING THE SOFTWARE – MACINTOSH
Please remove or disable any antivirus system extensions before launching this
installer. These extensions may conflict with the operation of this installer. Replace
or re-enable them when installation is complete. Hold the shift key down during
startup to disable the extensions.
1. Turn on the Dimâge Scan Speed, then turn on
your Macintosh.
2. Quit any open applications.
3. Insert the Dimâge Scan Speed CD-ROM into the
CD-ROM drive.
•
will appear on the desktop.
4. Double-click on
.
• The language folders will appear.
5. Open the English language folder, then double
click on the Dimage Scan Speed Installer.
The installer’s start-up screen will appear.
6. Click on
.
The End-User License Agreement will appear.
7. Click on
.
• If you do not agree to the conditions stated in the
End-User License Agreement, click on Decline
and the software will not be installed.
Continued on the following page.
Dimâge Scan Speed
15
INSTALLING THE SOFTWARE – MACINTOSH
The following dialog box will appear.
Install type pulldown menu
Install location pulldown menu
Name and icon of the selected
install drive or folder.
8. Select the install drive (or folder) and type from
the pulldown menus.
• You can also click on
to select an install drive.
9. Click on
.
The following message appears when the installer is finished.
11.Click on
.
• The software will be installed in a new
folder titled Dimage Scan Speed.
• If Easy Install was chosen, the Dimage
Scan Speed folder will contain the following
items: DS_Speed Utility, DS_Speed Plugin, and Read Me file.
11. Drag the DS Speed Plug-in to the Import/Export
folder in the Adobe Photoshop Plug-ins folder.
16
S TA N D A R D O P E R AT I O N
SCAN
FLOW
Launch the Software
Set the Preferences
Load the Film Holder
Insert the Film Holder
Specify the Film Type
Prescan
Orient the Image
Correct the Brightness,
Contrast, and Colour
Specify the Job Type
Scan
Save
LAUNCHING THE SOFTWARE
The TWAIN driver lets you control the software through another application, such as your image
editing software.
Launching the TWAIN Driver — Windows
This manual uses Adobe Photoshop 4.0.1 as the host application. Commands may vary among
applications.
1. Open the host application.
2. Select File > Import >
Select TWAIN_32 Source...
The Select Source dialog box appears.
3. Select DS_Speed, then click on
Select.
4. Select File > Import > TWAIN_32.
The software is ready for use when the Command window appears (p.20).
18
LAUNCHING THE SOFTWARE
The plug-in software lets you access the software through Adobe Photoshop.
Launching the Plug-in — Macintosh
1. Launch Adobe Photoshop.
2.
Photoshop 4.0.1 and newer:
Select File > Import > DS_Speed Plug-in.
Photoshop 3.0.5:
Select File > Acquire > DS_Speed Plug-in
The software is ready for use when the Command window appears (p.20).
Launching the Utility Software
Windows
Select Start > Programs > Minolta Dimage Scan Speed > DS Speed Utility
Macintosh
Double click on
.
The software is ready for use when the Command window appears (p.20).
Dimâge Scan Speed
19
COMMAND WINDOW – NAMES OF PARTS
20
Index Scan button (APS p. 52)
Rewind button (APS p. 56)
Prescan button
Help button (
Scan button
Status bar
Scan Settings button
Load Job button
Save Index Scan button
Displays current Job selection
Save Job button
Film Type list box
Preferences button
Film Format list box
on Macintosh)
PRESCAN WINDOW – NAMES OF PARTS
Zoom button
Variations button
Flip Vertical button
Histogram button
Rotate Right button
Reset All button
Rotate Left button
Cropping frame dimensions
Flip Horizontal button
RGB/CMY display
Full-Screen View button
Tone Curves button
AEL button
Image area
Grab button
Dimâge Scan Speed
21
SETTING THE PREFERENCES
1. Click on
.
2. Set the preferences as desired.
Auto Expose Slides checkbox
Select this checkbox when scanning underexposed slides.
Close Driver After Scanning checkbox
Closes the scanner's driver software after the scan is complete.
Prescan Size list box
There are three size options for prescan window: Small, Large, and Auto.
• Auto determines the appropriate prescan window size based on the size of your monitor.
Colour Depth list box
The pixel depth of each colour channel used to scan your image (RGB or CMY). Three
options are available:
• 8-bit
– over 16.7 million colours
• 16-bit
– over 2.8 billion colours
• 16-bit linear – same as 16 bit, but image correction is not applied when the image is
scanned.
3. Click on
settings.
to accept the new preference
• Changes to the Preference settings take effect immediately.
22
LOADING THE FILM HOLDER
Using the included 35mm negative and slide holders, the Minolta Dimâge Scan Speed can
scan mounted or unmounted…
• 35mm colour negatives
• 35mm black & white negatives
• 35mm colour slides
• 35mm black & white positives
Advanced Photo System negatives and slides can also be scanned using the optional AD-10
APS Adapter. See page 48.
Loading the Negative Holder
1. Open the film holder.
2. Place the film in the film holder
emulsion side down.
• The film holder will accept film
strips up to 6 frames long.
• Brush dust off the film before
placing it into the film holder.
The frame nu
mbers and
text are backw
ards when
the film’s emul
sion side is
up.
3. Align the frames within the scanning windows.
4. Snap the film holder closed.
Continued on the following page.
Dimâge Scan Speed
23
LOADING THE FILM HOLDER
Loading the Slide Holder
1. Insert slides into the slide holder emulsion side
down.
• Brush dust off the the slide before placing it into the film holder.
• Slide mounts must be thicker than 1 mm and thinner than 2 mm to fit into
the slide holder.
• Orient the slides horizontally, not vertically.
Do not scan g
lass
mounted slide
s. Glass
mounts bend
the light
from the line
scanner,
producing ba
d results.
24
INSERTING THE FILM HOLDER INTO THE SCANNER
The notches in the film and slide holders identify the position of the scanning windows. Push
the holder in all the way in to scan the last frame on that side of the film holder. Remove, flip,
then re-insert the film holder to scan the frames on the other side of the holder.
Insert the negative holder into the scanner’s film
slot to scan frames 1, 2, or 3.
• Frames 1 or 2 with the slide holder.
The white
should be up
rig
mark
ht.
Remove, flip, then re-insert the negative holder to
scan frames 4, 5, or 6.
• Frames 3 or 4 with the slide holder.
• The blue
mark should be upright
Dimâge Scan Speed
25
SETTING THE FILM TYPE / PRESCAN
Setting the Film Type
1. Select 35mm from the film format
drop-down list.
• The Prescan window appears.
2. Select the film type from the film
type drop-down list.
3. Click on
in the Command window.
The prescanned image will appear in the Prescan window.
Press Ctrl wh
en
prescanning
(
on
the Macintosh
) to see
CMY values in
the
RGB/CMY dis
play.
26
AUTO-EXPOSURE LOCK
Especially useful when scanning bracketed exposures, AE lock lets you scan multiple images with
the same initial exposure settings. AE Lock saves the automatic exposure settings determined when
an image is prescanned. Subsequent images are prescanned using the ‘locked’ exposure settings.
• AE-lock does not save exposure corrections made in the Variations, Histogram, or Tone Curves dialog boxes.
Setting AE-Lock
After prescanning the image…
1. Click on
•
.
can not be selected until an image has been prescanned.
2. Select another image, then click on
.
• The scanner skips the setting exposure step in the prescan sequence.
Images will be scanned using the AE lock settings until
AE lock is cancelled or the scanner is reinitialized.
Cancelling AE-Lock
1. Click on
2. Click on
.
to prescan the image again.
Dimâge Scan Speed
27
ORIENTING THE IMAGE
Rotate
Click on the
and
buttons to correct the orientation of your image before scanning.
Changes will be reflected in the prescan image.
• Click on
to view a full screen display of the area inside the cropping frame.
Click on
to rotate
the image 90° clockwise.
Click on
to rotate the
image 90° counter-clockwise.
28
ORIENTING THE IMAGE
Flip
The
and
buttons let you flip the image left to right or top to bottom before scanning.
Changes will be reflected in the prescan image.
• Click on
Click on
to view a full screen display of the area inside the cropping frame.
to flip the image top to bottom.
• The image is upside down
compared to the original prescan.
Click on
to flip the image left-to-right.
• Image is backwards compared to
the original scan.
Dimâge Scan Speed
29
ORIENTING THE IMAGE
Cropping
The cropping frame defines how much of the prescan image will be scanned. The dimensions
of the cropping frame are displayed in the lower left corner of the prescan window
• Click on
to view a full screen display of the area inside the cropping frame.
To enlarge or reduce the size of the cropping frame…
Click on the cropping frame and drag the
pointer in or out.
• Click on the corners and drag to resize the cropping frame
proportionally.
• Click on the sides and drag to resize the cropping frame
non-proportionally.
To move the cropping frame…
Click inside the cropping frame, then drag
the cropping frame to its new location.
To define a new cropping frame…
Click and drag outside the current
cropping frame.
30
ORIENTING THE IMAGE
Magnifying or Reducing the View
Use the zoom button
to increase or reduce the image magnification.
Zooming In
1. Click on
in the Prescan window.
• The pointer will change to
.
2. Click anywhere on the image to zoom
in.
• The clicked position will be the center of the magnified view
in the Prescan window.
• The + disappears from the magnifier icon when the
maximum image magnification has been reached.
Zooming Out
1. Press and hold the Ctrl key (option key
on the Macintosh) to reduce the image
magnification.
• The pointer will change to
.
2. Click anywhere on the image to zoom
out.
• The – disappears from the magnifier icon when the minimum
image magnification has been reached.
Scroll
Use the grab button to scroll an enlarged image.
•
can only be selected when the image has been magnified beyond the limits of the Prescan window.
1. Click on
in the Prescan window.
• The pointer will change to
.
2. Click on and drag the image to the
desired location
Dimâge Scan Speed
31
IMAGE CORRECTION
This scanner gives you three options for correcting the brightness, contrast, and colour
balance of the final scan
Variations
This is the easiest way to make image corrections and is
recommended for beginners. Simply choose the image that
looks best from a visual display of contrast and brightness
differences. Click on slider bars to correct the colour
A control (uncorrected) and preview (corrected) image appear
in the Variations dialog box for comparison.
Histogram
The Histogram dialog box gives a graphical representation of
the 256 brightness levels for the red, green, and blue colour
channels.
Using sliders, the input and output levels can be adjusted to
make changes in the brightness, overall contrast, gamma
(midtone contrast), and the colour of the image.
A control and preview image appear in the Histogram dialog
box for comparison.
Tone Curves
The Tone Curves dialog box displays correction curves for the
red, green, and blue colour channels. Change the brightness,
contrast, gamma and colour of the output image by changing
the shape of the correction curves.
A control and preview image appear in the Tone Curves dialog
box for comparison.
Reset All – Prescan Window
The Reset All button in the Prescan window cancels all
corrections applied in the Variations, Histogram, and Tone
Curves dialog boxes.
Colour, brightness, and contrast settings are returned to their
prescan values.
32
IMAGE CORRECTION – VARIATIONS
The Variations dialog box lets you quickly correct the brightness and contrast of your image by
clicking on simulations that represent varying amounts correction to your image. Correct the
colour in your image by clicking on the appropriate colour slider.
• Click on
to view a full screen display of the control and prescan windows.
1. Click on
in the prescan window.
The Variations Dialog Box — Names of Parts
Grayscale
Brightness slider
RGB sliders
Image simulation windows
Control image
Preview image
Full-screen display button
Reset button
Help button
Cancel button
Contrast-level slider
OK button
Status window
Dimâge Scan Speed
33
IMAGE CORRECTION – VARIATIONS
Adjusting the Brightness and Contrast
The image simulation windows map contrast and brightness changes to the preview image.
The windows display a one step change in the brightness and contrast, but up to 10 steps (+/-)
can be applied. The selected colour, brightness, and contrast changes are automatically
applied to the preview image
2. Click on the appropriate window or
move the sliders to increase or
decrease the contrast and/or
brightness.
• The changes are automatically applied to the preview
image.
• Additional contrast and brightness simulations will be
mapped around the center image.
Correcting th
e brightness
and contrast
may
eliminate the
need for
colour correct
ions.
Adjusting the Colour
3. Adjust the colour balance as necessary by
clicking on the R, G, and B sliders.
• R can subtract red (left arrow) or subtract cyan (right arrow).
• G can subtract green (left arrow) or subtract magenta (right
arrow).
• B can subtract blue (left arrow) or subtract yellow (right arrow).
Applying the Corrections
4. Click on
scan.
to apply the changes to your
• Click on
to cancel all corrections and start over.
• Click on
corrections.
to close the variations window without applying any
34
IMAGE CORRECTION – HISTOGRAM
The histogram dialog box displays the frequency of occurrence of the 256 levels of brightness
(0-255) for each of the colour channels that make up the image area inside the cropping
frame. Level 0 is minimum brightness (black). Level 255 is maximum brightness (white). The
midtones fall in-between.
• The histograms represent the red, green, and blue brightness levels for the control image. Click on
to view the histograms for the preview image.
Click on
and hold
in the prescan window.
The Histogram Dialog Box — Names of Parts
Control image
Save settings button
White point button
Shadow sliders
Black point button
Midtone slider
Gray point button
Highlight sliders
Output histogram button
Output level sliders
RGB synchro button
Input level sliders
Load settings button
Preview image
Dimâge Scan Speed
35
IMAGE CORRECTION – HISTOGRAM
Setting the White, Black, and Gray Points
Properly setting an image’s white and black points will usually correct the colour cast and
midtone distribution. Properly setting the gray point will correct the colour balance.
• Changes are automatically applied to the preview image.
1. Click on
, then click on the tone
in the control or prescan image
that should be scanned as the
brightest neutral white in your
image.
• The pointer will change to
.
• The RGB brightness values of the selected tone will
be changed to 255.
2. Click on
, then click on the tone
in the control or prescan image
that should be scanned as the
darkest neutral black in your
image.
• The pointer will change to
.
• The RGB brightness values of the selected tone will
be changed to 0.
3. Click on
, then click on the tone in the
control or prescan image that should be
scanned as a neutral tone.
• The pointer will change to
.
• The colour balance of the image is shifted to make the selected tone
neutral.
• The selected tone’s brightness value does not change.
36
Setting the gr
ay point
is not necess
ary for
most images.
IMAGE CORRECTION – HISTOGRAM
Brightness and Contrast Changes - RGB Synchro
When RGB synchro is selected, moving the levels sliders remaps the pixel values without
changing the colour balance. Correcting the highlight and shadow values with the histogram
sliders, may produce better results on images without neutral highlights or shadows.
If the histogram contains large flat line areas…
1. Click on
.
• Changes applied to one colour channel will be reflected in the other two.
2. Click on and move the input level highlight and
shadow sliders to the edges of the flat line area.
Input Level Histograms
• Changes are automatically applied to the preview image.
• Values to the right of the highlight slider will be scanned as pure white
(level 255). Values to the left of the shadow slider will be scanned as
pure black (level 0).
Input level highlight sliders moved to
the edge of the flat line area.
3. Click on and slide the output level sliders until
the preview image has the desired image
contrast.
• Click on
to view a full screen display of the control and
preview windows.
4. Click on
and hold to view the output level
histograms.
Output Level Histograms
The brightness
level
for the curren
tly
selected slide
r is
displayed nex
t to the
histogram.
Pixel values have been spread to
better utilize the brightness range.
Continued on the following page.
Dimâge Scan Speed
37
IMAGE CORRECTION – HISTOGRAM
Colour Balance Adjustment - Individual Channels
Changing the slider positions for individual channels affects the colour balance of the output image.
1. Click on
to deselect RGB Synchro.
Input Level Histograms
2. Click on and move the R, G, and B sliders to the
desired locations.
• Changes are automatically applied to the preview image.
• Click on
to view a full screen display of the control and
preview windows.
The red input level highlight slider is
moved to the edge of the red flat line
area.
3. Click on
and hold to view the output level
histograms.
Output Level Histograms
Only the red pixel values have been
remapped. Remapping the values of a
single colour channel usually affects
the colour balance.
Applying or Cancelling Corrections
Click on
to apply or
to cancel the
corrections to the image being scanned.
38
IMAGE CORRECTION – HISTOGRAM
Saving and Loading Histogram Settings
Histogram settings can be saved as a data file that can be loaded and applied to other images.
Save Settings
1. Click on
.
• The histogram settings are saved to
a data (dat) file.
The save file dialog box will appear.
2. Enter a file name and the
location to save the file, then
click on
.
Load Settings
1. Click on
.
The open file dialog box will appear.
2. Select the settings file you
want to use, then click on
.
• The settings in the selected file are applied
to the current image.
The histogram
settings files
for
colour and bl
ack and
white film are
not
interchangea
ble.
Dimâge Scan Speed
39
IMAGE CORRECTION – TONE CURVES
The Tone Curves dialog box displays curves for the prescanned image inside the cropping frame.
The curve represents the input brightness values (x-axis) in relation to the output values (y-axis).
This dialog box allows you to make changes to the tone curves. It is possible to make changes to
the individual curves for each channel; red (R), green (G), and blue (B), or to make changes to the
overall curve (RGB curve).
• The right side of the curve affects highlights, the left side of the curve affects shadows, and the midtones fall in
between. Brightness values are 0 (black) at the bottom of the grid, 255 (white) at the top of the grid, and the
middle values fall in between.
Click on
in the prescan window.
Tone Curves Dialog Box — Names of Parts
The curves dialog box will appear.
Control image
Calculate button
Colour channel list box
Output brightness value
White point button
Input brightness value
Black point button
Preview image
Free curve button
40