1
Tips for Using the Monomachine
(Using Information from the Elektron-Users Forum)
Compiled by tIB
Tips for Using the Monomachine
Version 1.01
This document has been compiled using posts from the
Elektron-Users website.
Apologies for not listing names, it proved to be too time
consuming. If you have any suggestions for things that are
missing, have spotted any glaring mistakes or you have something
you would like to add then PM me at the Elektron-Users forum and
I’ll update.
Happy tweaking,
tIB
www.virb.com/tib
2
Contents:
Basics …………………………………………... 4
Synth…………………………………………………………………..
Seq…………………………………………………………………….
Song Mode……………………………………………………………
External seq…………………………………………………………..
4
4
4
5
Advanced Sequencer …………………………
6
Recording modes…………………………………………………….
P-locks………………………………………………………………...
Trigless trigs………………………………………………………….
Kits/patches…………………………………………………………..
LFO……………………………………………………………………
Swing………………………………………………………………….
Arp…………………………………………………………………….
Transpose…………………………………………………………....
Slides………………………………………………………………….
Ploy…………………………………………………………………....
Multi trig……………………………………………………………….
Multi env. ……………………………………………………………..
6
6
6
8
9
9
10
10
10
11
11
12
Machines……………………………………..…. 13
BBOX………………………………………………………………….
GND……………………………………………………………………
FM……………………………………………………………………..
V/O…………………………………………………………………….
DPRO WAVES……………………………………………………….
13
13
13
14
14
Sound programming…………………………...
15
Bass……………………………………………………………………
Drums…………………………………………………………………
Snares………………………………………………………………...
Pads…………………………………………………………………..
Ens…………………………………………………………………….
Organ………………………………………………………………….
Strings…………………………………………………………………
Sound design (inc drones)..……………………………………………
15
20
21
22
23
23
26
27
Effects…………………………………………… 29
Delays…………………………………………………………………
Inputs………………………………………………………………….
Outputs………………………………………………………………..
29
29
30
Miscellaneous ………………………………….
31
Pitchbend……………………………………………………………..
Joystick………………………………………………………………..
Nuking…………………………………………………………………
Sysex………………………………………………………………….
Cases………………………………………………………………….
Velocity………………………………………………………………..
31
31
31
31
31
32
3
MONOMACHINE SYNTH BASICS
Basic Monomachine vocabulary:
Machines = Synthesis ie. SWave, SID, DIGIPro, FM+, VCO and FX
Tracks (1-6) = host your desired Machines and Patterns
Patterns = the total or whole of the 6 track parts.
Kits contain all of these...Machines, Tracks, Patterns and Midi data. Think of Kit's as the
equivalent to the MPC's Programs…Just remember that its all integrated.
Machines > Tracks > Patterns
(you don't need a pattern to hear the machines though.....but Machines have to have a Track
for playback)
I would load up a 'New Kit' on say Bank F-1 and see for yourself:
Starting from scratch/New Kits really helped me to learn it. I know
other people find it helpful to hear the pre-existing Kits....either way,
just keep hammering at it. It took me probably about 1 week or 2 to
really understand how everything was working together.
SEQUENCING BASICS
Note input works (SFX-60) through 16 step triggers (you can choose what octave you're in),
and/or external keyboard. You can do both in real time, step-sequencing, and can edit an
individual note after the fact. You can see what particular pitch a note-on trigger is by pressing
and holding the particular step trigger. While doing this, you can using the arrow keys of the
MNM to alter the pitch. You don't specifiy note lengths in the way in which the MIDI machines
on the MD do. Each synth track has evenlope parameters (attack, hold, decay, release) which
control note duration. You can, of course, freak the fuck out with parameter locks for total
control.
In terms of mono vs. poly modes. It's all or nothing--either you have 6 internal mono tracks or
6 tracks polyphonically assigned to one 'machine.' Synthesizer parameters are roughly
parallel to the MD's, and, IMO, there are more than enough for a huge pallete of sounds. The
individual machines within the synthesis types, coupled with their own parameters, coupled
with effects, filter, delay, lfo, etc., provide ample room to diverse sounds.
The sequencer is actually one of the strongest parts of the Monomachine.
SONGMODE:
In song mode, you can specify the offset of a pattern. For example, if you have a pattern that
is 32 beats long, you can specify that the pattern should start on beat 5, play for 16 beats, and
then switch to another pattern.
The Elektron song sequencer is derived from old-school MOD trackers, which require that the
composer enter in which events will occur, row by row.
Stick with it! You may find that the sequencer will do what you want it to do, and show you
things you didn't know you wanted to do.
4
You can change the start point and length of a pattern from within songmode. What this
means is you can literally remix and rehash patterns from within songmode. This is also
possible with the MD. So, for example: Instead of your pattern starting on its first beat, it starts
on the third beat and comes in off-beat, you can use this to create stutters and that feeling
that the beat has just fallen in on itself before you right it a couple of bars later etc..
...or by changing the length of the pattern : create shorter/longer loops from your original
patterns. - useful for that housey build up where the loop reduces to 1 qtr beat (or any
variation between 2 - 32 - 1/16th notes) instead of being 4. Or you can use a combination of
the two concepts for total rehashing.
This is just a basic use of these functions, when you combine them with switching between
patterns all kinds of stuff is possible.
To achieve 1 step of the mnm’s songe mode (shortest vaule is 2 steps), double the tempo of
for the two steps using the tempo fix; its crude but it works.
One thing that helped me a lot is "Function+Down Arrow" it's a copy of the
high-lighted "part" of the song, so if you're muting you always get your
"newest" muting part – recording mutes
EXTERNAL MIDI SEQUENCING
The MNM is able to sequence 6 midi tracks each offering a root note + 3 additional notes thus
total 24 in theory. In practice this is not quite true: Midi memory limit is 400 midi notes (single
or root) and 192 chord notes.
Using this info, a single step for single midi track can have an astounding 193 note polyphony.
However, you can only enter 99 chord notes per step, so the actual polyphony is 100. Using
all six tracks you can trigger 5 more base notes so you can get 198 note polyphony.
Well, nobody is going to use all that on one step, so the polyphony is spread across the steps.
For example, you can have 4 note chords for every 64 step, and this would make total 64
base notes and 3*64=192 chord notes. You would have still 334 base notes for other midi
tracks and they would have to be monophonic because the chord notes are all used for the 4
note chords.
So, the amount of polyphony on Monomachine is a bit unclear by its definition, you seldom
max the midi memory out so I wouldn't worry about it.
Important thing to note is that notes are shared between all the tracks inside the pattern so
entering a lot of chords on few tracks eats the polyphony from others. And this limit affects
only the Note on-steps. You can still have all the triggerless steps you like for controlling CC
and PB.
5
ADVANCED SEQUENCER FUNCTIONS
REAL TIME AND STEP RECORDING
Step recording is done by pressing the record button.
Realtime recording can be accessed without stopping the pattern by holding rec and play
together:
1. Put your gear playing
2. if you now just press the record-button you enter into grid programming
3. If you press record and while pressing the record also press play, you enter to live record
more (which is of course quantised to grid).
RECORDING MELODY LINES BY PRESSING THE TRIG KEYS
1.
Press the STOP key if the Monomachine is playing and choose track 1 by pressing
the corresponding TRACK button. Make sure the record led is unlit and press a few
randomTRIG keys. You should now hear sound, as the TRIG keys function as a minikeyboard. The first TRIG key is a C note. You can change octaves by pressing
the UP and DOWNarrow keys.
2.
To record in real time, press and hold the RECORD key whilst pressing
the PLAY key. The led next to the RECORD key will now flash and the Monomachine
will start playing.
3.
Press a few TRIG keys. These will now be recorded to track 1. Exit real time
recording mode by pressing the RECORD key twice.
6
PARAMETER LOCKS
Perhaps the most important aspect of the monomachine sequencer is the concept of
parameter locks. Experiment with them as much as you can and you will soon discover just
how powerful they really are.
Choose track 1. Make sure the record led is firmly lit and not flashing by pressing
the RECORD key.
Press the DATA PAGE keys and choose the filter page.
Press and hold a TRIG key containing a note trig. A note trig is indicated by a firmly lit led
above the TRIG key.
While holding the TRIG key, turn encoder A to change the BASE parameter. This will alter
the frequency of the filter, filtering out more low frequencies the more you turn the knob. Note
how the parameter graphics will invert in the display.
Release the TRIG key. Note how the led above the note trig will start to flash. This indicates
that the parameter has been locked to the chosen value. Parameter locks can be applied to
all parameters found in the data pages. Have fun!
CLEARING P-LOCKS
To clear P-locks from an individual step hold the trig and press ‘clear’ (play).
To clear P-locks from a pattern hold down Function + Clear at the same time but hold it for
about 3-4 seconds and select clear p-locks.
You can do all of the previous methods without stopping playback.
SHIFTING PATTERNS: You can shift patterns along 1 step at a time by
pressing Func + Left or Right
TRIGLESS TRIGS:
7
The trigless trigs feature on the Monomachne seems too cool to be under-utilized given that it
seems unique and really extends the grid sequencing paradigm as far as hardware
sequencers go. Trigless trigs mean that you can change parameters without having to launch
certain other parameters:
For instance, let's say you have a sequence and would like to retrigger the LFO without
retriggering the amp envelope or some other parameters, you can with trigless trigs.
You could do the same with notes. or, say that you have a sound with a very long decay -you could play that one note on step one and then change its sound as it decays over the rest
of the steps: Put in a trigless trig and then lock the parameters for each step. The sound
would change, but the envelopes don't have to be retriggered on each step.
It's best to think about trigless trigs abstractly, then let your mind wander
through the possibilities that they open up.
Monomachine triggers could be further explained like this:
1. Normal trig
This is when you play MnM normally. It trigs the note-on and amp, filter-env, lfos.
The normal behaviour.
2. Specific trig
You can choose to trig just amp, filter-env or lfos, any of them and any couple of them.
Use 'trigger button' on the UI and manual.
3. Trigless trig
Doesnt trig any of those above, just changes the whatever parameter you want. You can
change any parameter, even notes with this. Very handy for soundcreation. Also people
would love to see this on the MD also.
Further examples of trigless trig uses:
Lets say I have a regular trig NOTE_ON event in step 1 of my sequence that has a long
So decay and I re-trigger the LFO only (a trigless trig) on step 5. Which LFO am I actually
triggering on step 5 since the MM has 3 LFOs? Does it trig all three?
It will trig all the three. BUT you can change the trig destinations and amounts with the
parameter locks; you can make lfos work differently on all trigs (or trigless trigs) throught the
sequence.
Using trigless trigs and slide can make really good shit, like on the vo6 or FM+ it can be really
great sounding.
A filter is a great tool for drums; trigging the filter for rytmh and playing a synt on the same
channel is a good technique to use in order to conserve track limits.
KITS/PATCHES
With the Monomachine you have to save a kit to save a machine; ie. each pattern does not
have an associated kit saved with it. You can customize the Mono to your workflow i.e. you
can save various basses in a bass kit, leads in lead kits or you save your 'performances' in
one kit (bass-perc-lead-pad) etc.
Copying a machine out of another track:
8
Go into edit (almost like you are setting up or changing the current machine) but don't select a
machine.
When you are in the machine selection window (IE. saw, sid, vo, etc) press function and copy
Select the track you want to copy to (1 through 6 on the right side of the MnM) then press
function and paste.
You just exit out of the machine window and you are done. If you want to save your change
then save the kit as normal. Alternatively make another kit to change the machines used in a
progression of sequences.
LFO:
The monomachine features 3 LFO’s per track.
LFO times work at 2x number, so 64=1/4 note
(with multipliers you can get large LFO time range)
A couple of words on the lfo's:
1) The lfo's will run whatever happens; that is whether you trigger a note or not, the lfo runs.
So you cannot "turn off" the lfo. It is calculated anyway.
2) The lfo is alway tempo synced. On the lfo page, you'll find the mult parameter which
multipies the speed of the lfo with a certain factor relative to the tempo. The spd parameter
next to it, gives you a finer speed control which let's you break out of the 1/16 or 1/2 measure
per lfo cycle speed. (I hope this makes sense)
3) The lfo is free running. This means that the lfo triggers on the lfo track are meaningless,
unless you configure the trig parameter on the lfo page on "trig", "one" or "half". That
parameter is very important.
When you configure the lfo trig parameter on "trig". Putting an lfo trigger on the lfo trig track
will reset the phase of the lfo to the beginning of it's cycle.
Try the following experiment:
-place two notes on a track: one on step 1, the next one on step 9.
-go to the amp page and set hold on anything above 64. You have a continuously running
tone now, while in fact it is built with two notes.
-go to the flo page:
-pitch on 80
-trig on free
-mult on 8
-depth on 100 or something
Now go to the lfo trig track. There should be two triggers, both on the same steps as where
you programmed the notes (1 and 9). Program some extra triggers, I don't care where.
To see how the triggering works, move into the lfo page again and put the trig parameter on
trig, hold, one, half and free again....You'll see.
Say you want to route track 2's LFO to control a parameter on Track 1. Go to track two, press
Function + Synth Page select to enter the LFO screen as normal. The first parameter on the
LFO screen lets you then choose which track the LFO will be applied to.
9
SWING
The swing percentage amount is for all tracks. You can’t have individual track swing amounts.
But whats is possible is to change where in the 16 step it should swing and where not:
You can set the grid steps that have swing applied for each individual track AND a global
swing track.
The global swing amount is applied to every step on every track which you specify.
You could probably use this technique from the MD tips and tricks to offset a track:
Its a little tricky buy you can offset another track slightly with swing.
Completely fill a track with swing triggers and set swing at about 51%. This
track will run slightly behind the other tracks.
Program the main beat on the swung tack and add flams on the unswung
track.
ARP:
The Monomachines arpeggiators offer a number of features all of which can be found in the
user manual. The following are suggestions for its uses:
I use the monomachine's arpeggiators along with transpose a LOT: They're amazing
when you know how to work with them.
For example, I often sequence a nice chord progression in Ableton Live, then put
Ableton's arpeggiators to work and spit arpeggiated data back into the monomachine. I'll
route that data into a track in the mnm, turn the arpeggiator to "add", and quite often
wonderful things happen.
You can tweak the arp settings live by going into arp mode and changing the length of the
arp, the steps on which the arp sounds, the number of octaves the arp covers, and numerous
other functions.
When you have an octave set in the arp, OJMP controls the note on which the octave jump
occurs.
TRANSPOSE
The transpose function is pretty straightforward, its used to transpose either whole patterns or
individual tracks up or down. You can also use it to create chords over more than one track by
copying a machine/sequence onto others track and then transposing the copied parts.
The transpose function can be tweaked to add breaks or fills on a bbox track.
SLIDES
MNM slide function is a little different to that of say a TB303 as it doesn’t slide pitch, however
this can be recreated.
10
Parameter lock one of the LFO's on the note that has to slide to the second one. The
waveform I use is saw up ( /| )for slide up and saw down ( |\) for a slide down.
You have to play a little with the speed and amount etc to make the slide work, and MOST
IMPORTANT you have to transpose the note you're sliding because it's really out of tune
because of the LFO you apply.
Use parameter locks on the portamento feature
Turn portamento up and just let the the notes overlap on a internal sequencer. That means:
Turn portamento to 64.
1. use hold long enough (set it to max for test)
2. trig one note
3. trig other note after it (don't program note_off to MnM; no yellow leds).
You can also use the slide function to ‘smooth’ parameter locks: MNM track-slide feature
makes your sequence more ‘liquid’. For example:
1.
2.
3.
4.
Set low cutoff parameter lock on step 1
2. Set high cutoff parameter lock on step 16
Press function + slide
Select step 1 and 16 in slide mode
Tied notes with MnM are easy:
1. Make basic synth sound with SuperSaw for example.
2. Use Amp-Env to make is 1/16 lenght.
3. Program some notes on the sequencer
4. Now, program some trigless trigs, with the note changes next to normal trigs
5. Parameter lock the 'hold' value bigger for notes that you want to be tieing other notes.
6. Adjust the slide to your taste.
That's it. If you do it couple of times, you will get the workflow and start to think less
technically this.
You should also do parameter locks for filter and different slide-times. Even more, you can
use the
You can do some pretty nice acid-lines out of MnM.
Don't forget to route your filter to joystick
There are some great waves for acid to found at the end of DigiPro-machine,
or you could load your own into the mk2.
POLY MODE:
You can solo an individual track by entering poly mode with that track selected.
Poly mode intros/fills:
1) mute all but the track you are to solo in poly mode (eg track 1),
2) start the sequence and play track 1 in poly mode, layer the sound to create some
atmosphere,
3) go back into normal mode (with the other tracks muted) and the layer you've made keeps
playing until you unmute the other tracks (2-6)
11
MULTITRIG
Multi trig mode basically means you can play all 6 machines on 1 midi ch, so you have to set
the multi trig ch on the mnm to the same as what you are playing it from. Mine is set 1-6
machines 7 multi trig ch etc. This is set in the global section
Multi trig responds to midi track 11 or 10 only, though I believe you can change this in the
global settings menu. Play some keys at it from MIDI ch 11, should work.
If you sequence the MNM externally (eg using logic) the MnM is a 6 part multi timbral synth.
The advantage of the M trig m is to combine it with internal seq/arps, so you
can trig it from logic but it plays the int seq/arps with up to 6 parts.
It’s a little hard to control but is capable of some big sounds.
There are 4 ways multi trig works:
*all tracks
*key split
*seq start
*seq transpose
You have to select one of these modes....
and depending on which mode further parameters.
This is set in the kit section.
Then play a note on a keyboard(do that first) or send a seq note and away it goes.
With the keyboard version mulitriggin is easy, under kit setup->multi select seq transp, then
the kit will transpose to the key you select on the multi-trig channel, which is 8 by default.
You can also transpose each (or all) track using funct and trans and altering the settingtrack moves the whole track and patt moves the individual pattern.
MULTI ENV
This is a sound shaping tool, an ADSR for all output. In poly mode, multi env will let you use 1
machine X 6 polyphony, you then use multi env to shape the the resultant audio. Multitrig
does the same, but allows different machines on each track.
12
MACHINES
BEATBOX:
The MnM has 6 internal tracks, each of which is monophonic. In the case of using the
beatbox, you can only trigger one sample per step on a single track. You can change the
sample over the course of a sequence, so you could have:
Kick - Hat - Kick Snare Hat Hat
However, you can't trigger two samples at the same time with just one track.
The MNM beatbox’s monophony is a major limitation; you can't layer drum sounds within a
track, so you need to use multiple tracks, i.e. one for kick, one for snares, one for hats etc.
unless you are not triggering snare and kick simultaneously (etc. etc.), which seems unlikely.
The best solution to the problem is buy a drummachine, elektron make a very nice one, it
matches the MnM.
Alternatively its worth having a go at using the arp, you can get 2 notes playing very quickly
together although obviously not at the same time. There is interest to be had here though with
the MNM beatbox.
On a Bbox track, you can add live variation or breaks to a pattern easily by tweaking the
Transpose controls.
Its worth mentioning that some of the string type sound techniques mentioned in the MD tips
guide (p14 &15) should be able to be recreated in the MNM varying the pitch of, for example,
a hi-hat.
The bbox also gets very interesting creating ‘synth’ sounds using a very short delay with a
long decay feedback/width; interesting sounds to be had here.
Tranpose using the pitch knob and vary the sample start with PLocks it.
GND
Machines on the MonoMachine have a category called "synth" (GND, SID, SWAVE, FX etc)
and an actual machine type called "machine" (GND, SIN, NOIS, SID6581, SAW..). So for
each "synth" category you have multiple "machines".
I think GND>SIN and GND>NOIS are pretty much self-explanatory, but GND>GND doesn't
produce any sound. The GND is there to trigger notes but you don't want the track to sound just act as a trigger- you could use it to trigger external gear.
13
FM
To understand more about FM synthesis in general try this article.
http://www.soundonsound.com/sos/may00/articles/synth.htm
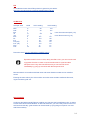
VO Machine
example word
vowel
VOC1 setting
VOC2 setting
-------------------------------------------------------------------------------------lake
A
93
118
leak
E
40
127
like
I
not a discreet sound (aah-y-uh)
oh
O
99
48
you
U
not a discreet sound (y-oo)
lack
a
127
93
let
e
124
98
lick
i
91
109
lock (ah)
o
127
60
luck (uh)
u
112
53
luke
u
71
51
look
oo
93
61
Phonetics chart: http://en.wikipedia.org/wiki/Phoneme
Experiment with P-locks on hold, decay and filters. Also you can use the track
copy/paste function to create vocal harmonies with VO synth and then
transpose track. Very fast and efficient and you can hear the result
immediatley by going up and down with the transpose knob.
Monomachine's VO-machine with little noise and some distortion makes a nice melodica
sound.
Entering the retro territory the VO machine can make some excellent mellotron-like tones,
organ is another good use.
DPRO WAVES
Looking at the MnM manual Elektron explains very little how the DoubleDraw works. It seems
to have same kind of rationalization as with FM-machines; you don't really need to know how
stuff works technically, great sounds can be achieved by trying things out (which is so true
with FM-machines).
14
The MKII 1.20 update brings the new functionality of the Digi Ensemble and Draw machines
and included are waveforms. The waveforms are preloaded by default. So you can replace
them with your own sound but can't delete them from memory. Confused? Ok, so the defaults
are always there. You can overwrite a waveform by uploading your own, but if you delete your
uploaded waveform the default will take it's place. The slots are never empty essentially.
The MNM ‘factory’ waves included:
> Basic waves
SINE
HSIN
TRI
ZOID
SQR
SAW
ISAW
RND
> Synth waves
SYN1 (synthish tone)
SYN2 (" " w/ heavier body)
SYN3 (" " w/ more mid range)
SYN4 (variation of the above)
SYN5 (very cutting)
SYN6 (variation)
SYN7 (brighter, highs and
mids pronounced)
SYN8 (even more highs and
mids pronounced)
> All the organs are really
rad; lot's of character for use
in any kind of music me
thinks
ORG1
ORG2
ORG3
ORG4
ORG5
ORG6
ORG7
ORG8
ORG9
ORGA
ORGB
ORGC
ORGD
>Electric Piano/Rhode'ish.
Unconvinced at first but with
some filters and EQ'ing these
sound great
EP1
EP2
EP3
>Strings. I have used these
but not as strings.
STR1
STR2
STR3
STR4
STR5
STR6
STR7
STR8
> Winds. Again, not using as
winds, but rad nonetheless.
WND1
WND2
WND3
WND4
WND5
WND6
WND7
WND8
> Vocal waves.
MAL A
MAL O
MAL U
MAL a (another a but sounds
different)
MAL E
MAL I
MAL a ( " ")
MAL M
FEM A
FEM O
FEM U
FEM a ( "")
FEM E
FEM I
FEM a ("")
FEM M
-------------
Hopefully I haven't forgotten any. There should be 64, as there is 64 slots. Many, many
usable defaults but the love of the new update is that if you don't use or like some of the
defaults you can replace them in a non-destructive way.
15
A wikipedia wavetable explantion:
To begin the process, the sound of an existing instrument (a single note) is sampled and
processed using a spectrum analyzer, producing a graph of overtones contained in the
sample. This graph is then parsed into a sequence of samples or wavetables, each having
one period or cycle per table, generated by adding together the partials at each parse point. A
set of wavetables with user specified harmonic content can also be generated
mathematically. These wavetables are typically arranged one after the other in a randomaccess memory, allowing for easy access and nearly instant start-point changes; when the
data is played back, a phase accumulator looping at a set rate (determined by the sample
rate and the frequency of the note desired) feeds the samples to a digital-to-analog converter,
creating a continuous waveform at the given frequency.
During playback, the waveform produced can be changed by switching to a different starting
point in memory, usually on command from an envelope generator or low frequency
oscillator. Doing this modifies the spectral characteristics of the output wave in real time,
producing sounds that can imitate certain analog instruments (such as organs, pianos,
harpsichords and reed instruments) acceptably without requiring the use of a pulse code
modulation technique, which requires much more memory and higher sample rates for good
results. The technique is also useful for evolving pads, where the waveform changes slowly
over time and can reverse itself or loop back to an arbitrary point.
Since a wavetable oscillator can generate arbitrary waveforms, it is also possible to load
simple sine wave, square wave and sawtooth wave tables and use the synthesizer like an
analog synthesizer, using subtractive synthesis to modify the sound. Also, some wavetable
synthesizers (such as the PPG Wave 2.3 with Waveterm) can reset the loop point on the
phase accumulator to a period longer than a single cycle, making a PCM mode possible with
minimal hardware changes.
Just a quick tip for windows users, you can use waveosaur to do some single cycle
waveforms, its freeware and actually pretty cool - http://www.wavosaur.com/
To find single cycle waveforms from classic analogues go here:
For a direct link, check http://www.defeq.com/Defeq/Welcome.html
Yes, the double draw machine will allow you to mix waveforms. You don't have to mix them
thought. There is a mixer so you can set how much you do or don't want your wave mixing.
There is a Time parameter allowing to determine how quickly the two are interpolated (mixed
over time). Width sets the pitch difference between the two. It's a very cool machine. Loads of
sonic possibilities. Plus, you can then use the LFO's to even get freaky with it.
While the Digi Ensemble only has one loadable waveform, it does have the PCH2, PCH3 and
PCH4 + the Chorus which gives you poly like character and enormously big pads and that
whole mess.
Wave machine ‘time’ parameter:
Turn up the intensity of an LFO which is controlling osc waveform then mess about with the
time setting to hear the effects, off is steppy and going clockwise smooths things out.
16
SOUND PROGRAMMING
BASS
FM+ is always my first port of call for basslines (im a big fan of sega megadrive sounds), just
experimenting with the envelopes on simple FM ratio settings can give wild bass sounds.
The filter works like a band pass filter with double resonance. Lots of resonance on the HPF
will result in a resonant peak at the lower end of the audio spectra, whereas resonance on the
LPF gives more empahsis to the top end of the spectra. There is infact only one filter
envelope. BOFS, WOFS are the filter envelope destinations, filter base and filter width
respectively.
Also be aware that the Key tracking of both the filters is switched on.
Key tracking is simply where the cutoff is changed as you go along the keyboard, usually the
cutoff is higher (filter opens up) as you get higher on the keyboard.
Its in a annoying spot in the kit edit menu at the end of the page, too far away for my liking;I
often forget its on and you don't pass it in general editing.
I really didnt get the filter untll I read in the manual that the keytracking is on, i didnt
understand why/how it reacted as it did.
Just tweak and listen, I use very little/or no res on basses, just pull down cutoff and tweak in
bofs/wofs and the env and it groowls..... the sawmaskin is good, i think the subosc is cool, can
make a deep bass a bit higher up in the scale but use subosc for subpower.
The puls is rather nice for basses, much more delicate than a saw.
Turn off key-tracking for high & and lowpass in the aasign-menu. That helped
me for creating a good low bass.
You already mentioned my favorites, SID & FM. The other machines are capable too but
involve a bit more sound shaping. I remember when we had the "Noise" MnM Lab, I was able
to get bass out of it but it took a lot more work.
I get great results by starting with the humble GND->Sin machine. Huge basses can be had.
Yeah, I'm starting to figure it out... if something is too thin...I will run a sine wave bass
underneath it. FM Basses are new to me...and I've got some good ones. Haven't been too
sucessful with the saw engine yet...can't get the filter to sound right. That's probably due to
liking analog filters.
17
Add just a little distorsion to the sound, barely audible. Combined with a fast
filter envelope adds a bit more definition to the attack phase of the sound.
Distorsion could also be controlled by a triggered single shot ramp LFO.
Here are some bass related observations and tests:
1. Bigger range of usefull bass-tones
MnM can deliver a loads of bass, no prblem with that. Most of the time I end up creating too
bassy or too low tones for being anything usefull. So, a good signal of lower end of spectrum
can be delivered. But the problem mostly seems to be, that they only sound good/thick on a
certain range and this range seem to be so small. Compared to simple juno-106, juno wins,
because of thickness and usability in a bigger range.
2. What's the problem
I guess MnM produces sweet and clean signals that, in the lower range, produce full energy
on a very narrow area. It's hi-fi and works beautifully in the mid range (it makes MnM sound
very detailed and open ended). Thickness of a Juno bass might be related analog parts,
which produce a lot more harmonic distortion while driving the circuitry. Harmonic distorition
spreads over the spectrum and makes produces bass-tones to have nice overtone-structure,
which makes them seem more thick and present. So, when MnM creates clean 50Hz tone,
Juno or eqvivalent creates 100hz, 150hz, 200, 400, and so on.
3. How to cure
Now you can use distortion on the MnM or use Digipro to create juicy overtones over basstones, but use of filter always filters them out. Distortion is build between HP and LP, and
when LP is used, it filters the upper spectrum out.
I tried to cure this thing with the compressor effect and thought it could add something.
Normally I hate when people tend to offer compressor as a solution to every problem, but it
just might work here.
I made bass patch with SAW-machine. Nothing special, just very filtered, just low-end working
here. Then I routed it to compressor. Attack and relese to low enough that compressor will
distort a little. Dig very deep with treshold and adjust ratio to your liking (it seems to harden
the bass). Distorting compressor creates distortion to bass-tone and creates some overtones,
while at the same time reduces dynamics to zero. Bass becomes more present and range
seems to broaden. At first you might lose some low-end, but then comes the EQ on
compressor track. Use it to boost where you want your bass line to have balls.
It's an old house-music trick. To have punchy low-end you need to compress/limit it to death,
so you have no dynamics left. Otherwise they will jump out in a mix and ruine the consistency
of low-end in a mix. But you also need to make it rumble, so you insert the eq *after* the
compressor. With eq, you can now adjust the amount of rumble and different bassline notes
around that will resonate also a little. With this you should have controlled low end. In theory
at least.
I didn't try it very extensively, but it might, again, provide some starting point. I might also be
interested to hear what kind of approaches you have found.
There are also some good results to be had by using the Mono's EQ.
I've found the Mono's filter envelope doesn't work well for punchy, snappy bass sounds. Try
using the Exp waveform on an LFO instead. It's a lot closer to the envelope shape you'll get
out of an analog, and it sounds MUCH better on bass sounds to my ears.
18
303 style/Acid Bass:
303 basses cant be done accurately because:
a) There's no 303-like saw oscillator - SID saw will do just fine though.
b) No filter like in 303 available (MnM has 24dB/oct, 303 has 18dB/oct)
However, 303ish or ‘acid’ sounds are possible; Just use saw oscillator and disable envelope
tracking in settings. If you want slides use p-locked portamento. It all depends on what you
consider acid…
To make Acid lines with MnM, takes some time at first, because you have a lot of options and
you need to find your own workflow. One thing that I've found is that you tend to do too
normal sequences when you are using MnM sequencer in a normal way. The sequences will
end up missing the 303ish style. One great way to go around this, is to program simple
melody to 'Arp-slot' and trigger it different ways from the normal sequencer; this way you will
get more interesting 303 lines.
More bass tips:
- For basses remember to disable filter keytracking.
- For layering fat sounds use the track trigger (you can set T1 to trigger also T2).
- Digipro (or other synth) with arp and delay directed to internal reverb with threshold can
create some fresh sounds.
- SRR works as a low quality lowpass filter, you can combine it with the real lowpass with high
resonance get those progressive house filter sweeps. Boost highs with the internal eq to
emphasize the SRR.
- delay times work with power of two minus one, 2^N - 1. For 1/4 note, use 63, 1/8 = 31, 1/16
= 15 etc
- LFO times work 2^N, 64=1/4 note (with multipliers you can get large LFO time range)
- positive delay send -> ping pong delay, negative -> stereo delay (panned sounds will have
delay panned to same position)
- and yeah, slides are essential for fx and build up sounds 8-)
My favourite MnM machine at the moment is definitely the DPRO BBOX. It's
really excellent for sharp, heavy basses when retrigged with a very short loop.
With a total of 24 retrigged drum sounds you end up with a fantastic potential
for different tonal characteristics. True, you're back to MD "stone age" lock
programming of note values, but it sounds so cool that it's totally worth it. shot
ramp LFO.
Try the following:
- Load the BBOX to a part
- Enter random notes in a 16 note pattern, something suitable for a bass line
- Tweak the retrig time to a short value, giving the effect of a note
- Tweak AMP decay time, lower the low pass cutoff frequency, and add a short envelope to
the filter to get an attack.
- Apply slight LFO to the SYNTH - PITCH parameter to get movement to the sound.
- Add a slow square wave LFO to the RETRIG TIME - this will give you alternating "notes".
Alternatively you can manually change all the locks. Which reminds me - there should be a
lock offset function in the MnM!
- Experiment with the notes in the pattern, add some delay, tweak until it sounds right!
19
Dubstep bass:
The wobble= Sine, Distortion, LFO to pitch and/or filter, parameter lock LFO speed.
You could also try that on the fm machines.
DRUMS
Note: before drum programming with mono read this:
MNM oscillator properties:
When VA appears in 1995 this was the ultimate feature to have ina synth, because "each
notes sounds different than the other, like in a real analog"
I checked it and found that even true the change isn´t that bad as you can´t use the mono for
drums...I hate my kicks phasing and loosing attack but having a good and stable kick out of
the GND-SIN machine isn´t big deal.
Other synths like the nord modular (G1) has free running oscillators too and is very difficult to
make a solid kick that don´t oscillates and loose attack in a cyclic way. In this synth I use the
LFOz as oscillators because you got note.on retrigger as an option in some of the LFOs
In the MD you can hear some little oscillation (phasing) in some kicks too (TRX-B2),It isn´t
that bad because the heavy and pronounce ramp and the "tick" attack mask the phasing. Try
a 4x4 kick on that machine and remove all but the basic tone and you could hear what I´m
talking about
808 style:
You can get a reasonable result by using the GND-SIN machine :trig a low note, set the hold /
decay parameters suitably & I think I've also used an LFO on PITCH set up several octaves,
to be trigged on each hit to get the MD-type 'ramp'. Its a fairly 'soft' kick,but nice & low &
boomy.
I didn't mention the GND sin but I tried it too, the most simple way to make that sound, but the
main "problem" is that the kick is quite soft.
I've tried to use the envelopes and the filter to make it more punchy but it get "clicky", a click
made by the env.
I'm trying to do it with FM but I think the main problem is caused by the env section that is
good for synth sounds but not for percussive synthesis, so even with FM will be quite
problematic, I should understand how to set the envs right...to be punchy but not clicky.
Even the snares ( made with the gnd-noise) are not so snappy, that's caused by the env.
I Try a light dose of exponential curve on EQG and/or vol for added punch.
The filter page is key with drums, tweak the attack, decay, BOFS and WOFS.
I agree with you that FM machines are very good at percussive synthesis…
20
I tried from the beginnig messing with the filter, as I do on my MS20, get the Q to the top and
play with the env amount. The result was a good powerful "909style" kick but with a kind of
oscillation that turns every kick a bit different... quite unstable.
Try some layering to get some attack, thats the classic way to create a full drum hit. Maybe
add some filternoise, and or some fm attacky to the sin.
I've used the "cross-trig" function to play two sounds with a track but the problem is not the
harmonic content but the clicky/fluctuant sound... If I use the sin the sound is quite clicky , but
I cannot get the click off cutting the freq with the filter, cause the click is produced by the env,
is not generated by the oscillator.
My conclusion is that you can produce rhythm sounds with the mono, but they need external
processing or sampling for a uniform kick, as its difficult to get a consistency between the
different triggers in a sequence (eg same bass drum, same settingsm, slight variation in
sounds over a bar).
I focused on getting the Q high to achieve the most powerful/rounded Kick but I was quite
wrong. Using the Square or the TRI wave and using the EXP LFO(full amount on the volume
parameter) instead of the amp env I got the sounds punchy and not clicky, and for the Kick
instead of Q at full amount the Qs are at zero, and the kick is SOLID and STABLE!
the speed of the EXP must fit the lenght of the env but a bit faster so the click does not
appear and the sound is more punchy.
I used a too slow LFO to get this result..
Using the SID with a TRI wave (as oscillator), wdth turned to 0 and the HPQ to 0 LPQ to 127,
wofs 36 and decay 43,
LFO1 ->amp-vol ->trig one , wave EXP, speed (as you like) , dpth 64 (THIS IS THE KEY TO
GET THE PERCUSSION PUNCHY!!!)
LFO2 ->filt-hpq ->trig one , wave saw, mult2, dpth 55
LFO3 -> amp-dist ->t one, wave sqr ,mult 2x , dpth 64
Playing with the env, the Qs and the speed of LFOs you can obtain a great variety of kicks.
using the same settings but;
the LPQ turned to 0 filter dec 100 ,
wofs to 25 ,
the kick has a more harmonic feel- more 808
I forgot to mention that the amp ahdr is : 0 0 64 0
and dist is 0 and vol is 64.
SNARES
Id say the SID and GND noise machines are your friend for these (along with the bbox snares
which you can tweak into nice sounds). If you don’t mind using 2 tracks for a snare then
layering a combination of these is an option too.
If you param lock a SID machine you can make a bass and snare on the same track,
providing of course you dont want a long decay on either sound. (In fact if you get the filters
right for the Bass drum Im pretty sure you can get a nice kick with the GND noise too...)
Interesting and digital lo-fi snares could be created by using the SID machine
I was trying to get some equivalents of analog snares but using more digital texture ti get
21
something like the synthetic drums in some early digital home organs, like casio VL-1, SK-1
and the like. So I use the classic model of a short tuned spike attack followd by a noise burst
with longer decay
If you use an exponential decayed LFO in on-shot mode to modulate the wave of the SID you
get a sound that could go from the triangle wave to the noise one very quicly, so this makes a
really close aproximation of the model I described...
Try move the speed and depth of the LFO to get more "membrane" or more "snare"...you can
further process them with both filters to make a more restricted band of noise.
PADS
Despite being regarded by some as a ‘cold’ machine, the mono is capable of some nice pads.
For string pads you have the Superwave ensemble, which enables triggering 4 notes
simultaneously (or playing the chord from a midi keyboard by playing one note). The MK2
wave machines are also suitable for a variety of pad or drone sounds.
A short "lesson" in how to get there:
1. Use a minor chord (both ensemble machines are good for this, but the
superwave ensemble machine have more modulation possibilities)
2. Add some distortion
3. Tweak the sound itself, narrow pulse width usually sounds better when
distorted
4. Cut some frequency using the build in eq for the sound
5. Low pass filtering, just a little resonance
Now you should have something that sound quite nice. The next step is to
use the LFO to modulate parameters in the sound; eq frequency, pulsewidth,
et.c.
Some nice slow LFO's routed to the EQ and Filter section parameters can really at some nice
atmospheric pads. Also, with the slow attack and long release tip, add some delay to make a
mono sound a bit 'bigger'.
Ensemble Wave is your friend for classic Roland-ish pads:
Check the sysex file of Emnine’s Eva W Was track in the sandbox section of the forum:
Nothing but Ensemble Wave and two reverb tracks (apart from the drums of course).
Don't forget
-the chorus paramter or add a chorus track.
-parameter locking the suboscillators for adding 9tths-7ths-sus4's etc.
22
Try using the EQ as a notch filter for phasing effects: set gain negative and sweep frequency
slowly with an LFO.
You can get shimmering tones with the high pass filter:
Start with the cut off high and sweep slowly into the mids, with some LFO for extra movement.
Slow values of the interlace parameter on the LFO can also add sparkling effects.
Sweeping SRR can also give sparkling tones, especially into a delay.
You can also build up washes of delay by setting the feedback close to 64
You can accomplish some nice pads using 5 detuned Swave sawtooths (with the unison
width different on each one) through a chorus machine: Comes out pretty nice, though the
only problem is that you use up all voices/tracks this way.
However, you don’t need to go into poly mode to get full sounding pads; layering two tracks
with related tones can already get pretty lush sounding
The monomachine has a very bright sound, to combat this:
Turn the Width parameter down to around 40 makes the sounds a lot less harsh and put the
delay time to 47 and Delay send to -40, and as much feddback you can take gives a little bit
of warmth. Also using pan on a LFO aswell as a little bit of pitch modulation on antoher LFO.
Take out frm there and mess with the filter envelope aswell to shae the sound over time, add
little bit of LPQ for this and use the EQ reverse (subtract some frequencies).
Do not forget to use the sinewave for bass, the best one for dub in my opinion
ENS CHORDS
Look in the back of the manual it explains the ens much better, but major chord with the ENS
is 0, +4, +7 and minor you just move the 3 in the 1, 3, 5 down a half step, you could try many
other different variations too.
0 + 3 -5
0 -5 +10
-5 +3 +12
-2 +7 +10
For this kind of stuff I often use the Gipsy Woman progression
G -2 +3 +5
G -2 +3 +4
x2
F +2 +5 +9
G +1 +6 +9
F +3 +7 +9
23
F +3 +6 +8
and vary last 2 steps with
D +3+7+ +10
C# +3 +7 +11
ORGAN TONES
Start with a supersaw
set the three pitches to taste
automate filter sweeps with lfo
a very common thing to get organs in analog synths is to use a sub oscillator TWO octaves
below the main oscillator....then choose a square wave for the main oscillator; you can get
such oscillator arranges by using the superwqve square or ensemble
In ensemble you can also get some intermediate harmonics by setting notes to specific
intervals...set the wave parameter to achieve an square wave
Set a lowpass filter static in a low to mid frequency and turn up resonance.
With classic ADSR you could use the amp EG to simulate the click at the start, but no luck
whit the odd EG on the mono...still you can use an LFO with max modulation aplied to volume
to get a spaike at the start of the sound...just put the LFO in one-shot mode, choose a linear
or logarythmic falling curve and set the speed as fas as you can.
Another way is to set the filter EG to minimum time attacjk and decay, and turn up a little the
EG depth of the filter. The amp has to be controlled by a kind of gate EG, so choose minimum
attack and release and set decay to max to get infinite sustain.
Use the other LFO to achieve Leslie-style FX by modulate pan and pitch in a
doppler way.
If you’re in the ensemble oscillator you can fat your organ using the chorus in the synth
section.
Put some reverb with long decay but in very little quaqntity, so you can only hear the tail when
you leave the keys
In Ensemble Wave where you have 3 pitch parameters which you can setup in relation to the
note triggered, e.g if you trigger G3 and set the first parameter to +2, the second to +3 and
the fourth to +7, then you're triggering a Gmin9 chord. Now use locks on the fourth parameter
going to +5 or +8 (meaning youl'll go from D to C and then to Eb).
Organ sounds are like chords in itself...with strong frequency components that could match
note frequencies, even in a single played note, so you could use the ensemble "notes" to get
something similar. Sometimes these notes could be too loud to get just formants but try it
anyway; with a bit of lowpass filtering you could soft the higher ones leaveing the fundamental
dominate the timbre
FM is another way of get organ sounds because of the ability of this synthsis method to get
several harmonics from just 2 oscillators...try exact multiples of modullator/carrrier
frequencies relationship to get those harmonic regions in the organ, after that you could
shape some things with the EQ to get some region low or high
24
Distortion on the MnM is very crude and digital so maybe it not suited for dub
organs, you´ll go better with an external analog devise, a tube one ore a
modelling thing like the some of the POD models.
Organ patch:
IMPORTANT : FIRST turn OFF the keyboard tracking of both filters.
KIT > ASSIGN > KEY > HPF and LPF has to be in OFF.
then set as follows:
SYNTH > SUPERWAVE ENSEMBLE MACHINE
PITCH 1 = -12
PITCH 2 = 2/3
PITCH 3 = 12
WAVE = 127 (SQUARE)
PW = 29
CHRL = 9
CHRW = 127
TUNE = 0
----------------------------------------------------------AMP
A=0
H=0
D = 127
R=0
DIST = -9
VOL = 90
PAN = 0
PORT = 0
------------------------------------------------------------FILTER
BASE = 2
WIDTH = 79
HPQ = 84
LPQ = 31
A=0
D=0
BOFS = -6
HOFS = 16
-------------------------------------------------------------FX
EQF = 79
EQG = 11
SRR = 0
DTIM = 2
DSND = -19
DFB = 56
DBSS = 22
DWID = 81
-------------------------------------------------------------LFO 1
25
PAGE = PITCH
DEST = 1/12
TRIG = FREE
WAVE = TRI
MULT = 32x
SPEED = 64
INTL = 0
DEPTH = 33
-------------------------------------------------------------LFO 2
PAGE = AMP
DEST = VOL
TRIG = FREE
WAVE = TRI
MULT = 32x
SPEED = 50
INTL = 0
DEPTH = 12
-------------------------------------------------------------LFO 3
PAGE = AMP
DEST = PAN
TRIG = FREE
WAVE = TRI
MULT = 16x
SPEED = 64
INTL = 0
DEPTH = 55
Go to octave 6...play step keys 9, 13 and 16 rhythmically, then hold that interval move the
whole chord 2 semitones and you´ll be transported to bossa territory instantly.
If the sounds too dissonant in some chords you can change the interval of the osc pitch 3
try change the wave, PW, filter width and EQ freq parameters to get another tonalities
Take it as a starting point...it sounds like an organ but of course you can let the mono goes far
from it...
in the OSC you can see the different notes who conjure some of the timbric personality of an
organ, the other things that helps accentuate it are the resonace peaks of both LPF and HPF;
they serve as a FIXED harmonic shaper since the filters doesn´t track the keyboard and
makes the organ some of the character of a speaker cabinet.
One thing I really like is the spring reverb-like delay...see the short delay time plus a long and
filtered feedback
The LFO 1 makes vibrato and the LFO 2 makes tremolo...they both helps to get some of the
cheese tones of say, a farfisa organ or something like that. LFO 3 makes auto pan to get
some stereo movement like leslie FX (not an exact reproduction but workable)
STRINGS
26
You can get some nice ensemble/string sounds in with the Superwave-ENS. The biggest
difficulty is doing those sounds in mono. Consider putting the Mono in poly mode while you're
making those sounds.
Pseudo Karplus Strong synthesis with the FM engine that has feedback.
Though that sounds closer to real strings, rather than analogue strings...
I'll have a fiddle when I get home to my gear.
MnM STRING-MACHINE-LIKE PATCH:
A somewhat DIGITAL version of the ARP classic string machines like the solina or the omni II
of course not at exact replica
VERY IMPORTANT : FIRST turn OFF the keyboard tracking of both filters.
KIT > ASSIGN > KEY > HPF and LPF has to be in OFF.
Then set as follows:
SYNTH > SUPERWAVE ENSEMBLE MACHINE
PITCH 1 = -12
PITCH 2 = +12
PITCH 3 = OFF or add a fifth (+7)...i like it with a fifth
WAVE = 127 (SQUARE)
PW = 63
CHRL = 63 or more
CHRW = 127
TUNE = 0
----------------------------------------------------------AMP
A = 44 or more
H=0
D = 127
R = 63 or more
DIST = 0
VOL = 0
PAN = 0
PORT = 0...or try it
------------------------------------------------------------FILTER
BASE = 1
WIDTH = 82
HPQ = 21
LPQ = 15
A = 49
D = 89
BOFS = 0
HOFS = 17
-------------------------------------------------------------FX
EQF = 42
EQG = -9
SRR = 0
DTIM = 16 or what you want...in 16 sounds more like a spring reverb than delay
DSND = 41
DFB = 50
DBSS = 21
DWID = 76
-------------------------------------------------------------LFO 1
27
PAGE = SYNT
DEST = PW
TRIG = FREE
WAVE = TRI
MULT = 1x
SPEED = 8
INTL = 0
DEPTH = 36
-------------------------------------------------------------LFO 2
PAGE = FILT
DEST = WDTH
TRIG = FREE
WAVE = TRI
MULT = 1x
SPEED = 57
INTL = 0
DEPTH = 2 or 3
-------------------------------------------------------------LFO 3
PAGE = SYN
DEST = TUN
TRIG = FREE
WAVE = TRI
MULT = 32x
SPEED = 44
INTL = 0
DEPTH = 10
Try it in multi mode from trigger octave 4 and up
the low notes sounds closer to the ARP machines, if you can get something "analog" out of
the mono.
SOUND DESIGN IDEAS
-How did Autechre make the sounds on Quaristice?
First, I think some of the weird synthy/reverb sounds were derived by turning the delay time
on the mono way down (to 1 or 2) and the feedback very high. You can get some weird
timbres in this way, and, on the low end, sometimes they sound like some of the stuff off of
Quaristice. Also mess with sweeping the delay time; at certain settings you can get some
autechery wooshes.
Second, last night I went nuts with the lfos on the mono and noticed that setting one to the
retrig time resulted in some fun stuttering effects, esp. when combined with filtering lfoing on
the bbox pitch. I think the multiplier on the lfo also had something to do with it.
Quaristice sounds like it is full of the FM+ machines, also Booth is well documented for his
love of FM synthesis.
DRONES
I use the static FM machine with long decays and slow synced LFO's modulating operator
levels good for drones.
Drums sounds can be quite abstract given the monophonic nature on the MnM's percussion
kits but this does give very original results when used with the arpeggiator and p/locking the
retrigger amount. I wish you could load your own kits as that whistle sound really spoils
things.
28
Copy a pattern and then switch off the trigs of the track I want to fade out
slowly into the next pattern so it should work during various patterns provided
Hold/Dec parameters are set high enough.
This could also be good for creating less subtle walls of sound, especially in combination with
setting the delay feedback parameter to a high setting to add another layer.
Make sure not to overlook the trigless trigs on the Mono, perfect for changing the sound
without retriggering envelopes (unless you want). i wish the MD had them, but they're a
brilliant and idea and really cool function. More obviously slow lfos and slides are good for
drone stuff.
Delay, delay, delay... the MnM has a beautiful delay for creating drones, and they definitely
drone on through chained patterns, stopped patterns.
Load up a single sound, crank the delay, set some slow lfo's, adjust filter to taste (I like to do
extreme filtering with some decent Q to create those little random plucks and things which
sound great in the delay and with trigless trigs), play some drones and bliss out; joystick
tweaking is especially fun in these moments.
EFFECTS
DELAYS
For some reason the MnM-delay is my favourite of all delays I've tried. Maybe it's because it's
so tighly integrated to patch-design and sequencing that I've got better results from it than
other delays (vsts mainly). Sometimes I end up with smooth as ever type delays with it.
It would be great to see same functionally with
Theoretically the mono can create two tap delay, with individual panning:
Track 1=source (+ delay can be engaged)
Track 2(tap1) = FX Machine input neighbor, pan L Dsend/time as chosen
Track 3 (tap2)= FX machine input neighbor, pan R Dsend/time as chosen.
.
.
.
Track 6 = FX machine input neighbor...you know the drill.
Delay times work with power of two minus one, 2^N - 1. For 1/4 note, use 63, 1/8 = 31, 1/16 =
15 etc
Try fiddling around with the LFO sweeping on the depth of the delay or whatever you come up
with... dont forget that you can let the 3 LFO's control eachother
Plocking the delay time can be nice
Route some tracks to a reverb machine and use it's delay with various types
of locks on different steps
29
INPUTS:
The monomachine inputs open up many possibilities for external sound processing.
If you are suffering a low level or noise loss make sure you turn off Filtertracking.
See the joystick-menu and turn both lpf- and hpf-tracking off.
You can run an external audio signal through the monomachines filter section and the entire
env, SRR, dist., etc. block, though you may have to trigger the filter using the sequencer.
Not only can you filter, add delay, use SRR on inputs but you can rythmically gate the sounds
by setting different amount on Hold parameter. Mnm is a killer processing unit - much more
extensive than MD when talking input only.
You can use the MNM as a P-locked effects unit, just with the limitation of
only 2 inputs.
Applying FX Machines internally:
Once you choose your synth as FX and the type of FX machine, it will automatically set you
up as input ~neighbor...this means it's going to apply to the prior track.
Apart from the neighbour option you can route one or various tracks to a bus (e.g. CD i.e.
select CD as output when editing kit)) and then setup an FX track with input CD and output
that one to AB - thus all tracks routed to bus CD will be effected by the FX track. You can also
route a track to AB + CD then you will have the dry signal as well as the effected signal on the
output bus. Lots of possibilities, experimenting is key here.
Dont forget to press the steps you want your FX machine to be hear, it´s a weird but excellent
concept that you have to sequence the trigger for the audio FX too. This opens a vast array of
possibilities using the triggers in combination with parameter locks for the steps
The arp is pretty cool on FX tracks too... try it on ring mod.
OUTPUTS
Individual outs make sense if you have external processors in your aux sends/returns or
inserts on your mixer. Very interesting and useful once you know you way around multi-fx
processors, reverbs, compressors etc.
Using the individual outs, you lose MnM panning. However, you gain the ability to shape
individually tracks out of all recognition (should you choose). Plus, as already stated, you also
then have the ability to remix the individually captured audio. Overall, if you use the individual
outs you gain far more than you lose.
30
I use the 6 Mono outs constantly as well as the input (mainly processing NL2x).
Don’t forget to route your mixers send back into the monos inputs for more
onboard processing.
You can also route out to do frequency cuts. After starting to separate outs it was interesting
how the percussion sounds actually gained a lot of their output from frequency ranges that I
didn't expect them to be in (the kick was in a large part up in the mids, the snares were down
in the lows and the hats were in the mid-highs), I've had a lot of fun cutting out the
unneccessary frequencies to get more of a seperation in the mix. Also told me about how I
was programming stuff.
MISCELLANIOUS:
Adjusting Pitch Bend:
- go to the kit menu
- go to assign
- you will find that the Joy R and Joy L are mapped to pitch bend by default for control with an
external pitch wheel.
- you can select page and destination for each tab at the top.... including the special "pitch
page" and in its destination you should find selections for various ranges of octaves. (i think it
goes up to 8 octvs or something)
- also you can play with the ADD / depth parameter.
If i didn't remember this correctly, check out the ASSIGN section of the manual. I'm pretty
sure the MnM can do what you want in the assign page.
Joystick calibration:
This is how you calibrate the sfx6 joystick.
1. Power up the unit whilst holding the FUNCTION-button.
2. Choose TEST MODE by pressing the first button of the step sequencer.
3. Calibrate the joystick by holding the two OCTAVE keys located to the far right pressed
simultaneously while you move the joystick 360 degrees (you should see a little asterisk
appear on the screen). Then you let go of the joystick and make sure the parameters visible
on the screen reads "80,80". Then release the two OCTAVE keys. Done.
31
Factory Reset/Pattern Nuke:
Turn off. Power up while holding 'Function'. Presto
Sysex:
press: Function + Global (pattern/song)
go to: File
then: Sysex Receive
Cases:
Pelican Cases
Model 1500 this model can hold one MM SFX-60 or MD series
Model 1550 capable of holding two units
Model 1700 cable of holding two units lengthwise
Model 1720 works excellent for the Monomachine SFX-6
Misc. Options
Old trumpet cases.
Photography stores have nice hard plastic flight cases for cheap.
DAP makes a microphone case which matches the Machinedrum exactly (Unconfirmed)
Cheap cases at Lowe’s Hardware. Home Depot has similar “adjustable” tool cases with foam
packing.
Flightkit.
Don Skeller SN4 camera bag w/ some custom cut gray packing foam.
Velocity
The mono is velocity sensitive yet the sequencer does not record velocity; you have no way
defining velocity on the step sequencer. So it's only velocity sensitive if played with a
keyboard ext seq
To get a more "velocity/human" feel, I usually just turn rec on and tweak the volume knob.
To alter settings:
kit page
assign tab
4 right arrows to>>>>>>>>>>>>>>>>VEL tab
Select ANY 2 parameters to be controlled by Velocity
32