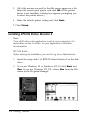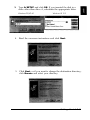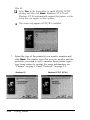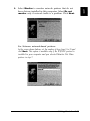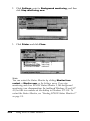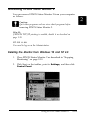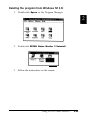
1
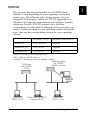
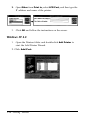
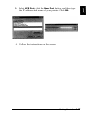
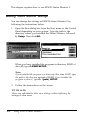
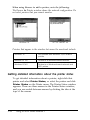
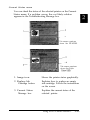
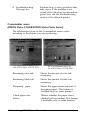
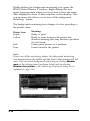
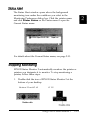
EPSON
®
C82357*
EPSON Status Monitor 2
User’s Guide
4007801
EH3-00
All rights reserved. No part of this publication may be reproduced, stored in a retrieval
system, or transmitted in any form or by any means, electronic, mechanical, photocopying,
recording, or otherwise, without the prior written permission of SEIKO EPSON
CORPORATION. No patent liability is assumed with respect to the use of the information
contained herein. Neither is any liability assumed for damages resulting from the use of
the information contained herein.
Neither SEIKO EPSON CORPORATION nor its affiliates shall be liable to the purchaser of
this product or third parties for damages, losses, costs, or expenses incurred by purchaser
or third parties as a result of: accident, misuse, or abuse of this product or unauthorized
modifications, repairs, or alterations to this product, or (excluding the U.S.) failure to
strictly comply with SEIKO EPSON CORPORATION’s operating and maintenance
instructions.
SEIKO EPSON CORPORATION shall not be liable against any damages or problems
arising from the use of any options or any consumable products other than those
designated as Original EPSON Products or EPSON Approved Products by SEIKO EPSON
CORPORATION.
EPSON is a registered trademark of SEIKO EPSON CORPORATION.
Microsoft and Windows are registered trademarks of Microsoft Corporation in the United
States of America and other counties.
Product names are for identification purposes only and may be trademarks of their
respective owners. EPSON disclaims any and all rights in those marks.
Copyright © 1997 by SEIKO EPSON CORPORATION, Nagano, Japan.
Notice
If you use the Ethernet card in a Novell NetWare environment,
set the polling time from 5 (factory default) to 25 seconds. If
you set the polling time out of the this range, the card may not
poll correctly.
Copyright
©
1997 by SEIKO EPSON CORPORATION, Nagano,
4007898
EH3-00
Contents
Introduction . . . . . . . . . . . . . . , . . . . . . . . . . . . . .
About This Book . . . . . . . . . . . . , . . . . . . . . . . . . . .
iii
iii
Chapter 1 Getting Started
System Requirements . . . . . . . . . . . . . . . . . .
Printers . . . . . . . . . . . . . . . . . . . . . . . .
Computers . . . . . . . . . . . . . . . . . . . . . .
Protocols . . . . . . . . . . . . . . . . . . . . . . .
Interface cards . . . . . . . . . . . . . . . . . . . .
Installing EPSON Status Monitor 2 . . . . . . . . . .
Selecting a Printer to Monitor . . . . . . . . . . . . .
Windows 95 . . . . . . . . . . . . . . . . . . . . .
Windows NT 3.51 . . . . . . . . . . . . . . . . . .
Windows NT 4.0 . . . . . . . . . . . . . . . . . . .
.
.
.
.
.
.
.
.
.
.
.
.
.
.
.
.
.
.
.
.
.
.
.
.
.
.
.
.
.
.
. 1-2
. 1-2
.
.
.
.
.
.
.
1-2
1-3
1-7
1-8
1-13
1-13
1-15
Making Status Monitor Settings . . . . . . . . . . . . . . . . . .
Starting EPSON Status Monitor 2 . . . . . . . . . . . . . . . . .
Starting the program in Windows 95 and NT 4.0 . . . . . .
Starting the program in Windows NT 3.51 . . . . . . . . . .
Basic Operating Procedure . . . . . . . . . . . . . . . . . . . . .
Main window . . . . . . . . . . . . . . . . . . . . . . . . . .
Adding uninstalled network printers . . . . . . . . . . . .
Getting detailed information about the printer status . . .
Setting monitoring preferences . . . . . . . . . . . . . . . .
Background Monitoring Icon and Status Alert . . . . . . . . .
Background monitoring icon . . . . . . . . . . . . . . . . .
Status Alert . . . . . . . . . . . . . . . . . . . . . . . . . . .
2-2
2-3
2-3
2-3
2-4
2-6
2-11
2-12
2-16
2-17
2-17
2-19
Chapter 2
. 1-16
Using EPSON Status Monitor 2
i
Stopping Monitoring . . . . . . . . . . . . . . . . . . . . . . . . .
Uninstalling EPSON Status Monitor 2 . . . . . . . . . . . . . . .
Deleting the Monitor from Windows 95 and NT 4.0 . . . . .
Deleting the program from Windows NT 3.51 . . . . . . . .
Chapter 3
2-19
2-21
2-21
2-23
Tips and Troubleshooting
Tips for Network Administrators . . . . . . . . . . . . . . . . . .
Controlling the packet traffic on the network . . . . . . . . .
Monitoring printers beyond routers . . . . . . . . . . . . . .
About uninstalled network printers . . . . . . . . . . . . . .
Troubleshooting . . . . . . . . . . . . . . . . . . . . . . . . . . .
3-2
3-2
3-2
3-3
3-3
Index
For the latest information, read the “Readme.txt” file stored in the
directory where this program is installed: if you use the default
directory for setup, the file is stored in “ESM2.” Use Explorer (for
Microsoft® Windows® 95 or Windows NT® 4.0) or File Manager
(for Windows NT 3.51) to locate the file. Double-click the file name
to open and read it.
ii
Introduction
EPSON Status Monitor 2 is a utility program that monitors your
printer and gives you information about the current status of the
printer, including the amount of remaining ink or toner. If a print
error occurs, the Status Monitor also provides you with a message
describing the error. The Status Monitor allows you to print using
the TCP/IP protocol with Windows 95.
For more information on using the Status Monitor, open online
help included with this utility.
Before using the Status Monitor, be sure to read the README file
located on EPSON Status Monitor 2 Disk 1. This file contains the
latest information on the Status Monitor.
About This Book
This user’s guide explains how to set up the program and use it.
EPSON Status Monitor 2 is compatible with the following
Microsoft operating systems:
Windows 95
Windows NT 3.51
Windows NT 4.0
Some notes and helpful information are provided only for certain
operating systems, this guide uses the following conventions when
such information is given:
Win 95:
Read this paragraph for information specific to Windows 95.
NT 3.51:
Read this paragraph for information specific to Windows NT 3.51.
NT 4.0:
Read this paragraph for information specific to Windows NT 4.0.
iii
Chapter 1
Getting Started
System Requirements
Printers . . . . . .
Computers . . . .
Protocols . . . . .
Interface cards . .
.
.
.
.
.
1-2
1-2
1-2
1-3
1-7
Installing EPSON Status Monitor 2 . . . . . . . . . . . . . . . .
1-8
Selecting a Printer to Monitor
Windows 95 . . . . . . . .
Windows NT 3.51 . . . . .
Windows NT 4.0. . . . . .
1-13
1-13
1-15
1-16
.
.
.
.
.
.
.
.
.
.
.
.
.
.
.
.
.
.
.
.
.
.
.
.
.
.
.
.
.
.
.
.
.
.
.
.
.
.
.
.
.
.
.
.
.
.
.
.
.
.
.
.
.
.
.
.
.
.
.
.
.
.
.
.
.
.
.
.
.
.
.
.
.
.
.
.
.
.
.
.
.
.
.
.
.
.
.
.
.
.
.
.
.
.
.
.
.
.
.
.
.
.
.
.
.
.
.
.
.
.
.
.
.
.
.
. . . . . . . . . . . . . . . . . . .
. . . . . . . . . . . . . . . . . . .
. . . . . . . . . . . . . . . . . . .
. . . . . . . . . . . . . . . . . . .
Getting Started
1-1
This chapter explains certain requirements and setup
procedures you need to follow to use EPSON Status Monitor 2.
System Requirements
Make sure your system meets the following system
requirements before using EPSON Status Monitor 2.
Printers
EPSON Status Monitor 2 can work with EPSON printers that
are connected to the network via an Ethernet Card:
0
EPSON Stylus COLOR 800, EPSON Stylus COLOR 1520,
EPSON Stylus COLOR 3000
0 EPL-N1200, EPL-N2000
0 FX-880, DLQ-3000+
As of June, 1997
Computers
This Status Monitor works with IBM® PC AT or compatible
computers that are running Windows 95, Windows NT 3.51, or
Windows NT 4.0.
Note:
If an incorrect network interface card driver is selected for your PC’s
network interface card, your software may not operate properly. You
should always use the latest network interface card driver supplied by
the card’s manufacturer.
1-2
Getting Started
PROTOCOLS
The protocols that must be installed to run EPSON Status
Monitor 2 vary depending on your operating system and
printer type. The following table divides printers into two
categories: LPR printers, which use TCP/IP (generally in a
Windows NT network environment); and NetWare printers,
which use Novell’s IPX/SPX protocol in a NetWare
environment. Use this table to determine what protocols you
need to install according to your operating system and printer
type, then see the corresponding section for your operating
system.
LPR Printer (TCP/IP)
NetWare Printer (IPX/SPX)
Windows 95
TCP/IP & EPSON1
NetWare3
Windows NT 3.51
TCP/IP & LPR2
NetWare3
Windows NT 4.0
TCP/IP & LPR2
NetWare3
EPSON1 = EPSON TCP/IP Printing protocol
LPR2 = Windows NT LPR protocol
NetWare3 = Necessary protocols already installed
NetWare printer
with C82357*
LPR Printer
IPX/SPX protocol
with C82357*
TCP/IP
w,
rf
!LL
Windows 95
EPSON TCP/IP
!LL
Windows NT 3.51/NT 4.0
Windows NT LPR
!&ii=
Windows 95 /
NT 3.51 / NT 4.0
Getting Started 1-3
Note:
Cl To set up the Ethernet card (C82357*) for use with TCP/IP, see
the documentation that came with the card. To set up the card for
use with NetWare, see your NetWare documentation.
0
Use NetWare in the bindery emulation mode.
0
If you configure more than one interface card for one queue, the
Status Monitor cannot monitor the printer that is assigned to
that queue.
For an explanation of the LPR printer protocols, see the
following section. NetWare printer protocols are already
installed in your NetWare network, so users with NetWare
printers can skip to “Installing the EPSON Status Monitor 2” on
page 1-8. For an explanation of NetWare printer protocols, see
your NetWare documentation.
LPR printer protocols
LPR printers use LPR over TCP/IP as their communication
protocol suite, and both protocols must be installed to use the
Status Monitor to monitor a LPR printer.
Win 95:
Windows 95 does not come with LPR, so in addition to installing
TCP/IP, as described below, you need to install the EPSON TCP/IP
printer protocol. The Status Monitor installer program automatically
prompts you when to install EPSON TCP/IP, see “Installing
EPSON Status Monitor 2” on page 1-8 for instructions.
Installing TCP/IP
1. Click Start, point to Settings, and click Control Panel.
2.
Double-click the Network icon.
1-4 Getting Started
3.
If TCP/IP appears in the list of installed network
components on the Configuration menu, TCP/IP is already
installed, and you can skip to “Installing EPSON Status
Monitor 2” on page 1-8.
If TCP/IP does not appear in the list of installed network
components, click Add.
4.
Click Protocol and the Add button.
5.
Select Microsoft from the Manufacturers list and TCP/IP
from the Network Protocols list. Then click OK.
6.
Click OK on the Network menu and follow any on-screen
instructions to enable TCP/IP, and go to “Installing EPSON
Status Monitor 2” on page 1-8 when finished installing
TCP/IP.
NT 3.51:
Windows NT 3.51 comes with LPR and TCP/IP, so all you need to do
is select Microsoft TCP/IP Printing in the Network Settings dialog
box, as described below.
1.
Double-click the Network icon in the Control Panel to open
the Network Settings dialog box. Click Add Software.
Getting Started 1-5
2.
Double-click TCP/IP Protocol and related components,
and select TCP/IP Network Printing Support. Then click
Continue.
3.
Follow the instructions on the screen.
NT 4.0:
Windows NT 4.0 comes with LPR and TCP/IP, so all you need to do
is select Microsoft TCP/IP Printing in the Network Settings dialog
box, as described below.
1.
Double-click the Network icon in the Control Panel and click
Add on the Services menu.
1-6 Getting Started
2.
Select Microsoft TCP/IP Printing and click OK.
3.
Follow the instructions on the screen.
interface cards
The following interface card must be installed in your printer;
otherwise EPSON Status Monitor 2 cannot monitor the printer.
C82357*
EPSON Type B Ethernet I/F card
connecting to a NetWare print queue
If you use your printer in a NetWare environment, you need to
connect to the print queue that is assigned to your printer
before installing EPSON Status Monitor 2.
1.
Click Start, point to Settings, and click Printers.
2. Click Add Printer.
3.
Select Network printer, and click Next.
4.
Double-click the NetWare file server that services the print
queue assigned to your printer.
Getting Started 1-7
5.
All of the queues serviced by that file server appear in a list.
Select the correct print queue, and click OK. (If the printer
driver is not installed, a dialog box appears prompting you
to select the printer driver.)
6.
Make the default printer setting and click Next.
7. Click Finish.
Installing EPSON Status Monitor 2
Note:
Turn off all other active applications (such as virus protection). For
instructions on how to do this, see your application or Windows
documentation.
NT 3.51 & 4.0:
Before starting the installation, you need to log on as Administrator.
1. Insert the setup disk 1 of EPSON Status Monitor 2 in the disk
drive.
2.
If you use Windows 95 or Windows NT 4.0, click Start and
Run. If you use Windows NT 3.51, choose Run from the File
menu in the Program Manager.
1-8 Getting Started
3.
Type A:\SETUP and click OK. If you inserted the disk in a
drive other than drive A, substitute the appropriate letter.
Windows 95/NT 4.0
Windows NT 3.51
4.
Read the on-screen instructions and click Next.
5.
Click Next, or if you want to change the destination directory,
click Browse and select your directory.
Getting Started 1-9
Win 95:
0 Select Yes in the screen below to enable EPSON TCP/IP
printing, and then click Next. Windows NT 3.51 and
Windows NT 4.0 automatically support this feature, so this
screen does not appear in those systems.
Cl
7.
This screen only appears if TCP/IP is installed.
Select the type of the printer(s) you want to monitor and
click Next. The printer types that you can monitor and the
protocols you need to use to monitor those printer types
vary from system to system. For more information, see
“Printers” on page 1-2 and “Protocols” on page 1-3.
Windows 95
1-10
Getting Started
Windows NT 3.51 /NT 4.0
8.
Select Monitor to monitor network printers that do not
have drivers installed in this computer. Select DO not
monitor only if network traffic is a problem. Click Next.
For Netware network-based printers:
In the screen shown below, set the number of hops from 0 to 15 and
click Next. This option is available only if the IPX/SPX protocol is
installed in your computer and you selected Monitor Net Ware
printers in step 7.
Getting Started
1-11
e
9.
Caution:
If you have dial-up routers in a NetWare environment, they
may automatically dial up the next hop and you are likely to
be charged for the line connection depending on the number
of hops you set. To prevent this and to keep network traffic to
a minimum, set hops carefully. for more information, see
“Monitoring printers beyond routers” on page 3-2.
Check the current settings and click Next. The installation
program starts installing the necessary files. Follow the
instructions on the screen.
10. Select Yes and click Finish to restart Windows when you
see the following screen.
1-12
Getting Started
Selecting a Printer to Monitor
Before you can start monitoring a TCP/IP or LPR printer with
EPSON Status Monitor 2, you need to select the printer in your
operating system. Follow the steps for your operating system:
Windows 95, below; NT 3.51, page 1-15; and NT 4.0, page 1-16.
Note:
The printer must be equipped with an Ethernet card C82357*, and
the card’s IP address must be set; otherwise the printer does not
appear on the screen. For instructions on installing the card, see the
printer user’s guide, and for instructions on setting the IP address
for the card, see the user’s guide that came with the card.
Windows 95
Note
If the EPSON TCP/IP Printing setting is not set to Yes for
Windows 95, you cannotfollow these steps. See step 5 of the
installation instructions on page 1-8 for more information.
1.
Double-click the Network Neighborhood icon on your
desktop.
2.
Double-click EPSON-TCPIP-Printers, so that available
printers equipped with Ethernet cards in the same segment
as your computer appear in the window.
Getting Started
1-13
1-14
3.
Double-click the target printer.
4.
Follow the instructions that the Wizard gives you on the
screen. If you are required to install the printer driver, set
up the printer referring to the user’s guide that came with
the printer.
Getting Started
Note:
To install a printer located beyond a router, double-click Add Printer
in the Printers folder to start the Add Printer Wizard. Set the IP
address for the target printer by typing \ \ EPSON-TCPIP-Printers\
followed by your IP address.
About IP addresses
IP addresses are unique numbers assigned to computers and printers
connected to the network. They specify a device’s location on the network.
For the IP address of your printer, ask the network administrator.
Windows NT 3.51
1.
Choose Create Printer from the File menu in the Print
Manager. Type the printer name and select the driver.
Prk,tsr &,.a: EPSON EPL.NZOOO
Getting Started 1-15
L
2.
Open Other from Print to, select LPR Port, and then type the
II’ address and name of the printer.
3.
Click OK and follow the instructions on the screen.
Windows NT 4.0
1.
Open the Printers folder and double-click Add Printer to
start the Add Printer Wizard.
2. Click Add Port.
1-16 Getting Started
3.
Select LPR Port, click the New Port button, and then type
the IP address and name of your printer. Click OK.
4.
Follow the instructions on the screen.
Getting Started
1-17
Chapter 2
Using EPSON Status Monitor 2
Making Status Monitor Settings . . . . . . . . . . . . . . . . . . 2-2
Starting EPSON Status Monitor 2 . . . . . . . . . . . . . . . . .
Starting the program in Windows 95 and NT 4.0
. . . . . .
Starting the program in Windows NT 3.51 . . . . . . . . . .
2-3
2-3
2-3
Basic Operating Procedure . . . . . . . . . . . . . . . . . . . . .
Main window . . . . . . . . . . . . . . . . . . . . . . . . . .
Adding uninstalled network printers . . . . . . . . . . . .
Getting detailed information about the printer status . . .
Setting monitoring preferences . . . . . . . . . . . . . . . .
2-4
2-6
2-11
2-12
2-16
Background Monitoring Icon and Status Alert . . . . . . . . .
Background monitoring icon . . . . . . . . . . . . . . . . .
Status Alert . . . . . . . . . . . . . . . . . . . . . . . . . . .
2-17
2-17
2-19
Stopping Monitoring . . . . . . . . . . . . . . . . . . . . . . . .
2-19
Uninstalling EPSON Status Monitor 2 . . . . . . . . . . . . . .
Deleting the Monitor from Windows 95 and NT 4.0 . . . .
Deleting the program from Windows NT 3.51 . . . . . . .
2-21
2-21
2-23
Using EPSON Status Monitor 2
2-1
This chapter explains how to use EPSON Status Monitor 2.
Making Status Monitor Settings
You can change the settings in EPSON Status Monitor 2 by
following the instructions below.
1.
Open the Run dialog box from the Start menu or the Control
Panel depending on your system. Type the path to the
directory where you installed the Status Monitor, followed
by Setup. Then click OK.
C:\ESYZ\SETUP
When you have installed the program in directory ESM2 of
drive C, type C:\ESM2\SETUP.
Note:
If you installed the program in a directory other than ESM2, type
the path to the directory instead of ESM2. If you installed the
program in drive C, type C: \ (path) \SETUP.
2.
Follow the instructions on the screen.
NT 3.51 & 4.0:
Users can individualize their own settings without affecting the
settings of other users.
2-2
Using EPSON Status Monitor 2
Starting EPSON Status Monitor 2
Starting the program in Windows 95 and NT 4.0
This section divides the startup instructions into two sections
according to your operating system. Double-click the Status
Monitor icon on the right side of the task bar.
I
Note:
You can also start EPSON Status Monitor 2 from the Start menu. To
do so, click Start, point to Programs and EPSON, and then click
EPSON Status Monitor 2.
Starting the program in Windows NT 3.51
Double-click the EPSON Status Monitor 2 icon on the screen.
Using EPSON Status Monitor 2
2-3
Note:
You can also start EPSON Status Monitor 2 from within the Epson
program group in Program Manager.
US EPS
tus
Monh 2
Uninstall
Basic Operating Procedure
This section describes the basic operation and functions of
EPSON Status Monitor 2.
1.
Click a printer in the EPSON Status Monitor 2 window. The
Installed Printers list shows the current status of all EPSON
printers that have printer drivers installed in your
computer.
For more information about the Status Monitor window, see
page 2-6.
2-4
Using EPSON Status Monitor 2
2.
Click the printer status icon to see detailed information
about the printer, see page 2-7 for more information. Click
the monitoring- preferences icon to make various settings,
see page 2-16 for more information.
printer statu
3.
E
monitoring
preferences
Click OK to close the dialog box after checking the printer
status or making preference settings.
For details, see page 2-7.
For details, see page 2-16.
Using EPSON Status Monitor 2
2-5
Note:
If you click the Monitor this printer check box in the Monitoring
Preferences dialog box, a Status Alert message appears according to
the conditions you select in the Status Alert box. For detailed
information, see “Background Monitoring Icon and Status Alert”
on page 2-17.
Main window
The Main window shows the current status of the printers. The
color of the printer icon changes according to the printer’s
status.
2-6
Using EPSON Status Monitor 2
Printer Icon:
Green
Yellow
Red
Gray
Meaning:
Ready to print.
Ready to print; however the printer has
detected something that may become a
problem if it isn’t fixed.
Cannot print because of a problem.
Cannot monitor the printer.
Printer menu
This menu provides you with detailed information on printer
and print job status for any printer you select in the Installed
Printers list. Click Printer Status for detailed information on the
selected printer’s status, or click Job Status to get details on
jobs waiting to print. Click Select Paper Memory to open the
Paper Memory Selection dialog box, where you can select a
saved paper type to print on. The Select Paper Memory
command is not available on some printers. Click Close to
close the Status Monitor.
If you select Job Status while monitoring an EPSON TCP/IP
printer, the following menu commands are available but do not
take effect:
Printer menu
Pause Printing, Purge Print Jobs
Document menu
Pause Printing, Cancel Printing
Using EPSON Status Monitor 2
2-7
View menu
This menu lets you control the appearance and content of the
EPSON Status Monitor 2 window and the Installed Printers list.
You can choose to show or hide the toolbar and status bar, and
you can choose whether large or small icons will appear next to
the printers in the Installed Printers list. Clicking List on this
menu displays only the printer name and icon in the Installed
Printers list. Clicking Details displays the printer name, status,
and job count. Click Refresh to update the status information
shown in the Installed Printers list.
Settings menu
The Settings menu gives you control over the Status Monitor’s
background monitoring feature, and allows you to add and
delete printers from the Installed Printers list. Select a printer
from the Installed Printers list and click Monitoring
Preferences to turn background monitoring on or off, and to
adjust the monitoring preferences for the selected printer. Click
Add Printer to add a new printer to the list, or click Delete
Printer to delete the selected printer from the list. Point to
Background Monitoring to select when to start and stop the
background monitoring feature. Click Select background
monitoring icon to specify the type of printer icon that is
displayed on the taskbar when background monitoring is
turned on.
Help menu
Choose Help Topics from this menu to view online help about
the EPSON Status Monitor 2. Click About to view the Status
Monitor’s version number and copyright information.
2-8
Using EPSON Status Monitor 2
Many of the commands available on the Status Monitor menus
can be accessed directly by clicking the buttons on this toolbar.
If you point to a toolbar button, the corresponding menu
command appears briefly on your screen, and an explanation
of the button’s function appears in the Status Bar at the bottom
of the Status Monitor window.
NT 3.51 & 4.0:
Job Status is not available.
Note:
0 Close the Printer list window when you do not need it: this
window uses computer resources if left open.
U
If you change the printer port setting (Print to the following
port or Print to) in the printer driver, quit EPSON Status
Monitor 2 as described in “Stopping Monitoring” on page 2-19,
and then restart it.
Installed Printers list
This list displays information about the EPSON printers that
are connected to your computer through the network and have
printer drivers installed in your system. To change the printer
information that is displayed in this list, see “View menu” on
page 2-8.
Printer Name
Provides the names of the installed printers. You can add or
delete printers to be monitored by choosing Add Printer or
Delete Printer from the Settings menu. To save computer
resources and reduce network traffic, delete printers you do
not need to monitor. (Doing so does not remove the printer
driver from your computer.)
Using EPSON Status Monitor 2
2-9
Status
Displays brief messages describing the current status of the
printer.
Job Count
Displays the number of print jobs waiting to be printed from a
particular printer.
Note:
You can rearrange the order of the printers in the list by clicking the
Printer Name, Status, and Job Count title bars.
Uninstalled Network Printers list
The Uninstalled Network Printers list displays non-EPSON
printers and EPSON printers that do not have installed printer
drivers.
Note:
If you do not check Monitor in the Network Printer Monitoring
dialog box during installation, the Uninstalled Network Printers list
is not available.
To monitor network printers that do not have drivers installed
in your computer, add uninstalled network printers as
described on the next page.
2-10
Printer Path:
Shows the network printer path.
Status:
Shows the current printer status.
Model:
Shows the model name of the network printer.
Using EPSON Status Monitor 2
NT 3.51 & 4.0:
You need to log on as the Network Administrator to use this feature.
Note:
Delete printers that appear in this list but are not always connected to
the network and printers that the Status Monitor cannot get status
information about, because they unnecessarily use system resources.
To delete a printer, select the printer and click Delete Printer on the
Settings menu.
Adding uninstalled network printers
Before you start monitoring uninstalled network printers, you
need to add them to the Uninstalled Network Printers list.
Follow these steps:
1.
Click the Uninstalled Network Printers list.
2.
Click Add Printer on the Settings menu.
3.
Type the path or IP address of the printer. If you do not
know either, click Browse to select the target printer from
the network.
Using EPSON Status Monitor 2
2-11
When using Browse to add a printer, note the following:
The Browse for Printer window shows the network configuration. Do
not select printers that you cannot monitor.
NT 3.51 and NT 4.0
Windows 95
Printers that appear in the window but cannot be monitored include:
Windows 95
NDS printers and Windows 95/NT shared
printers
Windows NT 3.51
Printers in a Windows-based network
Windows NT 4.0
Printers in a Windows-based network and
NDS printers
Getting detailed information about the printer status
To get detailed information about a printer, right-click that
printer and select Printer Status, or select the printer and click
Printer Status on the Printer menu. The Printer Status window
appears. There are three menus in the Printer Status window,
and you can switch between menus by clicking the tabs at the
tops of the menus.
2-12
Using EPSON Status Monitor 2
Current Status menu
You can check the status of the selected printer on the Current
Status menu. If a problem occurs, the most likely solution
appears in the Troubleshooting Message box.
This screen capture
shows the EPL-N2000.
1
This screen capture
shows the Stylus
1. Image icon:
Shows the printer status graphically.
2. Replace Ink
Cartridge button:
Explains how to replace an empty
ink cartridge. Follow the instructions
on the screen.
3. Current Status
Message box:
Explains the current status of the
selected printer.
Using EPSON Status Monitor 2
2-13
4. Troubleshooting
Message box
Explains how to solve problems that
may occur. If the problem is not
solved after following the instructions
given here, see the troubleshooting
section of the affected printer.
Consumables menu
(EPSON Stylus COLOR/EPSON Stylus Photo Series)
The information given on the Consumables menu varies
according to the printer you are monitoring.
The Consumables menu for
the EPSON Stylus COLOR 1520.
2-14
The Consumables menu for
the EPSON Stylus COLOR 3000
Remaining color ink:
Shows the amount of color ink
remaining.
Remaining black ink:
Shows the amount of black ink
remaining.
Remaining paper:
Shows the approximate amount of
remaining paper. This feature is
available only on some printers.
Check paper size
before:
Defines whether the paper size is
checked before printing. This feature
is available only on some printers.
Using EPSON Status Monitor 2
Consumables menu (EPL Series)
The information given on the Consumables menu varies
according to the printer you are monitoring.
Remaining paper:
Shows the paper size and
approximate amount of remaining
paper in each paper source.
Remaining toner:
Shows the amount of toner
remaining.
The Printer Information menu provides you with information
about the selected printer and its options.
2
This example shows the
Printer Information menu
for the EPL-N2000 printer.
Using EPSON Status Monitor 2
2-15
List:
1. Printer Resources:
Provides information about the
printer and the print server.
2. Details:
Provides details about the item
selected in the Printer Resources list.
Setting monitoring preferences
To make specific monitoring settings, right-click a printer and
select Monitoring Preferences, or select the printer and click
Monitoring Preferences on the Settings menu. The
Monitoring Preferences window appears.
NT3.52 & 4.0:
Monitoring Preferences settings made from one computer do not
affect the settings made from another computer.
2-16
Using EPSON Status Monitor 2
settings:
1. Monitoring Interval:
Determines how often the Status
Monitor checks for new printer
status information, from short (every
2 seconds) to long (every 60
seconds). The default setting is 10
seconds.
2. Background
Monitoring:
Click the Monitor this printer check
box to monitor the selected printer.
A check in the check box means the
selected printer is being monitored.
3. Status Alert:
Determines under what conditions
the Status Alert window will open.
See “Status Alert” on page 2-19.
Background Monitoring Icon and Status Alert
When you click and select the Monitor this printer check box
in the Monitoring Preferences dialog box, EPSON Status
Monitor 2 monitors the selected printer. The background
monitoring icon changes its color according to the printer’s
status, and the Status Alert window opens according to the
conditions you select in the Monitoring Preferences dialog box.
Background monitoring icon
A printer-shaped background monitoring icon appears on the
taskbar after you install the EPSON Status Monitor 2.
Using EPSON Status Monitor 2
2-17
Double-clicking the background monitoring icon opens the
EPSON Status Monitor 2 window. Right-clicking this icon
opens a pop-up menu where you can choose to have the Status
Alert displayed in front of other windows on the desktop. This
pop-up menu also allows you to turn off the background
monitoring feature.
The background monitoring icon changes its color according to
the printer status:
Printer Icon:
Green
Yellow
Red
Gray
Meaning:
Ready to print.
Ready to print; however the printer has
detected someting that may become a problem
if it isn’t fixed.
Cannot print because of a problem.
Cannot monitor the printer.
Note:
If you turn off the monitoring feature, the background monitoring
icon disappearsfrom the taskbar and the Status Alert window will not
open. You can restart background monitoring by clicking Monitor
now on the Settings menu (as shown below) and by selecting
Monitor this printer in the Monitoring Preferences dialog box as
explained on page 2-16.
2-18
Using EPSON Status Monitor 2
The Status Alert window opens above the background
monitoring icon under the conditions you select in the
Monitoring Preferences dialog box. Click the printer name
and click Printer Status on the Printer menu to open the
Current Status menu.
For details about the Current Status menu, see page 2-13.
EPSON Status Monitor 2 automatically monitors the printer or
printers you designate it to monitor. To stop monitoring a
printer, follow these steps:
1.
Double-click the icon of EPSON Status Monitor 2 at the
bottom of your desktop.
Windows 95 and NT 4.0
NT 3.51
I
Double-click
Using EPSON Status Monitor 2
2-19
2.
Click Settings, point to Background monitoring, and then
click Stop monitoring now.
3.
Click Printer and click Close.
Note:
You can restart the Status Monitor by clicking Monitor from
restart or Monitor now on the Settings menu. If you stop
monitoring and close EPSON Status Monitor 2, the background
monitoring icon disappearsfrom the taskbar of Windows 95 and NT
4.0, but the icon remains on the desktop in Windows NT 3.51. To
restart the Status Monitor, see “Starting EPSON Status Monitor 2”
on page 2-3.
2-20
Using EPSON Status Monitor 2
Uninstalling EPSON Status Monitor 2
You can remove EPSON Status Monitor 2 from your computer
as follows:
e
Caution:
Quit other programs such as virus check programs before
removing EPSON Status Monitor 2.
Win 95:
If EPSON TCP/IP printing is enabled, disable it as described on
page 1-10.
NT 3.51 & 4.0:
You need to log on as the Administrator.
Deleting the Monitor from Windows 95 and NT 4.0
1.
Close EPSON Status Monitor 2 as described in “Stopping
Monitoring” on page 2-19.
2.
Click Start on the taskbar, point to Settings, and then click
Control Panel.
Using EPSON Status Monitor 2
2-21
3. Double-click Add/Remove Programs.
4.
Click EPSON Status Monitor 2 and click the Add/Remove
button.
5.
Follow the instructions on the screen.
2-22
Using EPSON Status Monitor 2
Deleting the program from Windows NT 3.5I
1.
Double-click Epson in the Program Manager.
2.
Double-click EPSON Status Monitor 2 Uninstall.
3.
Follow the instructions on the screen.
Using EPSON Status Monitor 2
2-23
Chapter 3
Tips and Troubleshooting
Tips for Network Administrators . . . . . . . . . . . . . . . . .
Controlling the packet traffic on the network . . . . . . . .
Monitoring printers beyond routers . . . . . . . . . . . . .
About uninstalled network printers . . . . . . . . . . . . .
3-2
3-2
3-2
3-3
Troubleshooting . . . . . . . . . . . . . . . . . . . . . . . . . . .
3-3
Tips and Troubleshooting
3-1
I
This chapter contains tips for using EPSON Status Monitor 2
and explains how to cope with possible problems.
Tips for Network Administrators
Controlling the packet traffic on the network
The computer with EPSON Status Monitor 2 communicates
with the printer across the network. If there are many
monitoring computers and printers to be monitored, packet
traffic increases and may slow down the network. Limit the
number of monitoring computers and printers to be monitored
to control network traffic.
It is a good idea to designate a single printer administrator who
can monitor all printers on the network and allow others to
monitor only the printer that they usually use. This is one way
to decrease network traffic.
The monitoring interval also affects the network traffic. Make
the interval longer for printers at a great distance on the
network.
Monitoring printers beyond routers
When you monitor NetWare printers located beyond dial-up
routers in the wide area network, you are likely to be charged
because of the line connection. Consider the network
configuration and set hops carefully on NetWare networks.
3-2
Tips and Troubleshooting
If you set one or more hops for the NetWare network, the
search packet travels beyond the routers. Even if there are no
printers to be monitored beyond dial-up routers, it is likely that
the dial-up line will be used and you will be charged more than
you expect. If you do not monitor printers beyond routers, set 0
for the number of hops during installation. To reset the number
of hops, reinstall the Status Monitor as described on page 1-8.
About uninstalled network printers
The Uninstalled Network Printers menu shows network
printers that do not have drivers installed in your computer.
Because you can monitor printers without installing printer
drivers, this feature is useful for network printer
administrators.
Troubleshooting
The Current Status menu shows “A communication error has
occurred.”
Cause
What to do
The printer is turned off.
Make sure that the power cord is
properly plugged into the
electrical outlet. Turn on the
printer.
The printer is running the self-test Turn off the printer to terminate
or initializing itself.
the self-test, and then turn it on
again.
Allow the printer enough time to
finish initialization.
Tips and Troubleshooting
3-3
Multiple computers are
monitoring a single printer, and
the printer cannot reply to all of
them at the same time.
Decrease the number of
monitoring computers or make
the monitoring interval longer in
the Monitoring Preferences dialog
box. See “Setting monitoring
preferences” on page 2-16 and
“Tips for Network
Administrators” on page 3-2.
The printer is not ready to print.
Make sure the printer is ready to
print. For details, see the user’s
guide of your printer.
The status information does not match the real status of the
printer.
Cause
What to do
EPSON Status Monitor 2 monitors
the printer at intervals set in the
Monitoring Preferences dialog
box. A long interval may result in
incorrect information.
Click Refresh on the View menu
to update the information.
Decrease the monitoring interval
in the Monitoring Preferences
dialog box if you find that the
Status Monitor often displays data
that is old.
Wait until EPSON Status Monitor
2 monitors the printer next time.
3-4
Tips and Troubleshooting
NetWare printers cannot be monitored.
Cause
What to do
You are using EPSON Net!.
You cannot use EPSON Status
Monitor 2 and EPSON Net! at the
same time. Quit EPSON Net! and
use EPSON Status Monitor 2. If
you use EPSON Net!, quit EPSON
Status Monitor 2 in advance.
NetWare print servers cannot be monitored beyond routers.
Cause
What to do
The number of hops is set to 0.
Change the number of hops
according to “Changing the Initial
Settings” on page 1-11. See also
“Tips for Network
Administrators” on page 3-2.
An existing printer cannot be found in Windows NT 3.51.
I
Cause
What to do
You may have logged on to the
network before network modules
were completely loaded.
Log on again. To clear this
problem immediately after the
operating system starts, log on
after access to the hard disk drive
is completed.
Tips and Troubleshooting
3-5
r ~~
Cannot print when using EPSON TCP/IP in Windows 95.
Cause
What to do
An incompatible or invalid printer
name is typed in the Print to the
following port box of the printer’s
Properties dialog box.
Delete the unnecessary printer
name.
For example,
“EPSON-TCPIP-Printers\255.255.
255.255 (EPL-N2000)” should be
“EPSON-TCPIP-Printers\255.255.
255.255”.
If you use the EPL-N1200 printer,
only printers with the 7717 or
later ROM version are compatible.
To confirm the ROM version
number, print a status sheet and
make sure the first four numbers
of the Firmware Revision number
are 7717 or higher. See page 10 of
your Getting Ready! guide for
information on how to print a
status sheet. Contact your dealer
and purchase a ROM update if
necessary.
3-6
Tips and Troubleshooting
I
Index
A
E
About, 2-8
Add Printer, 2-8, 2-9
Adding uninstalled network
printers, 2-11
EPSON Status Monitor 2
install, 1-8
EPSON TCP/IP, 1-3
Ethernet card, 1-4
B
H
Background Monitoring, 2-8, 2-17
Bindery emulation, 1-4
Help
menu, 2-8
Topics, 2-8
C
Cancel printing, 2-7
Check paper size before, 2-14
Computers, 1-2
Connect NetWare print queue,
1-7
Consumables menu, 2-14, 2-15
Current Status
menu, 2-13
message box, 2-13
D
Delete Printer, 2-8, 2-9, 2-10
Delete monitor, 2-21-23
Details, 2-8, 2-16
I
Image icon, 2-13
Installed Printers list, 2-9
Install, 1-8-12
Interface card, 1-7
IP address, 1-15
IPX/SPX, l-3, 1-11
J
Job Count, 2-10
Job Status, 2-7
L
List, 2-8, 2-16
LPR, 1-3
LPR printer protocol, 1-4
Index IN-1
M
Q
Main window, 2-6
Model, 2-10
Monitor
now, 2-18
this printer, 2-6, 2-18
Monitoring
Interval, 2-17
preferences, 2-5, 2-8, 2-16
Q & A, 3-3
N
NetWare, 1-3
print queue, 1-7
Network administrator, 3-2
Novell, 1-3
P
Pause Printing, 2-7
Print queue, 1-7
Printer
icon, 2-7, 2-18
Information menu, 2-15
menu, 2-7
name, 2-9, 2-10
path, 2-10
resources, 2-16
status, 2-5, 2-7, 2-12, 2-19
Printers, 1-2
Protocols, 1-3
LPR printer, 1-4
Purge Print Jobs, 2-7
IN-2
Index
R
Refresh, 2-8
Remaining
black ink, 2-14
color ink, 2-14
paper, 2-14, 2-15
toner, 2-15
Replace Ink Cartridge, 2-13
S
Select Paper Memory, 2-7
Select background monitoring
icon, 2-8
Select printer to monitor,
1-13-17
Setting,
monitoring preferences, 2-16
status monitor, 2-2
Settings, 2-17
Status, 2-10
Status Alert, 2-17, 2-19
Stopping monitoring, 2-19
System Requirements, 1-2
T
TCP/IP, 1-3
Tips, 3-2
Toolbar, 2-9
Troubleshooting, 3-3
u
Uninstalled Network Printers
list, 2-10
Uninstall, 2-21-23
V
View menu, 2-8
Index IN-3
I
EPSON OVERSEAS MARKETING LOCATIONS
EPSON AMERICA, INC.
EPSON UK LTD.
20770 Madrona Ave.
Campus 100, Maylands Avenue,
P.O. Box 2842
Hemel Hempstead, Herts,
Torrance, CA 90509-2842
HP2 7TJ, U.K.
Phone: (800) 922-8911
Phone: (+44) 01442 61144
Fax: (310) 7825220
Fax: (+44) 01442 227227
EPSON DEUTSCHLAND GmbH
EPSON FRANCE S.A.
Ztilpicher StraBe 6,
68 bis, rue Marjolin
40549 Dusseldorf Germany
92300, Levallois-Perret. France
Phone: (0211) 56030
Phone: 33.1.40.87.37.37
Telex: 8584786
Telex: 610657
EPSON AUSTRALIA PTY. LTD.
EPSON SINGAPORE PTE. LTD.
70 GIBBES STREET, CHATSWOOD 2067 NSW.
No. 1 Temasek Avenue #36-00
Phone: 2-9903-9000
Millenia Tower, Singapore 039192
Fax: 2-9903-9177
Phone: (065) 33 77 911
Fax: (065) 33 41 185
EPSON HONG KONG LTD.
Rooms 4706-10, 47/F,
EPSON TAIWAN TECHNOLOGY &
TRADING LTD.
China Resources Bldg.,
IOF, No. 287 Nanking E. Road, Sec. 3,
26 Harbour Road, Wanchai, Hong Kong
Taipei, Taiwan, R.O.C.
Phone: 2585-4300
Phone: (02) 717-7360
Fax: 2827-7083
Fax: (02) 712-9164
EPSON ITALIA S.p.A.
EPSON IBERICA S.A.
V.le F.lli Casiraghi 427
Av. de Roma. 18-26
20099 Sesto S.Giovanni
08290 Cerdanyola del Valles
MI, Italy
Barcelona, Spain
Phone: 2-262331
Phone: 582. 15.00
Fax: 2-2440750
Fax: 582. 15.55
SEIKO EPSON CORPORATION
(Hirooka Office)
EPSON PORTUGAL, S.A.
80 Harashinden, Hirooka
4460 Matosinhos, Portugal
Shiojiri-shi, Nagano-ken
Phone: (02) 996 14 02
399-07 Japan
Fax: (02) 996 14 11
R. do Progresso, 471, 1’ Perafita
1996 October
EPSON
®
Printed in Japan 97.8-5