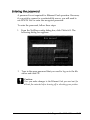
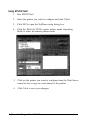
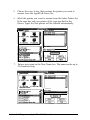
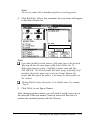
1
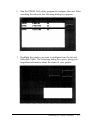
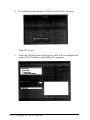
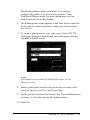
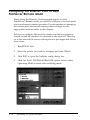
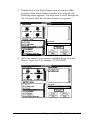
User’s Guide Update
Please update your EPSON Type B Ethernet Interface Card
(C82332*) User’s Guide with the following information:
cl The Type B Ethernet Interface Card is also referred to as the
Multi-protocol Ethernet Interface Card. You may notice this
name when ordering, for example.
0 The Type B Ethernet interface card can be installed in ink jet
printers, as well as laser and dot matrix printers.
0 Although the manual states that your printer must support
PostScript printing, you can use the Ethernet interface card
in any EPSON Stylus ink jet printer that has a Type B option
slot.
Ll If you are using your printer in an Apple Ethertalk network,
you need to use the EPSON Namer program to rename it, as
described on page 3-2. However, please note that the
EPSON Namer program is on the printer driver diskette
that came with your printer, not on the EPSON Net! for
Macintosh diskette, as mentioned in your manual.
Copyright © 1995 by Epson America, Inc.
Torrance, California, USA
8/95
cpd-3018
Product Update for EPSON PostScript
Printer Users
This update applies only to networks that include EPSON
PostScript® printers.
Note:
If your network does not include Macintosh® workstations, please disregard
this update. No additional settings need to be made.
Your C82331* Ethernet Interface Card cannot automatically switch
between AppleTalk® and non-AppleTalk PostScript printing
environments. You first need to configure your printer for AppleTalk
or non-AppleTalk PostScript printing with the AppleTalk PS option
in the Epson Zoner utility. The Epson Zoner dialog box shown on
page 3-7 of your User’s Guide should appear as follows:
To configure your printer, see the appropriate section below.
For non-AppleTalk PostScript printer support
Make sure the AppleTalk PS option in Epson Zoner is set to
Inactive (default setting).
For AppleTalk PostScript printer support
Be sure to change the AppleTalk I’S option in Epson Zoner to
Active.
After changing the AppleTalk PS option, click the Set button and
wait for at least 30 seconds before rebooting your printer.
Copyright © 1995 by Seiko Epson Corporation
Printed In Japan 95.02.1
4004273
EH3-00
SEIKO EPSON CORPORATION
SOFTWARE license AGREEMENT
l
IMPORTANT! The EPSON software in the sealed package will be licensed to you,
the licensee, on the condition that you agree with SEIKO EPSON CORPORATION
(“EPSON”) to the terms and conditions set forth in this legal agreement.
PLEASE READ THIS AGREEMENT CAREFULLY. YOU WILL BE BOUND BY
THE TERMS OF THIS AGREEMENT IF YOU OPEN THIS SEALED PACKAGE
CONTAINING THE DISKETTE. If you do not agree to the terms contained in this
agreement, please return the diskette UNOPENED to your dealer for a refund of your
license fee.
If you agree to these terms and conditions, EPSON grants to you a non-exclusive license
to use the accompanying software (the “Software”) and documentation. The Software and
the documentation are referred to in this Agreement as the “Licensed Materials”.
1. Ownership
The Licensed Materials are the sole and exclusive property of EPSON and/or its software
suppliers. By applying the license fee and by opening the sealed disk package, you do not
become the owner of the Licensed Materials, but are entitled solely to use the Licensed
materials according to the terms of this Agreement.
2. license
The license granted to you by EPSON in this Agreement authorizes you to use the Software
on any single computer, or any replacement for that computer. A separate disk, licensed
under an additional Software license Agreement, is required for any other computer on
which you wish to use the software.
YOU MAY NOT USE, COPY OR MODIFY THE LICENSED MATERIALS, IN
WHOLE OR IN PART, EXCEPT AS EXPRESSLY PROVIDED IN THIS AGREEMENT.
3. Term
This Agreement is effective from the date on which you open the sealed disk package. This
Agreement may be terminated by you at any time by destroying the license Materials,
together with all copies, modifications and merged portions in any form. It will also
terminate automatically if you fail to comply with any term or conditions of this
Agreement.
4. Restrictions on Transfer
You may permanently transfer the Software to any other party if the other party agrees
to the terms and conditions of this Agreement, and you transfer all copies on the Licensed
Materials to that party or destroy those not transferred. By such transfer, you terminate
the license granted to you in this Agreement.
You may not sub-license, assign, share,
rent, lease, or otherwise transfer your right to use the Licensed Materials, nor any other
rights granted to you under this Agreement, except as stated in this paragraph.
5. Restrictions against copying or modifying the Licensed Materials.
The Licensed Materials are copyrighted by EPSON or third parties. Except as expressly
permitted in this Agreement, you may not copy or otherwise reproduce the Licensed
Materials. In no event does the limited copying or reproduction permitted under this
Agreement include the right to decompile, disassemble, or electronically transfer the
Software, or to translate the Software into another computer language.
The Software may be copied by you into printed or machine readable form, for use by you
(1) for program error verification, (2) for archive purposes or (3) for replacement of
defective media. You may not copy or reproduce the documentation. You agree to
maintain appropriate records of the location of the original media and all copies of the
Software made by you. You may modify the machine-readable form of the Software for
your own use, or merge the Software into other program material to form an updated
work. However, any such modification will avoid EPSON’s limited warranty on the
Software. Any portion of the Software included in any such updated work shall be used
only on a single computer and shall remain subject to the terms and conditions of this
Agreement. On the termination of this Agreement, you are required to completely
remove the Software from any such updated work.
You agree to include the copyright notice set forth on the label of the media embodying
the Software on any copy of the Software in any form, in whole or in part, or of any
modification of the Software or any updated work containing the Software any part
thereof. You also agree not to remove any existing copyright notice from any of the
license Materials.
6. Protection and Security
You agree to use your best efforts and take all reasonable steps to safeguard the Licensed
Materials to ensure that no unauthorized person has access to them and that no
unauthorized copy, publication, disclosure, or distribution of any of the Licensed
Materials is made. You acknowledge that the Licensed Materials contain valuable,
confidential information and trade secrets and that unauthorized use and copying are
harmful to EPSON and its Software suppliers, and that you have the confidential
obligation on such valuable information and trade secrets.
7. Limited Warranty
EPSON warrants that the media on which the Software is recorded will be free from
defects in workmanship and materials for a period of 90 days from the date of payment
of license fee. If the media and dated proof of purchase are returned to EPSON or the
dealer from which the media was obtained within 90 days of the date of payment of the
license fee, and if EPSON determines the media to be defective and provided the media
was not subject to misuse, abuse or use in defective equipment, EPSON will, at its
option, ( 1) replace the media, or (2) refund the license fee paid by you, upon your return
to EPSON of the Licensed Materials, including all copies of any portions thereof, and
dated proof of payment of the license fee. ALL IMPLIED WARRANTIES ON THIS
MEDIA, INCLUDING IMPLIED WARRANTIES OF MERCHANTABILITY AND
FITNESS FOR A PARTICULARPURPOSE, ARE LIMITED TO THE DURATION
OF THE EXPRESS WARRANTY SET FORTH ABOVE.
IN NO EVENT WILL EPSON’S OR ANY OTHER PARTY WHO HAS BEEN
INVOLVED IN THE CREATION, PRODUCTION OR DELIVERY OF THE
LICENSED MATERIALS BE LIABLE FOR SPECIAL, DIRECT, INDIRECT, OR
CONSEQUENTIAL DAMAGES, INCLUDING LOSS OF PROFITS OR INABILITY
TO USE THE LICENSED MATERIAL, EVEN IF EPSON OR SUCH OTHER
PARTY HAS BEEN ADVISED OF THE POSSIBILITY OF SUCH DAMAGES. IN
NO EVENT SHALL EPSON’S OR SUCH OTHER PARTY’S LIABILITY FOR ANY
DAMAGES OR LOSS TO YOU OR ANY OTHER PARTY EXCEED THE LICENSE
FEES PAID FOR THE LICENSED MATERIALS.
8. General
If any provision or portion of a provision of this Agreement is determined to be invalid
under any applicable law, shall be deemed omitted and the remaining provisions and
partial provisions of this Agreement shall continue in full force and effect. Any notices
or other communications to be sent to EPSON must be mailed by certified mail to one
of the addresses on the last page of this Agreement.
This Agreement constitutes the entire agreement between the parties with respect to
the subject matter hereof, and all prior agreements, representations, statements, and
undertakings are hereby expressly cancelled.
EPSON AMERICA, INC.
EPSON UK LTD
20770 Madrona Ave
P.O. Box 2842
Torrance, CA 90509-2842
Phone: (800) 922-89 11
Fax: (3 10) 782-5220
Campus 100, Maylands Ave
Hemel Hempstead , Herts
HP2 7TJ, U.K.
Phone: 0442-6 1144
Telex: 5 182467
EPSON DEUTS CHLAND GmbH
EPSON FRANCE S.A.
Ztilpicher St.&e 6,
40549 Dussledorf Germany
Phone: (0211) 56030
Telex: 8584786
68 bis, rue Marjolin
92300, Levallois-Perret, France
Phone: (1) 4087-3737
Telex: 610657
EPSON AUSTRALIA PTY. LTD.
EPSON SINGAPORE PTE. LTD
l/70 Gibbes Street,
Chatswood 2067 NSW
No. 1 Raffles Place # 26-00
OUB Centre, Singapore 0104
Phone: 5330477
Phone: 24 15-9000
Fax: 24 17-0077
Fax: 5338119
EPSON HONG KONG LTD.
Rooms4706-10,47/F,
China Resources Bldg.
26 Ha&our Road, Wanchai, Hong Kong
Phone: 5854300
Fax: 8277083
EPSON ELECTRONICS TRADING LTD.
(TAIWAN BRANCH)
lOF, No. 287 Nanking E. Road, Set 3
Taipei, Taiwan, R.O.C.
Phone: (02) 717-7360
Fax: (02) 712-9164
EPSON ITALIA S.p.A
V.le F.lli Casiraghi 427
20099 Sesto S. Giovanni
Ml, Italy
Phone: 2-26233 1
Fax: 2-2440750
EPSON IBERIA S.A.
Av. de Roma, 18-26
08290 Cerdanyola de1 Valles
Barcelona, Spain
Phone: 582.15.00
Fax: 582.15.55
SEIKO EPSON CORPORATION
(Hirooka Office)
80 Harashinden, Hirooka
Shiojiri-shi, Nagano-ken
399-07 Japan
Phone: (0263) 52-2552
EPLA © 1994
EPSON”
4004030
EH3-00
EPSON
®
C82331*
EPSON Type B Ethernet Interface Card
for:
Cl Novell NetWare 2.x, 3.1x, and 4.x Print server or
Remote Printer
®
0 Ethertalk (Apple) Printer
0 Windows” NT Using DLC Protocol
0 UNIX lpd Printer or ftp Printer
User’s Guide
All rights reserved. No part of this publication may be reproduced, stored in a retrieval
system, or transmitted in any form or by any means, electronic, mechanical, photocopying,
recording, or otherwise, without the prior written permission of Seiko Epson Corporation.
No patent liability is assumed with respect to the use of the information contained herein.
Neither is any liability assumed for damages resulting from the use of the information
contained herein.
Neither Seiko Epson Corporation nor its affiliates shall be liable to the purchaser of this
product or third parties for damages, losses, costs, or expenses incurred by purchaser or
third parties as a result of: accident, misuse, or abuse of this product or unauthorized
modifications, repairs, or alterations to this product, or (excluding the U.S.) failure to
strictly comply with Seiko Epson Corporation’s operating and maintenance instructions.
Seiko Epson Corporation shall not be liable against any damages or problems arising from
the use of any options or any consumable products other than those designated as
Original EPSON Products or EPSON Approved Products by Seiko Epson Corporation.
EPSON and EPSON ESC/P are registered trademarks and EPSON ESC/P2 is a trademark
of Seiko Epson Corporation.
IBM, PC, PC AT, and OS/2 are trademarks of International Business Machines
Corporation.
MS-DOS is a trademark of Microsoft, Inc.
AppleTalk and Macintosh are registered trademarks of Apple Computer, Inc.
Novell and NetWare are registered trademarks of Novell, Inc.
Microsoft and MS-DOS are registered trademarks and Windows is a trademark of
Microsoft Corporation.
HP, LaserJet, LaserJet Series II, LaserJet Series IID, LaserJet Series III, LaserJet Series IIID,
and PCL are trademarks of Hewlett-Packard Corporation.
PostScript is a registered trademark of Adobe Systems, Inc.
Copyright © 1995 by Seiko Epson Corporation, Nagano, Japan.
ii
FCC Compliance Statement for United States Users
This equipment has been tested and found to comply with the limits for a Class A digital
device, pursuant to Part 15 of the FCC Rules. These limits are designed to provide
reasonable protection against harmful interference when the equipment is operated in a
commercial environment. This equipment generates, uses, and can radiate radio frequency
energy and, if not installed and used in accordance with the instruction manual, may
cause harmful interference in which case the user will be required to correct the interface
at his own expense.
This devise complies with Part 15 of the FCC Rules. Operation is subject to the following
two conditions: (1) This device may not cause harmful interference, and (2) this device
must accept any interference received, including interference that may cause undesired
operation.
WARNING
The connection of a non-shielded equipment interface cable to this equipment will
invalidate the FCC Certification of this device and may cause interference levels which
exceed the limits established by the FCC for this equipment. It is the responsibility of the
user to obtain and use a shielded equipment interface cable with this device. When this
equipment is attached to some printers, you should not leave cables connected to the
printer’s built-m connectors. See your printer’s user’s manual for details.
Changes or modifications not expressly approved by Seiko Epson Corporation could void
the user’s authority to operate the equipment.
for Canadian Users
This digital apparatus does not exceed the Class A limits for radio noise emissions from
digital apparatus as set out in the radio interference regulations of the Canadian
Department of Communications.
Le present appareil numerique n’emet pas de bruits radioelectriques dgpassant les limites
applicables aux appareils num6riques de Classe A prescrites dans le reglement sur le
brouillage radioelectrique edict6 par le Ministere des Communications du Canada.
iii
Contents
Introduction
Supported Network Protocols and Features . . . . . . . . . . . . .
Ethernet Card Hardware . . . . . . . . . . . . . . . . . . . . . . . .
Ethernet Card Software . . . . . . . . . . . . . . . . . . . . . . . . .
EPSON Printers Supported by the Ethernet Card . . . . . . . . . .
Overview . . . . . . . . . . . . . . . . . . . . . . . . . . . . . . . . .
Terms and Concepts . . . . . . . . . . . . . . . . . . . . . . . . . . .
Chapter 1
Installing the Ethernet Card
Hardware Installation . . . . . . . . . . . . . . . . . . . . . . . . . .
Installing in a printer . . . . . . . . . . . . . . . . . . . . . . .
Connecting the network cable . . . . . . . . . . . . . . . . . .
Setting up the printer . . . . . . . . . . . . . . . . . . . . . . .
Ethernet Card Operation . . . . . . . . . . . . . . . . . . . . . . . .
Lights . . . . . . . . . . . . . . . . . . . . . . . . . . . . . . . .
Report printing. . . . . . . . . . . . . . . . . . . . . . . . . . .
Using the EPSON PostScript card . . . . . . . . . . . . . . . .
Network installation . . . . . . . . . . . . . . . . . . . . . . .
Chapter 2
Contents
1-1
1-2
1-3
1-3
1-4
1-4
1-5
1-6
1-6
Installing on Novell NetWare
Ethernet Card Configuration Software . . . . . . . . . . . . . . . .
Before setting up . . . . . . . . . . . . . . . . . . . . . . . . . .
Installing the utility software. . . . . . . . . . . . . . . . . . .
Print server mode . . . . . . . . . . . . . . . . . . . . . . . . .
Remote printer mode . . . . . . . . . . . . . . . . . . . . . . .
Auto PrintServer/Remote mode. . . . . . . . . . . . . . . . .
iv
1
3
3
4
4
5
2-1
2-2
2-2
2-3
2-4
2-5
Using the Ethernet Card as a Print Server. . . . . . . . . . . . . . .
Setting up queues on a file server . . . . . . . . . . . . . . . .
Setting up queues on multiple file servers . . . . . . . . . . .
Changing the configuration in print server mode . . . . . . .
Renaming the print server . . . . . . . . . . . . . . . . . . . .
Entering the password . . . . . . . . . . . . . . . . . . . . . .
Setting the queue polling time interval . . . . . . . . . . . . .
Using the Ethernet Card as a Remote Printer . . . . . . . . . . . . .
Changing the configuration in remote printer mode . . . . .
Changing the port number . . . . . . . . . . . . . . . . . . . .
Enabling/disabling Hunting . . . . . . . . . . . . . . . . . . .
Configuring the Ethernet Card in Auto PrintServer/Remote Mode
Chapter 3
installing on an Apple Ethertalk Network
Installation Overview . . . . . . . .
Renaming Your Printer . . . . . . .
Using Epson Namer . . . . . .
Selecting a Zone with Epson Zoner
Using Epson Zoner . . . . . .
Chapter 4
2-6
2-6
2-10
2-12
2-12
2-13
2-14
2-14
2-15
2-17
2-17
2-18
..................
..................
..................
..................
..................
3-1
3-2
3-2
3-6
3-6
Printing Documents with Windows NT
Installing on Microsoft Windows NT . . . . . . . . . . . . . . . . .
Requirements. . . . . . . . . . . . . . . . . . . . . . . . . . . .
Installation for Windows NT . . . . . . . . . . . . . . . . . . .
How to configure the printer . . . . . . . . . . . . . . . . . . .
4-1
4-1
4-1
4-2
Chapter 5 Installing in UNIX
Printing Documents with TCP/IP
Setting up . . . . . . . . . . .
Printing via lpr . . . . . . . .
Printcap file . . . . . . . . . .
Operation . . . . . . . . . . .
Protocol . . . . . . . . . . . . . .
...................
...................
...................
...................
5-1
5-1
5-3
5-4
5-5
Contents v
Set-Up Variations for Different UNIX OS . . . . . . . . . . . . . . .
General interface program file . . . . . . . . . . . . . . . . . .
Setup for SCO UNIX . . . . . . . . . . . . . . . . . . . . . . .
Set up for IBM AIX Systems (RS/6000) . . . . . . . . . . . . .
Set up for HP-UX System . . . . . . . . . . . . . . . . . . . . .
Appendix Specifications
Index
vi
contents
5-9
5-9
5-10
5-11
5-13
Introduction
The C82331* EPSON Type B Ethernet Interface Card is a
combination of hardware and software that lets you connect an
EPSON printer equipped with an optional Type B interface slot
directly to your network. Just install the Ethernet Card into your
printer’s optional interface slot (see your printer guide or contact
your EPSON dealer for applicable models), and connect it
anywhere on your network.
Use the EPSON Ethernet Card software to quickly and easily set
up the interface as either a print server or remote printer on a
Novell NetWare network, or as an Ethertalk (Apple) network
printer. Utility software is not needed for installation on a
Windows NT® (with DLC Transport protocol) or UNIX@ network.
The Ethernet Card can be directly connected to a l0BASE or
I0BASE-T network. It automatically selects the connected network
when powered on. In addition, it supports IEEE 802.3, IEEE 802.2,
and Ethertalk Phase II network protocols.
Supported Network Protocols and Features
The Ethernet Card supports the following network protocols:
Novell NetWare
Cl
Allows your printer to function as a print server or remote
printer. An additional mode, Auto PrintServer/Remote,
automatically switches between print server and remote
printer modes, depending on network conditions.
Cl
Services up to 32 print queues on up to eight file servers.
D
Provides the same functions as NetWare’s PSERVER program
in print server mode and RPRINTER in remote printer mode.
Introduction 1
AppleTalk
D
Supports Ethertalk Phase I and Phase II communication.
Ll
Provides easy installation with Epson Zoner and Epson
Namer utilities. Requires only the Epson Zoner utility for set
up in Ethertalk Phase II.
Cl
Works with optionally equipped PostScriptTM (EpsonScript)
printers.
UNIX
LI
Supports most major commands, including lpd, ftp, arp, and
Ping.
Cl
Requires no setup utility. Allocation of the IP address is
executed by sending the arp command directly from the host
computer.
Windows NT
0
Supports Windows NT 3.1.
Ll Compatible with Hewlett-Packard network printers.
Cl Easily configured with Print Manager.
2 Introduction
Ethernet Card Hardware
The Ethernet Card is an interface card that plugs into an EPSON
printer’s optional Type B interface slot. It has connectors for either
an Ethernet Thin Coaxial (l0BASE2) or an Ethernet Twisted-Pair
(l0BASE-T) network connection.
Ethernet Card Software
The interface software consists of the following programs used to
install and configure the card on either a Novell NetWare or
Ethertalk network:
Ll
EPSON Net!® for NetWare® (DOS®, Windows™ is an
easy-to-use menu-driven installation and configuration utility
for installing on a Novell NetWare network.
Ll
Epson Zoner is a utility for installing the Ethernet Card on an
Ethertalk (Apple) network.
Cl
Epson Namer is a utility that assigns a unique name to your
printer on an Ethertalk (Apple) network.
Introduction 3
EPSON Printers Supported by the Ethernet Card
EPSON’s Ethernet Card can be installed in a variety of EPSON
laser and dot-matrix printers.
Check you printer guide for a list of optional interfaces that can be
installed in your printer, or check with your local EPSON dealer. If
you are using an optional LocalTalk interface, see your interface
guide for information on compatibility.
Overview
This manual describes how to install, configure, and use your
Ethernet Card in a variety of network environments using the
following cable connections:
Cl
Ethernet Twisted-Pair (l0BASE-T)
Q Ethernet Thin Coaxial (l0BASE2)
Installation of the Ethernet Card in your printer is simple and is
described in Chapter 1. The following steps provide an overview
of the installation process.
1.
Install the Ethernet Card in your EPSON printer and connect it to
the network as described in Chapter 1.
2.
Follow the instructions for installation under your specific
network environment. Use the EPSON Net! software if you are
installing on a Novell NetWare network or use Epson Zoner
and Epson Namer (if required) if installing on an Ethertalk
network.
4 Introduction
Note:
LI The default interface setting is print server mode. If you are setting
up the card for use in the Novell Net Ware environment, you will
need to determine whether you want to set up the Ethernet Card in
print server, remote printer, or Auto PrintServer/Remote mode.
Cl If you want to operate you printer in more than one network
environment, install the interface for each network as described in
the following chapters.
Terms and Concepts
A node address is a set of numbers that gives an item a unique
identity, including a printer on a network.
The file server stores data required for the Ethernet Card to operate
as a print server. Each Ethernet Card print server has one master
file server, which you designate during initial setup.
A print queue is a directory on a file server where a print job is
stored as a file, until the print server sends the job to the assigned
printer.
A print server moves jobs from print queues to printers.
A remote printer is a shared printer connected elsewhere on the
network, but under the control of a NetWare print server.
Traditionally, a remote printer is connected to a network
workstation running NetWare’s RPRINTER, but the Ethernet
Card can also function as a remote printer.
A status sheet prints each time the Status Sheet button of the
Ethernet Card is pushed. If the Card is installed as a print server,
the status sheet lists the configurations of the Ethernet Card on
each network.
Introduction 5
Ethertalk is AppleTalk’s communication protocol governing
Ethernet transmissions.
A print spooler is an application that places print jobs or requests in
a queue.
TCP/IP (Transmission Control Protocol/Internet Protocol) is a
layer of protocols that provides communications between nodes
on a network.
ftp is a TCP/IP application protocol for file transfer.
lpd is a TCP/IP remote printing protocol application.
Resetting the Ethernet Card causes it to initialize. You can reset the
Ethernet Card in the following ways:
Cl
Switching the EPSON Ethernet Card-equipped printer off and
back on again.
Cl Using the reset function or buffer clearing operation from the
control panel of your EPSON printer.
6 Introduction
This chapter explains how to install the Ethernet Card in your
printer. Subsequent chapters describe how to install the interface
on your network. See the section that applies to your particular
network for more information.
Hardware Installation
The interface card must be installed in the printer, connected to the
network, and the printer turned on before you set up the software.
Your interface package includes:
Li The Ethernet Card
0
A coaxial Y-connector
Cl
Utility software disks for installing on a Novell NetWare
or Ethertalk (Apple) network
You must provide:
Cl
A network connection for the Ethernet Card (l0BASE or
l0BASE-T)
Cl
The host EPSON printer
Installing the Ethernet Card
1-1
You need to install the Ethernet Card in the optional interface slot
of your EPSON printer. Bee your printer guide for the location of
the optional interface slot.
The method of installing this interface card varies by printer. The
instructions for your printer are located in your printer manual in
the section on using printer options.
Note:
After installing the Ethernet Card, do not connect any cable to the
printer’s parallel port until after the card is booted and operating (green
status light on, red off. Otherwise, it may not boot properly.
Before installing this interface, locate the hexadecimal serial
number on the component side of the card. For convenience, write
the number here:
The serial number may be necessary for some software
installations to identify the Ethernet Card. When installing this
card on a Novell or Ether-talk network using the accompanying
setup utility software, this number is automatically recorded and
displayed.
1-2
Installing the Ethernet Card
Connecting the network cable
Once the board is installed in your printer, you must attach the
network cable to the interface. The Ethernet Card can accept either
a 10BASE-T or 10BASE2 network cable.
The Ethernet Card is an intelligent interface that can detect which
kind of cable is attached; you do not need to make any hardware
or software settings to specify the cable type. However, you must
not attach more than one cable at a time.
Attach the network cable to the appropriate connector on the
interface, as shown in the diagram.
Twisted-Pair (10BASE-T) Thin Coaxial (10BASE2)
Setting up the printer
Some EPSON printers require you to use the printer’s control
panel or DIP switches to select the interface you plan to use. The
method of making control panel settings on EPSON printers may
be called SelecType or Default-Settings Mode. See your printer
manual for instructions on making the necessary interface settings.
Installing the Ethernet Card
1-3
Ethernet Card Operation
The LED lights and the status sheet function can provide you with
important information about the operation of the Ethernet Card.
Lights
This section describes the Ethernet Card indicator light behavior,
including when you first turn on the host printer, during normal
conditions, and when errors occur. The Ethernet Card has two
LEDs (red and green) that together indicate the current operating
status of the Ethernet Card, and one LED that shows data
transmission.
/
Status lights
/
Data Transmission light
/
/ /-i?R 0
l
0+
Here is a brief explanation of indicator light activity
Red
Green
Function
6
8
Waiting for printer initialization
(lights flash simultaneously)
.*,
0
a;
Recognizing the network
(lights flash alternately on and off)
0
0
Normal operating mode
0
0
Error has occurred
On 0 Off 0 Flashing 6
1-4
Installing the Ethernet Card
+
0
Printer Initialization
After Ethernet Card installation, the red and green status lights on
the interface flash simultaneously during printer initialization.
Network recognition and normal operation
At start up, the Ethernet Card checks all active NetWare file
servers. While the card is recognizing the network, the red and
green status lights flash alternately on and off.
After recognizing the network, the Ethernet Card is ready to send
and receive data. In this mode, only the green status light is lit.
Data Transmission light
When the Ethernet Card receives a data packet, it automatically
recognizes the protocol of the packet and switches to that protocol
mode. When the card sends data, the Data Transmission light
(green) is lit.
Report printing
When the Status Sheet/Error Resume button is pressed, the
connected printer prints out a status sheet showing the current
card configuration.
Status Sheet/Error Resume button
Installing the Ethernet Card
1-5
If normal operation is suspended for any reason, the Ethernet Card
enters an error state (red and green status lights are lit). To obtain
a printout describing the error, press the Status Sheet/Error
Resume button once. After printing the report, the card returns to
its normal operating mode (green status light is lit).
Note:
if the status sheet does not print, first make sure that the printer is on
line. If it is on line but the status sheet still does not print, you will have
to reset the printer by turning it off and back on. After turning off the
power, wait at leastfive seconds before turning it back on; otherwise you
may damage the printer.
Report printing is available after the printer is turned on and has
completed its initialization routine. The Status Sheet/Error
Resume function is not available under the following conditions:
Cl
The printer is off line or not ready
Cl
The printer has started printing
Under normal operating conditions, the status sheet will print in
one of the following emulation modes: ESC/P*-**, ESC/Page, PCL
(LJ-2P, 3/P/Si, LJ-4P), GL (HP-GL, HP-GL2, EP-GL), PostScript
(EpsonScript), PR-201, GQ.
Using the EPSON PostScript card
If your printer has an EpsonScript (PostScript) card installed, allow
about a minute for the printer to initialize before trying to install
or configure the Ethernet Card on the network. The Ethernet Card
may not respond if initialization has not been completed.
Network installation
See the appropriate chapter in this guide for instructions on
installing the card on a specific network.
1-6
Installing the Ethernet Card
Chapter 2
Installing on Novell NetWare
The Ethernet Card can function as a print server or remote
printer running under Novell NetWare. It also has an automatic
print server/remote printer mode that allows it to switch modes
depending on network conditions. The following sections
describe how to configure the interface card to operate in each
of these modes.
Ethernet Card Configuration Software
The Ethernet Card comes with EPSON Net! for NetWare,
EPSON’S proprietary network printer management utility
program. The disk includes a Windows-based version and a
DOS version of this easy-to-use, menu-driven program.
Use the appropriate version to set up your card as a print server
or a remote printer. The default setting is print server mode. You
must use the EPSON Net! network printer management software
to add or delete queues, change port configurations, rename the
print server, configure the interface to service queues on other
file servers, and other tasks.
Installing on Novell NetWare
2-1
Before setting up
Lt
First decide whether you want to use the interface card as a
dedicated print server or remote printer, or in Auto
PrintServer/Remote mode.
Lt
Install the Ethernet Card and connect it to the network
following the instructions in Chapter 1. The card must be
connected to the network and the host printer must be turned
on before setting up.
Installing the utility software
Follow these steps to install the EPSON Net! utility software.
for Windows:
2-2
1.
Make sure Windows is running and the Main window is open.
2.
Insert the EPSON Net!@ for NetWare’ disk in drive A (or B).
3.
Choose Run from the File menu
4.
Type a:windows/install (or b:windows/install) and click OK.
5.
Follow the instructions on the screen.
6.
After installation is completed, Epson Net!(nu) appears in the
Epson Net! group.
Installing on Novell NetWare
For DOS:
At a workstation with a high-density disk drive, insert the EPSON
Net! for NetWare diskette in drive A (or B). Use the DOS COPY
command (copy a:filename. *) to copy the following files to a
network directory or to your hard drive:
EPNWDE.EXE!
EPNWDE.DAT
Note:
Cl Before running the EPSON Net! utility, you mustfirst log on the
NetWare network with supervisor privileges.
Cl
This utility requires a minimum of 480 KB of conventional memory.
Print server mode
The default setting for the Ethernet Card is print server mode. In
this mode, the card performs all print server functions and can
service up to 32 queues and eight file servers. No VAP
(Value-Added Process) or NLM (NetWare Loadable Module®) is
required. The network user sends a print job from a workstation,
the job is moved across the network to the file server, and it is
placed in a print queue. When the printer is ready, the print server
moves the job from the print queue to the printer.
The Ethernet Card operates like any Novell NetWare print server,
servicing the assigned queues in a round robin fashion. In queues
of the same priority, the Ethernet Card services the first job in a
queue before those in a lower priority queue. The card also
supports encrypted passwords.
This mode provides the highest printing speed while retaining the
control, security, and convenience of a NetWare print server.
Installing on Novell NetWare
2-3
Remote printer mode
As a remote printer, the Ethernet Card emulates a workstation
running Novell’s RPRINTER program, and operates under the
control of a Novel NetWare print server. The print server can be
either a dedicated workstation running PSERVER or a file server.
At power-up, the interface will attempt to attach to a print server
(elsewhere on the network) and act as a particular printer of that
print server. To do this, it needs to know which print server to
attach to, and which printer of that print server to use. This is
similar to the need to specify these parameters in the RPRINTER
command line (or to interactively choose them from the
RPRINTER program).
You can set up these parameters on the Ethernet Card with the
EPSON Net! utility. Once the interface card is set up, it will store
these settings, which means that you will normally only need to
do this once at the time of installation. However, as with all Novell
remote printers, the card’s print speed is slower in remote printer
mode than in print server mode.
The main advantage of remote printer mode is that connection to a
file server is not required, making this mode desirable in
installations with limited available file server connections. Each
NetWare print server can support up to 16 printers and requires
only one file server connection.
2-4
Installing on Novell NetWare
Auto PrintServer/Remote mode
In Auto PrintServer/Remote mode, the Ethernet Card provides
automatic switching between print server and remote printer
operation, depending on network conditions. If the Ethernet Card
has the same name as the main Novell print server on your
network, it detects the presence of the print server and operates as
a remote printer. If your primary print server becomes
unavailable, the Ethernet Card automatically switches modes to
provide print server backup.
Each Ethernet Card, when running in print server mode, requires a
connection to a file server. For more information about operating
the Ethernet Card as a print server, see the following section.
As a remote printer, the Ethernet Card emulates a workstation
running Novell’s RPRINTER program. For more information
about this mode, see “Using the Ethernet Card as a Remote
Printer.”
Installing on Novell NetWare
2-5
Using the Ethernet Card as a Print Server
Each Ethernet Card, when running in print server mode, requires a
connection to a file server. In addition, the Ethernet Card can
service up to 32 queues and eight file servers in print server mode.
Make sure the host printer is turned on and the interface is
connected to the network, then follow these steps to configure the
Ethernet Card.
Note:
Before running the EPSON Net! utility, you must log on to the selected
file server with supervisor privileges before you can configure the
Ethernet Card.
Setting up queues on a file server
To set up queues on a file server in print server mode, follow the
steps below. To configure the printer as a remote printer, see
“Using the Ethernet Card as a Remote Printer” later in this
chapter. For information on using your printer as a print server in
Auto PrintServer/Remote mode, see page 2-18.
1.
From any NetWare workstation, log on with supervisor
privileges.
Note:
The following examples are based on the Windows version of the
setup utility. However, the menus and procedures used in
configuring the Ethernet Card are the same for both versions of the
utility.
2-6
Installing on Novell NetWare
2.
Run the EPSON Net! utility program to configure the card. After
searching the network, the following dialog box appears.
3.
Highlight the printer you want to configure from the list and
then click Open. The following dialog box opens, giving you
important information about the status of your printer.
Installing on Novell NetWare
2-7
4.
For additional information, click the Printer Status button.
Click OK to exit.
5.
2-8
From the NetWare Status dialog box, click Edit to configure the
printer. The NetWare config dialog box appears.
Installing on Novell NetWare
The default setting is print server mode. You can also
configure the printer to work in remote printer or Auto
PrintServer/Remote mode. For more information, see the
related sections later in this chapter.
6.
The default printer name appears in the Print Server name box.
If you want to rename the printer, simply type the new name
into the box.
7. To assign a print queue to your print server, click Add. The
Add queue dialog box appears and shows the queues that are
available to the file server.
Note:
If you want to set up queues on multiple file servers, see the
following section.
8.
Select a print queue from the drop-down list, or create a new
queue by typing its name in the Queue field.
9.
Set the priority level from the Priority box. The available options
are from 1 to 10, with 1 having the highest priority.
10. Click OK.
Installing on Novell NetWare
2-9
11. Repeat steps 7 through 10 if you want to add additional print
queues to the print server.
12. To save your settings, click Save.
Caution:
Once you make changes to the Ethernet Card, you must wait for
at leastfive minutes before turning off or rebooting your printer.
Setting up queues on multiple file servers
The EPSON Net! utility allows you configure print queues on
multiple file servers. However, you must have supervisor
privileges and the correct password for each file server.
Follow these steps to configure multiple file servers.
1.
2-10
Click Add in the NetWare config dialog box.
Installing on Novell NetWare
2.
Select the file server you want to attach the printer to from the
File Server list. If you have not already logged on to the
selected file server, the Login Fileserver dialog box appears.
3.
Enter a user name with supervisor privileges and the password
and click OK.
4.
Select the file server you want to attach the printer to and then
select a print queue from the Queue list box, or create a new
queue by typing a name in the box. Next, click OK.
5.
Repeat steps 1 through 4 if you wish to attach additional file
servers to the printer.
6.
To save your settings and exit EPSON Net!, return to the
NetWare config dialog box and click Save.
7.
To delete a queue, highlight the queue in the NetWare config
dialog box and then press Delete. At the prompt, click OK.
Installing on Novell NetWare
2-11
Changing the configuration in print server mode
In print server mode, you can use the EPSON Net! utility to do the
following:
Cl
Rename print server
0 Enter password
Cl
Set queue polling time
Before editing the Ethernet Card configuration with EPSON Net!,
you must first log on to the network with supervisor privileges.
Renaming the print server
Always use EPSON Net! to rename the printer on the master file
server. Never use PCONSOLE to perform this operation.
1.
Type the new print server name into the Print Server name box.
You can enter up to 32 characters. The following characters are
notallowed:Ctrl/\:;,* I + = [ ] ” and space. A period (.) is
allowed if it is not the first character.
2. Click Save.
Note:
If the first part of the new printer name is the same as the product name,
the last four characters of the the hexadecimal serial number will affix
themselves automatically to the end of the new name.
2-12
Installing on Novell NetWare
A password is not required for Ethernet Card operation. However,
if you wish to connect to a restricted file server, you will need to
use EPSON Net! to enter the encrypted password.
To enter the password, follow these steps:
1.
From the NetWare config dialog box, click Password. The
following dialog box appears.
2.
Type in the same password that you used to log on to the file
server and click OK.
Caution:
Once you make changes to the Ethernet Card, you must wait for
at least five minutes before turning off or rebooting your printer.
Installing on Novell Net Ware
2-13
Setting the queue polling time interval
Use EPSON Net! to change the interval at which the parallel
port(s) check queues for waiting print jobs. To reduce network
traffic, you can change the polling interval from 1 second up to 90
seconds. The default setting is 5 seconds.
1.
From the NetWare config dialog, enter a value, in seconds, from
1 to 90 in the Poll Time (sec) box.
2.
Click Save to save your setting changes.
Caution:
Once you make changes to the Ethernet Card, you must wait for
at least five minutes before turning off or rebooting your printer.
Using the Ethernet Card as a Remote Printer
Each Ethernet Card that is set up as a remote printer needs to be
defined on any Novell print server. When defined, the remote
printer may have its printer port defined, such as LPT1 or COM2.
The Ethernet Card currently ignores this setting, but to maintain
compatibility, you should define a remote printer as LPT1.
Before running EPSON Net!
Before using the EPSON Net! setup utility to install the Ethernet
Card as a remote printer, you must do the following:
1.
From any NetWare workstation, log on to the network with
supervisor privileges.
Note:
Menu screens will differ slightly on NetWare 4.x, and Bindery
Emulation has to be selected. Press F4 to switch between Director y
Services and Bindery Emulation.
2-14
Installing on Novell NetWare
2.
Enter PCONSOLE.
3.
From the Available Options screen, select Print Server
Information. Next, select the print server name from the Print
Servers list and press Enter.
4.
From the Print Server Information list, select Print Server
Configuration and press Enter.
5.
Select Printer Configuration from the menu and then press Enter.
6.
From the Configured Printers List, highlight a port number and
press Enter.
7.
From the Printer Configuration screen, enter the printer name.
Next, highlight the Printer Type and select LPTl.
8.
Press ESC; then press Enter to save changes.
9.
Select Queues Serviced by Printer from the Print Server
Configuration menu and assign a queue to the print server
port from the Available Queues list.
10. Press ESC to exit.
Changing the configuration in remote printer mode
You can change the following parameters in remote printer mode
using EPSON Net!:
Cl
Printer port assignment
Cl Enable/disable Hunting
Installing on Novell NetWare
2-15
Using EPSON Net!
2-16
1.
Run EPSON Net!.
2.
Select the printer you wish to configure and click Open.
3.
Click Edit to open the NetWare config dialog box.
4.
Click the Remote Printer option button under Operating
Mode to select the remote printer mode.
5.
Click on the printer you want to configure from the Print Server
name list box or type in a new name for the printer.
6.
Click Save to save your changes.
Installing on Novell NetWare
Changing the port number
Use the EPSON Net! utility to change the parallel port number for
the remote printer as follows:
1.
Enter the number for any available port in the Port No. box. The
available settings for Novell NetWare versions 3.x and below
are from 0 to 15. For Novell 4.x and higher, the available
settings are from 0 to 254.
2.
Click Save to save the port setting.
Enabling/disabling Hunting
You can use EPSON Net! to turn the Ethernet Card’s Hunting
feature on or off. When Hunting is on, the interface card connects
to the first available unassigned active port. This feature is useful if
the Novell print server has many printer ports. To change this
setting, follow these steps:
1.
Click On under Hunting to enable the function. The default
setting is Off.
2.
Click Save to save the setting.
Installing on Novell NetWare
2-17
Configuring the Ethernet Card in Auto
PrintServer/Remote Mode
When using the Ethernet Card-equipped printer in Auto
PrintServer/Remote mode, you need to configure it for both print
server and remote printer operation. For information on changing
the various print server and remote printer settings, see the
appropriate sections earlier in this chapter.
Before you configure the card, first make sure the host printer is
turned on and the interface is connected to the network. Then log
on to the selected file server with supervisor privileges and follow
these steps:
2-18
1.
Run EPSON Net!.
2.
Select the printer you wish to configure and click Open.
3.
Click Edit to open the NetWare config dialog box.
4.
Click the Auto PrintServer/Remote option button under
Operating Mode to select auto switching mode.
Installing on Novell NetWare
Chapter 3
Installing on an Apple Ethertalk
Network
This chapter describes how to configure the Ethernet Card for use
on an Apple Ethertalk network. Use the Epson Zoner and Epson
Namer utilities to configure and install the interface card.
Before using the Ethernet Card interface on an Ethertalk network,
make sure:
Ci
The Ethernet Card is installed in the printer.
D
The printer contains PostScript, which means that the optional
EpsonScript card or module must be installed.
Installation Overview
To set up the Ethernet Card, you will need to do the following:
Ci
Install the Epson Zoner and Epson Namer setup utilities.
Lt
Rename your printer using Epson Namer.
CI
Select a zone for your printer with Epson Zoner.
Note:
Epson Zoner
works
only on a Phase 11 Ethertalk network.
Installing on an Apple Ethertalk Network
3-1
Renaming Your Printer
Becuase your printer has a defualt name, you will need to rename
it to avoid having multiple printers on the same network with the
same name. Choose any name you like for your printer.
The Epson Namer utility renames a selected AppleTalk device
(printer). With this program, you can rename devices located in
different zones on the network, including the local zone.
Note:
Cl If your printer is to be serviced by a print spooler, you shouldfirst
rename the printer before configuring the spooler.
Q
Epson Namer provides balloon help for System 7.x users. Turn on
Show Balloons in the Help menu.
Using Epson Namer
To rename your printer, first copy the Epson Namer program from
the EPSON Net! for Macintosh floppy disk to your hard drive.
Note:
Connection Manager, which is part of the Communications Toolbox,
must be loaded before running Epson Namer.
Follow these steps to rename your printer.
3-2
1.
Make sure the Ethernet Card-equipped printer is on and the
printer is ready. After turning on the printer, wait at least a
minute to allow for PostScript initialization.
2.
Insert the EPSON Net! for Macintosh disk into your computer,
and double-click on the disk icon if necessary. Copy the utility
to your hard disk. You can also run the program from the
floppy.
Installing on an Apple Ethertalk Network
3.
Double-click on the Epson Namer icon to start the utility
program. After Epson Namer searches your network, the
following screen appears. You may need to scroll through the
list of zones to find the one that contains your printer.
sni%
Device Types:
Select Printer:
AppleTalk Zones:
New Name:
hd TP System
hd TP System 2
hdTP -NW
4.
Select the name of your printer’s installed driver from the
Device Types list. For example, AT-LP1500ART.
Select Printer:
EPL-8000-FFOF
New Name:
Installing on an Apple Ethertalk Network
3-3
5.
Choose the zone, if any, that contains the printer you want to
rename from the AppleTalk Zones list.
6.
Select the printer you want to rename from the Select Printer list.
If the zone has only one printer of the type specified in the
Device Types list, that printer will be selected automatically.
1 Device Tupes.:
AppleTalk Zones:
New Name:
hc TP SWR ether
IEPL-8000-FFOF
I
hd TP HDANGER
(Done)
7.
Enter a new name in the New Name box. The name can be up to
32 characters long.
Select Printer:
Device Types:
AppleTalk Zones:
New Name:
1 hc TP SWR ether
3-4
(Help)
I
Allison’s printer
Installing on an Apple Ethertalk Network
Note:
Do not use a name that is already assigned to an existing printer.
8.
Click Rename. After a few moments, the new name will appear
in the Select Printer list.
Device Types:
Select Printer:
I
AppleTalk Zones:
New Name:
Allison’s printed
I
(vpnompll
Note:
Q if you have installed several printers of the same type on the network,
they may all have the same name in the Select Printer list. To
differentiate between printers, highlight a printer name and then
click Identify. The selected printer will print a page to identify itself
providing the printer name, type, and zone (if any). Rename the
printer and then repeat the process, if necessary, for other printers on
the network.
Cl
Clicking Reset returns the printer to its default name. For example,
“Epson.”
9.
Click Done to exit Epson Namer.
After changing printer names, you will need to notify everyone on
the network of the new names. Network users will then have to
reselect the renamed printer with the Chooser.
Installing on an Apple Ethertalk Network
3-5
Selecting a Zone with Epson Zoner
A zone is a group of users, computers, and devices, including
printers. Zones can be grouped according to physical location, and
would include, for example, all of the printers in a particular
building. Zones can also be grouped logically, according to work
groups or departments. For example, Zone 1 could contain all of
the printers used by a company’s marketing department or
publications group.
Use the Epson Zoner utility to assign your printer to a specific
zone on a Phase II Ethertalk network.
Note:
Epson Zoner cannot be used on a Phase I network.
Using Epson Zoner
Follow these steps to select a zone for your printer.
3-6
1.
Make sure that your Ethernet Card-equipped printer is on and is
ready. After turning on the printer, it will take about a minute
for PostScript to initialize.
2.
Insert the EPSON Net! for Macintosh disk into your computer.
Double-click the disk icon to open it, if necessary.
3.
Create a new folder for Epson Zoner, if desired, and then copy
the utility to your Macintosh.
Installing on an Apple Ethertalk Network
4.
Double-click on Epson Zoner to expand the utility. Next,
double-click the Epson Zoner icon. After searching your
network, Epson Zoner displays the following screen.
5.
Highlight your printer name in the Printer list. If there are many
devices on the network, you may have to scroll through the
list to find your printer.
If your printer is not in the list, click on a different zone in the
Zone list and check for your printer in the Printer list.
6.
Make sure your printer is highlighted and then select the
network zone that you want your printer to appear in from the
Zone list.
Note:
The default zone appears as an asterisk (*) in the Zone list.
7. Click Set to assign your printer to the selected zone.
If you are assigning a zone to more than one printer, repeat
steps steps 5-7 for each printer.
Your printer will stay in the new zone as long as the zone is
available.
Installing on an Apple Ethertalk Network
3-7
8.
Click Quit to exit Epson Zoner.
Be sure to notify all network users of the new zone for your
printer. They will have to reselect the rezoned printer in the
Chooser.
3-8
Installing on an Apple Ethertalk Network
Chapter 4
Printing Documents with Windows NT
The Ethernet Card provides network printing support in the
Windows NT environment with DLC Transport protocol, and can
be configured without a special setup utility.
Installing on Microsoft Windows NT
Requirements
Before you can install the Ethernet Card in the Windows NT
environment, make sure that Windows NT is installed with DLC
protocol.
Installation for Windows NT
1.
Run Windows NT.
2.
Double-click on the Control Panel icon.
3.
Double-click on the Networks icon.
4.
Click on the Advanced box.
5.
Install the DLC Transport protocol and Driver by choosing
Install Software from the Advanced Network screen.
6.
Reboot your system for the installation to take effect.
Note:
To verify that the DLC protocol is installed correctly, check the list
of installed Network Software in the Networks dialog box.
Printing Documents with Windows NT
4-1
How to configure the printer
Follow these steps to configure the printer:
1.
Select Print Manager from the Main group.
2.
Choose Create Printer from the printer menu at the top of the
screen. The Create Printer dialog box appears.
3.
Enter a name for the printer in the Printer Name field.
4.
Select the printer driver from the Driver pull-down menu.
5.
Select Other from the Print To pull-down menu. The Print
Destination dialog box appears.
6.
Choose [HP Network Port] from the Available Print Destinations
list. The Add an HP Network Peripheral Port dialog box
appears.
Note:
If HP Network Port does not appear as a choice in the dialog box,
then the DLC Transport Protocol and Driver are not installed. Go to
the installation for Windows NT section above for detailed
installation instructions.
7.
Enter a name for the port in the Name field.
Note:
The name must not be identical to an existing port, such as LPT1, or
any other existing DOS device.
8.
4-2
Select the LAN Hardware Address (Node Address) from the
Card Address list. This address matches the one listed under
Node Number on the status sheet.
Printing Documents with Windows NT
9.
Click OK to exit the Add a Network Peripheral Port dialog box.
Note:
You may share the new printer if you wish. To do so, click the
Share the Printer on the Network box. The share name
defaults to the printer name and can be changed if necessary.
10. Click OK to exit the Create Printer dialog box. A dialog box
from the selected model’s device driver appears.
11. Set any printer-specific options, and click OK.
You are now ready to print.
Printing Documents with Windows NT
4-3
Chapter 5
Installing in Unix
The Ethernet Card supports many standard UNIX commands and
can be configured from a host computer without using a special
setup utility.
Printing Documents with TCP/IP Protocol
The Ethernet Card is able to function as a remote printer on
systems using TCP/IP Ethernet transfer with Berkeley’s popular
lpr remote printing protocol, or standard ftp (file transfer protocol).
All devices operating with TCP/IP have to be assigned a unique
“IP Address node.” This address must be different to that assigned
to any other device to which your network is capable of
communicating. This unique address acts like a telephone number,
enabling all other devices on the network to be able to “dial up”
and “talk to” the Ethernet Card, as long as they know its number.
There are conventions surrounding how to make up an IP address,
which are discussed later. In the most complex case, where a
network is capable of communicating with other networks
worldwide, it is necessary to have some of the numbers assigned
by an international body that coordinates the numbering.
Installing in UNIX
5-1
Unless the network is not yet in existence, however, an address
will already have been given to the network section that the
Ethernet Card is to be plugged into. In this case, the interface card
should be given an address that has the first three numbers of the
address the same as the other devices on that network section, and
be given a unique last (4th) number, different to that of any other
device on that network section. The network supervisor should be
able to advise what addresses are in use at the site.
How to input the IP Address
Use arp to set the IP address for the Ethernet Card, as described
below:
1.
Obtain a status sheet for the Ethernet Card (for Node addrs).
2.
Enter command ARP-S IP ADDRS NODE Addrs.
For example:
ARP-S 133.200.3.181 00:00:48:92:DA:35
or
PING the new IP address.
For Example:
PING 133.200.3.181
The Ethernet Card will be set to this IP address.
Caution:
Two different Ethernet cards should not be active on the same
network until their addresses have been set, otherwise they will both
have the same address (which will confuse the network).
5-2
Installing in UNIX
Updating Hosts file
Once the IP address is defined, the file /etc/hosts needs to have
this IP address and host name added. For example:
132.147.69.4 Allison
Testing the connection
Use ping to test if the Ethernet Card is responding. For example,
send the following command:
PING Allison
or
PING 132.147.69.4
If the card responds, you are ready to print. If not, check the IP
address on the status page and details in /etc/hosts file.
Note:
If your host does not support any devices where the first three numbers of
the internet address are different from the network you are working with,
then you may temporarily change the Net Sub Mask in your-file ‘hosts.‘
The file is located on the file server as well as on the workstation you are
sending the print job from. After you have set up the network interface,
change the Net Sub Mask back to its previous setting. A Net Sub Mask of
000.000.000.000 will allow any inter-net address on the system.
Printing via lpr
Once the internet address has been assigned to the Ethernet Card,
all the host computers that will be using it to print through need to
have its address added to their “telephone directories.” The
method for achieving this differs from system to system, and so
the systems administrator should be consulted.
Installing in UNIX
5-3
5-4 Installing in UNIX
Operation
After setting up the card, you can use the routine lpr command
from any host to direct a print file to the Ethernet Card. The card
does not have to interpret any of the incoming print data
whatsoever, allowing binary image files, font download files, as
well as ASCII text to be printed transparently.
The interface card is able to handle many separate communication
channels simultaneously. Unless coupled with a compatible
spooling unit, the Ethernet Card will not have any disk-spooling
capability, so incoming print requests from other hosts when the
card is already servicing a print job are “stacked,” and serviced in
rotation.
The Ethernet Card will respond to an lpq print query by sending
back details of the current print job, as well as all stacked prints. If
a connection request is received after all available connections are
taken up, the card will not respond to the connection attempt.
Note:
An lpq enquiry may show “missing” stack entries; for example, only jobs
2, 5, and 7 appear. The missing entries (3,4, and 6) will be print jobs
sent by a different protocol, such as Novell or Ethertalk.
Printing a file
At the prompt type (example):
lpr -Allison filename or lp-d Allison
Installing in UNIX
5-5
For programmers’ information, the Ethernet Card TCP/IP mode
responds only to arp packets and to TCP/IP connections made to
port (socket) x0203, and ftp socket. Connection attempts to other
port addresses will meet with no response. All data arriving at this
port is assumed to be following valid lpr protocol, and therefore
you cannot just send data to this port.
Instead of lpr, which may strip control characters, (use - 1 to avoid
this), ftp may be used to print. Enter ftp, then open the Ethernet
Card by entering its host name (for example, “open Allison”). A
file may be printed simply by sending it (“send filename”). You
can use console commands or Scripts to automate this process, and
create ftp spool queues.
Both ftp and lpr have output filters available, which are capable of:
LI
translating a UNIX line-end to a normal line-end by inserting a
carriage return byte
Cl
sending a form feed at the end of a file in order to eject a page.
The means of invoking these filters differ between ftp and lpr as
follows:
ftp (line ending)
As default, ftp runs with binary file transfer. This may be changed
to ASCII file transfer by simply entering the command “ASCII” on
the ftp command line. When in ASCII mode, the Ethernet Card
will convert incoming UNIX line-ends to include a carriage return.
To change back to BINARY mode, enter the command “BINARY”
on the ftp command line.
5-6
Installing in UNIX
ftp (Form feed)
The Ethernet Card will append a form feed to the end of the print
job if the destination file is given the name of “FEED” or “feed.”
For example, to send a text file called “txtfile” to the Ethernet Card
in ASCII mode and append a formfeed, use the following ftp
commands:
ascii
send txtfile feed
Ipr-Filters
Filters for lpr are controlled by the name given to the remote
printer. When setting up an lpr printer entry, a name is entered for:
Cl
the local printer name to be redirected
Cl
the host name of the station to which the print is sent
Cl
the remote printer name (name of the printer port on the
remote station).
It is this last name that the Ethernet Card uses to determine which
filters to use.
Many different remote printer names may be set up, all directed to
the same Ethernet Card remote host, and each is given a different
local printer name to be redirected. Different types of print jobs
may thus be sent to different printer names, which will then all
print out on the same printer, through the same Ethernet Card
interface, but using different filters.
Installing in UNIX
5-7
Note:
tl To eliminate confusion, you should give the local and remote
printers the same name, except where an existing local default
name is required.
Q
Use the local printer name as the lpr entry on the lpr command
line to direct the print.
The printer names used to invoke the different filters are as
follows:
1pb
1Pa
lpbf
lpaf
-
Binary files (no filters)
ASCII files (carriage returns at line ends)
Binary file with form feed at file end
ASCII file with form feed at file end
All other printer names will be treated the same as lpb.
Note:
Some versions of lpr strip out all control characters and carriage
return characters from a file before it is sent, making it unsuitable for
bit-imagefiles or font downloadfiles. In many cases the “-l” option
may be used on the lpr command line to prevent this happening
(worth tying even if this option is not documented).
The following is an example of sending a text file “txtfile” via lpr
with a form feed appended:
lpr -Plpaf txtfile
5-8
Installing in UNIX
Set Up Variations for Different UNIX OS
Here are some scripts and setup examples for different types of
UNIX systems:
General interface program file
$NETPRINTER=“132.200.69.4”
copies=$4
shift;shift;shift;shift;shift;
files&~$WJ
i=l
while [$i -1e $copies]
do
for file in $files
do
/bin/cat/tmp/ftp.$$<!
binary
put $file
quit
!
/usr/bin/ftp-n $NETPRINTER /tmp/ftp.$$
/bM-m/~p/ftp.$$
done
i=expr $i+l
done
exit 0
*end of script*
Installing in UNIX
5-9
Set up for SCO UNIX
Some UNIX systems, such as SCO, do not support the Berkeley lpr
print function, The following script allows you to print from
within some applications using ftp, which is supported on most
TCP/IP systems. The script has been tested for SCO UNIX, but
may require modification for other systems.
In SCO UNIX the original printer model scripts are located in
directory usr/spool/lp/model.
The process of creating a printer using the SCO administration
program (SYSADMSH) copies these files to:
/usr/spool/lp/admins/lp/interfaces.
You can place the script directly into your interface directory.
The following script should have the same name as the host name
you gave the printer.
TEMPFILE=/tmp/ftpprint.$$
printer=‘laserprt$(O)’
/usr/spool/lp/model/standard”$B”$TEMPFILE
ftp -n $printer<<<END
binary
send $TEMPFILE
quit
rm $TEMPFILE
exit
5-10
Installing in UNIX
This script intercepts the print command and runs another printer
interface script, in this case the printer “standard” using the same
options ($@), redirecting the output to a temporary file. The script
then opens an ftp session with the printer, sets binary mode and
sends the temporary file to the printer. The temporary file is then
removed.
Note:
The name of the model and interface directories used by your UNIX
system may differ from SCO.
Set up for IBM AIX Systems (RS/6000)
AIX implements the lpr function, which is set up using the SMIT
utility.
1.
Set up the print server as detailed in the manual. To set the IP
address you can use arp and ping.
2.
Modify the \etc\hosts file to include the print server, and verify
network operation using ftp to copy a file to the print server.
3.
Invoke SMIT as the super user and follow the sub menus as
below:
select “DEVICES”
“PRINTER/PLOTTER”
“MANAGE REMOTE PRINTER SUBSYSTEM”
“CLIENT SERVICES”
REMOTE PRINTER QUEUES”
“ADD REMOTE QUEUE”
4.
You will finally see a screen similar to the one below. Fill in the
data as required.
Installing in UNIX
5-11
Name of Queue
Queuing discipline
Activate the queue
Destination Host
Pathname short filter
Pathname long filter
Name of queue for remote printer
5.
EPSON
first come first serve
Yes
11.22.33.44
C8233l_PRT
Check the entry for your queue under Remote Printer Queue
devices. It will list the queue name and printer capabilities.
You may then have to start the queue (use MANAGE LOCAL
PRINTER SUBSYSTEM, AND LOCAL PRINTER QUEUES).
The /etc./qconfig file will look like this:
epson:
device =epsonprn
up=true
host = 200.200.200.99
rq = C82331_PRT
epsonprn:
6.
5-12
backend=/usr/lp/rembak
You may also specify a Remote Device = lpa:, lpaf:, etc. for using
filters, (see the “lpr-Filters” section earlier in this chapter).
Installing in UNIX
Set up for HP-UX System
There are two methods of printing from HP UX, ftp and rlp (lpr).
Both are set up using SAM. Enter the IP and Host name in the
/etc/hosts file before starting SAM.
FTP SCRIPT
Type:
lpshut
lpadmm -p(spoolername) -m(modelscript)
-v/dev/null
accept (spoolername) enable (spoolername)
lpsched
Then create a model script:
vi/usr/spool/lp/model/lan.model
and enter:
MODEL=‘basename $0
REALMODEL=‘echo$0 /sed -e “s%$MODEL %model.lan
/$MODEL%”
# This variable may be initialized when the script is installed
in the spooler.
# If not use the name:
PERIPH=
if [“$PERIpH”=““]
then
PERIPH=$MODEL
if
# Path for output of the original model
TMPPATH=/tmp/$MODEL.data
# invoke original model and write to temporary file
$REALMODEL “$@‘TMPPATH
Installing in UNIX
5-13
# Log in to peripheral switch to binary and send temporary file
( echo user xx
echo binary
echo put $TMPPATH
echo bye
) ftp -i -n $PERIPH
ERRSTAT=$?
/bin/rm $TMPPATH
exit $ERRSTAT
* End of Script *
RLP SET UP
On the printer definition page of SAM use the following settings:
Printer Name:
Remote System Name:
Remote Printer Name:
Remote Council Model:
Remote Status Model:
Make System Default:
Printer Class:
Restrict Council:
Remote Printer on BSD system:
5-14
Installing in UNIX
Any name
Use the host name in /etc/hosts
nothing or ‘lpa ‘, ‘lpaf’ etc if using
filters.
/etc./true
/etc/true
Enter as appropriate
Leave out
Leave out
Leave out
Appendix
Specifications
b’WifOl?m8nfCY/
Operating temp.:
0° to 70°C (32° to 158°F)
Storage temp.:
-30° to 70°C (-22° to 158°F)
Operating humidity:
20% to 80%
Storage humidity:
5% to 95%
N8fVb’Ofk sOffWCYr8
Novell NetWare 2.15x or later, 3.x, and 4.0
Ethertalk (AppleTalk)
lFth8m8f N8fWOfk HUrdwUr8
IEEE 802.3 l0BASE RG-58A/U coaxial cable via BNC connector or
IEEE 802.3 l0BASE-T straight-through twisted pair modular cable
via RJ45 connector
~8QU/UfOt’y
Approvals
Safety:
UL/CSA approved
EMI:
FCC Class A
Relicrbility
MTBF:
10,000 hours (power on, 100% duty)
Specifications A-l
Index
A
Add a Network Peripheral Port
dialog box, 4-3
Add queue dialog box, 2-9
Address, IP, 2, 5-1 -4, 5-11
Apple, 1, 3
Apple Ethertalk network, 1-2,
1-2,3-1
AppleTalk,
defined, 6
device, 3-2
installing on, 3-1
AppleTalk zones, 1-2,3-2,3-4
arp, 2, 5-2, 5-6
ASCII
command, 5-6
file, 5-8
mode, 5-6-7
text, 5-5
Auto PrintServer/Remote mode,
1, 5, 2-1 -2, 2-5 -6, 2-18
B
Berkeley lpr, 5-1, 5-10
Bindery Emulation, 2-14
Button, Status Sheet/Error
Resume, 5, 1-5-6
Ethernet Thin Coaxial
(l0BASE2), 3-4, 1-3, A-1
Chooser, 3-5, 3-8
Coaxial
cable, 1-1
Y-connector, 1-1
Communications Toolbox, 3-2
COM2, 2-14
Configuration, changing
in Auto PrintServer/Remote
mode, 2-18
in print server mode, 2-12-14
in remote printer mode,
2-15-17
Configuring port, 2-1, 2-3
Connection Manager, 3-2
Connecting network cable, 1-3
Create Printer dialog box, 4-2-3
D
Data packet, 1-5
Data Transmission light, 1-4-5,
Default setting, 5,2-1, 2-3
Default-Settings Mode, 1-3
Default zone, 3-7
Device Types, 3-3
DLC Transport protocol,
1,4-1-2
DOS Copy command, 2-3
C
Cable connection types
Ethernet Twisted-Pair
(I0BASE-T), 3-4, 1-3, A-1
E
Emulation mode, 1-6
Index IN-1
EPSON Net! utility
assigning print queues, 2-9-11
changing queues serviced by
printer, 2-9-11
configuring printer port, 2-1,
2-14, 2-17
disabling/enabling Hunting,
2-15
DOS version, 2-1, 2-3
entering password, 2-12-13
installing, 4,2-1-3
renaming print server,
2-1, 2-12
selecting printer mode,
2-1, 2-4 -5
setting queue polling
time, 2-14
setting queue priority, 2-9
Windows version, 2-1-2,2-6
Epson Namer, 2-4,3-1-3,3-5
Epson Zoner, 2+3-1, 3-6-8
EpsonScript (PostScript) card,
2,1-6,3-1
Error
clearing, 1-6
detecting, 1-4,1-6
Error Resume button, 1-5-6
Ethernet Card
configuration software, 1, 3-4,
2-1-3,3-1-3,3-6-8
hardware installation, 4-5,
1-1-3
network installation, 1-6,2-1,
3-1,4-1, 5-1
Ethernet Thin Coaxial, 3-4
Ethernet Twisted-Pair, 3-4
Ethertalk
network, 4,3-1, 5-5
Phase I, 1-2,3-6
Phase II, 2,3-1, 3-6
IN-2 Index
Ethertalk, installing in, 3-1
F
File server
checking, 1-5
connecting print server to,
2-5-6
defined, 5
setting up queues on, 2-6 -10
setting up queues on
multiple, 2-10-11
File transport protocol See ftp
ftp, 2,6,5-1, 5-6 -7, 5-10, 5-11, 5-13
ftp filters, 5-6-7
ftp socket, 5-6
ftp spool queues, 5-6
H
Hardware Address, 4-2
Hardware installation, 1-1
Hewlett-Packard, 2
Host name, 5-4, 5-6 -7, 5-10
Host printer, 1-1, 2-2, 2-6
Hosts file, 5-3, 5-11, 5-13
HP Network Peripheral Port
dialog box, 4-2
HP-UX, 5-13-14
Hunting
disabling, 2-15
enabling, 2-15
I
IBM AIX, 5-1 1-12
IEEE 802.2 protocol, 1, A-1
IEEE 802.3 protocol, 1, A-1
Indicator lights
behavior, 1-4-5
location, 1-4-5
Initialization, 1-4 -5, 1-6
Installation
Apple Ethertalk, 3-1
Ethernet Card, 4,1-1-3
hardware, 1,3-4,1-1-3
Novell NetWare, 2-1
in printer, 1,3-4,1-1-3
software, 1,3,2-1-3,3-2-3,
3-6-7
UNIX, 5-1
Windows NT, 4-1
Interface slot, optional, 1,3-4, 1-2
Interface, Type B, 1,3
Internet address, 5-3
IP address, 2,5-1-4, 5-11
L
LEDs
behavior, 1-4-5
location, 1-4-5
Lights
Data Transmission, 1-2,1-4-5
Status, 1-2,1-4-5
Local printer, 5-4, 5-7 -8
Local zone, 3-2
LocalTalk interface, 4
Log on, 2-3, 2-6, 2-12, 2-14, 2-18
Login Fileserver dialog box, 2-11
Ipd, 2, 6
Ipq, 5-5
lpr, 5-3, 5-5 -8, 5-10, 5-11,5-13
Ipr filters, 5-6-8
lpr protocol, 5-4, 5-6
LPT1, 2-14 -15, 4-2
M
Mode, emulation, 1-6
Multiple file servers, installing
on, 2-10 -11
N
NetWare Config dialog box, 2-8,
2-10 -11, 2-14, 2-16,2-18
NetWare Loadable Module See
NLM
NetWare Status dialog box, 2-8
Network cable, connecting, 1-3
Network node, 6
Network recognition, 1-4 -5
Networks supported
Ethertalk, 1-2, 1-2, 3-1
Novell NetWare, 1, 3-5, 1-1 -2,
2-1, 2-3
UNIX, 1-2, 1-2, 5-1
Windows NT, 1-2,1-2,4-1
NLM (NetWare Loadable
Module), 2-3
Node address, 5, 4-2,5-3
Node number, 4-2
Novell NetWare, 1,3-5,1-1 -2,
2-1, 2-3
0
Operating mode
Auto PrintServer/Remote, 1,
5, 2-2, 2-5 -6, 2-18
print server, 1, 5, 2-1 -4, 2-6 -14
remote printer, 1, 5, 2-1 -2, 2-4,
2-14 -17
Optional interface slot, 1-2
Index IN-3
P
Packet, data, 1-5
Parallel port, 1-2
Password, entering, 2-13
PCONSOLE, 2-12, 2-15
Phase I, EthertaIk, 1-2, 3-6
Phase II, Ethertalk, 1-2,
3-1, 3-6
ping, 2, 5-2 -3
Polling time, 2-12, 2-14
Port
address, 5-6
configuration, 2-1, 2-15, 2-17
number, 2-17
socket, 5-5
PostScript, 2, 3-1, 3-2, 3-6
PostScript (EpsonScript) card, 2,
1-6, 3-1
Print Destination dialog box, 4-2
Print Manager, 2
Print queue
adding, 2-1, 2-9 -11
creating, 2-9
defined, 5
deleting, 2-1, 2-11
setting priority, 2-9
setting up on fiIe server,
2-6 -11
Print server
assigning queues to, 2-9-11
changing configuration of,
2-12-14
configuring, 2-6 -11
connecting to file server, 2-5-6
default mode, 5, 2-1, 2-3
defined, 5,2-3
installing as, 2-6-11
mode, 1, 5, 2-3, 2-6
operating mode, 2-1, 2-3 -5
IN-4 Index
renaming, 2-1, 2-12
status, 2-7-8
Print spooler, 6, 3-2, 3-5 -6
Printcap file, 5-4
Printer initialization, 1-4 -5, 1-6
Printer port, 2-1, 2-14, 2-17
Printers, supported, 4
Printing, report, 1-5
Priority, setting, 2-9
Protocol, DLC Transport, 1,
4-1-2
PSERVER, 1, 2-4
a
Queue polling time
interval, 2-14
setting, 2-12, 2-14
Queue, print
adding, 2-1, 2-9 -11
creating, 2-9
defined, 5
deleting, 2-1, 2-11
setting priority, 2-9
setting up on fiIe server,
2-6-11
R
Remote printer
changing configuration,
2-15-17
defined, 5
installing as, 2-1 -2,2-4,
2-14-15
mode, 1, 5, 2-1 -2, 2-4
redirecting in UNIX, 5-4, 5-7
setup, 2-14-17
Rename print server, 2-1, 2-12
Rename printer, 3-1-5
Report printing, 1-5
Resetting
interface, 6
printer, 1-6
RPRINTER, 1, 5, 2-4 -5
S
SC0 UNIX, 5-10-11
Scripts, 5-6, 5-1 -11, 5-13
Selecting interface
with Default-Settings Mode,
1-3
with SelecType, 1-3
SelecType, selecting interface
with, 1-3
Serial number, 1-2,2-12
Set queue polling interval, 2-12,
2-14
Setting up queues
on file server, 2-1, 2-6 -10
on multiple file servers, 2-1,
2-10-11
Setup variations for UNIX OS
general printer interface
file, 5-9
HP-UX, 5-13 -14
IBM AIX (, 5-11 -12
SC0 UNIX, 5-10 -11
Specifications
environmental, A-1
hardware, A-1
software, A-1
Spooler, print, 6, 3-2,3-5-6
Status lights, 1-2,14-6
Status sheet, 5, 1-5 -6, 4-2, 5-2
Status Sheet button, 5, 1-5 -6
Supervisor privileges, 2-3, 2-6,
2-12, 2-14, 2-18
System 7.x, 3-2
T
TCP/IP, 6,5-1, 5-6
I0BASE-T, 1,4, 1-1, 1-3, A-1
l0BASE2, 1, 4, 1-1, 1-3, A-1
Type B interface, 1,3
U
commands, 1-2, 5-1
configuring for different OS,
5-9-14
general interface program file,
5-9
network, 1,5-1-4
scripts, 5-6, 5-10 -11, 5-13
Utility software, 1-4, 1-1, 1-3,
2-1-3,3-1-3,36-8
V
VAP (Value-Added Process), 2-3
W
Windows NT
configuring, 4-1-3
installing with DLC Transport
protocol, 1,4-1-2
network, 1-2
Index IN-5
Y-Connector, coaxial, 1-1
Z
Zone, AppleTalk, 1-2, 3-2, 3-4
Zones, selecting, 3-1, 3-6 -8
IN-6 Index
Printed in U.K. 95.04-1