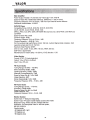
1
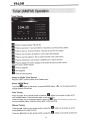
SD-9 04W
OWNER' S MANUAL
VALOR
------------------------------------------------------MULTIMEDIA--Table of Contents
Thank you for purchasing a Valor Multimedia product. We hope you will find the instructions in
this user manual clear and easy to follow. If you take a few minutes to look through this user
manual, you will have a better understanding of how to use all of the features on this
infotainment system which will allow you to have maximum enjoyment. Once you read this
manual and understand its features, please keep this manual near you for future reference.
Precautions··· ·· ·· ······ ··· ·· ··· · ·· · ··· ·· ·· · · ··· ·· ·· · ·· · ·· · ·· ·· ·· ·· · ·· ·· ····· ·· · ··· ··· ·· ·· · · · · ·· · ··· ·· · ·· · ·· · ·3
On Safety····························· ······································· ·····························3
Display Brightness· ··· ····· ····· ·· ··· ·· ·· ···· ·· · ··· · ·· ···· ·· ··· ··· ········ ······ ···· ·· · · ··· ··· ·· ··· ·· · ··3
DISC Care······························· ······································· ··························3
Playable Discs······························ ······································· ······················4
DVD Region Management············································································ ·4
Preparations·· ········· ··· · ··· ··· ··· ··· ·· ·· · ·· ·· ·· ·· · ·· · ·· · ··· ·· ·· ·· · ··· ···· ····· ··· ··· ·· · ·· · · ··· ·· ·· · ·· ·· · ·· ·5
Features·································································································· ·5
Tools and Supplies···················································································· ·5
Warning·························· ······································· ··································5
Disconnecting the Battery··········································································· ··6
Controls and Indicators····· ···· ··· ··· · · ····· · ··· · ··· · ·· ···· ·· ··· · ·· ········· ··· ····· · ·· ·· · ··· ·· ··· ·· ·· · ··7
Buttons Operation··· ····· ···· · ·· ··· ·· ···· ·· ·· ·· ·· · ·· ··· ··· ··· ·· ········· ··· ···· ···· · · · · ·· ··· ·· · ··· ·· · ··7
Key Areas for the Touch Screen· ·· ··· ···· · ··· ··· ·· ··· ·· ··· ···· ······ ··· ····· ··· · · · ·· ··· ·· · · ·· ·· ·· ··8
Remote Control····························· ······································ ····························9
Remote Control Functions······································································· ·9-1 0
TFT Monitor Operation· ······ ·· ···· ··· ·· · ··· ·· ··· · ··· · ·· ·· ··· ·· ··· ········· ····· ··· ···· · · · · ·· ··· ·· ··· · ·· ·11
Rear Camera Mode···················································································11
Screen Adjustment··················································································· ·11
Screen Adjustment Procedures··································································· ·11
Parking Brake······························ ······································· ···················· ·11
Operating Instructions····················· ······································· ······················ ·12
Power On/Off······ ·· ·· ··· · ·· ··· · ·· ··· · ·· ·· · ·· · · · ·· · ·· ·· · · ··· · · · ·· ······· ·· ·· ·· · ·· · ·· · · · · · ·· · ·· · · · ·· · ·12
Source Selection···· ·· ···· ··· ·· ··· ··· · ··· ·· ·· ··· · ·· · ···· ·· ····· ·········· ····· ···· ·· · · · ·· ··· · · · ···· · · ·12
Volume Adjustment·················································································· ·12
Equalizer Setting················································································· ·12-13
System Reset······························ ······································· ···················· ·13
Mute······························· ······································· ································13
Standby·························· ······································· ·································14
Setup Menu······························ ······································· ···························· ·15
Main Menu······························ ······································· ························ ·15
Screen Setting······ ····· ··· ·· ···· · ··· · ··· ·· ··· · ·· ·· ·· · ··· ···· ·· ···· ······ ··· ···· · ··· · · ·· · ·· ··· · · · ·15-16
Date Setting··························································································· ·17
Time Setting··························································································· ·17
Clock Mode Setting· ··· ··· ·· ····· ··· · · ··· ·· ·· · ·· ·· · ··· ·· ·· ··· ·· · ··········· ··· ··· ·· ·· · ·· · ·· ·· ·· · ··· ·· ·17
DVD Setting························································································18-19
System Setting······ ····· ···· ····· ··· · · ·· · ··· ·· ·· · ·· ·· ·· ···· ···· ·· ····· ··· ····· ··· ·· ·· ·· ·· ·· ·· · · ··· ··· ·19
Steering Wheel Control Setting··· · ··· · ···· · ·· ·· ·· ·· ··· ··· ·· ·· ········ ···· ··· ·· ··· · · · ·· ··· · · ··· ·· ··20
Basic Settings·················································································· ····21-22
Other Settings·················································································· ···22-23
Tuner (AM/FM) Operation························ ······································· ················24
Tuner Display·······················································································.···24
Switch to Radio/Tuner Source····································································24
Select AM/FM Band······························· ······································· ············24
Auto Tuning··································································.·· ························ ·24
Manual Tuning·····················································································24-25
Using Preset Stations··············································································· ·25
Saving a Station····· ··· ···· ·· ···· ··· · · ·· ·· · ··· · ··· · ·· · ···· · ·· ·· ·········· ·· · ···· ·· ·· · ·· · · ·· ·· · · ···· · ··25
Select a Station······· ····· ····· ···· ·· · ··· ·· · ·· ··· · ·· ·· ·· ···· ··· ·········· ····· ·· ·· ··· · · · ·· ·· · · ·· ···· ··25
VALOR
---MULTIMEDIA------------------------------------------------------Auto Store (AS) · · · · · · · · · · · · · · · · · · · · · · · · · · · ·· · · · · · · · · · · · · · ·· ·· · · · · · · · · · · · · · · · · · · · · · · · · · · · · · · · · · · · · · · · · ·25
Program Scan (PS) · · · · · · · · · · · · · · · · · · · · · · · · · · · · · · · · · · · · · ·· ·· · · · · · · · · · · · · · · · · · · · · · · · · · · · · · · · · · ·· · · · · · ·25
OX and LOC Stations Signals································································ ······25
DVD Player Operation··························································· ························· 26
lnserUEject Disc··································································· ··················· ·26
Reset the Loading Mechanism·························································· ·········· ·26
Accessing DVD Source································································ ············· ·26
Using the Touch-Screen Controls···························································· 26-27
Controlling Playback····························································· ·····················27
Accessing the DVD Menu·································································· ········· 27
Moving Through Chapters····························· .... ········································ ·27
Fast Forward/Fast Reverse······························································ ········· ··27
GOTO Search································································ ·····················27-28
Direct Chapter I Track Selection····························································· ······ 28
Viewing an Alternate Picture Angle (DVD Only) · ·· · ·· · · · · · ·· · · · · · · · · · · · · · · · · · · · · · · · · · · · · · · · · ·28
Zooming····························································· ····································28
Multi-Language Discs (DVD Only) · · · · · ·· · · · · · · · · · · · ·· · · ·· · · · · · · · · ·· · · · · · · · · · · · · · · · · · · · · · · · · ·28-29
Playback Information·· · · · · · · · · · · · · · · · · ·· · · · · · · · · · · ·· · · · ··· ·· · · · · · · · · · · · · · · · · · · · · · · · · · · · · · · · · · ·· · ·29-30
General Disc Information·························································· ··················30
CD/MP3/WMA/JPEG Operation··························································· ·········· ··31
DISC User Interface····························································· ················ ·31-32
MP3/WMA Disc··································································· ···················· ·32
JPEG Disc··································································· ·························· ·32
FLASH DRIVE Operation··························································· ····················· 33
Accessing Flash Source· · · · · · · · · · · · · · · · · · · · · · · · · · · · · · · ·· ·· · · · ·· · · · · · · · · · · · · · · · · · · · · · · · · · · · · · · · · · · · · ·33
Flash Drive Instructions·························································· ·················· ··33
Card Operation··························································· ··································34
Accessing CARD Source································································ ··········· ·34
CARD Instructions· · · · · · · · · · · · · · · · · · · · · · · · · · · · · · · · · · · · · · · ·· · · ·· · · · · · · · ·· · · · · · · · · · · · · · · · · · · · · · · · · · · · · · ·34
Bluetooth Operation··· ·· · · · · · · · · · · · · · · · ·· · · · · · · · · · · · · · · · · · · · ·· ·· · · · · · · · · · ·· · · · · · · · · · · · · · · · · · · · · · · ·· · · · · · ·35
Before Using the Bluetooth · · · ·· · · · · · · · · · · · · · · ·· · · · · · · ·· · · ·· · · · · · · · · ·· · · · · · · · · · · · · · · · · · · · · · · · · · · · · · ·35
Bluetooth Indicator····························································· ·······················35
Accessing Bluetooth Source································································ ········35
Bluetooth User Interface····························································· ··············· ·36
Bluetooth Setup································································· ······················ ·36
A2DP································································· ····································37
Paring································································ ····································37
Auto Connect······························································ ·····························37
Making a Phone Call···································································· ············· 38
Answering an Incoming Call···································································· ··· ·38
End a Call···································································· ···························38
Camera Mirror································································ ····························· ·39
Troubleshooting········ .. ················ .. ·················· .. ·········································· ·40
Error Message····························································· ··························· ·41
Remote Cotrol· · · · · · · · · · · · · · · · · · · · · · · · · · · · · · ·· · · · · · · · · · · ·· ·· ·· · · · · · · · · · ·· · · · · · · · · · · · · · · · · · · · · · · · · · ·42-43
Suggestions· · · · · · · · · · · · · · · · · · · · · · · · · · · · · · · · · · · · · · · · · · · · · · · · · · · · · · · · · · · · · ·· · · · · · · · · · · · · · · · · · · · · · · · · · · · · ·43
Specifications··· · · · · · · · · · · · · · · · · · · · · · · · · · · · · · · · · · · · · · · · · · · · · · · ·· · · ·· · · · · · · · · · · · · · · · · · · · · · · · · ·· · · · · ·· · · ·44-45
Accessory List···································································· ··························46
NOTE: 1. Certain descriptions in this user manual may differ from the actual unit.
2. Some pictures or icons in this user manual may differ from actual display.
3. Specifications subject to change without notice.
VALOR
-------------------------------------------------------MULTIMEDIA--To prevent the risk of injury or accident, read the following precautions before installing and
operating the unit.
On Safety
Comply with your local traffic rules and regulations.
• While driving
r:r You must not watch a video while the vehicle is in motion. It may distract you and cause an
accident. Park your vehicle in a safe place before watching a video.
• While operating
r:r Do not insert your fingers or foreign object into the unit's loader while a CD/DVD is playing.
It may cause injury or damage to the unit.
r:r Keep small articles out of the reach of children.
• If your vehicle was parked in a direct sunlight area this can result in a high increase in
tern erature inside the vehicle, lease allow the unit to cool down before o eratin it.
Preventing Accidents
The video appears only after you park the car and set the parking brake.
When the car is in motion, the video will automatically prompt a "Caution" screen for your
safety.
CAUTION!!!
IT'S UNLAWFUL TO OPERATE A VEHICLE WHILE VIDEO IS DISPLAYED IN THE
DRIVERS VIEWING AREA.
ENGAGE EMERGENCY BRAKE TO ENJOY THE VIDEO
Do not watch the monitor while driving. You may cause a traffic accident if your attention
is distracted by the monitor.
Do not use the System Setup feature while driving, or perform any other function which could
divert your attention from the road.
• When using the reverse back-up camera:
r:r When you are driving, watch the surroundings carefully for your safety. Do not entirely
depend on the back-up camera.
• When backing up your vehicle, be sure to look back for your safety.
•
Damage Screen
• Do not touch the liquid crystal fluid, if the LCD is damaged or broken. The liquid crystal fluid
may be hazardous to your health or fatal. If the liquid crystal fluid from the LCD contacts your
body or clothing, wash it off with soap immediately.
Display Brightness
When the temperature of the unit falls (as in winter), the liquid crystals inside the screen will
become darker than usual and normal brightness will return once the unit warms up.
DISC Care
Be careful not to spill juice or soft drinks onto the unit or the discs.
Make sure that the disc is clean and free of dust and debris.
3
VALOR
---MULTIMEDIA------------------------------------------------------Playable Discs
The following types of discs/files are compatible:
• CD-ROM (ISO), CD-R, CD-RW, DVD+RIRW, DVD-RIRW
• CD-DA, DVD Video
• MP3 data
• WMAdata
• JPEG images
• XVID Video
• AVI format
• MPEG 1&2 formats
The following types of discs/files are not compatible:
• WMA files that are protected by DRM (Digital Rights Management)
• WMA lossless format
• Discs recorded with Track At Once or packet writing
• MP3 PRO format
• MP3 playlists
• WAVformat
Some recordable DVDs and COs may be incompatible with this unit, depending on media type
and recording method.
DVD Region Management
Some DVD discs can be played only in certain playback modes according to the intentions of the
software developer. As the unit playing a disc according to their intentions, some functions may
not work as intended. Please be sure to read the instructions provided with each disc. This
player has been designed to play back DVD software that has been encoded for specific region
areas.
The unit will play discs labeled "All".
DVD region codes:
1 - USA, Canada
2- Japan, Europe, South Africa, Middle East
3 - Rep. of Korea, Taiwan, Hong Kong, Parts of Southeast Asia
4 -Australia, New Zealand, Mexico, South America
5 - Eastern Europe, Russia, India, Africa
6- China
4
VALOR
-------------------------------------------------------MULTIMEDIA--Read all of the instructions below before beginning your installation. We recommend that you
have your unit installed by an experienced car audio/navigation system installer (MECP
certified).
IMPORTANT NOTICE: It is very important that you read the WARNINGS and NOTES in this
manual to ensure correct installation and use of your unit.
Features
•
•
•
•
•
•
•
•
•
•
7" Digital TFT Display
DVD/DVD-RIDVD-RWNCD/CD/CD-RICD-RW Compatible
Touch-screen Control with Dynamic Graphic User Interface
Built-in 45W X 4 outputs amplifier, 4.1 channels surround sound output
Bluetooth with A2DP & Hands-free Cell phone use with Phonebook
AM/FM Tuner with 48 Memory Presets
SO Card Slot on Front Panel , Support SDHC-up to 32GB
Rear 2.0 High Speed USB Port (support max. 500GB external hard drive)
Rear Auxiliary
Back-up Camera Input
Steering Wheel Control Module Integrated (Analog)
Tools and Supplies
We
•
•
•
•
•
•
•
•
•
•
•
suggest using these tools and supplies to install the unit.
Torx type, flat-head and Philips screwdrivers
Wire cutters and strippers
Tools to remove existing radio (screwdriver, socket wrench set or other tools)
Electrical tape
Crimping tool
Crimp connections
Volt meter/test light
18 gauge wire for power connections
16 - 18 gauge speaker wire
Heat shrinks tubing
Soldering iron and solder
Warning
1. Only connect the unit to a 12-volt negative ground system.
2. Never install this unit where operation and viewing could interfere with safe driving conditions.
3. To reduce the risk of a traffic accident (except when using the backup camera feature) never
use the video display function while driving the vehicle. This may be a violation of local laws.
4. Never disassemble or adjust the unit without the assistance of a professional. For details,
please consult your local car stereo/Automotive electronic specialist shop.
5. To prevent injury from shock or fire, never expose this unit to moisture or water.
6. Never use irregular discs, the only recommended disc size is a 12cm round disc.
7. To prevent damage to the mechanism inside this unit, avoid dropping the unit.
8. To ensure the touch screen is functioning properly please avoid hard impact to the TFT
monitor.
9. Do not change the fuse on the power wire without professional guidance. Using an improper
fuse may cause damage to the unit and result in a fire.
5
V1lLOR
----MULTIMEDIA-------------------------------------------------------Disconnecting the Battery
To prevent a short circuit during installation of this unit, please turn off the ignition and remove
the negative (-) battery cable prior to starting the installation.
NOTE: If the unit is to be installed in a car equipped with an on-board drive or navigation
computer, do not disconnect the battery cable. If the cable is disconnected, the computer
memory may be lost. Under these conditions, use extra caution during installation to avoid
causing a short circuit.
6
VALOR
------------------------------------------------------MULTIMEDIA---
Controls and Indicators
Buttons Operation
CD Flip down touch screen
@ Eject
Press to eject disc.
@ Bluetooth Microphone
@ Source
Press to change the source.
® Power offNOL
Press and hold to turn off the unit.
Press once to power on when the unit is turned off.
Short press while unit is on to mute the volume.
Rotate to adjust the volume.
® Menu
Press to enter MAIN menu, press again to return to previous source.
<D Disc slot
® Small LCD screen
® SO card slot
®> Touch to eject the detachable panel
® Previous
@ Play/Pause
@ Next
@ Angle adjustment
®> Remote Sensor
® Reset
7
V1lLOR
----MULTIMEDIA-------------------------------------------------------Key Areas for the Touch Screen
The key areas are outlined below, for DVD, VCD playback mode and so forth.
A- Return to MAIN MENU
B- Select previous chapter
C - Select next chapter
D- Display the on-screen controls, and different mode displays different menu.
E- Display playing information
8
V1lLOR
-------------------------------------------------------MULTIMEDIA ---
Remote Control
Remote Control Functions
Name
Ref#
Signal
Function
Power
Eject
Mute
SRC
Numeric
button
VOL up
VOL down
Information
GOTO search
1
2
3
4
Q)
Stop/Band
10
Select
ESC
Menu
Picture
11
12
13
14
15
16
17
Turn the power on/off
Eject Disc
Toggle on/off audio output
Select source
Directly access certain chapter I track I preset station in
current band
Increase the volume
Decrease the volume
Display playing information
Position search function on VCD/DVD mode
Select FM/AM band on Tuner mode
Stop playback
Enter the audio settings
Exit the current menu
Enter the main menu of system
Adjust the Screen settings
Set start point A and end point B to repeat continually
Start or pause playback, confirm the settings
Up/down/lefUright to select items for certain setting
RepeatA~B
OK
Direction
5
6
7
8
9
LA.J
alX
SRC
1.2.3.4.5.
6.7.8.9.0
VOL~
VOLINFO
-1--
•J
BAND
SEL
ESC
MENU
PIC
....
A-B
OK
9
VALOR
---MULTIMEDIA------------------------------------------------------... ~
buttons
Title
18
TITLE
Go back to title while playing DVD
Root
19
ROOT
Enter the main menu of the disc
Turn on PBC while playing DVD
Repeat
20
Q
Repeat playback for current chapter
Next
21
Previous
22
...
...
Fast Reverse
23
...
Select the next chapter/track for playback
Search an available radio station by increasing tuning
frequency on tuner mode
Select the previous chapter/track for playback
Search an available radio station by decreasing tuning
frequency on tuner mode
Fast Forward
24
...
Audio
25
AUDIO
Change the audio language for disc playback
Zoom
26
ZOOM
Zooming in/out on an image
Angle
27
ANGLE
Play in different angle for a scene (if it is applicable)
SUB Title
28
SUB·T
Language selection for subtitle
Fast reverse the disc content
Fast forward the disc content
10
VALOR
-------------------------------------------------------MULTIMEDIA--Rear Camera Mode
When the vehicle is placed in "Reverse", and a rear camera is connected to the unit, the monitor
will automatically switch to the camera input source. Please make sure the reverse wire is
properly connected.
Screen Adjustment
"COLOR" "CONTRAST" and "BRIGHTNESS" can be adjusted.
Screen Adjustment Procedure
1. Enter the Screen adjustment mode:
Press the PIC button on the remote control or go to main menu, then select SETUP and then
press the screen.
2. Select settings:
Press the(*') buttons on the remote or on the screen when in the SETUP mode, and then
adjust the selected feature to the desired setting.
located on the top right corner of the screen or press the
3. Press the back icon
SETUP button (remote control) to EXIT the screen.
Parking Brake
1. When the vehicle is stopped and the parking brake is on, the "PARKING Brake" wire must be
connected to the parking brake(-) switch in order for the monitor to display video.
2. The Parking brake does not apply when using the reverse backup camera feature.
3. When the "parking brake" is off, the front monitor will display a "Caution" with blue background,
preventing the driver from watching video while driving. This is for your safety and to reduce the
risk of a traffic accident.
Please see the "INSTALLATION SECTION" for installation guidance on the parking brake wire.
11
VALOR
----MULTIMEDIA-------------------------------------------------------Power On I Off
Press the POWER NOL button to turn the unit on. You can also turn on the unit by pressing the
button ( C!> ) on the remote.
Press and hold the POWERNOL button on the front panel or press the POWER button ( <!> )
on the remote to power off the unit.
Source Selection
Press the SRC Button on the front panel to change sources: TUNER, DISC, CARD, FLASH
DRIVE, BT-TEL, F-AUX, R-AUX, SETUP, and STANDBY. The name of the source is displayed
on the top right corner of the screen.
Volume Adjustment
To increase or decrease the volume level, turn the POWERNOL knob on the front panel or
press the VOL+/ VOL- buttons on the remote control. The volume ranges from "0" to "40".
Equalizer Setting
The Equalizer Setting allows you to easily adjust your audio system to meet your sound needs.
To get the best possible sound quality from your new system, be sure to adjust the settings for
the speakers as well.
Accessing the EQ Settings
Press the ( SEL ) button on the remote control or go to one of these audio sources MP3 DVD/CD,
Radio Tuner, MP3 SO card or MP3 flash drive to get access to the
B
icon.
Selecting an EQ for Adjustment
Press the (AJ',.) buttons on the remote control or press the icons on the front panel once, and
then select an audio setting to be adjusted.
Adjusting an Audio Setting
Press the(*) buttons on the remote or use the touch screen to adjust the selected feature.
EQ Settings (Jazz, Pop, Rock, Classic or USER)
12
YI1LOR
---------------------------------------------------------MULTIMEDIA--Balance & Fader
You can adjust the sound from left to right and from front to rear.
Loudness
This feature will increase the bass & treble level at lower volumes.
NOTE: The Bass and Treble levels are only adjustable when EQ is on "User" mode.
The Loudness function increases the sound ranges from low level to high level.
Exiting the Equalizer Setting
Touch the return arrow on the top right corner of the screen or press the (SEL) button on the
remote control to exit the Equalizer setting.
System Reset
To reset the system in case of a halt or other unusual operation, use the tip of a pen to press the
RESET button located on the front top-right corner of the unit. After the system resets, the unit
will restores the default settings before it was last powered off.
Mute
The volume can be mute by the following:
1. Press the MUTE button ( c::JX ) on the remote control to mute the volume from the unit.
2. Press the <!>/MUTENOL knob on the panel.
3. Turning the <!>/MUTENOL knob counter-clockwise on the panel to decrease the volume level
to "0".
NOTE: Press the MUTE button on the remote control again to restore the volume.
Adjusting the volume or using any of the audio set-up features will cancel the mute function.
13
VALOR
----MULTIMEDIA-------------------------------------------------------Standby
1. On the Main menu press the Standby icon.
2. In the standby mode, the screen will turn off while the audio output is still active.
3. In the standby mode, touch the screen or press the Menu button to return the screen to the
normal stage.
14
V1lLOR
--------------------------------------------------------MULTIMEDIA---
Setup Menu
Main Menu
There are three methods to access the MAIN menu.
·Press the MENU button on the front papel.
·Press the MENU button on the remote control.
·Touch the A area (Top left corner) on the touch-screen.
Note: Touch screen must be used to select menu and adjust settings. The remote control four
directional pads cannot be used to select the features on the screen. The following instructions
will show the different ways to access menus and settings.
Screen Setting
Press the SETUP icon on the main menu.
Press the "SCREEN" icon while on the Setup menu.
Selecting a Setting for Adjustment
Press one of the setting icons to make any adjustment.
15
V1lLOR
----MULTIMEDIA---------------------------------------------------------Brightness
Use this setting to adjust the proper brightness for your needs.
Contrast
Use this setting to make adjustment to the sharpness of the picture.
Color
Use this setting to adjust the color tone of the picture.
16
VALOR
-------------------------------------------------------MULTIMEDIA--Date Setting
Press the Date icon on the SETUP menu, and then select one of the following options
Month/Day/Year to make the date adjustment.
Time Setting
Press the Time icon on the SETUP menu, and then select the hour or minute to make the time
adjustment.
Clock Mode Setting
Press the Clock Mode icon on the SETUP menu, and then select "12 Hr" or "24 Hr" modes.
17
V1lLOR
----MULTIMEDIA------------------------------------------------------DVD Setting
Press the DVD icon while on the SETUP menu.
Selecting a Setting for Adjustment
Select one of the three setting options to make any adjustment.
Mode
Select one of the three setting options to make any adjustment.
This will allow you to adjust the movie image to best fit the screen.
Aspect Ratio
4:3=Standard Format
16:9=Letterbox Format .
18
VALOR
---------------------------------------------------------MULTIMEDIA--Parental Control
In order to change the parental password, you need to enter this manufacture default password
8888. Warning: If you decide to set your own password, make sure to write it down on the user
manual or on a piece of paper and store it somewhere safe that you won't lose it because once a
new password is set, you cannot use the default password anymore.
System Setting
Press the SYSTEM icon while on the SETUP menu.
Selecting a Setting for Adjustment
Select one of the three setting options to make any adjustment.
19
V1lLOR
----MULTIMEDIA---------------------------------------------------------Steering Wheel Control Setting
Press YES to enter Steering Wheel Control setting.
1. Press Learn to begin the steering wheel control programming process.
2. Depend on the vehicle steering wheel control wiring configuration, the user can use mode one
or mode two to program the commands function.
3. Press one of the function icon on the list to start the learn command.
4. Press one of the buttons on your steering wheel control that you would like to use for this
function in order to finalize the learning command.
5. Once the button has learned, the icon will turn blue.
Load Factory
Use this feature to reset the unit back to factory setting.
20
VALOR
---------------------------------------------------------MULTIMEDIA--TS Calibration (Touch Screen Calibration)
If your touch control seems to be a little off. You can go into this setting to calibrate the touch
control. If you select yes, you will see a (+) icon on your screen that you will need to press with
your finger. Once the calibration command has been recognize, the (+) icon will move to another
part of the screen. Once you have calibrated all of the points. You can press the SETUP part of
the screen to get out of this mode.
Basic Settings
Press the BASIC icon while on the SETUP menu.
Selecting a Setting for Adjustment
Select one of the three setting options to make any adjustment.
Key Light
You can change the front panel buttons display to 6 different colors (Red, Blue, Green, Yellow,
Sky Blue or Violet).
21
V1lLOR
----MULTIMEDIA------------------------------------------------------Beep
You can turn the Beep sound ON or OFF.
TFT
You can set the opening of this screen to "ON" (auto open), "OFF" (not open automatically) or
"MANUAL" (only open & close when you want it to).
Other Settings
Press the OTHER icon while on the SETUP menu.
Selecting a Setting for Adjustment
Select one of the three setting options to make any adjustment.
Soft Info (Software Information)
This will show you the unit software version.
22
R
------------------------------------------------------MULTY1lLO
IMEDIA--Radio Region
This will allow you to change the AM/FM Tuner to work in that country. (Preset USA).
Language
You can change the language to best serve your needs. (Preset English)
SETUP
Soft Info
11:28 AM
J_[
j
Osd Language •
---
Audio Language
Radio Region
Language
j
DVD Language
;
.!)
English
French
1
Spanish
Chinese
Auto
Sub Language
Off
23
VALOR
----MULTIMEDIA---------------------------------------------------------
. : Press to change between FM and AM.
II: Press to seek down. Touch and hold for 3 seconds to scan the previous station.
II: Press to seek up. Touch and hold for 3 seconds to scan the next station.
lJNt Press to scan and store all stations in current band automatically.
•
: Press to scan the stations in the 12 preset channels in the current band .
•
: Press to activate the Local function in AM/FM tuner or the OX function
. : Press to display the numeric keypad on the screen and then use the numeric
=rad to input a station directly
fil: Previous page/set
II: Next page/set
. : Press to enter EQ setup
Switch to Radio Tuner Source
Press the "SRC" control to switch to the Tuner source.
Select AM/FM Band
button on the screen, or press the BAND button
Touch the •
change between FM and AM.
JMo)
C
on the remote control to
Auto Tuning
II
Press the button ~ on the remote control or press the II button on the screen to seek down
button on the screen to seek up the
Press the button il+-l on remote control or press the
searching.
stop
to
again
button
the
Press
next available station.
the next available station. Press the button again to stop searching.
Manual Tuning
Press the ...,.. button on the remote control or press the
tuning frequency one step at a time.
Press the ,..... button on the remote control or press the
24
II
button on the screen to up the
II button on the screen to down the
VALOR
---------------------------------------------------------MULTIMEDIA--tuning frequency one step at a time.
Using Preset Stations
12 preset buttons are used to save your favorite stations for each band. First 4 saved stations
(P 1-P4) for the current band appear on the screen.
You can touch the arrow buttons
II or II on the screen to see the other 4 stations.
Saving a Station
1. Select a band (AM/FM), and then select a station.
2. Press and hold one of preset (P1-P40) on the right side of the screen for three seconds. The
station will then be saved on the selected preset number.
Select a Station
1. Select a band (AM/FM).
2. Touch one of the presets (P1-P4) on the right side of the screen.
Auto Store (AS)
Press the AS button on the screen to automatically scan and save all stations in current band.
Program Scan (PS)
Press the PS button on the screen to scan through the stations in the 12 preset channels in the
current band.
Press any button to stop scanning and listen to the selected station.
OX and LOC Stations Signals (LOC)
When the Local function is on, only radio stations with a strong signal are found. When the Local
function is active, "LOC" appears on the screen.
Press •
to activate the Local function in AM/FM tuner or to activate the OX function.
25
V1lLOR
---MULTIMEDIA------------------------------------------------------NOTE: When properly installed, DVD video cannot be displayed on the main screen unless the
parking brake is applied. If you attempt to play a DVD while the vehicle is in motion, the screen
will display "caution" with a blue background. Rear video output, (if used) will operate normally.
Insert/Eject Disc
Inserting a Disc
When inserting a DVD disc, DVD mode will be enabled and disc will begin to play.
NOTE: If Parental Lock (Rating) is activated and the disc inserted is not authorized, a 4-digit
code must be entered or the disc will not play (see "Parental Lock Menu").
You cannot insert a disc if there is already a disc in the unit or if the power is off.
NOTE: CD-RJRW, DVD-R/RW, DVD+RJRW will not play unless the recording session is closed.
Ejecting a Disc
Press the button ~. on the unit to eject the disc. The unit will automatically revert to Tuner
mode at the same time.
Reset the Loading Mechanism
If the disc loads abnormally or does not play properly, press and hold the button ~ on the unit
to reset the loading mechanism. The disc should ejected and resume to normal operation.
Accessing DVD Source
To switch to DVD source when a disc is already inserted, press the "SRC" button on the remote
control until the DVD source appears on the top of the screen.
On the front panel press Menu and select the "Disc" icon.
Using the Touch-Screen Controls
II: Press to Play/Pause
a:
Press to stop
. : Press to fast reverse
II: Press to fast forward
. : Press to display Sub-title
. : Press to switch among LEFT, RIGHT and STEREO.
26
V1lLOR
---------------------------------------------------------MULTIMEDIA--. : Press to return to DVD main menu
. : Press to select Title, Chapter, and Time.
II:
Press to enter EQ setup.
Controlling Playback
Stop Playback
Press the stop button
a
•l
on the screen or press the (BAND) button on the remote control to stop
the DVD playback; press the play/pause button •
remote control to resume play.
on the screen or the (OK) button on the
Pause Playback
Press the play/pause button •
on the screen to pause or to resume play.
Accessing the DVD Menu
1.
2.
3.
4.
button to access the
You can touch the area E (middle of screen), and then press the •
main DVD menu.
Use the arrow buttons on the remote control to select a title from the menu.
Press the TITLE button on the remote control to select a different title for playback.
Press the 0 button on the remote control or touch the item directly to confirm your selection
and begin playback.
Moving Through Chapters
Press the ~ button on the remote control to advance to the next chapter on the DVD.
Press the ...._ button on the remote control to move to the previous chapter on the DVD.
Touch the right side of the screen to advance to the next chapter, or touch the left side of the
screen to move to the previous chapter.
Fast Forward/Fast Reverse
of area E on the screen to fast
Press the ...._ button on the remote control or press the •
forward. Continue pressing to increase the rate from X 2, X 4, X 8, and X 16.
of area E on the screen to fast
Press the ..,... button on the remote control or press the •
reverse. Continue pressing to decrease the rate from X 2, X 4, X 8, and X16.
GOTO Search
During DVD or VCD playback, use the following steps for the "GOTO" feature to access a
specific location on the disc:
1. Press the -/-- button on remote control or touch Area F on the screen and then press •
icon.
2. Press the &/"" buttons on the remote control to select a category.
• For DVD mode, you can choose Time or Title/ Chapter search.
• For VCD mode, press the -/-- button to choose between Track Search, Disc Search and Exit.
Search
- -I- Title
- -I- Chapter
Time
DVD Search
Time- Go to specific time in current title
Title/Chapter - Go to specific title or chapter
27
V1lLOR
---MULTIMEDIA------------------------------------------------------Track Search
Time
-- -- -Track
--I--
Disk Search
Time
-- -- -Track
--I--
VCD Track Search
Time - Go to specific time in the current track
Track - Go to specific track
VCD Disc Search
Time- Go to specific time on disc
Track - Go to specific track
3. Enter a Time/Track number into the field using the numeric keypad on the remote control or
on the screen.
4. Press the OK button on the remote control or on the touch screen to go to the specified
location on the disc.
5. Press the -/-- button on the remote control again or touch the OK icon on the screen to exit.
Direct Chapter I Track Selection
During DVD, VCD and CD playback, you can use t~e numeric keypad on the remote control to
access a track directly.
Viewing an Alternate Picture Angle (DVD Only)
Some DVDs contain scenes that have been shot from different angles. For DVDs recorded with
multiple angles, press the ANGLE button on the remote control to toggle available angles.
Zooming
Press the ZOOM button on the remote control to enlarge and scan through the video image
using the following options: 01, 02, 03, and OFF.
Multi-Language Discs (DVD Only)
Changing Audio Language
If you are watching a disc recorded in multiple languages, press the AUDIO button on the remote
control to choose a language. You can also touch area E, and then press this •
button.
NOTE: During VCD playback, press the AUDIO button on the remote control to choose between
Left Channel, Right Channel, and Stereo.
28
Y1lLOR
---------------------------------------------------------MULTIMEDIA--Changing Subtitle Language
If you are watching a disc that contains multiple languages subtitles, press the SUBT button on
the remote control to choose the language in which you would like the subtitles to appear. You
can also touch area E, and then press this •
button.
Playback Information
During DVD and VCD playback, press the INFO button on the remote control or touch area B to
display playback information on the screen, this will include the media playing and current
playback time.
DVD Playback Information
The following information is displayed at the middle of the screen during DVD playback:
DVD VIdeo
@-Title
tii
3.'3
9
Tune 30:40
Subti tie
l
15:32
off ~~~·~~·~~.~,j~D
Chapter-,'-
Audia1!'2
Angle
Bitra;e 3.105Mbps
1l1
~
-~
®
CD : Indicate the current source playing.
@®: Indicate the playback time of the current title.
@: Indicate the subtitle status.
® : Indicate the audio channel
@: Indicate velocity
0 : Indicate angle
®:
Indicate DVD chapter.
® : Indicate the number of titles on the DVD.
29
V1lLOR
---MULTIMEDIA----------------------------------------------------VCD Playback Information
The following information is displayed at the middle of the screen during VCD playback:
Track 2.115
~
<D : Indicate the Current source playing.
®®: Indicate the playback time of the current title.
@) : Indicate VCD Track.
General Disc Information
Symbol
0\m
12cm Disc Properties
Max Play Time
411"1111·•
Single side single layer (DVD-5)
Single side double layer (DVD-9)
Double side single layer (DVD-10)
Double side double layer (DVD-18)
(MPEG 2 Method)
133 minutes
242 minutes
266 minutes
484 minutes
diSC
Single side single layer (VCD)
(MPEG 1 Method)
74 minutes
Single side single layer
74 minutes
VtDEO
~
fDI<IIlAl \IIJEO]
m
~~
o·ISC siym bOS
1
Symbol
Meaning
@))
Number of voice languages recorded. The number inside the
icon indicates the number languages on the disc (maximum
of 8).
em
tR
116:91 LB I
(tJ
Number of subtitle languages available on the disc
(maximum of 32).
Number of angles provided (maximum of 9).
Aspect ratios available. "LB" stands for Letter Box and "PS"
stands for Pan/Scan. In the example on the left, the 16:9
video can be converted to Letter Box video.
Indicates the region code where the disc can be played.
• Region 1: USA, Canada, East Pacific Ocean Islands
• Region 2: Japan, Western Europe, Northern Europe, Egypt,
South Africa, Middle East
•' Region 3: Taiwan, Hong Kong, South Korea, Thailand,
Indonesia, South-East Asia
• Region 4: Australia, New Zealand, Middle and South
America, South Pacific Ocean Islands/ Oceania
• Region 5: Russia, Mongolia, India, Middle Asia, Eastern
Europe, North Korea, North Africa, North-West Asia
• Region 6: Mainland China
• ALL: All regions
30
YI1LOR
-------------------------------------------------------MULTIMEDIA--Instructions for Insert/Eject, Play/Pause, Stop Playback, Track Selection, Fast Forward/Fast
Reverse, Scan, and Random Play are the same for DVD, CD and MP3 operation. Please see
the DVD Player Operation section for information about these topics.
The file naming formats listed below are compatible with this unit:
• ISO 9660- file name: 12 characters, file extension: 3 characters
• ISO 9660- file name: 31 characters, file extension: 3 characters
• Joliet - 64 characters
If the file or folder name does not comply to ISO 9660 file system standards, it may not be
displayed or played back correctly.
DISC User Interface
<D : Press to Play/Pause
® : Press to play previous track
· ® : Press to play next track
@ : Press to activate/deactivate Repeat Single/Folder Repeat/Repeat All
® : Press to activate/deactivate Shuffle Mode
@ : Press to enter EQ setup
0 : Next page/set
® : Press to return to the root folder menu
®: Press to display the numeric keypad on the screen and then you can use the numeric
keypad to access a track directly
@) : Previous page/set
@:Elapsed playing time
®:Song info
31
V1lLOR
---MULTIMEDIA------------------------------------------------------Playing CD Files
After inserting a CD disc, a file will play in the sequence of the directory. During playing back,
you can press the numeric button on the remote control or press a track that you would like to
play.
MP3/WMA Discs
This player allows you to playback MP3/WMA files recorded on CD-R, CD-RW, DVD+RIRW and
DVD-RIRW. For CD-RW discs, please make sure to use a slow speed write and not the fastest
speed in order to prevent improper disc writing.
When recording MP3 up to the maximum disc capacity, disable additional writing. Please use the
"disc at once" setting.
The touch keys for CD/MP3/WMA playback are described below.
Playing MP3/WMA Files
After inserting a MP3/WMA disc, a file will play in the sequence of the directories/folders. While
playing back, you can press the numeric button on the remote control or touch the selected track
that you would like to play.
JPEG Discs
B: Flip the current image counter-clockwise
a:
stop
al: Play/Pause
II: Flip the current image clockwise
32
VALOR
---------------------------------------------------------MULTIMEDIA---
Accessing the Flash Source
1. To switch to FLASH source, press the Menu button on the front panel and press the Flash
Drive icon or press the (SRC) button on the remote control until the FLASH appears at the top of
the screen.
NOTE: Make sure the USB cable is connected with a flash drive device.
2. Select the Main menu, and then touch the FLASH DRIVE icon to select FLASH as your
source.
Flash Drive Instructions
The touch keys on the screen for FLASH playback are described below:
al: Press to Play/Pause
II:
II:
Press to play previous track
Press to play next track
1111
llill: Press to return to the root folder menu
II:
Press to enter EQ setup
B: Press to activate/deactivate Repeat Single/ Repeat Folder/Repeat All
II:
Press to activate/deactivate Shuffle Mode
. : Press to display the numeric keypad on the screen and then you can use the numeric
keypad to access a track directly
Note: For other definitions, please go to CD/MP3/WMA/JPEG Operation as references.
33
V1lLOR
---MULTIMEDIA------------------------------------------------------Accessing CARD Source
1. To switch to CARD source, press the Menu button on the front panel and press the CARD
icon or press the (SRC) button on the remote control until the CARD appears at the top of the
screen.
NOTE: Make sure the SO card is inserted properly into the unit.
2. Select the Main menu, and then touch the CARD icon to select CARD as your source.
CARD Instructions
The touch keys on the screen for CARD playback are described below:
II:
Press to Play/Pause
. : Press to play previous track
II:
Press to play next track
. : Press to return to the root folder menu
. : Press to enter EQ setup
B: Press to activate/deactivate Repeat Single/ Repeat Folder/Repeat All
. : Press to activate/deactivate Shuffle Mode
B: Press to display the numeric keypad on the screen and then you can use the numeric
keypad to access a track directly
Note: For other definitions, please go to CD/MP3/WMA/JPEG Operation as references.
34
V1lLOR
-------------------------------------------------------MULTIMEDIA--Before using the Bluetooth
Before using the Bluetooth, it is necessary to perform the following steps.
1. Go to the Main menu and select the "SET UP" icon, select the "BASIC icon" option and select
"Biuetooth", make sure the "On" option is highlighted to activate the Bluetooth feature.
2. Pair your mobile phone to this unit (refer to the "Pairing" operation). It is necessary to pair your
phone first with the unit in order to use the Bluetooth feature.
Bluetooth Indicator
There is a Bluetooth indicator
a
at the top of the screen.
When the Bluetooth function is "Off', the indicator does not appear.
When the Bluetooth function is "On" and no phone is connected to the unit, the indicator
Bluetooth symbol will blink constantly.
If a phone is connected to the unit, the indicator will be solid.
Accessing Bluetooth Source
Access the MAIN menu first and then touch the BT icon on the screen to access Bluetooth
mode.
35
YI1LOR
----MULTIMEDIA-------------------------------------------------------Bluetooth User Interface
Dial Interface
Press and hold the "Phonebook" icon
lrl for 2 seconds on the right side of the Bluetooth
screen, and then your contact list from your phone will display on the screen.
Press one of the following icons received calls • • missed calls •
. . . to access a listing of the following categories.
Bluetooth Setup
36
or dialed calls
VALOR
--------------------------------------------------------MULTIMEDIA--A2DP
Pairing
Access the Bluetooth "Setup" screen and select "Pair Mode" to "Yes", then select "Phone" and
a "Waiting to pair" message will be displayed on the screen. Now you can begin pairing a phone
to the unit. Once your Bluetooth device has received the signal from the radio, then you will see
the Bluetooth device name "VALOR" displaying on the screen. Select Bluetooth device name
"VALOR" to begin the Bluetooth connection between your phone and the unit. This unit can
memorized up to 5 mobile phones, but only one mobile phone can be used at a time. The Default
phone will be retained only if all other paired phones are deleted. (Default Phone: The phone that
was first paired with the unit.)
When using the maximum limit to pair phones, (for example four mobile phones have been
connected with the unit, and you want to pair a new one, then the system will retain the last
paired phone as the system default phone) the phone least used (except the default phone) will
be deleted and the new paired phone will become the last phone.
Note: The password to pair your phone with the unit is "1234". When asked/prompt, enter this
password on your phone.
Auto Connect
If the unit has been set to auto connect, it will attempt to connect to the last used phone first. If
Auto Connect is not activated, the unit will return to the previous operating mode.
When the phone connects to the unit successfully, the cell phone's Bluetooth features will be
enabled.
Note: Please make sure your phone's Bluetooth is on before turning on the unit. If your phone's
Bluetooth is turned on after the unit has been turned on you must pair the phone again in order to
connect.
37
V1lLOR
---MULTIMEDIA------------------------------------------------------Making a Phone Call
There are four ways to make a phone call from this unit:
1. You can enter the phone number using the numeric keypad on the screen of the unit and
press the green "pick up" button . . on the screen or on the remote control press the
"OK" button to make a phone call. (must be connected to the Bluetooth)
2. You can use the contact listing to make a phone call by selecting one of the contacts.
3.
If your phone support voice dial, access this mode on your phone to make a call directly.
4. You can make a phone call by selecting one of the contact numbers listed on the missed
calls, received calls or dialed calls.
Answering an Incoming Call
You can answer an incoming call even if the source other than the telephone is selected.
You can answer an incoming call automatically or manually by going to the Bluetooth setup
screen to set the "Auto Answer" to ON or OFF.
When a call comes in, the graphic will be displayed on the screen:
End a Call
Press the
a:l button to end a call.
38
VilLOR
-----------------------------------------------------MULTIME
DIA--Camera Mirror
To access the reverse image on the back-up camera. Press the bottom left corner of the screen.
39
V1lLOR
----MULTIMEDIA--------------------------------------------------------
Problem
I Cause
Corrective Action
GENERAL
Radio Fuse blown
Car battery fuse blown
Unit will not power on
Illegal operation
Battery depleted
Remote control does
not function
Battery installed incorrectly
Improper audio output connection
Volume set too low
Improper "MUTE" connection
No/low audio output
Poor sound quality or
distortion
Unit resets itself when
engine is off
Speakers damaged
Heavily biased volume balance
Speaker wiring is in contact with
metal part of car
Unauthorized disc is in use
Speaker power rating not
compatible with unit
Speaker is shorted
Incorrect connection between
yellow memory wire and positive
battery wire
lnstall.the new fuse with the
correct specification
Install the new fuse with the
correct specification
Press the RESET button located
at the top left corner of the front
panel
Replace depleted battery with a
brand new battery
Remove and install the battery
correctly
Check the wiring and make the
correction
Increase the volume level
Review the wiring diagram and
check the "MUTE" connection
Replace speakers
Adjust the channel balance to
the center position
Insulate all speaker wiring
connections
Use the original media disc
Connect the proper speakers
Check the speaker connections
Check the wiring and make the
correction
TFT MONITOR
No Video playback
Flashing image or
interference appears
on screen
Prolonged image or
improper height/width
ratio display_
Incorrect connection to parking
brake wire
PRK SW is activated and parking
brake is not engaged
DVD is not compatible with current
unit system settings
Improper video signal connections
Improper aspect ratio setup
Check the wiring and make the
correction
Stop vehicle in a safe place and
apply the parking brake
Change the setup to
accommodate disc
Check the wiring and make the
correction
Use the correct aspect ratio
setting
TUNER
Weak station
searching
Auto antenna is not fully extended
or not properly connected
Radio reception is poor.
LOCAL function is activated
Connect the auto antenna
control cable properly
Current location has a weak
radio signal, so move to another
location.
Turn the LOCAL function off
DISC
Cannot insert disc
There is a disc inside the unit
40
Eject the current disc and insert
a new disc
VALOR
-------------------------------------------------------MULTIMEDIA--Disc is warped or scratched
Disc goes not play
back
Disc is dirty or wet
lncom_Q_atible disc is used
Disc rating exceeds Parental Lock
rating limit
Disc region code is not compatible
with unit
Disc is inserted upside down
Image
blurred, Disc is illegally copied
distorted, or dark
PBC cannot be used PCB is not available on the disc
during VCD playback
No
repeat
or PCB is on
searching
while
playing VCD
MP3
Interruption occurred Disc is dirty or scratched
during playback
File is damaged/bad recording
Incorrect
playback Message is longer than LCD can
message displayed
display
Use a disc that is in good
condition
Clean the disc with a soft cloth
Use compatible disc
Change Parental Lock settings
to allow such restriction
Use disc with the proper region
code
Insert the disc with the label side
up
Use the original disc
Turn PCB off
Clean the disc or replace the
disc
Recreate disc with good files
Shorten the name of the file
Error Messages
Message Displayed
Loading
Cause
Disc is being read
Disc is dirty
Disc is upside down
Corrective Action
No Disc
Bad Disc
Unknown disc
Region Error
Error
Disc not present in loading
compartment
Disc is dirty
Disc is upside down
Disc format is not compatible with
this unit
DVD is not compatible with region
code of unit
illegal mechanism operation
41
Clean the disc with a soft cloth
Insert the disc with the label side
up
Insert disc
Clean the disc with a soft cloth
Insert the disc with the label side
up
Press & hold the EJECT key for
5 seconds to reset loading
mechanism
V1lLOR
---MULTIMEDIA------------------------------------------------------Remote control
Remote control
does not function
Battery is covered with
insulation tape
Battery depleted
Battery installed incorrectly
Pull out the insulation tape
Re_place battery_ with new one
Remove battery and install correctly.
1. When using the remote for the first time, you must pull out the insulation tape.
2. Remove the battery if the remote control is not used for a month or longer. If the battery is
depleted, remove and dispose the old battery immediately.
3. Inserting/Replacing the Battery:
Remove the battery holder
sac:r su:sil
l
I
Remove the battery from the battery holder
42
VALOR
-------------------------------------------------------MULTIMEDIA--Install the battery
Keep the battery ( +)
side facing up
Insert the battery holder
NOTE: Only use one (CR2025 3V) lithium battery.
If battery is incorrectly replaced it may explode. Replace only with the same or equivalent type of
battery. Do not recharge, disassemble, heat or dispose of the battery in fire.
Keep batteries away from children to avoid the risk of accident.
Suggestions
1. Only use a clean silicone cloth and neutral detergent to clean the front panel or monitor's
screen. Using a rough cloth and non neutral detergent (such as alcohol) may result in scratching
or discoloration.
2. Keep away from water and other liquids.
3. If the temperature inside the unit gets too high, the unit's loader will automatically stop playing
the disc. Please wait for the unit to cool down before using the player again.
4. Never insert anything other than a 5 inch (12 em) compact disc into the player as the
mechanism can be damaged by foreign objects.
5. Do not attempt to use a 3" (8 em) Single-CO disc in this unit, either with or without an adaptor,
as it will damage the player and disc. Such damages are not covered under Warranty.
6. When the vehicle warms up during cold weather or under damp conditions, condensation may
appear on the LCD panel. If this occurs, the screen will not operate properly until the moisture
has evaporated.
7. We recommend that you clean your discs before inserting them into the unit; this will prevent
damages to the laser and prolong its life
43
V1lLOR
---MULTIMEDIA----------------------------------------------------Main Amplifier
Power Output: 45 watts X 4 channels into 4-ohms @ < 1Oo/o THD+N
Signal to Noise Ratio: 70d8 below reference. (Reference: 1 watt, 4-ohms)
Frequency Response: 20 Hz to 20 kHz, -3d B. Aux input used as source reference
Reference Supply Voltage: 14.4VDC
DVD/CD Player
Compatible formats: DVD-R, DVD-RW, DVD+R, DVD+RW,
CD-R, CD-RW, CD-DA, HDCD, SVCD, VCD.
MPEG, JPEG, XVID, MP3, WMA, MP3/WMA files burned onto a DVD+RIW or DVD-RIW and
CD-RIRW
Signal to Noise Ratio: 70d8
Dynamic Range: >95d8
Frequency Response: 20 Hz to 20 kHz, -3dB
Channel Separation: > 60dB @ 1 kHz
D/A Converter(s): High performance 24-bit, 192kHz, multi-bit Sigma Delta modulation. DAC
supports sample rates from 8-192 kHz.
Electronic Skip Protection (ESP):
DVD: 2-3 sec, CO-DA: 10 sec, MP3: 100 sec, WMA: 200 sec
(ESP time is approximate)
Mechanical anti vibration ability: 10-200 Hz, X/Y/Z direction: 1.0G
Video Section
Format: NTSC, PAL (auto-detection)
Output: 1Vp-p (75-ohm), buffered
Input: 1Vp-p (75-ohm)
FM Tuner Section
Tuning Range: 87.5 MHz -108 MHz
Mono Sensitivity (-30d8): 10d8u
Quieting Sensitivity (-50d8 ): 15dBu
Alternate Channel Selectivity: 70dB
Signal to Noise Ratio @ 1 kHz: 58dB
Image Rejection: 60dB
Stereo Separation@ 1 kHz: 30dB
Frequency Response: 30Hz - 15 kHz, -3dB
AM Tuner Section
Tuning Range: 530 kHz- 1710 kHz
Sensitivity (-20d8): 20dBu
Signal to Noise Ratio @1 Hz: 50dB
Image Rejection: 60d8
Frequency Response: 50 Hz- 2 kHz, -3dB
Monitor Section
Screen Size: 7" (Measured diagonally).
Screen Type: TFT Liquid Crystal Display (LCD) active matrix
Response Time: 30mSec rise time, 50mSec fall time
Resolution, DVD/Composite Video in: 480i sub pixels,
BOO (W) X 480 (H)
Viewing angle:
• 60 degrees left or right
• 30 degrees up
• 60 degrees down
44
VALOR
-------------------------------------------------------MULTIMEDIA--General
Auxiliary Input impedance: 1Ok
Power Supply: 10.5 to 16V DC, negative ground
Fuse: 10-amp, mini ATM type
DIN chassis dimensions: 7" X 7" X 2" (178mm x 178mm x50mm)
* Specifications subject to change without notice.
45
VJlLOR
-MULTIMEDIA
Accessory List
Description
Image
QTY
I
Frame
\
USB cable
<[!t
Power hamess
...
r
,
Av cable
Remote control
~
User manual
-
Detachable Box
EJ
-
Warranty card
Mounting bar/screws
',""~."·.
., _...,
Wiring Diagram
R~·->,,
-
_!!_
Unlocking Tool
2
n
46
VIlLOR
MULTIMEDIA
18061 Arenth Avenue
City of Industry, CA 91748
888-588-2567
www.3valor.com
Note:
1) Manufactured under license from Dolby laboratories.Dolby and the double-D symbol are trademarks of
Dolby laboratories.
2) Changes or modifications to this unit not expressly approved by the party responsible for compliance could
void the user's authority to operate the equipment.
3) This equipment complies with FCC RF radiation exposure limits set forth for an uncontrolled environment.
This equipment should be installed and operated with a minimum distance of 20 centimeters between the
radiator and your body.
SD-904W Multimedie Wiring Diagram
WHITE
II II
REO
11 1 - l l<::i ll
I
REO
111- l l!:l ll
Ill
WH ITE
II II
lll <::i ll
VUI!""V I
lll!:l lll
llllll
BLUE
I
l<:i lll
II II
YELLOW
ll<::illl
II II
YELLOW
~DREAR OUTPUT VIDEO
~o
~'=}
"
BLACK
WHITE
BLACK
~
RED
YELLOW
FM/AM
ANTENNA
GROUND
you~:
,~ - i'
i: ;;; '
- ""'
~
equipment ~nd vehicle. Installation by an experienced technician is recommended,
<;}j
_, -;;
,.
:.)""
-
' -'
Place
Postage
Here
VilLOR
MULTIMEDIA
Valor Warranty Validation Dept
18061 Arenth Ave
City of Industry. CA 91748
Y1lLOR
MULTIMEDIA
ONE YEAR LIMITED WARRANTY
VIlLOR
MULTIMEDIA
ONE YEAR LIMITED WARRANTY
Valor Multimedia hereby warrants to the original retail purchaser of this product
that should this product or any part thereof, under normal use and conditions, be
proven defective in material or workmanship within one year parts and labor from
the date of original purchase, such defect(s) will be repaired or replaced with
reconditioned product (at Valor Multimedia's option) for parts and repair labor.
This limited warranty is the purchaser's exclusive remedy for any such defect(s).
To obtain repairs or replacement within the terms of this warranty, please visit
www.valormultimedia.com or contact us at 18061 Arenth Avenue; City oflndustry,
CA 91748 (626) 581-8900. Proof of warranty coverage (i.e. - dated bill of sale) and
a valid serial number is required.
This warranty does not apply to any product of part thereof which, in the opinion of
Valor Multimedia , has suffered or been damaged through alteration, improper
installation, mishandling, misuse, neglect, accident, or by removal or defacement of
the factory serial number/bar code label(s). The opinion of Valor Multimedia with
respect to this matter shall be final. This warranty does not extend to the
elimination of car static or motor noise, to correction of antenna problems, to costs
incurred for installation, removal or reinstallation of the product, or damage to
compact discs, speakers, accessories, or vehicle electrical systems. THE EXTENT
OF VALOR MULTIMEDIA'S LIABILITY UNDER THIS WARRANTY IS
LIMITED TO THE REPAIR OR REPLACEMENT PROVIDED ABOVE AND, IN
NO EVENT, SHALL THE COMPANY'S LIABILITY EXCEED THE
PURCHASE PRICE PAID BY PURCHASER FOR THE PRODUCT.
THIS WARRANTY IS IN LIEU OF ALL OTHER EXPRESSED WARRANTIES
OR LIABILITIES, ANY IMPLIED WARRANTIES, INCLUDING ANY
IMPLIED WARRANTY OF MERCHANTABILITY, SHALL BE LIMITED TO
THE DURATION OF THIS WRITTEN WARRANTY. ANY ACTION FOR
BREACH OF ANY WARRANTY HEREUNDER, INCLUDING ANY IMPLIED
WARRANTY OF MERCHANTABILITY, MUST BE BROUGHT WITHIN A
PERIOD OF 18 MONTHS FROM THE DATE OF ORIGINAL PURCHASE. IN
NO CASE SHALL THE COMPANY BE LIABLE FOR ANY CONSEQUENTIAL
OR INCIDENTAL DAMAGES FOR BREACH OF THIS OF ANY OTHER
WARRANTY EXPRESS OR IMPLIED WHATSOEVER.
No person or representative is authorized to assume for Valor Multimedia any
liability other than expressed herein in connection with the sale of this product.
Some jurisdictions do not allow limitations on how long an implied warranty lasts
or the exclusion of limitation of incidental or consequential damages so the above
limitations or exclusions may not apply to you. This warranty gives you specific
legal rights and you may also have other rights, which vary from jurisdiction to
jurisdiction.
VIlLOR
MULTIMEDIA
Warranty Validation Card
Please complete all fields to validate your Valor Multimedia limited warranty. Remember to include a copy
of your dated sales invoice. All \'a lor Products must he register within 90 days by mail or online in
nrdl·r to receive \'a lor 's I year limited wa rranty cowragc. Failure to return this card or register online
will result in no warranty coverage. Special warranty provisions will only be honored if this card is returned
complete. Limitations to warranty periods and exclusions may not apply to your area if applicable by Jaw.
Please check with your local regulatory offices for details regarding warranty regulations in your area.
NAME
DATE
SHIPPING ADDRESS (NO PO BOXES)
CITY
STATE
ZIP CODE
RETAILER NAME
RETAI LER ADDRESS
RETAILER PHONE NUMBER
PRODUCT PURCHASED
PRODUCT SERIAL NUMBER
DATE OF PURCHASE
PHON E NUMBER
. ·wny did you choose·aValor Multimedia product'/' - o Appearance
o
o
o
o
Value
Features
Brand Name
Other _ __ __ _ _ __ __ __
How was your product acquired?
o Gift
o Internet Retailer
o Standard Retailer
o Specialty Store
o Mass Merchant I Discount Retailer
Where will this product be used?
o Personal Automobile
o RV
o Commercial Vehicle
o Other _ _ _ __ __ _ _ _ _ _ __
How long have you owned your vehicle?
o
o
o
o
o
Would you buy another Valor product?
o Yes
o No
Would you recommend a Valor product?
o Yes
o No
Brand New
< 1 year
l- 2years
3 - 5 years
> 5 years
PRJ\ A( Y \ O"l !Cl: Information gathered is used for the sole purpose of product registration. Your personal information will not be
sold or offered for telemarketing or contact unless you request it.