1
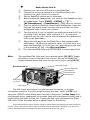
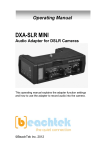
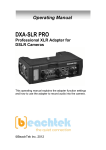
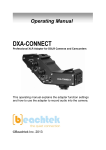
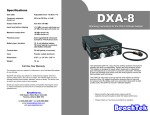
1
Vixia HF S21
WORKSHOP NOTES
CONTENTS
Introduction
Parts and Functions
Precautions
Setup & Operation
- Modes, Menus
- Setting Up:
A) White Balance
B) Storage Media
C) Recording Mode
D) Frame Rate
E) Zebra Striping
E) Lens Functions
E) Focusing
D) Image Stabilization
E) Viewfinder
F) Audio Levels
Miscellaneous Features
Ingesting/Importing Foot
Quick Start Guide
1
2
3
4
4
5
5
5
6.
6.
6.i
6.ii
7.iii
7.iv
7,8
9
9
10
Introduction
The HF S21 is a dual flash-memory camcorder, with a 64GB internal flash drive
and two SD memory card slots, allowing for continuous “Relay Recording.” This
means a very extended record time is possible. As well as a viewfinder, it features
a sharp 3.5” LCD touch screen where all menu selections and functions can be
adjusted.
Features like Touch & Track allow you to achieve sharp focus and precise exposure
for any subject, simply by touching the image of the subject on the LCD screen.
The camcorder has a max. resolution of 1920x1080 and can shoot multiple frame
rates including 60i, 30p, & 24p. The lens has a focal length of 6.4mm – 64mm and
a 4X optical zoom with a 200X digital zoom.
The touch screen menus allow users to setup manual focus, aperture, exposure,
and many other features. A user-assignable knob (see item 7 on page 2) allows
for manual adjustment of focus, exposure, mic level, and aperture.
Look for the asterisks * in the notes. These point out questions that will be
on the test.
Note:
The camera has physical buttons and touch screen buttons. In the following notes,
words in brackets [SAMPLE BUTTON] refer to these buttons; the text indicates
whether you would “press” a physical button, or “touch” a button on the screen.
2
Parts and Functions
Precautions
3
I. Care & Handling
1. *When signing out and returning gear from AV, check the
contents of your kit and ensure that all items are accounted for. If
you return the kit with anything missing, you can be invoiced for
replacement costs.
2. When connecting ANY cables, DO NOT force connectors.
Ensure they are the right way around before you connect the cables.
3. Keep camera away from moisture, dust, and of course,
DO NOT drop.
4. When connecting to computer for offloading, power down
camera FIRST, then connect and power on. NEVER connect or unplug
any cord while powered on.
5. Never EVER leave camera in high heat (car, window,
etc.) and never let the sun shine into the Eyepiece as this can
damage the screen.
6. Since this camera uses a touch screen, ensure your hands
are free from dirt and oils before use.
7. Clean lens ONLY with special lens-cleaning papers.
II. Memory
i.
When changing SD cards, ensure that camera is powered OFF and
insert card as shown beside card-slot.
ii.
* The camera will not recognize SD memory unless the card-bay
door is closed.
iii.
* NEVER unplug from a computer or change cards while the
Access Light (red) is lit. Doing so may erase your files and damage
the card.
III. Power
AV has specially configured a Lead-acid motorcycle battery to work with this
camera.
i.
*ALWAYS turn off camera before connecting or disconnecting
the battery pack. The green light must go out before your data is safe.
ii.
Note:
Be very careful when connecting the cables between camera and
battery. Do NOT force the connectors; ensure they are the right way
around.
Since we are using custom batteries, battery life is not indicated on
screen. Charge lasts approx. three hours, depending on camera
settings.
4
Setup & Operation
I. Modes
i.
The camcorder has two modes of operation. One is called Dual Shot
(allows photos) and the other is Movie Mode.
ii.
Use the mode switch (item 14 on page 2) to switch between modes or
touch the icons on the screen: Movie:
Photo:
If you are in Dual Shot mode, the camcorder operates with automatic focus,
aperture, exposure, mic level, and Image Stabilization. This mode also allows 8MP
still images to be captured.
By default, most of these settings are ON in Movie mode as well. To change
any of these settings, touch [FUNC] on the touch screen, and then select the
function you want to adjust.
The touch screen works much like an iPhone, and allows gestures like sliding
up, down, and sideways to scroll through menu items. You can also use the touch
screen to control zoom, or to track a subject for focus.
Lets set the camera to Movie Mode.
II. Menu Navigation
There are really two menus: one controls general settings (press Play
button (item 3, pg.2), then [MENU]), and one is for Camera Functions (touch
[FUNC], then [MENU]). These menus are very intuitive and after a few minutes
scrolling through them, you’ll find all available adjustment parameters for this
camcorder.
i.
To get to the menu, press the playback button (item 3 on page 2),
then select [MENU].
ii.
To exit any menu, touch [X] and you’ll be back ready to shoot. Exiting
the menu also saves any changes you made to the settings.
Note:
You must set the camera to M (Movie Mode) to access these functions;
slide the switch to M (item 14 on pg.2).
On the touch screen there’s an icon of a photo camera.
If
you touch this, the camera will change to photo mode, disabling video
recording. If this happens, just touch the icon
of the movie
camera to get back to video mode.
III. Setting up for a Shoot
5
Before shooting begins, select Movie Mode (slider-switch item 14, pg.2) to
access all the manual settings for focus, aperture, frame rate, etc. The following
setup will give you the best control and overall results 99% of the time.
A) White Balance
White balance can be set manually or controlled by a program within the
camera. To access this function, touch [FUNC] > [White Balance]. Choose a
preset like cloudy, sunny, shade, snow, beach, tungsten, etc.
Try manually setting your white balance: touch [Custom WB] then point the
camera at something white, like foam-core or a blank page. Once you’re focused
on your white object, touch [Set WB] and wait for the flashing icon to disappear
and you’re done.
B) Selecting Recording Media
The camera has 3 available recording media: 64GB internal memory, and
two High Capacity SD card slots. Using all three, it’s possible to shoot
uninterrupted for over 20 hours in the highest setting! For most of our purposes,
we’ll just use the internal memory, which is on by default. If you have your own
SD cards and want to record to them, you need to assign that card to be the
movie recorder and initialize the card. Go to the [MENU] and touch
.
Then scroll down to [Rec Media for Movies] and select either Internal Memory,
card A or B, and whether you want Relay Recording. Relay recording fills one
memory after another until there is no more space, allowing for uninterrupted
recording of very long shoots; you’ll rarely, if ever, use this. Let’s just set it to
Internal Memory for now.
Note: You should erase internal memory before you shoot. Also, a half full
memory should be considered FULL to ensure all data is secure. A good practice is to
dump your card (or internal memory) onto a computer once it’s half full.
C) Recording Mode (Quality)
The Recording Mode menu (touch [FUNC] > [MENU] >
>
[Recording Mode] then touch [X] to exit menu) allows you to choose the quality
of the recording and affects file size, detail level, and battery life. There are five
modes; in order from highest to lowest, they are: MXP, FXP, XP+, SP, and LP.
Most of the time we want the best setting possible which is MXP. It records media
at 24Mb/s while the FXP records at 17Mb/s. Both end up looking very similar in the
end. If you want to conserve some battery life, select FXP, otherwise use MXP.
6
D) Set the Frame Rate
Set the frame rate for your project depending on the look you want and
what you’ll be editing in. If cutting in iMovie, use [60i] which is a standard
setting for iMovie. If you’ll be using FCP, you can use any of the options. If you
want your project to have a filmic look, choose [24F]. This is a true 24 frame-persecond capture in progressive mode. [PF24] is recorded at 24 fps, then dummy
frames are added every 4th or 5th frame to make it fit in a 60i container. This is an
interlaced format and not recommended. If you’re shooting for the web, use
[PF30]. Follow the steps below to change frame rate:
Touch [FUNC] > [MENU] >
> [Frame Rate] then choose a frame rate.
Once you’ve made your selection, touch [X] to exit menu.
E) Working With the Lens
Turn on Zebra striping to indicate what regions of our shot may be
overexposed (100%) or getting close to overexposed (70%). Touch [FUNC] then
[EXPOSURE] to access this function. Touch the [100] button to turn on Zebra,
touch the wrench
to select between 70% and 100%. I use 100% or too
many objects look zebra-striped.
i.
The lens has several controllable parameters within the [FUNC] >
[Rec. Programs] menu. The options are:
• [P Programmed AE] Automatic control of aperture and shutter.
• [Tv Shutter-Pri. AE] Manual shutter speed, automatic aperture.
• [Av Aperture-Pri. AE] Manual aperture control, automatic shutter.
• [Cine Mode] Gives a flat, filmic look. Less noise in low light.
• [Custom] Depends on last user. Contains presets for cloudy, sunny,
beach, snow, tungsten, fluorescent, etc. conditions.
The [P Programmed AE] program will be the easiest to use and
works quite well for most situations, especially for the new user. With the
other two programs, you can manually control the shutter and aperture
using a slider on the touch screen. Practice holding the camera and making
smooth changes using the sliders.
ii.
Focusing the lens can be done automatically or manually. Touch
[FUNC] > [FOCUS] then touch [MF] to toggle between manual and
auto focus. Touch [PEAK] to display peaking lines; they can help you
with manual focus by illuminating on the screen when your subject is
in sharp focus. If you want to assign focus control to the knob, go to
[FUNC] > [MENU] >
> Custom Key/Dial. There you can
choose what function the knob controls. The knob houses a button in
its center that toggles between auto and manual modes. Using
the knob allows us to rack focus between two
differently spaced subjects.
iii.
Note:
7
The lens has a good image stabilizer that can be controlled by touching
[FUNC] then scrolling down to [IMAGE STABILIZER]. Dynamic
mode is for walking-and-shooting while Normal is for static shots.
Press and hold the physical button “Powered IS” (located on the LCD
flip out) while zoomed in to get a rock-steady image stabilization.
iv.
The viewfinder must be pulled out to be active. It has a lever for
magnification adjustment, allowing closer or more distant viewing.
*Using this instead of the LCD can really extend battery life and helps
when working in bright sunlight.
F)
Audio Levels:
To set input levels, touch [FUNC] then touch [Mic Level]. Now choose
Manual Mode. When using manual, touch the arrows [<] [>] to increase or
decrease the input level from the mic. Auto Mode uses a compressor that ends up
increasing the background noise floor. I recommend using Manual Mode.
i.
Think of the meter as displaying how much room you have in volume
before the audio distorts. The closer you get to 0dB, the louder your
audio will be. Try to keep it around -12, only momentarily
getting higher (into the yellow bars) on the loudest parts of your
scene. Use the meter. Trust it, but above all, use your ears (which are
in your headphones, of course). In general, you want to keep your
audio meter lit around half-way. Any less could be too thin sounding
later; too much more and it will get close to distorting and become
unusable.
ii.
The camera has a decent stereo mic onboard, but if you’re using an
external mic, (the only way to control your sound) you’ll need to
ensure that mic has a new battery inside (condenser mics need power)
and then connect the mic to the BeachTek DXA-2T XLR adapter. Screw
the BeachTek into the camera’s tripod mount and then mount a tripod
beneath the BeachTek, if you’re using one. Once you’ve mounted the
BeachTek with the volume knobs at the rear of the camera, do the
following:
continued on next page . . .
8
1)
2)
3)
4)
5)
6)
7)
8)
Note:
Audio Levels Cont’d.
Connect your mic to an XLR input on the BeachTek.
Connect the mini-plug coming out of the BeachTek to the
camera’s mic input (item 20 on page 2).
Set the BeachTek volume pot to maximum.
Before putting on headphones, you must set the Headphone jack
for headphones. Touch [FUNC] > [MENU] >
>
[AV/Headphones] > [Headphones] > [X]. Set your volume.
Plug in a set of circumaural, closed-back headphones; these are
the type that totally cover your ear and help isolate you from
background noise. Check your volume.
Test the mic as if you (or subject) are performing what you’ll be
recording. Don’t whisper “hello…testing 1,2,3,” or snap your
fingers to test the mic. Use the volume that will be performed in
order to get good audio.
Adjust the volume pot on the BeachTek so the average audio
reads about –12 dB on the camera’s meter. If it’s too loud, turn
down the BeachTek. If it’s still too loud, start adjusting the level
in the camera [<] [>] in the Mic Level Menu.
Do a test recording now and LISTEN BACK to ensure good level.
The new BeachTek (blue one) has a ground switch [G1/G2]. Toggle
this switch if you’re hearing a hum or buzz. Also on the BeachTek,
toggle between stereo and mono for the mic(s) you’re using [M/S].
Mounting Screw
BeachTek DXA-2T
Mic/Line Switches
Mono/Stereo
Ground Switch
Volume pots
Mini-plug out
(on front)
XLR inputs
The XLR inputs also accept line level sources like mixers, or wireless
microphone receivers. If you’re using the inputs this way, switch to LIN (line)
using the LIN/MIC switch above each channel’s volume pot. The Aux Input miniplug accepts mono, unbalanced line sources (best with a wireless mic pack) and is
controlled by the Right volume pot. If using the Aux input, disconnect the Right
XLR cable. Follow the steps above to adjust levels for this device.
Some scenes call for major volume swings in performance and getting the best sound may
involve “riding” the custom dial in order to capture everything without distorting. Just go to the
Custom Dial setting menu to assign Mic Input level control to the dial (pg.6).
Note:
9
Poorly captured audio can ruin an otherwise
excellent project. You can’t always “fix it in post.” Take the time to
test the mic and set levels correctly; you’ll be glad you did.
Miscellaneous Features
•
Color Bars and Test Tone
Located in the [MENU] under the Film Tab. Scroll to the bottom and
just touch Color Bars & Test Tone. It outputs standard SMPTE Color
Bars and a –12dB 1Khz tone for calibration. This tone plays back at a
perfect –12dB in Final Cut, so it’s useful to have 30 seconds of this at
the start of your footage for calibration.
•
Video Light
If you are really stuck and need some quick light, activate the onboard
video light by touching [FUNC] > [Video Light] > [ON]. Remember
this is not a great light, just a quick fix and does add to battery
consumption.
•
HDMI Out
If you want to check some footage and you have an HDMI equipped
HDTV, simply plug an HDMI-mini cable into the camera, behind the
hand strap.
Importing Footage (getting footage into a computer for editing)
Hopefully you’ve taken some time the day(s) before your shoot to practice
shooting with the camera. Now you’re ready to ingest that footage into a computer
for editing.
i.
Power off the camera, then connect the USB cable to its port (item 17
on pg. 2) and connect the other end to the computer.
ii.
Power on the camera, and then press the Playback button (item 3 on
pg 2). Now touch [Computer/Printer] and wait for the disk image to
show up on the desktop.
iii.
If using iMovie, import the normal way by clicking on Import From
Camera or use Quick Dump (clips may take a few minutes to appear).
iv.
If using FCP, use Log and Transfer and wait for a few minutes for the
footage to show up. Then you can select clips and add them to the
queue for importing.
Note:
AVCHD will not import into the older Power PC style Macs. Only Intel Macs support
this HD format.
Important: If you are recording to SD cards, instead of the internal memory, ensure they are at
least Class 4 rated. When copying the files over to the computer, copy all contents of AVCHD
folder onto something that "mounts" on the computer - external flash memory stick, disk image,
DVD, or hard drive. Also, you should erase all memory on the camera before each shoot. This
ensures that the card(s) and/or internal memory are totally clear and ready to record onto, and it
eliminates the possibility of importing someone else’s footage.
10
HFS-21 Quick Start Guide
ALWAYS: *Check through all the menus each time, as the settings will be
saved from the previous user and may not be appropriate for
your shoot. Also ERASE (initialize) the camera memory first.
1.
Carefully connect the adapter to the camera, then the adapter to the battery. Power
socket is on back of camera next to viewfinder.
2.
Power up the camera. The Power button is on the top of camera.
3.
Set camera to Movie Mode by sliding switch (#14, pg.2) to M.
4.
Select Recording Media. Go to the [MENU] >
> scroll down to [Rec Media for
Movies] > select Internal Memory.
5.
Select Recording Mode. Touch [FUNC] > [MENU] >
> [Recording Mode] then
select MXP for max quality or FXP (high quality, longer battery).
6.
Set Frame rate. Touch [FUNC] > [MENU] >
> [Frame Rate] then choose a
frame rate (choose 60i mostly). Once you’ve made your selection, touch [X] to exit
menu. See page 5, section C for more info.
7.
Set the lens functions. Touch [FUNC] > [Rec. Programs] > select [P Programmed
AE] which auto-controls aperture and exposure.
8.
Set auto-focus. Touch [FUNC] > [FOCUS] then touch [MF] to toggle between manual
and auto focus. Orange dot indicates selection made.
9.
Activate Image Stabilization. Touch [FUNC] then scroll down to [IMAGE
STABILIZER]. Select Dynamic for most situations.
10.
Set White Balance. Touch [FUNC] > [White Balance]. Choose a preset according to
where you’re shooting (sunny, cloudy, beach, snow, etc.).
11.
Connect external mic using BeechTek adapter or use internal mic.
12.
Enable headphones: Touch [FUNC] > [MENU] >
> [AV/Headphones] >
[Headphones] > [X].
13.
Set audio levels. Touch [FUNC] then touch [Mic Level]. Now choose Automatic. If
using Manual, touch the arrows [<] [>] to increase or decrease volume. See page 7,
section F for more info.
14.
Shoot a test image and test the mic, then play back your test recording, observing
image quality and audio levels.
15.
Based on your test shot, re-adjust any settings and start shooting!