1
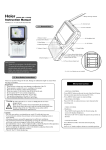
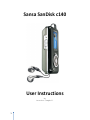
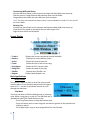
Sansa SanDisk c140
User Instructions
By
Brandon Campbell
1
Introduction and Basic Overview
These instructions are for users operating the Sansa SanDisk MP3 player. These guidelines will instruct the consumer on how to use this product's various functions, easily and efficiently.
The Sansa SanDisk MP3 is a multi‐purpose digital audio player. Its main function is to play songs stored onto its memory. These files are transferred onto it via a USB cable connection. It also includes a digital FM tuner, a photo browser, and a voice recorder.
Specifications
The player is 3 x 1.4 x 1‐inches and has a 1.2 inch color LCD screen. It is approximately 0.39lbs and includes 1GB storage capacity, which can hold approximately 240 MP3 songs. With a new AAA battery playback time is roughly 15‐16 hours.
As you open the product, alongside this guide, other items that should be included are pictured below: 2
Safety Guidelines
CAUTION: Keep device away from bathtubs, swimming pools,
and other water surrounding areas, as player is not waterproof. CAUTION: Do not use or store in places exposed to extreme sunlight or in humid locations. Exposure to direct sunlight may cause damage to screen. WARNING: Do not use Headphones at high volumes. Safely keep the volume at a moderate level. Too high levels can damage headphones and your hearing! WARNING: Avoid using this product when driving, as driving should be your main focus on the road; also when performing other activities that could be potentially dangerous for people around you! Functions & Controls
1. Volume Button: 2. Lanyard Bar:
3. LCD Screen:
4. Headphone Outlet:
5. On/Off; Menu Button:
6. Center Button:
7. Play/Pause/Up:
8. Fast‐forward/ Next:
9. Option Tab/Down:
10. Rewind/Backward:
11. Battery Latch:
12. USB Cable Port:
13. Mic:
14. Hold Switch
3
Press the left and right arrows to lower or raise the volume.
Connect the lanyard strap using this.
View information and songs displayed.
Connect the headphones there to listen to music.
Press and hold to turn on/off power; press to display menu.
Press to select an item.
Push to play song, pause, or move up a selection.
Press to move right or play next song; press and hold to fast‐
forward track.
Press to open options menu or move down a selection.
Push to move left or play previous song; press and hold to rewind track.
Open this latch to take out and replace battery.
Connect the USB cable here.
Speak into area to use Microphone.
Slide right to lock(orange)player controls and left to unlock
Getting Started
System Requirements
‐Operating System Required: Microsoft Windows XP
‐Software Requirements: Windows Media Player 10.0 or higher.
‐Peripheral/Interface Devices: CD‐ROM Drive, USB 2.0 port required for transfer.
Installation CD and Process
‐First place the SanDisk Installation CD into your CD‐ROM Drive. ‐Follow the quick steps presented on the screen to properly install the program. Connecting the USB Cable to the CPU
‐Connect the large USB Cable plug to the USB Cable Port on the Sansa Player. ‐Place the small plug into the USB port on the computer.
‐It should detect it automatically if plugged in correctly. ‐Slowly take out cable when finished with transferring to avoid damaging the cord for future use.
4
Transferring MP3’s and Photos
‐Connect the Sansa Player to the computer and open the data folder that comes up.
‐Take the music or image files and drag and drop them into the folder.
‐Drag and drop them back the same way onto your computer.
NOTE: The player will automatically detect if there is space available for transfer. If it is full, the file will not be added.
Deleting Files
‐Connect the Sansa Player to the computer and open the data folder that comes up.
‐View all the files stored on the player that you want to get rid of. ‐Right click on the file and hit delete. Screen Display
1. Track #: Displays the current song # and the total available.
2. Battery:
Displays the current battery power.
3. Artist:
Shows the name of the artist.
4. Timer:
Shows the time of the current song.
5. Play/Pause:
Shows the file’s current status.
6. Song Title:
Shows the name of the song.
7. Shuffle:
Displays when Shuffle is on. 8. Repeat: Displays when Repeat is on.
Basic Applications
Music Section
This section is where to listen to all of the music stored onto the player. Press the Menu button and click right to select Music. Use the Up and Down buttons to scroll through the selections.
Play Music
‐Scroll up and down to find the desired song, by choosing artist, album, song, genre, or play all. The selections are in alphabetical order. Push Center button to play.
‐Press Play/Pause button to stop and resume track.
‐Press Left button once to start song over and twice to go back to the previous one. ‐Hold it to rewind.
‐Press Right button to go to next song and hold it to fast‐forward.
5
Playlists
‐Listen to favorite songs selected.
Recordings
‐Listen to songs recorded. *[More information in Voice Section]
Music Options
‐Add current song to playlist by selecting Add to Go List and pushing Right button.
‐Clear songs from playlist by selecting Clear Go List and pushing Right button. Pick yes or no with the Center button.
‐Turn On or Off Shuffle mode by pressing Right button
‐Turn All, Off, or One Repeat mode by pressing Right button. [All: Repeat all songs/Off: No repeat of songs/One: Repeat current song]
‐Play previous song by selecting Play Previous and push Right but‐
ton.
Radio Section
This is where to listen to the FM radio and all of the channels available. Press the Menu button, scroll down, and click right to select Radio. The next screen should look like the picture to the right. Press the Left and Right buttons to find the preferred station. Press the Down button to bring up the option menu and the Menu button to return back.
Add This Preset
‐Push the Center button to add the current station to the preset selection.
Delete a Preset
‐Press the Right button to scroll up and down the list of presets to delete. ‐Push the Center button to delete.
View all Presets
‐Press the Right button to scroll up and down the list of presets. ‐Push the Center button to play the selected station. NOTE: The maximum number of presets is twenty.
Record Now
‐Push the Center button to record the current song playing on the radio. ‐Press Play/Pause button to stop and resume recording. ‐Push Center button and pick yes or no to save the song or not.
Play Recording
‐Press Right button to scroll and play saved recordings. 6
Voice Section
This section is where you can record your voice or other close sounds. Press the Menu button, scroll down, and click right to select Voice. The Mic mentioned in the “Functions and Controls” section is used to do the recording.
‐Push the Play/Pause button to start recording. Press it again to stop it.
‐Press the Center button and pick yes or no to save the recording or not.
NOTE: You can listen to your sounds recorded in the Music Section.*
Photo Section
This is where to view all the photos stored onto the player. Press the Menu button, scroll down, and click right to select Photo. View All
‐Push the Right button to scroll up and down the list of stored photos. Push the Center button to view.
Starts Slideshow
‐Press the Center Button to view the slideshow. Push the Left and Right buttons to scroll through the slides.
Photo Options
‐Turn Random mode On or Off by pushing Right button.
‐Turn Loop On or Off by pushing Right button.
‐Select Duration and press Right to choose the different duration times for each picture during the slideshow. [2, 5, or 10 seconds]
NOTE: Supported picture types include: JPEG, TIFF, PNG BMP, and GIF.
Settings Section
Change the settings of overall MP3 player functions to your liking. Press the Menu button, scroll down, and click right to select Settings. Equalizer
‐Set equalizer to change music sound and quality from 6 sets: Normal, Rock, Jazz, Classic, Pop, and Custom. Select choice then press Center button.
‐For the Custom equalizer, press the Left and Right buttons to choose between the different bars. Use the Up and Down buttons to change each bar. Power ‐Use Auto Power Off to set a timer to turn off the player automatically when it is in use. [30s, 1 minute, 5, 10, 20, 30, 60m]
‐Use Sleep to set the player to turn off automatically when it is not in use for a period of time. [10 minutes, 20, 30, 45, 60, 90, 120]
7
Display
‐Click Backlight to set how long the backlight will be on before it turns off after the player has been idle, to save energy. [5s, 10s, 15 minutes, 30, 45, 60, 90 or On to keep it on permanently] Press any button to turn the light back on.
‐Select Contrast and use the Left and Right buttons to set the contrast level from depending on your lighting surroundings. Language
‐Choose a language you want the player to use. [English, François, Italiano, Deutsch, Espanol, Nederlands, svenska]
FM settings
‐Use the Right button to change the FM Stereo to stereo or mono.
‐Use the Right button to change the FM Region to America, Japan, or World.
NOTE: FM functions are not available in Europe.
USB
‐Use the Up and Down buttons to select from Auto Detect or MSC. Push the Center button to choose.
Volume
‐Use the Up and Down buttons to select from Normal or High for the volume setting. Push the Center button to choose.
Reset All
‐Press the Center button and select from yes or no when display asks reset all settings? This will reset to the original factory settings.
System Info
‐This displays all of the system information on the player. It shows Firmware, Capacity, and Free MB space left.
Troubleshooting
‐If you have questions about the use or features of your player, please call the SanDisk Technical Support Center at 1‐866‐SanDisk (1‐866‐726‐3475), or fill out an on‐line support request at http://www.sandisk.com/retail/support.
8
Sources
Pictures (P) included are modified from:
P1. Title Picture: <http://images.amazon.com/images/G/01/electronics/detail‐page/c140‐2‐lg‐
061606.jpg>
P2. Included Items: <http://www.anythingbutipod.com/archives/images/sandisk‐sansa‐c100/sandisk‐
sansa‐c100‐acc.php>
P3. Warning Symbols: <http://www.exclamation‐mark.com/warning.php>
P4. Side Views: <http://www.anythingbutipod.com/archives/2006/03/sandisk‐sansa‐c100‐series‐
review.php>
P5. Screen Display: <http://www.anythingbutipod.com/archives/2006/03/sandisk‐sansa‐c100‐series‐
review.php>
P6.‐12. application Pictures: <http://www.anythingbutipod.com/archives/images/sandisk‐sansa‐
c100/sandisk‐sansa‐c100‐screenshots1.php>
9


![13.56MHz [MIFARE] Contactless Smart Card](http://vs1.manualzilla.com/store/data/005689074_1-1b5ba2b7f854420e24ee51932ec4423a-150x150.png)