1
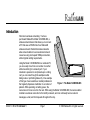
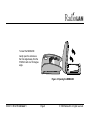
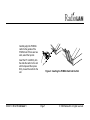
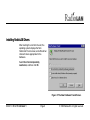
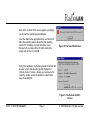
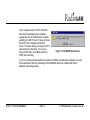
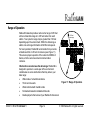
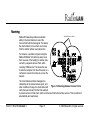
Model 140 MOBILINK
User Guide
890-013 06/02/99 Version 1
© 1999 RadioLAN. All rights reserved.
Notices
FCC
This equipment has been tested and found to comply with the limits for a Class A digital device,
pursuant to Part 15 of FCC Rules. These limits are designed to provide reasonable protection against
harmful interference when the equipment is operated in a commercial environment. This equipment
generates, uses, and can radiate radio frequency energy and, if not installed and used in accordance
with the instruction manual, may cause harmful interference to radio communications. Operation of
this equipment in a residential area is likely to cause harmful interference in which case the user will
be required to correct interference at his own expense.
FCC Registration Number: MCI140
890-013 06/02/99 Version 1
Page i
© 1999 RadioLAN. All rights reserved.
Disclaimer
The instructions in this document have been carefully checked for accuracy and are presumed to be
reliable. RadioLAN and its writers assume no responsibility for inaccuracies and reserves the right to
modify and revise this document without notice.
It is our goal at RadioLAN to always supply accurate and reliable documentation. If you discover a
discrepancy in this document, please e-mail your comments or suggested corrections to
[email protected].
No part of this publication may be placed in a retrieval system, transmitted, or reproduced in any way,
including but not limited to photograph, photocopy, computer disk or other record, without prior
agreement and written permission from:
RadioLAN
455 DeGuigne Drive
Suite D
Sunnyvale, CA 94086
© 1999 RadioLAN, Sunnyvale, CA, USA. All rights reserved.
890-013 06/02/99 Version 1
Page ii
© 1999 RadioLAN. All rights reserved.
Trademark Disclosures
RadioLAN has made every effort to provide disclosures when using trademarks owned by other
companies. Trademarked designations appear throughout this publication. The publisher states that it
is using the designations only for editorial purposes, and to the benefit of the trademark owner with no
intent to infringe upon that trademark. The following trademarks are found in this manual:
Microsoft™, and Windows for Workgroups™, and Windows 95™, and Windows NT™ are trademarks of the
Microsoft Corporation.
Novell™ and Netware™ are trademarks of Novell, Inc.
Xerox™ is a trademark of the Xerox Corporation.
IBM™ is a trademark of International Business Machines.
10BaseRadio™ and RadioLAN10™ are trademarks of RadioLAN.
Manual Conventions
The following text formats are used throughout this manual.
References to other locations in the manual or to other Manuals provided by RadioLAN are italicized.
Narrow Letters describe buttons and fields on the screen
SMALL CAPITAL LETTERS describe Screen Names or Screen Tab Names
Bold and Italicized Letters indicate important information.
890-013 06/02/99 Version 1
Page iii
© 1999 RadioLAN. All rights reserved.
Table Of Contents
NOTICES ........................................................................................................................................................................... I
FCC................................................................................................................................................................................... I
DISCLAIMER ...................................................................................................................................................................... II
TRADEMARK DISCLOSURES................................................................................................................................................ III
MANUAL CONVENTIONS .................................................................................................................................................... III
INTRODUCTION..............................................................................................................................................................1
I TEMS I NCLUDED WITH THE MODEL 140 MOBILINK ............................................................................................................ 3
SYSTEM REQUIREMENTS ..................................................................................................................................................... 4
I NSTALLING THE MODEL 140 MOBILINK............................................................................................................................ 4
Inserting and removing the MOBILINK........................................................................................................................... 5
Removing the MOBILINK .............................................................................................................................................. 8
Installing RadioLAN Drivers.......................................................................................................................................... 9
I NSTALLING RADIONET MANAGER ................................................................................................................................... 13
RANGE OF OPERATION...................................................................................................................................................... 14
Roaming .................................................................................................................................................................... 15
Performing a Site Survey ............................................................................................................................................. 16
GETTING TECHNICAL ASSISTANCE......................................................................................................................18
890-013 06/02/99 Version 1
Page iv
© 1999 RadioLAN. All rights reserved.
Introduction
Welcome to wireless networking. You have
purchased RadioLAN’s Model 140 MOBILINK, a
wireless network device that allows you to connect
a PC that uses a PCMCIA slot to a RadioLAN
wireless network. RadioLAN wireless networks
allow network stations to access shared network
resources using a full-speed 10Mbps connection,
without typical cabling requirements.
Using the Model 140 MOBILINK in a notebook PC,
you can easily move from one location to another
without searching for a network port. If your
notebook is powered on and placed upon a rolling
cart, you can route through the workplace while
taking notes or performing data entry. One example
of this type of user would be a medical professional
Figure 1: The Model 140 MOBILINK
that regularly dispenses medication to a number of
patients. While operating on battery power, the
nurse moves from one room to the next. While using the Model 140 MOBILINK, the nurse’s station
maintains a wireless connection to the facility’s network, and can continually receive network
messages, e-mail, and chat requests throughout the day.
890-013 06/02/99 Version 1
Page 1
© 1999 RadioLAN. All rights reserved.
Another example of Model 140 use would be a professional in an office complex. When using a hardwired network, the professional would typically have connection to the network in his office, but would
leave this connection to valuable resources behind when going to meetings in conference rooms.
When using the Model 140 MOBILINK, the professional would have network resource access while in
his office, and during meetings in conference rooms. The professional would enjoy necessary
network resources any time they were required.
The Model 140 MOBILINK comes with RadioNET Manager, RadioLAN’s powerful network connection
application. RadioNET Manager manages wireless network stations, enabling them to function at
optimum speeds and performance.
With RadioNET Manager you can gain access to shared network resources like printers, hard disk
drives, and other network stations. You can also receive network performance information that allows
you to:
•
•
•
•
•
•
•
View detailed information for a selected station.
View information about several stations at once.
Modify your station name.
Modify station Subnet ID.
Identify access type for each station.
Test individual stations to determine success/failure rate of transmissions.
Test the communication connection between stations.
890-013 06/02/99 Version 1
Page 2
© 1999 RadioLAN. All rights reserved.
Items Included with the Model 140 MOBILINK
When you received your new Model 140 MOBILINK, you should have received the following items in
the product container:
•
This Manual
•
The Model 140 MOBILINK PCMCIA Card
•
Network Drivers and Configuration Utilities Diskette (1 of 1)
•
RadioNET Manager Diskette (1 of 1)
890-013 06/02/99 Version 1
Page 3
© 1999 RadioLAN. All rights reserved.
System requirements
To use RadioNET Manager, station computers must meet or exceed the following requirements:
•
Windows 95b or later operating system
•
32Mb of RAM recommended
•
3.5 inch floppy disk drive
•
Hard disk drive with at least 1Mb of available space
Installing the Model 140 MOBILINK
When installing the Model 140 MOBILINK for the first time, Windows displays a series of screens that
guide you through a driver installation procedure. After properly installing the unit’s drivers, your PC
may annunciate the presence of the PCMCIA card after the operating system boots, or when you
insert the card while the PC is operating normally.
This section of the manual discusses the steps needed to install the Model 140 with the Windows
operating system. Actual installation procedures may vary depending upon the version of Windows
that you use, but driver installation is intuitive, and easy to perform.
890-013 06/02/99 Version 1
Page 4
© 1999 RadioLAN. All rights reserved.
Inserting and removing the MOBILINK
The transceiver comes installed on the end of the PCMCIA card, and is hinged for easy installation
and safe storage after removal. The unit is designed to open at a 130-degree angle from the PCMCIA
card. This allows the card to slide completely into the PCMCIA slot inside of the PC.
When using other PCMCIA devices: When the unit is open, the MOBILINK’s antenna points
upward. If you use other PCMCIA devices in a second slot, consider inserting the MOBILINK into the
top slot. This allows cable access to other the other card because the MOBILINK’s antenna does not
cover the other card.
The PC card interfaces the transceiver with your personal computer. It slides into any Type II or Type
III PCMCIA slot inside your notebook. After properly installing the MOBILINK, and software drivers,
you will configure the unit using RadioNET Manager.
890-013 06/02/99 Version 1
Page 5
© 1999 RadioLAN. All rights reserved.
To insert the MOBILINK:
Gently open the antenna so
that it is angled away from the
PCMCIA card at a 130-degree
angle.
Figure 2: Opening the MOBILINK
890-013 06/02/99 Version 1
Page 6
© 1999 RadioLAN. All rights reserved.
Carefully align the PCMCIA
card into the guides of the
PCMCIA slot. If there are two
slots, select the top slot.
Insert the PC card firmly into
the slide the card into the slot
until it stops and then press
firmly to seat the card into the
slot.
890-013 06/02/99 Version 1
Figure 3: Inserting the PCMCIA Card Into the Slot
Page 7
© 1999 RadioLAN. All rights reserved.
Removing the MOBILINK
Always take care when removing the
MOBILINK from the slot. PCMCIA slots
are designed to tightly hold the card into
place. There are usually ejector buttons
on one end of the slot. Before
attempting to remove the card, follow
these important steps:
1.
Press the ejector button. Pressing
the button causes the unit to
unplug from the internal connector,
and to partially slide out of the slot.
2.
Once the card has moved slightly
outward, grasp the MOBILINK on
each side, at the hinge, and then
pull the card free from the slot.
3.
Figure 4: Ejecting the MOBILINK from the Slot
Fold down the transmitter for
storage.
890-013 06/02/99 Version 1
Page 8
© 1999 RadioLAN. All rights reserved.
Installing RadioLAN Drivers
After inserting the card into the slot, the
operating system displays the NEW
HARDWARE FOUND screen, and offers driver
choices that are appropriate for the
hardware.
Select Driver from disk provided by
manufacturer, and then click OK.
Figure 5: The New Hardware Found Screen
890-013 06/02/99 Version 1
Page 9
© 1999 RadioLAN. All rights reserved.
The operating system displays the INSTALL
FROM DISK screen.
Insert the Network Drivers disk into drive A, and
then click OK.
Figure 7: The Install from Disk Screen
The operating system begins copying files from
the diskette, and shows progress on the
Copying Files screen.
Figure 6: The Copying Files Screen
890-013 06/02/99 Version 1
Page 10
© 1999 RadioLAN. All rights reserved.
Soon after, the INSERT DISK screen appears, prompting
you to insert the operating system diskette.
Insert the disk into the appropriate drive, and then click
OK. If the operating system cannot find the operating
system CD, it displays a screen that allows you to
Browse for the location of the CD. After locating the
proper path for the CD, click OK.
Figure 9: The Insert Disk Screen
During the installation, if a file being installed conflicts with
a newer version, the operating system displays the
V ERSION CONFLICT screen, allowing you to preserve the
newer file. Under normal circumstances, select Yes to
keep the existing file.
Figure 8: The Version Conflict
Screen
890-013 06/02/99 Version 1
Page 11
© 1999 RadioLAN. All rights reserved.
If your computer is set for TCP/IP with DHCP,
then after the operating system completes
copying files onto the hard disk drive, it begins
searching for a DHCP client. If it does not locate
the DHCP client, it displays a notification
screen. The screen allows you to bypass DHCP
client searching in the future. If you are not
using a DHCP client, select No to stop future
DHCP client searching.
Figure 10: The DHCP Client Screen
If your PC normally provides audible annunciation of PCMCIA card activation, it displays or sounds
this annunciation at this time, indicating that the MOBILINK drivers are installed and that the
hardware is operating properly.
890-013 06/02/99 Version 1
Page 12
© 1999 RadioLAN. All rights reserved.
Installing RadioNET Manager
Install RadioNET Manager onto your computer’s hard disk drive.
1.
Insert RadioNET Manager Diskette (1 of 1) into your floppy disk drive.
2.
Double-click the My Computer icon on the Windows 95™ desktop, then double-click the drive
letter where you inserted the diskette. Windows 95 displays the contents of the diskette.
3.
Double-click Setup to launch the installation program. Follow the instructions on the screen to
complete the setup.
890-013 06/02/99 Version 1
Page 13
© 1999 RadioLAN. All rights reserved.
Range of Operation
RadioLAN networks provide a radio carrier range of 250 feet
with a nominal data range of a 120 feet radius from each
station. Your system’s range may be greater than 120 feet
depending upon the environment. Within the data range, a
station can exchange information at full Ethernet speeds.
120 feet
data range
For best operation, RadioLAN recommends that you locate
all stations within a 120-foot circular area (see Figure 11).
This ensures proper operation of the network’s CSMA/CA
feature, which overcomes network communication
collisions.
Obstructions can decrease the data range: RadioLAN is
designed to operate in a semi-open office environment.
Listed below are some obstructions that may reduce your
data range:
•
•
•
•
•
Walls made of a metallic substance
Thick concrete walls
Walls reinforced with metallic studs
Foil-backed insulation installed within walls
Desktop objects that surround your RadioLAN transceiver
890-013 06/02/99 Version 1
Page 14
Figure 11: Range of Operation
© 1999 RadioLAN. All rights reserved.
Roaming
Two Radio Carrier Areas
RadioLAN networks provide an automatic
ability in the client stations to select the
Access Point with the best signal. This allows
the client stations to move from one Access
Point to another without user intervention.
For instance, a portable computer using the
RadioLAN Model 140 card may easily move
from one area of the building to another area
served by a separate Access Point, while
receiving 10Mb service. This allows the user
to take the computer from the office area, to a
conference room and continue to work on the
network.
WAP #1
RaA
d
N
o
Li
Roaming PC
RaA
d
N
o
Li
WAP #2
Roaming PC
RaA
d
N
o
Li
Roaming PC
The client stations software manages the
relationship to the nearest access point, and
Figure 12: Roaming Between Access Points
when conditions change, the client station will
notify the new Access Point that it is selected
to provide service for that client, and the old Access Point to discontinue service. This is performed
automatically and seamlessly.
890-013 06/02/99 Version 1
Page 15
© 1999 RadioLAN. All rights reserved.
Performing a Site Survey
Performing a site survey allows you to map out your signal quality ratings throughout the office area.
To perform the survey, you need to configure two stations. For example, the first station might be a
desktop station. The second station might be a wireless notebook station using the Model 140
PCMCIA Card. While testing, each station is monitoring the other for connectivity quality.
Maping the Site
Create a map of the wireless site. On the map, mark the locations of each stationary station, for
example, mark each office where a wireless station will be located. Also specify and mark the station
that will connect to the hard-wired 10BaseT local area network. In this example, the Access Point is
the center point of the wireless network.
From the Access Point, measure the distance to each office where a wireless station is located. Note
the distance at each station on the map.
Performing the Test
1.
Using RadioNET Manager, view the NETWORK INFORMATION AND CONNECTIVITY screen at both
stations to monitor the connectivity quality of the other station.
2.
Raise and locate the desktop Access Point station’s transceiver to the highest possible location,
clear from obstructions on any side.
890-013 06/02/99 Version 1
Page 16
© 1999 RadioLAN. All rights reserved.
3.
With the portable notebook station, move to the location where each wireless station will be
located. Locate the notebook so that you can position its transceiver as close to the location
where the proposed station’s transmitter will be located. Place the transceiver, and then call up
the NETWORK INFORMATION AND CONNECTIVITY screen onto the notebook’s screen. Read the
rating for the Access Point. If the Access Point does not have a rating of 5, attempt to raise the
value to 5 by relocating the transceiver. Note the highest rating that you attain during the test on
the map. Also note that this rating was noted at the notebook’s location.
4.
With map in hand, go to the Access Point, and then read the connectivity rating for the notebook
on the NETWORK INFORMATION AND CONNECTIVITY screen. Note this rating on the map at the
location of the notebook. Also note that this reading was taken from the Access Point.
After noting the two ratings, move to the next designated station location. Repeat the steps above
until you note each location’s connectivity quality rating from the Access Point and the notebook.
When you have completed your mapping, you will have an illustrated view of the best connectivity
quality that can be attained between the Access Point and each station in the network. You will also
be familiar with the best locations to position transceivers throughout the network.
890-013 06/02/99 Version 1
Page 17
© 1999 RadioLAN. All rights reserved.
Getting Technical Assistance
If you have technical questions, or have determined that your equipment is damaged, RadioLAN
offers a number of ways to get assistance:
1. Contact your local RadioLAN reseller where you purchased the product.
2. See the RadioLAN Web Site for technical assistance:
http://www.radiolan.com
When your browser accesses the Web Site, click Technical Support.
3. You can reach RadioLAN Technical Support directly by dialing:
(408) 616-6300.
4. Alternatively, you can reach our technical staff at the following e-mail address:
[email protected]
Please have the following information available and ready:
•
Your name, address, and phone number
•
The serial number of the RadioLAN part in question
•
A description of the problem that you are experiencing
Technical Support may ask you to run tests and give results of those tests. It is therefore best if you
are located as close as possible to the unit when you call.
890-013 06/02/99 Version 1
Page 18
© 1999 RadioLAN. All rights reserved.
455 De Guigne Drive
Sunnyvale, CA 94086
Phone (408) 616-6300
Fax (408) 524-0600