1
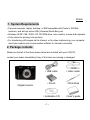
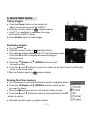
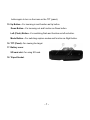
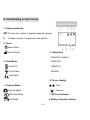
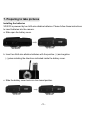
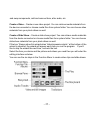
User's Manual
For customers in North and South America
For customers in USA
This device complies with Part 15 of the FCC rules. Operation is subject to the
following two conditions:
(1) This device may not cause harmful
interference.
(2) This device must accept any interference
received, including interference that may
cause undesired operation.
For customers in Canada
This Class B digital apparatus meets all requirements of the Canadian
Interference-Causing Equipment Regulations.
For customers in Europe
“CE” mark indicates that this product complies with the European
requirements for safety, health, environment and customer protection.
“CE” mark cameras are intended for sales in Europe.
Table of Contents
1. System Requirements -----------------------------------------------------------2. Package Contents ----------------------------------------------------------------3. Read this first --------------------------------------------------------------------------4. Quick Start Guide ---------------------------------------------------------------------5. VQ3010 Components ----------------------------------------------------------------6. Introduction Screen Icons -------------------------------------------------------7. Preparing to Take Pictures---------------------------------------------------------• Installing VQ3010 Batteries ---------------------------------------------------• Inserting SD Card (Optional) -------------------------------------------------• To insert an SD Card ---------------------------------------------------------------• Taking Pictures ----------------------------------------------------------------------•Taking Pictures With Self-Timer --------------------------------------------------• Using Flash Light --------------------------------------------------------------------• Recording Video Clips -------------------------------------------------------------• Using Digital Zoom ------------------------------------------------------------------• Reviewing Images ----------------------------------------------------------------• Deleting a single file ----------------------------------------------------------------• Deleting all unprotected files -----------------------------------------------------• Protecting photos and video Clips -----------------------------------------------• Removing protection ---------------------------------------------------------------• Formatting internal or SD card memory ---------------------------------------• Zooming the displayed image ----------------------------------------------------8. Customizing Your VQ3010 Settings --------------------------------------------• Capture Function Menu ---------------------------------------------------------• Playback Function Menu ----------------------------------------------------------9. Installing VQ3010 Driver And Software ----------------------------------------
Page
1
1
2
3
4
6
8
8
9
9
10
10
11
11
12
12
13
13
14
14
14
15
16
16
19
20
Table of Contents
10. Uninstalling Software and VQ3010 Driver -------------------------------------• Uninstalling Software -------------------------------------------------------------• Uninstalling VQ3010 Driver ----------------------------------------------------11. Downing Images to Your Computer -------------------------------------------12. ArcSoft PhotoImpression 5 ------------------------------------------------------13. ArcSoft VideoImpression 2 ------------------------------------------------------14. Using VQ3010 in PC-Cam Mode -----------------------------------------------15. Checking the Connection of Your VQ3010---------------------------------16. Internet Video Conference -----------------------------------------------------Appendix --------------------------------------------------------------------------------FAQ -----------------------------------------------------------------------------------Troubleshooting
-------------------------------------------------------------------Safety Precautions -------------------------------------------------------------------Specifications
-----------------------------------------------------------------------
Page
21
21
21
22
23
24
27
28
29
30
30
31
33
36
020606
1. System Requirements
• Personal computer, laptop, desktop, or IBM compatible with Pentium 166 MHz
minimum, and with an active USB (Universal Serial Bus) port.
• Windows 98 SE / ME / 2000 / XP, CD ROM drive, color monitor, mouse and keyboard.
• Color printer for printing color pictures.
• For transferring still images via the Internet, or for video conferencing, your computer
must have modem and communication software for Internet connection.
2. Package contents
Make sure that all of the items shown below are included with your VQ3010,
contact your dealer immediately if any of the items are missing or damaged.
• Digital camera
• USB cable
• Video cable
• Pouch
• Wrist strap
• Installation CD
• User’s guide
-1-
3. Read This First
Please ensure that you read and understand the safety precautions described below
before using the VQ3010.
Warnings
1.
Do not expose the battery to water or moisture place.
2.
Do not disassemble, damage, or modify the VQ3010.
3.
Do not drop or subject the VQ3010 to strong impacts.
4.
Do not use a leaking battery. If fluid from the battery enters your eye, immediately
rinse the eye with plenty of fresh water and consult a doctor.
5.
Do not put the VQ3010 into the micro-wave oven, water or expose to high
temperature over 60°C (140F).
6.
Do not expose the VQ3010 to fire.
7.
Only use or charge the VQ3010 in an environment with ambient temperature
between 0° C and 40°C (32 and 104F).
8.
Do not open the battery cover if you use SDRAM to save the pictures. If you do so,
it may power off and the pictures saved in the SDRAM may lose. So please save
the pictures before open the battery cover.
9.
Please download the pictures to your computer when battery low
10. The pictures saved in the SDRAM cannot be transferred to the SD card.
-2-
4. Quick Start Guide
Taking images
a. Press the Power button on the camera for
about 3 seconds to turn on the VQ3010.
b. Slide the function switch to
(capture status).
c. Use TFT or viewfinder to compose the image
and hold the VQ3010 steady.
d. Press Shutter button to take images.
Reviewing images
a. Turn the power on.
b. Slide the function switch to ► (playback status).
c. The captured images display on the TFT as thumbnails mode.
Press the OK button to display the selected image in
full screen size.
d. Press the ◄ (Flash) and ► (MODE) buttons to stroll
through the files.
e. Press the ▲ and ▼ buttons to zoom in or zoom out the files. Press the OK button
twice to cancel the zoom.
f. Slide the function switch to
(capture status).
Erasing files from memory
a. Turn the power on and slide the function switch to playback status.
b. Press the ◄ (Flash) and ► (MODE) buttons to select the file
you want to delete.
c. Press the Menu button and you will see the toolbar as right.
d. Press the ▲ and ▼ buttons to select [Frame] and then press Ok
button to confirm.
e. Slide the function switch to (capture status).
-3-
5. VQ3010 components
1. Shutter Button--Shooting pictures.
2. Power Button--Turn on/off VQ3010.
3. LED--Self-timer Lamp.
4. Viewfinder--For viewing the target.
5. Flash--For Using in gloomy conditions.
6. Lens--Do not cover the lens while shooting.
7. Focus Switch
8. Microphone.
9. USB Port--For connecting to a computer.
10. Power/Recharge/Shooting lamp.
11. Menu Button--Menu option pops up after
pressing the Menu button.
12. Strap Eyelet.
13. Function Switch--For switch capture/playback mode.
14. Ok Button--For confirming settings.
Note: Press [Ok] button once to turn off the icons on the TFT (panel), Press the [OK] button
twice to turn off the TFT, then you can view the target from the viewfinder. Press the [OK]
-4-
button again to turn on the icons on the TFT (panel).
15. Up Button—For zooming in and function as Up button.
Down Button---For zooming out and function as Down button.
Left (Flash) Button---For switching flash and function as left as button.
Mode Button---For switching capture modes and function as Right button.
16. TFT (Panel)--For viewing the target.
17. Battery cover.
SD card slot--For using SD card.
18. Tripod Socket.
-5-
6. Introducing screen icons
Capture Status
1. Captured pictures
003 To show the number of present captured pictures.
5
To show number of images you can capture.
2. Focus
Macro Mode
5. Resolution
Normal Mode
2048x1536 (default)
3. Flash Mode
1600x1200
Flash Off
1280x1024
Force Flash
640x480
Auto Flash
6. Picture Quality
4. Capture Mode
Fine
Normal Mode
Normal
Self-timer Mode
7. SD Card Indicator
AVI Mode
8. Battery Capacity Indicator
-6-
Playback Status
1. Protect Indicator
To show the pictures has been protected.
2. To show number of images you can capture.
3. To show the number of present captured pictures.
4. To show the number of present captured pictures.
5. To show total number of captured pictures.
Power Saving:
VQ3010 will automatically power off approximately 60,120,180 seconds (Selectable)
after you do not perform any operation.
When this function is disabled, the power is not turned off automatically.
-7-
7. Preparing to take pictures
Installing the batteries
VQ3010 is powered by two AAA-size alkaline batteries. Please follow these instructions
to insert batteries into the camera.
a. Slide open the battery cover.
b. Insert two AAA-size alkaline batteries with the positive (+) and negative
(-) poles matching the directions indicated inside the battery cover.
c. Slide the battery cover back into the closed position.
-8-
Installing the SD card (option)
VQ3010 offers two options for storing pictures and video.
Internal Memory – Store pictures and videos in the 16MB internal memory.
SD card –SD card provides removable, reusable storage for pictures and
videos. The pictures stored depend on the size of the card.
Caution: The card can only be inserted one-way; forcing it may damage the camera or
card. Do not insert or remove a card when power is on.
To insert an SD card:
a. Turn off the camera and open the battery cover.
b. Orient the card as shown (on the right top side).
Push the card into the slot to the connector.
c. To remove the card gently push the card until it
get released from the hooking mechanism. After
it has popped it out completely, close the battery cover.
Note: 1. If the SD card is present in the camera, and then the picture/ video will save in
the SD card. If no card is installed, the camera uses internal memory.
2. If the “Memory Full” warning message appears on the LCD monitor, it
means the SD card or internal memory is full. Please remove the memory and
insert a new one or move/store all picture/video in memory to your computer.
-9-
Taking pictures
a. Press the Power button on the camera for about 3 seconds
to turn on the camera.
b. Slide the function switch to
c. Make sure the
(capture status).
icon (Normal mode) appears on the
right top of the TFT, if the icon doesn’t appear, please
press ►(MODE) button until the icon appears.
d. Use TFT or viewfinder to compose the image and hold the camera steady. (If the icon
appears on the TFT, you can take pictures as close as 50cm~150cm, the flash is
deactivated at this mode.)
e. Hold the camera still and press the Shutter button to take pictures.
Note: 1. How to take a good shot? After pressing down shutter button, keep your
hand steady for 2 seconds to get best result.
2. Press [OK] button once to close the icons on the TFT; press [OK] button two
times to turn off the TFT, then you can view the image through the viewfinder;
press the [OK] button three times to turn on the TFT.
Taking pictures with Self – Timer
The Self Timer creates a default delay between the time you press the Shutter button
and the time the picture is taken. This setting is ideal when you want to include yourself
in the picture.
a. Make sure the Function switch is set to
(capture status).
appears on the TFT.
b. Press the ►(MODE) button until
c. Place the camera on a flat surface or use a tripod.
d. Use the TFT or the viewfinder to compose the image.
e. Press the Shutter button, the red Self Timer light, located on the front of the camera,
blinks for 10 seconds before the picture is taken.
- 10 -
Note: The Self – Timer delay is set to 10 seconds by default and it is
enough to put your image in the picture.
Using flash light
When you take pictures at night, indoors, or in gloomy conditions, please use the flash.
button (◄) repeatedly to scroll through the flash options.
Press the
Flash Off: the flash is off. (Default)
Force Flash: flash fires regardless of the ambient
lighting conditions.
Auto Flash: the camera detects ambient lighting conditions,
and the flash fires if it detects insufficient light.
Press the Shutter button to take pictures after the blink finishes.
Note: 1. Do not use flash while recording.
2. Flash options revert to Off when VQ3010 is turned to off.
3. Do not cover the flash while using it.
4. The flash is deactivated when the camera is in
(Macro mode) and
video mode.
5. Do not do any operation while the flash is charging.
Recording Video clips
a. Turn the power on.
b. The TFT will display image and symbols.
c. Slide the Function switch to
(capture status).
d. Press the ► (MODE) button until
appears on the TFT. (Video Mode)
e. Frame your subject through the TFT or viewfinder, and then press the Shutter button
to start recording.
f. Press the Shutter button again to stop recording.
Note: Flash is deactivated in the video mode.
- 11 -
• Using Digital Zoom
The Digital Zoom provides up to 4X magnification of your pictures. You may notice a
decrease in printed image quality when using Digital Zoom.
a. Make sure the Function switch is set to
(captures status).
Use the TFT to frame your subject.
b. (▲) Button: The subject will be enlarged.
(▼) Button: The subject will be reduced.
Press the ▲ to zoom in. Keep the button pressed for continuous magnification. The
TFT displays the zoomed image and the magnification level.
c. Press the ▼ to zoom out.
d. Press the Shutter button to take the picture.
Note: 1. The image will appear grainier as the image is digitally zoomed.
2. Digital Zoom is automatically turned off when the camera is turned off.
3. The digital Zoom function is deactivated in the video mode.
Reviewing images
View pictures & videos clips and listen to audio clips that are stored in the camera’s
memory (internal or SD card) on the TFT when the camera is in playback status.
a. Turn on the VQ3010.
b. Slide the Function switch to ► (Playback status).
c. The captured images display on the TFT as thumbnails mode.
Press the ▲ ▼ ◄ ► buttons to stroll through the files.
Press the OK button to display the selected image in full screen size.
Note: Press the OK button once to cover the icons on the picture (except AVI picture);
press the OK button twice to return to thumbnails mode.
d. Press the ◄ (Flash) and ► (MODE) buttons to stroll through the previous or next
- 12 -
picture.
e. Slide the function switch to capture status.
Note: 1.If the icon appears on the TFT like the right side, please use
◄ or ►button to select “Yes” (to start playback the video) or “No” then press the
OK button to confirm.
2.If you choose AVI picture press the OK button to start the
video playing, press the Shutter button to pause the video playing.
Erasing files from memory
Delete item allow user to delete current or all the stored images from the internal
memory or SD card.
Deleting a single file
a. Turn the power on and slide the function switch to playback status.
b. Press the ◄ (Flash) and ► (MODE) buttons to select the file
you want to delete.
c. Press the Menu button and you will see the toolbar as right.
d. Press the ▲ and ▼buttons s to select [frame] and then press the Ok button to
confirm.
Deleting all unprotected files
a. Turn the power on and slide the function switch to playback status. ►
b. Press the ◄ (Flash) and ► (MODE) buttons to select the file
you want to delete.
c. Press the Menu button and you will see the toolbar as right.
d. Press the ▲ and ▼buttons to select [All]. To confirm the deletion, press the Ok
button, and all the files will be deleted. To cancel the deletion, use ▲ and ▼buttons to
select [cancel] and then press the OK button, no file will be deleted.
e. Slide the function switch to capture status.
Note: 1.If all files (Photos and video clips) are erased, the message “No file exist”
- 13 -
appears on the on the TFT.
2.Files that are erased cannot be recovered. Make sure you have selected the
images you want to erase.
3.Files that have been protected (see the following section) cannot be erased
even if “All” is selected.
Protecting photos and video Clips
Individual files can be protected (locked) or unprotected (unlocked). Protect any photos
or video clips that you want to keep to ensure that they are not accidentally erased.
a. Turn the power on and slide the function switch to playback status. ►
b. Press the ◄ (Flash) and ► (MODE) buttons to select the file you want to protect.
c. Press the Menu button and then press the Up and Down buttons to select [Protect].
Press the Ok button to confirm.
Note: The protect
icon appears on the TFT display for all protected files.
Removing protection
If the file is protected, select protect [Protect] again to remove protection. The
will disappear when unprotected images are viewed on the TFT.
Formatting internal or SD card memory
To format the memory may repair the corrupted internal or SD card memory, or make the
SD card valid with the camera. However, this action will erase all the files in the memory
or the SD card.
a. Turn the power on and slide the function switch to playback status. ►
b. Press the Menu button.
c. Press the ▲ and ▼buttons to select [Format] and then press the Ok button to confirm.
Note: 1.“No file exist” warning message appears on the TFT after formatting and please
slide the function switch to capture status.
- 14 -
2.Formatting memory permanently erases the contents of memory. Photos and
video clips cannot be recovered from memory after formatting. Transfer any files
that you want to keep to a computer before formatting memory.
Zooming the displayed image
Magnify an image in playback mode by zooming in on it from
1.0X to 4.0X.
a. Slide the function switch to playback status. ►
b. Press the OK button to display the selected image
in full screen size.
c. Press the ▲ and ▼buttons to zoom in or zoom out the files. (When an image is
zoomed in playback status, a scale indicator appears in the middle of the TFT. The
zoom factor is as shown.) Press the ◄ or ► button to view the next/previous
picture.
d. Start from the zoomed size (except 1.0X size), press the Ok button and the icon PAN
appears on the left top of the TFT. Use ▲ ▼ ◄ ► to see different parts of the
zoomed picture.
e. Press the OK button to view the picture in original size and then press the ◄ or ►
button to view the next/previous picture.
Note: Video (AVI picture) cannot be enlarged.
- 15 -
8. Customizing Your VQ3010 Settings
Capture Function Menu
When user slide the Function switch to
(Capture Status). Press the MENU button
can turn on capture function menu. Press the ▲ or ▼ button to change the current
selected setting, press the ◄ or ► button to enter the next menu.
Press the OK button to confirm the setting and return to shooting status.
Note: If you want to set the options included with submenu. Please use ▲ or ▼to
change the current selected setting, press the OK button to confirm the setting
and return to shooting status.
Capture
Single: Take one picture.
Self Timer: Take the picture with self-timer.
Video 320x240: Take the video about 0.07M pixels.
Video 192x144: Take the video about 0.03M pixels.
Color
Cancel: Exit the present menu.
Auto: Adjust the parameter according to the capture surroundings.
Exposure: Set exposure value (EV value) manually to compensate for certain lighting
conditions including: backlighting, indirect indoor lighting, and dark backgrounds.
The setting can be adjusted in 0.3 steps within the range from –1.5 to +1.5 with steps.
You can check the result of the compensation by viewing the image on the TFT.
White Balance: When the white balance is set to match the light source, VQ3010 can
take picture more accurately.
- 16 -
Daylight: For recording outdoors on a bright day.
Cloudy: For recording outdoors on a cloudy day.
Incandescent: For recording indoor lighting conditions.
Fluorescent: For recording fluorescent lighting.
Sharpness
Normal:
Sharp:
Soft:
Resolution
Cancel: Exit the present menu.
2048x1536: Take pictures about 3.2M pixels.
1600x1200: pixels. Take pictures about 2.0M pixels.
1280x1024: pixels. Take pictures about 1.3M pixels.
640x480: pixels. Take pictures about 0.5M pixels.
Quality
Cancel: Exit the present menu.
Fine: Setting the picture quality to fine.
Normal: Setting the picture quality to normal.
Auto Power Off
60s: Setting power off after 60 seconds.
120s: Setting power off after 120 seconds.
180 s: Setting power off after three seconds.
Never: Always on.
- 17 -
Date Time
Setting: Setting date Time.
Press ▲ or ▼ button to change the value and then press ◄ or ► button to enter the
next item. Press the OK button and you will see
in the middle of the TFT,
press ◄ or ► button to select yes/no and then press the OK button to confirm.
Date on photo:
Print the date and time on the picture.
Date off photo:
Do not print the date and time on the picture
Language
VQ3010 offers eight languages for you to choose.
Cancel: Exit the present menu.
English: Display the menu items in English. (Default)
Le Francais: Display the menu items in French.
Espanol: Display the menu items in Spanish.
Deutsch: Display the menu items in German.
Italiano: Display the menu items in Italian.
Nederlands: Display the menu items in Nederlands.
Po polsky: Display the menu items in Polak.
中文: Display the menu items in Chinese.
AE Type
Cancel: Exit the present menu.
50HZ: Setting the flicker frequency to 50HZ (PAL).
60HZ: Setting the flicker frequency to 60HZ (NTSC).
- 18 -
Playback Function Menu
When user slide the Function switch to
► (Playback Status). Press the MENU button
can turn on playback function menu. Press the ▲ or ▼ button to change the current
selected setting, press the ◄ or ► button to enter the next menu.
Press the OK button to confirm the setting and return to playback status.
Delete
Cancel: Exit the present menu.
Delete one: Erase the present picture.
Delete all: Erase all the pictures and videos. (Erase pictures and videos on the
SD card if SD card is available; otherwise erase pictures and videos on the
internal memory.)
Format: Format memory (If SD card is available, format SD card; otherwise format
internal memory.)
Protect image: To lock image so that the image cannot be delete.
Note: Pictures and video clips cannot be recovered from memory after formatting.
Transfer any files that you want to keep to a computer before formatting memory.
Rotation
0: Rotate the picture at an angle of 0 degree.
90: Rotate the picture at an angle of 90 degree.
180: Rotate the picture at an angle of 180 degree.
270: Rotate the picture at an angle of 270 degree.
Note: The settings will return to the factory default if you replace the batteries.
- 19 -
9. Installing VQ3010 Driver and Software
In order to download your photos to your computer, you must Install:
• Installing Driver
1. Turn on the computer.
2. Insert installation CD into the CD-ROM drive and the
installation CD menu will appear.
3. When you see the following screen, choose “Digital
Camera Driver”.
4. Follow the on-screen instructions.
For Windows 2000/XP only: During installation of the driver or software,
computer may display the message: “The software you are going to install
doesn’t contain the Microsoft signature, and may not work correctly.
Do you want to continue? “Y / N”
Please select Y to continue the installation.
• Installing Software
1. Insert installation CD into the CD-ROM drive and
the installation CD menu should appear.
2. When you see the following screen, choose
“Arcsoft Software” to install the software.
3. Follow the instructions on screen.
4. Installed software will automatically create
“VideoImpression 2” or “Photo Impression 5” logo on your desktop.
- 20 -
10. Uninstalling Software and VQ3010 Driver
Following instruction will guide you to uninstall (remove) software from computer.
• Uninstalling Software
1. Click "Start" from the task bar and choose "Settings" -> "Control Panel". (For Windows
XP: "Start" -> "Control Panels")
2. Double click "Add/Remove Programs".
3. Select the program to be uninstalled: "ArcSoft Software Suite".
4. Click on "Remove Program" (For Windows 2000/XP: "Change/Remove") and then
"OK".
• Uninstall VQ3010 Driver
1. Click "Start" from the task bar and choose "Settings" -> "Control Panel". (For Windows
XP: "Start" -> "Control Panels").
2. Double click "Add/Remove Programs".
3. Select the program to be uninstalled "Icatch(IV) Still Camera Device"&
"Icatch(IV) Video Camera Device".
4. Click on "Remove Program" (For Windows 2000/XP: "Change/Remove") and then
"OK".
- 21 -
11. Downloading Images to your Computer
For Windows 98/me customers:
Please install VQ3010 driver before connecting.
1. Turn the camera and computer on, then connect VQ3010 to the computer with the
included USB cable, and then slide the Function switch to ► (Playback Function)
2. “USB Mass Storage device” appears on the computer screen.
For Windows XP:
A dialogue box with options appears as
shown on the Right side.
The options are Play, Find/Fix/Share Images.
Open folders to view files, take no action,
Copy images to a folder on my computer,
View a slide show of images, and etc.
Please select one of them and click on “OK”.
For Windows 2000/me/98:
Double click on “My computer”, and then double click on Removable Disk (I:) or
Removable Disk (H:) [If SD card is not available, you can only open one of the both.]
Find the folder “DCIM” inside the Removable Disk. Double-click to open the next folder
labeled “100MEDIA”. (All the photos and videos are stored here).
3. Press “Ctrl+A” on the keyboard to choose all the photos/videos, then press “Ctrl+C” to
copy photos, and then open a file in the computer, press “Ctrl+V” to paste the photos.
- 22 -
12. ArcSoft PhotoImpression 5
ArcSoft PhotoImpression 5 is a complete digital
image editing application designed with real people in
mind. Easy-to-use “Getting Start” guides,
user-friendly UI, complete image editing functionality,
give users wonderful experience to organizing,
viewing, enhancing, editing, printing and sharing
photos.
Click “Start”Æ “Program”Æ “ArcSoft Software Suite“Æ “PhotoImpression 5” to launch
PhotoImpression 5 or double click PhotoImpression 5 icon on the desktop and you will
see a window as the screenshot above.
Select the picture source. For example: 1. Click “Folder”
for acquiring photos
from your computer 2. Select the file path. 3. You can start editing them.
- 23 -
1. Get Photo – Choose how to view or acquire photos.
2. Enhance – Crop, brighten, rotate, resize and modify photos.
3. Create – Add clip art, special effects, frames and more.
4. Project – Make calendars, photo books and greeting cards.
5. Print – Print multiple images per page and multiple pages at one time.
6. Send – Email photos or upload them to online photo sharing accounts.
Note﹕For more detailed information, please refer to the [Help] of the program.
13. ArcSoft VideoImpression 2
ArcSoft VideoImpression 2 creates home
movies and slide shows by combining existing
videos, still images, exciting scene transitions,
and multiple audio tracks. Though simple to
use, the program provides intense and broad
video editing and export options perfect for
owners of digital still cameras, desktop and
digital video cameras, and camcorders.
Click “Start”Æ “Program”Æ “ArcSoft Software Suite“Æ “VideoImpression 2” to launch
VideoImpression 2 or double click VideoImpression 2 icon on the desktop and you will
see a window as the screenshot above.
Open a Project – Let you browse the project files in the VideoImpression system folder.
By “project,” we mean to say a file that contains all of the settings and each individual
component on the Storyboard. When you save your work as a project, you can go back
- 24 -
and swap components, add and remove them, alter audio, etc.
Create a Video – Create a new video project. You can retrieve media materials from
the device connected or choose media files from system folder. You can choose video
materials from your photo album as well.
Create a Slide Show – Create a slide show project. You can retrieve media materials
from the device connected or choose media files from system folder. You can choose
slide show materials from your photo album as well.
If the box “Always show this wizard when VideoImpression starts.” at the bottom of the
wizard is checked, the wizard will appear each time you run the program. If you'd
like to skip the wizard the next time, uncheck the box.
Select the item you desire and the picture and videos you need then you will enter the
editing interface as below.
You can use the six steps in the Function Menu to create video clips and slide shows.
- 25 -
1. Media - Select the videos and images that will comprise your final movie or slide
show.
2. Edit - Modify video and image color and adjust the duration of each movie component.
Only available for video projects.
3. Effects - Add neat special effect transitions between each component, or apply a
pre-made theme.
4. Text - Place animated text on any movie component.
Only available for video
projects.
5. Narrate - Record audio directly from the program and add it to your movie.
6. Produce - Combine all components to create your final video; save it in a variety of
ways or email it to friends.
The Storyboard - The backbone of the creation process, it's where you assemble your
movie.
The Player - Preview and modify your movies in this area.
Working with Albums - Albums let you organize your media for easy access.
Note: For more detailed information, please refer to the [Help] of the program.
- 26 -
14. Using VQ3010 in PC-Cam Mode
VQ3010 offers two USB modes: Removable Disk (MSDC) and PC Camera.
Note: Please install VQ3010 driver before you can use the camera in PC-Cam.
Setting Up PC-Cam
1.Turn the camera power on and slide the Function switch to
(Capture Function).
2. Connect VQ3010 and the computer use the USB cable.
3. There are many methods to view your image in PC-Cam mode if you have
Video software. For example:
A.
Click “NetMeeting”Æ “Start Video”.
B.
About Arcsoft software:
a. PhotoImpression 5: Click “file” on the
function menuÆ Click “Get photo” Æ
an icon
on the browse pane
as shown on the right Æ“Live”.
b. VideoImpression 2: Click “Create a new video”Æ“Get from
Album”Æ“Capture Video”.
- 27 -
15. Checking the Connection of Your VQ3010
For Windows 98/Me only
Double click “My Computer” icon ->
Control Panel -> System -> Device ->
Manager -> Imaging Device; when you
See "Icatch(IV) Still Camera Device"&
"Icatch(IV) Video Camera Device"
that means now the camera
is installed.
For Windows 2000/Xp only
Double click “My Computer” icon
(Windows 2000) or go to Start button
and select “My Computer” (Windows
XP) -> Control Panel -> System ->
Hardware -> Device Manager ->
Imaging Device; when you see
"Icatch(IV) Still Camera Device"&
"Icatch(IV) Video Camera Device"
that means now the VQ3010 is installed.
- 28 -
16. Internet Video Conferencing
To run a video conference with another person, you and the other person must have the
computer station configured with web camera, microphone, speakers, modem and have
access to the Internet.
You have to download video conference software, purchased or free, such as basic
software like I-phone, Microsoft NetMeeting or Yahoo Messenger.
As example: to download Windows NetMeeting, go to www.microsoft.com search for
NetMeeting and follow the download procedure.
Starting NetMeeting, you have to follow the simple set up procedure on the computer
screen, enter your personal information and adjust the microphone volume. Here's how
video conferencing works:
To receive video:
1.Call someone you want to see/hear.
2.On the Tools menu, point to Video, and then click Receive.
If you have a video camera, you can send video to the person you are calling.
To send video
1.Call someone you want to see/hear.
2.Click the Start Video button.
Note:
1. You can also send video by clicking the Tools menu, pointing to Video, and then
clicking Send. After starting the video, the button changes to Stop Video. To stop the
video, click the Stop Video button again.
2. For software support, or detailed information how to work with PhotoImpression 5 or
VideoImpression 2 – contact www.ArcSoft.com.
- 29 -
Appendix
FAQ
Q1: If I do not use batteries, can I use an USB cord and Adaptor and still take
pictures with my VQ3010?
A1: No, when taking pictures, it is important that you use batteries. Also, you have to
remember to charge the batteries before operating your VQ3010.
Q2: I am not very familiar with VQ3010 and usually my pictures turn out blurred.
Is there any way I can better focus my camera?
A2: Yes, please locate the Macro Switch on the camera lens. Switch it to the Normal (
setting unless taking close-up pictures in which case, you must switch to the Macro (
setting.
)
)
Note: If the pointer is found anywhere in between these two symbols, it will adversely
affect the focus. Also, ensuring there is enough lighting and that your hands are steady
for one second after you press the Shutter Button will help with the focus.
Q3: I have noticed that the pictures I have taken are all very dark.
these pictures lighter? Should I use the flash often?
How can I make
A3: Avoid taking pictures in places with little lighting. When it is cloudy, please use other
means to create more light before taking pictures. We recommend using the flash
function during nighttime. During the day, the flash may be too strong and the picture
may come out too bright, thus use it only during the night.
- 30 -
Troubleshooting
Problem
Source
Solution
The VQ3010 is
not running
The power is not on
• Press the Power button to turn the
camera on.
The batteries were not
inserted properly
• The correct direction to insert the
AAA batteries is indicated on the
camera.
Batteries are depleted
• Replace with unused alkaline or fully
recharged batteries (two AAA-size
batteries).
The SD card slot/battery
cover is not closed
properly
• Close the cover correctly and
securely.
The camera is not
taking pictures.
The camera is in the
• Slide the function switch to Capture
Playback Function mode
Function mode.
The flash is charging
• Wait until the flash charges. You can
press the shutter button when the
indicator glows a steady green.
The SD card or internal
memory is already full
• Obtain a new SD card and insert it.
• Download images to your computer,
and then erase them from the card
or format to free up more space.
The SD card is not
formatted correctly
• Ask SD card manufacturer for
assistance.
- 31 -
Problem
Source
Solution
Picture is not
clear
The lens is dirty
• Clean the lens.
The pictures are
blurred
Hands were not steady
when taking the picture
• Ensure hands are steady when
taking picture and remain steady
one minute after clicking the Shutter
button.
The picture subject was
not in the focus range of
the camera
• Keep a minimum distance of 60
inches between the picture subject
and the camera lens to stay in the
focus range of the camera.
The flash doesn't
fire
The flash mode is set to
Off
• Set the flash to any other mode
except Off.
The computer
cannot
communicate with
the camera
Camera power is off
• Turn on the camera.
USB cable is not
securely connected
• Connect cable to camera and
computer port.
The PC Camera
doesn't work
Driver is not installed (for • Install the camera driver.
Windows 98 user)
Camera power is off
• Turn on the camera.
USB cable is not
securely connected
• Connect cable to camera and
computer port.
Driver is not installed
• Install the camera driver.
- 32 -
Safety Precautions
Precautions for The camera
1
Do not shoot while driving or walking, otherwise it may cause traffic accident.
2
Do not trigger the flash in close proximity to human or animal eyes.
3
Expose to the intense light produced by the flash may damage eyesight,
especially for young children, please shoot at least one meter (39 inches) away
when using the flash.
4
Do not use the viewfinder to compose the sun or other intense light sources that
could damage your eyesight.
5
Don not allow the camera to come into contact with, or became immerse, water or
other liquids when using the camera, otherwise it may result in fire or electrical
shock.
6
Do not use camera in rain, snow, and at seaside, pond, and bathroom.
7
Turn off the camera immediately if it emits smoke or noxious fumes, and then
keep away from the camera.
8
Do not take pictures on the plane or any other places where taking picture is
forbidden, otherwise it will lead to accident.
9
Do not attempt to modify this camera in anyway. This may cause a fire, electronic
shock or severe damage to the camera.
10
Please do not use this product in close proximity to flammable or explosive gases
as this could increase the risk of explosion.
11
Do not swallow batteries or small camera accessories.
12
Do not insert or drop metallic or inflammable foreign objects into the camera
through access points, e.g. card slot and battery chamber. This may cause a fire
- 33 -
or electronic shock.
13
Do not operate this camera with wet hands. This could pose a risk of electronic
shock.
14
Under the environment with electrostatic discharge, the camera may malfunction
and require the user to reset the camera.
15
Under the environment with electrical fast transient (EFT), the camera may lose
function and require user to reset the camera.
16
Shield cables must be used with unit to ensure complies with the Class B FCC
limits.
17
It is normal that the temperature of the camera body rises after being in use for a
long period.
18
Do not leave the camera in places subject to extremely high temperature, such as
in a sealed vehicle, under direct sunlight, or in other places with extremely
variances in temperature. Exposure to extremely temperature may adversely
affect the camera’s internal components and could cause a fire.
19
Always use the camera and its accessories in a well-ventilated area.
20
Allowing dust to accumulate in the camera over a long period of time is hazardous
and in extreme prior to seasonal periods of high humidity.
- 34 -
Precautions for Batteries
1
Dispose of the batteries in a manner that complies with applicable laws.
2
Leakage, overheating, or burst batteries could result in fire or injury.
3
Do not short circuit, heat or dispose the batteries on fire.
4
Do not use old batteries with new ones, or mix brands of battery.
5
Ensure the batteries are positioned correctly with regard to polarity (+/-).
6
Batteries may lose power and leakage if kept inside the camera for a long time
without using. Please remove the batteries while the camera is not in use.
7
Do not use manganese batteries as they cannot supply sufficient power to support
the camera’s operations.
- 35 -
Specifications
Image Sensor
Lens
Still Image Resolution
(16MB SDRAM
internal Memory)
PC Mode – Frame
Rate
Video Capture
(16MB SDRAM
internal Memory)
Movie Mode
(for SD card)
Flash
Memory
Continuous Capture
White Balance
Exposure
Compression
Zoom
LCD Display
Self-Timer
Interface
Operating System
Power
Software Application
Accessories
3.2M pixels CMOS Sensor (2048 x 1536), 1/2-inch
F 2.8, f =9.3 mm; 2 Glasses & 2 Plastic
L 3.2M --- 2048 x 1536 Pixels
7pictures
M 2.0M ---1600 x 1200 Pixels
15 pictures
S XVGA --- 1280 x 1024 Pixels
20 pictures
VGA --- 640 x 480 Pixels
75 pictures
VGA 30 fps; QVGA 30 fps
QVGA 320 x 240 pixels 8fps
SVGA 192 x 144 pixels 8fps
Video: QVGA 320 x 240 Pixels 9 fps.
SVGA 192 x 144 pixels 9fps SD card included
Force, Off, Automatic
16MB SDRAM
N/A
Automatic / Daylight / Cloudy / Incandescent / Fluorescent lamp
Automatic / Manual (-1.5EV ~ +1.5EV)
JPEG / MJPEG (AVI)
4 x Digital Zoom for Preview & Playback
1.5” Color TFT
Yes
USB 1.1
Microsoft Windows 98 SE / 2000 / ME / XP
Support Image Download for RedHat Linux 8.0 and MAC OS 9 or Later
2 AAA 1.5V Alkaline Batteries (included)
ArcSoft PhotoImpresssion 5 & ArcSoft VideoImpression 2
Software CD, USB Cable, User’s Manual
C 2006 Vistaquest Corporation
○
- 36 -
www.vistaquestusa.com