1
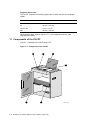
PrintServer 32 Printer
Optional Large Capacity Output
Tray User’s Guide
Order Number: EK–PLCOT–UG. A01
This manual describes how to operate the PrintServer 32 optional large
capacity output tray.
Revision/Update Information:
Digital Equipment Corporation
Maynard, Massachusetts
This is a new manual.
First Printing, February 1994
Digital Equipment Corporation makes no representations that the use of its products in the
manner described in this publication will not infringe on existing or future patent rights, nor do
the descriptions contained in this publication imply the granting of licenses to make, use, or sell
equipment or software in accordance with the description.
Possession, use, or copying of the software described in this publication is authorized only pursuant
to a valid written license from Digital or an authorized sublicensor.
© Digital Equipment Corporation 1994. All Rights Reserved.
The postpaid Reader’s Comments forms at the end of this document request your critical evaluation
to assist in preparing future documentation.
The following are trademarks of Digital Equipment Corporation: AXP, DEC, DECnet, DECprint,
Digital, OpenVMS, PrintServer, MicroVAX, Q–bus, ThinWire, TK, ULTRIX, ULTRIX–32, VAX,
VAXcluster, VAX DOCUMENT, VAXELN, VMS, and the DIGITAL logo.
Adobe and PostScript are trademarks of Adobe Systems, Incorporated, which may be registered in
certain jurisdictions.
UNIX is a registered trademark of UNIX System Laboratories, Inc.
AIX and IBM are registered trademarks of International Business Machines Corporation.
HP, HP-UX, and LaserJet are registered trademarks of Hewlett-Packard Company.
Microsoft and Windows are registered trademarks of Microsoft Corporation.
NetWare and Novell are registered trademarks of Novell, Inc.
OSF/1 is a registered trademark of Open Software Foundation, Inc.
SCO is a trademark of Santa Cruz Operations, Inc.
Sun and SunOS are registered trademarks of Sun Microsystems, Inc.
All other trademarks and registered trademarks are the property of their respective holders.
S2497
This document was prepared using VAX DOCUMENT Version 2.1.
FCC Notice
This equipment has been tested and found to comply with the limits of a Class A digital device,
pursuant to Part 15 of the FCC Rules. These limits are designed to provide a reasonable protection
against harmful interference when the equipment is operated in a commercial environment. The
equipment generates, uses, and can radiate radio frequency energy and, if not installed and used in
accordance with the instruction manual, may cause harmful interference to radio communications.
Operation of this equipment in a residential area is likely to cause harmful interference in which
case the user will be required to correct the interference at his own expense.
Any changes or modifications not expressly approved by the manufacturer could void the user’s
authority to operate the equipment.
Canadian Department of Communications compliance statement:
This equipment does not exceed Class A limits per radio noise emissions for digital apparatus
set out in the Radio Interference Regulation of the Canadian Department of Communications.
Operation in a residential area may cause unacceptable interference to radio and TV reception
requiring the owner or operator to take whatever steps are necessary to correct the interference.
Avis de conformité aux normes du ministère des Communications du Canada:
Cet équipement ne dépasse pas les limites de Classe A d’émission de bruits radioélectriques pour les
appareils numériques telles que perscrites par le Règlement sur le brouillage radioélectrique établies
par le ministère des Communications du Canada. L’exploitation faite en milieu résidentiel peut
entraîner le brouillage des réceptions radio et télé, ce qui obligerait le propriétaire ou l’opérateur a
prendre les dispositions nécessaires pour en éliminer les causes.
This document was prepared using VAX DOCUMENT Version 2.1.
Contents
Preface . . . . . . . . . . . . . . . . . . . . . . . . . . . . . . . . . . . . . . . . . . . . . . . . . . . . . . . . . . . .
vii
1 PrintServer 32 Printer Optional Large Capacity Output Tray
1.1
1.2
Components of the OLCOT . . . . . . . . . . . . . . . . . . . . . . . . . . . . . . . . . . . .
Messages . . . . . . . . . . . . . . . . . . . . . . . . . . . . . . . . . . . . . . . . . . . . . . . . . .
1–2
1–3
2 User Tasks
2.1
2.2
2.3
Sending Print Jobs to the Optional Large Capacity Output Tray . . . . . . . .
Removing Print Jobs from the OLCOT . . . . . . . . . . . . . . . . . . . . . . . . . . .
Turning the Printer and OLCOT On and Off . . . . . . . . . . . . . . . . . . . . . . .
2–1
2–1
2–4
3 Setting Up the OLCOT
3.1
3.2
3.3
3.3.1
3.3.2
3.4
3.4.1
3.4.2
When to Use — Large Jobs . . . . . . . . . . . . . . . . . . . . . .
Specifying the OLCOT as the Default Tray . . . . . . . . . .
Specifying Job Separation Pages . . . . . . . . . . . . . . . . . .
OpenVMS Systems . . . . . . . . . . . . . . . . . . . . . . . . . .
UNIX Systems . . . . . . . . . . . . . . . . . . . . . . . . . . . . .
Specifying a Special Tray for Job Flag and Burst Pages
OpenVMS Systems . . . . . . . . . . . . . . . . . . . . . . . . . .
UNIX Systems . . . . . . . . . . . . . . . . . . . . . . . . . . . . .
.
.
.
.
.
.
.
.
.
.
.
.
.
.
.
.
.
.
.
.
.
.
.
.
.
.
.
.
.
.
.
.
.
.
.
.
.
.
.
.
.
.
.
.
.
.
.
.
.
.
.
.
.
.
.
.
.
.
.
.
.
.
.
.
.
.
.
.
.
.
.
.
.
.
.
.
.
.
.
.
.
.
.
.
.
.
.
.
.
.
.
.
.
.
.
.
.
.
.
.
.
.
.
.
.
.
.
.
.
.
.
.
3–1
3–1
3–1
3–2
3–2
3–2
3–2
3–3
Jam Error Message . . . . . . . . . . . . . . . . . . . . . . . . . . . . . . . . . . . . . . . . . .
Clearing a Paper Jam . . . . . . . . . . . . . . . . . . . . . . . . . . . . . . . . . . . . . . . .
Possible Causes for Continuous Jams . . . . . . . . . . . . . . . . . . . . . . . . . . . .
4–1
4–1
4–2
4 Clearing Jams
4.1
4.2
4.3
5 Troubleshooting
5.1
5.2
Isolating the Problem . . . . . . . . . . . . . . . . . . . . . . . . . . . . . . . . . . . . . . . . .
Calling Digital Services . . . . . . . . . . . . . . . . . . . . . . . . . . . . . . . . . . . . . . .
5–1
5–1
Components of the OLCOT . . . . . . . . . . . . . . . . . . . . . . . . . . . . . . . . .
1–2
Figures
1–1
v
Tables
5–1
vi
Service Information . . . . . . . . . . . . . . . . . . . . . . . . . . . . . . . . . . . . . . .
5–1
Preface
Intended Audience
This guide is for users and system managers.
•
Users can use the guide for instruction on day-to-day operations, such as
sending jobs, removing paper, and clearing jams.
•
System managers can use the guide for setting up the tray for optimal use.
Users should be familiar with the operation of the PrintServer 32 printer.
Conventions
The following conventions are used throughout this document:
Convention
Meaning
UPPERCASE
OpenVMS commands, files, and utilities are shown in uppercase
letters. However, you can enter OpenVMS VAX commands in either
uppercase or lowercase letters.
Italics
Italics are used in examples to indicate that you are to substitute a
word or value.
[]
Brackets in command syntax lines indicate that the enclosed item is
optional.
Courier
Courier text (typewriter font) indicates user input and system
output.
vii
1
PrintServer 32 Printer Optional Large Capacity
Output Tray
Required Hardware
You must have a PrintServer 32 printer with a duplexing unit to use the
optional large capacity output tray (OLCOT).
Required Software Versions
The OLCOT runs with the following versions of software:
•
DECprint Supervisor Software, Version 1.0 or higher.
•
PrintServer Software, Version 5.0
Required Firmware
Before installing the OLCOT, confirm that the printer has the correct firmware
versions.
To find the firmware version levels, reboot the printer.
During the power-up process, the operator panel displays the following:
xx-xx-xx-xx-xx-xx
xx 2.0 1.2
If firmware versions below 2.0 and 1.2 are displayed, call Digital Services to
install FCO Kit ‘‘LPS32-F001.’’
Capacity of the OLCOT
The OLCOT can stack approximately 3,000 sheets of paper. To ensure reliable
printing, use high-quality paper, as listed in the PrintServer 32 Printer Operator’s
Guide.
PrintServer 32 Printer Optional Large Capacity Output Tray 1–1
Supported Paper Sizes
The OLCOT supports the following paper sizes in both portrait and landscape
modes:
Sheet Name
Media Size
Letter (A-size)
8.5 in. x 11.0 in.
A4
210 mm x 297 mm
Letter (LTR)
11.0 in. x 8.5 in.
A4R
297 mm x 210 mm
Sending other paper sizes to the OLCOT is not supported and may yield
unpredictable results.
1.1 Components of the OLCOT
Figure 1–1 identifies the parts of the OLCOT.
Figure 1–1 Components of the OLCOT
5
6
1
2
4
3
1–2 PrintServer 32 Printer Optional Large Capacity Output Tray
TAY-2031CD
Callout
!
"
Description
The Tray Cover allows access to the transport unit of the large
capacity output tray.
The Transport Unit moves the paper from the printer into the
OLCOT. Paper is delivered to the OLCOT face down. You can lift
the guide in the center of the transport unit to access paper jammed in
that area.
#
$
%
&
The Elevator moves up and down to accommodate the amount of
paper in the tray.
The Tray Door allows access to the print jobs and components within
the OLCOT.
The Tray Down Key lowers the elevator so you can easily remove
print jobs.
The LEDs indicate the status of the large capacity output tray:
Green Ready LED
Blinking: The elevator or the paper transport is moving.
Solid On: Power is on.
Amber Error LED
Blinking: An error condition exists: the tray is full, the covers are
open, the tray is not in the operating position, or paper is jammed.
1.2 Messages
The following messages could appear on the operator panel of the PrintServer 32
printer:
Optional output tray full
The OLCOT has reached its capacity. See Section 2.2 for instructions on removing
print jobs from the tray.
Clear jam at optional output device
Paper is jammed in the OLCOT. See Section 4.1 for instructions on clearing the
jam.
Close optional output device cover or door
This message is displayed if:
•
The cover or door of the tray is open or not secured.
Close the cover and door tightly.
•
The elevator is in the down position or is moving up.
If the elevator is in the down position, open and close the cover to move the
elevator to the top of the OLCOT.
PrintServer 32 Printer Optional Large Capacity Output Tray 1–3
2
User Tasks
This chapter explains how to send jobs to the OLCOT and how to remove jobs
from the tray.
2.1 Sending Print Jobs to the Optional Large Capacity Output Tray
This section provides examples of the software commands for sending print jobs
to the printer. For more information, refer to your software documentation.
OpenVMS and DECprint Supervisor, V1.1
$ PRINT/QUE=queuename/PARAM=OUTPUT_TRAY=LCOS filename
OpenVMS and DECprint Supervisor, V1.0
$ PRINT/QUE=queuename/PARAM=OUTPUT_TRAY=1 filename
BSD UNIX (including SunOS and OSF/1)
% lpspr -Mqueuename -olcos filename | lpr
UNIX System V (including IBM-AIX, HP-UX, SCO UNIX, Solaris, SCO
UNIX/DECadvantage)
% lp -dqueuename -o"outtray=lcos" filename
2.2 Removing Print Jobs from the OLCOT
Use the following procedure to remove print jobs from the tray:
1. Press Pause on the operator panel. Wait for the printer to display the
following message on the operator panel before proceeding:
Paused—Press Resume to Continue
User Tasks 2–1
2. Press the Tray Down key to lower the elevator.
The green Ready LED blinks while the elevator is in motion. The operator
panel displays the following message until the elevator reaches its lowest
position:
Close optional output device cover or door
If the paper tray is full, the elevator tray is at its lowest operating position.
ERROR
READY
TAY-2032CD
2–2 User Tasks
3. Open the tray door and remove all the paper in manageable sections.
TAY-2033CD
Tip: Remove all the paper in the tray, not just your print job. This prevents
paper jams and enables neater stacking.
User Tasks 2–3
4. Close the tray door. The elevator moves up automatically and the operator
panel displays the following message until the elevator reaches its operating
position:
Close optional output device cover or door
TAY-2034CD
5. Press
Resume
on the operator panel.
2.3 Turning the Printer and OLCOT On and Off
The power switch on the back of the OLCOT controls the power to both the
OLCOT and the printer. Use this power switch as the Master switch to supply
power to both the printer and the tray.
Avoid turning the printer or OLCOT on and off with the power switch on the
printer and the OLCOT. Powering the printer and OLCOT on and off with both
switches can result in erroneous diagnostic messages.
2–4 User Tasks
3
Setting Up the OLCOT
This chapter explains how the system manager can set up the printer and
OLCOT for the most efficient use.
3.1 When to Use — Large Jobs
The OLCOT, when combined with an optional large capacity input tray, allows
you to turn your PrintServer 32 printer into a production printer. You can
print jobs with many pages or many copies of large jobs without worrying about
running out of paper or overflowing the top output trays.
Because the OLCOT does not have a sorting or offset feature, using it for all print
jobs is not recommended. The purpose of the tray is for holding jobs that exceed
the capacity of the other output trays. Therefore, you might want to reserve the
printer for large print jobs.
3.2 Specifying the OLCOT as the Default Tray
To specify the OLCOT as the default tray, use the following procedure:
1. Edit the defaults file, for example:
LPS$SUPPORT:LPSDEFAULTS.printer-node-name
or
/usr/kits/lps/lpsdefaults.printer-node-name
2. Specity 4 setdefaultoutputtray to set the OLCOT as the default output
tray.
3. Reboot the printer or use the Remote Console Facility ‘‘reconfigure’’ command.
See the PrintServer Software management guide for your system for more
information.
3.3 Specifying Job Separation Pages
This section explains how to specify job separation pages.
Types of Separation Pages
Job separation pages include:
Type of Page
Description
Job flag pages
Precedes each file or job that is printed. The
flag page contains information about the
printer and the print job.
Job burst pages
Separates print jobs or copies of files.
Job trailer pages
Follows each file printed.
Setting Up the OLCOT 3–1
3.3.1 OpenVMS Systems
Procedure:
To enable job separation pages, use the following procedure:
1. Edit the DCPS$STARTUP.COM file, where the job separation pages are
specified.
2. Include the /SEPARATE qualifier to specify which job separation pages you
want for a queue.
The following example specifies job flag and trailer pages, but disables job
burst pages:
@SYS$STARTUP:DCPS$EXECUTION_QUE
DCPS_TTB!P1 Execution queue name
TTB4:!P2 Device name
...
"/SEPARATE=(FLAG,NOBURST,TRAILER)" !P5 Default queue qualifiers
Job Burst Pages
Job burst pages automatically print when you specify job flag pages. To
disable job burst pages, use /SEPARATE=(FLAG,NOBURST).
3.3.2 UNIX Systems
To set job separation pages, invoke lpssetup and set the print client attribute
‘‘Enable Banners’’ to ‘‘yes.’’ See the PrintServer Software management guide for
your UNIX system for more information.
3.4 Specifying a Special Tray for Job Flag and Burst Pages
You can specify that job flag and burst pages come from a different input tray
than the rest of the print job. This technique is useful if you want to use colored
paper for separating print jobs.
3.4.1 OpenVMS Systems
Restriction:
This procedure requires the DCPS-PLUS license.
Procedure:
Issue the following command to specify the input tray for flag and burst pages:
$ DEFINE/SYSTEM DCPS$queuename_SEPARATOR_TRAY n
The variable n can be any input tray. The following table lists which values to
use for the PrintServer 32 printer:
To specify this input tray . . .
Specify this value . . .
TOP
1
MIDDLE
2
BOTTOM
3
3–2 Setting Up the OLCOT
3.4.2 UNIX Systems
To specify the input tray for separation pages, invoke lpssetup and set the print
client attribute ‘‘Banner Tray’’ to one of the following choices:
•
Top
•
Middle
•
Bottom
•
Default (uses the default input tray)
See the PrintServer Software management guide for your UNIX system for more
information.
Setting Up the OLCOT 3–3
4
Clearing Jams
4.1 Jam Error Message
The amber Error LED blinks and the operator panel displays the following
message when a paper jam occurs:
Clear jam at optional output device
4.2 Clearing a Paper Jam
To clear a paper jam, perform the following:
1. Press
Pause
on the operator panel.
2. Open the door and cover of the LCOT.
TAY-2036CD
Clearing Jams 4–1
3. Remove paper from the following areas:
Stacking area
Transport area
You can lift the guide in the center of the transport unit to access the
paper. Remove the paper carefully and avoid leaving torn paper in the
printer.
TAY-2035CD
4. Close the door and cover of the large capacity output tray.
5. Check for jammed paper in other parts of the printer, such as the duplex unit
or lower side door. See the PrintServer 32 Printer Operator’s Guide and the
labels inside the printer for instructions on clearing jams inside the printer.
6. Press
Resume
on the operator panel.
4.3 Possible Causes for Continuous Jams
If you encounter an inordinate number of paper jams, check the following:
•
The paper quality matches the PrintServer 32 printer media specifications.
•
The paper sizes sent to the tray are not Letter or A4.
•
All paper has been removed from the paper paths of the printer and the tray.
See Chapter 5 for more troubleshooting information.
4–2 Clearing Jams
5
Troubleshooting
5.1 Isolating the Problem
Before proceding with any testing, verify that the power cord and the
communications cable (with the 9-pin connector on the end) are correctly
connected. See the installation sheet for proper configuration. Use the following
procedure to troubleshoot:
1. Remove the OLCOT from the printer. (See the installation sheet.)
2. Keep the power cord and communications cable attached.
3. Send a sheet of paper to the OLCOT slot.
If the paper feeds to the OLCOT slot without jamming, the problem exists in
the OLCOT. Replace the OLCOT.
The OLCOT does not have any replacement parts. Replace the unit, if any of the
following conditions occur:
•
The elevator does not move after you close the door and cover or when you
press the Tray Down key.
•
A sheet of paper that you send to the OLCOT slot does not activate the
horizontal transport motor and belt.
•
The green Ready LED does not illuminate even though power is applied to
the unit.
•
Mechanical components are broken, causing jams or preventing operation.
5.2 Calling Digital Services
Refer to the following table to find the service phone number for your area:
Table 5–1 Service Information
United States
1–800–354–9000
Outside the US
Contact your local sales office.
Troubleshooting 5–1