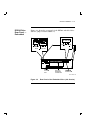
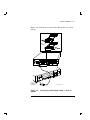
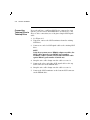
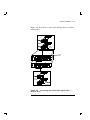
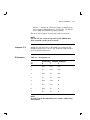
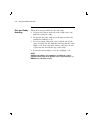
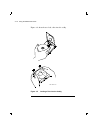
1
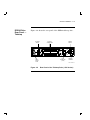
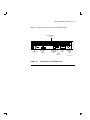
RRD42 Disc Drive
Owner’s Manual
Order Number EK-RRD42-OM-003
Digital Equipment Corporation
First Edition, February 1991
The information in this document is subject to change without notice and
should not be construed as a commitment by Digital Equipment Corporation.
Digital Equipment Corporation assumes no responsibility for any errors that
may appear in this document.
Restricted Rights: Use, duplication, or disclosure by the U. S. Government is
subject to restrictions as set forth in subparagraph ( c ) ( 1 ) ( ii ) of the Rights
in Technical Data and Computer Software clause at DFARS 252.227–7013.
Copyright © Digital Equipment Corporation 1991
All Rights Reserved.
Printed in U.S.A.
The postpaid Reader’s Comment Card included in this document requests the
user’s critical evaluation to assist in preparing future documentation.
FCC NOTICE: The equipment described in this manual has been certified to
comply with the limits for a Class B computing device, pursuant to Subpart
J of Part 15 of FCC Rules. Only peripherals (computer input/output devices,
terminals, printers, etcetera) certified to comply with the Class B limits
may be attached to this computer. Operation with noncertified peripherals
may result in interference to radio and television reception. This equipment
generates and uses radio frequency energy and if not installed and used
properly, that is, in strict accordance with the manufacturer’s instructions,
may cause interference to radio and television reception. It has been type
tested and found to comply with the limits for a Class B computing device
in accordance with the specifications in Subpart J of Part 15 of FCC Rules,
which are designed to provide reasonable protection against such interference
in a residential installation. However, there is no guarantee that interference
will not occur in a particular installation. If this equipment does cause
interference to radio or television reception, which can be determined by
turning the equipment off and on, the user is encouraged to try to correct the
interference by one or more of the following measures:
–
Reorient the receiving antenna.
–
Move the computer away from the receiver.
–
Plug the computer into a different outlet so that computer and receiver
are on different branch circuits.
If necessary, the user should consult the dealer or an experienced
radio/television technician for additional suggestions. The user may find
the following booklet prepared by the Federal Communications Commission
helpful: How to Identify and Resolve Radio-TV Interference Problems. This
booklet is available from the US Government Printing Office, Washington, DC
20402, Stock No. 004–000–00398–5
The shielded interface cable recommended in this manual must be used with
this equipment to comply with the limits for a computing device pursuant to
subpart J of Part 15 of FCC rules.
DOC CANADA/CSA 108.8 class/classe B
The following are trademarks of Digital Equipment Corporation.
BASIC, DEC, DECdirect, DECmailer, DECservice, MicroVAX, SERVICenter,
Q–bus, RRD42, ULTRIX, VAX, VMS, and the DIGITAL logo.
MS–DOS is a registered trademark of Microsoft Corporation.
SCO is a trademark of Santa Cruz Operations, Incorporated.
UNIX is a registered trademark of AT&T Bell Laboratories.
This document was prepared and published by Educational Services
Development and Publishing, Digital Equipment Corporation.
This RRD42 drive is classified as a Class 1 laser product. The Class 1 laser
product label is on the bottom of the drive.
•
CLASS 1 LASER PRODUCT
•
LASER KLASSE 1
•
APPAREIL À LASER DE CLASSE 1
•
LUOKAN 1 LASERLAITE
•
PRODUCTO LÁSER DE CLASE 1
NOTICE
THIS NOTICE IS APPLICABLE TO USA AND CANADA ONLY.
If shipped to USA, use the UL LISTED power cord specified below for
100–120 V operation.
If shipped to CANADA, use the CSA CERTIFIED power cord specified below
for 100–120 V operation.
USE POWER CORD 17-03040-01. DO NOT USE ANY OTHER POWER
CORD.
Plug Cap
Cord
Length
Rating
Parallel blade with ground pin
(NEMA 5-15P Configuration)
Type SVT or SJT, three 16 or 18 AWG wires (shielded )
Maximum 15 feet
Minimum 10 A, 125 V
ATTENTION
LIRE LA REMARQUE DANS LE MODE D’EMPLOI
REMARQUE
CETTE REMARQUE NE CONCERNE QUE LES ETATS-UNIS ET LE
CANADA.
En cas d’envoi aux Etats-Unis, n’utiliser que le cordon d’alimentation inscrit
sur LISTE UL et spécifié ci-dessous pour utilisation sur 100–120 V.
En cas de’envoi au CANADA, n’utiliser que le cordon d’alimentation
CERTIFIE Par CSA et spécifié ci-dessous pour utilisation sur 100–120
V.
UTILISER CORDON D’ALIMENTATION 17-03040-01. N’UTILISER AUCUN
AUTRE CORDON D’ALIMENTATION.
Fiche
Cordon
Longeur
Capacité
Lame parallé avec une broche de mise à la terre
(Configuration NEMA 5-15P)
Type SVT ou SJT, trois fils 16 ou 18 AWG (blindé)
Maximum 15 pieds
Minimum 10 A, 125 V
Für Bundesrepublik Deutschland For Federal Republic of Germany Pour la
République féderale d’Allemagne
Bescheinigung des Herstellers/Importeurs
Hiermit wird bescheinigt, daß die Einrichtung in Übereinstimmung mit den
Bestimmungen der DBP-Verfügung 1046/84, Amtsblatt Nr. 163/1984, und
Grenzwertklasse "B" der VDE0871, funkentstört ist.
Der Deutschen Bundespost (DBP) wurde das Inverkehrbringen dieses Gerätes
angezeigt und die Berechtigung zur Überprüfung der Serie auf Einhaltung
der Bestimmungen eingeräumt.
Betreiberhinweis
Wir sind verpflichtet, Sie auf folgende Fakten hinzuweisen (DBP-Verfügung
1046/84, §2, Abschnitt 5):
Das Gerät wurde funktechnisch sorgfältig entstört und geprüft. Beim
Zusammenschalten mit anderen EDV- Geräten können im ungünstigsten
Fall Funkstörungen entstehen, die dann im Einzelnen zusätzliche
Funkentstörungs- Maßnahmen durch den Benutzer erfordern.
Externe Datenkabel
Sollte ein Austausch der von Digital spezifizierten Datenkabel nötig werden,
muß der Betreiber für eine einwandfreie Funkentstörung sicherstellen,
daß das Austauschkabel im Aufbau und Abschirmqualität dem Digital
Originalkabel entsprechen
Laser
•
Typ: Halbleiterlaser GaAlAs
•
Wellenlänge: 780 nm
•
Ausgangsleistung: 0,6 mW
•
Strahldivergenz: 53,4°±1,5°
ZU IHRER SICHERHEIT
Vorsicht
Um Feuergefahr und die Gefahr eines elektrischen Schlages zu vermeiden,
darf das Gerät weder Regen noch Feuchtigkeit ausgesetzt werden.
Um einen elektrischen Schlag zu vermeiden, darf das Gehäuse nicht geöffnet
werden. Überlassen Sie Wartungsarbeiten stets nur einem Fachmann.
Überlassen Sie Wartungsarbeiten dem von Sony zugelassenen Fachmann.
Achtung
Da der interne Laserstrahl in lhre Augen eindringen und Verletzugen
verursachen kann, darf das Gehäuse nicht selbst geöffnet werden. Überlassen
Sie Wartungsarbeiten stets nur einem Fachmann.
Die Verwendung von Brillen, Kontaktlinsen usw. vergrößert die Gefahr.
Zur besonderen Beachtung
Zur Sicherheit
Sollte ein fester Gegenstand oder Flüssigkeit in das Geräteinnere gelangen,
trennen Sie das Gerät von der Wandsteckdose ab und lassen Sie es von einem
Fachmann überprüfen, bevor Sie es weiter verwenden.
Zum Abziehen des Kabels fassen Sie stets am Stecker und niemals am Kabel
selbst an.
Zur Aufstellung
Stellen Sie das Gerät weder auf einer weichen Unterlage (z.B. Decke,
Teppich) noch in der Nähe von Vorhängen, Tapeten usw. auf, da hierdurch
die Ventilationsöffnungen blockiert werden können.
Zur Reiningung
Verwenden Sie zur Reinigung des Gehäuses, des Bedienungspultes und der
Bedienungselemente ein trockenes, weiches Tuch oder ein weiches, leicht
mit mildem Haushaltsreiniger angefeuchtetes Tuch. Lösemittel wie Alkohol
oder Benzin dürfen nicht verwendet werden, da diese die Gehäuseoberfläche
angreifen.
Contents
About This Manual
1
RRD42 Disc Drive Product Description
Overview . . . . . . . . . . . . . . . . . . . . . . . . . . . . . . . . . . . . . . . . . . . . . . . . . . .
2
ix
1–1
Generic Installation
Familiarizing Yourself with the Drive . . . . . . . . . . . . . . . . . . . . . . . . . . . . .
2–1
Connecting the Cables . . . . . . . . . . . . . . . . . . . . . . . . . . . . . . . . . . . . . . . .
2–6
Installing the RRD42 Tabletop Drive . . . . . . . . . . . . . . . . . . . . . . . . . . . . . 2–11
Installing the RRD42 Embedded Drive . . . . . . . . . . . . . . . . . . . . . . . . . . . . 2–12
Verifying the RRD42 Drive Installation . . . . . . . . . . . . . . . . . . . . . . . . . . . 2–14
3
Using the RRD42 Disc Drive
How the RRD42 Drive Operates . . . . . . . . . . . . . . . . . . . . . . . . . . . . . . . . .
3–1
Operating the RRD42 Drive . . . . . . . . . . . . . . . . . . . . . . . . . . . . . . . . . . . . 3–11
4
Problem Solving and Preventive Maintenance
Problem Solving . . . . . . . . . . . . . . . . . . . . . . . . . . . . . . . . . . . . . . . . . . . . .
4–2
Preventive Maintenance . . . . . . . . . . . . . . . . . . . . . . . . . . . . . . . . . . . . . . .
4–3
Generic, System-Based Diagnostics . . . . . . . . . . . . . . . . . . . . . . . . . . . . . . .
4–4
Repair Services . . . . . . . . . . . . . . . . . . . . . . . . . . . . . . . . . . . . . . . . . . . . . .
4–4
iii
iv Contents
A
RRD42 Disc Drive Specification
Specification . . . . . . . . . . . . . . . . . . . . . . . . . . . . . . . . . . . . . . . . . . . . . . . .
A–1
Index
Figures
1–1
2–1
2–2
2–3
2–4
2–5
2–6
3–1
3–2
3–3
3–4
3–5
3–6
3–7
4–1
RRD42 Drive — Tabletop and Embedded . . . . . . . . . . . . . . . . . . .
Front Panel of the RRD42 Drive . . . . . . . . . . . . . . . . . . . . . . . . . .
Rear Panel of the Tabletop Drive (–DA Version) . . . . . . . . . . . . . .
Rear Panel of the Embedded Drive (–AA Version) . . . . . . . . . . . .
Connecting a SCSI Signal Cable — Drive to System . . . . . . . . . .
Connecting the 50-Pin SCSI Signal Cable — Drive to Drive . . . . .
Connecting a Power Cable to the RRD42 Drive Power Connector .
Front Panel of the RRD42 Drive . . . . . . . . . . . . . . . . . . . . . . . . . .
Rear Panel of the Tabletop Drive (–DA Version) . . . . . . . . . . . . . .
Rear Panel of the Embedded Drive (–AA Version) . . . . . . . . . . . .
Opening the Caddy . . . . . . . . . . . . . . . . . . . . . . . . . . . . . . . . . . . .
Loading a Disc into the Caddy . . . . . . . . . . . . . . . . . . . . . . . . . . .
Loading the Drive . . . . . . . . . . . . . . . . . . . . . . . . . . . . . . . . . . . . .
Ejecting the Caddy from the Drive . . . . . . . . . . . . . . . . . . . . . . . .
Manually Ejecting the Caddy . . . . . . . . . . . . . . . . . . . . . . . . . . . .
.
.
.
.
.
.
.
.
.
.
.
.
.
.
.
.
.
.
.
.
.
.
.
.
.
.
.
.
.
.
1–3
2–2
2–3
2–5
2–7
2–9
2–10
3–3
3–5
3–7
3–9
3–10
3–12
3–13
4–2
Tables
2–1
ID Jumpers 0–2 . . . . . . . . . . . . . . . . . . . . . . . . . . . . . . . . . . . . . . . . 2–13
About This Manual
Introduction
Purpose
This manual describes the RRD42 disc drive, the drive’s
installation, and the drive’s specifications.
Intended
Audience
This manual is intended for the owner of the RRD42 disc drive.
No prerequisites are necessary to use this manual.
Manual Structure Chapter 1 describes the RRD42 disc drive.
Chapter 2 shows how to install the RRD42 disc drive.
Chapter 3 shows how to use the RRD42 disc drive.
Chapter 4 shows how to maintain the RRD42 disc drive and
how to solve drive problems.
Appendix A provides RRD42 disc drive specifications.
ix
1
RRD42 Disc Drive Product Description
Overview
Description
The RRD42 disc drive is a half-height, 5¼-inch, 600-megabyte,
compact disc, storage device compatible with Digital systems.
The drive, capable of audio playback, has audio line outputs
and a headphone jack.
NOTE
The audio capability is included in the hardware and is
operating system dependent. Operating system support
will be added when it becomes available.
The device uses the SCSI-2 (small computer system
interconnect) bus, and can be used on low-end, desktop, and
Digital workstation systems.
Two Drive
Versions
The RRD42 drive is the primary load device for operating
system software and layered products. Two versions of the
drive are available: the tabletop version and the embedded
version. Although the installation of the drives differ, they
function the same. Figure 1–1 shows the RRD42 front panel.
1–1
1–2 RRD42 Disc Drive Product Description
Tabletop Drive
The RRD42 tabletop drive is a standalone unit and contains
industry-standard SCSI connectors on the rear panel. An
address selection switch, 3-pin ac connector, and audio output
jacks are also on the rear panel.
Embedded Drive
The RRD42 embedded drive is designed to be installed in a host
system. The embedded drive can be used in a horizontal or
vertical position.
RRD42 Disc Drive Product Description 1–3
RRD42 Drive
Figure 1–1 shows the RRD42 disc drive.
CADDY INSERTION
SLOT
HEADPHONE
JACK
HEADPHONE
LEVEL
CONTROL
DIMPLE FOR
ID NUMBER
LABEL
EJECT
BUTTON
BUSY
INDICATOR
EMERGENCY
EJECT
HOLE
SHR−XR0062−90
Figure 1–1
RRD42 Drive — Tabletop and Embedded
1–4 RRD42 Disc Drive Product Description
System Support
The RRD42 drive subsystem is supported under VMS, ULTRIX,
MS–DOS, and SCO UNIX operating systems.
To determine the correct operating system level, consult your
Digital sales representative.
Ordering
Additional Disc
Caddies
To order additional disc caddies, contact your Digital sales
representative or DECdirect ordering service. Refer to part
number 30-34512-01.
2
Generic Installation
Familiarizing Yourself with the Drive
In this Chapter
This chapter describes:
•
Becoming familiar with the drive
•
Connecting the cables
•
Installing the RRD42 tabletop drive
•
Installing the RRD42 embedded drive
•
Setting the SCSI ID address
•
Verifying installation with power-on self-test (POST)
This chapter provides general installation procedures. This
chapter does not give specific, host system installation
instructions.
Part Locations
To familiarize yourself with the tabletop and embedded drives’
buttons, switches, and connectors, see Figure 2–1. The tabletop
and embedded drives have the same front panel.
See Figure 2–2 for a rear view of the RRD42 tabletop drive and
Figure 2–3 for a rear view of the RRD42 embedded drive.
2–1
2–2 Generic Installation
RRD42 Drive
Front Panel
Figure 2–1 shows the front panel of the RRD42 drive.
CADDY INSERTION
SLOT
HEADPHONE
JACK
HEADPHONE
LEVEL
CONTROL
DIMPLE FOR
ID NUMBER
LABEL
EJECT
BUTTON
BUSY
INDICATOR
EMERGENCY
EJECT
HOLE
SHR−XR0062−90
Figure 2–1
Front Panel of the RRD42 Drive
Generic Installation 2–3
RRD42 Drive
Rear Panel —
Tabletop
Figure 2–2 shows the rear panel of the RRD42 tabletop drive.
ID SELECT
SWITCH
SCSI BUS
CONNECTORS
POWER
SWITCH
1
L
0
R
AUDIO
OUTPUT
JACKS
AC IN
CONNECTOR
(3 PIN)
GROUND
TERMINAL
SHR−XR0063−90
Figure 2–2
Rear Panel of the Tabletop Drive (–DA Version)
2–4 Generic Installation
Mode Select
Jumper
IMPORTANT
The mode select jumper is a USER-SELECTABLE feature
for the embedded drive only. If you do not select the
correct mode, the drive does not operate properly.
The mode select jumper has two modes:
Mode 0 — Jumper Out. In this mode the drive block size
is 2 kilobytes. Use Mode 0 under MS–DOS and SCO UNIX
operating systems.
Mode 1 — Jumper In. When the jumper is installed, the
drive operates with a block size of 512 bytes. Use Mode 1
under VMS and ULTRIX operating systems.
The mode select jumper does not affect other operations.
NOTE
The microcode revision reported by the RRD42 disc
drive depends on the mode selected.
Generic Installation 2–5
RRD42 Drive
Rear Panel —
Embedded
Figure 2–3 shows the rear panel of the RRD42 embedded drive
with the jumper installed (Mode 1).
L
GND
5V+5%
R
AUDIO OUT
MODE
0 1
GND 12V+10%
DC INPUT
2
ID SELECT
FRAME
GROUND
TAB
SCSI BUS
INTERFACE
CONNECTOR
POWER−IN
CONNECTOR
SHR−XR0064−90
Figure 2–3
Rear Panel of the Embedded Drive (–AA Version)
2–6 Generic Installation
Connecting the Cables
WARNING
Connecting
Tabletop Drive to To prevent fire or shock hazard, do not expose the unit
to rain or moisture.
System
To avoid electrical shock, do not open the cabinet. Refer
servicing to qualified personnel only.
If you are connecting an RRD42 tabletop drive directly
to your system, use the SCSI signal cable supplied in
your system installation kit..
If you do not have this cable, contact your Digital sales
representative. Use a cable supplied by Digital Equipment
Corporation. Failure to do so may result in degraded
performance of your RRD42 drive.
To connect a SCSI cable — drive to system — perform the
following steps:
1. See Figure 2–4.
2. Connect one end of the cable to the host system SCSI port.
3. Connect the other end of the SCSI signal cable to the top
SCSI connector on the rear of the RRD42 drive.
4. Snap the wire cable clamps into place to secure the SCSI
cable.
5. Connect the SCSI terminator to the bottom SCSI connector
on the rear of the RRD42 drive, if this device is to be the
last unit on the bus.
6. Snap the wire cable clamps into place to secure the
terminator.
Generic Installation 2–7
Figure 2–4 shows how to connect the tabletop drive to a host
system.
SCSI
CABLE
SCSI
TERMINATOR
L
1
0
R
o
HOST
SYSTEM
SCSI PORT
Figure 2–4
System
SHR−XR0065−90
Connecting a SCSI Signal Cable — Drive to
2–8 Generic Installation
If you already have a tabletop SCSI device connected to your
Connecting
system,
you can connect the RRD42 drive to that device. For
Tabletop Drive to
drive to drive connections, use a 50-pin to 50-pin SCSI signal
Tabletop Drive
cable.
1. See Figure 2–5.
2. If present, remove the SCSI terminator from the existing
SCSI drive.
3. Connect one end of a SCSI signal cable to the existing SCSI
drive.
NOTE
If the host system uses a KZQSA adapter module, the
SCSI cables must be type BC06P (part number
17-02659). Other systems can use the standard cable
option BC19J (part number 17-01351-xx).
4. Snap the wire cable clamps onto the cable to secure it.
5. Connect the other end of the SCSI signal cable to the top
SCSI connector on the RRD42 drive.
6. Snap the wire cable clamps onto the cable to secure it.
7. Connect the SCSI terminator to the bottom SCSI connector
on the RRD42 drive.
Generic Installation 2–9
Figure 2–5 shows how to connect the tabletop drive to another
tabletop drive.
SCSI
CABLE
SCSI
CABLE
TO HOST
SYSTEM
L
1
0
R
L
1
0
R
SCSI
CABLE
SCSI
TERMINATOR
SHR−XR0066−90
Figure 2–5 Connecting the 50-Pin SCSI Signal Cable —
Drive to Drive
2–10 Generic Installation
Connecting the
Power Cable
To connect the power cable, perform the following steps:
1. Make sure the RRD42 drive power switch (Figure 2–6) is
off.
2. Connect the power cable to the RRD42 drive’s power
connector (Figure 2–6).
3. Connect the other end of the power cable to a nearby ac
outlet.
NOTE
For Digital service personnel — the power cable is the
drive’s disconnect device from the main ac power source.
AC IN
CONNECTOR
(3 PIN)
POWER
SWITCH
L
1
0
R
SHR−XR0067−90
SHR−XR0067−90B
Figure 2–6 Connecting a Power Cable to the RRD42 Drive
Power Connector
Generic Installation 2–11
Installing the RRD42 Tabletop Drive
Introduction
If you are installing an RRD42 drive on a running system,
have your system manager perform an orderly shutdown of
the operating system: stop and power down the system and all
attached SCSI devices.
SCSI Cable
Requirements
Up to seven SCSI devices can be connected through a SCSI bus
in a daisy chain. The total length of the SCSI cables (including
internal cables in attached expansion boxes) should not exceed
6 meters (19.67 feet).
On Digital systems using the KZQSA SCSI to Q–bus adapter,
the length of the external SCSI cable cannot exceed 2 meters
(6.56 feet). The cables used with the KZQSA must be option
number BC06P or part numbers: 17-02659-01, 0.30 meters (1
foot); 17-02659-02, 1.82 meters (6 feet); and 17-02659-03, 0.76
meters (2.5 feet)
The KZQSA adapter can support only a maximum of two
devices on each port.
Assigning the
SCSI ID
•
Assign the SCSI bus ID number for each drive using the ID
SELECT switch on the rear (Figure 2–2).
•
Do not use the same ID number as the one already set for
the other SCSI device on the same bus.
2–12 Generic Installation
Installing the RRD42 Embedded Drive
Introduction
The installation of the embedded drive varies with different
host systems. Consult your host system installation guide for
correct mounting directions.
NOTE
The embedded drive is shipped with a plastic cover
to prevent dust infiltration. DO NOT REMOVE THIS
COVER. Take care when installing the cables in the rear
of the embedded drive. Make sure the dust cover does
not interfere with the SCSI cable connector.
The RRD42 does not require periodic cleaning. However,
the environment where the drive is installed should be
clean.
Setting the SCSI
ID
A set of pins with jumpers installed on the rear panel of the
embedded drive must be set to correspond to the configuration
of your computer system (Figure 2–3). Remove and install
jumpers as necessary, using small pliers or tweezers.
Mode Select
Jumper
IMPORTANT
The mode select jumper is a USER-SELECTABLE feature.
If you do not select the correct mode, the drive does not
operate properly.
The mode select jumper has two modes:
Mode 0 — Jumper Out. In this mode the drive block size
is 2 kilobytes. Use Mode 0 under MS–DOS and SCO UNIX
operating systems.
Generic Installation 2–13
Mode 1 — Jumper In. When the jumper is installed, the
drive operates with a block size of 512 bytes. Use Mode 1
under VMS and ULTRIX operating systems.
The mode select jumper does not affect other operations.
NOTE
The microcode revision reported by the RRD42 disc
drive depends on the mode selected.
Jumpers 0–2
Assign the embedded drive’s ID number by setting the ID
SELECT jumpers in or out. Do not assign the same number
used on another SCSI device.
ID Jumpers
Table 2–1 ID Jumpers 0–2
ID
ID SELECT Jumper Settings
0
1
2
0
Out
Out
Out
1
In
Out
Out
2
Out
In
Out
3
In
In
Out
4
Out
Out
In
5
In
Out
In
6
Out
In
In
7
In
In
In
NOTE
Consult system documentation for further addressing
information.
2–14 Generic Installation
Changing the
SCSI ID Jumper
Setting
If either of the following conditions exist, change the SCSI ID
jumper setting:
•
If you install the RRD42 drive on a system that already has
a SCSI device attached, use any available SCSI ID. (You
may need to consult your system manager for available
SCSI IDs.)
•
If you install multiple RRD42 (or other SCSI) drives, make
sure the SCSI ID for each drive is set with the drive’s
unique SCSI ID. No two drives in the series can have
identical SCSI IDs.
If you need to change the SCSI ID, select the desired SCSI ID
from Table 2–1.
Verifying the RRD42 Drive Installation
Executing POST
To verify successful installation of the RRD42 drive by
executing power-on self-test (POST), perform the following
steps:
1. Power on the drive.
2. Load a disc with the caddy into the drive.
3. The BUSY indicator lights for about 10 seconds and then
extinguishes.
4. Continue the procedure: power up the remaining external
devices, and then power up the host systems.
5. Run one pass of the host system or MicroVAX diagnostic
monitor (MDM) diagnostics to verify system operation.
3
Using the RRD42 Disc Drive
How the RRD42 Drive Operates
In this Chapter
This chapter describes:
•
Location and function of components on the tabletop and
embedded drives
•
System software
•
Disc and caddy handling
•
Operating procedure
3–1
3–2 Using the RRD42 Disc Drive
The RRD42 tabletop and embedded drives have the same
Parts and
front
panel parts and controls. The following table describes
Controls — Front
the location and function of the drive’s front panel parts and
controls (Figure 3–1).
Parts and Controls
Function
Caddy insertion slot
Accepts a caddy loaded with a
disc.
Emergency eject hole
Provides a means to manually
eject a caddy (See chapter 4)
Eject button
Ejects the caddy from the drive
when power is on.
Busy indicator
Lights when data is read from
the disc, and blinks during seek
operations.
Dimple
Where the drive number label is
placed.
Headphone level control
Adjusts the volume.
Headphone jack
Accepts headphone connector.
.
Using the RRD42 Disc Drive 3–3
Figure 3–1 shows the front panel of the RRD42 drive.
CADDY INSERTION
SLOT
HEADPHONE
JACK
HEADPHONE
LEVEL
CONTROL
DIMPLE FOR
ID NUMBER
LABEL
EJECT
BUTTON
BUSY
INDICATOR
EMERGENCY
EJECT
HOLE
SHR−XR0062−90
Figure 3–1
Front Panel of the RRD42 Drive
3–4 Using the RRD42 Disc Drive
Tabletop
Components —
Rear
Power Switch —
Tabletop
The following table describes the location and function of the
tabletop drive’s components in the rear panel (Figure 3–2).
Components
Function
ID SELECT switch
Selects unit SCSI address.
SCSI bus connectors
Connect to the host computer’s
SCSI bus connector or to another
SCSI device using a SCSI bus
cable.
POWER switch
Powers on and off the drive.
Ground terminal
Connects to the host computer
or an amplifier to reduce audio
noise.
AC IN connector (3-pin)
Connects to an ac power source
with supplied ac power cord.
AUDIO output jacks
Connect to CD or AUX input
jacks of an amplifier using an
audio cable.
Press the power switch to turn on, or turn off, the RRD42
drive. The on position is designated with a 1. The off position
is designated with a 0 (Figure 3–2).
Using the RRD42 Disc Drive 3–5
Figure 3–2 shows the rear panel components of the RRD42
tabletop drive.
ID SELECT
SWITCH
SCSI BUS
CONNECTORS
POWER
SWITCH
1
L
0
R
AUDIO
OUTPUT
JACKS
AC IN
CONNECTOR
(3 PIN)
GROUND
TERMINAL
SHR−XR0063−90
Figure 3–2
Rear Panel of the Tabletop Drive (–DA Version)
3–6 Using the RRD42 Disc Drive
Embedded
Components —
Rear
The following table describes the location and function of the
embedded drive’s components in the rear panel (Figure 3–3).
Components
Function
Jumpers for SCSI bus ID
Specify assignment of the RRD42
drive SCSI bus ID.
Mode select jumper
Selects mode.
SCSI bus interface
connector
Connects the embedded drive
to a SCSI host adapter using a
connecting cable.
Power-in connector
Connects the embedded drive
to the power supply within the
computer.
Frame ground tab
Grounds the embedded drive
to the host computer when the
drive frame is not in direct
contact with the computer.
Audio output connector
Connects output to the external
audio amplifier.
Using the RRD42 Disc Drive 3–7
Figure 3–3 shows the rear panel components of the RRD42
embedded drive with the jumper installed (Mode 1).
L
GND
5V+5%
R
AUDIO OUT
MODE
0 1
GND 12V+10%
DC INPUT
2
ID SELECT
FRAME
GROUND
TAB
SCSI BUS
INTERFACE
CONNECTOR
POWER−IN
CONNECTOR
SHR−XR0064−90
Figure 3–3
Rear Panel of the Embedded Drive (–AA Version)
3–8 Using the RRD42 Disc Drive
Disc and Caddy
Handling
Follow these steps to handle the disc and caddy:
1. If a protective film is on the lid of the caddy, remove the
film before using the caddy.
2. To open the lid of the caddy, press the tabs on both sides,
and lift the lid (Figure 3–4).
3. To load an empty caddy with a disc, hold the disc by the
edges, and place the disc (with disc label up) into the caddy
(Figure 3–5). Do not touch the surface of the disc. Be sure
to place the disc beneath the edge of the caddy.
4. Press both corners firmly, to close the lid (Figure 3–5).
NOTE
Additional caddies (part number 30-34512-01) can be
purchased through your Digital sales representative or
DECdirect ordering service.
Using the RRD42 Disc Drive 3–9
Figure 3–4 shows how to open the caddy.
SHR−XR0070−90
Figure 3–4
Opening the Caddy
3–10 Using the RRD42 Disc Drive
Figure 3–5 shows how to load a disc into the caddy.
SHR−XR0073−90
Figure 3–5
Loading a Disc into the Caddy
Using the RRD42 Disc Drive 3–11
Operating the RRD42 Drive
Loading the Drive
NOTE
The operating procedure for the RRD42 tabletop and
embedded drives is the same with one exception: the
tabletop drive requires setting the POWER switch to on.
Make sure the supporting software is installed in the host
system before operating the drive.
1. Press the POWER switch to on at the rear of the tabletop
drive, and insert the caddy into the caddy insertion slot
(Figure 3–6).
The drive reads the Table of Contents (TOC) on the disc.
The BUSY indicator lights while the TOC is read.
2. When the BUSY indicator goes off, the drive is ready to
receive the command from the host computer.
3. Follow the instructions provided by the host system’s
software manual.